1
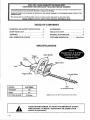
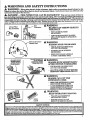
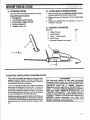
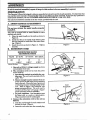
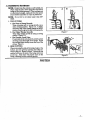
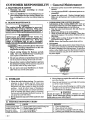
IMPORTANT
MANUAL
Do Not Throw Away
Operator's
Manual
@
Model No:.
:::: 358i798660
'_
ASSISTANCE
1-800-235-5878
!
Always
Wear Eye Protection
SE_A/,qS/CRR
FTSMRNo
ELECTRIC
HEDGE TRIMMER
_k WARNING:
Read the Operator's
Manual and
Follow All Warnings
and Safety
Instructions.
Failure To Do So
Can Result in Serious Injury.
Sears,
530-082628-05/05/94
Roebuck
DOUBLE
INSULATED
• Assembly
• Maintenance
• Operation
• Repair
and Co., Hoffman
Estates,
IL 60179
Parts
USA
© 1994, Sears, Roebuck
and Co.
FULL
CRAFTSMAN
TWO YEAR WARRANTY
ON.SEARS
BEST
BRUSHWACKER
® ELECTRIC
HEDGE
TRIMMER
If this Craftsman Brushwacker Electric Hedge Trimmer fails to perform properly due to a defect in material or workmanship within (2)
two years from the date of purchase, Sears will repair or replace it, free of charge.
WARRANTY SERVICE IS AVAILABLE BY RETURNING THE HEDGE TRIMMER TO THE NEAREST SEARS STORE IN THE
UNITED STATES.
This warranty gives you specific legal rights, and you may also have other rights which vary from state to state.
ROEBUCK Ab
817WA
TABLE
WARNINGS
AND SAFETY INSTRUCTIONS
KNOW YOUR UNIT
ASSEMBLY
.........................
.................................
PRE -OPERATION
CHECKS
................
OF CONTENTS
.. 3
ACCESSORIES
.............................
5
USING YOUR UNIT .........................
6
GENERAL
7
CUSTOMER
MAINTENANCE
ASSISTANCE
7
8
...............
.........
10
Back Cover
SPECIFICATIONS
Assist Handle
Trigger
Lock-out
Rear
Handle
Hand Guard
Cord
Trigger
MODEL:
Switch
t
Hole
(forconvenientstorage)
358.798660
VOLTAGE
120
AMPS
3.5
CUTTING
Cutting Blades
BLADE
24 Inches
Illustrations
may differ from a_al
model due to design
changes.
LOOK FOR THIS SYMBOL TO POINT OUT IMPORTANT
SAFETY
PRECAUTIONS.
IT MEANS
"ATTENTION!
BE ALERT! YOUR
SAFETY IS INVOLVED."
A WARNINGS
AND SAFETY INSTRUCTIONS
A
WARNING:
When using electric
hedge trimmers,
basic safety precautions
should always be followed to reduce the risk of floe, electric shock, and personal
injury. Read all instructions (see additional safety
instructions
throughout this manual).
Ak DANGER
-
THIS
POWER
TOOL
CAN BE DANGEROUS!
This unit can cause serious in-
jury including
amputation
or blindness
to the operator and others. The warnings
and saf.ety "instructions ".m
this manual must be followed to provide reasonable
safety and efficiency
in using this .unit. The operator is
responsible
for following
the warnings
and iustruetionsin
this manual and on the unit. Readthe entireOperator's Manual before assembling and using rids unit! Restrict the use of this power tool to persons wno reaa, unnsrstand, and follow the warnings and instructions
in this manual and on the unit.
WARNING
Eye
Always Wear
Eye Protection
Protection
BLADES
-
,
,_.,;
THROW
OBJECTS
YOU CAN BE BLINDED
OR INJURED,
- ALWAYS WEAR SAFETY GLASSES
VIOLENTLY.
AND A DUST MASK IF OPERATION
IS DUSTY.
°"
__
CAN
A WARNING
30 foot (10 meter)
- THE BLADES CAN SERIOUSLY
L_''lSft
' " \ (5 m)
15 ft
_
"'_
f[
-
_'
OTHERS CAN BE BLINDED
CUT YOU OR OTHERS.
ORINJURED.
KEEP PEOPLE AND ANIMALS
15 FEET (5 METERS)
ALLOW
BL_S TO _
STOP BEFORE
BLADES MOVES
MO_ENTARILY
AFTER SWITCH
IS RELEASED.
_OVINO
THEM
FROM THE CU'L.
AWAY.
WARNING
BLADES
MOVE
AFTER
SWITCH
MOMENTARILY
IS RELEASED.
-
THE BLADES CAN SERIOUSLY
CUT YOU OR OTHERS.
-
ALLOWBLADES
TO STOP BEFORE
REMOVING
THEM FROM THE CUT.
Ak WARNING
BLADES
CAN CUT THE
EXTENSION
CORD.
-
KEEP THE EXTENSION
CORD
AWAY FROM THE BLADES.
A CUT EXTENSION CORD CAN
CAUSE SERIOUS ELECTRICAL
SHOCK TO YOU OR OTHERS.
-
Ak WARNING
READ
Labels
OPERATOR'S
MANUAL.
-
FOLLOW ALL WARNINGS
AND INSTRUCTIONS.
-
FAILURE TO DO SO CAN
RESULT IN SERIOUS INJURY.
,r
SAFETY
Exposure
to vibrations
through
prolonged
use of alectrieally
NOTICE
powered
band tools
could
cause
blood
vessel
or nerve
damage
in the
_mgers, hands, and wrists ofp .eopleprone to circulation disordei's or abnormal swellings. Prolonged use in cold weathe_ has be e.n
linked to blood vessel damage m otherwise healthy people. If symptoms occur such as numbness, pare, ross ozs_rengm, eaange m
skin color or texture, or loss of feeling in the fingers, hands, or wrists, discontinue the use of this tool and seek medical attention_
An anti-vibration
system does not guarantee the avoidance of these problems. Users who operate power tools on a continual ant
regular basis must monitor closely'their physical condition and the condition of this tool
WARNINGS
A
OPERATOR
AND SAFETY INSTRUCTIONS....(Continued)
SAFETY
1. DANGER--RISK
OF CUT--KEEP
HANDS
AWAY FROM BLADES--KEEP
BOTH HANDS ON
HANDLES WHEN POWER IS ON. Do not attempt to
clear away cut material when the blade is in motion.
Make sure the trigger switch is not engaged and the
power source is disconnected when removing jammed
material from the blades. Do not grab or hold the unit
by the blades.
2. DRESS PROPERLY--Always
wear eye protection.
Always wear heav_, long pants, boots, and gloves. Do
not go barefoot or wear short pants, sandals, jewelry,
loose clothing, or clothing with loosely hanging
straps, ties, tassels, etc.; they can be caught in moving
parts. Secure hair so it is above shoulder length. Being fully covered will help protect you from pieces of
toxic plants such as poison ivy thrown by the blades,
which could be more of a hazard than touching the
plant itself.
3. STAY ALERT--Do
not operate th e unit when you
are tired, ill, or under the influence of alcohol, drugs,
or medication. Watch what you are doing. Use common sense.
4. AVOID UNINTENTIONAL
STARTING OF THE
UNIT--Never
carry the unit with YOurfinger on the
trigger switch. Be sure the trigger switch is not engaged before connecting the extension cord.
5. CAUTION--Blades
move momentarily aider the
trigger switch is released.
6. Wear hearing protection when using this unit.
A
ELECTRICAL
SAFETY
1. WARNING--TO
REDUCE THE RISK OF ELECTRICAL SHOCK--Do
not use on wet hedges or
shrubbery, in damp or wet locations, or around swimming pools, hot tubs, etc. Do not expose to snow, rain,
or water to avoid the possibility of electrical shock.
2. WARNING--TO
REDUCE THE RISK OF ELECTRICAL SHOCK--Use
extension cords specifically
marked as suitable for outdoor appliances having
electrical rating not less than the rating of the unit.
The cord mustbe marked with the suffix "WA. " An undersized extension cord will cause a drop in line voltage resulting in loss of power and overheating.
If in
doubt, use the next heavier gauge. The smaller the
gauge number, the heavier the cord. (NOTE: Figure 1 shows the correct size to be used depending on
the cord length).
3. Use only a 120 A.C. voltage supply as shown on the
name plate of the unit.
4. Avoid dangerous situations.
Do not.use in the presence of flammable liquids or gases to avoid creating a
fire or explosion and!or causing damage to unit.
5. DO NOT ATTEMPT TO REPAIR UNIT--Inspect
the insulation and connectors on the unit and extension cord before each use. If there is any damage, do
not use until damage is repaired by qualified service
personnel.
Do not use a damaged extension cord.
6. DON'T ABUSE CORD - -Never carry the unit by the
cord or yank the cord to disconnect the unit.
7. To reduce the possibility of the extension cord disconnecting from the unit during operation, attach the extension cord to the cord retainer on the unit as shown
in Figure 4.
If situations
tance,
A
UNIT SAFETY
1. Ground Fault Circuit Interrupter
(GFCI) protection
should be provided on the circuit(s) or outlet(s) to be
used for the hedge trimmer. Receptacles are available
having built -in GFCI protection and may be uasd for
this measure of safeW.
2. Inspect entire unit, including guards, befare each nse.
Have damaged parts replaced by your service dealer.
Make sure all fasteners are in place and securely fastened.
3. Before using the unit, have your service dealer replace blades or parts that are cracked, chipped, broken, or damaged in any other way. Throw away damaged or bent blades.
4. Use only SEARS ® specified blades.
A
TRIMMING
SAFETY
1. DON'T FORCE THE HEDGE TRIMMER--it
will
do the job better and with less likelihood of a risk of
injury at the rate for which it was designed.
2. Inspect area to be trimmed before each use. Remove
objects (rocks, broken glass, nails, wire, string, etc.)
which can wrap around or be thrown by the blades.
3. KEEP CHILDREN AWAY--Keep
others including
children, animals, bystanders and helpers outside the
80 foot (10 meter) Hazard Zone. Stop the unit iinmediately if you are approached.
4. Always keep the unit in front of your body.
5. DON'T OVERREACH OR STAND ON UNSTABLE
SUPPORT such as ladders, stools, truck beds, etc.
Keep f'n'm footing and balance at all times.
6. Do not raise unit above your shoulders. The blades
can come dangerously close to your body.
7.. Keep all parts of your body away from the blades.
8. USE UNIT PROPERLY--Use
only for jobs ex-plained in this manual.
A
MAINTENANCE
SAFETY
1. MAINTAIN UNIT WITH CARE - -Maintain the unit
according to recommended procedures.
2. Keep the blades and air vents free of debris.
3. DISCONNECT UNIT FROM THE POWER SUPPLY
before performing maintenance.
4. Use only genuine SEARS replacement parts as recommended.
A
TRANSPORTING
AND
STORAGE
1. DISCONNECT UNIT FROM THE POWER SUPPLY
when not in use.
2. Hand carry the unit with the motor stopped and the
blades away from your body.
3. Secure the unit before storing or transporting it in a
vehicle.
4. Store unit so blades cannot accidentally cause injur_.
The unit can be hung by hole in blades.
5. STORE UNIT INDOORS--Store
unit unplugged in
a high, dry place out of the reach of children.
occur which are not covered
in this manual,
use care and good judgment.
If you need assiscontact your SEARS Store or call the Customer
Assistance
Hotline,
1-800-235-5878.
SAVE
4
8. Do not use the unit if the trigger switch does not turn
the unit on and off properly. Repairs to the switch
must be made by qualified service personnel.
9. Keep the extension cord clear of the operator, blades,
and obstacles at all times. Do not expose cords to
heat, oil, water, or sharp edges.
10. Avoid any body contact with any grounded oonductor,
such as metal pipes or wire fences, to avoid the possibility of electric shock.
THESE
INSTRUCTONS
II
I
II
/
rl
I
I
r /
"
I
I
r
fl
'-
_ .....................
.....
KNOW YOUR UNIT
B. UNPACKING
A. INTRODUCTION
Your unit will trim hedges precisely and nsatl_
Speeia! FeatUres InClude.
• Hsnd_ci
"
• Comfortable
Assist Hamile
•
•
Four Finger Trigger
Double Insulated
•
Trigger
Switch
Lock-out
INSTRUCTIONS
1. After removing the co_t_'fr_m
_l_._<)il!,_b_k
the parts.against the Carton C(mtents list.,
2. Examinethepar_sfor'damagg_
par_s_.
Db'u_tu_damaged
.
3. No_fy your SEARS Stol"e'immedid_ely
mrssing or damaged.
C.
CARTON
.,, .
if a_))art is
"
CONTENTS
KEY NO.
QTY.
1.
2.
8.
4.
Hedge Trimmer
Assist Handle
Screw - Assist Handle
Hex Wrench
1
1
2
1
--
Operator's
1
Manual (not shown)
1,
\
\
4.------_ _ffi=
D.DOUBLE
INSULATION
CONSTRUCTION
This unit is Double Insulated
to help protect
against
electric
shock.
Double insulation
construction consists of two separate "layers" of electrical insulation instead of grounding.
_a WARNING
All electrical
repairs
to this unit,
including
housing,
switch, motor_ etc., must be diagnosed
and repaired by qualified service personnel.
Re-
Tools and appliances
built with a double insulation
system are not intended to be grounded. No means of
grounding
is provided on this unit, nor should a
means of groundingbe
added to this unit. As a result,
the extension cord used with your unit can be plugged
into any standard 120 volt electrical outlet.
placement
parts,
for
a
double
insulated
appliance
must be identical
to the parts they replace.
A double insulated
appliance
is marked
with the words
"DOUBLE
INSULATION"
or
"DOUBLE
INSULATED."
The symbol (square
within
a square) [] may also be marked on the
appliance.
Failure to have the unit repaired
by
qualified
service
personnel
can
cause
the
double
insulation
construction
to become ineffective and result in serious injur_.
Safety precautions
must be observed
when operating any electrical
tool. The double insulation
system ouly provides added protection against injury
resulting from an intei_nal electrical insulation failure.
-5-
ASSEMBLY
"
If unit is received
assembled,
repeat
all steps
in this section
to be sure assembly
t
is correct.
PREPARATION
This Operator's Manual is designed to help you assemble the tool and to provide its safe operation. It is important that
you read the entire manual to become familiar with the tool before you begin assembly. If you have any questions or
need further assxstanco, call our CUSTOMER ASSISTANCE HOTLINE at 1-800-235-5878.
The only tool needed for assembly
A. ASSIST
Donot
HANDLE
is the box wrench provided with the unit.
ATTACHMENT
use without
A WARNING
the assist
handle
properly
installed.
Assist
Handle
[
I
This unit is equipped with an Assist Handle for extra
comfort and control.
1. Place the assist handle on the unit as shown in
Figure 2.
2. Insert the ribs on the inside of the bottom plate
into the channels on each side of the motor housing. Figure 3.
3. Insert the screws as shown in Figure 3. Tighten
securely.
B.
EXTENSION
Figure 2
CORD
MINIMUM WIRE GAUGE
RECOMMENDATIONS
VOLTS
25-50
120
•_
FT.
50-100
FT.
100_- 150 FT.
16
16
14
A.W.G.*
A.W.G.*
A.W.G.*
w_ o_
Figure
i
1. Use only a 120 A.C. voltage supply as shown
on nameplate of the unit.
2. The extension
cord used to reach the power
source must be:
Rib
/
Channel
Bottom
Plate
Rib
a. Specifieallymarked
as suitable
for outdoor use. The cord must be marked with the
suffix "WA."
b. Heavy enough to carry current from the
power source the full length of the extension
cord tothe unit. Otherwise, loss of power and
overheating can occur causing damage to the
unit. Refer to Figure i for minimum
wire
gauge recommendatians_
The cord must be
markedwiththeproperwiregaugc.
(Appropriato extension cords are available.)
c: In good condition.
Cord insulation must
be intact with no cracks or deterioration.
Plug connectors must be undamaged.
3. Connect
the extension
cord to the unit as
follows:
a. Loop the cord through the cord retainer and
around the hook. Figure 4.
b. Insert the cord socket into the recessed plug.
_
Figure
Screws
3
Cord
Receptacle
Pigtai! Plug
Hook
Cord Retainer
Figure
4
PRE.
OPERATION
CHECKS
A WARNmG
.Re.wew all Warnings
this manual.
and Safety
2. Use only SEARS specified
cutting blades,
See "Specifications."
3. Use only genuine SEARS accessories.
4. Have your SEARS Service
Center replace
damaged
parts or cutting
blades that are
bent, warped, cracked, broken, or damaged
in any other way before using the unit.
J
Instructions
in_
Before operating
your unit, always:
1. Inspect
the entire
unit, including
guards
and cord, before each use. Make sure all fastenors are in place and securely fastened.
ACCESSORIES
ITEM
STOCK NO.
SAFETY FACE SHIELD ..................................................................
952-701601
SAFETY GOGGLES
952-701645
.................................
_...................................
NOTES
7
US G
YOUR:UNiT
A DANGER-
THIS
POWER
UNIT
CAN BE DANGEROUSX
This linit can cause serioiis i_ijury _ncluding amputation or blinclness to the operator and others. The warnings and
safety instructions
in this manual must be followed to provide reasonablesafety
and efficiency-inusingthis
unit. The
operator is respons_le
for follow!ng the warmngs and mstructloas
m this manual and on the umt. Read the-entire
Operat0Fs
Manual befm'e using thi_ _tl
Restrict
the use of this unit _0 perseus who read,,understand,
and follow the wa_,nii_gs and instrueti0ns;in
this manual
and on the unit.
A. HEDGE
TRIMMER
1. OPERATOR
SAFETY
SAFETY
a. Read the entire Op.erator's Manual before
assemblin_
aiid iising-thi_ unit! Restrict the
use of this unit to persons who read, understand, and follow the warnings and instructions
in this manual and on the unit.
b.Always
wear eye protection.
The cutting
blades can cause debris to be thrown or ricochet
into the eyes and face which can result in loss of
vision or serious injury. See the '_ccessories"
section.
c. Always wear heav_ long pants, boots, and
gloves.
Do not gu barefoot or wear short pants,
sandals, jewalry, loose clothing, or clothing with
loosely hanging straps, ties, tassels, etc. Secure
hair so it is above shoulder length. Being fully
covered will help protect you from pieces of
toxic plants such as poison ivy thrown by the
blades, which could be more of a hazard than
touching the plant itself,
d.Do not operate
this unit when
tired, ill, or under the influence
hol, drugs, or medication.
e. Always keep
the handles.
both
hands
firmly
you are
of alco-
gripped
on
2. UNIT
a.Inspect
the entire
unit before each use.
Have damaged parts replaced. Make sure all
fasteners are in place and securely fastened.
b. Make sure the cutting
installed
and securely
B. OPERATING
blades are properly
fastened.
Figure 5
3. TRIMMING
a. Inspect the area to be cut before each use.
Remove objects (rocks, broken glass, nails, wire,
string, etc.) which can be thrown or become entangled in the cutting blades.
b.Always
keep the unit in front of your bod3_
Hold handle firmly with both hands. Figure 5.
c. Keep firm
over-reach.
footing
and
balance.
Do not
d.Do not raise motor above your shoulders.
The cutting blades can come dangerously
close
to your body.
e. Use only for jobs explained
in this manual.
TIPS
As you become familiar with your unit, you will be able
to determine your own operating pace. Conditions such
as the type and size of material being cut will regulate
the speed and time required for your job.
Air Vents
The trigger lock-out
must be pressed before the trigger
can be activated. The lock- out can be released while the
trigger is squeezed.
1. Allow the cutting blades to reach full speed
before entering
the material
to be cut.
2. Always work going away from people and
solid objects
such as walls, large stones, trees,
automobiles,
etc.
Q
If the blades stall, immediately
stop the motor. Disconnect the unit from the power source
and clear jammed debris from the cutting blades.
Inspect blades for damage and repair or replace as
needed.
Figure 6
4. Always keep the
unit, make sure the
stopped moving, and
power source before
air vents clean.
Stop the
cutting blade has completely
disconnect the unit from the
cleaning.
,C. TRIMMING
METHODS
NOTE'. Always keep the extension cord behind you
when using the unit. Never drape the cord ever e
hedge or bush being trimmed. If the cord gets cut
or otherwise damaged, unplug it from the power
source before inspection or repair is performed.
A
B
Do not try to cut stems larger than 3/8"
thick,
1. TOP CUTTING
a. For New or Young Growth:
When tMmming new or young growth, use a
wide. sweeping motion. Figure 7 A. A slight,
downward tilt of the cutting blades in the direction of motion gives the best cutting results.
b. For Older, Thicker Growth:
Figure 7
Trim "older
,thickergrowth by using a sawing
motion. Figure 7 B.
c. For Precise, Level Cuts:
Ifa precisely level cut is desired, stretch a piece
of string across the length of the hedge. Guide
the cutting blades slowly across the top of the
string. Figure 8.
2. SIDE CUTTING
When trimming_he sides of the hedge, begin at the
bottom and cut upward, tapering the hedge inward at the top. Figure 8 (inset). Cuttingin this
method will leave the body of the hedge narrower
at the top. This shape will expose more of the
hedge, resulting in more uniform growth.
Figure_8
NOTES
-9-
CUSTOMER
RESPONSIBILITY
A. MAINTENANCE
- General
SAFETY
1. Maintain _ the unit
mended procedures,
according
to
3. Disconnect
tenance.
recom-
MAINTENANCE
1,
WARNING
Always
have your. SEARS Service
Center
replace a blade that .is bent, warped, cracked, broken, or damaged
m any other way. Never attempt
to straighten
au..d re-use
a damaged
blade. Use only the specified
replacement
blade•
I CAUTION: I Wear protective
gloves
diing or performing
maintenance
ting blades to help avoid injur_
2.
when hanon the cut-
•
Check cutting
blades
for flatness
periodically. Have your SEARS Service Center/Department replace a blade that is not fiat.
•
Do not use solvents or petroleum
base cleaners of any kind or damage to the unit can occur.
*
Do not allow water or other liquids to get into
the trimmer housing.
Never immerse any part of
the unit into water or any other liquid.
•
Do not store unit near fertilizers
cais Which can corrode metal parts.
main-
replacementpartsasrec-
5. Inspect the entire unit. Replace damaged parts.
Make sure all fasteners are in place and securely
fastened.
A WARNING
The cutting
blades will. continue
to move momentarily
after switch is released.
Make sure
blade has stopped and disconn, eet the unit from
power source before performing
maintenance.
A
power source before performing
4. UseonlygenuineSEARS
ommended.
2. Have your SEARS Service Center/Department
replace cutting blades that are cracked, chipped, broken, or damaged in any other way before using the
unit.
B. BLADE
Maintenance
LUBRICATING
THE CUTTING BLADES
Lubrication
of the cutting blades after each use
will lengthen blade life and make operation easier. To
lubricate the cutting blades, do the following:
a. Step the motor and disconnect the unit from the
power source.
b. Remove any debris on the cutting blades.
c. Clean all p_n-ts and check for damage. Have damaged parts replaced. Be cautious of sharp and cut_ing edges.
d. Apply a light machine oil along the edge of the top
and bottom straps. Figure 9.
NO_QT._TE"
Insure that handles remain clean and dry.
CLEANING
Use mild soap and a damp cloth to clean trimmer housing. Do not use solvents or petroleum base cleaners of
any kind oi" damage to the unit can occur. Do not allow
water or other liquids to get into the trimmer housing,
and never immerse any part of the unit into water or
any other liquid.
Top Strap
or chemi-
Figure 9
3. Never douse or squirt the unit with water or
any other liquids.
4. Store the unit indoors in a cool, high, dry location
out of the reach of children.
C. STORAGE
1. Clean the unit before storing.
Pay particular
attention
to the air intake and air vents; keep
them free of debris. Use a mild soap and sponge
• dampened with warm water to clean the plastic
surfaces.
Avoid all other types of detergents,
cleaners, or solvents; they can contain chemicals,
such as aromatic oils (lemon, pine) or kerosene,
that can seriously damage the plastic housing. Do
not spray the unit with water.
2. Never immerse any part of the unit into any
Hquid.
D.
TROUBLE
SYMPTOM
Cutting blade stops
under a load or does
not move when
switch is pressed.
- 10 -
SHOOTING
5. The unit can be stored hanging on a wall by using
the hole in the end of the cutting blade (refer to
"Specifications"
for location).
•
A WARNING
Avoid all types
of detergents,
vents. Never submerge,
douse,
with water or any other liquid.
or solthe unit
CHART
CAUSE
1.
2.
3.
4.
]
cleaners
or squirt
Forcing blade into material being cut.
Blades clogged with debris.
Unit not plugged in.
None of the above.
REMEDY
1.
2.
3.
4.
Cut at a slower pace.
Clean debris from blades.
Plug unit into a standard 120 volt outlet.
Contact your SEARS Service Center/Dept.
• NOTES
-1t
-
The Model Number will be found below the top handle with the Serial
Number. Always mention the Model Number when requesting service
or repair parts for your unit.
All parts listed herein may be ordered
and most Sears Stores.
Operator's
Manual
from any Sears Service Center
WHEN ORDERING REPAIR PARTS ALWAYS GIVE THE
FOLLOWING INFORMATION
AS SHOWN IN THIS LIST:
1.
The PART NUMBER
3.
The PART DESCRIPTION
2.
The MODEL
4.
The NAME OF ITEM --
NUMBER
358.798660
Electric
Hedge
Trimmer
If the parts you need are not stocked locally, your order will be
transmitted to a Sears Repair Parts Distribution Center for handling.
When you buy merchandise
from
Sears you get an extra value that
nobody else can offer -Sears Service.
Model No.
358.798660
Acrosstown or across the country,
Sears Service is always near, providing
trustworthy,
competent
service
technicians
using only
Sears specified factory parts.
How to Order
Repair Parts
SEARS
Your Sears Merchandise takes on added value when you discover
that Sears has Service Units throughout
the country. Each is
staffed by Sears-Trained,
professional technicians
using Sears
approved methods.
SERVICE
IS AT YOUR SERVICE
Sears,
Roebuck
and Co., Hoffman
Estates,
IL 60179
USA
PRINTED
IN U.S.A,