1
1473-1-8041 │ 19.12.2014
Operating Instructions
Busch-ComfortTouch®
Pos: 3 /Layout bis 2014-11-11/Online-Dokumentation (+KNX)/Titelblätter/KNX/ComfortPanel 3.0/Titelblatt - Bedienungsanleitung - CP 3.0 - ABB @ 36\mod_1364392422833_15.docx @ 293647 @ @ 1
Busch-ComfortTouch® 9
8136/09-811-500 (CP/U 9.3.1)
8136/09-825-500 (CP/U 9.4.1)
Busch-ComfortTouch® 12.1
8136/12-811-500 (CP/U 12.3.1)
8136/12-825-500 (CP/U 12.4.1)
=== Ende der Liste für Textmarke Cover ===
Operating Instructions
Busch-ComfortTouch ®
Pos: 5 /Layout bis 2014-11-11/Online-Dokumentation (+KNX)/Inhaltsverzeichnis (--> Für alle Dokumente <--)/Inhaltsverzeichnis @ 19\mod_1320649044386_15.docx @ 109653 @ @ 1
1
2
3
4
5
6
Notes on operating instructions................................................................................................................................ 3
1.1
General information................................................................................................................................. 3
1.2
Setup of the manual ................................................................................................................................ 3
1.3
Symbols in the manual ............................................................................................................................ 3
Safety....................................................................................................................................................................... 4
2.1
Intended use ........................................................................................................................................... 4
2.2
Improper use ........................................................................................................................................... 4
2.3
Liability and warranty .............................................................................................................................. 5
2.4
Cyber Security) ....................................................................................................................................... 5
Environment ............................................................................................................................................................. 5
Product overview ..................................................................................................................................................... 6
4.1
Product description ................................................................................................................................. 6
4.2
Function overview ................................................................................................................................... 7
4.3
Device setup ........................................................................................................................................... 9
Operation ............................................................................................................................................................... 10
5.1
Fundamentals ....................................................................................................................................... 10
5.1.1
Colour concept ...................................................................................................................................... 10
5.1.2
Basic setup of the monitor..................................................................................................................... 11
5.1.3
Navigation bar ....................................................................................................................................... 12
5.1.4
Status bar.............................................................................................................................................. 13
5.2
Operating processes on the touchdisplay ............................................................................................. 15
5.2.1
Buttons .................................................................................................................................................. 15
5.2.2
Control elements ................................................................................................................................... 16
5.2.3
Entries ................................................................................................................................................... 29
5.2.4
Swiping motions (scrolling) ................................................................................................................... 29
5.3
Explanation of functions ........................................................................................................................ 30
5.3.1
Page types ............................................................................................................................................ 30
5.3.2
Basic functions of switching, dimming, blinds, value, scenes, RTC and measured values ................... 31
5.3.3
Media Player ......................................................................................................................................... 32
5.3.4
Image messaging .................................................................................................................................. 35
5.3.5
Voice messages .................................................................................................................................... 38
5.3.6
E-mail .................................................................................................................................................... 40
5.3.7
Feed Reader ......................................................................................................................................... 42
5.3.8
Weekly programs .................................................................................................................................. 44
5.4
Simpls weekly program ......................................................................................................................... 47
5.4.1
Calendar (twelve-month timer) .............................................................................................................. 49
5.4.2
Miele (only via Plug-In).......................................................................................................................... 50
5.4.3
Camera surveillance ............................................................................................................................. 51
5.4.4
Alarm control unit .................................................................................................................................. 53
5.4.5
Presence simulation .............................................................................................................................. 55
5.4.6
Short-time timer .................................................................................................................................... 56
5.4.7
Alarm clock ........................................................................................................................................... 58
5.4.8
Data logger ........................................................................................................................................... 60
5.4.9
Web browser ......................................................................................................................................... 61
5.4.10
Telephone (VoIP) .................................................................................................................................. 62
5.4.11
Door Communication ............................................................................................................................ 66
5.4.12
Fault and alarm messages .................................................................................................................... 71
5.4.13
IR remote control .................................................................................................................................. 72
5.4.14
Scene editor .......................................................................................................................................... 73
5.4.15
Room temperature controller ................................................................................................................ 76
5.4.16
Date and time settings .......................................................................................................................... 82
5.4.17
Import and export of files....................................................................................................................... 84
5.4.18
System settings ..................................................................................................................................... 85
5.4.19
Device information ................................................................................................................................ 85
Cleaning ................................................................................................................................................................. 86
=== Ende der Liste für Textmarke TOC ===
Operating Instructions | 1473-1-8041
—2—
Operating Instructions
Busch-ComfortTouch ®
Notes on operating
instructions
Pos: 7.1 /Layout bis 2014-11-11/Online-Dokumentation (+KNX)/Überschriften (--> Für alle Dokumente <--)/1. Ebene/G - L/Hinweise zur Bedienungsanleitung @ 34\mod_1361801165580_15.docx @ 283615 @ 1 @ 1
1
Notes on operating instructions
Pos: 7.2.1 /Layout bis 2014-11-11/Online-Dokumentation (+KNX)/Überschriften (--> Für alle Dokumente <--)/2. Ebene/A - F/Allgemeine Hinweise @ 30\mod_1348481024126_15.docx @ 238505 @ 2 @ 1
1.1
General information
Pos: 7.2.2 /Layout bis 2014-11-11/Online-Dokumentation (+KNX)/Hinweise zum Handbuch (--> Für alle Dokumente --<)/Allgemeine Hinweise/Allgemeine Hinweise - Bedienungsanleitung @ 35\mod_1363589814870_15.docx @ 287994 @ @ 1
Please read this manual through carefully and adhere to the information listed. This will ensure reliable operation
and long service life of your product.
If additional information is required or problems arise that are not dealt with in this manual, the necessary
information can be requested from the manufacturer or from your electrical installer.
Pos: 7.3.1 /Layout bis 2014-11-11/Online-Dokumentation (+KNX)/Überschriften (--> Für alle Dokumente <--)/2. Ebene/A - F/Aufbau der Bedienungsanleitung @ 35\mod_1363591944772_15.docx @ 288042 @ 2 @ 1
1.2
Setup of the manual
Pos: 7.3.2 /Layout bis 2014-11-11/Online-Dokumentation (+KNX)/Hinweise zum KNX Technischen Handbuch/KNX/KNX-Aktorik/ComfortPanel 3.0/Bedienungsanleitung/Aufbau des Handbuches/Aufbau des Handbuches - Bedienungsanleitung @ 35\mod_1363592055121_15.docx @ 288058 @ @ 1
–
-
This manual provides you with the detailed information about the operation. This will ensure reliable operation
and long service life of your product.
The chapters "Information on the manual", "Safety", "Environmental information" and "Product overview"
contain general specifications and basic information as well as a description of functions.
The operation of the device is explained in chapter "Operation".
Chapter "Maintenance" contains information about cleaning.
Pos: 7.4.1 /Layout bis 2014-11-11/Online-Dokumentation (+KNX)/Überschriften (--> Für alle Dokumente <--)/2. Ebene/S - T/Symbole des Handbuches @ 30\mod_1348481258296_15.docx @ 238518 @ 2 @ 1
1.3
Symbols in the manual
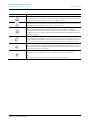
Pos: 7.4.2 /Layout bis 2014-11-11/Online-Dokumentation (+KNX)/Hinweise zum KNX Technischen Handbuch (--> Für alle Dokumente --<)/Symbole des Handbuches (Reduziert - KNX BA)/Symbole des Handbuches (Reduziert - KNX BA) @ 34\mod_1361779236928_15.docx @ 281524 @ @ 1
Attention - damage to property
This symbol indicates a possibly harmful situation. Non-observance of the safety instructions can
lead to damage or destruction of the product.
Note ...
This symbol indicates information or references to additional useful topics. This is not a signal word
for a dangerous situation.
This symbol indicates information on the protection of the environment.
Pos: 8 /Layout bis 2014-11-11/Modul-Struktur/Online-Dokumentation/Steuermodule - Online-Dokumentation (--> Für alle Dokumente <--)/++++++++++++ Seitenumbruch ++++++++++++ @ 9\mod_1268898668093_0.docx @ 52149 @ @ 1
Operating Instructions | 1473-1-8041
—3—
Operating Instructions
Busch-ComfortTouch ®
Safety
Pos: 9.1 /Layout bis 2014-11-11/Online-Dokumentation (+KNX)/Überschriften (--> Für alle Dokumente <--)/1. Ebene/S - T/Sicherheit @ 18\mod_1302612791790_15.docx @ 103357 @ 1 @ 1
2
Safety
Pos: 9.2 /Layout bis 2014-11-11/Online-Dokumentation (+KNX)/Sicherheitshinweise und Hinweise (--> Für alle Dokumente <--)/Hinweise - Sachschäden/Achtung - Schaden durch äußere Einwirkung (Renovierung - Betrieb) @ 34\mod_1361780986628_15.docx @ 281540 @ @ 1
Caution
Risk of damaging the device due to external factors!
Moisture and contamination can damage the device.
That is why the device must be protected against humidity, dirt and damage during storage
(renovations) and operation.
Pos: 9.3.1 /Layout bis 2014-11-11/Online-Dokumentation (+KNX)/Überschriften (--> Für alle Dokumente <--)/2. Ebene/A - F/Bestimmungsgemäßer Gebrauch @ 25\mod_1340691838858_15.docx @ 220036 @ 2 @ 1
2.1
Intended use
Pos: 9.3.2 /Layout bis 2014-11-11/Online-Dokumentation (+KNX)/Sicherheit/KNX/KNX-Aktorik/ComfortPanel 3.0/Bedienungsanleitung/Bestimmungsgemäßer Gebrauch/Bestimmungsgemäßer Gebrauch - Bed. ... @ 35\mod_1363592354102_15.docx @ 288075 @ @ 1
The Busch-ComfortTouch® is a central switching and monitoring location for the entire building automation with
control, monitoring and visualisation functions for numerous devices and media within a building. The device
makes available numerous functions. The range of functions is contained in chapter "Description of Functions".
Note
The device must only be used in dry indoor rooms.
Note
Making and saving video recordings can infringe on personal rights! Always observe applicable
legal and labeling requirements for placement and operation of video components!
Pos: 9.4.1 /Layout bis 2014-11-11/Online-Dokumentation (+KNX)/Überschriften (--> Für alle Dokumente <--)/2. Ebene/A - F/Bestimmungswidriger Gebrauch @ 30\mod_1348482382253_15.docx @ 238583 @ 2 @ 1
2.2
Improper use
Pos: 9.4.2 /Layout bis 2014-11-11/Online-Dokumentation (+KNX)/Sicherheit/KNX/KNX-Aktorik/ComfortPanel 3.0/Bedienungsanleitung/Bestimmungswidriger Gebrauch/Bestimmungswidriger Gebrauch - Bed. ,,, @ 35\mod_1363592673470_15.docx @ 288108 @ @ 1
The device is dangerious if used improperly. Any non-intended use is deemed improper use. The manufacturer is
not liable for damages resulting from such improper use. The associated risk is borne by the user/operator.
The device must never be used outdoors or in bathroom areas. Do not push objects through the openings in the
device.
Maintenance and repair work must only be performed by authorized electricians.
Pos: 9.5 /Layout bis 2014-11-11/Online-Dokumentation (+KNX)/Steuermodule - Online-Dokumentation (--> Für alle Dokumente <--)/++++++++++++ Seitenumbruch ++++++++++++ @ 9\mod_1268898668093_0.docx @ 52149 @ @ 1
Operating Instructions | 1473-1-8041
—4—
Operating Instructions
Busch-ComfortTouch ®
Environment
Pos: 9.6.1 /Layout bis 2014-11-11/Online-Dokumentation (+KNX)/Überschriften (--> Für alle Dokumente <--)/2. Ebene/G - L/Haftung und Gewährleistung @ 30\mod_1348478525228_15.docx @ 238363 @ 2 @ 1
2.3
Liability and warranty
Pos: 9.6.2 /Layout bis 2014-11-11/Online-Dokumentation (+KNX)/Sicherheit (--> Für alle Dokumente <--)/Haftung und Gewährleistung/Haftung und Gewährleistung - Bed. ... @ 35\mod_1363592929989_15.docx @ 288140 @ @ 1
Improper use and non-observance of this manual excludes the liability of the manufacturer for the damages
caused. It voids the warranty of the manufacturer.
Pos: 9.7.1 /Layout bis 2014-11-11/Online-Dokumentation (+KNX)/Überschriften (--> Für alle Dokumente <--)/2. Ebene/A - F/Cyber Security (Netzwerksicherheit) @ 40\mod_1418804878733_15.docx @ 310416 @ 2 @ 1
2.4
Cyber Security)
Pos: 9.7.2 /Layout bis 2014-11-11/Online-Dokumentation (+KNX)/Sicherheit (--> Für alle Dokumente <--)/Cyber Security (Netzwerksicherheit)/Cyber Security (Netzwerksicherheit) @ 40\mod_1418804500166_15.docx @ 310401 @ @ 1
This product has been developed in connection with a network interface and for communicating information and
data via this network interface. It is exclusively your responsibility for establishing a safe connection between the
product and your network or (if necessary) a different network and to regularly check this. You must use suitable
measures (for example, the installation of firewalls, the use of authentication measures, data encryption, the
installation of anti-virus programs, etc.) to protect the product, the network, its system and interface against all
kinds of violations of security, unauthorized access, intrusions, information leaks and/or piracy of data and
information.ABB and associated companies are not liable for damages and/or losses in connection with the
violation of security, unauthorized access, malfunctions, intrusions, information leaks and/or piracy of data or
information.
Pos: 10.1 /Layout bis 2014-11-11/Modul-Struktur/Online-Dokumentation/Überschriften (--> Für alle Dokumente <--)/1. Ebene/U - Z/Umwelt @ 18\mod_1302614158967_15.docx @ 103383 @ 1 @ 1
3
Environment
Pos: 10.2 /Layout bis 2014-11-11/Online-Dokumentation (+KNX)/Sicherheitshinweise und Hinweise (--> Für alle Dokumente <--)/Hinweise/Hinweis - Umwelt - Hinweis Elektrogeräte @ 18\mod_1302763973434_15.docx @ 103500 @ @ 1
Consider the protection of the environment!
Used electric and electronic devices must not be disposed of with domestic waste.
– The device contains valuable raw materials which can be recycled. Therefore, dispose of the
device at the appropriate collecting depot.
Pos: 10.3 /Layout bis 2014-11-11/Online-Dokumentation (+KNX)/Sicherheitshinweise und Hinweise (--> Für alle Dokumente <--)/Hinweise/Hinweis - Umwelt - Entsorgung Elektrogeräte @ 20\mod_1325760695972_15.docx @ 136583 @ @ 1
All packaging materials and devices bear the markings and test seals for proper disposal. Always dispose of the
packaging material and electric devices and their components via the authorized collecting depots and disposal
companies.
The products meet the legal requirements, in particular the laws governing electronic and electrical devices and
the REACH ordinance.
(EU Directive 2002/96/EC WEEE and 2002/95/EC RoHS)
(EU REACH ordinance and law for the implementation of the ordinance (EC) No.1907/2006)
Pos: 11 /Layout bis 2014-11-11/Modul-Struktur/Online-Dokumentation/Steuermodule - Online-Dokumentation (--> Für alle Dokumente <--)/++++++++++++ Seitenumbruch ++++++++++++ @ 9\mod_1268898668093_0.docx @ 52149 @ @ 1
Operating Instructions | 1473-1-8041
—5—
Operating Instructions
Busch-ComfortTouch ®
Product overview
Pos: 13.1 /Layout bis 2014-11-11/Online-Dokumentation (+KNX)/Überschriften (--> Für alle Dokumente <--)/1. Ebene/P - R/Produktübersicht @ 33\mod_1361365511862_15.docx @ 278082 @ 1 @ 1
4
Product overview
Pos: 13.2.1 /Layout bis 2014-11-11/Online-Dokumentation (+KNX)/Überschriften (--> Für alle Dokumente <--)/2. Ebene/P - R/Produktbeschreibung @ 33\mod_1361366656992_15.docx @ 278290 @ 2 @ 1
4.1
Product description
Pos: 13.2.2 /Layout bis 2014-11-11/Online-Dokumentation (+KNX)/Produktübersicht/KNX/KNX-Aktorik/ComfortPanel 3.0/KNX Technisches Handbuch/ProduktbeschreibungProduktbeschreibung @ 40\mod_1418304922983_15.docx @ 308408 @ @ 1
Busch-ComfortTouch® are high-quality colour touch displays in 16:9 format with a resolution of 800 x 480 pixel
for the 23 cm (9“) display and 800 x 1280 pixel for the 31 cm (12.1“) display.
®
The Busch-ComfortTouch consists of a basic system on a modern computer platform that is also designed for
future tasks and is capable of being upgraded. The unit is of fan-free cooling design and does not require a
mechanical hard disc to store the platform-independent operating system in the device.
®
The Busch-ComfortTouch is a central switching and monitoring location for the entire building automation with
control, monitoring and visualisation functions for numerous devices and media within a building. It unites the
functions of a building control system and an information centre and Media Players on a single monitor. Using the
colour display, it is possible to switch on or dim lights in the entire building, control the blinds or regulate the room
temperature or scenes using a combination of the functions mentioned above - even via remote control. Please
note that additional components of building automation are required for this. The operation and control is carried
out via the text-labelled touch surfaces in a clear menu structure and/or via floor plans and room views. It is a
labelling code that is understood internationally and does not rely on language.They are supplemented by easily
understood function icons. No lettering is needed. You can design the touch surfaces to your individual
preferences dependent of the parameter settings.
The display has LED backlighting. The integrated speaker can, for example, provide acoustic feedback to
operations, be used as an alarm clock or to signal alarms and fault messages and can also be used for playing
back stored audio files.
®
The Busch-ComfortTouch has a USB connection (USB 2.0) and a slot for a 64 GB multimedia / SD card (SD,
SDHC and Micro SD (SDHC with the use of a suitable adapter)).
Pos: 13.2.3 /Layout bis 2014-11-11/Online-Dokumentation (+KNX)/Produktübersicht/KNX/KNX-Aktorik/ComfortPanel 3.0/KNX Technisches Handbuch/ProduktbeschreibungProduktbeschreibung - ABB - LAN/WLAN/KNX @ 40\mod_1418305527658_15.docx @ 308440 @ @ 1
The design of the Busch-ComfortTouch® allows the connection to networks via LAN or WLAN. Access to KNX is
also possible by means of the optional connection of twisted pair power supply modules or via the appropriate
IP/KNX router. And the device can additionally serve as gateway between IP networks and KNX networks.
Pos: 13.3 /Layout bis 2014-11-11/Online-Dokumentation (+KNX)/Steuermodule - Online-Dokumentation (--> Für alle Dokumente <--)/++++++++++++ Seitenumbruch ++++++++++++ @ 9\mod_1268898668093_0.docx @ 52149 @ @ 1
Operating Instructions | 1473-1-8041
—6—
Operating Instructions
Busch-ComfortTouch ®
Product overview
Pos: 13.4.1 /Layout bis 2014-11-11/Online-Dokumentation (+KNX)/Überschriften (--> Für alle Dokumente <--)/2. Ebene/A - F/Funktionsübersicht @ 33\mod_1361366367915_15.docx @ 278258 @ 2 @ 1
4.2
Function overview
Pos: 13.4.2 /Layout bis 2014-11-11/Online-Dokumentation (+KNX)/Produktübersicht/KNX/KNX-Aktorik/ComfortPanel 3.0/Bedienungsanleitung/FunktionsübersichtFunktionsübersicht - Bed. ... @ 40\mod_1418724623506_15.docx @ 309514 @ @ 1
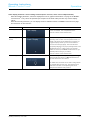
The following table provides an overview of the functions of the Busch-ComfortTouch®:
Note
The overview shows all the functions the Busch-ComfortTouch® offers. However, many functions
are are available only when the project planning software of the Busch-ComfortTouch® has been
appropriately activated. Please contact your electrical installer who will set up the Busch®
ComfortTouch for you individually and according to your wishes.
Function group
Function
Description
Entertainment / Multimedia
Media Player
Replay of:
(includes Web Radio and Web TV)
- Audio and video data
– Internet Radio Streams
– Internet TV Streams
News
Home automation
Image messaging
Recording and displaying of notes
Voice message
Recording and playback of voice messages
Email
Reading of e-mails
Feed Reader
Reading of feeds (news feeds)
KNX *)
Control and monitoring of a KNX bus
system
Scene editor
Editing and calling up of scenes and
Weekly programs
Editing of weekly timers
Calendar (twelve-month timer)
Setting specific repeating anniversaries
sequences
Miele (only via Plug-In)
Visualisation for activating Miele household
appliances
Logic editor *)
Setting of separate logic functions, for
Camera surveillance
Display of IP camera images
implementing complex switching sequences
Safety
Alarm control unit
Message also of opened doors / windows or
glass breakage (with the use of the
appropriate sensors). And with it the
protection against uninvited guests
Presence simulation
Recording and replay of switching
sequences which can be automatically
simulated during absence
Tools
Telephony
Short-time timer
Integrating an egg timer
Alarm clock
Integration of an alarm clock
Data logger
Recording of data, e.g. energy consumption
Web browser
Call-up of predefined Internet sites
Telephone (VoIP)
Internet telephony
Door Communication
For the communication with image and
sound between the Busch-ComfortTouch®
and a ABB-Welcome outdoor station
Operating Instructions | 1473-1-8041
—7—
Operating Instructions
Busch-ComfortTouch ®
Product overview
Function group
Function
Description
Settings
IR remote control
Editing and calling up scenes, sequences
and operating functions via an infrared
remote control
Fault and Alarm Messages
Display and acknowledgement of faults and
alarms
Access control *)
Blockage of individual pages and functions
with password protection
File browser *)
Administering external storage media and
network shares
Mobile access *)
Remotely controlling the BuschComfortTouch® (via MobileApp)
Camera module
Use in various applications (e.g. door
communication)
Control elements
*)
Basic functions of switching, dimming,
All conventional functions in building
blinds, value, scenes, RTC and measured
automation can be controlled and have their
values
status displayed
No directly visible application with an operating page. The setting is made by the electrical installer via the
project planning software. The activation is fundamental in part for other applications.
Pos: 13.5 /Layout bis 2014-11-11/Online-Dokumentation (+KNX)/Steuermodule - Online-Dokumentation (--> Für alle Dokumente <--)/++++++++++++ Seitenumbruch ++++++++++++ @ 9\mod_1268898668093_0.docx @ 52149 @ @ 1
Operating Instructions | 1473-1-8041
—8—
Operating Instructions
Busch-ComfortTouch ®
Product overview
Pos: 13.6.1 /Layout bis 2014-11-11/Online-Dokumentation (+KNX)/Überschriften (--> Für alle Dokumente <--)/2. Ebene/A - F/Aufbau Gerät @ 33\mod_1361366224154_15.docx @ 278226 @ 2 @ 1
4.3
Device setup
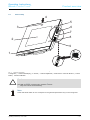
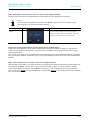
Pos: 13.6.2 /Layout bis 2014-11-11/Online-Dokumentation (+KNX)/Produktübersicht/KNX/KNX-Aktorik/ComfortPanel 3.0/Bedienungsanleitung/Aufbau Gerät - Bed. ...Aufbau Gerät - Bed. ... @ 40\mod_1418725076081_15.docx @ 309530 @ @ 1
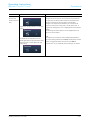
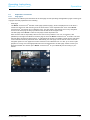
4
5
3
6
7
8
2
9
!
1
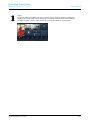
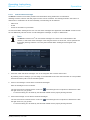
Fig. 1:
Overview of devices
1 Design bar | 2 Colour touchdisplay | 3 Camera | 4 Camera adjustment | 5+9 IR sensors 6 Slot for SD card | 7 Reset
button | 8 Slot for USB stick
Caution
Risk of damaging the device due to touching!
The USB connection contains many sensitive contacts.
They must not be touched directly!
Note
Some USB sticks which do not correspond to the general specification may not be recognised.
Pos: 14 /Layout bis 2014-11-11/Modul-Struktur/Online-Dokumentation/Steuermodule - Online-Dokumentation (--> Für alle Dokumente <--)/++++++++++++ Seitenumbruch ++++++++++++ @ 9\mod_1268898668093_0.docx @ 52149 @ @ 1
Operating Instructions | 1473-1-8041
—9—
Operating Instructions
Busch-ComfortTouch ®
Operation
Pos: 15.1 /Layout bis 2014-11-11/Modul-Struktur/Online-Dokumentation/Überschriften (--> Für alle Dokumente <--)/1. Ebene/A - F/Bedienung @ 11\mod_1279185541649_15.docx @ 83043 @ 1 @ 1
5
Operation
Pos: 15.2.1 /Layout bis 2014-11-11/Online-Dokumentation (+KNX)/Überschriften (--> Für alle Dokumente <--)/2. Ebene/G - L/Grundlagen @ 34\mod_1361783815778_15.docx @ 281737 @ 2 @ 1
5.1
Fundamentals
Pos: 15.2.2 /Layout bis 2014-11-11/Online-Dokumentation (+KNX)/Bedienung/KNX/KNX-Aktorik/ComfortPanel 3.0/Bedienungsanleitung/GrundlagenGrundlagen @ 34\mod_1361783692984_15.docx @ 281700 @ @ 1
The following pages will guide you through the advantages of the Busch-ComfortTouch®. Intuitive operability
easily familiarizes you with the versatility of the technical options. The operation distinguishes itself through its
clarity and user-friendliness.
Note
However, many functions are are available only when the project planning software of the BuschComfortTouch ® has been appropriately activated. Please contact your electrical installer who will
®
set up the Busch-ComfortTouch for you individually and according to your wishes. In the project
planning software the scope of available functions is specified. Also consult your specialist
electrical dealer.
Pos: 15.2.3.1 /Layout bis 2014-11-11/Online-Dokumentation (+KNX)/Überschriften (--> Für alle Dokumente <--)/3. Ebene/A - F/Farbkonzept @ 34\mod_1361784416110_15.docx @ 281801 @ 3 @ 1
5.1.1
Colour concept
Pos: 15.2.3.2 /Layout bis 2014-11-11/Online-Dokumentation (+KNX)/Produktübersicht/KNX/ComfortPanel 3.0/KNX Technisches Handbuch/Farbkonzept/Farbkonzept @ 33\mod_1361365475354_15.docx @ 278065 @ @ 1
The Busch-ComfortTouch® is equipped with an intelligent, intuitive operating concept. The basis is a consistent
colour orientation for a better overview and faster recognition of the control element functions. The functions
"Light", "Blinds", "Heating" and "Scenes" are illuminated in colour code (colour code on the operating surfaces) as
follows:
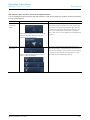
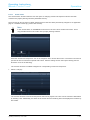
B
Fig. 2:
Colour concept
Colour
Function assignment
Yellow (like the sun)
Light control
Blue (like the sky)
Blind functions
Orange (like warmth)
Climate functions
Magenta (stands for extravagance)
Scenes
Pos: 15.2.4 /Layout bis 2014-11-11/Online-Dokumentation (+KNX)/Steuermodule - Online-Dokumentation (--> Für alle Dokumente <--)/++++++++++++ Seitenumbruch ++++++++++++ @ 9\mod_1268898668093_0.docx @ 52149 @ @ 1
Operating Instructions | 1473-1-8041
— 10 —
Operating Instructions
Busch-ComfortTouch ®
Operation
Pos: 15.2.5.1 /Layout bis 2014-11-11/Online-Dokumentation (+KNX)/Überschriften (--> Für alle Dokumente <--)/3. Ebene/A - F/Basisaufbau des Bildschirms @ 34\mod_1361789765109_15.docx @ 281995 @ 3 @ 1
5.1.2
Basic setup of the monitor
Pos: 15.2.5.2 /Layout bis 2014-11-11/Online-Dokumentation (+KNX)/Bedienung/KNX/KNX-Aktorik/ComfortPanel 3.0/Bedienungsanleitung/Grundlagen/Basisaufbau des Bildschirms/Basisaufbau des Bildschirms @ 34\mod_1361789476750_15.docx @ 281931 @ @ 1
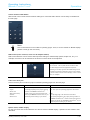
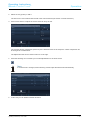
The functions available in the Busch-ComfortTouch® depend on their individual installation. This means that also
®
the display image of the operating page and the naming of the functions vary from Busch-ComfortTouch to
®
Busch-ComfortTouch . However, the basic structure always remains the same.
1 Title | 2 Operating surface | 3 Navigation bar | 4 Status bar
Element
Description
Title (pages, etc.) [1]
Specification of page or directory
Control button (pages) [2]
This is set up individually for you.
Navigation bar [3]
Contains a menu that is tailored to your apartment.
Status bar [4]
Displays information about your Busch-ComfortTouch® with the aid of icons.
Pos: 15.2.6 /Layout bis 2014-11-11/Online-Dokumentation (+KNX)/Steuermodule - Online-Dokumentation (--> Für alle Dokumente <--)/++++++++++++ Seitenumbruch ++++++++++++ @ 9\mod_1268898668093_0.docx @ 52149 @ @ 1
Operating Instructions | 1473-1-8041
— 11 —
Operating Instructions
Busch-ComfortTouch ®
Operation
Pos: 15.2.7.1 /Layout bis 2014-11-11/Online-Dokumentation (+KNX)/Überschriften (--> Für alle Dokumente <--)/3. Ebene/M - O/Navigationsleiste @ 34\mod_1361789901569_15.docx @ 282011 @ 3 @ 1
5.1.3
Navigation bar
Pos: 15.2.7.2 /Layout bis 2014-11-11/Online-Dokumentation (+KNX)/Bedienung/KNX/KNX-Aktorik/ComfortPanel 3.0/Bedienungsanleitung/Grundlagen/Navigationsleiste/Navigationsleiste @ 34\mod_1361789580305_15.docx @ 281978 @ @ 1
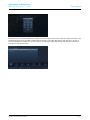
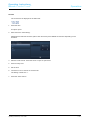
Fig. 3:
Navigation bar (example)
The navigation bar is used exclusively for navigation in a Busch-ComfortTouch®. An exception are links to the
start page, which also provides quick access to certain pages in the navigation bar.
Each operating or application page is represented by an access in the navigation bar. This means that each
access on the navigation bar stands for exactly one page. Or conversely, each access to the navigation bar
stands for exactly one page. Pressing an access takes you directly to the respective page. Also the functions are
activated via the pages. The various accesses can also be bundled topically. Then, after a press, an option opens
for calling up operating pages or application pages.
With a swiping motion of the fingers the bar can be moved back and forth. This shows all elements one after the
other. Access to the start page is provided on the left edge of the navigation bar.
Fig. 4:
Moving the navigation bar with swiping motion
Note
The icons for the buttons (accesses) can be selected individually.
Pos: 15.2.8 /Layout bis 2014-11-11/Online-Dokumentation (+KNX)/Steuermodule - Online-Dokumentation (--> Für alle Dokumente <--)/++++++++++++ Seitenumbruch ++++++++++++ @ 9\mod_1268898668093_0.docx @ 52149 @ @ 1
Operating Instructions | 1473-1-8041
— 12 —
Operating Instructions
Busch-ComfortTouch ®
Operation
Pos: 15.2.9.1 /Layout bis 2014-11-11/Online-Dokumentation (+KNX)/Überschriften (--> Für alle Dokumente <--)/3. Ebene/S - T/Statusleiste @ 34\mod_1361790168538_15.docx @ 282027 @ 3 @ 1
5.1.4
Status bar
Pos: 15.2.9.2 /Layout bis 2014-11-11/Online-Dokumentation (+KNX)/Bedienung/KNX/KNX-Aktorik/ComfortPanel 3.0/Bedienungsanleitung/Grundlagen/StatusleisteStatusleiste @ 40\mod_1418725921684_15.docx @ 309564 @ @ 1
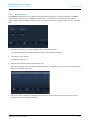
Fig. 5:
Status bar (Example)
®
The status bar displays information about your Busch-ComfortTouch with the aid of icons. Applications and
functions can also be called up and activated directly by pressing the icons.
The following list shows a selection of important icons that can be displayed in the status bar (additional symbols
are available).
Icon
Description
Displays the current date
An option opens when pressing the date. Here the "Date settings" can be selected.
Additional date-relevant functions are available for selection depending on the activation. The functions
are described in greater detail in section "Explanation of functions".
Displays the current time
An option opens when pressing the time. Here the "Time settings" can be selected.
Additional time-relevant functions ("Alarm clock" and "Timer") are available for selection depending on
the activation. The functions are described in greater detail in section "Explanation of functions".
Depending on the setting, it displays the current room temperature or outside temperature, as
well as the current operating mode of the local room temperature controller
Displays the current room temperature or the outside temperature, as well as the current operating
mode of the local room temperature controller via different icons. With a press on the temperature the
local room temperature controller opens. This function is described in greater detail in section
"Explanation of functions" -> "Room temperature controller".
When you touch the pin [1], you can hold the screen view since your Busch-ComfortTouch® switches
1
to the start screen after the expiry of a time interval. After the activation the icon looks like icon [2].
2
Indicates that the blocked application (access control) has been enabled
The message centre is displayed after pressing this icon
All currently received messages are displayed here. Also "Image message" and "Voice message" are
available for selection, calls (not accepted), e-mails or system messages. The icon appears brighter as
soon as a message is received. After the message is opened in the "Message centre" it is deleted from
the overview.
Note
When a message is received, a notice (with icons) appears via the "Message centre" icon indicating
the type of message received.
Operating Instructions | 1473-1-8041
— 13 —
Operating Instructions
Busch-ComfortTouch ®
Icon
Operation
Description
Indicates that the alarm control unit has been activated
When pressing the icon, a selection with "Disarm" and "Open" is displayed. This function is described
in greater detail in section "Explanation of functions" -> "Alarm control unit".
Indicates that the alarm control unit has been disarmed
When pressing the icon, a selection with "Arm" and "Open" is displayed. This function is described in
greater detail in section "Explanation of functions" -> "Alarm control unit".
Indicates that presence simulation is being played
Presence simulation is activated during prolonged absences such as holidays. Your BuschComfortTouch® switches the lights and blinds on and off during your absence, to simulate someone's
presence in the house. This function is described in greater detail in section "Explanation of functions" > "Presence simulation".
Indicates that presence simulation is being recorded
During recording by your Busch-ComfortTouch®, presence simulation runs continuously to constantly
have up-to-date information available. This is how a typical daily routine is recorded and stored. This
function is described in greater detail in section "Explanation of functions" -> "Presence simulation".
Indicates that the the volume is active (not mute)
With a long press of this icon the volume controller is displayed. By shifting the controller you set the
volume foe all applications of the Busch-ComfortTouch®. A brief press of this icon switches the volume
to mute and the following icon is displayed.
Indicates that the the volume is mute (not active)
A brief press of this icon switches the volume to active and the previous icon is displayed.
Note
If you set the volume on "Mute", the alarm clock does not generate an alarm tone.
Pos: 15.3 /Layout bis 2014-11-11/Online-Dokumentation (+KNX)/Steuermodule - Online-Dokumentation (--> Für alle Dokumente <--)/++++++++++++ Seitenumbruch ++++++++++++ @ 9\mod_1268898668093_0.docx @ 52149 @ @ 1
Operating Instructions | 1473-1-8041
— 14 —
Operating Instructions
Busch-ComfortTouch ®
Operation
Pos: 15.4.1 /Layout bis 2014-11-11/Online-Dokumentation (+KNX)/Überschriften (--> Für alle Dokumente <--)/2. Ebene/A - F/Bedienungsvorgänge am Touchdisplay @ 34\mod_1361791386659_15.docx @ 282063 @ 2 @ 1
5.2
5.2.1
Operating processes on the touchdisplay
Buttons
Pos: 15.4.2.1 /Layout bis 2014-11-11/Online-Dokumentation (+KNX)/Überschriften (--> Für alle Dokumente <--)/3. Ebene/S - T/Schaltflächen @ 34\mod_1361791774658_15.docx @ 282202 @ 3 @ 1
Pos: 15.4.2.2 /Layout bis 2014-11-11/Online-Dokumentation (+KNX)/Bedienung/KNX/KNX-Aktorik/ComfortPanel 3.0/Bedienungsanleitung/Bedienungsvorgänge am Touchdisplay/Schaltflächen/Schaltflächen @ 34\mod_1361791449195_15.docx @ 282078 @ @ 1
Operating surfaces are generally termed buttons, which are frequently used in user operating surfaces. The user
can trigger a function by touching the button.
®
In the Busch-ComfortTouch these are, among others, icons (e.g. in the navigation and status bars), data
displays and lettering (e.g. date and time display in the status bar), list entries (e.g. options lists / menus) and
graphically highlighted elements.
®
Examples of buttons in the Busch-ComfortTouch :
Pos: 15.4.3 /Layout bis 2014-11-11/Online-Dokumentation (+KNX)/Steuermodule - Online-Dokumentation (--> Für alle Dokumente <--)/++++++++++++ Seitenumbruch ++++++++++++ @ 9\mod_1268898668093_0.docx @ 52149 @ @ 1
Operating Instructions | 1473-1-8041
— 15 —
Operating Instructions
Busch-ComfortTouch ®
Operation
Pos: 15.4.4.1 /Layout bis 2014-11-11/Online-Dokumentation (+KNX)/Überschriften (--> Für alle Dokumente <--)/3. Ebene/A - F/Bedienelemente @ 20\mod_1323260220559_15.docx @ 111647 @ 3 @ 1
5.2.2
Control elements
Pos: 15.4.4.2 /Layout bis 2014-11-11/Online-Dokumentation (+KNX)/Bedienung/KNX/KNX-Aktorik/ComfortPanel 3.0/Bedienungsanleitung/Bedienungsvorgänge am Touchdisplay/BedienelementeBedienelemente @ 40\mod_1418726532038_15.docx @ 309580 @ @ 1
Control elements in the Busch-ComfortTouch® are used to fulfil the basic functions of "Switching", "Dimming",
Blinds", "Value", "Scenes", RTC and "Measured values". The elements can include switches, buttons and sliders.
This makes possible the button mode, (executing the function with one press), the tipping mode (executing the
function by pressing and holding), as well as controller mode (moving a slider).
®
The following selection shows the most commonly used control elements available in the Busch-ComfortTouch .
The type and appearance of the control elements may vary due to individual adaptation.
Note
The type and appearance of some control elements has been fixed and cannot be altered (e.g.
volume control). However, for some control elements (e.g. light switches) individual formats (also
icons) can be selected.
®
This must be appropriately activated in the project planning software of the Busch-ComfortTouch .
®
Please contact your electrical installer who will set up the Busch-ComfortTouch for you
individually and according to your wishes.
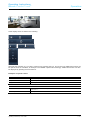
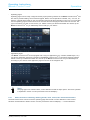
Basic structures of control elements
Fig. 6:
Different statuses of the same control element
1 Status display of "Device" | 2 Designation of "Control element" | 3 Function button | 4 Status display of "Device" |
5 Function button
Control element
Presentation of the device templates
Status display of device [1]
The device is switched off (lettering is dark).
Designation of control element [2]
Light control:
Yellow
Blind functions:
Blue
Climate functions:
Orange
Scenes:
Magenta
Other functions:
Grey
Function button (push-button) [3]
The function is triggered with a press of the button (can also display the status, here: "Device
off").
Status display of device [4]
The device is switched on (Lettering: white / bright).
Function button (push-button) [5]
The function is triggered with a press of the button (can also display the status, here: "Device
on").
Operating Instructions | 1473-1-8041
— 16 —
Operating Instructions
Busch-ComfortTouch ®
Operation
Additional basic principles
Function buttons of dimming control elements can display different stages of dimming by means of alternating
icons (e.g. larger light halo around the icon).
Default settings of steps (e.g. dimming steps, fan speed levels) are shown in white / bright lettering / icons. The
step or level values can be specified. The following example shows the brightness value of "20%". A 1-byte
feedback signal results.
If a selection or setting cannot be made, the colour of the lettering / icons appears dark. In the following example
the uppermost setting for dimming has been reached ("100%"). Increased dimming is not possible, and that is why
"Plus (+)" and "100%" appear in a dark colour.
Active elements or functions are displayed in white / bright lettering / icons.
Operating Instructions | 1473-1-8041
— 17 —
Operating Instructions
Busch-ComfortTouch ®
Operation
Adjustable control elements
Push-buttons (basic versions, which can be adapted further)
Simple switches can be implemented with push-buttons. This makes light switches or switches for simple
switching processes based on push-buttons possible.
Control element
State
Push-button (Light)
Function
A simple light pushbutton always transmits the same value when it is
pressed. Its status remains unchanged (e.g. "On").
Also value 1 can be sent at a rising edge and value 2 at a falling
edge.
Switch (Light)
A reverser light push-button alternately sends one of two values
when actuated and alternates between two statuses (e.g. "On" and
"Off").
Push-button
A simple neutral pushbutton always transmits the same value when it
(Neutral)
is pressed. Its status remains unchanged (e.g. "On").
Also value 1 can be sent at a rising edge and value 2 at a falling
edge.
Switch (Neutral)
A reverser light push-button alternately sends one of two values
when actuated and alternates between two statuses (e.g. "On" and
"Off").
Rocker switch
A neutral push-button with rocker function when actuated on the right
(Neutral)
or left side of the rocker sends out a switching telegram. A
differentiation is made between whether the rocker is actuated on
the left or on the right side. This allows one of two versions to be
selected. A neutral push-button with rocker function can be used to
call up two different scenes for example (in the example: "Presence"
or "Absence").
Operating Instructions | 1473-1-8041
— 18 —
Operating Instructions
Busch-ComfortTouch ®
Operation
Dimmers (basic versions, which can be adapted further (e.g. with value display))
Dimmers can be used to implement convenient light switches with dimming functions.
Control element
State
Dimmer without slider
Function
The version
Without slider has a push-button for switching
on/off in the centre and two buttons left and right for stepwise
dimming (brighter/darker).
Dimmer with slider
The version
With slider has a push-button for switching on/off
on the left side and a slider for dimming.
Pop-up slider has a push-button for switching
Dimmers with popup
The version
slider
on/off on the left side and another button on the right side. The
latter opens a slider for dimming. When not actuated the slider
closes automatically again after a few seconds.
Operating Instructions | 1473-1-8041
— 19 —
Operating Instructions
Busch-ComfortTouch ®
Operation
Blinds (basic versions, which can be adapted further (e.g. with value display))
Blind control elements can be used to implement the activate of blinds, awnings, doors and other motor-driven
actuators.
Control element
State
Function
Blinds / roller shutters
Top
The blind control element has push-buttons on the left and right
to open or close a blind and, if necessary, an additional button to
stop / start in the middle (depending on the operating mode
selected.
Bottom
The button in the middle can display the status.
An appropriate animation is displayed during the movement.
Operating procedure:
– Icons for up / down
Brief press of the button
Intermediate positions
Movement by one step (the icon in the centre does not
change).
Long button press
Movement up to stop (the icon in the centre changes).
Stop
When the end stop has been reached or a brief press on icon
"Up / Down" (depending on the direction of movement).
Change
The change of direction of movement with a brief press on icon
"UP / Down". Followed by a long press on icon "Up / Down"
(depending on the desired direction of movement)
– Icon in the centre (Blind)
Brief press of the button
Movement up to stop (the icon in the centre changes).
Stop
When reaching the end stop or the intermediate position with
a brief press on the icon. The icon then indicates the direction
to be taken during a renewed movement.
If the blind was in the end position (top / bottom), it
automatically moves in the other direction (Up / Down).
Change
The change of direction of movement with a brief press on
icon. Followed by a press on icon "Up / Down" (depending on
the desired direction of movement). Followed by a renewed
press in the icon in the centre.
Operating Instructions | 1473-1-8041
— 20 —
Operating Instructions
Busch-ComfortTouch ®
Operation
Scenes / sequences (basic versions, which can be adapted further)
With the "Scene" control element the user can call up so-called scenes or sequences.
In "Scenes" several actions can be combined into one, so that the user can create, for instance, certain
lighting scenes with just one press of the button (several dimming actions).
Sequences (processes) are a special form of scenes. Instead of all grouped actions being started at the same
time, which is the case in a scene, a sequence initiates actions one after another in a predefined order.
Sequences can be started, stopped and paused. Scenes can now be started.
Control element
Scene
State
Scene can be called up:
Function
The "Scene" control element has a push-button for calling up a
scene.
Changes to the scene are indicated by an icon and can be stored.
This is done with a long press of the push-button. A progress bar is
displayed. An icon is displayed after the successful storage.
Scene is running:
Note
The scene to be called up must be assigned appropriately in the
project planning software of the Busch-ComfortTouch®. Please
contact your electrical installer who will set up the BuschComfortTouch® for you individually and according to your wishes.
Scene (List)
Scene can be called up:
The "Scene (List)" control element has a pop-up button for calling
up a list with different scenes. The list closes automatically after a
few seconds if no selection has been made. The scene must be
selected in the list. The scene is then started via the push-button.
Changes to the scene are indicated by an icon and can be stored.
This is done with a long press of the push-button. A progress bar is
displayed. An icon is displayed after the successful storage.
Scene selection:
Note
The scenes must be assigned appropriately in the project planning
software of the Busch-ComfortTouch®. Please contact your
electrical installer who will set up the Busch-ComfortTouch® for
you individually and according to your wishes.
Scene is running:
Operating Instructions | 1473-1-8041
— 21 —
Operating Instructions
Busch-ComfortTouch ®
Operation
Control element
State
Function
Sequences
Scene can be called up:
The "Sequences" control element has a pushbutton on both the left
(Process with
and right side. On the left, the user can start or stop a sequence.
influence from the
The right button is used to pause a sequence and restart it (the
user)
sequence continues from the spot where it was stopped).
Changes to the sequence are indicated by an icon and can be
Sequence is running (animation on left pushbutton)
stored. This is done with a long press of the left push-button. A
progress bar is displayed. An icon is displayed after the successful
storage.
The remaining time of the sequence can be displayed at the top
right in the control element.
Note
The sequence was stopped and can be
started again with the right push-button (start
from the position it was stopped (see right
push-button)).
Operating Instructions | 1473-1-8041
The sequence to be called up must be assigned appropriately in
the project planning software of the Busch-ComfortTouch®. Please
contact your electrical installer who will set up the BuschComfortTouch® for you individually and according to your wishes.
— 22 —
Operating Instructions
Busch-ComfortTouch ®
Operation
Step switches (basic versions, which can be adapted further)
You can implement switch sequences with step switches. A step switch effectively combines several push-buttons
into one control element.
Control element
State
Function
Step switch
Device is off:
The version without step display (and without slider) has two
without step
buttons left and right for calling up the next or previous step
display
and a button in the centre. By pressing the right / left button
a few times one reaches the next higher or lower step. The
button in the middle returns the step switch to the bottom
step (= "Off"). The icon in the middle can be animated during
Device on and adjustable (as soon as the upper
adjusting.
setting limit has been reached, the right icon
appears dark (in this example:))
Step switch with
Device is off:
step display
The version with step display (with slider) has a button to
reset the step switch (= off) and buttons to call up the next or
previous step. In addition, it uses a slider to show which step
is currently on. The slider cannot be operated. The icon in
Device on and adjustable (adjustment only with
the middle can be animated during adjusting.
buttons -> slider only displays):
Operating Instructions | 1473-1-8041
— 23 —
Operating Instructions
Busch-ComfortTouch ®
Operation
Value display elements / value sending elements (basic versions, which can be adapted further)
With value display elements, values are displayed as text or graphical information in a page of the Busch®
ComfortTouch . They cannot be operated (an exception is the slider value) and are only used to display
values.
®
With value sending elements, you can display values in different formats in a Busch-ComfortTouch page
and send them to other devices.
Control element
State
Text display element
Function
The "Text display" version can display values and texts that
are sent, for instance, from a temperature sensor.
There are no direct control elements here!
Graphic display
The "Graphics display" version can display values
element
graphically, which are sent from a temperature sensor, for
example. The values are also displayed as a number. For
the graphic display element you can choose between a
wind rose and a dial-type gauge. This must have been
appropriately assigned in the project planning softwar of the
Busch-ComfortTouch®. Please contact your electrical
installer who will set up the Busch-ComfortTouch ® for you
individually and according to your wishes.
There are no direct control elements here!
Value sending element
With value sending elements, you can display values in
different formats (see above) in a Busch-ComfortTouch®
page and send them to other devices.
With "Slider value" the slider can be used to change values.
The changed values are then sent. Text displays can be
made here. In this case, a corresponding text can be
displayed at the different slider positions.
Operating Instructions | 1473-1-8041
— 24 —
Operating Instructions
Busch-ComfortTouch ®
Operation
Room temperature controller (basic versions, which can be adapted further)
Climate control units can be controlled with the control element for room temperature controllers.
Note
The internal room temperature controller of the Busch-ComfortTouch® is not opened via this
control element (see room temperature controller).
Control element
State
Function
Room temperature
The current operating mode and the mode (e.g. "Heating")
controller
of the controller are displayed in the control element.
Additional operating modes can be called up with wiping
movements. Control is carried out via the buttons.
Philips Hue control element (basic versions, which can be adapted further)
Philips Hue control elements can be used to define specific settings for Philips Hue lamps. For example, the
colours can be switched or the amount of warm white can be adjusted. Control normally takes place using an
RGB control element.
This function is an option and only available with a corresponding plug-in. More detailed information is available
from your electrical installer. He will also carry out the commissioning process with the aid of the commissioning
software.
Miele control elements (basic versions, which can be adapted further)
With the Miele control element you have the option of transferring information and data about kitchen appliances
®
from Miele to the Busch-ComfortTouch and to call this information up there. It is also possible to remotely
®
control certain appliance functions with the Busch-ComfortTouch and to implement these for KNX devices.
This function is an option and only available with a corresponding plug-in. More detailed information is available
from your electrical installer.
Operating Instructions | 1473-1-8041
— 25 —
Operating Instructions
Busch-ComfortTouch ®
Operation
Control element "KNX Audio"
With the aid of this control element all audio settings for connected audio devices can be easily controlled from
the start page.
Note
This control element can be added to operating pages. There, it can be created as "Bubble display"
(bubble control) (in the room view).
RGB control (basic versions, which can be adapted further)
RGB control elements can be used to define specific settings for related lamps (LEDs, Philips Hue, etc.). For
example, the colours can be switched or the amount of warm white can be adjusted.
Control element
State
RGB control
Function
Pressing the button on the control element switches the
lamp on and off. . Also a preset can be carried out here.
The value display shows the brightness component.
Depending on the lamp type and the default settings in the
commissioning software, additional functions can be called
up (via the arrow, as shown in the example), colour or white
control, for example.
Links in the floor plan
Links in the floor plan are used to jump to individual operating pages from the start page.
Control element
State
Function
Links:
Some forms are possible. They must be
The control element of the link can be selected within the
– Pages
created appropriately in the project planning
field. This opens the operating page which was linked.
– Room view
software of the Busch-ComfortTouch®.
– Web (Internet site)
Please contact your electrical installer who
Note
– Camera
will set up the Busch-ComfortTouch® for you
The operating page to be linked must have been
– News centre
individually and according to your wishes.
appropriately assigned in the project planning softwar of
the Busch-ComfortTouch®. Please contact your electrical
installer who will set up the Busch-ComfortTouch ® for you
individually and according to your wishes.
Special forms, bubble display
For the room view most control elements can also be used as "Bubble display". Operation is then similar to that
described.
Operating Instructions | 1473-1-8041
— 26 —
Operating Instructions
Busch-ComfortTouch ®
Operation
Some display forms are listed in the following:
Generally the activation (e.g. On-Off) is carried out by pressing the icon. This is also how additional functions can
be opened, such as controllers, for example. The "Bubble" opens itself accordingly. Additional functions can also
be displayed by pressing the arrow buttons.
Examples of special control:
Blind controller:
Press the icon
The controller opens
Brief press on the arrows
Stepwise adjustment
Long press on the arrows
Standard procedure
Dimmer:
Press the icon
The controller opens and the lamp is switched on.
Renewed press on the icon
The lamp is switched off
Control via -/+
Operating Instructions | 1473-1-8041
— 27 —
Operating Instructions
Busch-ComfortTouch ®
Operation
Non-adaptable control elements
These are control elements that are fixed according to the system and therefore cannot be adapted.
Volume control
Control element
State
Function
The controller for the "System
Example: System volume
The controller for the volume
volume" is opened via the
appears with a long press on the
status bar of the start page.
loudspeaker icon in the status
Controllers for "Applications"
bar. The volume is adjusted by
are each opened via the status
sliding the controller.
bar of the application page.
These always contain also the
With a brief press on the
controllers for the system
loudspeaker icon on the controller
volume.
the respective volume can be set
on mute. The volume can be
activated again in reverse.
Special case "Media volume": With this it can be selected
whether the setting refers to the Busch-ComfortTouch® and / or
to connected loudspeakers / devices.
Pos: 15.4.5 /Layout bis 2014-11-11/Online-Dokumentation (+KNX)/Steuermodule - Online-Dokumentation (--> Für alle Dokumente <--)/++++++++++++ Seitenumbruch ++++++++++++ @ 9\mod_1268898668093_0.docx @ 52149 @ @ 1
Operating Instructions | 1473-1-8041
— 28 —
Operating Instructions
Busch-ComfortTouch ®
Operation
Pos: 15.4.6.1 /Layout bis 2014-11-11/Online-Dokumentation (+KNX)/Überschriften (--> Für alle Dokumente <--)/3. Ebene/A - F/Eingaben @ 34\mod_1361792319025_15.docx @ 282218 @ 3 @ 1
5.2.3
Entries
Pos: 15.4.6.2 /Layout bis 2014-11-11/Online-Dokumentation (+KNX)/Bedienung/KNX/KNX-Aktorik/ComfortPanel 3.0/Bedienungsanleitung/Bedienungsvorgänge am Touchdisplay/Eingaben/Eingaben @ 34\mod_1361791462951_15.docx @ 282110 @ @ 1
Appropriate entry options are always offered in the Busch-ComfortTouch® when entries have to made for the
execution of functions.
®
Examples for entry options in the Busch-ComfortTouch :
Pos: 15.4.7.1 /Layout bis 2014-11-11/Online-Dokumentation (+KNX)/Überschriften (--> Für alle Dokumente <--)/3. Ebene/U - Z/Wischbewegungen (Scrollen) @ 34\mod_1361792432573_15.docx @ 282234 @ 3 @ 1
5.2.4
Swiping motions (scrolling)
Pos: 15.4.7.2 /Layout bis 2014-11-11/Online-Dokumentation (+KNX)/Bedienung/KNX/KNX-Aktorik/ComfortPanel 3.0/Bedienungsanleitung/Bedienungsvorgänge am Touchdisplay/Wischbewegungen (Scrollen)/Wischbewegungen (Scrollen) @ 34\mod_1361791468984_15.docx @ 282126 @ @ 1
Scrolling is carried out with swiping motions of the fingers on the touchdisplay. This allows the navigation bar to
be shifted to the left or right so that all elements become accessible.
Fig. 7:
Moving the navigation bar with swiping motion
Pos: 15.5 /Layout bis 2014-11-11/Online-Dokumentation (+KNX)/Steuermodule - Online-Dokumentation (--> Für alle Dokumente <--)/++++++++++++ Seitenumbruch ++++++++++++ @ 9\mod_1268898668093_0.docx @ 52149 @ @ 1
Operating Instructions | 1473-1-8041
— 29 —
Operating Instructions
Busch-ComfortTouch ®
Operation
Pos: 15.6.1 /Layout bis 2014-11-11/Online-Dokumentation (+KNX)/Überschriften (--> Für alle Dokumente <--)/2. Ebene/A - F/Erläuterung der Funktionen @ 34\mod_1361800733938_15.docx @ 283595 @ 2 @ 1
5.3
5.3.1
Explanation of functions
Page types
Pos: 15.6.2.1 /Layout bis 2014-11-11/Online-Dokumentation (+KNX)/Überschriften (--> Für alle Dokumente <--)/3. Ebene/S - T/Seitentypen @ 34\mod_1361794640313_15.docx @ 283114 @ 3 @ 1
Pos: 15.6.2.2 /Layout bis 2014-11-11/Online-Dokumentation (+KNX)/Bedienung/KNX/KNX-Aktorik/ComfortPanel 3.0/Bedienungsanleitung/Erläuterung der Funktionen/Seitentypen/Seitentypen @ 34\mod_1361785795466_15.docx @ 281839 @ @ 1
The functions are called up and executed via the start page and the operating and application pages. These types
of pages are briefly explained in the following.
-
Start page:
®
The Busch-ComfortTouch includes a start page (welcome page), which is displayed to the user after a
certain time interval or after returning from the screensaver. It thus represents the "face" of the Busch®
ComfortTouch and serves as an orientation point. The start page is the starting point of any navigation.
Access to the start page is always provided on the left side of the navigation bar.
®
The start page of the Busch-ComfortTouch plays another important role:
Here functions that are especially useful for the user can be positioned. You can, for instance, add
®
(additional) room lights and blinds to the start page in which the Busch-ComfortTouch is located. The user
then has direct access to these functions. To integrate such functions of building control into the start page,
control elements must be positioned there. Alternatively, the start page can be used to create a second
navigation option for such pages that involve functions of an individual room. For this, up to six floor plan
graphics of a living room with appropriate links can be integrated into the start page. Please contact your
®
electrical installer who will set up the Busch-ComfortTouch for you individually and according to your
wishes.
Operating Instructions | 1473-1-8041
— 30 —
Operating Instructions
Busch-ComfortTouch ®
Operation
-
Operating pages:
®
Operating pages can be freely configured via the project planning software of the Busch-ComfortTouch and
are used to provide building control functions (lights, blinds, room temperature controller, etc.). You can, for
instance, operate all the blinds on the one operating page and all the home lights on the next. You could also
use the operating page for all the functions of one room and the next page for all functions of the next. The
type of structuring you wish to use is left to you. Please contact your electrical installer who will set up the
®
Busch-ComfortTouch for you individually and according to your wishes.
-
Application pages:
®
The Busch-ComfortTouch can be equipped with a range of applications (e.g. calendar, Media Player, etc.).
®
For this the application pages are inserted into the Busch-ComfortTouch via its project planning software.
Please contact your electrical installer who will set up the Busch-ComfortTouch® for you individually and
according to your wishes. Each application page has access in the navigation bar.
Note
The page types can contain buttons, control elements as well as input options. The basic operation
is explained in section "Control processes at the touchdisplay".
Pos: 15.6.3.1 /Layout bis 2014-11-11/Online-Dokumentation (+KNX)/Überschriften (--> Für alle Dokumente <--)/3. Ebene/G - L/Grundfunktionen Schalten, Dimmen, etc. @ 34\mod_1361794554222_15.docx @ 283098 @ 3 @ 1
5.3.2
Basic functions of switching, dimming, blinds, value, scenes, RTC and measured values
Pos: 15.6.3.2 /Layout bis 2014-11-11/Online-Dokumentation (+KNX)/Bedienung/KNX/KNX-Aktorik/ComfortPanel 3.0/Bedienungsanleitung/Erläuterung der Funktionen/Grundfunktionen Schalten, Dimmen, etc./Grundfunktionen Schalten, Dimmen, etc. @ 34\mod_1361793783929_15.docx @ 282651 @ @ 1
The basic functions are carried out via the operating page with the aid of control elements. These control
elements are described in detail in section "Control processes at the touchdisplay" -> "Control elements".
Pos: 15.6.4 /Layout bis 2014-11-11/Online-Dokumentation (+KNX)/Steuermodule - Online-Dokumentation (--> Für alle Dokumente <--)/++++++++++++ Seitenumbruch ++++++++++++ @ 9\mod_1268898668093_0.docx @ 52149 @ @ 1
Operating Instructions | 1473-1-8041
— 31 —
Operating Instructions
Busch-ComfortTouch ®
Operation
Pos: 15.6.5.1 /Layout bis 2014-11-11/Online-Dokumentation (+KNX)/Überschriften (--> Für alle Dokumente <--)/3. Ebene/M - O/Media-Player @ 34\mod_1361794750011_15.docx @ 283131 @ 3 @ 1
5.3.3
Media Player
Pos: 15.6.5.2 /Layout bis 2014-11-11/Online-Dokumentation (+KNX)/Bedienung/KNX/KNX-Aktorik/ComfortPanel 3.0/Bedienungsanleitung/Erläuterung der Funktionen/Media-PlayerMedia-Player @ 40\mod_1418727612907_15.docx @ 309596 @ @ 1
The Media Player serves for the playback of audio and video data, as well as Internet radio streams and Internet
TV streams.
Note
Both music data (MP3, AAC, WAV) and films (MPG MPEG, MP4, AVI) can be replayed directly,
unless they are copy protected by DRM (Digital Rights Management).
Press the "Media Player" icon in the navigation bar to access the Media Player.
Via the directory you can select whether you wish to read in audio or video data via USB stick or SD card. Here
you can also open the lists of the Web radio stations and Web TV.
An example of how to start a radio station is shown in the following. An entry must be selected in the options list
on the left side. Only then can the play button on the right-hand side be activated. The replay starts immediately.
Operating Instructions | 1473-1-8041
— 32 —
Operating Instructions
Busch-ComfortTouch ®
Operation
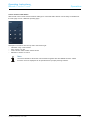
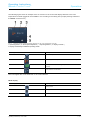
Operation during the replay of audio and video files
An operating bar appears during the replay:
1 Expired time | 2 Slider for "Forward" and "Back" |
3 Opening the 2nd view "Operating bar" (see following Figure)
4 Expired time | 5 Pause (during "Pause" the icon "Start ►) appears | 6 Stop | 7 Volume control opens
The replay can be terminated anytime via the cross in the top right-hand corner.
Additional details about the Web radio and Web TV
Audio can be provided by the integrated speaker or in stereo via the "Audio out" output with a connection to
an external sound system or active speakers.
®
Up to ten streams each can be set via the project planning software of the Busch-ComfortTouch .
The image can be displayed in reduced size at the upper left or in full-screen mode.
Note
The quality of the full-screen display depends on the image size of the stream being broadcast.
Note
Via the Web interface there is the option of making settings independently on the Busch®
®
ComfortTouch . Practical adjustments in the Busch-ComfortTouch are, for example, station
adaptation for streaming(Web) TV and Web radio. It can additionally be defined whether the
various lists such as audio/favourites lists or station lists are displayed. It is activated via the
®
project planning software of the Busch-ComfortTouch . Please see your electrical installer. He will
also explain the operation to you.
Operating Instructions | 1473-1-8041
— 33 —
Operating Instructions
Busch-ComfortTouch ®
Operation
Control element "KNX Audio"
With the aid of this control element all audio settings for connected audio devices can be easily controlled from
the start page or from a different operating page.
Description of functions from the top left to the bottom right:
– Title back / Play / Title forward
– Stop / Pause / On-Off
– Lower volume / Mute On/Off / Raise volume
– Selection of station or source
Note
The above illustration shows the control element together with all available functions. Which
functions are to be displayed can be specified via the project planning software.
Pos: 15.6.6 /Layout bis 2014-11-11/Online-Dokumentation (+KNX)/Steuermodule - Online-Dokumentation (--> Für alle Dokumente <--)/++++++++++++ Seitenumbruch ++++++++++++ @ 9\mod_1268898668093_0.docx @ 52149 @ @ 1
Operating Instructions | 1473-1-8041
— 34 —
Operating Instructions
Busch-ComfortTouch ®
Operation
Pos: 15.6.7.1 /Layout bis 2014-11-11/Online-Dokumentation (+KNX)/Überschriften (--> Für alle Dokumente <--)/3. Ebene/A - F/Bildnachricht @ 34\mod_1361794878294_15.docx @ 283147 @ 3 @ 1
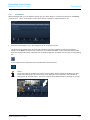
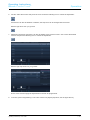
5.3.4
Image messaging
Pos: 15.6.7.2 /Layout bis 2014-11-11/Online-Dokumentation (+KNX)/Bedienung/KNX/KNX-Aktorik/ComfortPanel 3.0/Bedienungsanleitung/Erläuterung der Funktionen/BildnachrichtBildnachricht @ 40\mod_1418727990694_15.docx @ 309612 @ @ 1
The "Image messaging" function serves for recording and displaying notes. This enables users to leave image
®
messages for other users on the Busch-ComfortTouch . An image message is a handwritten text message or
drawing created with the finger on the display.
Press the "Image messaging" icon in the navigation bar to access the function.
1.
Press "New message" to record a new image message.
2.
Use the operating bar for the selection of the tasks.
1 Selecting the line colour | 2 Deleting the previously created text stroke |
3 Confirm and open the next view
Operating Instructions | 1473-1-8041
— 35 —
Operating Instructions
Busch-ComfortTouch ®
Operation
Leave a handwritten message for members of you family and others
3.
Select the receiver of the message by inserting a tick.
4.
Press "Save“.
An icon appears in the status bar which indicates that a new message has arrived.
Operating Instructions | 1473-1-8041
— 36 —
Operating Instructions
Busch-ComfortTouch ®
Operation
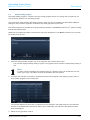
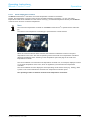
Reading a handwritten message
5.
To read the message, touch the icon in the status bar.
The message centre opens.
6.
Here select the image message.
The message is displayed in full-page mode. The dark blue dot signals a new message.
7.
Close the message by clicking the cross in the right-hand top corner.
A list of all available messages is displayed. News that has been read is marked with a light blue dot. All the
messages can be selected and read again. The messages can also be deleted here. To do this, touch the
following icon:
Cross icons appear next to the messages. A message is deleted by touching it.
Note
The list of all available messages for a receiver can be called up at any time via the "Image
messaging" function. Just select the respective receiver.
Pos: 15.6.8 /Layout bis 2014-11-11/Online-Dokumentation (+KNX)/Steuermodule - Online-Dokumentation (--> Für alle Dokumente <--)/++++++++++++ Seitenumbruch ++++++++++++ @ 9\mod_1268898668093_0.docx @ 52149 @ @ 1
Operating Instructions | 1473-1-8041
— 37 —
Operating Instructions
Busch-ComfortTouch ®
Operation
Pos: 15.6.9.1 /Layout bis 2014-11-11/Online-Dokumentation (+KNX)/Überschriften (--> Für alle Dokumente <--)/3. Ebene/S - T/Sprachnachrichten @ 34\mod_1361795169543_15.docx @ 283162 @ 3 @ 1
5.3.5
Voice messages
Pos: 15.6.9.2 /Layout bis 2014-11-11/Online-Dokumentation (+KNX)/Bedienung/KNX/KNX-Aktorik/ComfortPanel 3.0/Bedienungsanleitung/Erläuterung der Funktionen/SprachnachrichtSprachnachrichten @ 40\mod_1418729614462_15.docx @ 309705 @ @ 1
The "Voice messages" function serves for recording and playback of voice messages. They are recorded with the
integrated microphone and can therefore be played back later.
1.
Press the "Voice messages" icon in the navigation bar to access the function.
2.
Press "New message" to record a new voice message.
3.
Now select "rec" (red dot) and speak into the integrated microphone. If you are finished inside a period of 60
seconds, press "OK". Otherwise the recording is automatically terminated after 60 seconds.
4.
You can interrupt and restart the recoding at any time by again pressing "rec" (white square) and then
selecting "Start" (►).
Operating Instructions | 1473-1-8041
— 38 —
Operating Instructions
Busch-ComfortTouch ®
5.
Select the receiver of the message by inserting a tick.
6.
Then press "Save".
Operation
An icon appears in the status bar which indicates that a new message has arrived.
7.
To listen to a message, just touch the icon in the status bar. The message centre opens. Select the voice
message here.
The message is displayed in full-page mode and can be played back. The dark blue dot signals a new
message.
8.
Close the message by clicking the cross in the right-hand top corner.
A list of all available messages is displayed. Messages that heve been heard are marked with a light blue dot.
All the messages can be selected and replayed again. The messages can also be deleted here. To do this,
touch the following icon:
Cross icons appear next to the messages. If they are touched, the message is deleted.
Note
The list of all available messages for a receiver can be called up at any time via the "Voice
message" function. Just select the respective receiver.
Pos: 15.6.10 /Layout bis 2014-11-11/Online-Dokumentation (+KNX)/Steuermodule - Online-Dokumentation (--> Für alle Dokumente <--)/++++++++++++ Seitenumbruch ++++++++++++ @ 9\mod_1268898668093_0.docx @ 52149 @ @ 1
Operating Instructions | 1473-1-8041
— 39 —
Operating Instructions
Busch-ComfortTouch ®
Operation
Pos: 15.6.11.1 /Layout bis 2014-11-11/Online-Dokumentation (+KNX)/Überschriften (--> Für alle Dokumente <--)/3. Ebene/A - F/E-Mail @ 34\mod_1361795591795_15.docx @ 283179 @ 3 @ 1
5.3.6
E-mail
Pos: 15.6.11.2 /Layout bis 2014-11-11/Online-Dokumentation (+KNX)/Bedienung/KNX/KNX-Aktorik/ComfortPanel 3.0/Bedienungsanleitung/Erläuterung der Funktionen/E-Mail/E-Mail @ 34\mod_1361793768626_15.docx @ 282587 @ @ 1
E-mails can be displayed without the need for a separate computer. E-mails can be easily answered via a graphic
or voice message.
1.
Press the "E-mail" icon in the navigation bar to access the function.
The list of e-mails received with a blue dot indicates new ones that have not yet been read. E-mails that have
been read are marked with a light blue dot.
2.
Press an entry to open the e-mail.
An update of the PO box can be made via the following icon.
An icon appears in the status bar which indicates that a new e-mail has arrived.
3.
Press an entry to open the e-mail.
4.
Answer e-mails direct via voice or image messages.
Operating Instructions | 1473-1-8041
— 40 —
Operating Instructions
Busch-ComfortTouch ®
5.
Operation
Touch the respective icon in the bottom bar. The functions "Image message" or "Voice messages" are opened
(see sections "Image message" or "Voice message"). The receivers are selected automatically.
Note
E-mails cannot be deleted in the Busch-ComfortTouch® !
Pos: 15.6.12 /Layout bis 2014-11-11/Online-Dokumentation (+KNX)/Steuermodule - Online-Dokumentation (--> Für alle Dokumente <--)/++++++++++++ Seitenumbruch ++++++++++++ @ 9\mod_1268898668093_0.docx @ 52149 @ @ 1
Operating Instructions | 1473-1-8041
— 41 —
Operating Instructions
Busch-ComfortTouch ®
Operation
Pos: 15.6.13.1 /Layout bis 2014-11-11/Online-Dokumentation (+KNX)/Überschriften (--> Für alle Dokumente <--)/3. Ebene/A - F/Feed-Reader @ 34\mod_1361795689711_15.docx @ 283195 @ 3 @ 1
5.3.7
Feed Reader
Pos: 15.6.13.2 /Layout bis 2014-11-11/Online-Dokumentation (+KNX)/Bedienung/KNX/KNX-Aktorik/ComfortPanel 3.0/Bedienungsanleitung/Erläuterung der Funktionen/Feed-Reader/Feed-Reader @ 34\mod_1361793764765_15.docx @ 282571 @ @ 1
With the Feed Reader you can display and read up to ten "News feeds" in compact form directly on the Busch®
ComfortTouch . This is, for example, current news, weather information, traffic information, etc.
1.
Press the "Feed Reader" icon in the navigation bar to access the function.
The list shows the Feeds (news services) that have been previously specified via the project planning
®
software of the Busch-ComfortTouch . Please see your electrical installer. A blue dot shows that the latest
news has arrived at the Feeds. Otherwise the dot remains light blue. An update can be made via the following
icon.
An icon appears in the status bar which indicates that news has arrived.
Note
The project planning software can also be used to specify whether Feeds are displayed as news
feeds on the start page. The ones that are to be displayed can be selected in the overview (by
setting a tick at "On start page"). The news is opened in the Web browser by pressing on an entry.
Operating Instructions | 1473-1-8041
— 42 —
Operating Instructions
Busch-ComfortTouch ®
2.
Operation
Press an entry to open the Feed.
The list of news received with a blue dot indicates new ones that have not yet been read. News that has been
read is marked with a light blue dot. The news is opened in the Web browser by pressing on an entry.
Note
Via the Web interface there is the option of making settings independently on the BuschComfortTouch ®. Practical changes in the Busch-ComfortTouch® are, for example, adjustments of
the news services (Feeds) for the Feed Reader. It is activated via the project planning software of
®
the Busch-ComfortTouch . Please see your electrical installer. He will also explain the operation
to you.
Pos: 15.6.14 /Layout bis 2014-11-11/Online-Dokumentation (+KNX)/Steuermodule - Online-Dokumentation (--> Für alle Dokumente <--)/++++++++++++ Seitenumbruch ++++++++++++ @ 9\mod_1268898668093_0.docx @ 52149 @ @ 1
Operating Instructions | 1473-1-8041
— 43 —
Operating Instructions
Busch-ComfortTouch ®
Operation
Pos: 15.6.15.1 /Layout bis 2014-11-11/Online-Dokumentation (+KNX)/Überschriften (--> Für alle Dokumente <--)/3. Ebene/U - Z/Wochenprogramme @ 34\mod_1361796283801_15.docx @ 283211 @ 3 @ 1
5.3.8
Weekly programs
Pos: 15.6.15.2 /Layout bis 2014-11-11/Online-Dokumentation (+KNX)/Bedienung/KNX/KNX-Aktorik/ComfortPanel 3.0/Bedienungsanleitung/Erläuterung der Funktionen/WochenprogrammeWochenprogramme @ 40\mod_1418732281330_15.docx @ 309721 @ @ 1
Processes occurring on a weekly basis (scenes and sequences) can be set for each weekday in a clearly
arranged way and automated in any number of weekly programs. These presets are then repeated every week
on a continuing basis. The weekly programs are created via the project planning software of the Busch®
®
ComfortTouch . Please see your electrical installer. The compiling or adjusting on the Busch-ComfortTouch can
then be carried out by the user. Validity intervals (e.g. holidays) can be assigned to weekly programs, during
which the preset weekly program is not triggered but the program of a specially defined day. This could be days
such as Xmas, Sylvester or New Year. In this way weekly programs can be automatically activated and
deactivated. A maximum of 8 periods of validity can be defined.
1.
Press the "Weekly program" icon in the navigation bar to access the function.
The function can also be opened by pressing the date in the status bar.
The overview displays existing weekly programs. The program can be activated / deactivated by setting a tick.
2.
To access the overview of scenes that have been assigned to the weekly program, press an entry (weekly
program) in the overview list.
The overview displays the scenes that can be played in the weekly program (e.g. sequentially or
simultaneously for different devices). The scene can be activated / deactivated by inserting a tick.
Additionally, the statuses of the validity intervals and start times are displayed.
Operating Instructions | 1473-1-8041
— 44 —
Operating Instructions
Busch-ComfortTouch ®
3.
Operation
Select an entry (scene) to edit it.
The validity intervals can be specified via "Set validity".
The months can be selected with the arrows.
4.
Select a validity interval on the right-hand side.
5.
Select the day(s) in the calendar.
6.
Also specify the characteristics of the intervals.
Interval
Description
characteristics
Always
The weekly program is continuous: there is no assignment to an interval.
Include
Within the marked days: The weekly program runs only within the marked days.
Exclude
Outside the marked days: The weekly program is suspended during the marked days.
7.
Press "OK".
You return to the overview of scenes.
8.
Adjust the start times via "Set start time".
9.
Select the day(s) in the upper bar.
Operating Instructions | 1473-1-8041
— 45 —
Operating Instructions
Busch-ComfortTouch ®
Operation
10. Set the start time.
By setting a tick you can also specify whether the Astro function is to be activated. The Astro function can, for
example, be used to automatically raise or lower blinds a few minutes earlier or later each day in dependence
of the annual season. A blocking function with "Not before" and "Not after" fixes the blocking times before or
after which no functions are carried out. For this, a tick must have been set in the blocking function.
11. Touch the "Hours" or "Minutes".
The setting is made via -/+.
12. Press "OK".
You return to the overview of scenes.
Pos: 15.6.16 /Layout bis 2014-11-11/Online-Dokumentation (+KNX)/Steuermodule - Online-Dokumentation (--> Für alle Dokumente <--)/++++++++++++ Seitenumbruch ++++++++++++ @ 9\mod_1268898668093_0.docx @ 52149 @ @ 1
Operating Instructions | 1473-1-8041
— 46 —
Operating Instructions
Busch-ComfortTouch ®
Operation
Pos: 15.6.17.1 /Layout bis 2014-11-11/Online-Dokumentation (+KNX)/Überschriften (--> Für alle Dokumente <--)/2. Ebene/U - Z/Wochenprogramme -- einfache @ 40\mod_1418822358921_15.docx @ 310561 @ 2 @ 1
5.4
Simpls weekly program
Pos: 15.6.17.2 /Layout bis 2014-11-11/Online-Dokumentation (+KNX)/Bedienung/KNX/KNX-Aktorik/ComfortPanel 3.0/Bedienungsanleitung/Erläuterung der Funktionen/Wochenprogramme -- einfache/Wochenprogramme -- einfache -- BA @ 40\mod_1418898547236_15.docx @ 310778 @ @ 1
The simple weekly program in contrast to the other weekly program serves for ensuring that a program can run
only for specific periods, such as holiday periods.
The overview list clearly displays the weekly programs. Here they can be activated and deactivated. Additional
settings for the processes / programs contained in the weekly programs can be made.
®
The weekly programs are created via the project planning software of the Busch-ComfortTouch . Also the holiday
intervals are specified here.
®
Please see your electrical installer. The activation and minor adjustments on the Busch-ComfortTouch can then
be carried out by the user.
1.
Press the "Simple weekly program" icon in the navigation bar to access the function.
The overview displays existing weekly programs. The program can be activated / deactivated by setting a
tick.
Note
If a value column is displayed, the indicated value (e.g. dimming value) can be adjusted. For this,
press on the value. The values can then be adjusted in the input window.
2.
To access the overview of processes / programs that have been assigned to the weekly program, press an
entry (weekly program) in the overview list.
The overview displays the processes / programs that can be played in the weekly program. The respective
process can be deactivated / activated by setting a tick. Additionally, the statuses of the validity and start
times are displayed.
3.
Select an entry (process) to edit it.
Operating Instructions | 1473-1-8041
— 47 —
Operating Instructions
Busch-ComfortTouch ®
–
Operation
Specify the validity via the selection on the right-hand side.
Property
Description
Always
The weekly program is continuous.
When on holiday
The weekly program runs only within the specified holiday interval.
When not on holiday
The weekly program stops within the specified holiday interval.
Switch the displayed values on and off via ON / Off.
4.
Adjust the start times via "Set start time".
5.
Select the day(s) in the upper bar.
6.
Set the start time.
By setting a tick you can also specify whether the Astro function is to be activated.
The Astro function can, for example, be used to automatically raise or lower blinds a few minutes earlier
or later each day in dependence of the annual season. A blocking function with "Not before" and "Not
after" fixes the blocking times before or after which no functions are carried out. For this, a tick must have
been set in the blocking function.
7.
Touch the "Hours" or "Minutes".
The setting is made via -/+.
8.
Press "OK".
You return to the overview of processes.
Note
The weekly programs can also be changed during the running time via the system settings (see
also chapter 5.4.18 "System settings"). For example, when the holiday ends one day earlier the
weekly program can be terminated accordingly.
Pos: 15.6.18 /Layout bis 2014-11-11/Online-Dokumentation (+KNX)/Steuermodule - Online-Dokumentation (--> Für alle Dokumente <--)/++++++++++++ Seitenumbruch ++++++++++++ @ 9\mod_1268898668093_0.docx @ 52149 @ @ 1
Operating Instructions | 1473-1-8041
— 48 —
Operating Instructions
Busch-ComfortTouch ®
Operation
Pos: 15.6.19.1 /Layout bis 2014-11-11/Online-Dokumentation (+KNX)/Überschriften (--> Für alle Dokumente <--)/3. Ebene/G - L/Kalender (Jahreszeitschaltuhr) @ 34\mod_1361797961411_15.docx @ 283226 @ 3 @ 1
5.4.1
Calendar (twelve-month timer)
Pos: 15.6.19.2 /Layout bis 2014-11-11/Online-Dokumentation (+KNX)/Bedienung/KNX/KNX-Aktorik/ComfortPanel 3.0/Bedienungsanleitung/Erläuterung der Funktionen/Kalender (Jahreszeitschaltuhr)/Kalender (Jahreszeitschaltuhr) @ 34\mod_1361793756649_15.docx @ 282539 @ @ 1
Via the calendar function you can specify times on certain days of the year when special scenes are triggered.
These default settings can be repeated annually.
1.
Press the "Calendar" icon in the navigation bar to access the function.
The overview by means of coloured boxes shows the days that have been specified.
2.
If you wish to specify additional days, or you wish to change specifications, touch a month.
3.
Touch one or several days in the calendar.
They are highlighted in colour. For these days special scenes can be specified via the scene editor (see
"Scene editor"). Additionally, the time of the day at which the scene is to start can be specified via "Start time"
(-/+). By setting a tick you can also specify whether a repeat is to take place each year.
4.
Activate the specification by setting a tick.
Pos: 15.6.20 /Layout bis 2014-11-11/Online-Dokumentation (+KNX)/Steuermodule - Online-Dokumentation (--> Für alle Dokumente <--)/++++++++++++ Seitenumbruch ++++++++++++ @ 9\mod_1268898668093_0.docx @ 52149 @ @ 1
Operating Instructions | 1473-1-8041
— 49 —
Operating Instructions
Busch-ComfortTouch ®
Operation
Pos: 15.6.21.1 /Layout bis 2014-11-11/Online-Dokumentation (+KNX)/Überschriften (--> Für alle Dokumente <--)/3. Ebene/M - O/Miele (nur über Plug-In) @ 34\mod_1361798123555_15.docx @ 283243 @ 3 @ 1
5.4.2
Miele (only via Plug-In)
Pos: 15.6.21.2 /Layout bis 2014-11-11/Online-Dokumentation (+KNX)/Bedienung/KNX/KNX-Aktorik/ComfortPanel 3.0/Bedienungsanleitung/Erläuterung der Funktionen/Miele (nur über Plug-In)/Miele (nur über Plug-In) @ 34\mod_1361793752748_15.docx @ 282523 @ @ 1
Note
A link to certain Miele appliances can be established with aid of this function. This function is only
available with the aid of a special plug-in. Please see your electrical installer. A separate
description is available for this function.
Pos: 15.6.22 /Layout bis 2014-11-11/Online-Dokumentation (+KNX)/Steuermodule - Online-Dokumentation (--> Für alle Dokumente <--)/++++++++++++ Seitenumbruch ++++++++++++ @ 9\mod_1268898668093_0.docx @ 52149 @ @ 1
Operating Instructions | 1473-1-8041
— 50 —
Operating Instructions
Busch-ComfortTouch ®
Operation
Pos: 15.6.23.1 /Layout bis 2014-11-11/Online-Dokumentation (+KNX)/Überschriften (--> Für alle Dokumente <--)/3. Ebene/G - L/Kameraüberwachung @ 34\mod_1361798576547_15.docx @ 283284 @ 3 @ 1
5.4.3
Camera surveillance
Pos: 15.6.23.2 /Layout bis 2014-11-11/Online-Dokumentation (+KNX)/Bedienung/KNX/KNX-Aktorik/ComfortPanel 3.0/Bedienungsanleitung/Erläuterung der Funktionen/Kameraüberwachung/Kameraüberwachung @ 34\mod_1361793748768_15.docx @ 282507 @ @ 1
Camera surveillance provides fast, visual information about events occurring within the detection range of
connected cameras. The surveillance cameras can be triggered and the transmission signal displayed. The
application can be used to display the images from up to eight (with the 9" display) or ten (with the 12,1" display)
®
network cameras (also internal camera modules) or other Busch-ComfortTouch cameras.
1.
Press the "Camera surveillance" icon in the navigation bar to access the function.
The overview displays the current images of the available cameras in small image form. With a double press
on a small image the full-page mode is opened for the respective camera image.
2.
Depending on the type of camera, you can control the camera or reduce or enlarge the size of the camera
image.
Archived camera images can be called up via the archive.
Operating Instructions | 1473-1-8041
— 51 —
Operating Instructions
Busch-ComfortTouch ®
Operation
Note
The project planning software can also be used to specify whether camera surveillance is
displayed as a small window at the start page. The current camera image is the displayed
permanently. With a press on this window the "Camera surveillance" function opens.
Pos: 15.6.24 /Layout bis 2014-11-11/Online-Dokumentation (+KNX)/Steuermodule - Online-Dokumentation (--> Für alle Dokumente <--)/++++++++++++ Seitenumbruch ++++++++++++ @ 9\mod_1268898668093_0.docx @ 52149 @ @ 1
Operating Instructions | 1473-1-8041
— 52 —
Operating Instructions
Busch-ComfortTouch ®
Operation
Pos: 15.6.25.1 /Layout bis 2014-11-11/Online-Dokumentation (+KNX)/Überschriften (--> Für alle Dokumente <--)/3. Ebene/M - O/Meldeanlage @ 34\mod_1361799170574_15.docx @ 283301 @ 3 @ 1
5.4.4
Alarm control unit
Pos: 15.6.25.2 /Layout bis 2014-11-11/Online-Dokumentation (+KNX)/Bedienung/KNX/KNX-Aktorik/ComfortPanel 3.0/Bedienungsanleitung/Erläuterung der Funktionen/MeldeanlageMeldeanlage @ 40\mod_1418732431076_15.docx @ 309737 @ @ 1
The Busch-ComfortTouch® can monitor message circuits / contacts and display their status. This enables the
panel to monitor the security of the building and, if necessary, to transmit messages about unauthorized access.
For this purpose, movement detectors, glass break sensors, window sensors and further contacts can be
integrated.
Note
The alarm control unit is not intended to serve as a VDS-certified (German Association of Property
Insurers) alarm system but to merely offer the option of monitoring windows, doors or interior
rooms via movement detectors. It is no substitute for an alarm system.
The status of the alarm control unit is displayed in the status bar. The function is opened by pressing the icons.
The function can, however, also be called up via the navigation bar.
This icon indicates that the alarm control unit has been armed. When pressing the icon, a selection with "Disarm"
and "Open" is displayed.
This icon indicates that the alarm control unit has been disarmed. When pressing the icon, a selection with "Arm"
and "Open" is displayed.
The overview displays the available message circuits. By setting a tick under "Monitored" you can specify the
message circuits are armed when setting the alarm. The access code is required when setting the alarm. This can
be entered via the numbers keyboard which appears. The access code can also be changed (first the request for
the old access code -> "OK" -> then new entry -> "OK").
Operating Instructions | 1473-1-8041
— 53 —
Operating Instructions
Busch-ComfortTouch ®
Operation
The sensors (e.g. movement detectors) contained in the message circuits can be seen by touching the entry. The
individual sensors can be activated / deactivated by setting a tick under "Monitored". With the aid of "Ignore" it
can be specified that an alarm can be set in spite of an existing message. By touching the lettering "Overview"
you return to the previous view.
Pos: 15.6.26 /Layout bis 2014-11-11/Online-Dokumentation (+KNX)/Steuermodule - Online-Dokumentation (--> Für alle Dokumente <--)/++++++++++++ Seitenumbruch ++++++++++++ @ 9\mod_1268898668093_0.docx @ 52149 @ @ 1
Operating Instructions | 1473-1-8041
— 54 —
Operating Instructions
Busch-ComfortTouch ®
Operation
Pos: 15.6.27.1 /Layout bis 2014-11-11/Online-Dokumentation (+KNX)/Überschriften (--> Für alle Dokumente <--)/3. Ebene/A - F/Anwesenheitssimulation @ 34\mod_1361799253354_15.docx @ 283317 @ 3 @ 1
5.4.5
Presence simulation
Pos: 15.6.27.2 /Layout bis 2014-11-11/Online-Dokumentation (+KNX)/Bedienung/KNX/KNX-Aktorik/ComfortPanel 3.0/Bedienungsanleitung/Erläuterung der Funktionen/Anwesenheitssimulation/Anwesenheitssimulation @ 34\mod_1361793740816_15.docx @ 282475 @ @ 1
The absence of the resident of the building can be realistically simulated to a great extent via the Busch®
ComfortTouch , for increasing the protection against unauthorised access.
®
The Busch-ComfortTouch records (weekday-specific) up to 20 objects of all actions precisely to the minute and
then plays these back.
Note
This function does not have a direct application page. It is deactivated / activated via the status bar
with the following icons:
Please note that you must always create a presence simulation beforehand, so that the simulation
can be played back later!
1.
Open the function by pressing the icons shown above .
Additional text windows are then displayed.
2.
Press "Record scene", to record a presence simulation.
3.
Press "Play back scene", to play back the presence simulation recorded.
The status of the presence simulation is displayed in the status bar.
®
This icon indicates that presence simulation is being recorded. During recording by your Busch-ComfortTouch ,
presence simulation runs continuously to constantly have up-to-date information available. This is how a
typical daily routine is recorded and stored.
This icon indicates that presence simulation is being recorded. Presence simulation is activated during
®
prolonged absences such as holidays. Your Busch-ComfortTouch switches the light and blinds on and off
during your absence, for example, to simulate someone's presence in the house.
Pos: 15.6.28 /Layout bis 2014-11-11/Online-Dokumentation (+KNX)/Steuermodule - Online-Dokumentation (--> Für alle Dokumente <--)/++++++++++++ Seitenumbruch ++++++++++++ @ 9\mod_1268898668093_0.docx @ 52149 @ @ 1
Operating Instructions | 1473-1-8041
— 55 —
Operating Instructions
Busch-ComfortTouch ®
Operation
Pos: 15.6.29.1 /Layout bis 2014-11-11/Online-Dokumentation (+KNX)/Überschriften (--> Für alle Dokumente <--)/3. Ebene/G - L/Kurzzeittimer @ 34\mod_1361799471325_15.docx @ 283332 @ 3 @ 1
5.4.6
Short-time timer
Pos: 15.6.29.2 /Layout bis 2014-11-11/Online-Dokumentation (+KNX)/Bedienung/KNX/KNX-Aktorik/ComfortPanel 3.0/Bedienungsanleitung/Erläuterung der Funktionen/KurzzeittimerKurzzeittimer @ 40\mod_1418900721531_15.docx @ 310810 @ @ 1
On the Busch-ComfortTouch®, four different short-time timers ("Egg timers") can be activated for a 9" Busch®
®
ComfortTouch and five for a 12.1" Busch-ComfortTouch . A tone sequence can be set after the time has
expired. There is also the additional option of running an automated scene at the start and/or end of a short-time
timer.
1.
Press the "Short timer" icon in the navigation bar to access the function.
The overview displays the available shot-time timers. Here the timers can be set.
2.
Touch the hours or minutes.
The setting is made via -/+.
3.
Start the time sequence with the "Start button" (►).
This can be stopped at any time with the "Stop button" (■). Via "Activate scene" you can activate scenes that
have been assigned to the timers.
4.
Set a tick to specify whether the assigned special scene is to be played at the start and/or at the end (for
adjustment of scenes see "Szeneneditor").
Operating Instructions | 1473-1-8041
— 56 —
Operating Instructions
Busch-ComfortTouch ®
5.
Operation
Confirm the changes by touching the tick in the right-hand top corner.
Via the arrow in the top bar you again return to the overview.
Note
At the end of the running time, a message appears which must be confirmed.
Pos: 15.6.30 /Layout bis 2014-11-11/Online-Dokumentation (+KNX)/Steuermodule - Online-Dokumentation (--> Für alle Dokumente <--)/++++++++++++ Seitenumbruch ++++++++++++ @ 9\mod_1268898668093_0.docx @ 52149 @ @ 1
Operating Instructions | 1473-1-8041
— 57 —
Operating Instructions
Busch-ComfortTouch ®
Operation
Pos: 15.6.31.1 /Layout bis 2014-11-11/Online-Dokumentation (+KNX)/Überschriften (--> Für alle Dokumente <--)/3. Ebene/U - Z/Wecker @ 34\mod_1361799585005_15.docx @ 283365 @ 3 @ 1
5.4.7
Alarm clock
Pos: 15.6.31.2 /Layout bis 2014-11-11/Online-Dokumentation (+KNX)/Bedienung/KNX/KNX-Aktorik/ComfortPanel 3.0/Bedienungsanleitung/Erläuterung der Funktionen/WeckerWecker @ 40\mod_1418732689320_15.docx @ 309753 @ @ 1
Specific weekday times can be set for activating a specific scene for waking up (e.g. starting the Media Player
with one’s favourite music).
It is also possible to set a scene to precede the alarm, to prepare the home environment for its occupants prior to
rising (the heating, for example, is switched on already one hour before to the alarm clock).
This allows a scene or a sequence to be started for the lead-in time (specific time set before alarm time), for
alarm time, at activation of "Snooze" and switching off the alarm clock.
1.
Press the "Alarm clock" icon in the navigation bar to access the function.
The overview displays the available alarm clock for each weekday. Here the alarm clock can be set
individually.
2.
Touch the "Hours" or "Minutes".
The setting is made via -/+. It is activated by setting a tick next to the weekday. You can set a tick on "All" to
activate all days. If you do not wish to be woken the next day, set a tick at "Not tomorrow".
3.
Activate the the scenes assigned to the alarm clocks with "Activate scene".
Operating Instructions | 1473-1-8041
— 58 —
Operating Instructions
Busch-ComfortTouch ®
Operation
4.
Set a tick to specify whether the assigned special scenes are to be played for "Wake-up", "Off", "Snooze" or
"Lead-in" (for adjustment of scenes see "Scene editor"). The lead-in time can be set individually.
5.
Touch the "Hours" or "Minutes".
The setting is made via -/+.
6.
Confirm the changes by pressing "Save".
Via the arrow next to "Save" you again access the overview.
Note
After the alarm clock has been activated, the alarm clock icon appears in the status bar. Here all
the time settings can be called up again.
Pos: 15.6.32 /Layout bis 2014-11-11/Online-Dokumentation (+KNX)/Steuermodule - Online-Dokumentation (--> Für alle Dokumente <--)/++++++++++++ Seitenumbruch ++++++++++++ @ 9\mod_1268898668093_0.docx @ 52149 @ @ 1
Operating Instructions | 1473-1-8041
— 59 —
Operating Instructions
Busch-ComfortTouch ®
Operation
Pos: 15.6.33.1 /Layout bis 2014-11-11/Online-Dokumentation (+KNX)/Überschriften (--> Für alle Dokumente <--)/3. Ebene/A - F/Datenlogger @ 34\mod_1361799681492_15.docx @ 283381 @ 3 @ 1
5.4.8
Data logger
Pos: 15.6.33.2 /Layout bis 2014-11-11/Online-Dokumentation (+KNX)/Bedienung/KNX/KNX-Aktorik/ComfortPanel 3.0/Bedienungsanleitung/Erläuterung der Funktionen/DatenloggerDatenlogger @ 40\mod_1418896202650_15.docx @ 310660 @ @ 1
The data logger integrated in the Busch-ComfortTouch® can graphically display data for up to eight
communication objects. If these communication objects with sensors are linked via group addresses, then the
energy consumption of a house, the power of a photovoltaic system or the fill level of an oil tank can be
visualised, for example.
Note
The data logger can display up to 4 graphs (data points) in one view. The individual graphs can be
named and colour coded. For this the legend is displayed.
®
The Busch-ComfortTouch can store the values as file in a specified directory to allow the determined values to
be further processed. The following storage media can be used:
-
SD Card
USB stick
Network
1.
Press the "Data logger" icon in the navigation bar to access the function.
If several views are available, they are listed on the right side. The respective view opens when an entry is
touched. The values can be reset via "Reset". With the aid of "Export" the data of the specified directory are
exported.
Pos: 15.6.34 /Layout bis 2014-11-11/Online-Dokumentation (+KNX)/Steuermodule - Online-Dokumentation (--> Für alle Dokumente <--)/++++++++++++ Seitenumbruch ++++++++++++ @ 9\mod_1268898668093_0.docx @ 52149 @ @ 1
Operating Instructions | 1473-1-8041
— 60 —
Operating Instructions
Busch-ComfortTouch ®
Operation
Pos: 15.6.35.1 /Layout bis 2014-11-11/Online-Dokumentation (+KNX)/Überschriften (--> Für alle Dokumente <--)/3. Ebene/U - Z/Web-Browser @ 34\mod_1361799846947_15.docx @ 283405 @ 3 @ 1
5.4.9
Web browser
Pos: 15.6.35.2 /Layout bis 2014-11-11/Online-Dokumentation (+KNX)/Bedienung/KNX/KNX-Aktorik/ComfortPanel 3.0/Bedienungsanleitung/Erläuterung der Funktionen/Web-Browser/Web-Browser @ 34\mod_1361793724769_15.docx @ 282411 @ @ 1
Also Internet sites can be called up and displayed in full-screen mode with the integrated Web browser of the
®
®
Busch-ComfortTouch . Predefined Internet sites can be called up on the Busch-ComfortTouch . For this, up to
20 bookmarks for Internet sites can be stored in the project planning software for the Busch-ComfortTouch®.
When the Web browser starts, a list of all stored bookmarks are displayed. This list can be selected at any time.
When the user selects an Internet site, it opens.
1.
Press the "Web browser" icon in the navigation bar to access the function.
The buttons have the following functions:
Button
Function
One page back.
One page forward.
Call-up of the "Bookmark" list.
Scaling.
Quitting the loading process (also a progress bar appears during the loading process).
Update.
2.
Close the Web browser by clicking the cross in the right-hand top corner.
Note
Via the Web interface there is the option of making settings independently on the Busch®
®
ComfortTouch . Practical changes in the Busch-ComfortTouch are, for example, adjustments of
the favourite (Internet sites) for the Web browser. It is activated via the project planning software of
®
the Busch-ComfortTouch . Please see your electrical installer. He will also explain the operation
to you.
Pos: 15.6.36 /Layout bis 2014-11-11/Online-Dokumentation (+KNX)/Steuermodule - Online-Dokumentation (--> Für alle Dokumente <--)/++++++++++++ Seitenumbruch ++++++++++++ @ 9\mod_1268898668093_0.docx @ 52149 @ @ 1
Operating Instructions | 1473-1-8041
— 61 —
Operating Instructions
Busch-ComfortTouch ®
Operation
Pos: 15.6.37.1 /Layout bis 2014-11-11/Online-Dokumentation (+KNX)/Überschriften (--> Für alle Dokumente <--)/3. Ebene/S - T/Telefon (VoIP) @ 34\mod_1361799995294_15.docx @ 283425 @ 3 @ 1
5.4.10
Telephone (VoIP)
Pos: 15.6.37.2 /Layout bis 2014-11-11/Online-Dokumentation (+KNX)/Bedienung/KNX/KNX-Aktorik/ComfortPanel 3.0/Bedienungsanleitung/Erläuterung der Funktionen/Telefon (VoIP)/Telefon (VoIP) @ 34\mod_1361793720517_15.docx @ 282395 @ @ 1
With the function "Telephone (VoIP)" the Busch-ComfortTouch® can be used as an Internet protocol telephone
("VoIP telephone"). Please check the requirements with your electrical installer.
The following requirements must be fulfilled:
-
A broadband Internet connection with a transfer rate of at least 100 kbit/s in both directions must exist.
The Internet provider must allow VoIP telephony.
®
For the Busch-ComfortTouch to be reachable via a conventional call number, an SIP account must be
obtained from the Internet provider.
®
There is also the option of calling a different Busch-ComfortTouch in the house. This allows the Busch®
ComfortTouch as intercom system (intercom function).
1.
Press the "Telephone" icon in the navigation bar to access the function.
You can dial a number directly or select a stored number via the address book.
Operating Instructions | 1473-1-8041
— 62 —
Operating Instructions
Busch-ComfortTouch ®
Operation
Dialling the number directly
1.
Enter the number via the numbers keyboard.
The digit entered last can only be deleted by touching the following sign:
2.
Touch the following button.
The connection is being made. The time starts to run as soon as the call is answered.
3.
Terminate the call with the following button.
Operating Instructions | 1473-1-8041
— 63 —
Operating Instructions
Busch-ComfortTouch ®
Operation
Dialling a stored number via the address book
1.
Touch the entry "Address book".
A list with the stored address entries opens.
2.
Set a tick at the desired party.
The name appears in the right field.
Operating Instructions | 1473-1-8041
— 64 —
Operating Instructions
Busch-ComfortTouch ®
3.
Operation
Touch the following button.
The connection is being made. The time starts to run as soon as the call is answered.
4.
Terminate the call with the following button.
Note
Several parties may be called simultaneously as a group. For this you need to set a tick at several
entries in the address book. The image on the right shows this accordingly.
Note
Via the Web interface there is the option of making settings independently on the Busch®
®
ComfortTouch . Practical changes in the Busch-ComfortTouch are, for example, adjustments to
the address book for the telephone application. It is activated via the project planning software of
®
the Busch-ComfortTouch . Please see your electrical installer. He will also explain the operation
to you.
Pos: 15.6.38 /Layout bis 2014-11-11/Online-Dokumentation (+KNX)/Steuermodule - Online-Dokumentation (--> Für alle Dokumente <--)/++++++++++++ Seitenumbruch ++++++++++++ @ 9\mod_1268898668093_0.docx @ 52149 @ @ 1
Operating Instructions | 1473-1-8041
— 65 —
Operating Instructions
Busch-ComfortTouch ®
Operation
Pos: 15.6.39.1 /Layout bis 2014-11-11/Online-Dokumentation (+KNX)/Überschriften (--> Für alle Dokumente <--)/3. Ebene/S - T/Türkommunikation @ 34\mod_1361800066654_15.docx @ 283441 @ 3 @ 1
5.4.11
Door Communication
Pos: 15.6.39.2 /Layout bis 2014-11-11/Online-Dokumentation (+KNX)/Bedienung/KNX/KNX-Aktorik/ComfortPanel 3.0/Bedienungsanleitung/Erläuterung der Funktionen/TürkommunikationTürkommunikation @ 40\mod_1418733035704_15.docx @ 309769 @ @ 1
The "Door communication" function makes communication with image and sound possible between the Busch®
ComfortTouch and an outdoor station. For this, up to five outdoor stations can be configured in the network. In
addition, up to three cameras can be assigned to each outdoor station.
®
As soon as a visitor presses the bell of a Welcome outdoor station, this is signalled on the Busch-ComfortTouch
®
as a door call. The Busch-ComfortTouch switches automatically to the "Door communication" function (or,
depending on the setting, first issues a message that needs to be confirmed) and shows the camera image of the
respective outdoor station. The user can now accept or reject the call and switch conversation to mute, open the
door and switch on the light. The view can also be switched to a different camera of the outdoor station.
In addition, the user can view all previous events via History (progress). Images (snapshots)can be recorded
automatically or manually for this.
The function is opened either by pressing the "Door communication" icon in the navigation bar or automatically by
an incoming bell call of an outdoor station. Depending on the setting, a message that must be confirmed appears
first.
Selecting the function via the icon (no bell call)
A call up is practical when one wishes to view an archived snapshot or a current camera image of the different
outdoor stations. The ring tone can also be deactivated.
Switching outdoor stations (camera image)
1.
Open a list of connected outdoor stations with the aid of the following arrow on the right side.
2.
Select the outdoor station.
The image will now displayed. If the outdoor station has several cameras, the arrow buttons (< / >) can be
used to switch between the cameras.
Operating Instructions | 1473-1-8041
— 66 —
Operating Instructions
Busch-ComfortTouch ®
Operation
Open and edit the history (progress) of snapshots
1.
Open a list of connected outdoor stations with the aid of the following arrow on the right side.
2.
Now select the outdoor station.
3.
Press "History".
4.
Select an entry.
The snapshot is displayed.
With the aid of the arrows one can switch between all snapshots of the outdoor station.
Operating Instructions | 1473-1-8041
— 67 —
Operating Instructions
Busch-ComfortTouch ®
5.
Operation
Press "OK".
The overview is displayed again.
6.
Press the tool icon for editing.
7.
Select an entry from the list.
This entry (snapshot) can be deleted with the cross on the right side. The entry can also be exported with
"Export". For this, additional pages open which enquire the storage medium and the directory.
Caution
The entire list can be deleted with the cross next to "Export".
8.
Return by pressing each time on the following arrow.
Deactivating the ring tone
The ring tone can be activated or deactivated via the following buttons (top right).
Button
Description
Activating the ring tone (the ring tone is on: the icon is white).
Deactivating the ring tone (the ring tone is off: the icon is white. The icon is also displayed in the status bar).
Operating Instructions | 1473-1-8041
— 68 —
Operating Instructions
Busch-ComfortTouch ®
Operation
The function opens automatically at an incoming bell call.
®
When the visitor presses the bell of an outdoor station, it is indicated on the Busch-ComfortTouch as a bell call.
®
The Busch-ComfortTouch switches automatically to the "Door communication" function (or, depending on the
setting, first issues a message that needs to be confirmed) and shows the camera image of the respective
®
outdoor station. Via the project planning software of the Busch-ComfortTouch it can also be specified that the
camera image is displayed in full-page mode. Please see your electrical installer.
Control options
Accept the bell call.
Activate the door opener at the outdoor station.
Activate the light at the outdoor station.
Deactivate the light at the outdoor station.
Control options after acceptance of the bell call.
Mute function off (sound transmission to the outdoor station).
Mute function on (no sound transmission to the outdoor station).
Switch between the different cameras of an outdoor station.
Create images (snapshots) (manually).
Ending a bell call.
Operating Instructions | 1473-1-8041
— 69 —
Operating Instructions
Busch-ComfortTouch ®
Operation
Note
The project planning softwar of the Busch-ComfortTouch® can also be used to specify how long
the function remains open until it is automatically closed. Please see your electrical installer.
The running time is displayed in the status bar. If the time has run down to 10 seconds, the expired
time also appears in the camera image (see the following figure).
Pos: 15.6.40 /Layout bis 2014-11-11/Online-Dokumentation (+KNX)/Steuermodule - Online-Dokumentation (--> Für alle Dokumente <--)/++++++++++++ Seitenumbruch ++++++++++++ @ 9\mod_1268898668093_0.docx @ 52149 @ @ 1
Operating Instructions | 1473-1-8041
— 70 —
Operating Instructions
Busch-ComfortTouch ®
Operation
Pos: 15.6.41.1 /Layout bis 2014-11-11/Online-Dokumentation (+KNX)/Überschriften (--> Für alle Dokumente <--)/3. Ebene/S - T/Stör- und Alarmmeldungen @ 34\mod_1361800129814_15.docx @ 283457 @ 3 @ 1
5.4.12
Fault and alarm messages
Pos: 15.6.41.2 /Layout bis 2014-11-11/Online-Dokumentation (+KNX)/Bedienung/KNX/KNX-Aktorik/ComfortPanel 3.0/Bedienungsanleitung/Erläuterung der Funktionen/Stör- und AlarmmeldungenStör- und Alarmmeldungen @ 40\mod_1418733120195_15.docx @ 309785 @ @ 1
The Busch-ComfortTouch® offers protection and information during malfunction or interference.
Message contacts, sensors and their proper function can be monitored. The message issued in the event of a
malfunction or notification can be set individually. The following can be selected:
-
Alarm tone
E-mail
Scene for information or prevention.
®
Via "Fault and alarm messages" the user can see which messages have appeared on the Busch-ComfortTouch .
He can additionally use this function to acknowledge the messages, to export or delete them.
Note
The Busch-ComfortTouch® can send alarm messages via e-mail. The e-mail address of the
receiver, to which the alarm messages of the assigned sensor are to be sent, can be specified via
the project planning software. In this way the individual alarm messages are assigned to the
sensors.
1.
Press the "Fault and alarm messages" icon in the navigation bar to access the function.
By inserting a tick in "Settings" you can assign to the individual sensors how the information is to be provided.
Several information paths can be selected together.
2.
Press "Last message" to view all the unconfirmed messages.
Here the messages can be confirmed.
The next overview is accessed via the "Tool icon" ( ). The messages can be exported or deleted here. With
the right arrow icon you go back.
For this the setting is to be made by the electrical installer via the project planning software.
3.
Press "Old message" to view all the confirmed messages.
The next overview is accessed via the "Tool icon" ( ). The messages can be exported or deleted here. With
the right arrow icon you go back.
For this the setting is to be made by the electrical installer via the project planning software.
Pos: 15.6.42 /Layout bis 2014-11-11/Online-Dokumentation (+KNX)/Steuermodule - Online-Dokumentation (--> Für alle Dokumente <--)/++++++++++++ Seitenumbruch ++++++++++++ @ 9\mod_1268898668093_0.docx @ 52149 @ @ 1
Operating Instructions | 1473-1-8041
— 71 —
Operating Instructions
Busch-ComfortTouch ®
Operation
Pos: 15.6.43.1 /Layout bis 2014-11-11/Online-Dokumentation (+KNX)/Überschriften (--> Für alle Dokumente <--)/3. Ebene/G - L/IR-Fernbedienung @ 34\mod_1361800213833_15.docx @ 283472 @ 3 @ 1
5.4.13
IR remote control
Pos: 15.6.43.2 /Layout bis 2014-11-11/Online-Dokumentation (+KNX)/Bedienung/KNX/KNX-Aktorik/ComfortPanel 3.0/Bedienungsanleitung/Erläuterung der Funktionen/IR-FernbedienungIR-Fernbedienung @ 40\mod_1418733370592_15.docx @ 309801 @ @ 1
The Busch-ComfortTouch® can be controlled via an RC5 or B&O capable remote control. To do this, the functions
®
of the Busch-ComfortTouch are assigned to the buttons of the IR remote control. For this the available IR
functions are predefined in the Busch-ComfortTouch® by the electrical installer with the aid of the project
planning software. Programming of a new IR remote control is also possible on the device later.
1.
Press the "IR remote control" icon in the navigation bar to access the function.
The functions suitable for the IR remote control are described on the left.
2.
Press an entry in the list and then "Programming" to assign this function to the remote control.
A time of 5 seconds runs down.
3.
To occupy the button with the respective function, press a button on the IR remote control during this time.
®
Point the remote controlg in the direction of the Busch-ComfortTouch during this time. When this process is
successful, a tick appears in "Assigned".
4.
Select an entry from the list.
The assignment can also be deleted at any time.
5.
Then press "Reset".
When this process is successful, the tick is removed from "Assigned".
Pos: 15.6.44 /Layout bis 2014-11-11/Online-Dokumentation (+KNX)/Steuermodule - Online-Dokumentation (--> Für alle Dokumente <--)/++++++++++++ Seitenumbruch ++++++++++++ @ 9\mod_1268898668093_0.docx @ 52149 @ @ 1
Operating Instructions | 1473-1-8041
— 72 —
Operating Instructions
Busch-ComfortTouch ®
Operation
Pos: 15.6.45.1 /Layout bis 2014-11-11/Online-Dokumentation (+KNX)/Überschriften (--> Für alle Dokumente <--)/3. Ebene/S - T/Szeneneditor @ 34\mod_1361800300396_15.docx @ 283489 @ 3 @ 1
5.4.14
Scene editor
Pos: 15.6.45.2 /Layout bis 2014-11-11/Online-Dokumentation (+KNX)/Bedienung/KNX/KNX-Aktorik/ComfortPanel 3.0/Bedienungsanleitung/Erläuterung der Funktionen/SzeneneditorSzeneneditor @ 40\mod_1418733840545_15.docx @ 309817 @ @ 1
The "Scene editor" function offers the user the option of changing scenes and sequences which have been
created in the project planning software ("Standard scenes").
The end user can also change so-called "Special scenes" that have been permanently assigned to an application
page or a software module (e.g. alarm clock scenes).
Note
In the "Scene editor" on the Busch-ComfortTouch® the user cannot create new scenes. This is
only possible with the scene editor in the project planning software.
Press the "Scenes and sequences" icon in the navigation bar to access the function. The function can also be
opened via other functions that operate with scenes. Here the editing function then opens directly (see the
directions of use in the following).
The overview shows the available categories of corresponding scenes and sequences.
1.
Select a category .
The overview shows the scenes and sequences that can be played. The scene can be activated / deactivated
by inserting a tick. Additionally, the status of the scenes and the remaining times are displayed here after they
are started.
Operating Instructions | 1473-1-8041
— 73 —
Operating Instructions
Busch-ComfortTouch ®
2.
Operation
Select an entry (scene) to edit it.
The scene can now be started with the aid of the control element (see section "Control elements").
3.
Press "Scene editor" to adjust the scene. Select an entry for this.
The overview shows components (functions) of the selected scene or the sequence. These components can
be changed to a limited extent.
The adjustments that can be made are shown on the right.
4.
Press the following icon to enable you to make adjustments for the entire scene.
Note
If the start time is changed, all the following scenes adjust their start times automatically.
5.
In this view you can delete individual functions.
Operating Instructions | 1473-1-8041
— 74 —
Operating Instructions
Busch-ComfortTouch ®
6.
Operation
For this, select the function and press the cross. Press the following icon to confirm the adjustment.
All functions can also be deleted. In addition, the sequence can be changed with the arrows.
With the right arrow icon you go back.
7.
Additional components (functions) can also be added. Press "Insert function". Set a tick at the desired
function and press the following icon to confirm the adjustment.
With the right top arrow icon you go back.
On the scene overview page the adjustments must then be programmed.
8.
To do this, press "Programming". The scene can then be played (sequence, see the figure above).
Pos: 15.6.46 /Layout bis 2014-11-11/Online-Dokumentation (+KNX)/Steuermodule - Online-Dokumentation (--> Für alle Dokumente <--)/++++++++++++ Seitenumbruch ++++++++++++ @ 9\mod_1268898668093_0.docx @ 52149 @ @ 1
Operating Instructions | 1473-1-8041
— 75 —
Operating Instructions
Busch-ComfortTouch ®
Operation
Pos: 15.6.47.1 /Layout bis 2014-11-11/Online-Dokumentation (+KNX)/Überschriften (--> Für alle Dokumente <--)/3. Ebene/P - R/Raumtemperaturregler @ 34\mod_1361800385603_15.docx @ 283515 @ 3 @ 1
5.4.15
Room temperature controller
The Busch-ComfortTouch® includes a local room temperature controller in the device.
Further, the temperature of various rooms can be controlled centrally by the device, i.e. only one actual
temperature needs to be available from the various rooms (e.g. an external temperature sensor) and the Busch®
ComfortTouch can then control the temperature.
Pos: 15.6.47.2 /Layout bis 2014-11-11/Online-Dokumentation (+KNX)/Bedienung/KNX/KNX-Aktorik/ComfortPanel 3.0/Bedienungsanleitung/Erläuterung der Funktionen/RaumtemperaturreglerRaumtemperaturregler @ 40\mod_1418734375691_15.docx @ 309833 @ @ 1
Note
The local room temperature controller on the Busch-ComfortTouch® is opened via the status bar
[1].
An external room temperature controller [2] is opened via the control element.
When the comfort mode has been activated, the status bar indicates the actual or set-point
temperature of the room. Also the set operating mode of the local room temperature controller is
displayed via different icons. Pressing on the temperature opens the page of the local room
temperature controller.
The control element of an external room temperature controller can, for example, display the actual
or set-point temperature of the room, which is regulated by the external room temperature
controller.
The control element can also display the actual operating mode and the mode (e.g. heating). With
a press on the control element the external room temperature controller opens.
The operating window is identical for both room temperature controllers!
Operating Instructions | 1473-1-8041
— 76 —
Operating Instructions
Busch-ComfortTouch ®
Operation
The following figure shows an example of the an overview of the control and display elements of the room
temperature controller (elements are available or not according to the setting in the project planning software of
®
the Busch-ComfortTouch ).
Fig. 8:
Overview of the control and display elements of the room temperature controller
1 Operating modes | 2 Set set-point temperature | 3 Operating buttons | 4 Display of modes |
5 Display of availability of additional operating modes
Operating modes
Description
The room temperature controller is deactivated
Presence (comfort temperature: the residents are at home)
Absent (eco mode, cost-saving temperature: the residents are not
at home).
Frost protection is activated!
The icons appear also in the status bar or the control element.
Mode display
Mode display
Description
Heating mode.
Cooling mode.
Fan mode
Operating Instructions | 1473-1-8041
— 77 —
Operating Instructions
Busch-ComfortTouch ®
Operation
Fan setting
The fan setting is a "Step switch". The fan setting can be switched up or down via the buttons. Also the step
currently switched is displayed.
Operation
The modes and settings are visually highlighted by means of a colour system.
Some typical applications are shown in the following.
-
Heating mode active:
Star heating mode since the actual temperature is lower that the set-point temperature.
–
Cooling mode active:
Start cooling mode since the actual temperature is higher than the set-point temperature.
–
Manual adjustment.
The set-point temperatures can also be adjusted manually. Simply press the buttons.
Operating Instructions | 1473-1-8041
— 78 —
Operating Instructions
Busch-ComfortTouch ®
Operation
–
Eco mode:
The eco mode is indicated by means of a green leaf. Additional settings cannot be made. The settings are
®
made via the project planning software of the Busch-ComfortTouch . Here it can also be specified that a
manual adjustment is admissible!
-
Only fan operation:
Here only the fan system can be operated (for a description, see page 78 "Fan setting").
-
The room temperature controller is deactivated
No settings can be made. To reactivate the room temperature controller, a different operating mode must be
selected.
Operating Instructions | 1473-1-8041
— 79 —
Operating Instructions
Busch-ComfortTouch ®
Operation
RGB control
RGB control elements can be used to define specific settings for related bulbs (LEDs, Philips Hue, etc.). For
example, the colours can be switched or the amount of warm white can be adjusted.
The control of a lamp via the RGB control is to be shown by means of an example. Here it should be noted that
the functions which can be called up can vary slightly according to the type of lamp and the default settings in the
commissioning software (which your electrician will appropriately configure). There are lamps without a colour
component, for example. In this case there is only one white control. Which control is possible is indicated in the
control element (in the example: RGB + W, equals colour and white control).
1.
Switching the lamp on and off
The lamps are switched on and off by pressing the control element. The icon changes according to the status.
2.
White and colour control
The controllers are called up by pressing the arrow. Then the colour or white control can be selected by
pressing one of the two buttons at the top left.
•
Colour control
Controller 1 = Brightness (display in %)
Controller 2 = Colour
Controller 3 = Colour saturation
The lamp icon changes according to the setting. This is then also indicated in the control element.
The settings must be confirmed with OK.
Operating Instructions | 1473-1-8041
— 80 —
Operating Instructions
Busch-ComfortTouch ®
•
Operation
White control
Controller 1 = Brightness (display in %)
Controller 2 = Colour temperature
The lamp icon changes according to the setting. This is then also indicated in the control element.
The settings must be confirmed with OK.
3.
Preset adjustment
First the lamp must be set as desired. Then the lamp is switched on. This is followed by a long press on the
control element. This saves this lamp setting as a preset. Now the preset is called up at every activation (brief
press). This process must be repeated for each adjustment.
Philips Hue control (only via plug-in)
Philips Hue control elements can be used to define specific settings for Philips Hue lamps. For example, the
colours can be switched or the amount of warm white can be adjusted.
Note
This function is an option and only available with a corresponding plug-in. More detailed
information is available from your electrical installer. He will also carry out the commissioning
process with the aid of the commissioning software.
Control normally takes place using an RGB control element. That is why the explanations for the RGB control
elements in the previous chapters can also be used here.
Note
In contrast to normal KNX actuators, the response of Philips Hue lamps is slightly delayed. They
react generally a little later than the KNX dimming actuator, for example. This is system-dependent
and normal. Since it is a Philips product we have no influence over the matter.
Note
Adjustments to the commissioning of Philips Hue lamps can also be made via the system settings
(see also chapter 5.4.18 "System settings"). The settings can be made under "Philips Hue Bridge
Settings".
Pos: 15.6.48 /Layout bis 2014-11-11/Online-Dokumentation (+KNX)/Steuermodule - Online-Dokumentation (--> Für alle Dokumente <--)/++++++++++++ Seitenumbruch ++++++++++++ @ 9\mod_1268898668093_0.docx @ 52149 @ @ 1
Operating Instructions | 1473-1-8041
— 81 —
Operating Instructions
Busch-ComfortTouch ®
Operation
Pos: 15.6.49.1 /Layout bis 2014-11-11/Online-Dokumentation (+KNX)/Überschriften (--> Für alle Dokumente <--)/3. Ebene/A - F/Datum- und Zeiteinstellungen @ 34\mod_1361800449937_15.docx @ 283531 @ 3 @ 1
5.4.16
Date and time settings
Pos: 15.6.49.2 /Layout bis 2014-11-11/Online-Dokumentation (+KNX)/Bedienung/KNX/KNX-Aktorik/ComfortPanel 3.0/Bedienungsanleitung/Erläuterung der Funktionen/Datum- und Zeiteinstellungen/Datum- und Zeiteinstellungen @ 34\mod_1361793692586_15.docx @ 282299 @ @ 1
Set date
The current date is displayed in the status bar.
1.
Press on the date.
An option opens.
2.
Here select the "Date setting".
Additional date-relevant functions are available for selection depending on the activation.
3.
Select the date format. Press the arrow to open an options list.
4.
Press an entry here.
5.
Set the date.
6.
Touch the day, the month or the year.
The setting is made via -/+.
7.
Press the "Save" button.
Operating Instructions | 1473-1-8041
— 82 —
Operating Instructions
Busch-ComfortTouch ®
Operation
Set time
The current time is displayed in the status bar.
1.
Press the time.
An option opens.
2.
Here select the "Time setting".
Additional time-relevant functions (alarm clock and timer) are available for selection depending on the
activation.
3.
Select the date format. Press the arrow to open an options list.
4.
Press an entry here.
5.
Set the time.
6.
Touch the hours or minutes or the seconds.
The setting is made via -/+.
7.
Press the "Save" button.
Pos: 15.6.50 /Layout bis 2014-11-11/Online-Dokumentation (+KNX)/Steuermodule - Online-Dokumentation (--> Für alle Dokumente <--)/++++++++++++ Seitenumbruch ++++++++++++ @ 9\mod_1268898668093_0.docx @ 52149 @ @ 1
Operating Instructions | 1473-1-8041
— 83 —
Operating Instructions
Busch-ComfortTouch ®
Operation
Pos: 15.6.51.1 /Layout bis 2014-11-11/Online-Dokumentation (+KNX)/Überschriften (--> Für alle Dokumente <--)/3. Ebene/G - L/Import und Export von Dateien @ 34\mod_1361800522144_15.docx @ 283546 @ 3 @ 1
5.4.17
Import and export of files
Pos: 15.6.51.2 /Layout bis 2014-11-11/Online-Dokumentation (+KNX)/Bedienung/KNX/KNX-Aktorik/ComfortPanel 3.0/Bedienungsanleitung/Erläuterung der Funktionen/Import und Export von DateienImport und Export von Dateien @ 40\mod_1418739108714_15.docx @ 309951 @ @ 1
The Busch-ComfortTouch® contains a simple import and export function for files.
This can be used to import project and firmware files as well as export existing project files.
An export of the project file is especially practical prior to carrying out a firmware update.
This function is started via "System" -> "Import / Export". The export function is described in the following.
1.
Select the storage medium on which the file is to be saved.
2.
Select the directory on the storage medium.
3.
Press the "Save" button.
Pos: 15.6.52 /Layout bis 2014-11-11/Online-Dokumentation (+KNX)/Steuermodule - Online-Dokumentation (--> Für alle Dokumente <--)/++++++++++++ Seitenumbruch ++++++++++++ @ 9\mod_1268898668093_0.docx @ 52149 @ @ 1
Operating Instructions | 1473-1-8041
— 84 —
Operating Instructions
Busch-ComfortTouch ®
Operation
Pos: 15.6.53.1 /Layout bis 2014-11-11/Online-Dokumentation (+KNX)/Überschriften (--> Für alle Dokumente <--)/3. Ebene/S - T/Systemeinstellungen @ 34\mod_1361800598757_15.docx @ 283563 @ 3 @ 1
5.4.18
System settings
Pos: 15.6.53.2 /Layout bis 2014-11-11/Online-Dokumentation (+KNX)/Bedienung/KNX/KNX-Aktorik/ComfortPanel 3.0/Bedienungsanleitung/Erläuterung der Funktionen/Systemeinstellungen/Systemeinstellungen @ 34\mod_1361793678986_15.docx @ 282267 @ @ 1
Some system settings can also be made directly on the Busch-ComfortTouch®. They are called up via the
®
"System" icon in the navigation bar of the Busch-ComfortTouch .
The following system settings are possible (depending on the project planning status, additional settings are
available):
System settings
Description
Date and time
Formats, date, time and time zones.
Screen
Screen brightness.
Network settings
Network type, IP settings and WLAN network.
Settings on the Busch-
Basic settings (separators, first day of the week)
ComfortTouch®
Camera setting (Attention: This settings is made by the electrical installer)
Dialog settings (signal tones and messages)
Temperature settings (temperature unit and internal temperature offset)
User settings (system language, user language, tone when pressing a button, ....)
Screen saver
Running time "Start saver", running time "Monitor off", effects, interval change and order
Modification of system settings
1.
Select a category .
2.
Then select the desired entry (or first the sub-list and then the entry).
3.
Make the settings on the right-hand side.
4.
Press the "Save" button.
Pos: 15.6.55.1 /Layout bis 2014-11-11/Online-Dokumentation (+KNX)/Überschriften (--> Für alle Dokumente <--)/3. Ebene/G - L/Geräteinformationen @ 34\mod_1361800674962_15.docx @ 283578 @ 3 @ 1
5.4.19
Device information
Pos: 15.6.55.2 /Layout bis 2014-11-11/Online-Dokumentation (+KNX)/Bedienung/KNX/KNX-Aktorik/ComfortPanel 3.0/Bedienungsanleitung/Erläuterung der Funktionen/GeräteinformationenGeräteinformationen @ 40\mod_1418739790017_15.docx @ 309967 @ @ 1
Important information about the device is available in the Busch-ComfortTouch® via "System" -> "Device
information". This includes the IP address, the MAC address and the contact details of the fitter.
Pos: 16 /Layout bis 2014-11-11/Modul-Struktur/Online-Dokumentation/Steuermodule - Online-Dokumentation (--> Für alle Dokumente <--)/++++++++++++ Seitenumbruch ++++++++++++ @ 9\mod_1268898668093_0.docx @ 52149 @ @ 1
Operating Instructions | 1473-1-8041
— 85 —
Operating Instructions
Busch-ComfortTouch ®
Cleaning
Pos: 17.1 /Layout bis 2014-11-11/Online-Dokumentation (+KNX)/Überschriften (--> Für alle Dokumente <--)/1. Ebene/P - R/Reinigung @ 21\mod_1328188565860_15.docx @ 138239 @ 1 @ 1
6
Cleaning
Pos: 17.2 /Layout bis 2014-11-11/Online-Dokumentation (+KNX)/Reinigung/KNX/KNX-Aktorik/ComfortPanel 3.0/BedienungsanleitungReinigung @ 40\mod_1418740102503_15.docx @ 309983 @ @ 1
Dirty units can be cleaned with a slightly moistened cloth. If this is insufficient, the cloth can be moistened also
with a soap solution.
Caution
Incorrect cleaning can damage the device!
Incorrect cleaning agents can cause permanent damage to the surface of the device.
Never use caustic cleaning agents or solvents.
Note
"Cleaning blockage"
To ensure that no functions is triggered unintentionally when cleaning the Busch-ComfortTouch®,
the control elements can be blocked for a certain period.
The cleaning blockage is activated with a long press of the start button. It is
automatically deactivated after 30 seconds.
=== Ende der Liste für Textmarke Content ===
Operating Instructions | 1473-1-8041
— 86 —
Operating Instructions
Busch-ComfortTouch ®
A member of the ABB Group
Notice
We reserve the right to at all times make
Busch-Jaeger Elektro GmbH
PO box
58505 Lüdenscheid
Freisenbergstraße 2
58513 Lüdenscheid
Germany
www.BUSCH-JAEGER.de
[email protected]
Central sales service:
Phone:
+49 (0) 2351 956-1600
Fax:
+49 (0) 2351 956-1700
technical changes as well as changes to the
contents of this document without prior notice.
The detailed specifications agreed to at the time
of ordering apply to all orders. ABB accepts no
responsibility for possible errors or
incompleteness in this document.
We reserve all rights to this document and the
topics and illustrations contained therein. The
document and its contents, or extracts thereof,
must not be reproduced, transmitted or reused by
third parties without prior written consent by ABB.
Copyright© 2015 Busch-Jaeger Elektro GmbH
All rights reserved
=== Ende der Liste für Textmarke Backcover ===
1473-1-8041 | 19.12.2014
Pos: 19 /Layout bis 2014-11-11/Online-Dokumentation (+KNX)/Rückseiten (--> Für alle Dokumente <--)/Rückseite - BJE-Variante @ 32\mod_1357201421897_15.docx @ 262132 @ @ 1