1
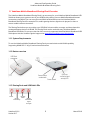
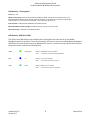
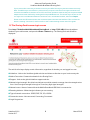
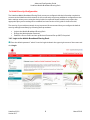
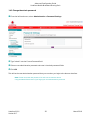
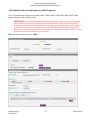
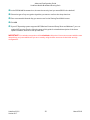
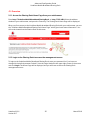
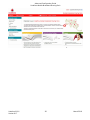
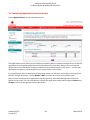
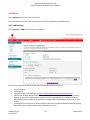
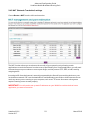
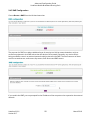
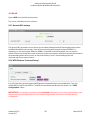
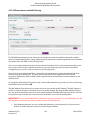
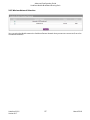
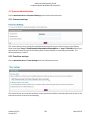
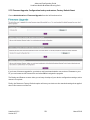
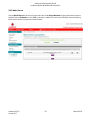
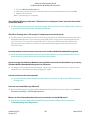
Advanced Configuration Guide Vodafone Mobile Broadband Sharing Dock Vodafone R101 Advanced Configuration Guide Vodafone Mobile Broadband Sharing Dock Table of Contents Welcome................................................................................................................................. 3 1. Getting Started – Initial Connection and Security Settings ...................................................... 4 1.1 Vodafone Mobile Broadband Sharing Dock Overview...................................................................... 5 1.1.1 System Requirements............................................................................................................. 5 1.1.2 Device overview ...................................................................................................................... 5 1.1.3 Sharing Dock and USB Stick LEDs ............................................................................................ 5 1.2 Initial Connection .......................................................................................................................... 7 1.3 The Sharing Dock browser login screen.......................................................................................... 8 1.4 Initial Security Configuration.......................................................................................................... 9 1.4.1 Login to the Mobile Broadband Sharing Dock .......................................................................... 9 1.4.2 Change the admin password ................................................................................................. 10 1.4.3 Establish a Secure Profile and set up WPS if required ............................................................. 11 1.4.4 WPS Configuration ................................................................................................................ 13 2. Vodafone Mobile Broadband Sharing Dock Browser Interface ...............................................14 2.1 Overview...................................................................................................................................... 15 2.1.1 Access the Sharing Dock Home Page from your web browser................................................ 15 2.1.2 Login to the Sharing Dock to access the management menus .............................................. 15 2.2 Service Status .............................................................................................................................. 17 2.3 Configuring Applications Internet Access..................................................................................... 18 2.4 Router ......................................................................................................................................... 19 2.4.1 LAN Settings ......................................................................................................................... 19 2.4.2 NAT (Network Translation) settings ...................................................................................... 21 2.4.3 DMZ Configuration................................................................................................................ 22 2.5 WLAN........................................................................................................................................... 23 2.5.1 General WiFi settings............................................................................................................. 23 2.5.2 WPS (Wireless Protected Setup)............................................................................................. 23 2.5.3 SSID parameters and MAC filtering ........................................................................................ 24 2.6 Mobile Broadband Settings .......................................................................................................... 25 2.6.1 SIM PIN Management & Mobile Broadband Connection Settings ........................................... 25 2.6.2 Wireless Network Selection................................................................................................... 27 2.7 Systems Administration ............................................................................................................... 28 2.7.1 Password settings ................................................................................................................. 28 2.7.2 Time Zone settings ............................................................................................................... 28 2.7.3 Firmware Upgrade, Configuration backup and restore, Factory Default Reset ........................ 29 2.8 Home Network ............................................................................................................................ 30 2.8.1 Connected Equipment .......................................................................................................... 30 2.8.2 External Storage Management .............................................................................................. 30 2.8.3 Media Server ......................................................................................................................... 31 3. Troubleshooting ................................................................................................................32 3.1 Overview...................................................................................................................................... 33 3.2 The Box Diagnostics Screen ......................................................................................................... 34 3.3 Common Problems and Solutions................................................................................................ 35 3.3 Using the Master Reset Button..................................................................................................... 39 4. Glossary ............................................................................................................................40 Vodafone R101 Version 0.17 2 March 2010 Advanced Configuration Guide Vodafone Mobile Broadband Sharing Dock Welcome This Advanced Configuration Guide outlines the steps necessary to install and configure your Vodafone Mobile Broadband Sharing Dock and how to use the browser interface. This guide is separated into 4 chapters: Getting Started – Initial Setup and Security Settings The Vodafone Mobile Broadband Sharing Dock Browser Interface Troubleshooting Glossary Please save this Advanced Configuration Guide to your computer’s hard drive for future reference. © Vodafone Group 2010, VODAFONE, the Vodafone logos and Vodafone Mobile Connect are trade marks of the Vodafone Group. Microsoft and Windows are either registered trade marks or trade marks of Microsoft Corporation in the United States and/or other countries. Other product and company names mentioned herein may be the trade marks of their respective owners. Vodafone R101 Version 0.17 3 March 2010 Advanced Configuration Guide Vodafone Mobile Broadband Sharing Dock 1. Getting Started – Initial Connection and Security Settings - Vodafone Mobile Broadband Sharing Dock Overview - Initial Connection - The Sharing Dock Browser Login Screen - Initial Security Configuration Getting Started Vodafone R101 Version 0.17 4 March 2010 Advanced Configuration Guide Vodafone Mobile Broadband Sharing Dock 1.1 Vodafone Mobile Broadband Sharing Dock Overview The Vodafone Mobile Broadband Sharing Dock is an accessory for your Vodafone Mobile Broadband USB Stick that allows you to get more out of your USB Stick by sharing a secure Mobile Broadband internet connection using WLAN. You can connect most WLAN-enabled devices to the Vodafone Mobile Broadband Sharing Dock (for example PCs, mobile gaming devices, digital music players) to share a secure mobile internet connection. The Sharing Dock allows you to position your USB Stick for best mobile coverage, and then shares this coverage between devices via WLAN. The Sharing Dock can be used with many Vodafone Mobile Broadband USB Sticks. For an up-to-date list of the currently supported Vodafone Mobile Broadband USB Sticks please visit the Vodafone global support site www.support.vodafone.com/sharingdock . 1.1.1 System Requirements To use the Vodafone Mobile Broadband Sharing Dock you need a device with WLAN capability (supporting WLAN 802.11 b/g/n) and an internet browser. 1.1.2 Device overview 1.1.3 Sharing Dock and USB Stick LEDs Internet traffic Mobile WLAN Broadband connectivity signal strength Power Vodafone R101 Version 0.17 5 March 2010 Advanced Configuration Guide Vodafone Mobile Broadband Sharing Dock LED Activity - Sharing Dock Power: On / Off WLAN connectivity: Traffic between devices and Sharing Dock. The WLAN Connectivity LED on your Mobile Broadband Sharing Dock will flash when the WLAN is on and users are connected. It will be solid when WLAN is on but no users are connected. If it is not lit, then WLAN is off. Internet traffic: Traffic between USB Stick and mobile network Mobile Broadband signal strength: Excellent (3 bars) / Very good / Good (1 bar) Ethernet activity: LAN traffic via the Ethernet cable LED Activity - USB Stick LEDs The LEDs on the USB Stick provide valuable status information about the status of your Mobile Broadband network connection. These are the generic LED colours used on Vodafone Mobile Broadband USB Sticks, but some devices may have additional LED colours – please refer to the Quick Start Guide for the specific device used with the Sharing Dock. GREEN ■ GPRS/ EDGE Flashing: GPRS/EDGE service is available Solid: BLUE ■ 3G Flashing: 3G service is available Solid: CYAN ■ HSPA Connected to a network using 3G Flashing: HSPA service is available Solid: Vodafone R101 Version 0.17 Connected to a network using GPRS/EDGE Connected to a network using HSPA 6 March 2010 Advanced Configuration Guide Vodafone Mobile Broadband Sharing Dock 1.2 Initial Connection The Vodafone Mobile Broadband Sharing Dock comes pre-configured with the Access Point Number (APN) and other Vodafone network settings to allow you to use this device on the Vodafone network without complex configuration or set-up. Before you start : Make a note of your WLAN security details which include a WPA2 Key and a WLAN Network Name (SSID). The WPA2 Key and the SSID are unique to your device and can be found on a label on the bottom of the Sharing Dock. You have two connection options when doing the initial setup of the Vodafone Mobile Broadband Sharing Dock. Set up a connection to the Sharing Dock - WLAN Mode In WLAN mode you use the Vodafone Mobile Broadband Sharing Dock as an access point or hotspot. You use your PC’s WLAN capability to access the device. ➊ Use your normal WLAN manager on your computer to locate the Vodafone Mobile Broadband Sharing Dock wireless network. Note: The steps to connect to a WLAN network vary depending on your operating system and whether you use the native application or third-party software. Generally you click an icon (often in the System Tray for Windows or choose System Preferences > Network on a Mac) where you can select “View Available Wireless Networks.” If you are unfamiliar with wireless networking on your computer, consult the computer help system. Tip! If multiple wireless networks are found, highlight the one named VodafoneSharingDock_xxxxyy . The xxxxyy represent a randomly generated set of numbers and letters which will differ per device. ➋ Click Connect. Set up a connection to the Sharing Dock - Ethernet Cable connection In Ethernet Cable mode, you connect the Ethernet port on the back of the Vodafone Mobile Broadband Sharing Dock directly to a computer Ethernet port using a LAN cable provided with the Sharing Dock. You are using your PC’s LAN capability over the Ethernet Cable to access the device, and it will automatically establish a network connection. WARNING ! It is highly recommended that you set up security for your Vodafone Mobile Broadband Sharing Dock at this time. The device has WPA2 security enabled, but you may want to change the WPA2 network key and your device logon password with personalised settings. Note: if you are connected to the device over WLAN and find the hotspot redirects to the WEB UI (i.e. configuration page) instead of the page you expected when using the browser, this will be due to the fact that the device cannot connect the user to a mobile broadband network. Vodafone R101 Version 0.17 7 March 2010 Advanced Configuration Guide Vodafone Mobile Broadband Sharing Dock If you have trouble connecting to the device ensure your WPA2 security key has been entered correctly. Note: The WPA2 key is case sensitive - please ensure you input it with the correct upper and lower case characters. An additional common cause of PC connection problems could be that your computer’s WLAN adapter has become confused by working with multiple WLAN devices. The normal way to fix this on a PC is to right click on the Wireless Network Connection icon in the Windows toolbar, then select Repair. Please check the LED states and also the connected state in the web User Interface (UI) to confirm the device is showing “Connected”, and if not refer to the Troubleshooting section later in this guide. 1.3 The Sharing Dock browser login screen Enter http://VodafoneMobileBroadband.SharingDock or http://192.168.0.1 into the address window of your web browser, and press the Enter or Return key. The Sharing Dock web UI will be displayed. The web UI will always display certain information, regardless of whether you are logged in or not. ➊ Vodafone : Links to the Vodafone global web site and allows re-direction to your local country site. ➋ Add to Favourites : Creates a bookmark for the Sharing Dock. ➌ Support : Links to the global Vodafone support web site. ➍ Network signal strength : No white bars indicate no mobile network coverage, then the strength varies from 1 bar (low signal strength) through to 5 bars (very high signal strength). ➎ Network name : Name of network that the Mobile Broadband USB Stick is connected to. ➏ Roaming indicator : White triangle indicates you are roaming. ➐ Type of network connection : GPRS, EDGE, 3G, 3G+, HSUPA. ➑ Connection status :Not connected, Connecting, Connected. ➒ Login/Logout box. Vodafone R101 Version 0.17 8 March 2010 Advanced Configuration Guide Vodafone Mobile Broadband Sharing Dock 1.4 Initial Security Configuration The Vodafone Mobile Broadband Sharing Dock comes pre-configured with the information required to connect to the Vodafone mobile network. It will not normally require any additional configuration to the basic settings unless you are using the device behind a corporate firewall, and this may require the appropriate proxy server settings to be modified (see later section of this guide for how to do this). The security of your wireless network is very important. We recommend that you configure the default security settings immediately by following these procedures: Login to the Mobile Broadband Sharing Dock Change the Administration Password Establish a Secure Profile and set up Wireless Protected Set-up (WPS) if required 1.4.1 Login to the Mobile Broadband Sharing Dock ➊ Enter the default password “admin” into the Login window in the upper right corner of the screen and click Login. Vodafone R101 Version 0.17 9 March 2010 Advanced Configuration Guide Vodafone Mobile Broadband Sharing Dock 1.4.2 Change the admin password ➊ From the left hand menu, select Administration > Password Settings. ➋ Type “admin” into the Current Password field. ➌ Select a new administration password and enter it into both password fields. ➍ Click OK. This will be the new administration password that you use when you login to the browser interface. Note: Please record the new password. You will have to reset the device using the Master Reset button if you forget your new administration password. NOTE: Vodafone R101 Version 0.17 10 March 2010 Advanced Configuration Guide Vodafone Mobile Broadband Sharing Dock 1.4.3 Establish a Secure Profile and set up WPS if required You can use advanced router security options: WEP / WPA / WPA2 / WPA (PSK) / WPA (PSK2) / MAC address filtering / NAT or WPS security. IMPORTANT: Your Vodafone Mobile Broadband Sharing Dock comes with a pre-set WPA2 key that is unique to the device and is listed on the label that can be found on the bottom of the Sharing Dock. If you want to change this key to something more memorable, you can change it by following the steps below. Vodafone recommend changing the WPA2 key to a secure key which can be easily remembered. Note: The WPA2 key is case sensitive - please ensure you input it with the correct upper and lower case characters. ➊ From the left hand menu, select WiFi. Vodafone R101 Version 0.17 11 March 2010 Advanced Configuration Guide Vodafone Mobile Broadband Sharing Dock ➋ In the SSID WLAN Parameters box, choose the security level you want (WPA2 is the default). ➌ Select the type of key encryption algorithm you want to use from the drop-down box ➍ Enter a memorable Network Key you want to use for the Sharing Dock WLAN access. ➎ Click OK. ➏ If your PC Operating system supports WPS (Wireless Protected Setup) Vista and Windows 7 you can enable WPS security (See the following page of this guide for a detailed description of the three options available, and how to set up each one). IMPORTANT: Your wireless connection will be disabled at this point. You must reconnect with the new network key you just established if you are currently using wireless access to do the initial security configuration. Vodafone R101 Version 0.17 12 March 2010 Advanced Configuration Guide Vodafone Mobile Broadband Sharing Dock 1.4.4 WPS Configuration Wireless Protected Setup (WPS) allows a user to establish a WLAN connection easily between the Vodafone Mobile Broadband Sharing Dock and any device that supports WPS. Windows 7 and Windows Vista offer support for WPS natively, with Windows XP only offering support for WPS if the “Wireless Provisioning Services Information Element (WPS IE)” Update has been installed. WPS functionality is enabled by default. The Vodafone Mobile Broadband Sharing Dock supports the following three methods for enabling WLANDevices to obtain the Sharing Dock WLAN security details via WPS. 1. Push Button Configuration (PBC) method ➊ Make sure the WPS function has been enabled in the Mobile Broadband Sharing Dock ➋ On the WLAN device (eg PC), select the WLAN access utility which includes WPS support (provided by PC vendor) and select the PBC method. Follow the instruction in your WLAN utility. ➌ Push the WPS button on the Mobile Broadband Sharing Dock and the WiFi LED will begin blinking. When the WiFi LED is blinking the WPS button does not need to be pressed again. ➍ If the WPS functionality is working correctly the WiFi LED will stop blinking and will display solid red. 2. PIN-Enter Configuration method ➊ Make sure the WPS function has been enabled in the Mobile Broadband Sharing Dock ➋ On the WLAN device (eg PC), select the WLAN access utility which includes WPS support (provided by PC vendor) and select the PIN method if appropriate. An eight digit number will be generated. ➌ From the left hand menu of the Mobile Broadband Sharing Dock, select WLAN. On the WPS screen enter the 8 digit PIN number obtained from the PC’s WPS utility into the WPS-PIN field of the Sharing Dock web UI and click "Start" button to activate PIN method. ➍ If the WPS functionality is working correctly the WPS LED will change to green. 3. PIN for External Registrar method ➊ If an external registrar is available, you can use the Mobile Broadband Sharing Dock’s PIN within the external registrar. ➋ From the left hand menu of the Mobile Broadband Sharing Dock, select WLAN. On the WPS screen select "Generate" and generate a new PIN or click "Default" to reset the PIN to factory default. ➌ Enter this PIN into the external registrar. Vodafone R101 Version 0.17 13 March 2010 Advanced Configuration Guide Vodafone Mobile Broadband Sharing Dock 2. Vodafone Mobile Broadband Sharing Dock Browser Interface - Overview Service Status Configuring Applications Internet Access Router WLAN Mobile Broadband Settings System Administration Home Network Using File Sharing Vodafone R101 Version 0.17 14 March 2010 Advanced Configuration Guide Vodafone Mobile Broadband Sharing Dock 2.1 Overview 2.1.1 Access the Sharing Dock Home Page from your web browser Enter http://VodafoneMobileBroadband.SharingDock or http://192.168.0.1 into the address window of your web browser, and press the Enter key. The Sharing Dock Home Page will be displayed. When you first connect to the Vodafone Mobile broadband Sharing Dock with your web browser, you see the “Vodafone Mobile Broadband Sharing Dock Home Page” which gives basic status information. You will not be logged into the Sharing Dock at this stage. 2.1.2 Login to the Sharing Dock to access the management menus To login to the Vodafone Mobile Broadband Sharing Dock, enter your password (or if you have not changed it, the default password “admin”) into the Login window in the upper right corner of the screen and click Login. The Home Page will be displayed, and you will have access to the Sharing Dock management menus. Vodafone R101 Version 0.17 15 March 2010 Advanced Configuration Guide Vodafone Mobile Broadband Sharing Dock Vodafone R101 Version 0.17 16 March 2010 Advanced Configuration Guide Vodafone Mobile Broadband Sharing Dock 2.2 Service Status Choose Service Status from the left hand menu bar. The Service Status screen allows you to understand the overall status of the device, when used in conjunction with the information on the Troubleshooting screen on the left hand menu bar. The screen is divided into 2 parts : The top part of the screen displays the status of the WLAN network provided by the Vodafone Mobile Broadband Sharing Dock (enabled/disabled). The lower part of the screen displays the status of the connection to the wireless network made by the Vodafone Mobile Broadband USB Stick. Vodafone R101 Version 0.17 17 March 2010 Advanced Configuration Guide Vodafone Mobile Broadband Sharing Dock 2.3 Configuring Applications Internet Access Choose Applications from the left hand menu bar. The Applications screen allows you to configure the Sharing Dock to authorise network access to specific applications (usually gaming applications) to allow them to work correctly. Many of the most popular games and access methods are already included in the drop-down menus on this screen – consult your application user guide to see what options you should select on this screen. If your application does not appear on the drop-down menu you can add it and configure it manually on the NAT configuration page – choose Router > NAT to access this manual configuration page. After you have configured your applications they will appear in the authorised applications list at the bottom of the screen. You can now delete or change the application authorisation using the Delete and Change buttons on the right hand side of the screen. Vodafone R101 Version 0.17 18 March 2010 Advanced Configuration Guide Vodafone Mobile Broadband Sharing Dock 2.4 Router Choose Router from the left hand menu bar. There are three sub-menus: LAN configuration, NAT/PAT management and DMZ setup. 2.4.1 LAN Settings Choose Router > LAN from the left hand menu bar. The LAN screen gives you the following status information about your device: Local IP Address Subnet Mask LAN domain name (default value is http://VodafoneMobileBroadband.SharingDock) DHCP server enable/disable. DHCP Server allows the device to automatically assign a local IP address to a new device joining your network (such as a wireless printer or additional laptop). Without DHCP Server enabled, you will have to assign static IP addresses to all devices on your network. IP Address Range and Lease. IP Address Range used by the Vodafone Mobile Broadband Sharing Dock DHCP server, and the time of each lease (default 1 day). Vodafone R101 Version 0.17 19 March 2010 Advanced Configuration Guide Vodafone Mobile Broadband Sharing Dock Reserved IP Addresses. Specific IP Addresses that are manually assigned to a specific device and that should not be assigned by the DHCP server. Vodafone R101 Version 0.17 20 March 2010 Advanced Configuration Guide Vodafone Mobile Broadband Sharing Dock 2.4.2 NAT (Network Translation) settings Choose Router > NAT from the left hand menu bar. The NAT function allows you to enhance the security of your system by only allowing certain applications to reach the Internet. In order to set up port filtering for a custom application, you will need to know the source port numbers or source port ranges, and the protocol (TCP, UDP, or both) used by outgoing traffic. Incoming traffic from the Internet is normally prevented by the firewall from reaching devices on your local wireless network. PAT uses the destination IP and destination port fields to allow Internet users to reach any server you are running on your computer, such as an FTP server. Also some online games require incoming access to work properly. IMPORTANT: You will need to set up static IP addresses on your WLAN for each device that has an application you want to forward to. Vodafone R101 Version 0.17 21 March 2010 Advanced Configuration Guide Vodafone Mobile Broadband Sharing Dock 2.4.3 DMZ Configuration Choose Router > DMZ from the left hand menu bar. The purpose of a DMZ is to add an additional layer of security to a LAN; an external attacker only has access to equipment in the DMZ, rather than the whole of the network. Generally, any service that is being provided to users in an external network could be placed in the DMZ. The most common of these services are web servers, mail servers, ftp servers, VoIP servers and DNS servers. If you enable the DMZ, you are prompted for the IP address of the computer to be exposed to the external network. Vodafone R101 Version 0.17 22 March 2010 Advanced Configuration Guide Vodafone Mobile Broadband Sharing Dock 2.5 WLAN Choose WiFi from the left hand menu bar. The screen is divided into three sections: 2.5.1 General WiFi settings The general WiFi parameters screen allows you to enable/disable the WLAN functionality and to select the WLAN Bandwidth and channels. If the devices accessing the Sharing Dock have IEEE 802.11n capability you can select either 20MHz or 40MHz (2 bonded) channel bandwidth. You can select a specific channel for the WLAN in order to prevent conflict or contention with other wireless devices which are transmitting within the local area, or leave the setting at “auto” and the Sharing Dock will automatically choose a free channel. 2.5.2 WPS (Wireless Protected Setup) If your PC Operating system supports WPS (Wireless Protected Setup) Vista and Windows 7 you can enable WPS security in the WPS box. The WPS set up methods are described in Section 1.4.4 “WPS Configuration” above. IMPORTANT: Your wireless connection will be disabled at this point. You must reconnect with the new network key you just established if you are currently using wireless access to do the initial security configuration. Vodafone R101 Version 0.17 23 March 2010 Advanced Configuration Guide Vodafone Mobile Broadband Sharing Dock 2.5.3 SSID parameters and MAC filtering The SSID WLAN parameters screen allows you to change the name of the WLAN network (the default name is VodafoneSharingDock_xxxxyy where the xxxxyy represents a randomly generated set of numbers and letters which will differ for each Sharing Dock). You can also select whether the name of the network is broadcast (if it is not broadcast then other users will not see it on their list of available networks, but you will need to specify the name on the WLAN configuration for your PC in order to connect to the Sharing Dock). Several levels of security are available – the default is the highest level of generally available wireless security encryption (WPA2-PSK). The Auto option means device will support both TKIP and AES encryption algorithms in WPA or WPA2, and the algorithm that will actually be used will depend on the wireless client. To change the Network Key (Password), enter a memorable Network Key you want to use for the Sharing Dock WLAN access and select OK. The MAC Address Filter allows you to restrict access to your device by MAC address. The MAC address is specific to a particular piece of hardware such as a network adapter. By using the MAC Address Filtering you only allow certain devices access to your Vodafone Mobile Broadband Sharing Dock device. If the list is empty then any client with the correct security credentials can access the Sharing Dock. IMPORTANT: Do not enable MAC Address Filtering unless you have added your own MAC address to the MAC address list, otherwise you will be unable to access the Sharing Dock. On a Windows computer, you can find the MAC address by running ipconfig /all from the cmd window. The MAC address is referred to as the Physical Address. Vodafone R101 Version 0.17 24 March 2010 Advanced Configuration Guide Vodafone Mobile Broadband Sharing Dock On a Mac, open System Preferences > Network. Select Airport in the Show: drop down list. The MAC address is the Airport ID that displays underneath. 2.6 Mobile Broadband Settings Choose Mobile Broadband from the left hand menu bar. The Vodafone Mobile Broadband Sharing Dock will be automatically set up based on the settings in your Vodafone SIM. This screen allows you to modify these settings if required for your own specific circumstances. This screen also provides connectivity status and connection statistics. 2.6.1 SIM PIN Management & Mobile Broadband Connection Settings Some networks require a SIM PIN to be entered before access to the network is allowed. If your network is one of these you can store the SIM PIN here, and it will be sent to the network automatically when required. Standard Vodafone connectivity information will be automatically based on your SIM, but you can modify the settings in this screen. Vodafone R101 Version 0.17 25 March 2010 Advanced Configuration Guide Vodafone Mobile Broadband Sharing Dock Vodafone R101 Version 0.17 26 March 2010 Advanced Configuration Guide Vodafone Mobile Broadband Sharing Dock 2.6.2 Wireless Network Selection You can select the Mobile network or Vodafone Partner Network that you want to connect to (from a list of enabled networks). Vodafone R101 Version 0.17 27 March 2010 Advanced Configuration Guide Vodafone Mobile Broadband Sharing Dock 2.7 Systems Administration Choose Administration > Password Settings from the left hand menu bar. 2.7.1 Password settings This screen allows you to change the administration password that you need to enter on the Sharing Dock Home Page (http://VodafoneMobileBroadband.SharingDock or http://192.168.0.1 from your web browser) in order to login to the Sharing Dock. Please change it to something memorable. The default password is “admin”. 2.7.2 Time Zone settings Choose Administration > Time Settings from the left hand menu bar. The screen allows you to set the local time, and to synchronize with an external public time server on the internet to ensure accurate record-keeping. Vodafone R101 Version 0.17 28 March 2010 Advanced Configuration Guide Vodafone Mobile Broadband Sharing Dock 2.7.3 Firmware Upgrade, Configuration backup and restore, Factory Default Reset Choose Administration > Firmware Upgrade from the left hand menu bar. If you have a firmware upgrade for your device, and have downloaded a new version of firmware to your PC you can browse to the firmware file and select OK to instigate the upgrade. The Backup and Restore screens allow you to keep a backup of your device configuration settings, and to restore it if required. Finally, the Restore to Factory Defaults option will reset your device to the standard settings that applied when it first came out of the box. Vodafone R101 Version 0.17 29 March 2010 Advanced Configuration Guide Vodafone Mobile Broadband Sharing Dock 2.8 Home Network 2.8.1 Connected Equipment Choose Connected Equipment from the left hand menu bar under Home Network. This will help diagnosing any problems as it shows all devices (terminals and accessories) connected to the Sharing Dock, and their status. 2.8.2 External Storage Management Choose Hard Disk from the left hand menu bar under Home Network. If Digital Living Network Alliance (DLNA) is enabled, and you have a microSD card in your USB device, then the microSD card storage space can be shared between devices accessing the Sharing Dock via WLAN. Vodafone R101 Version 0.17 30 March 2010 Advanced Configuration Guide Vodafone Mobile Broadband Sharing Dock 2.8.3 Media Server Choose Media Server from the left hand menu bar under Home Network. If the media server button is enabled (select Enabled then click OK) , and there is a Micro SD card in the USB Stick, then the Sharing Dock can be used to configure the shared folder. Vodafone R101 Version 0.17 31 March 2010 Advanced Configuration Guide Vodafone Mobile Broadband Sharing Dock 3. Troubleshooting - Overview - The Box Diagnostics Screen - Common Problems and Solutions - Using the Master Reset Button Vodafone R101 Version 0.17 32 March 2010 Advanced Configuration Guide Vodafone Mobile Broadband Sharing Dock 3.1 Overview The following tips will help solve many common problems encountered while using the Vodafone Mobile Broadband Sharing Dock. Make sure you are using the Vodafone Mobile Broadband Sharing Dock in the correct geographic region. Ensure that the Vodafone network coverage extends to your current location. When properly installed, the Vodafone Mobile Broadband Sharing Dock is a highly reliable product. Most problems are caused by one of these issues: System resources required by the Vodafone Mobile Broadband Sharing Dock are being used by other devices. Network coverage is unavailable due to coverage area, a network problem or an account problem. The following two items are referenced frequently in the solutions that follow. Please make note of their differences. Open the Vodafone Mobile Broadband Sharing Dock Home page. 1. Type http://VodafoneMobileBroadband.SharingDock or http://192.168.0.1 in your browser address bar and press Enter/Return. 2. The “Vodafone Mobile Broadband Sharing Dock Home Page” opens and gives basic status information Login to the Vodafone Mobile Broadband Sharing Dock. 1. Type http://VodafoneMobileBroadband.SharingDock or http://192.168.0.1in your browser address bar and press Enter/Return. 2. Type the administrative password into the login window and click Login. 3. The “Home” page opens and gives you access to the menus. Vodafone R101 Version 0.17 33 March 2010 Advanced Configuration Guide Vodafone Mobile Broadband Sharing Dock 3.2 The Box Diagnostics Screen Choose Troubleshooting from the left hand menu bar under Support. The Diagnostics screen provides you with trouble-shooting information about each area of functionality within the Sharing Dock. Vodafone R101 Version 0.17 34 March 2010 Advanced Configuration Guide Vodafone Mobile Broadband Sharing Dock 3.3 Common Problems and Solutions All of the steps mentioned here are given in more detailed form elsewhere in the user guide. No service is available. - OR - I get a “Limited or No Connectivity” message. ➤ You are outside of the coverage area of the Vodafone network. ➤ Re-orient the Vodafone Mobile Broadband Sharing Dock. ➤ If you are inside a building or near a structure that may be blocking the signal, change the position or location of the device. For example, try moving the Vodafone Mobile Broadband Sharing Dock close to a window. ➤ Check the status of the LEDs - if you are connected the USB Stick LED should be a solid colour as shown in the LED States page. ➤ Login to the Vodafone Mobile Broadband Sharing Dock and check the connected status ➤ Check the SIM status with your Vodafone customer care team – there may be a problem with your account. I forgot my password. ➤ You can reset the device to factory defaults using the master reset button which can be found on the bottom of the device. I cannot connect to the Vodafone Mobile Broadband Sharing Dock. ➤ Make sure the USB Stick LED is on (it will be solid cyan for a UMTS connection) ➤ Make sure your PC wireless radio / AirPort is turned on. (Check your computer help if you need assistance.) Open your wireless network connection list. Windows: Right-click icon and select View Available Networks. Mac: Pull down list from AirPort icon. Select the VodafoneSharingDock_xxxxyy network name (in Windows, click Connect). When the Vodafone Mobile Broadband Sharing Dock is connected to the network, the USB Stick LED begins to blink. My network does not appear in the wireless network list. ➤ Verify that the Vodafone Mobile Broadband Sharing Dock LEDs are on and are not showing an error condition. ➤ Check that there are not already 5 simultaneously connected devices on the device by choosing Connected Equipment from the left hand menu bar under Home Network. ➤ Refresh your network list on your computer. Windows: Click Refresh Network List on the left side of the Wireless Network Connection screen. If that does not work you can try the following: 1. Open Network Connections. 2. Right-click Wireless Network Connection and select Properties. Vodafone R101 Version 0.17 35 March 2010 Advanced Configuration Guide Vodafone Mobile Broadband Sharing Dock 3. Click the Wireless Networks tab. 4. Delete any unused wireless connections from the Preferred Networks list and click OK. 5. Restart your computer. Mac: Try rebooting your computer. The USB Stick LED stays solid red or “SIM not found” is displayed in the Connected Status field on the main web UI ➤ The SIM card may be missing or inserted incorrectly. Pull out and re-insert the SIM card. Be careful not to touch the contact points when handling the SIM card. The LED is flashing red or “PIN required” is displayed on the main web UI. ➤ The SIM card is locked. Enter your PIN code when prompted in the SIM PIN Management area of the Mobile Broadband screen. If you enter the wrong PIN code 3 times, you will be prompted to enter your PUK code. If you enter the wrong PUK code 10 times, your SIM card will be locked forever. Please contact your Vodafone customer care team before this happens and ask them for your PIN/PUK codes. I see the network name but cannot connect to the Vodafone Mobile Broadband Sharing Dock. ➤ Check the user name, password, and access point name (APN) in your connection profile. If any of these are wrong, you will not be able to connect to the network. I get a message that Vodafone Mobile Connect software cannot be installed when I try to use my Vodafone Mobile Broadband Sharing Dock in USB mode. ➤ You might not have administrative privileges. Contact your system administrator or log on to your computer as an administrator and try plugging it in again. How do I disconnect from the network? ➤ Turn off the Sharing Dock using the power button on the back, or unplug the USB Stick from the Sharing Dock. How can I set a new PIN for my SIM card? ➤ Set a new PIN using the Vodafone Mobile Broadband Sharing Dock browser interface. Go to Mobile Broadband Settings > SIM PIN Management. Where can I find information about Internet connectivity and my WLAN setup? ➤ Login to the Vodafone Mobile Broadband Sharing Dock Home browser interface and select Troubleshooting > Box Diagnostics Vodafone R101 Version 0.17 36 March 2010 Advanced Configuration Guide Vodafone Mobile Broadband Sharing Dock Can I use my Vodafone Mobile Broadband Sharing Dock as a tethered modem with my computer? ➤ No, but you can use the USB Stick directly in a USB port on your PC, and the Vodafone Mobile Connect software and drivers will install and start automatically. How do I check the model number and firmware versions of my Vodafone Mobile Broadband Sharing Dock? ➤ Login to the Vodafone Mobile Broadband Sharing Dock Home browser interface and select Troubleshooting > Box Diagnostics How can I find out the network technology and provider currently in use? ➤ Open the Vodafone Mobile Broadband Sharing Dock Home page http://VodafoneMobileBroadband.SharingDock. The network information is displayed in the menu bar. Can I backup my configuration settings? ➤ Yes. Login to the Vodafone Mobile Broadband Sharing Dock and choose Administration > Firmware Upgrade and select Backup. Can I find my IMEI number? ➤ Yes. Login to the Vodafone Mobile Broadband Sharing Dock and choose Mobile Broadband. How do I turn off the Vodafone Mobile Broadband Sharing Dock? ➤ Press and hold the Power button until the LEDs turn off, or switch off the mains power and the power socket. What is the default administrative/login password? ➤ “admin” How do I access information on the WLAN network and WLAN clients? ➤ Login to the Vodafone Mobile Broadband Sharing Dock and choose WiFi. How do I ensure my WiFi enabled devices can find the Vodafone Mobile Broadband Sharing Dock? ➤ When attempting to use the Sharing Dock with a WiFi enabled handheld device such as a phone, MP3 Player etc you may experience problems locating your Sharing Dock on the available WiFi networks (SSIDs). This may be due to the WiFi enabled devices inability to handle long SSID names. This can be easily corrected by amending the SSID name of the Sharing Dock within the WiFi settings page of the web UI to a smaller length of characters. See section 2.5.3 SSID parameters and MAC filtering. For example, you could change it from “VodafoneSharingDock_XXXXYY” to “VF”. Vodafone R101 Version 0.17 37 March 2010 Advanced Configuration Guide Vodafone Mobile Broadband Sharing Dock Why does my PC Wi-Fi not connect to the Vodafone Mobile Broadband Sharing Dock? ➤ There is a problem that appears when a computer that is running Windows XP SP3 cannot authenticate a wireless router that uses the Wi-Fi Protected Setup (WPS) when the router is configured to use Wired Equivalent Privacy (WEP). This problem occurs because Windows XP SP3 mistakenly tries to authenticate a WEP-configured device by using 802.1x authentication, and therefore the authentication fails. You will not experience this problem if you have all the Windows XP operating system updated automatically. If you experience this problem there is a hotfix (971455) available from Microsoft that should be applied to your PC. Please search for “hotfix 971455”on www.microsoft.com to access information, download and update instructions. Alternatively, you can follow this work-around :In the wireless connection manager on your PC you will see the message “Validating Identity” and the network icon state is “searching for network” if you have this problem. The solution is to disable 802.x authentication in your wireless connection manager. The process varies under different operating systems, but the approach is similar to below. Right-click on your internet connection Select “Properties” Select “Authentication” De-select the “Enable 208.x authentication”check-box Click “OK” Vodafone R101 Version 0.17 38 March 2010 Advanced Configuration Guide Vodafone Mobile Broadband Sharing Dock 3.3 Using the Master Reset Button The Vodafone Mobile Broadband Sharing Dock comes with a master reset button that allows you to return it to its factory default state. The master reset button is recessed in a hole on the bottom of the device. You will need a paperclip or similar object to push the button. ➤ Make sure the Vodafone Mobile Broadband Sharing Dock is powered on. ➤ Locate the master reset button on the back of the device next to the label. ➤ Insert a paperclip into the hole and hold the button down for 5 seconds until the LED goes off – this will power cycle the device. Holding the button down for 10 seconds will return the device to its factory default settings. Your list of wireless networks will now show the original default network when you first configured your device. ➤ Connect to the Vodafone Mobile Broadband Sharing Dock again. Vodafone R101 Version 0.17 39 March 2010 Advanced Configuration Guide Vodafone Mobile Broadband Sharing Dock 4. Glossary Vodafone R101 Version 0.17 40 March 2010 Advanced Configuration Guide Vodafone Mobile Broadband Sharing Dock 802.11 (b, g, n) — A set of WLAN communication standards in the 2.4, 3.6 and 5 GHz frequency bands. Access Point — A device that allows wireless communication devices to connect to a wireless network using a standard such as WLAN. DHCP — Dynamic Host Configuration Protocol. A network application protocol used to obtain configuration information for an Internet Protocol network. DHCP Server — A server that uses DHCP to obtain configuration information for operation in an Internet Protocol network. DNS — Domain Name System. A system for converting host names and domain names into IP addresses on the Internet or on local networks that use the TCP/IP protocol. Firmware — A program that internally controls an electronic device. Gateway — A network point that acts as an entrance to another network that uses a different protocol. Host Name — The unique name by which a network-attached device is known on a network. HTTP — Hypertext Transfer Protocol. An application-level protocol for accessing the World Wide Web over the Internet. IP Type — The type of service provided over a network. IP address — Internet Protocol address. The address of a device attached to an IP network (TCP/IP network). LAN — Local Area Network. A type of network that lets a group of computers, all in close proximity (such as inside an office building), communicate with one another. MAC Address — A number that uniquely identifies a given network adapter on a LAN. MAC addresses are 12-digit hexadecimal numbers. Network Mask — A number that allows IP networks to be subdivided for security and performance. Port — A virtual data connection used by programs to exchange data. Port Number — A number assigned to a user session and server application in an IP network. Router — A device that connects two networks. SSID — Service Set Identifier. The name assigned to a WLAN network. TCP — Transmission Control Protocol. A core protocol for transmitting and receiving information over the Internet. TCP/IP — Transmission Control Protocol/Internet Protocol. A communications protocol developed under contract from the U.S. Department of Defense to internetwork dissimilar systems. VPN — Virtual Private Network. A secure private network that runs over the public Internet. WAN — Wide Area Network. A public network that extends beyond architectural, geographical, or political boundaries (unlike a LAN, which is usually a private network located within a room, building, or other limited area). WEP — Wired Equivalent Privacy. An IEEE standard security protocol for 802.11 networks. Superseded by WPA and WPA2. WLAN Client — A wireless device that connects to the Internet via WLAN. WLAN — Wireless Local Area Network. A typically low-power network that transmits a wireless signal over a span of a few hundred feet and usually only to stationary devices. Vodafone R101 Version 0.17 41 March 2010 Advanced Configuration Guide Vodafone Mobile Broadband Sharing Dock WPA/WPA2 — WLAN Protected Access. A security protocol for wireless 802.11 networks from the WLAN Alliance. Vodafone R101 Version 0.17 42 March 2010