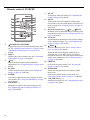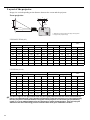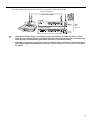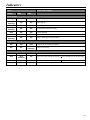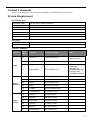
1
ENGLISH MULTIMEDIA PROJECTOR LV-WX300/LV-X300/LV-S300 User’s Manual Table of Contents Table of Contents ........................... 2 Safety instructions ......................... 3 Contents of package ..................... 13 Projector exterior view ................ 14 Controls and functions ................ 15 Positioning your projector .......... 19 Configuring the LAN Settings ....... 46 Choosing a location .........................19 Controlling the projector remotely through a web browser (e-Control™) (LV-X300/LV-WX300 only) ......... 47 Controlling the projector using PJLink™ application (LV-X300/LV-WX300 only) ......... 49 Obtaining a preferred projected image size ..................................................20 Menu operation .............................52 Maintenance ..................................59 Connection .................................... 23 Care of the projector ....................... 59 Connecting a computer or monitor .23 Lamp information ........................60 Indicators ......................................65 Troubleshooting ............................66 Specifications ................................67 Connecting Video source devices ...24 Operation ...................................... 28 Starting up the projector ..................28 Using the menus ..............................29 Utilizing the password function ......30 Switching input signal .....................32 Adjusting the projected image .... 33 Magnifying and searching for details ..............................................35 Selecting the aspect ratio ................35 Useful functions available during a presentation .................................. 37 Setting the presentation timer .........40 Hiding the image .............................41 Locking control keys .......................41 Freezing the image ..........................41 Adjusting the sound ........................42 Personalizing the projector menu display ..................................................42 Shutting down the projector ............42 Direct power off ..............................43 Watching 3D content ................... 44 Supervising and controlling by computer ....................................... 46 2 Projector specifications .................. 67 Dimensions ..................................... 68 Timing chart ................................... 69 Control Commands ......................... 72 System Requirement ....................... 72 Before installing and operating the projector, read this manual thoroughly. This projector provides many convenient features and functions. Operating the projector properly enables you to manage those features and maintain it in good condition for many years to come. Improper operation may result in not only shortening the product life, but also malfunctions, fire hazards, or other accidents. If your projector does not seem to be operating properly, read this manual again, check operations and cable connections, and try the solutions in the “Troubleshooting” section in the user’s manual. If the problem still persists, contact the Canon Customer Support Center. CAUTION RISK OF ELECTRIC SHOCK DO NOT OPEN CAUTION: TO REDUCE THE RISK OF ELECTRIC SHOCK, DO NOT REMOVE COVER (OR BACK). REFER SERVICING TO QUALIFIED SERVICE PERSONNEL. THIS SYMBOL INDICATES THAT DANGEROUS VOLTAGE CONSTITUTING A RISK OF ELECTRIC SHOCK IS PRESENT WITHIN THIS UNIT. THIS SYMBOL INDICATES THAT THERE ARE IMPORTANT OPERATING AND MAINTENANCE INSTRUCTIONS FOR THIS UNIT IN THE USER’S MANUAL. CAUTION Not for use in a computer room as defined in the Standard for the Protection of Electronic Computer / Data Processing Equipment, ANSI / NFPA 75. Copyright notice Please note that enlarging or reducing the size of an image for commercial purposes or public presentation any infringe on the legally protected copyright or the copyright holder of the original material About Trademarks • Ethernet is a registered trademark of Xerox Corporation. • Microsoft, Windows, Windows XP, Windows Vista, Windows 7, Windows 8 and Aero are registered trademarks or trademarks of Microsoft Corporation in the United States and / or other countries. • Mac, Mac OS and Macintosh are trademarks of Apple Inc., registered in the United States and / or other countries. • HDMI, the HDMI logo and High-Definition Multimedia Interface are trademarks or registered trademarks of HDMI Licensing, LLC. • PJLink is a registered trademark, or an application has been submitted for trademark, in Japan, the United States and / or other countries or regions. • Crestron®, Crestron RoomView®, and Crestron Connected™ are registered trademarks of Crestron Electronics, Inc. 3 ENGLISH Safety instructions Safety Precautions WARNING: • THIS APPARATUS MUST BE GROUNDED. • TO REDUCE THE RISK OF FIRE OR ELECTRIC SHOCK, DO NOT EXPOSE THIS APPLIANCE TO RAIN OR MOISTURE. • This projector produces intense light from the projection lens. Do not stare directly into the lens, otherwise eye damage could result. Be especially careful that children do not stare directly into the beam. • Install the projector in a proper position. Otherwise it may result in a fire hazard. • Allowing the proper amount of space on the top, sides, and rear of the projector cabinet is critical for proper air circulation and cooling of the unit. The diagram shown here indicates the minimum space required. If the projector is to be built into a compartment or similarly enclosed, these minimum distances must be maintained. SIDE and TOP REAR 50 cm (1.6') 50 cm (1.6') 50 cm (1.6') 50 cm (1.6') • Do not cover the ventilation slots on the projector. Heat build-up can reduce the service life of your projector, and can also be dangerous. • If the projector is unused for an extended time, unplug the projector from the power outlet. • Do not project the same image for a long time. An afterimage may remain on the DMD panel due to the characteristics of the panel of the projector. CAUTION ON HANGING FROM THE CEILING When hanging the projector from the ceiling, clean the air intake vents and top of the projector periodically with a vacuum cleaner. If you leave the projector unclean for a long time, the cooling fans can be clogged with dust, and it may cause a breakdown or a disaster. DO NOT SET THE PROJECTOR IN GREASY, WET, OR SMOKY CONDITIONS SUCH AS IN A KITCHEN TO PREVENT A BREAKDOWN OR A DISASTER. IF THE PROJECTOR COMES IN CONTACT WITH OIL OR CHEMICALS, IT MAY BECOME DETERIORATED. READ AND KEEP THIS MANUAL FOR LATER USE. All the safety and operating instructions should be read before beginning to operate the product. Read all of the instructions given here and retain them for later use. Unplug this projector from the AC power supply before cleaning. Do not use liquid or aerosol cleaners on the projector. Use a damp cloth for cleaning. Follow all warnings and instructions marked on the projector. For added protection of the projector during a lightning storm, or when it is left unattended or unused for long periods of time, unplug it from the wall outlet. This will prevent damage due to lightning and power surges. Do not expose this unit to rain or use near water. For example, in a wet basement, near a swimming pool..., etc. Do not use attachments not recommended by the manufacturer as they may result in hazards. 4 An appliance and cart combination should be moved with care. Sudden stops, excessive force, and uneven surfaces may cause the appliance and cart combination to overturn. Slots and openings in the rear and front of the cabinet are provided for ventilation, to insure reliable operation of the equipment and to protect it from overheating. The openings should never be covered with cloth or other materials, and the bottom opening should not be blocked by placing the projector on a bed, sofa, rug, or other similar surface. This projector should never be placed near or over a radiator or heat register. This projector should not be placed in a built-in installation such as a book case unless proper ventilation is provided. Never push objects of any kind into this projector through cabinet slots as they may touch dangerous voltage points or short out parts that could result in a fire or electric shock. Never spill liquid of any kind onto the projector. Do not install the projector near the ventilation duct of air-conditioning equipment. This projector should be operated using only the type of power source indicated on the marking label. If you are not sure of the type of power supplied, contact the Canon Customer Support Center or local power company. Do not overload wall outlets and extension cords as this can result in fire or electric shock. Do not allow anything to rest on the power cord. Do not locate this projector where the cord may be damaged by people walking on it. Do not attempt to service this projector yourself as opening or removing covers may expose you to dangerous voltages or other hazards. Refer all servicing to qualified service personnel. Unplug this projector from the wall outlet and refer servicing to qualified service personnel under the following conditions: a When the power cord or plug is damaged or frayed. b If liquid has been spilled into the projector. c If the projector has been exposed to rain or water. d If the projector does not operate normally after following the operating instructions. Adjust only those controls that are covered in the operating instructions as improper adjustment of other controls may result in damage and will often require extensive work by a qualified technician to restore the projector to normal operating condition. e If the projector has been dropped or the cabinet has been damaged. f When the projector exhibits a distinct change in performance-this indicates a need for servicing. When replacement parts are required, be sure the service technician uses replacement parts specified by the manufacturer that have the same characteristics as the original parts. Unauthorized substitutions may result in fire, electric shock, or injury. Upon completion of any service or repairs to this projector, ask the service technician to perform routine safety checks to determine that the projector is in safe operating condition. 5 ENGLISH Do not place this projector on an unstable cart, stand, or table. The projector may fall, causing serious injury to a child or adult, and serious damage to the projector. Use only with a cart or stand recommended by the manufacturer, or sold with the projector. For wall or shelf mounting, use a tool such as a mounting kit to secure the projector. AC Power Cord Requirement The AC Power Cord supplied with this projector meets the requirements for use in the country you purchased it. AC Power Cord for the United States and Canada: The AC Power Cord used in the United States and Canada is listed by the Underwriters Laboratories (UL) and certified by the Canadian Standard Association (CSA). The AC Power Cord has a grounding-type AC line plug. This is a safety feature to ensure the plug fits into the power outlet. Do not try to tamper with this safety feature. Should you be unable to insert the plug into the outlet, contact your electrician. Ground THE SOCKET-OUTLET SHOULD BE INSTALLED NEAR THE EQUIPMENT AND EASILY ACCESSIBLE. NOTE FOR CUSTOMERS IN THE US LAMP(S) INSIDE THIS PRODUCT CONTAIN MERCURY AND MUST BE RECYCLED OR DISPOSED OF ACCORDING TO LOCAL, STATE OR FEDERAL LAWS. Only for European Union and EEA (Norway, Iceland and Liechtenstein) These symbols indicate that this product is not to be disposed of with your household waste, according to the WEEE Directive (2012/19/EU), the Battery Directive (2006/66/ EC) and/or national legislation implementing those Directives. If a chemical symbol is printed beneath the symbol shown above, in accordance with the Battery Directive, this indicates that a heavy metal (Hg = Mercury, Cd = Cadmium, Pb = Lead) is present in this battery or accumulator at a concentration above an applicable threshold specified in the Battery Directive. This product should be handed over to a designated collection point, e.g., on an authorized one-for-one basis when you buy a new similar product or to an authorized collection site for recycling waste electrical and electronic equipment (EEE) and batteries and accumulators. Improper handling of this type of waste could have a possible impact on the environment and human health due to potentially hazardous substances that are generally associated with EEE. Your cooperation in the correct disposal of this product will contribute to the effective usage of natural resources. For more information about the recycling of this product, please contact your local city office, waste authority, approved scheme or your household waste disposal service or visit www.canon-europe.com/ weee, or www.canon-europe.com/battery. For CA, USA only Included lithium battery contains Perchlorate Material - special handing may apply. See www.dtsc.ca.gov/hazardouswaste/perchlorate/ for details. 6 ENGLISH Federal Communication Commission Notice Multimedia Projector, Model: LV-WX300 / LV-X300 / LV-S300 This device complies with Part 15 of the FCC Rules. Operation is subject to the following two conditions: (1) This device may not cause harmful interference, and (2) this device must accept any interference received, including interference that may cause undesired operation. Note: This equipment has been tested and found to comply with the limits for a Class B digital device, pursuant to Part 15 of the FCC Rules. These limits are designed to provide reasonable protection against harmful interference in a residential installation. This equipment generates, uses and can radiate radio frequency energy and, if not installed and used in accordance with the instructions, may cause harmful interference to radio communications. However, there is no guarantee that interference will not occur in a particular installation. If this equipment does cause harmful interference to radio or television reception, which can be determined by turning the equipment off and on, the user is encouraged to try to correct the interference by one or more of the following measures: • Reorient or relocate the receiving antenna. • Increase the separation between the equipment and receiver. • Connect the equipment into an outlet on a circuit different from that to which the receiver is connected. • Consult the dealer or an experienced radio / TV technician for help. The cable with a ferrite core provided with the projector must be used with this equipment in order to comply with Class B limits in Subpart B of Part 15 of the FCC Rules. Use of a shielded cable is required to comply with class B limits in Subpart B of Part 15 of FCC Rules. Do not make any changes or modifications to the equipment unless otherwise specified in the instructions. If such changes or modifications should be made, you could be required to stop operation of the equipment. Canon U.S.A. Inc. One Canon Park, Melville, New York 11747, U.S.A. Tel No. 1-800-OK-CANON (1-800-652-2666) Safety Symbols in this Manual This section describes the safety symbols used in this manual. Important projector safety information is identified by the following symbols. Always observe the safety information by these symbols. Warning Denotes the risk of death or serious injury from improper handling if the information is not observed. To ensure safe use, always observe this information. Caution Denotes the risk of injury from improper handling if the information is not observed. To ensure safe use, always observe this information. 7 Precautions for Use As this section contains important safety-related information, be sure to read the following carefully beforehand in order to use your projector correctly and safely. Warning If the following situations occur, turn the power off, remove the power plug from the power outlet and contact the Canon Customer Support Center. Failure to do so could cause a fire or result in an electric shock. • • • • • • If smoke is emitted If an unusual smell or noise is emitted If a loud noise is heard and the light source turns off If water or other liquid has entered the projector If metal or any other foreign material has entered the projector If the projector is knocked over or dropped and the cabinet is damaged Warning Pay attention to the following points for handling the power cord. Failure to pay attention to these points could cause a fire, electric shock or personal injury. • Do not place any objects on the power cord and do not allow it to become trapped under the projector. The power cord may be damaged. • Do not cover the power cord with a carpet. • Do not excessively bend, twist, pull or make modifications to the power cord. • Keep the power cord away from heaters and other sources of heat. • Do not use the power cord when it is bent finely, coiled or bundled. • Do not use a damaged power cord. If your power cord is damaged, contact the Canon Customer Support Center. • Do not use any power cord other than the type that is included with this projector. • Be sure to connect the ground wire of the power cord to ground. Failure to do so could result in an electric shock. • Be sure to connect the ground wire before connecting the power plug to the outlet. Also when you disconnect the ground wire, be sure to unplug the power plug from the outlet beforehand. Warning Pay attention to the following point to prevent the small parts from being accidentally swallowed by children. • Small parts such as the remote control battery, battery holder and adjustable feet that were detached may be accidentally swallowed by small children, which may result in choking. Parents/Guardians should keep them out of reach of children. If swallowed, consult a doctor immediately. 8 ENGLISH Warning Pay attention to the following points regarding the power source, power plug and handling of the connector. Failure to do so could result in a fire, electric shock or personal injury. • Do not use any power source with a voltage other than the voltage indicated (AC 100 – 240 V). • Do not pull the power cord and be sure to hold the power plug or connector when removing. The cord could be damaged as a result. • Do not insert any metal objects into the contact parts of the power plug or connector. • Remove the power plug from the outlet before performing cleaning or maintenance of the projector. • Do not remove the power plug or connector with wet hands. • Insert the power plug and connector securely up to the base. Additionally, do not use a damaged power plug or an outlet that is loose. • If using an extension cord attached to the outlet, make sure that the total electric power consumption of connected devices does not exceed the rated capacity. • Periodically inspect the power plug and outlet and remove any dust or dirt from between the plug and the outlet. Precautions for Installation Warning Pay attention to the following points regarding installation and handling of the projector. Failure to do so may cause a fire, electric shock or personal injury. • • • • Do not use the projector in a bathroom or shower room. Do not use the projector in rain or snow, by the sea, or in close proximity to a body of water. Do not place containers containing a liquid on top of the projector. Do not place the projector in any location where it will be exposed to oily smoke or steam, such as a kitchen work surface or table etc. • Do not touch the projector itself, the power cord, or the cable if lightening strikes. Warning Pay attention to the following points regarding installation and handling of the projector. Failure to do so may cause a fire, electric shock or personal injury. • Do not move the projector until you have switched off the power, removed the power plug from the power outlet and unplugged any other cables. • Do not remove the cabinet from the projector or disassemble it. The interior of the projector contains high-voltage components as well as parts that are hot. These could cause an electric shock or burn. If inspection, maintenance or repair is required, contact the Canon Customer Support Center. • Do not disassemble or modify the projector (including consumable parts) or the remote control. • Do not insert any object into vents in the projector, such as the air intake vent or exhaust vents. • Do not place a pressurized can in front of the exhaust vents. The pressure of the contents of the can may increase due to heat from the exhaust vents and this could result in an explosion. • As strong light beams are emitted while the projector is in use, do not look directly into the projector lens. Doing so could cause an eye injury. Pay particular attention in preventing young children to do so. • When giving a presentation in front of the projector while it is projecting an image, conduct your presentation from a position where your shadow will not be cast on the screen and where you do not feel blinded by light from the projector. 9 Caution Pay attention to the following points regarding installation and handling of the projector. • If the projector will not be used for a long period of time, be sure to remove the power plug from the power outlet to ensure safety. Failure to do so could cause a fire. • The temperature of the cabinet around and above the exhaust vents can become hot during projector operation. Touching these areas during operation could cause burns to the hands. Do not touch these areas. Doing so may cause burns. Pay particular attention in preventing young children from touching these parts. Additionally, do not place any metal objects on these areas. Due to the heat from the projector, doing so could cause an accident or personal injury. Caution Pay attention to the following points regarding installation and handling of the projector. • Do not place any heavy objects on top of the projector or sit/stand on it. Pay particular attention to prevent small children from doing so. The projector may be knocked over and this could result in damage or a personal injury. • Do not place the projector on an unstable or slanted surface. Doing so may cause the projector to fall or be knocked over and could result in a personal injury. • Do not place any objects in front of the lens while the projector is operating. Doing so could cause a fire. • When cleaning off dust or dirt from the projector lens etc., do not use any kind of spray that is flammable. As the temperature of the lamp inside the projector is high, it could ignite, causing a fire. • If the projector is used for a long period of time, dust could accumulate inside the projector. This could cause a fire or malfunction. It is recommended that periodic maintenance of the projector be performed. For details of maintenance costs, contact the Canon Customer Support Center. Precautions on the lamp This projector uses a high-pressure mercury lamp, which must be handled carefully and correctly as describeded below. The mercury lamp has the following characteristics. • Impact, abrasion, or use after the lamp’s useful life has expired may damage lamps (which may be accompanied by a loud noise) or cause them to burn out. • Useful life of lamps varies widely from lamp to lamp and depending on the environment of use. Lamps are not guaranteed to last for the same amount of time, and some lamps may fail sooner than others. • The lamp will gradually become darker over time. Warning When replacing the lamp, or when the lamp is damaged, pay attention to the following points. Failure to do so could result in an electric shock or personal injury. • Be sure to remove the power plug from the power outlet before replacing the lamp. • When the lamp is damaged, shards of glass may be scattered inside the projector. Contact the Canon Customer Support Center for cleaning and inspection of the projector interior and lamp replacement. 10 ENGLISH Caution When handling the lamp, pay attention to the following points. • Be sure not to handle the lamp immediately after it has been used. Be sure to switch off the power and wait for approximately 45 minutes for the lamp and the projector to cool down sufficiently. Failure to do so could result in a burn or personal injury due to heat from the lamp or projector. • When an instruction to replace the lamp has been displayed (LAMP Indicator Displays (See "Timing of replacing the lamp" on page 61 for details)), the possibility of the lamp breaking will increase. Replace the lamp with a new one as soon as possible. • If the lamp is damaged, gas inside the lamp (containing mercury) and dust may be emitted from the exhaust vents. If this happens, immediately open the windows and doors to provide ventilation to the room. If you inhale any gas emitted from the lamp or it has come into contact with your eyes or mouth, consult a doctor immediately. • When disposing of a used mercury lamp, dispose of it in the same way as a fluorescent lamp and in accordance with the local regulations where you live. Precautions for the remote control battery Warning Pay attention to the following points regarding handling of the battery. Failure to do so could result in a fire or injury. • • • • Do not place the battery in a fire or apply heat to, short circuit or disassemble the battery. Do not attempt to recharge the battery. Insert the battery in the correct + / - positions. If any liquid leaks from the battery and comes into contact with skin, wash off thoroughly with water. Caution for viewing 3D content Caution Pay attention to the following points when viewing 3D content. • Photosensitive patients, patients with heart disease, pregnant women, elderly people, and people with serious illness and/or with a history of epilepsy should not view 3D content. • We advise that you should refrain from viewing 3D content if you are in bad physical condition, need sleep or have been drinking alcohol. • Stop watching 3D content if you experience the following symptoms. If you experience such symptom, immediately stop viewing 3D content and take a break until the symptom has subsided. • You see doubly-blurred images or you cannot view the image stereoscopically. • You feel fatigue or discomfort. • Take breaks when viewing 3D content for an extended period of time. As this may cause eye fatigue. Viewing 3D content for an extended period of time or viewing them from an oblique angle can cause eye strain. • Parents should accompany and monitor their children as children cannot properly express discomfort with 3D content viewing. Children who are six year of age or younger should not view 3D content. • The optimum 3D viewing distance from the screen is about 3 times of the vertical screen size or more and your eyes should be level with the screen. 11 For Safe Use Pay attention to the following points when carrying or transporting the projector. • This projector is a precision instrument. Do not knock it over or subject it to impacts. Doing so may cause a malfunction. • Do not reuse any packaging or shock-absorbent materials that were supplied with the projector at the time of purchase for transporting or shipping the projector. Protection of the projector cannot be guaranteed if used packaging or shock-absorbent materials are reused. Fragments from shockabsorbent material may also enter the interior of the projector which could cause a malfunction. • Disconnect the cables connected to the projector. Carrying the projector with the cables attached may cause an accident. • Retract the adjustable feet. • Attach the lens cap to protect the lens. Pay attention to the following points when installing or using the projector. • Be sure to install the projector in a location where the air intake and exhaust vents are separated from the wall by more than 50 cm (1.6'). Failure to do so could cause a malfunction. • Do not install the projector in a location that is damp, or where there is a lot of dust, oily smoke or tobacco smoke. Doing so could cause contamination of optical components such as the lens and the mirror and may result in deterioration of image quality. • Do not touch the lens with bare hands. Doing so may result in deterioration of image quality. • If the projector is suddenly moved from a location where the temperature is low to a location where the temperature is high, or if the temperature in the location where the projector is installed increases suddenly, moisture in the air could cause condensation to form on the projector lens or mirror. This may cause a blurred image. Wait until the condensation has evaporated for the image projected to return to normal. • Do not install the projector in a location where the temperature is high or low. Doing so may cause a malfunction. Operating temperature: 0°C (32°F) to 40°C (104°F) Humidity level: 10% to 90% Storage temperature: -20°C (-4°F) to 60°C (140°F) • Do not install the projector near high-voltage electrical power lines or an electrical power source. • Do not use the projector on a soft surface such as carpet or sponge mat, etc. Doing so could cause heat to build up inside the projector and this could result in a malfunction. • Do not block the air intake or exhaust vents of the cooling fan. Doing so could cause heat to build up inside the projector and may cause a malfunction. • Do not place any objects on top of the projector that may change shape or color due to heat. • When using the projector at altitudes greater than 1500 m (4921'), please turn on the High Altitude Mode. • Please do not brush or rub the surface of the top plate of the projector. The surface may be damaged. 12 ENGLISH Contents of package (US) (EU) Projector (China) Power cord 1.8 m (70.8") CD & QSG Important Information Warranty card Computer cable 1.8 m (70.8") (5K.1VC09.501) Remote control (type number: LV-RC08) Battery (type number: CR2025) 13 Projector exterior view 1. Front/upper side 1 5 2 3 8 4 6 7 2. 3. 4. 5. 6. 7. 8. 9. External control panel (See "Projector" on page 15 for details.) Lamp cover Vent (heated air exhaust) Quick-release button Focus ring and Zoom ring Front IR remote sensor Projection lens Vent (air intake) Lens cap 9 Rear/lower side LV-S300 10 11 12 13 14 15 16 17 18. 19. 20. 21. 22. LV-X300/LV-WX300 18 19 21 20 14 10. 11. 12. 13. 14. 15. 16. 17. 22 SERVICE port LAN (RJ-45) port HDMI input terminal PC input terminal x 2 CONTROL port Video input terminal S-Video input terminal Audio input terminal Audio output terminal AC power cord inlet Kensington lock Quick-release foot Security bar Rear adjuster foot Projector 7. 1 8 2 3 4 5 6 7 1. 2. 3. 4. 5. 6. 9 10 11 12 13 8. 9. 11 Focus ring Adjusts the focus of the projected image. See "Fine-tuning the image size and clarity" on page 33 for details. Zoom ring Adjusts the size of the image. See "Fine-tuning the image size and clarity" on page 33 for details. POWER indicator light Lights up or flashes when the projector is under operation. See "Indicators" on page 65 for details. I I POWER (ON/STANDBY) Toggles the projector between standby mode and on. See "Starting up the projector" on page 28 and "Shutting down the projector" on page 42 for details. Left/BLANK Used to hide the screen picture. See "Hiding the image" on page 41 for details. OK/IMAGE Enacts the selected On-Screen Display (OSD) menu item. Selects an available picture setup mode. See "Selecting a image mode" on page 37 for details. 10. 11. 12. 13. MENU Turns on the On-Screen Display (OSD) menu. Goes back to previous OSD menu, exits and saves menu settings. See "Using the menus" on page 29 for details. TEMPerature indicator light Lights up red if the projector's temperature becomes too high. See "Indicators" on page 65 for details. LAMP indicator light Indicates the status of the lamp. Lights up or flashes when the lamp has developed a problem. See "Indicators" on page 65 for details. AUTO PC Automatically determines the best picture timings for the displayed image. See "Auto-adjusting the image" on page 33 for details. Keystone/Arrow keys ( / Up, / Down) Manually corrects distorted images resulting from an angled projection. See "Correcting keystone" on page 34 for details. Right/ Activates panel key lock. See "Locking control keys" on page 41 for details. When the On-Screen Display (OSD) menu is activated, the #5, #11, and #12 keys are used as directional arrows to select the desired menu items and to make adjustments. See "Using the menus" on page 29 for details. INPUT Displays the source selection bar. See "Switching input signal" on page 32 for details. 15 ENGLISH Controls and functions Remote control: LV-RC08 7. 2 8 9 10 3 11 4 5 12 13 9 6 14 1 7 1. 2. 3. 4. 5. 6. 16 POWER (ON/STANDBY) Toggles the projector between standby mode and on. See "Starting up the projector" on page 28 and "Shutting down the projector" on page 42 for details. INPUT Displays the source selection bar. See "Switching input signal" on page 32 for details. Left Selects the desired menu items and makes adjustments. See "Using the menus" on page 29 for details. BLANK Used to hide the screen picture. See "Hiding the image" on page 41 for details. TIMER Activates or adjusts some basic settings of an onscreen timer. See "Using the TIMER key" on page 40 for details. D.ZOOM (+, -) Magnifies or reduces the projected picture size. See "Magnifying and searching for details" on page 35 for details. I I 8. 9. 10. 11. 12. 13. 14. MUTE Temporarily mutes the audio. See "Adjusting the sound" on page 42 for details. MENU Turns on the On-Screen Display (OSD) menu. Goes back to previous OSD menu, exits and saves menu settings. See "Using the menus" on page 29 for details. Keystone/Arrow keys ( / Up, / Down) Manually corrects distorted images resulting from an angled projection. See "Correcting keystone" on page 34 for details. AUTO PC Automatically determines the best picture timings for the displayed image. See "Auto-adjusting the image" on page 33 for details. Right/ Activates panel key lock. See "Locking control keys" on page 41 for details. When the On-Screen Display (OSD) menu is activated, the #3, #9 and #11 keys are used as directional arrows to select the desired menu items and to make adjustments. See "Using the menus" on page 29 for details. FREEZE Freezes the projected image. See "Freezing the image" on page 41 for details. OK/IMAGE Enacts the selected On-Screen Display (OSD) menu item. Selects an available picture setup mode. See "Selecting a image mode" on page 37 for details. VOLUME keys (+, -) Adjusts the sound level. See "Adjusting the sound" on page 42 for details. ENGLISH Using the remote control for the first time Pull the tab before using the remote control. Remote control effective range Infra-Red (IR) remote control sensor is located on the front of the projector. The distance between the remote control and the sensor should not exceed 8 meters (~ 26 feet). Make sure that there are no obstacles between the remote control and the IR sensor on the projector that might obstruct the infra-red beam. • You may not be able to perform operations if there are any obstacles between the remote control and the projector. • You may not be able to operate the remote control if direct sunlight or strong light is shining onto the remote IR receiver. Replacing the remote control battery 1. Pull out the battery holder. Please follow the illustrated instructions. Push and hold the locking arm while pulling out the battery holder. 2. 3. Insert the new battery in the holder. Note the positive polarity should face outward. Push the holder into the remote control. • Risk of explosion if battery is replaced by an incorrect type. • Dispose of used batteries according to the instructions. • Use of a battery of wrong type may cause explosion. Use Lithium coin battery, type CR2025 only. • Dispose of used batteries according to your local regulations. Discard used battery promptly. Batteries may explode if mistreated. Do not recharge, disassemble, or dispose of in fire. • Be careful in handling the battery according to the instructions. • Load the battery with its positive (+) and negative (-) sides correctly oriented as indicated on the remote control. • Keep batteries out of reach of children and pets. • The remote control battery and battery holders can be a choking hazard if swallowed accidentally by small children. Make sure these are placed out of the reach of children. If they are swallowed accidentally, contact a physician immediately. • Remove the battery if the remote control is not used for a long time. • Keep battery in original package until ready to use. • Never put battery in mouth for any reason as it can easily be accidentally swallowed. If battery is accidentally swallowed, contact your physician or your poison control center. • Dispose of the used battery with cellophane tape wrapping both ends of it. • If any liquid leaks from the battery and comes into contact with skin, wash it off thoroughly with water. 17 Third party software This product includes third party software modules. • uIP (micro IP) version 0.9 Please see the below licence text concerning the licence condition. Copyright © 2001-2003, Adam Dunkels. All rights reserved. Redistribution and use in source and binary forms, with or without modification, are permitted provided that the following conditions are met: 1. 2. 3. Redistributions of source code must retain the above copyright notice, this list of conditions and the following disclaimer. Redistributions in binary form must reproduce the above copyright notice, this list of conditions and the following disclaimer in the documentation and/or other materials provided with the distribution. The name of the author may not be used to endorse or promote products derived from this software without specific prior written permission. THIS SOFTWARE IS PROVIDED BY THE AUTHOR ''AS IS'' AND ANY EXPRESS OR IMPLIED WARRANTIES, INCLUDING, BUT NOT LIMITED TO, THE IMPLIED WARRANTIES OF MERCHANTABILITY AND FITNESS FOR A PARTICULAR PURPOSE ARE DISCLAIMED. IN NO EVENT SHALL THE AUTHOR BE LIABLE FOR ANY DIRECT, INDIRECT, INCIDENTAL, SPECIAL, EXEMPLARY, OR CONSEQUENTIAL DAMAGES (INCLUDING, BUT NOT LIMITED TO, PROCUREMENT OF SUBSTITUTE GOODS OR SERVICES; LOSS OF USE, DATA, OR PROFITS; OR BUSINESS INTERRUPTION) HOWEVER CAUSED AND ON ANY THEORY OF LIABILITY, WHETHER IN CONTRACT, STRICT LIABILITY, OR TORT (INCLUDING NEGLIGENCE OR OTHERWISE) ARISING IN ANY WAY OUT OF THE USE OF THIS SOFTWARE, EVEN IF ADVISED OF THE POSSIBILITY OF SUCH DAMAGE. Third party software support Canon Inc., Canon's affiliated companies, as well as sales companies do not offer any support services for these programs. We are unable to respond to questions or inquiries from you or any other parties regarding these programs. 18 Positioning your projector ENGLISH Choosing a location Your room layout or personal preference will dictate which installation location you select. Take into consideration the size and position of your screen, the location of a suitable power outlet, as well as the location and distance between the projector and the rest of your equipment. Your projector is designed to be installed in one of the possible installation locations: 1. Front Table Select this location with the projector placed near the floor in front of the screen. This is the most common way to position the projector for quick setup and portability. 2. Rear Table Select this location with the projector placed near the floor behind the screen. Note that a special rear projection screen is required. 3. Rear Ceiling Select this location with the projector suspended upside-down from the ceiling behind the screen. Note that a special rear projection screen and qualified projector ceiling mount kit are required for this installation location. Set Rear Ceiling in the SYSTEM SETUP: Basic > Projector Position menu after you turn the projector on. 4. Front Ceiling Set Rear Table in the SYSTEM SETUP: Basic > Select this location with the projector suspended Projector Position menu after you turn the upside-down from the ceiling in front of the screen. projector on. Purchase a qualified projector ceiling mount kit from your dealer to mount your projector on the ceiling. Set Front Ceiling in the SYSTEM SETUP: Basic > Projector Position menu after you turn the projector on. For ceiling mounting, you need the ceiling mount kit to be available for this projector. Ask a specialist for installation. For details, consult your dealer. • • The warranty on this projector does not cover any damage caused by use of any non-recommended ceiling mount kit or installation of the ceiling mount kit in an improper location. When the projector is mounted on the ceiling, images may appear darker than those projected in the case of tabletop mounting. This isn’t a product malfunction. 19 Obtaining a preferred projected image size The distance from the projector lens to the screen, the zoom setting (if available), and the video format each factors in the projected image size. 4:3 is the native aspect ratio of LV-S300/LV-X300. To be able to project a complete 16:9 (widescreen) aspect ratio image, the projector can resize and scale a widescreen image to the projector's native aspect width. This will result in a proportionally smaller height equivalent to 75% of the projector's native aspect height. 4:3 aspect image in a 4:3 aspect display area 16:9 aspect image scaled to a 4:3 aspect display area Thus, a 16:9 aspect image will not utilize 25% of the height of a 4:3 aspect image displayed by this projector. This will be seen as darkened (unlit) bars along the top and bottom (vertical 12.5% height respectively) of the 4:3 projection display area whenever displaying a scaled 16:9 aspect image in the vertical center of the 4:3 projection display area. 16:10 is the native aspect ratio of LV-WX300. To be able to project a complete 16:9 (widescreen) aspect ratio image, the projector can resize and scale a widescreen image to the projector's native aspect width. This will result in a proportionally smaller height equivalent to 90% of the projector's native aspect height. 4:3 aspect image in a 16:10 aspect display area 16:9 aspect image scaled to a 16:10 aspect display area Thus, a 16:9 aspect image will not utilize 10% of the height of a 16:10 aspect image displayed by this projector. This will be seen as darkened (unlit) bars along the top and bottom (vertical 5% height respectively) of the 16:10 projection display area whenever displaying a scaled 16:9 aspect image in the vertical center of the 16:10 projection display area. The projector should always be placed horizontally level (like flat on a table), and positioned directly perpendicular (90° right-angle square) to the horizontal center of the screen. This prevents image distortion caused by angled projections (or projecting onto angled surfaces). The modern digital projector does not project directly forward (like older style reel-to-reel film projectors did). Instead, digital projectors are designed to project at a slightly upward angle above the horizontal plane of the projector. This is so that they can be readily placed on a table and will project forward and upwards onto a screen positioned so that the bottom edge of the screen is above the level of the table (and everyone in the room can see the screen). You can see from the diagram on page 22, that this type of projection causes the bottom edge of the projected image to be vertically offset from the horizontal plane of the projector. If the projector is positioned further away from the screen, the projected image size increases, and the vertical offset also increases proportionately. When determining the position of the screen and projector, you will need to account for both the projected image size and the vertical offset dimension, which are directly proportional to the projection distance. When fine streaks are seen on projected images This is due to interference with the screen surface and is not a mal-function. Replace the screen or displace the focus a little. 20 1. 2. 3. 4. Select your image size. Refer to the table and find the closest match to your image size in the left columns labeled "Image size". Using this value, look across this row to the right to find the corresponding average distance from screen value in the column labeled "Distance from the screen: L". This is the projection distance. On that same row, look across to the right column and make note of the "Hd" value. This will determine the final vertical offset placement of the projector in relation to the edge of the image. The recommended position for the projector is aligned perpendicular to the horizontal center of the screen, at the distance from the screen determined in step 2 above, and offset by the value determined in step 3 above. <Example> LV-S300/LV-X300: If you are using a 4:3 aspect ratio, 100-inch screen, distance from the screen is 3.8 m and with a vertical offset of 15.2 cm at Zoom position wide. If you place the projector in a different position (to that recommended), you will have to tilt it down or up to center the image on the screen. In these situations, some image distortion will occur. Use the Keystone function to correct the distortion. See "Correcting keystone" on page 34 for details. How to determine the recommended screen size for a given distance This method can be used for situations where you have purchased this projector and would like to know what screen size will fit in your room. The maximum screen size is limited by the physical space available in your room. 1. 2. 3. 4. Measure the distance between the projector and where you want to position the screen. This is the projection distance. Refer to the table and find the closest match to your measurement in the distance from the Image size column. If the min and max values are available on the table, check that your measured distance is between the min and max distances listed on either side of the average distance value. Using this value, look across that row to the left to find the corresponding "Image size". That is the projected image size of the projector at that projection distance. On that same row, look across to the right column and make note of the "Hd" value. This will determine the final placement of the screen in relation to the horizontal plane of the projector. <Example> LV-S300/LV-X300: If your measured projection distance was 3.5 m and your screen aspect ratio is 4:3, the closest match in the "Distance from the screen: L" column is from 3.4 m to 3.7 m. Looking across this row shows that a 90-inch screen is required. 21 ENGLISH How to determine the position of the projector for a given screen size Layout of the projector Image size varies depending on the distance between the screen and the projector. Front projection W B H A Hd A=B L L: Between the screen and the front edge of the projector H: Height of the projected image LV-S300/LV-X300 (4:3) Diagonal Size inch m Image size Width: W inch cm 60 70 80 90 100 120 150 48 56 64 72 80 96 120 1.5 1.8 2.0 2.3 2.5 3.0 3.8 122 142 163 183 203 244 305 Height: H inch cm 36 42 48 54 60 72 90 91 107 122 137 152 183 229 Distance from the screen: L Shortest (Wide) Longest (Tele) inch m inch m 89 104 119 134 149 178 223 2.3 2.6 3.0 3.4 3.8 4.5 5.7 98 114 131 147 163 196 - 2.5 2.9 3.3 3.7 4.2 5.0 - Hd inch cm 3.6 4.2 4.8 5.4 6.0 7.2 9.0 9.1 10.7 12.2 13.7 15.2 18.3 22.9 LV-WX300 (16:10) Diagonal Size inch m Image size Width: W inch cm 60 70 80 90 100 120 150 51 59 68 76 85 102 127 1.5 1.8 2.0 2.3 2.5 3.0 3.8 129 151 172 194 215 258 323 Height: H inch cm 32 37 42 48 53 64 79 81 94 108 121 135 162 202 Distance from the screen: L Shortest (Wide) Longest (Tele) inch m inch m 76 89 102 114 127 152 191 1.9 2.3 2.6 2.9 3.2 3.9 4.8 84 98 112 126 140 168 - 2.1 2.5 2.8 3.2 3.5 4.3 - Hd inch cm 0.0 0.0 0.0 0.0 0.0 0.0 0.0 0 0 0 0 0 0 0 The above figures are approximate and may be slightly different from the actual measurements. Canon recommends that if you intend to permanently install the projector, you should physically test the projection size and distance using the actual projector in suit before you permanently install it, so as to make allowance for this projector's optical characteristics. This will help you determine the exact mounting position so that it best suits your installation location. 22 Connection ENGLISH When connecting a signal source to the projector, be sure to: 1. 2. 3. Turn all equipment off before making any connections. Use the correct signal cables for each source. Ensure the cables are firmly inserted. • See the user’s manual of each device for details about its connections. • Contact your dealer for details about its connections. • In the connections shown below, some cables may not be included with the projector. They are commercially available from electronics stores. Connecting a computer or monitor Connecting a computer The projector provides a PC input terminal that allows you to connect it to both IBM® compatibles and Macintosh® computers. A Mac adapter is needed if you are connecting legacy version Macintosh computers. To connect the projector to a notebook or desktop computer: 1. 2. Take the supplied Computer cable and connect one end to the D-Sub output terminal of the computer. Connect the other end of the Computer cable to the COMPUTER-1 or COMPUTER-2 signal input terminal of the projector. 3. If you wish to make use of the projector speaker in your presentations, take a suitable audio cable and connect one end of the cable to the audio output terminal of the computer, and the other end to the AUDIO IN terminal of the projector. 4. If you wish, you can use another suitable audio cable and connect one end of the cable to the AUDIO OUT terminal of the projector, and the other end to your external speakers (not supplied). Once connected, the audio can be controlled by the projector On-Screen Display (OSD) menus. See "Adjusting the sound" on page 42 for details. The final connection path should be like that shown in the following diagram: Audio cable (option) Computer cable (supplied) LV-S300 Speakers Notebook or desktop computer LV-X300/LV-WX300 Audio cable (option) Many notebooks do not turn on their external video ports when connected to a projector. Usually a key combo like FN + F3 or CRT/LCD key turns the external display on/off. Locate a function key labeled CRT/LCD or a function key with a monitor symbol on the notebook. Press FN and the labeled function key simultaneously. Refer to your notebook's documentation to find your notebook's key combination. • When you use a longer Computer cable instead of the provided cable, the image may not be projected correctly. • Some computers require additional connectors or analog RGB output adapters to be connected with this projector. 23 Connecting Video source devices You can connect your projector to various Video source devices that provide any one of the following output sockets: • HDMI (LV-X300/LV-WX300) • Component Video • S-Video (LV-X300/LV-WX300) • Video (composite) You need only connect the projector to a Video source device using just one of the above connecting methods, however each provides a different level of video quality. The method you choose will most likely depend upon the availability of matching terminals on both the projector and the Video source device as described below: HDMI (High-Definition Multimedia Interface) supports uncompressed video data transmission between compatible devices like DTV tuners, DVD players and displays over a single cable. It provides pure digital viewing experience. See "Connecting an HDMI device" on page 24 for how to connect the projector to an HDMI device. Digital TV tuner and DVD players output Component Video natively, so if available on your devices, this should be your connection method of choice in preference to (composite) Video. See "Connecting a Component Video source device" on page 25 for how to connect the projector to a component video device. If you have both composite Video and S-Video output terminals on your Video source device, you should elect to use the S-Video option. See "Connecting an S-Video source device" on page 25 for how to connect the projector to an S-Video device. If you have only composite Video output terminals on your Video source device, connect to Composite Video input. See "Connecting a composite Video source device" on page 26 for how to connect the projector to a composite Video device. Connecting an HDMI device You should use an HDMI cable when making connection between the projector and HDMI devices. To connect the projector to an HDMI device: 1. 2. Take an HDMI cable and connect one end to the HDMI output terminal of the video device. Connect the other end of the cable to the HDMI input terminal on the projector. HDMI device LV-X300/LV-WX300 HDMI cable (option) When you connect this projector and an HDMI device (such as a DVD player) via the HDMI terminal, black color may appear dark and deep, depending on the type of the connected device. • This depends on the black level setting of the connected device. There are two kinds of methods to digitally transfer image data, in which different black level settings are employed respectively. Therefore, the specifications of the signals output from DVD players differ, depending on the type of the digital data transfer method they use. • Some DVD players are provided with a function to switch the methods to output digital signals. When your DVD player is provided with such function, set it as follows. EXPAND or ENHANCED -> NORMAL • See the User’s Manual of your DVD player for details. 24 ENGLISH • When you switch to HDMI input, the projected picture may display wrong colors for about 1 second. This is not product malfunction. Connecting a Component Video source device Examine your Video source device to determine if it has a set of unused Component Video output sockets available: • • If so, you can continue with this procedure. If not, you will need to reassess which method you can use to connect to the device. To connect the projector to a Component Video source device: 1. Take a Component Video to RGB (D-Sub) adaptor cable and connect the end with 3 RCA type connectors to the Component Video output sockets of the Video source device. Match the color of the plugs to the color of the sockets; green to green, blue to blue, and red to red. 2. Connect the other end of the Component Video to RGB (D-Sub) adaptor cable (with a D-Sub type connector) to the COMPUTER-1 or COMPUTER-2 terminal on the projector. 3. If you wish to make use of the projector speaker in your presentations, take a suitable audio cable and connect one end of the cable to the audio output terminal of the computer, and the other end to the AUDIO IN terminal of the projector. 4. If you wish, you can use another suitable audio cable and connect one end of the cable to the AUDIO OUT terminal of the projector, and the other end to your external speakers (not supplied). Once connected, the audio can be controlled by the projector On-Screen Display (OSD) menus. See "Adjusting the sound" on page 42 for details. The final connection path should be like that shown in the following diagram: Audio cable (option) Component Video to RGB (D-Sub) adaptor cable (option) LV-S300 Speakers LV-X300/LV-WX300 Audio cable (option) AV device If the selected video image is not displayed after the projector is turned on and the correct video source has been selected, check that the Video source device is turned on and operating correctly. Also check that the signal cables have been connected correctly. Connecting an S-Video source device Examine your Video source device to determine if it has an unused S-Video output terminal available: • • If so, you can continue with this procedure. If not, you will need to reassess which method you can use to connect to the device. To connect the projector to an S-Video source device: 1. 2. 3. 4. Take an S-Video cable and connect one end to the S-Video output terminal of the Video source device. Connect the other end of the S-Video cable to the S-VIDEO terminal on the projector. If you wish to make use of the projector speaker in your presentations, take a suitable audio cable and connect one end of the cable to the audio output terminal of the computer, and the other end to the AUDIO IN terminal of the projector. If you wish, you can use another suitable audio cable and connect one end of the cable to the AUDIO OUT terminal of the projector, and the other end to your external speakers (not supplied). 25 Once connected, the audio can be controlled by the projector On-Screen Display (OSD) menus. See "Adjusting the sound" on page 42 for details. The final connection path should be like that shown in the following diagram: S-Video cable (option) Audio cable (option) LV-X300/LV-WX300 Speakers Audio cable (option) AV device • If the selected video image is not displayed after the projector is turned on and the correct video source has been selected, check that the Video source device is turned on and operating correctly. Also check that the signal cables have been connected correctly. • If you have already made a Component Video connection between the projector and this SVideo source device, you need not connect to this device using an S-Video connection as this makes an unnecessary second connection of poorer picture quality. See "Connecting Video source devices" on page 24 for details. Connecting a composite Video source device Examine your Video source device to determine if it has a set of unused composite Video output sockets available: • • If so, you can continue with this procedure. If not, you will need to reassess which method you can use to connect to the device. To connect the projector to a composite Video source device: 1. 2. 3. 4. 26 Take a Video cable and connect one end to the composite Video output terminal of the Video source device. Connect the other end of the Video cable to the VIDEO terminal on the projector. If you wish to make use of the projector speaker in your presentations, take a suitable audio cable and connect one end of the cable to the audio output terminal of the computer, and the other end to the AUDIO IN terminal of the projector. If you wish, you can use another suitable audio cable and connect one end of the cable to the AUDIO OUT terminal of the projector, and the other end to your external speakers (not supplied). Once connected, the audio can be controlled by the projector On-Screen Display (OSD) menus. See "Adjusting the sound" on page 42 for details. ENGLISH The final connection path should be like that shown in the following diagram: Video cable (option) Audio cable (option) LV-S300 LV-X300/LV-WX300 Speakers Audio cable (option) AV device • If the selected video image is not displayed after the projector is turned on and the correct video source has been selected, check that the Video source device is turned on and operating correctly. Also check that the signal cables have been connected correctly. • You need only connect to this device using a composite Video connection if Component Video and S-Video inputs are unavailable for use. See "Connecting Video source devices" on page 24 for details. 27 Operation Starting up the projector 1. Plug the power cord into the projector and into a wall socket. Turn on the wall socket switch (where fitted). Check that the POWER indicator light on the projector lights orange after power has been applied. • Ask your installation specialist to provide an Earth leakage breaker. When you do not use the projector, be sure to shut down the main power by the breaker. • Please use the original accessories (e.g. power cord) only with the device to avoid possible dangers such as electric shock and fire. • In order to ensure the safety in case of trouble with the projector, use an electrical outlet having an earth leakage breaker to supply the power to the projector. If you do not have such outlet, ask your dealer to install it. 2. Remove the lens cap. 3. Press II POWER on the projector or remote control to start the projector. The POWER indicator light flashes green and stays green when the projector is on. The start up procedure takes about 30 seconds. In the later stage of start up, a startup logo is projected. (If necessary) Rotate the focus ring to adjust the image clearness. • If the projector is still hot from previous activity, it will run the cooling fans for approximately 90 seconds before energizing the lamp. • To maintain the lamp life, once you turn the projector on, wait at least 5 minutes before turning it off. • After I POWER is pressed, the image may flicker before the lamp becomes stable. This is not a product malfunction. 4. If the projector is activated for the first time, select your OSD language following the on-screen instructions. If you are prompted for a password, press the arrow keys to enter a six-digit password. See "Utilizing the password function" on page 30 for details. Switch all of the connected equipment on. The projector will start to search for input signals. The current input signal being scanned appears in the upper left corner of the screen. If the projector doesn't detect a valid signal, the message 'No Signal' will be displayed until an input signal is found. You can also press INPUT on the projector or remote control to select your desired input signal. See "Switching input signal" on page 32 for details. 5. 6. 7. I If the frequency/resolution of the input signal exceeds the projector's operating range, you will see the message 'Out of Range' displayed on a blank screen. Please change to an input signal which is compatible with the projector's resolution or set the input signal to a lower setting. See "Timing chart" on page 69 for details. 28 ENGLISH Using the menus The projector is equipped with On-Screen Display (OSD) menus for making various adjustments and settings. Below is the overview of the OSD menu. Main menu icon DISPLAY main menu Off Screen Color Aspect Keystone Position Phase H. Total Dots D.Zoom 3D 3D Sync Highlight Sub-menu Current input signal Auto Status 16 0 Normal MENU Exit Analog RGB Go to the previous page or to exit. Below is an example about how to set the OSD language. 1. Press MENU on the projector or remote control to turn the OSD menu on. 3. Press to highlight Language and press OK/IMAGE. DISPLAY SYSTEM SETUP: Basic Off Screen Color Aspect Keystone Position Phase H. Total Dots D.Zoom 3D 3D Sync Auto 16 0 MENU Exit Use / to highlight the SYSTEM SETUP: Basic menu. Analog RGB 4. 5. SYSTEM SETUP: Basic Presentation Timer Language Image flip H/V Blank Timer Auto Power Off Panel Key Lock Sleep Timer Splash Screen Analog RGB OK Front Table 20 min Disable Off Disable Canon Normal Analog RGB 2. Presentation Timer Language Image flip H/V Blank Timer Auto Power Off Panel Key Lock Sleep Timer Splash Screen MENU Exit Press / / / to select a preferred language and press OK/IMAGE. Press MENU on the projector or remote control to leave and save the settings. Front Table 20 min Disable Off Disable Canon MENU Exit 29 Utilizing the password function For security purposes and to help prevent unauthorized use, the projector includes an option for setting up password security. The password can be set through the On-Screen Display (OSD) menu. For details of the OSD menu operation, please refer to "Using the menus" on page 29. You will be inconvenienced if you activate the power-on lock functionality and subsequently forget the password. Print out this manual (if necessary) and write the password you used in this manual, and keep the manual in a safe place for later recall. Setting a password Once a password has been set, the projector cannot be used unless the correct password is entered every time the projector is started. 1. 2. 3. 4. Open the OSD menu and go to the SYSTEM SETUP: Advanced > Security Settings menu. Press OK/IMAGE. The Security Settings page is displayed. Highlight Power On Lock and select On by pressing / . As pictured to the right, the four arrow keys ( , , , ) Input New Password * respectively represent 4 digits (1, 2, 3, 4). According to the password you desire to set, press the arrow keys to enter six digits for the password. Confirm the new password by re-entering the new password. Once the password is set, the OSD menu returns to the Security Settings page. MENU Back The digits being input will be displayed as asterisks on-screen. Write your selected password down here in this manual in advance or right after the password is entered so that it is available to you should you ever forget it. Password: __ __ __ __ __ __ Keep this number in a safe place. 5. To leave the OSD menu, press MENU. If you forget the password If the password function is activated, you will be asked to enter the sixdigit password every time you turn on the projector. If you enter the wrong password, the password error message as pictured to the right is displayed lasting for three seconds, and the message 'INPUT PASSWORD' follows. You can retry by entering another six-digit password, or if you did not record the password in this manual, and you absolutely do not remember it, you can reset the password function. See "Resetting the password function" on page 30 for details. Password Error Please try again. If you enter an incorrect password 5 times in succession, the projector will automatically shut down in a short time. Resetting the password function 1. 2. 3. 4. Turn the projector off. See "Shutting down the projector" on page 42 for details. Unplug the power cord. Long press MENU and Right on the projector until the power cord was plugged. Now the password function has been reset and the Power On Lock is Off. You can turn on the projector without entering any password. You can also activate the power-on lock functionality as if you were setting the password for the first time. See "Setting a password" on page 30 for details. Changing the password 1. 2. 30 Open the OSD menu and go to the SYSTEM SETUP: Advanced > Security Settings > Change Password menu. Press OK/IMAGE. The message 'INPUT CURRENT PASSWORD' is displayed. 4. Enter the old password. • If the password is correct, another message 'INPUT NEW PASSWORD' is displayed. • If the password is incorrect, the password error message is displayed lasting for three seconds, and the message 'INPUT CURRENT PASSWORD' is displayed for your retry. You can press MENU to cancel the change or try another password. Enter a new password. The digits being input will be displayed as asterisks on-screen. Write your selected password down here in this manual in advance or right after the password is entered so that it is available to you should you ever forget it. Password: __ __ __ __ __ __ Keep this number in a safe place. 5. 6. 7. Confirm the new password by re-entering the new password. You have successfully assigned a new password to the projector. Remember to enter the new password next time the projector is started. To leave the OSD menu, press MENU. Disabling the password function To disable password protection, go back to the SYSTEM SETUP: Advanced > Security Settings > Power On Lock menu after opening the OSD menu system. Select Off by pressing / . The message 'INPUT PASSWORD' is displayed. Enter the current password. • If the password is correct, the OSD menu returns to the Security Settings page with 'Off' shown in the row of Power On Lock. You will not have to enter the password next time you turn on the projector. • If the password is incorrect, the password error message is displayed lasting for three seconds, and the message 'INPUT PASSWORD' is displayed for your retry. You can press MENU to cancel the change or try another password. Though the password function is disabled, you need to keep the old password in hand should you ever need to re-activate the password function by entering the old password. 31 ENGLISH 3. Switching input signal The projector can be connected to multiple devices at the same time. However, it can only display one full screen at a time. Be sure the Auto Search function in the INPUT menu is On (which is the default of this projector) if you want the projector to automatically search for the signals. You can also manually cycle through the available input signals. 1. 2. 32 Press INPUT on the projector or remote control. A source selection bar is displayed. Press / until your desired signal is selected and press OK/ IMAGE. Once detected, the selected source information will be displayed on the screen for seconds. If there is multiple equipment connected to the projector, repeat steps 1-2 to search for another signal. • The brightness level of the projected image will change accordingly when you switch between different input signals. Data (graphic) "PC" presentations using mostly static images are generally brighter than "Video" using mostly moving images (movies). • The input signal type effects the options available for the Image Mode. See "Selecting a image mode" on page 37 for details. • The native display resolution of this projector is in a 4:3 (LVS300/LV-X300)/16:10 (LV-WX300) aspect ratio. For best display picture results, you should select and use an input signal which outputs at this resolution. Any other resolutions will be scaled by the projector depending upon the 'aspect ratio' setting, which may cause some image distortion or loss of picture clarity. See "Selecting the aspect ratio" on page 35 for details. LV-X300/LV-WX300 LV-S300 Adjusting the projected image ENGLISH Adjusting the projection angle The projector is equipped with 1 quick-release adjuster foot and 1 rear adjuster foot. These adjusters change the image height and projection angle. To adjust the projector: 1. Press the quick-release button and lift the front of the projector. Once the image is positioned where you want it, release the quick-release button to lock the foot in position. 2. Screw the rear adjuster foot to fine tune the horizontal angle. To retract the foot, hold up the projector while pressing the quickrelease button, then slowly lower the projector. Screw the rear adjuster foot in a reverse direction. 1 2 If the projector is not placed on a flat surface or the screen and the projector are not perpendicular to each other, the projected image becomes trapezoidal. To correct this situation, see "Correcting keystone" on page 34 for details. • Do not look into the lens while the lamp is on. The strong light from the lamp may cause damage to your eyes. • Be careful when you press the adjuster button as it is close to the exhaust vent where hot air comes from. Auto-adjusting the image In some cases, you may need to optimize the picture quality. To do this, press AUTO PC on the projector or remote control. Within 3 seconds, the built-in Intelligent Auto Adjustment function will readjust the values of Frequency and Clock to provide the best picture quality. The current source information will be displayed in the upper left corner of the screen for 3 seconds. • The screen will be blank while AUTO PC is functioning. • This function is only available when a PC signal (analog RGB) is selected. Fine-tuning the image size and clarity For adjusting the size to your desired, you need to move the product for appropriate projection distance because of small Zoom ratio. Follow the procedure below for the installation and adjustment. The focus will be off after adjusting the zoom, so be sure to readjust the focus. If the image is very blurry, adjusting the focus to make the image sharp will change the size of the projected image. Repeat the zoom and focus adjustments in alternation as necessary. A Wide Tele B In the right figure, (A) Focus Ring, (B) Zoom Ring 1. 2. 3. 4. 5. Adjust Zoom. (using (B) Zoom Ring) For the short distance/large screen, dial the ring fully to Wide end. For the long distance/small screen, dial the ring fully to Tele end. Adjust Focus. (using (A) Focus Ring) Move the product back and forth to adjust the screen size. Adjust Focus again if necessary. 33 Correcting keystone Keystoning refers to the situation where the projected image is noticeably wider at either the top or bottom. It occurs when the projector is not perpendicular to the screen. To correct this, besides adjusting the height of the projector, you will need to manually correct it following one of these steps. • Using the remote control Press / on the projector or remote control to display the Keystone correction page. Press to correct keystoning at the top of the image. Press to correct keystoning at the bottom of the image. • 1. 2. 3. 34 Using the OSD menu Press MENU and then press / until the DISPLAY menu is highlighted. Press to highlight Keystone and press OK/IMAGE. The Keystone correction page is displayed. Press to correct keystoning at the top of the image or press to correct keystoning at the bottom of the image. Press / . Press / . • You can correct the vertical keystones. However, their adjustment ranges are limited in such correction. • When the keystone adjustment is carried out, the adjustment value is indicated. Note that this value doesn’t mean a projection angle. • The allowable range of the adjustment value in the keystone adjustment varies depending on the installation conditions. • Images may not be projected in a shape of a regular rectangle or with its aspect ratio 4:3, depending on the installation conditions of the projector and the screen. • When the keystone adjustment takes effect, the resolution decreases. In addition, stripes may appear or straight lines may bend in images with complicated patterns. They are not due to product malfunctions. • Noise may appear on the screen during the keystone adjustment because of the type of the video signal being projected and the setting values of the keystone adjustment. In such cases, set the keystone adjustment values in the range where the image is displayed without noise. • When the keystone adjustment is carried out, the image may not be displayed correctly because of the type of input signal. If you need to find the details on the projected picture, magnify the picture. Use the direction arrow keys for navigating the picture. • 1. 2. 3. 4. • 1. 2. 3. 4. 5. 6. 7. Using the remote control Press D.ZOOM +/- to display the Zoom bar. Press D.ZOOM + to magnify the center of the picture. Press the key repeatedly until the picture size is suitable for your need. Use the directional arrows ( , , , ) on the projector or remote control to navigate the picture. To restore the picture to its original size, press AUTO PC. You can also press D.ZOOM -. When the key is pressed again, the picture is further reduced until it is restored to the original size. Using the OSD menu Press MENU and then press / until the DISPLAY menu is highlighted. Press to highlight D.ZOOM and press OK/IMAGE. The Zoom bar is displayed. Repeat steps 2-4 in the section of "Using the remote control" above. Or if you are using the projector control panel, continue to the following steps. Press on the projector repeatedly to magnify the picture to a desired size. To navigate the picture, press OK/IMAGE to switch to the panning mode and press the directional arrows ( , , , ) to navigate the picture. Use the directional arrows ( , , , ) on the projector or remote control to navigate the picture. To reduce size of the picture, press OK/IMAGE to switch back to the zoom in/out functionality, and press AUTO PC to restore the picture to its original size. You can also press repeatedly until it is restored to the original size. The picture can only be navigated after the picture is magnified. You can further magnify the picture while searching for details. Selecting the aspect ratio The 'aspect ratio' is the ratio of the image width to the image height. Most analog TV and computers are in 4:3 ratio, and digital TV and DVDs are usually in 16:9 ratio. With the advent of digital signal processing, digital display devices like this projector can dynamically stretch and scale the image output to a different aspect than that of the image input signal. To change the projected image ratio (no matter what aspect the source is): 1. 2. 3. Press MENU and then press / until the DISPLAY menu is highlighted. Press to highlight Aspect. Press / to select an aspect ratio to suit the format of the video signal and your display requirements. 35 ENGLISH Magnifying and searching for details About the aspect ratio In the pictures below, the black portions are inactive areas and the white portions are active areas. OSD menus can be displayed on those unused black areas. LV-S300/ 1. Auto: Scales an image proportionally to fit the projector's native resolution in its horizontal width or its vertical height. This is suitable when you want to make most use of the screen without altering the image's aspect ratio. LV-X300 4:3 picture 16:9 picture 16:10 picture 2. Real: The image is projected as its original resolution, and resized to fit within the display area. For input signals with lower resolutions, the projected image will display smaller than if resized to full screen. You could adjust the zoom setting or move the projector towards or away from the screen to decrease or increase the image size if necessary. You may also need to refocus the projector after making these adjustments. For input signals with high resolutions, the projected image will be scaled proportionally to fit the projector's native resolution in its horizontal width or its vertical height. 4:3 picture 16:9 picture 16:10 picture 3. 16:10 (LV-WX300 only): Scales an image so that it is displayed in the center of the screen with a 16:10 aspect ratio. This is most suitable for images which are already in a 16:10 aspect. 16:9 picture 16:10 picture 4. 5. 36 16:9: Scales an image so that it is displayed in the center of the screen with a 16:9 aspect ratio. This is most suitable for images which are already in a 16:9 aspect, like high definition TV and 16:9 aspect DVD movies, as it displays them without aspect alteration. 4:3: Scales an image so that it is displayed in the center of the screen with a 4:3 aspect ratio. This is most suitable for 4:3 images like computer monitors, standard definition TV and 4:3 aspect DVD movies, as it displays them without aspect alteration. 16:9 picture 4:3 picture LV-WX300 Useful functions available during a presentation ENGLISH Selecting a image mode The projector is preset with several predefined image modes so that you can choose one to suit your operating environment and input signal picture type. To select a operation mode that suits your need, you can follow one of the following steps. • • Press OK/IMAGE on the remote control or projector repeatedly until your desired mode is selected. Go to the PICTURE > Image Mode menu and press / to select a desired mode. Image modes for different types of signals The image modes available for different types of signals are listed below. 1. 2. 3. 4. 5. Presentation mode: Suitable for projecting images with a lot of text. Standard mode: Suitable for projecting computer screens or colorful images (movies), etc. sRGB mode: Suitable for projecting photos from a digital camera that supports sRGB. Compatible with the sRGB standard. Movie mode: Suitable for projecting colorful images (movies). User 1/User 2 mode: You can save image quality settings that you have made as a custom setting. You can then select the saved settings as an image mode. See "Setting the User 1/User 2 mode" on page 37 for details. Setting the User 1/User 2 mode There are two user-definable modes if the current available image modes are not suitable for your need. User 1 (Presentation mode based) is for PC sources, and User 2 (Standard mode based) is for Video sources. 1. 2. 3. 4. 5. Press MENU to open the On-Screen Display (OSD) menu. Go to the PICTURE > Image Mode menu. Press / to select User 1 to User 2. Press to select a sub-menu item to be changed and adjust the value with the image quality in user modes" below for details. The settings will be stored automatically. / . See "Fine-tuning Fine-tuning the image quality in user modes According to the detected signal type, there are some user-definable functions available when User 1 or User 2 mode is selected. You can make adjustments to these functions based on your needs. Adjusting Brightness Highlight Brightness in the PICTURE menu and adjust the values by pressing remote control. / on the projector or The higher the value, the brighter the image. And lower the setting, darker the image. Adjust this control so the black areas of the image appear just as black and that detail in the dark areas is visible. +50 +30 Adjusting Contrast Highlight Contrast in the PICTURE menu and adjust the values by pressing remote control. / +70 on the projector or The higher the value, the greater the contrast. Use this to set the peak white level after you have previously adjusted the Brightness setting to suit your selected input and viewing environment. -30 Adjusting Color Highlight Color in the PICTURE menu and adjust the values by pressing remote control. / 0 +30 on the projector or 37 Lower setting produces less saturated colors. If the setting is too high, colors on the image will be overpowering, which makes the image unrealistic. Adjusting Tint Highlight Tint in the PICTURE menu and adjust the values by pressing control. / on the projector or remote The higher the value, the more reddish the picture becomes. The lower the value, the more greenish the picture becomes. Adjusting Sharpness Highlight Sharpness in the PICTURE menu and adjust the values by pressing remote control. / on the projector or The higher the value, the sharper the picture becomes. The lower the value, the softer the picture becomes. Adjusting BrilliantColor™ Highlight BrilliantColor™ in the PICTURE menu and select by pressing remote control. / on the projector or This feature utilizes a new color-processing algorithm and system level enhancements to enable higher brightness while providing truer, more vibrant colors in picture. It enables a greater than 50% brightness increase in mid-tone images, which are common in video and natural scenes, so the projector reproduces images in realistic and true colors. If you prefer images with that quality, select On. If you don’t need it, select Off. On is the default and recommended selection for this projector. When Off is selected, the Color Temperature function and 6-axis Color Adjust are not available. Selecting a Color Temperature Highlight Color Temperature in the PICTURE menu and adjust the values by pressing projector or remote control. / on the The options available for color temperature* settings vary according to the signal type selected. 1. High: The image becomes tinted with blue. (cold colors). 2. Middle: The image uses standard colors. 3. Low: The image becomes tinted with red. (warm colors). *About color temperatures: There are many different shades that are considered to be "white" for various purposes. One of the common methods of representing white color is known as the “color temperature”. A white color with a low color temperature appears to be reddish white. A white color with a high color temperature appears to have more blue in it. 6-axis Color Adjust In most installation situations, color management will not be necessary, such as in classroom, meeting room, or lounge room situations where lights remain on, or where building external windows allow daylight into the room. Only in permanent installations with controlled lighting levels such as boardrooms, lecture theaters, or home theaters, should color management be considered. Color management provides fine color control adjustment to allow for more accurate color reproduction, should you require it. Proper color management can only be achieved under controlled and reproducible viewing conditions. You will need to use a colorimeter (color light meter), and provide a set of suitable source images to measure color reproduction. These tools are not provided with the projector, however, your projector supplier should be able to provide you with suitable guidance, or even an experienced professional installer. The Color Management provides six sets (RGBCMY) of colors to be adjusted. When you select each color, you can independently adjust its range and saturation according to your preference. If you have purchased a test disc which contains various color test patterns and can be used to test the color presentation on monitors, TVs, projectors, etc. You can project any image from the disc on the screen and enter the 6-axis Color Adjust menu to make adjustments. 38 1. 2. 3. 4. 5. 6. 7. 8. 9. Go to the PICTURE menu and highlight 6-axis Color Adjust. Press OK/IMAGE and the 6-axis Color Adjust page is displayed. Highlight Select Color and press / to select a color from among Red, Green, Blue, Cyan, Magenta, or Yellow. Press to highlight Hue and press / to select its range. Increase in the range will include colors consisted of more proportions of its two adjacent colors. Please refer to the illustration to the right for how the colors relate to each other. For example, if you select Red and set its range at 0, only pure red Yellow GREEN RED in the projected picture will be selected. Increasing its range will include red close to yellow and red close to magenta. Press to highlight Saturation and adjust its values to your Magenta Cyan preference by pressing / . Every adjustment made will reflect to the image immediately. BLUE For example, if you select Red and set its value at 0, only the saturation of pure red will be affected. Press to highlight Brightness and adjust its values to your preference by pressing / . The brightness level of the primary color you select will be affected. Every adjustment made will reflect to the image immediately. Repeat steps 3 to 6 for other color adjustments. Make sure you have made all of the desired adjustments. Press MENU to exit and save the settings. Saturation is the amount of that color in a video picture. Lower settings produce less saturated colors; a setting of “0” removes that color from the image entirely. If the saturation is too high, that color will be overpowering and unrealistic. Using Screen Color In the situation where you are projecting onto a colored surface such as a painted wall which may not be white, the Screen Color feature can help correct the projected picture’s color to prevent possible color difference between the source and projected pictures. To use this function, go to the DISPLAY > Screen Color menu and press / to select a color which is the closest to the color of the projection surface. There are several recalibrated colors to choose from: Light Yellow, Pink, Light Green, Blue, and Blackboard. 39 ENGLISH To adjust the settings: Setting the presentation timer The presentation timer can indicate the presentation time on the screen to help you achieve better time management when giving presentations. Follow these steps to utilize this function: 1. 2. Go to the SYSTEM SETUP: Basic > Presentation Timer menu and press OK/IMAGE to display the Presentation Timer page. Press to highlight Preset Time and decide the timer period by pressing / . The length of time can be set from 1 to 5 minutes in 1-minute increments and 5 to 240 minutes in 5-minute increments. If the timer is already on, the timer will restart whenever the Preset Time is reset. 3. Press to highlight Timer Display and choose if you want the timer to show up on the screen by pressing / . Selection Description Always Displays the timer on screen throughout the presentation time. 1 min/2 min/3 min Displays the timer on screen in the last 1/2/3 minute(s). Never Hides the timer throughout the presentation time. 4. 5. Press to highlight Position and set the timer position by pressing / .The reminder position can be chosen from the upper-left, lower-left, upper-right to the lower-right corner of the screen. Press to highlight Counting Direction and select your desired counting direction by pressing / . Selection Description Count Up Increases from 1 to the preset time. Count Down Decrease from the preset time to 1. 6. 7. 8. Press to highlight Sound Reminder and decide if you want to activate sound reminder by pressing / . If you select On, a double beep sound will be heard at the last 30 seconds of counting down/up, and a triple beep sound will be produced when the timer is up. To activate the presentation timer, press and press / to select On and press OK/IMAGE. A confirmation message is displayed. Highlight Yes and press OK/IMAGE to confirm. You will see the message “Timer is On!” appearing on the screen. The timer starts counting once the timer is turned on. If you switch input signal or press AUTO PC when the timer is on, the timer will be stopped. To cancel the timer, perform the following steps. 1. 2. 3. Go back to the Presentation Timer page. Press and press / to highlight Off and press OK/IMAGE. A confirmation message is displayed. Highlight Yes and press OK/IMAGE to confirm. You will see the message “Timer is Off!” appearing on the screen. Using the TIMER key TIMER is a multi-functional key. • • 40 If the presentation timer is off, pressing this key displays a confirmation message. You can decide whether to activate the timer or not by following the on-screen instruction. If the timer is already on, pressing this key displays a confirmation message. You can decide whether to restart, continue or turn off the timer by following the on-screen instruction. ENGLISH Hiding the image In order to draw the audience's full attention to the presenter, you can use BLANK on the projector or remote control to hide the screen image. Press any key on the projector or remote control to restore the image. The word 'BLANK' appears at the lower right corner of the screen while the image is hidden. You can set the blank time in the SYSTEM SETUP: Basic > Blank Timer menu to let the projector return the image automatically after a period of time when there is no action taken on the blank screen. Once BLANK is pressed, the projector enters Economic mode automatically. Do not block the projection lens from projecting as this could cause the blocking object to become heated and deformed or even cause a fire. Locking control keys With the control keys on the projector locked, you can prevent your projector settings from being changed accidentally (by children, for example). When the Panel Key Lock is on, no control keys on the projector will operate except I POWER. I 1. Press on the projector or remote control or go to the SYSTEM SETUP: Basic > Panel Key Lock menu, and select On by pressing / on the projector or remote control. 2. A confirmation message is displayed. Select Yes to confirm. To release panel key lock, press any key of the projector once to display the panel key lock warning. With the warning being displayed, press on the projector or remote control again. (Press and hold the key on the projector for 3 seconds.) You can also use the remote control to enter the SYSTEM SETUP: Basic > Panel Key Lock menu and press / to select Off. • Keys on the remote control are still in use when panel key lock is enabled. • If you press I POWER to turn off the projector without disabling panel key lock, the projector will still be in locked status the next time it is turned on. I Freezing the image Press FREEZE on the remote control to freeze the image. The word 'FREEZE' will be displayed in the upper left corner of the screen. To release the function, press any key on the projector or remote control. Even if an image is frozen on the screen, the pictures are running on the video or other device. If the connected devices have active audio output, you will still hear the audio even though the image is frozen on screen. Do not keep displaying a still picture for an extended period of time, as the afterimages may linger on the screen. 41 Adjusting the sound The sound adjustments made as below will have an effect on the projector speaker. Be sure you have made a correct connection to the projector audio input. See "Connection" on page 23 for how the audio input is connected. Muting the sound To temporarily turn off the sound, press MUTE on the remote control, or: 1. 2. 3. Press MENU and then press / until the SYSTEM SETUP: Advanced menu is highlighted. Press to highlight Audio Settings and press OK/IMAGE. The Audio Settings page is displayed. Highlight Mute and press / to select On. Adjusting the sound level To adjust the sound level, press VOL +/- on the remote control, or: 1. 2. Repeat steps 1-2 above. Press to highlight Volume and press / to select a desired sound level. Personalizing the projector menu display The On-Screen Display (OSD) menus can be set according to your preferences. The following settings do not affect the projection settings, operation, or performance. • • • • Menu Display Time in the SYSTEM SETUP: Advanced > Menu Settings menu sets the length of time the OSD will remain active after your last key press. The time length ranges from 5 to 30 seconds in 5-second increments. Use / to select a suitable time frame. Menu Position in the SYSTEM SETUP: Advanced > Menu Settings menu sets the OSD position in five locations. Use / to select a preferred position. Language in the SYSTEM SETUP: Basic menu sets your familiar language for the OSD menus. See "Using the menus" on page 29 for details. Splash Screen in the SYSTEM SETUP: Basic menu sets a preferred logo screen to be displayed during projector start-up. Use / to select a screen. Shutting down the projector 1. Press II POWER and a confirmation message displays prompting you. If you don't respond in a few seconds, the message will disappear. 2. Press II POWER a second time. The POWER indicator light flashes orange, the projection lamp shuts down, and the fans will continue to run for approximately 90 seconds to cool down the projector. Once the cooling process finishes, the POWER indicator light is a steady orange and fans stop. Disconnect the power cord from the wall socket if the projector will not be used in an extended period of time. 3. 4. 42 • To protect the lamp, we suggest you not to operate the projector during the cooling process. • To shorten the cooling time, you can also activate the Quick Cooling function. See "Quick Cooling" on page 57 for details. • Do not unplug the power cord before the projector shutdown sequence is complete or during the 90-second cooling down process. If the projector is not properly shut down, to protect the lamp, when you attempt to re-start the projector, the fans will run for a few minutes to cool down. Press I POWER again to start the projector after the fans stop and the POWER indicator light turns orange. I Direct power off 1. 2. 3. 4. The AC power cord can be pulled out during the projector is on. To protect the lamp, wait about 10 minutes before re-starting the projector. When you attempt to re-start the projector, the fans may run for a few minutes to cool down. In such cases, press II POWER again to start the projector after the fans stop and the POWER indicator light turns orange. To protect the lamp, do not shut down the projector while the POWER indicator light is blinking green after the lamp lights up. Before shutting down the projector, be sure to close the menu screen. If you shut down the projector without closing the menu, the setting data of the menu may not be saved. If you shut down the projector while controlling the projector using the network function, the application software such as e-Control™ may fail. In this case, close the application software first. After the connection between the projector and the computer re-establishes, initialize the software again. 43 ENGLISH • Watching 3D content This projector supports 3D content display using the DLP Link system. This projector supports 3D image signals in Frame Sequential/Frame Packing/Top-Bottom/Side-By-Side format. You need the following items to project and watch 3D content. • • • 3D content capable device. For example, a computer with graphics board and software capable of outputting 3D images 3D content DLP-Link active electronic shutter 3D glasses (144Hz Compatible) Not all 3D glasses are guaranteed to work correctly. Supported 3D signal For supported timings in different 3D formats, see "Timing chart" on page 69 for details. To watch 3D content from a computer: 1. Connect the projector to a computer with a computer cable. When connecting the projector to a computer, make sure you switch the computer's output signal so that it is only outputting to the projector (do not use dual mode). 2. Output a 3D signal from the computer connected to the projector. 3. Turn on the DLP-Link system 3D glasses, and wear them to enjoy the content. 4. Choose an appropriate 3D format for the "3D" setting. 5. If you cannot see 3D objects, change the "3D Sync" setting from the OSD. To watch 3D content from an HDMI device: 1. Connect the projector to a computer with an HDMI cable. 2. Output a 3D signal from the HDMI device connected to the projector. 3. Turn on the DLP-Link system 3D glasses, and wear them to enjoy the content. 4. The default setting of the 3D menu is Auto and the projector automatically chooses an appropriate 3D format when detecting 3D contents. If the projector cannot recognize the 3D format, change the "3D" setting and choose a 3D mode. 5. If you cannot see 3D objects, change the "3D Sync" setting from the OSD. • It may be difficult to view 3D images if the room is too bright. Also, if there are fluorescent lights (50 Hz) in the room, the light may flicker when using 3D glasses. If this happens, turn down or turn off the fluorescent light. • You cannot change the image mode when viewing 3D content. Cautions when viewing 3D content • 3D content should not be viewed by people with a history of photosensitive epilepsy, people with heart conditions, pregnant women, the elderly, people with serious illnesses, or people with a history of epileptic seizures. Viewing 3D content could aggravate their pre-existing conditions. • Do not view 3D content if you are feeling unwell or are tired. In addition, do not view 3D content if you are sleep deprived or inebriated. • If you notice any of the following symptoms, stop viewing the 3D content immediately and wait until the symptoms subside. - If the image appears to be doubled or if the 3D effect is not clear. - Stop viewing if you feel your physical condition change, such as if you feel fatigued or unwell. - When enjoying 3D content that rotates, rolls, or shakes you may feel as if you are were moving, which can trigger a form of "sea sickness". • 44 Viewing 3D content for too long may cause eyestrain. To avoid this, be sure to take regular breaks. Viewing 3D content for too long or viewing them from an angle may cause eyestrain and so on. Children viewing 3D content should always be accompanied by an adult. Children may not tell you if they are feeling unwell when viewing 3D content, so always be sure to check with the child. The minimum recommended age for viewing 3D content is six years old. • Make sure you are at an appropriate distance from the front of the screen when viewing 3D content. Make sure you are at least three times the height of the screen away from the screen when viewing 3D content, and that your eyes are level with the screen. • The image source may be reversed. Check that the settings are correct and that the 3D effect is being correctly applied. If the image is inversed and the left and right eye images are swapped, the 3D effect does not work, which could cause eye strain or cause you to feel unwell. 45 ENGLISH • Supervising and controlling by computer With a proper LAN cable connection and LAN Control settings, you can operate the projector from a computer using a web browser or PJLink™ application (LV-X300/LV-WX300 only) when the computer and the projector are connected to the same local area network. The LV-X300/LV-WX300 projector supports Crestron® software and PJLink™. An example of connecting the projector to computer. External hub Computer LAN cable (option) (100BASE-TX or 10BASE-T should be supported.) • When using an external hub or router, use a Category 5 straight cable. (A crossed cable can be used with some hubs and routers. See the appropriate documentation for more information.) • Don't touch the metal parts of the LAN connector and LAN cable because static electricity may be discharged from your body, causing damage to the projector. Configuring the LAN Settings If you are in a DHCP environment: 1. 2. 3. 4. 5. 6. 7. Make sure the projector and your computer are properly connected to the same local area network. Press MENU and then press / until the SYSTEM SETUP: Advanced menu is highlighted. Press to highlight LAN Settings and press OK/IMAGE. The LAN Settings page is displayed. Press to highlight DHCP and press / to select On. Press to highlight Apply and press OK/IMAGE. Please wait for around 15 - 20 seconds, and then re-enter the LAN Settings page. The Projector IP Address, Subnet Mask, Default Gateway, and DNS Server settings will be displayed. Note down the IP address displayed in the Projector IP Address row. • If the Projector IP Address still does not appear, contact your network administrator. • If the LAN cables are not properly connected, the Projector IP Address, Subnet Mask, Default Gateway, and DNS Server settings will display 0.0.0.0. Make sure the LAN cables are properly connected and perform the above procedures again. If you are in a non-DHCP environment: 1. 2. 3. 4. 5. 6. 7. Repeat steps 1-3 above. Press to highlight DHCP and press / to select Off. Contact your network administrator for information on the Projector IP Address, Subnet Mask, Default Gateway, and DNS Server settings. Press to select the item you want to modify and press OK/IMAGE. Press / to move the cursor and then press / to enter the value. To save the setting, press OK/IMAGE. If you do not want to save the setting, press MENU. Press to highlight Apply and press OK/IMAGE. If the LAN cables are not properly connected, the Projector IP Address, Subnet Mask, Default Gateway, and DNS Server settings will display 0.0.0.0. Make sure the LAN cables are properly connected and perform the above procedures again. 46 Once you have the correct IP address for the projector and the projector is on or in standby state, you can use any computer that is on the same local area network to control the projector. When using this function, Adobe Flash Player has to be installed in your computer. Please download Adobe Flash Player from the website of Adobe Systems Incorporated. 1. Enter the IP address of the projector in the address bar of your browser and press enter. (for example, http://192.168.0.146) 2. The remote network operation page is displayed. This page allows you to operate the projector as if you were using the remote control or control panel on the projector. i ii i Press / to reveal more buttons. i i. These buttons function the same as the ones on the OSD menus or remote control. See "2. PICTURE menu" on page 56 and "Remote control: LV-RC08" on page 16 for details. ii. To switch input source, click on your desired source. When you use the projector control panel or remote control to change the OSD menu settings, it may take a while for the web browser to synchronize these changes with the projector. 3. The Tools page allows you to manage the projector, configure the LAN control settings and secure access of remote network operation on this projector. i ii iv iii v vi i. When using the Crestron Control System, please refer to the user manual of Crestron Control system for setup information. ii. You can name the projector, keep track of its location and the person in charge of it. This column allows a maximum of 22 single-byte characters. iii. You can adjust the LAN Settings. 47 ENGLISH Controlling the projector remotely through a web browser (e-Control™) (LV-X300/LV-WX300 only) iv. Once set, access to the remote network operation page on this projector has been passwordprotected. To enable this function, check the box in front of "Enable" and type in your desired password in the New Password column and confirm the new password by re-entering the new password at the Confirm column. To disable password protection, uncheck the box. v. Once set, access to the Tools page has been password-protected. Refer to step iv for how to use the password function. vi. Press Exit to go back to the remote network operation page. • After making the adjustments, press the Send button and the data will be saved in the projector. • Once the password is set, the Log Out button will display beside the Tools button. • Write down your selected password in advance or right after the password is entered so that it is available to you should you ever forget it. • If you did not write down your password, and you absolutely do not remember it you can reset the password by following procedure. - Open log in screen of e-Control. by your web browser. - Long press MENU and Right on the projector for 3 seconds. - Now the password has been reset. • The software is available in English language. • When DHCP is turned on, there is a possibility of stopping the webpage connection. If this happens, please check the new IP address of the projector and enter the new address to connect again. 4. The Info page displays the information and status of this projector. i ii i iii i. The information you entered in the Tools page will display here and these columns are empty when you use e-Control™ for the first time. ii. When the projector is in abnormal conditions, the following information will display. 48 ENGLISH When the projector is in normal conditions or in any abnormal conditions other than the ones mentioned below, the Error Status column will be "0:No Error". Error Status Description 3: Lamp fail The lamp fails to ignite or turns off during operation. 3: Over Temp The projector temperature is too high or cannot be detected. 3: Fan Lock The fan rotation speed cannot be set or detected. 3: Over Lamp Usage time The lamp is still in use after the lamp warning messages display. (3 = Error; 1 = notice) 5. iii. Press Exit to go back to the remote network operation page. After pressing the button ‘Contact IT Help’, the HELP DESK window will appear at the upper right corner. You will be able to deliver messages to RoomView™ software which is connected to the same local area network. For more information, visit http://www.crestron.com & www.crestron.com/getroomview. Controlling the projector using PJLink™ application (LV-X300/ LV-WX300 only) This projector supports standard protocol PJLink™ for projector control and you can control and monitor projector's operations using the same application among projectors of different models and different manufacturers. About PJLink™ • • • To use PJLink™ function, the PJLink™ application software is required. For the specifications of PJLink™, access to the Web site of Japan Business Machine and Information System Industries Association (JBMIA). (http://pjlink.jbmia.or.jp/english) This projector is fully compliant to the specifications of JBMIA PJLink™ Class 1. It supports all the commands defined by PJLink™ Class 1, and the compliance has been verified with the PJLink™ standard specifications Version 1.0. Utilizing the password function To prevent unauthorized connection to the projector via PJLink™ application, the projector includes an option for setting up password security. To set the password: 1. 2. 3. 4. 5. Open the OSD menu and go to the SYSTEM SETUP: Advanced > LAN Settings menu. Press OK/ IMAGE. The LAN Settings page is displayed. Highlight PJLink Certification and select On by pressing / . The default password is "admin". Press to highlight Change PJLink Password and press OK/IMAGE. Enter the current password. Press , to select the digit and press , to select from 0-9, A-Z, a-z or symbols. Press OK/IMAGE to confirm. Enter the new password and Press OK/IMAGE to confirm. If you forget the password, please use the password "projectorcontroller". 49 PJLink™ supported commands The table below shows commands to control the projector using the PJLink™ protocol. Commend Description Remark (Parameter) POWR Power control 0 = Power off 1 = Power on POWR? Inquiry about the power state 0 = Standby 1 = Power on 2 = Cooling down 3 = Warming up INPT Input switching INPT? Inquiry about input switching AVMT Mute control AVMT? Inquiry about the mute state 10 = BLANK disable 11 = BLANK enable 20 = Audio mute disable 21 = Audio mute enable 30 = BLANK and audio mute disable 31 = BLANK and audio mute enable Inquiry about the error state 1st byte: Fan error, 0 or 2 2nd byte: Lamp error, 0 or 2 3rd byte: Temperature error, 0 or 2 4th byte: Always 0 5th byte: Always 0 6th byte: Other errors, 0 or 2 * 0 or 2 mean as follows: 0 = No error detected, 2 = Error LAMP? Inquiry about the lamp state 1st value (1 to 4 digits): Cumulative lamp operating time (This item shows a lamp operating time (hour) calculated based on that Lamp Mode is Economic.) 2nd value: 0 = Lamp off, 1 = Lamp on INST? Inquiry about the available inputs The following value is returned. "11 12 21 22 31" NAME? Inquiry about the projector name The command responds with the projector name specified in the Tools page. INF1? Inquiry about the manufacturer name "Canon" is returned. INF2? Inquiry about the model name "LV-X300" or "LV-WX300" is returned. INF0? Inquiry about other information DMD resolution is returned. CLSS? Inquiry about the class information "1" is returned. ERST? 50 11 = COMPUTER1 12 = COMPUTER2 21 = VIDEO 22 = S-VIDEO 31 = HDMI • The PJLink "INPT?" will be replied only when the source is displayed on screen. When there is no signal, only "ERR3 Time!" will be answered. • The above-mentioned control may not be performed correctly or the monitoring data may not be obtained correctly in the following conditions: During standby • During input source switching • During command processing • During AUTO PC execution • Before the splash screen disappears after the power is turned on. • Use 1 computer to control/monitor 1 projector. • For how to control/monitor using PJLink™, see the operation manual of the PJLink™ application you use. • When you monitor the projector's operating state using this function by issuing inquiry commands successively, issue an inquiry command after receiving the response to the previous inquiry command from the projector. ENGLISH • Using the Network Function when the projector is in standby mode When the Standby LAN in the SYSTEM SETUP: Advanced > LAN Settings menu is activated, the projector is able to provide the network function when it is in standby mode. Glossary For more detail of the glossary below, refer to the technical book that is commercially available. Term Description DHCP Abbreviation for Dynamic Host Configuration Protocol. This protocol automatically assigns IP Address to networked devices. IP Address Numerical address to identify networked computers. Subnet Mask A numeric value to define the number of bits used for a network address of a divided network (or subnet) in an IP Address. Default Gateway A server (or router) to communicate across networks (subnets) that are divided by Subnet Mask. 51 Menu operation Menu system Please note that the on-screen display (OSD) menus vary according to the signal type selected. Main menu Sub-menu Options Screen Color Off*/Light Yellow/Pink/Light Green/Blue/Blackboard Aspect Auto*/Real/16:10 (LV-WX300 only)/4:3/16:9 Keystone Position 1. DISPLAY Phase H. Total Dots D.Zoom 3D Auto*/Frame Sequential/Frame Packing/Top-Bottom/Side-BySide 3D Sync Normal*/Invert Image Mode Presentation/Standard*/sRGB/ Movie/User 1/User 2 Brightness Contrast Color Tint 2. PICTURE Sharpness BrilliantColor™ On*/Off Color Temperature High/Middle*/Low Select Color 6-axis Color Adjust R*/G/B/C/M/Y Hue Saturation Brightness 3. INPUT Auto Search * Indicates an item that is factory-set (after reset). 52 On*/Off Sub-menu Presentation Timer ENGLISH Main menu Options Preset Time 1~240 minutes Timer Display Always*/1 min/2 min/3 min/Never Position Top-Left*/Bottom-Left/Top-Right/ Bottom-Right Counting Direction Count Down*/Count Up Sound Reminder On*/Off On/Off* 4. SYSTEM SETUP: Basic Language Image flip H/V Front Table*/Rear Table/Front Ceiling/Rear Ceiling Auto Power Off Disable/5 min/10 min/15 min/ 20 min*/25 min/30 min Blank Timer Disable*/5 min/10 min/15 min/ 20 min/25 min/30 min Panel Key Lock Off*/On Sleep Timer Disable*/30 min/1 hr/2 hr/3 hr/4 hr/ 8 hr/12 hr Splash Screen Black/Blue/Canon* Quick Cooling On/Off* High Altitude Mode On/Off* Audio Settings 5. SYSTEM SETUP: Advanced Menu Settings Lamp Settings Mute On/Off* Volume Menu Display Time 5 sec/10 sec/15 sec*/20 sec/ 25 sec/30 sec Menu Position Center*/Top-Left/Top-Right/ Bottom-Right/Bottom-Left Lamp Mode Normal*/Economic Reset Lamp Time Lamp Time * Indicates an item that is factory-set (after reset). 53 Main menu Sub-menu Security Settings Closed Caption Settings 5. SYSTEM SETUP: Advanced Options Change Password Power On Lock On/Off* Closed Caption On/Off* Caption Channel CC1*/CC2/CC3/CC4 Standby LAN Off*/On PJLink Certification Off*/On Change PJLink Password LAN Settings (LVX300/LV-WX300 only) DHCP On*/Off Projector IP Address Subnet Mask Default Gateway DNS Server Apply Reset All Settings Input Image Mode 6. INFORMATION Current System Status Color Format Resolution Lamp Time 54 • * Indicates an item that is factory-set (after reset). • The menu items are available when the projector detects at least one valid signal. If there is no equipment connected to the projector or no signal detected, limited menu items are accessible. 1. DISPLAY menu FUNCTION DESCRIPTION Screen Color Corrects the projected picture’s color when the projection surface is not white. See "Using Screen Color" on page 39 for details. Aspect There are several options to set the image's aspect ratio depending on your input signal source. See "Selecting the aspect ratio" on page 35 for details. Keystone Corrects any keystoning of the image. See "Correcting keystone" on page 34 for details. Position Displays the position adjustment page. To move the projected image, use the directional arrow keys. The values shown on the lower position of the page change with every key press you made until they reach their maximum or minimum. Phase Adjusts the clock phase to reduce image distortion. H. Total Dots Adjusts the horizontal width of the image. D.Zoom Magnifies or reduces the projected image. See "Magnifying and searching for details" on page 35 for details. 3D ENGLISH Description of each menu This projector features a 3D function which enables you to enjoy 3D movies, videos, and sporting events in a more realistic way by presenting the depth of the images. You need to wear a pair of 3D glasses to view the 3D images. See "Watching 3D content" on page 44 for details. 3D Sync When you discover the inversion of the image depth, enable this function to correct the problem. 55 2. PICTURE menu 3. INPUT menu 56 FUNCTION DESCRIPTION Image Mode Pre-defined image modes are provided so you can optimize your projector image set-up to suit your program type. See "Selecting a image mode" on page 37 for details. Brightness Adjusts the brightness of the image. See "Adjusting Brightness" on page 37 for details. Contrast Adjusts the degree of difference between dark and light in the image. See "Adjusting Contrast" on page 37 for details. Color Adjusts the color saturation level -- the amount of each color in a video image. See "Adjusting Color" on page 37 for details. Tint Adjusts the red and green color tones of the image. See "Adjusting Tint" on page 38 for details. The function is only available when Video or SVideo with NTSC system is selected. Sharpness Adjusts the image to make it look sharper or softer. See "Adjusting Sharpness" on page 38 for details. BrilliantColor™ Adjusts white peaking while maintaining correct color presentation. See "Adjusting BrilliantColor™" on page 38 for details. Color Temperature See "Selecting a Color Temperature" on page 38 for details. 6-axis Color Adjust See "6-axis Color Adjust" on page 38 for details. Auto Search See "Switching input signal" on page 32 for details. 4. SYSTEM SETUP: Basic menu ENGLISH FUNCTION DESCRIPTION Presentation Timer Reminds the presenter to finish the presentation within a certain time frame. See "Setting the presentation timer" on page 40 for details. Language Sets the language for the On-Screen Display (OSD) menus. See "Using the menus" on page 29 for details. Image flip H/V See "Choosing a location" on page 19 for details. Auto Power Off Allows the projector to turn off automatically if no input signal is detected and no operation is made by user after a set period of time. See "Setting Auto Power Off" on page 60 for details. Blank Timer Sets the image blank time when the Blank feature is activated, once elapsed the image will return to the screen. See "Hiding the image" on page 41 for details. Panel Key Lock Disables or enables all panel key functions except I I POWER on the projector and keys on the remote control. See "Locking control keys" on page 41 for details. Sleep Timer Sets the auto-shutdown timer. The timer can be set to a value between 30 minutes and 12 hours. Splash Screen Allows you to select which logo screen will be displayed during projector start-up. See "Personalizing the projector menu display" on page 42 for details. Selecting On enables the function and the projector cooling time will be shortened to a few seconds. Quick Cooling 5. SYSTEM SETUP: Advanced menu If you attempt to restart the projector right after the quick cooling process, it may not be turned on successfully and will rerun its cooling fans. Audio Settings See "Adjusting the sound" on page 42 for details. Menu Settings See "Personalizing the projector menu display" on page 42 for details. Lamp Mode See "Setting Lamp Mode as Economic" on page 60 for details. Lamp Settings Reset Lamp Time See "Resetting the lamp timer" on page 64 for details. Lamp Time See "Getting to know the lamp hour" on page 60 for details on how the total lamp hour is calculated. Security Settings See "Utilizing the password function" on page 30 for details. 57 FUNCTION DESCRIPTION Closed Caption Settings Activates the function by selecting On when the selected input signal carries closed captions. • 5. SYSTEM SETUP: Advanced menu Closed Caption Settings Captions: An on-screen display of the dialogue, narration, and sound effects of TV programs and videos that are closed captioned (usually marked as "CC" in TV listings). When the projector displays OSD or any dialog, captions are not displayed at the same time. Caption Channel Selects a preferred closed captioning mode. To view captions, select CC1, CC2, CC3, or CC4 (CC1 displays captions in the primary language in your area). LAN Settings If you are using a LAN cable for connection, see "Supervising and controlling by computer" on page 46 for details. If you are using the PJLink™ application, see "Controlling the projector using PJLink™ application (LV-X300/LVWX300 only)" on page 49 for details. Returns all settings to the factory preset values. Reset All Settings The following settings will still remain: User 1, User 2, Language, Image flip H/V, High Altitude Mode, Security Settings, LAN Settings, “Tools“ menu in web UI, PJLink Password. Input Shows the current signal source. 6. INFORMATION menu Image Mode Shows the selected mode in the PICTURE menu. Current System Status Resolution Shows the native resolution of the input signal. Color Format Shows input system format. Lamp Time Displays the number of hours the lamp has been used. 58 Care of the projector Your projector needs maintenance from time to time, depending on the environmental circumstances, and should be done by authorized service technicians only. Contact your dealer for instructions. The only thing you can do yourselves on a regular basis is to keep the lens and cabinet clean. Never remove any parts of the projector except the lamp. Contact your dealer if other parts need replacing. Cleaning the lens Clean the lens whenever you notice dirt or dust on the surface. • • Use a canister of compressed air to remove dust. If there is dirt or smears, use lens-cleaning paper or moisten a soft cloth with lens cleaner and gently wipe the lens surface. Never rub the lens with abrasive materials. Cleaning the projector case Before you clean the case, turn the projector off using the proper shutdown procedure as described in "Shutting down the projector" on page 42 and unplug the power cord. • • To remove dirt or dust, wipe the case with a soft, lint-free cloth. To remove stubborn dirt or stains, moisten a soft cloth with water and a neutral pH detergent. Then wipe the case. • Never use wax, alcohol, benzene, thinner or other chemical detergents. These can damage the case. • Flammable substances may ignite causing fire or breakdown while the lamp is illuminating. Storing the projector If you need to store the projector for an extended time, please follow the instructions below: • • • • Make sure the temperature and humidity of the storage area are within the recommended range for the projector. Please refer to "Specifications" on page 67 or consult your dealer about the range. Retract the adjuster feet. Remove the battery from the remote control. Pack the projector in its original packing or equivalent. Transporting the projector It is recommended that you ship the projector with its original packing or equivalent. 59 ENGLISH Maintenance Lamp information Getting to know the lamp hour When the projector is in operation, the duration (in hours) of lamp usage is automatically calculated by the built-in timer. The method of calculating the equivalent lamp hour is as follows: Total Lamp Hour = (hours used in Normal mode) + 5/6*(hours used in Economic mode) See "Setting Lamp Mode as Economic" below for more information on Economic mode. To obtain the lamp hour information: 1. Press MENU and then press / until the SYSTEM SETUP: Advanced menu is highlighted. 2. Press to highlight Lamp Settings and press OK/IMAGE. The Lamp Settings page is displayed. 3. You will see the Lamp Time information appearing on the menu. 4. To leave the menu, press MENU. You can also get the lamp hour information on the INFORMATION menu. Extending lamp life The projection lamp is a consumable item that normally can last up to 5000 (used in Normal mode)–6000 (used in Economic mode) hours with proper usage. Such interval differs depending on the operating environment and may be shorter than 5000–6000 hours. To keep the lamp life as long as possible, you can do the following settings via the OSD menu. Setting Lamp Mode as Economic Using Economic mode reduces system noise and power consumption by approximately 20%. If the Economic mode is selected, the light output will be reduced and result in darker projected pictures. Setting the projector in Economic mode also extends the lamp operation life. To set Economic mode, go into the SYSTEM SETUP: Advanced > Lamp Settings > Lamp Mode menu and press / . • When this mode is switched, the projected images may flicker. • If this mode is frequently switched, the lamp may be deteriorated. Setting Auto Power Off This function allows the projector to turn off automatically if no input source is detected and no operation is made by user after a set period of time to prevent unnecessary waste of lamp life. To set Auto Power Off, go into the SYSTEM SETUP: Basic > Auto Power Off menu and press / . The time period can be set from 5 to 30 minutes in 5-minute increments. If the preset time lengths are not suitable for your presentation, select Disable. The projector will not automatically shut down in a certain time period. 60 ENGLISH Timing of replacing the lamp When the lamp indicator lights up red or a message appears suggesting it is time to replace the lamp, please install a new lamp or consult your dealer. An old lamp may cause a malfunction in the projector and in some instances the lamp may explode. The LAMP indicator light and TEMPerature indicator light will light up if the lamp becomes too hot. Turn the power off and let the projector cool for 45 minutes. If the Lamp or LAMP indicator light still lights up after turning the power back on, please contact your dealer. See "Indicators" on page 65 for details. The following lamp warning displays will remind you to change the lamp. Status The lamp has been in operation for 4500 hours. Install a new lamp for optimal performance. If the projector is normally run with Economic selected (See "Setting Lamp Mode as Economic" on page 60), you may continue to operate the projector until the 4950 hour lamp warning appears. Message Notice Order Replacement Lamp Lamp>4500 Hours OK The lamp has been in operation for 4950 hours. A new lamp should be fitted to avoid the inconvenience when the projector runs out of lamp time. Notice Replace Lamp Soon Lamp>4950 Hours OK The lamp has been in operation for 5000 hours. It is strongly recommended that you replace the lamp at this age. The lamp is a consumable item. The lamp brightness diminishes with use. This is normal lamp behavior. You can replace the lamp whenever you notice that the brightness level has significantly diminished. If the lamp is not replaced beforehand, it must be replaced after 5000 hours usage. The lamp MUST be replaced before the projector will operate normally. Notice Replace Lamp Now Lamp>5000 Hours OK WARNING Out of Lamp Usage Time Replace lamp (Refer to user manual) Then reset lamp timer OK 61 Replacing the lamp • Be sure to replace the lamp with a new lamp separately sold that is exclusive to this projector. Contact your dealer for purchase of the lamp. • To reduce the risk of electrical shock, always turn the projector off and disconnect the power cord before changing the lamp. • To reduce the risk of severe burns, allow the projector to cool for at least 45 minutes before replacing the lamp. • To reduce the risk of injuries to fingers and damage to internal components, use caution when removing lamp glass that has shattered into sharp pieces. To reduce the risk of injuries to fingers and/or compromising image quality by touching the lens, do not touch the empty lamp compartment when the lamp is removed. • Be sure to install the lamp securely. When the lamp isn’t installed properly, it won’t illuminate. Improper installation may also result in fire. • If the lamp should break, never shake the lamp box or hold it in front of your face after removing it. The glass fragments may fall out and cause injury to your eyes. • In the event that the high-pressure mercury lamp exploded, glass fragments may have been scattered inside the projector. Ask your dealer to replace the lamp and to inspect the inside of the projector. When you clean or replace the lamp by yourself, be sure to hold the handle of the lamp. You may get injured by glass fragments. • Contact your dealer when replacing the lamp unit with the projector mounted to the ceiling. • Don’t remove the lamp for any purpose other than replacement. Unnecessary removal of the lamp may result in a breakdown. • This projector uses a high-pressure mercury lamp as the light source. The high-pressure mercury lamp may explode or fail to illuminate permanently because of an impact, scratch, or deterioration through use. The period of time until explosion or permanent failure to illuminate varies considerably from lamp to lamp, depending on operation conditions. Therefore, the lamp may explode soon after the start of use. • The possibility of explosion of the lamp increases if you use it beyond its replacement period. When the instruction of lamp replacement appears, replace it with a new one immediately even if the lamp is still lighting normally. • When the high-pressure mercury lamp explodes, glass fragments will scatter inside or outside the lamp box and the gas charged inside the lamp will diffuse inside or outside the projector. The gas inside the lamp contains mercury. Be careful not to breathe it or avoid it from entering your eye or mouth. If you should breathe it or if it should enter your eye or mouth, see a doctor immediately. • This lamp contains mercury. Consult your local hazardous waste regulations to dispose of this lamp in a proper manner. • Be sure to use the lamp dedicated to this projector, LV-LP37 (LV-X300/LV-S300)/LV-LP39 (LVWX300). Use of other lamps may cause a failure of the projector. 1. 2. 62 Spare lamp: LV-LP37 (LV-X300/LV-S300)/ LV-LP39 (LV-WX300) Turn the power off and disconnect the projector from the wall socket. If the lamp is hot, avoid burns by waiting for approximately 45 minutes until the lamp has cooled. Unscrew the screws on the lamp cover. Remove the lamp cover from the projector. 1 , ENGLISH 3. 2 2 Pull up the lamp cover, pushing up the allow parts of the front panel. • Do not turn the power on with the lamp cover removed. • Do not insert your fingers between the lamp and the projector. The sharp edges inside the projector may cause injuries. 4. Remove and dispose of the lamp protection film. 5. Loosen the screw that secures the lamp. 6. Lift the handle so that it stands up. Use the handle to slowly pull the lamp out of the projector. • Pulling it too quickly may cause the lamp to break and scatter broken glass in the projector. • Do not place the lamp in locations where water might splash on it, children can reach it, or near flammable materials. • Do not insert your hands into the projector after the lamp is removed. If you touch the optical components inside, it could cause color unevenness and distortion of the projected images. 7. As shown in the figure, lower the new lamp into the lamp compartment while aligning the lamp with the holes in the lamp compartment. Make sure it fits in the projector. 1 2 3 3 8. Tighten the screw that secures the lamp. • Loose screw may cause a bad connection, which could result in malfunction. • Do not over tighten the screw. 9. Ensure the handle is fully laid flat and locked in place. 63 10. Place the lamp protection film supplied with the new lamp on the lamp compartment. 11. As shown in the figure, replace the lamp cover on the projector. 2 1 12. Tighten the screws that secure the lamp cover. • Loose screw may cause a bad connection, which could result in malfunction. • Do not over tighten the screws. 13. Restart the projector. Do not turn the power on with the lamp cover removed. Resetting the lamp timer 14. After the startup logo, open the On-Screen Display (OSD) menu. Go to the SYSTEM SETUP: Advanced > Lamp Settings menu. Press OK/IMAGE. The Lamp Settings page is displayed. Press to highlight Reset lamp timer and press OK/IMAGE. A warning message is displayed asking if you want to reset the lamp timer. Highlight Reset and press OK/IMAGE. The lamp time will be reset to '0'. Notice Reset Lamp Time ? Reset Do not reset if the lamp is not new or replaced as this could cause damage. 64 Cancel Indicators POWER Status & Description TEMP ENGLISH Light LAMP Power events Orange Off Off Stand-by mode. Green Flashing Off Off Powering up. Green Off Off Normal operation. Orange Flashing Off Off Normal power-down cooling. Red Off Off FW Download. Green Off Red Color Wheel start fail. Red Flashing Off Off Scaler shutdown fail (data abort). Off Off Red Lamp error in normal operation. Off Off Red Flashing Red Red Off Red Red Flashing Off Red Green Off Fan 3 error (the actual fan speed is +25% outside the desired speed). Green Red Off Temperature 1 error (over limited temperature, 55°C (131°F)). Lamp events Lamp is not lit up. Thermal events Fan 1 error (the actual fan speed is +25% outside the desired speed). Fan 2 error (the actual fan speed is +25% outside the desired speed). 65 Troubleshooting The projector does not turn on Cause Remedy There is no power from the power cable. Plug the power cord into the AC inlet on the projector, and plug the power cord into the power outlet. If the power outlet has a switch, make sure that it is switched on. Attempting to turn the projector on again during the cooling process. Wait until the cooling down process has completed. No picture Cause Remedy The video source is not turned on or connected correctly. Turn the video source on and check that the signal cable is connected correctly. The projector is not correctly connected to the input signal device. Check the connection. The input signal has not been correctly selected. Select the correct input signal with the SOURCE key on the projector or remote control. The lens cover is still closed. Open the lens cover. Blurred image Cause Remedy The projection lens is not correctly focused. Adjust the focus of the lens using the focus ring. The projector and the screen are not aligned Adjust the projection angle and direction as well as the properly. height of the unit if necessary. The lens cover is still closed. Open the lens cover. Depending on video signal timing, the projector needs to fine-tune for less blurred image. Adjust Phase in the IMAGE menu. Remote control does not work Cause Remedy The battery is out of power. Replace the battery with a new one. There is an obstacle between the remote control and the projector. Remove the obstacle. You are too far away from the projector. Stand within 8 meters (26 feet) of the projector. The password is incorrect Cause Remedy You do not remember the password. Please see "Resetting the password function" on page 30 for details. The LAN function cannot be used 66 Cause Remedy LAN control settings or LAN cable connection are problematic. Verify the LAN control settings. Please see "Configuring the LAN Settings" on page 46 for details. Make sure the LAN cables are properly connected. The web page is not shown in the web browser or the web page is not responding. Reload the page to see the data after changing on the screen. If the page is not showing the modified data, check the IP address of projector and log-in again. Specifications ENGLISH Projector specifications All specifications are subject to change without notice. Model name LV-WX300 LV-X300 1-CHIP DLP™ Optical system Time division color extraction, sequential display Projection lens Display device Display system Type DMD Size / Aspect ratio 0.65" x 1/16:10 0.55" x 1/4:3 Drive system DLP™ x 1 chip Number dots / Total number dots 1,024,000 (1280 x 800) 786,432 (1024 x 768) x 1 panel/1,024,000 x 1 panel/786,432 LV-S300 0.70" x 1/4:3 480,000 (800 x 600) x 1 panel/480,000 Zoom ratio / Focal length / 1.1x/21.0–23.1mm /F2.56–2.8 F value Zooming / Focusing system Manual / Manual Lens shift V: 50%, fixed V: 60%, fixed Light source Super-high pressure mercury lamp 190W Image size (projection W: 60" to 150" (1.94m W: 60" to 150" (2.26m to 5.66m/7.4' to 18.6') to 4.84m/6.4' to 15.9') T: 60" to 120" (2.49m to 4.98m/8.2' to 16.3') T: 60" to 120" (2.13m to 4.26m/7.0' to 14') distance) Number of colors 16,770,000 colors (full color) Brightness (in presentation mode) 3000lumen Contrast ratio*1 2300:1 (Fully white:f ully black, presentation mode) *1 Ratio of brightness at 75% 80% *1 periphery to center 10W ・ monaural x 1 Maximum input resolution 1920 x 1080 dots Video signals Speaker 2W ・ monaural x 1 Analog PC input UXGA/SXGA+/WXGA+/FWXGA/WXGA/SXGA/XGA/SVGA/ VGA/MAC HDMI input From connected computers: UXGA/SXGA+/ WXGA+/FWXGA/WXGA/SXGA/XGA/ SVGA/VGA - From connected AV equipment: 1080p/1080i/ 720p/576p/480p Component video input 1080p/1080i/720p/576p/576i/480p/480i Video input NTSC/PAL/SECAM/NTSC4.43/PAL-M/PAL-N/PAL-60 S video input NTSC/PAL/SECAM/NTSC4.43/PAL-M/PALN/PAL-60 - 67 Input terminal Model name LV-X300 LV-S300 HDMI terminal Digital PC, digital video input ANALOG PC / COMPONENT terminal Analog PC, Component (mini D-sub 15-pin) Mini-DIN4 S video input RCA terminal Video input LAN terminal Network connection (100BASE-TX / 10BASE- T) USB Port Service port CONTROL terminal RS-232C (D-sub 9-pin) AUDIO IN terminal Audio signal (3.5 stereo mini jack) AUDIO OUT terminal Input signal LV-WX300 - - Audio signal (3.5 stereo mini jack) Digital PC TMDS (Transition Minimized Differential Signaling) Analog PC 0.7Vp-p, positive polarity, impedance = 75 Ω Horizontal / vertical synchronization: TTL level, negative or positive polarity Component video COMPONENT: Separate Y Cb/Pb Cr/Pr signal Y: 1Vp-p, negative synchronization, impedance = 75 Ω Cb/Pb: 0.7Vp-p, impedance = 75 Ω Cr/Pr: 0.7Vp-p, impedance = 75 Ω Audio Impedance = 47k Ω or more Noise 35 / 29dB (Lamp mode: normal/eco) Operating temperature 0°C (32°F) to 40°C (104°F) Power supply AC100V~240V 50 / 60Hz Power consumption 330 W (Max), < 275 W(eco) < 0.5 W (Standby) When setting is: Standby LAN:Off 330 W (Max), < 275 W(eco) < 0.5 W (Standby) < 3 W (Standby) When setting is: Standby LAN:On Dimensions W: 282 mm, H: 114.5 mm, D: 232 mm (including protrusion) W: 282 mm, H: 91 mm, D: 232 mm (not including protrusion) 68 Weight 2.5 kg (5.5 lbs) Accessories Remote control, remote control dry-cell batteries, power cord, PC cable, User's Manual (this manual), Important Information and Warranty Card • *1 Compliance with ISO21118-2012 • Note that using the projector continuously for a long period of time may make the optical components deteriorate faster. ENGLISH Dimensions 282 mm (W) x 114.5 mm (H) x 232 mm (D) / 11.1 in (W) x 4.5 in (H) x 9.1 in (D) (including the protrusion) 232 mm (9.1”) 282 mm (11.1”) 114.5 mm (4.5”) 91 mm (3.6”) Tolerance:±2 mm (0.08 in) 69 Timing chart Supported timing for PC input Resolution Mode Refresh Rate (Hz) Horizontal Frequency (kHz) Clock (MHz) 720 x 400 720 x 400_70 70.087 31.469 28.3221 VGA_60* 59.940 31.469 25.175 VGA_72 72.809 37.861 31.500 VGA_75 75.000 37.500 31.500 640 x 480 800 x 600 1024 x 768 VGA_85 85.008 43.269 36.000 SVGA_60* 60.317 37.879 40.000 SVGA_72 72.188 48.077 50.000 SVGA_75 75.000 46.875 49.500 SVGA_85 85.061 53.674 56.250 SVGA_120** (Reduce Blanking) 119.854 77.425 83.000 XGA_60* 60.004 48.363 65.000 XGA_70 70.069 56.476 75.000 XGA_75 75.029 60.023 78.750 XGA_85 84.997 68.667 94.500 XGA_120** (Reduce Blanking) 119.989 97.551 115.500 1152 x 864 1152 x 864_75 75.00 67.500 108.000 1280 x 720 1280 x 720_60* 60 45.000 74.250 1280 x 768 1280 x 768_60* 59.870 47.776 79.5 WXGA_60 59.810 49.702 83.500 WXGA_75 74.934 62.795 106.500 WXGA_85 84.880 71.554 122.500 WXGA_120** (Reduce Blanking) 119.909 101.563 146.25 1280 x 800 SXGA_60*** 60.020 63.981 108.000 1280 x 1024 SXGA_75 75.025 79.976 135.000 SXGA_85 85.024 91.146 157.500 1280 x 960 1280 x 960_85 85.002 85.938 148.500 1360 x 768 1360 x 768_60*** 60.015 47.712 85.500 1440 x 900 WXGA+_60*** 59.887 55.935 106.500 1400 x 1050 SXGA+_60*** 59.978 65.317 121.750 1600 x 1200 UXGA*** 60.000 75.000 162.000 1680 x 1050 1680 x 1050_60*** 59.954 65.290 146.250 1366 x 768 1366 x 768_60 59.790 47.712 85.500 1600 x 900 1600 x 900_60 60.000 60.000 108.000 *Supported timing for 3D signal in Frame Sequential, Top-Bottom and Side-By-Side formats. **Supported timing for 3D signal in Frame Sequential format. ***Supported timing for 3D signal in Top-Bottom and Side-By-Side formats. 70 ENGLISH Supported timing for HDMI (HDCP) input Supported PC timings Resolution Mode Vertical Frequency (Hz) Horizontal Frequency (kHz) Clock (MHz) 720 x 400 720 x 400_70 70.087 31.469 28.3221 640 x 480 800 x 600 1024 x 768 1152 x 864 VGA_60* 59.940 31.469 25.175 VGA_72 72.809 37.861 31.500 VGA_75 75.000 37.500 31.500 VGA_85 85.008 43.269 36.000 SVGA_60* 60.317 37.879 40.000 SVGA_72 72.188 48.077 50.000 SVGA_75 75.000 46.875 49.500 SVGA_85 85.061 53.674 56.250 SVGA_120** (Reduce Blanking) 119.854 77.425 83.000 XGA_60* 60.004 48.363 65.000 XGA_70 70.069 56.476 75.000 XGA_75 75.029 60.023 78.750 XGA_85 84.997 68.667 94.500 XGA_120** (Reduce Blanking) 119.989 97.551 115.500 1152 x 864_75 75.00 67.500 108.000 1280 x 720 1280 x 720_60* 60 45.000 74.250 1280 x 768 1280 x 768_60* 59.870 47.776 79.5 1280 x 800 WXGA_60* 59.810 49.702 83.500 WXGA_75 74.934 62.795 106.500 WXGA_85 84.880 71.554 122.500 WXGA_120** (Reduce Blanking) 119.909 101.563 146.25 SXGA_60*** 60.020 63.981 108.000 1280 x 1024 SXGA_75 75.025 79.976 135.000 SXGA_85 85.024 91.146 157.500 1280 x 960 1280 x 960_85 85.002 85.938 148.500 1360 x 768 1360 x 768_60*** 60.015 47.712 85.500 1440 x 900 WXGA+_60*** 59.887 55.935 106.500 1400 x 1050 SXGA+_60*** 59.978 65.317 121.750 1600 x 1200 UXGA*** 60.000 75.000 162.000 1680 x 1050 1680 x 1050_60*** 59.954 65.290 146.250 1366 x 768 1366 x 768_60 59.790 47.712 85.500 1600 x 900 1600 x 900_60 60.000 60.000 108.000 *Supported timing for 3D signal in Frame Sequential, Top-Bottom and Side-By-Side formats. **Supported timing for 3D signal in Frame Sequential format. ***Supported timing for 3D signal in Top-Bottom and Side-By-Side formats. 71 Supported Video timings Timing Resolution Horizontal Frequency (kHz) Vertical Frequency (Hz) Dot Clock Frequency (MHz) 480i* 720(1440) x 480 480p 720 x 480 15.73 59.94 27 31.47 59.94 27 576i 576p 720(1440) x 576 15.63 50 27 720 x 576 31.25 50 27 720/50p** 1280 x 720 37.5 50 74.25 720/60p** 1280 x 720 45.00 60 74.25 1080/24P** 1920 x 1080 27 24 74.25 1080/30P 1920 x 1080 33.75 30 74.25 1080/50i*** 1920 x 1080 28.13 50 74.25 1080/60i*** 1920 x 1080 33.75 60 74.25 1080/50P 1920 x 1080 56.25 50 148.5 1080/60P 1920 x 1080 67.5 60 148.5 *Supported timing for 3D signal in Frame Sequential format. **Supported timing for 3D signal in Frame Packing and Top-Bottom formats. ***Supported timing for 3D signal in Side-By-Side format. Supported timing for Component-YPbPr input Timing Resolution Horizontal Frequency (kHz) Vertical Frequency (Hz) Dot Clock Frequency (MHz) 480i 720 x 480 15.73 59.94 13.5 480p 720 x 480 31.47 59.94 27 576i 720 x 576 15.63 50 13.5 576p 720 x 576 31.25 50 27 720/50p 1280 x 720 37.5 50 74.25 720/60p 1280 x 720 45 60 74.25 1080/50i 1920 x 1080 28.13 50 74.25 1080/60i 1920 x 1080 33.75 60 74.25 1080/50P 1920 x 1080 56.25 50 148.5 1080/60P 1920 x 1080 67.5 60 148.5 Displaying a 1080i(1125i)@60Hz or 1080i(1125i)@50Hz signal may result in slight image vibration. Supported timing for Video and S-Video inputs 72 Video mode Horizontal Frequency (kHz) Vertical Frequency (Hz) Sub-carrier Frequency (MHz) NTSC 15.73 60 3.58 PAL 15.63 50 4.43 SECAM 15.63 50 4.25 or 4.41 PAL-M 15.73 60 3.58 PAL-N 15.63 50 3.58 PAL-60 15.73 60 4.43 NTSC4.43 15.73 60 4.43 ENGLISH Control Commands You can control this projector by sending commands via CONTROL port or LAN port. System Requirement CONTROL port Connection Cable 9-pin RS-232-C Cable (Crossover) Communication Mode RS-232-C asynchronous, half-duplex communication Baud Rate 19200 bps Character Length 8 bit Parity Check None Stop Bits 2 bit Flow Control None LAN port Connection System TCP/IP Connection Port 33336 Control Command Function Read/ Write Operation Command (ASCII) Note W Power On POWER=ON<CR> Enable during “Standby” state. W Power Off POWER=OFF<CR> Power Source Selection Audio Control R Power Status GET=POWER<CR> W Computer1 INPUT=DSUB1<CR> W Computer2 INPUT=DSUB2<CR> W HDMI INPUT=HDMI<CR> W Video INPUT=VIDEO<CR> W S-Video INPUT=S-VIDEO<CR> R Current source GET=INPUT<CR> W Mute On MUTE=ON<CR> W Mute Off MUTE=OFF<CR> R Mute Status GET=MUTE<CR> W Volume + RC=VOL_P<CR> W Volume - RC=VOL_M<CR> R Volume Status GET=AVOL<CR> Enable during any power state. [Warming up] g:POWER=OFF2ON [Cooling down] g:POWER=ON2OFF 73 Image Mode Aspect Image Flip H/V Auto Search W Presentation IMAGE=PRESENTATION<CR> W Standard IMAGE=STANDARD<CR> W sRGB IMAGE=SRGB<CR> W Movie IMAGE=MOVIE<CR> W User1 IMAGE=USER_1<CR> W User2 IMAGE=USER_2<CR> R Image Mode GET=IMAGE<CR> W Aspect 4:3 ASPECT=4:3<CR> W Aspect 16:9 ASPECT=16:9<CR> W Aspect Auto ASPECT=AUTO<CR> W Aspect Real ASPECT=TRUE<CR> W Aspect 16:10 ASPECT=16:10<CR> R Aspect Status GET=ASPECT<CR> W Front Table IMAGEFLIP=NONE<CR> W Rear Table IMAGEFLIP=REAR<CR> W Front Ceiling IMAGEFLIP=CEILING<CR> W Rear Ceiling IMAGEFLIP= REAR_CEIL<CR> R Image flip H/V Status GET=IMAGEFLIP<CR> W Auto search QAS=ON<CR> W Auto search QAS=OFF<CR> R Auto search status GET=QAS<CR> R Lamp Hour GET=LMPT<CR> W Lamp Mode Normal LAMP=NORMAL<CR> W Lamp Mode Economic LAMP=ECO<CR> R Lamp Mode Status GET=LAMP<CR> Lamp 74 Operation High Altitude Blank On BLANK=ON<CR> W Blank Off BLANK=OFF<CR> R Blank Status GET=BLANK<CR> W Freeze On FREEZE=ON<CR> W Freeze Off FREEZE=OFF<CR> R Freeze Status GET=FREEZE<CR> W Menu On MENU=ON<CR> W Menu Off MENU=OFF<CR> W Auto PC RC=AUTOPC<CR> W Up RC=UP<CR> W Down RC=DOWN<CR> W Right RC=RIGHT<CR> W Left RC=LEFT<CR> W OK RC=OK<CR> W High Altitude mode On HIGHALT=ON<CR> W High Altitude mode Off HIGHALT=OFF<CR> R High Altitude mode status GET=HIGHALT<CR> ENGLISH W Control Response Read/ Write Condition Response Example W Success i:OK<CR> < BLANK=ON<CR> > i:OK<CR> W Illegal format : Don't exist command or structure e:0002 INVALID_COMMAND<CR> < INVALID=ON<CR> > e:0002 INVALID_COMMAND<CR> W Unsupported item: this command parameter can't support e:000A INVALID_PARAMETER<CR> < BLANK=INVALID<CR> > e:000A INVALID_PARAMETER<CR> W Block item: Current state can't use. e:1011 FUNCTION_NOT_AVAILABL E<CR> < ASPECT=AUTO<CR> > e:1011 FUNCTION_NOT_AVAILABLE<CR> R Success g:XXX=YYY<CR> XXX=Command Name, YYY=Parameter Name < GET=BLANK<CR> > g:BLANK=ON<CR> 75 R 76 Unsupported item: this command parameter can't support e:000A INVALID_PARAMETER<CR> < GET=INVALID<CR> > e:000A INVALID_PARAMETER<CR> • If the projector didn’t receive <CR> to finish a command within 5 seconds, it will timeout and you need to resend the command. • No case sensitive. CANON INC. 30-2, Shimomaruko 3-chome, Ohta-ku, Tokyo 146-8501, Japan U.S.A. CANON U.S.A. INC. One Canon Park, Melville, New York 11747, U.S.A. For all inquires concerning this product, call toll free in the U.S. 1-800-OK-CANON CANADA CANON CANADA INC. HEADQUARTERS 6390 Dixie Road, Mississauga, Ontario L5T 1P7, Canada CANON CANADA INC. MONTREAL BRANCH 5990, Côte-de-Liesse, Montréal Québec H4T 1V7, Canada CANON CANADA INC. CALGARY OFFICE 2828, 16th Street, N.E. Calgary, Alberta T2E 7K7, Canada For all inquiries concerning this product, call toll free in Canada 1-800-OK-CANON EUROPE, AFRICA & MIDDLE EAST CANON EUROPE LTD. 3 The Square, Stockley Park, Uxbridge, Middlesex, UB11 1ET United Kingdom CANON EUROPA N.V. Bovenkerkerweg 59, 1185 XB Amstelveen, The Netherlands CANON FRANCE S.A.S 17, quai du President Paul Doumer, 92414 Courbevoie Cedex, France CANON UK LTD. Woodhatch Reigate Surrey RH2 8BF, United Kingdom CANON DEUTSCHLAND GmbH Europark Fichtenhain A10, 47807 Krefeld, Germany CANON ITALIA S.p.A. Via Milano 8 I-20097 San Donato Milanese, Milano, Italy CANON Schweiz AG Geschäftsbereich Wiederverkauf, Industriestrasse 12, CH-8305 Dietlikon, Switzerland CANON GMBH Zetschegasse 11, A-1230 Wien, Austria CANON España, S.A. Av. De Europa, 6 Alcobendas 28108 Madrid, Spain CANON PORTUGAL S.A. Rua Alfredo da Silva, 14 Alfragide 2610-016 Amadora, Portugal CANON Belgium N.V. / S.A. Berkenlaan 3, 1831 Diegem (Mechelen), Belgium CANON Netherland NV Neptunusstraat 1, 2132 JA Hoofddorp, The Netherlands CANON LUXEMBOURG S.A. Rue des Joncs 21, L-1818 Howald, Luxembourg CANON DANMARK A / S Knud Hoejgaards Vej 1 DK-2860 Soeborg, Danmark CANON OY Huopalahdentie 24 PL 1 00351 Helsinki, Finland CANON SVENSKA AB Gustav III:s Boulevard 26 169 88 Solna, Sweden CANON NORGE as Hallagerbakken 110, Postboks 33, Holmlia, 1201 Oslo, Norway CENTRAL & SOUTH AMERICA CANON LATIN AMERICA, INC. 703 Waterford Way, Ste. 400 Miami, FL 33126, U.S.A. ASIA CANON (China) Co., Ltd. 15F Jinbao Building No.89 Jinbao Street, Dongcheng District, Beijing 100005, China CANON HONGKONG CO., LTD. 19 / F., The Metropolis Tower, 10 Metropolis Drive, Hunghom, Kowloon, Hong Kong CANON SINGAPORE PTE. LTD. 1 HarbourFront Avenue, #04-01 Keppel Bay Tower, Singapore 098632 CANON KOREA CONSUMER IMAGING INC. Canon BS Tower 5F, #168-12 Samseongdong, Gangnam-gu, Seoul, Korea OCEANIA CANON AUSTRALIA PTY. LTD. 1 Thomas Holt Drive, North Ryde, N.S.W. 2113, Australia CANON NEW ZEALAND LTD. Akoranga Business Park, Akoranga Drive, Northcote, Auckland, New Zealand