1
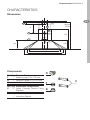
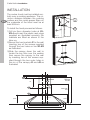
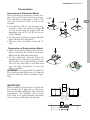
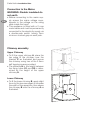
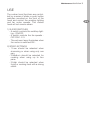
USER MANUAL
EFC60001
EFC70001
EFC90001
We were thinking of you
when we made this product
electrolux 3
EN
RECOMMENDATIONS AND SUGGESTIONS
5
CHARACTERISTICS
6
INSTALLATION
8
USE
11
MAINTENANCE
12
EN
Welcome to the world of Electrolux
Thank you for choosing a first class
product from Electrolux, which hopefully will provide you with lots of pleasure
in the future. The Electrolux ambition is
to offer a wide variety of quality products that make your life more comfortable. You find some examples on the
cover in this manual. Please take a few
minutes to study this manual so that
you can take advantage of the benefits
of your new machine. We promise that
it will provide a superior User Experience delivering Ease-of-Mind.
Good luck!
4 electrolux Recommendations and Suggestions
RECOMMENDATIONS AND SUGGESTIONS
Installation
•The manufacturer will not be held liable for any damages resulting from
EN
incorrect or improper installation.
•The minimum safety distance between the cooker top and the extractor hood is 650 mm.
•Check that the mains voltage corresponds to that indicated on the rating
plate fixed to the inside of the hood.
•For Class I appliances, check that the
domestic power supply guarantees
adequate earthing.
Connect the extractor to the exhaust
flue through a pipe of minimum diameter 120 mm. The route of the flue
must be as short as possible.
•Do not connect the extractor hood to
exhaust ducts carrying combustion
fumes (boilers, fireplaces, etc.).
•If the extractor is used in conjunction
with non-electrical appliances (e.g.
gas burning appliances), a sufficient
degree of aeration must be guaranteed in the room in order to prevent
the backflow of exhaust gas. The
kitchen must have an opening communicating directly with the open air in
order to guarantee the entry of clean
air.
Use
•The extractor hood has been designed exclusively for domestic use to
eliminate kitchen smells.
•Never use the hood for purposes
other than for which it has ben designed.
•Never leave high naked flames under
the hood when it is in operation.
•Adjust the flame intensity to direct it
onto the bottom of the pan only, making sure that it does not engulf the
sides.
•Deep fat fryers must be continuously
monitored during use: overheated oil
can burst into flames.
•Do not flambè under the range hood;
risk of fire
•The hood should not be used by children or persons not instructed in its
correct use.
Maintenance
•Switch off or unplug the appliance
from the mains supply before carrying
out any maintenance work.
•Clean and/or replace the Filters after
the specified time period.
•Clean the hood using a damp cloth
and a neutral liquid detergent.
The symbol
on the product or on
its packaging indicates that this product
may not be treated as household waste.
Instead it should be taken to the appropriate
collection point for the recycling of electrical
and electronic equipment. By ensuring this
product is disposed of correctly, you will help
prevent potential negative consequences for
the environment and human health, which
could otherwise be caused by inappropriate
waste handling of this product. For more
detailed information about recycling of this
product, please contact your local council,
your household waste disposal service or
the shop where you purchased the product.
Characteristics electrolux
5
CHARACTERISTICS
Dimensions
��
�
��
�
���
�
�
��
EN
�
�
�
�
�������
920 max
��������
670 min
�
���
670
�������
�
���
���
���
��������
���
���
���
Components
Ref.Q.ty Product Components
F
1 Adapting ring ø 120-125 mm
G
1 Reducer Flange ø 150-120 mm
H
1 Air Outlet Connection
Ref.Q.ty Installation Components
C
2 Upper Chimney Section Fixing
Brackets
Q.ty Documentation
1 Instruction Manual
�
�
�
�
6 electrolux Installation
INSTALLATION
The cooker hood must be installed centrally over a cooking appliance. The minimum distance between the cooking
EN surface and the metal grease filters on
the underside of the hood must be at
least 650mm.
�
��
�
To install the hood proceed as follows:
1)Drill six 8mm diameter holes at X1X2-J and insert the plastic rawl plugs
supplied as illustrated ensuring the
brackets are fitted as shown in the
blow up.
2)Secure the two brackets C to the wall
inserting two of the screws supplied
through the two holes on line X1-X2
as illustrated .
3)Slide the canopy down the wall to
locate the key hole over the washer
then secure the canopy to the wall
by inserting two of the screws supplied through the two outer holes in
the rim of the canopy J1 and J2 as
illustrated
��
�
��
��������
�
�
�
�
��������
�
�
���
�
�
�
�
�
�
��
�
��
�
920 max
�������
670 min
��������
�
���
�������
670
�
���
���
���
��������
���
���
���
Installation electrolux
7
Connections
Connection in Extraction Mode
When installing in extraction mode, connect the hood to the chimney using either a flexible or rigid pipe ø 150 or 125
mm, the choice of which is left to the
installer.
•To install a ø 125 mm air exhaust connection, insert the reducer flange G
on the hood body air outlet and the
adapting ring ø120-125 F on the reducer flange.
•Fix the pipe in position using sufficient
pipe clamps (not supplied).
•Remove any activated charcoal filters.
Connection in Recirculation Mode
•When the hood is fitted in the recirculation mode the Air Outlet Connection
H should be fitted as illustrated .
•Fit the (optional) charcoal filters by
repeating the following operation on
each side of the motor housing. Place
the two key hole slots in the filter and
turn the filter clockwise to lock the
filter in position.
WARNING: It is a possible fire hazard if
the metal grease filters are not cleaned
and the charcoal filters replaced regularly.
IMPORTANT:
When installing this product in recirculation mode over a gas hob or Gas cooker and between adjacent wall mounted
cupboards. The installer must ensure
that there is no gap between the edge
of the canopy and wall cup-boards.
����
�
����
EN
����
�
�
H ��
B
A
8 electrolux Installation/Use
Connection to the Mains
WARNING: Double insulated do
not earth
•Before connecting to the mains supply ensure the mains voltage correEN
sponds to the voltage on the rating
plate inside the hood.
•This appliance is fitted with a 2 core
mains cable and must be permanently
connected to the electricity supply via
a double-pole switch having 3mm
minimum contact gap on each pole.
Chimney assembly
Upper Chimney
•To fit the upper chimney A, place the
top edge of the chimney over the
bracket C as illustrated and secure
the chimney using two of the 2.9mm
self tapping screws provided.
•The distance H in the height between
the fixing holes X1 and X2 is determined by the height of the upper
chimney A.
Lower Chimney
•To fit the lower chimney B, apply slight
force to the two rear edges to increase
the width of the apperture, then sleeve
the chimney B over the chimney A as
illustrated.
�
��������
Maintenance electrolux
9
USE
The cooker hood functions are controlled by a series of slider or push button
switches mounted on the front of the
hood and control the worktop lighting
and fan motor speeds. This cooker
hood will not remove steam.
1) SLIDER SWITCHES
- A switch controls the wotktop lighting - ON/OFF.
- A switch controls the fan speeds OFF/ON-1-2-3.
- The red neon lamp illuminates when
the motor is switched ON .
2) SPEED SETTINGS
- 1/Low should be selected when
simmering or when using only one
pan.
- 2/Medium should be selected for
cooking when using up to four
pans.
- 3/High should be selected when
frying or cooking food with a strong
odour.
EN
MAINTENANCE
N.B. Before carrying out any kind of
maintenance, cleaning or replacing lamps, disconnect the hood from the mains
supply.
Lighting
40 W incandescent light
•Remove the metal grease filters. Disconnect the cooker hood from the
mains supply.
•Unscrew the bulbs and replace them
with new ones having the same characteristics.
•Replace the metal grease filters.
Filters
•The metal grease filter should be
cleaned every two months or more
frequently if the hood is used consistently and can be cleaned in a dishwasher or by hand using a mild detergent or liquid soap. When replacing,
ensure that they are dry.
•The charcoal filter cannot be washed
and should be replaced at least every
2 months or more frequently if the
hood is used consistently.
Cleaning
When cleaning the hood, it is recommended
to use a damp cloth and mild liquid household
cleaner. Never use abrasive cleaning materials.
ATTENTION: The manufacturer declines all
responsibility for any damage or injury
caused as a result of not following the instructions for installation, for maintenance
and replacement times of filters indicated (in
order to avoid a possible risk of fire when the
filters are saturated with grease).
www.electrolux.com
436003751_07 - 090313