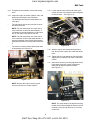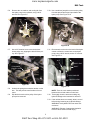
1
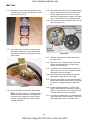
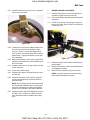
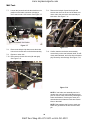
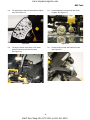
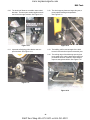
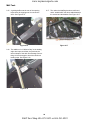
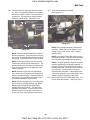
www.mymowerparts.com
Service Manual
Cub Cadet M48 Tank
IMPORTANT: READ SAFETY RULES AND INSTRUCTIONS CAREFULLY
This Service Manual is not a substitute for the Operator’s Manual. You must read, understand
and follow all of the directions in this manual as well as the Operator’s Manual before working
on this power equipment.
CUB CADET LLC, P.O. BOX 361131, CLEVELAND, OH 44136-0019
PRINTED IN USA
FORM NO.769-00966
(11/2003)
K&T Saw Shop 606-678-9623 or 606-561-4983
www.mymowerparts.com
K&T Saw Shop 606-678-9623 or 606-561-4983
www.mymowerparts.com
TABLE OF CONTENTS
M48 Tank .......................................................................................................... 1
About this Section ............................................................................................. 1
Changes for ‘03 and ‘04 .................................................................................... 1
Drive System Adjustment .................................................................................. 1
Hydro Pump Testing.......................................................................................... 4
Hydro Pump Replacement ................................................................................ 6
Hydro Pump Motor Replacement ...................................................................... 10
Brake Linkage Adjustment ................................................................................ 13
M72 Tank .......................................................................................................... 16
Other Tank Features ......................................................................................... 19
Kohler EFI ......................................................................................................... 23
EFI Controls ...................................................................................................... 26
K&T Saw Shop 606-678-9623 or 606-561-4983
www.mymowerparts.com
K&T Saw Shop 606-678-9623 or 606-561-4983
www.mymowerparts.com
M48 Tank
M48 Tank
1.
3.3.
ABOUT THIS SECTION:
The M48 is part of the Cub Cadet Commercial Tank
Series. The 2004 model year M48 is very similar to
The 2001 model year Tank. Earlier versions of this
machine have been covered in the “2001 Cub Cadet
Commercial Technical Handbook”: Form #77010528.
2.
CHANGES FOR ‘03 AND ‘04
•
New hydro motor frame assembly
•
New hydro motors
•
New brakes and brake linkages
•
Finer increments of height adjustment
•
Different choice of engines
•
Features of the 72” TANK
The hydraulic fluid level should be at the second
hole in the filler neck of the reservoir.
See Figure 3.3.
FIRST HOLE
SECOND HOLE
FLUID LEVEL
The content of this section is intended to detail
changes in service techniques that have occurred
since the introduction of the M Series.
3.
DRIVE SYSTEM ADJUSTMENT
3.1.
Prior to making any adjustments to the drive system, inspect the hydro control linkages, drive
belt, brake linkage, tires, fluid, and filter.
3.2.
The hydraulic reservoir and filter are accessible
beneath the seat. See Figure 3.2.
Figure 3.3
NOTE: It is very important that the hydraulic oil
does not become contaminated. Clean the surrounding area thoroughly prior to opening any
part of the hydraulic system.
NOTE: The hydraulic drive system contains
roughly 3.25 gal. of SAE 20W50 motor oil having
an API rating of SJ-CD or better. Hydraulic
Drive System Fluid Plus (P/N: 737-3121 gal.)
is an acceptable premium alternative.
NOTE: Complete draining and filling instructions
are contained in the “Operator’s and Service
Manual”.
RESERVOIR
OIL FILTER
3.4.
Tracking is effected by the circumference of the
rear tires, and the amount of drag produced by
the front tires.
•
Rear tire pressure may be adjusted within the
range of 8-10 PSI to achieve equal rear tire circumference.
•
Front tire pressure should be within the range
of 20-25 PSI.
BATTERY
Figure 3.2
1
K&T Saw Shop 606-678-9623 or 606-561-4983
www.mymowerparts.com
M48 Tank
3.5.
3.7.
For complete brake adjustment procedures,
refer to the “Brake Adjustment” section of this
manual. For the purpose of tracking, insure that
the brake linkage bellcranks and rods are well
lubricated, not damaged, and work as intended.
See Figure 3.5.
If in doubt about the source of brake drag, disconnect the brake link rod from the actuator arm
on the brake assembly. The actuator arm
should return to center, releasing the brakes.
See Figure 3.7.
BRAKE CONNECTING
ROD
BRAKE LINK
BRAKE ACTUATOR
ARM
Brake
Link
REAR BRAKE
ARM ASSEMBLY
BELLCRANK
MOUNTING
SHAFT
Figure 3.7
Figure 3.5
3.8.
3.6.
To check for brake drag, open the the relief valve
on each hydro pump. With the parking brake
released, both wheels should rotate with hand
pressure. See Figure 3.6.
Check the condition of the belt tensioner and
belt that drives the hydro pumps. See Figure 3.8.
OPEN
DRIVE BELT
TENSIONER
HYDRO PUMP
HYDRO RELIEF VALVE
Figure 3.8
3.9.
Figure 3.6
NOTE: Some hydraulic system drag will be
present, but a dragging brake will be immediately apparent.
Before making neutral control and tracking
adjustments, make sure the relief valves on both
hydro pumps are fully closed.
3.10. To check neutral control, safely lift and support
the rear wheels of the Tank.
3.11. Start the engine, and release the parking brake.
Do not move the lap bars from the neutral position. If either wheel rotates, neutral control
adjustment will be necessary. Turn off the
engine.
2
K&T Saw Shop 606-678-9623 or 606-561-4983
www.mymowerparts.com
M48 Tank
3.12. If adjustment is necessary, remove the cutting
deck.
3.14. Loosen the jam nuts at each end of the hydro
control link rods, and rotate the rods to lengthen
or shorten them. See Figure 3.14.
3.13. Inspect the return to neutral cylinders, rods, and
bellcranks of the hydro control linkages.
•
The bellcranks should pivot easily without too
much play.
•
The rods should not be bent, and the rod ends
should not be loose.
NOTE: The rod end and jam nut at the rear of
each connector rod have left hand threads. A
lock washer is placed between the control input
arm on the hydro pump and the rod end.
NOTE: The rod end and jam nut at the front of
each connector rod have right hand threads. A
spacer fits between each control hub assembly
(bellcrank) and the front rod end that connects to
it.
•
Figure 3.14
The return to neutral cylinders should both work
as advertised. See Figure 3.13.
3.15. Start the engine and release parking brake to
test, then turn the engine off to make the adjustment.
3.16. Tighten the jam nuts against the rod ends when
adjustment is complete, and make a final test to
confirm.
3.17. After neutral control is correctly adjusted, set the
travel stops to achieve correct tracking and
adjust the lap bars for operator comfort.
See Figure 3.17.
RETURN TO NEUTRAL
CYLINDER (RIGHT)
LAP BAR
MOUNTING
HANDLE
Figure 3.13
NOTE: Remove the control console to gain
access to the return to neutral cylinder.
CLAMP
BOLTS
JAM
NUT
LAP BAR TRAVEL
STOP BOLT
Figure 3.17
NOTE: The clamp bolts for the lap bar mounting
handle can be used to adjust the amount of force
required to move the lap bars into or out of the
neutral slot.
3
K&T Saw Shop 606-678-9623 or 606-561-4983
www.mymowerparts.com
M48 Tank
3.18. If one side does not drive as effectively as the
other, test the output of the hydro pump to determine if the problem lies in the pump or the hydro
motor. By the process of elimination, if performance is lacking, brake drag is eliminated,
adjustment is correct, and the pump is O.K.,
then the problem is the motor. Pressure and
flow tests will be used to determine if the pump
is the the source of the problem.
4.
4.4.
Thoroughly clean the area surrounding any
hydraulic fittings to be loosened or removed.
4.5.
If the unit has been run recently, allow it to cool
before doing loosening any hydraulic fittings.
WARNING: Hot hydraulic fluid can cause serious burns.
WARNING: Release of pressurized hydraulic
fluid can cause serious of fatal injury.
4.6.
Open the relief valve on the hydro pump that is
to be tested. This will relieve any residual
hydraulic pressure.
4.7.
Confirm that the hydraulic pressure has been
relieved by rotating the brake drum / hub assembly. If the it will not rotate, confirm that the brake
is released and that the brake linkage is not
bound.
4.8.
Install a 1/2” JIC double male coupler in one end
of the 18” hydraulic line in the test kit. Install a
90 deg. 1/2” JIC double male elbow in the other
end. See Figure 4.8.
TESTING HYDRO PUMP OUTPUT
NOTE: The log splitter hydraulic test kit is used
for this set of flow and pressure tests.
4.1.
Safely lift and support the rear of the M48.
4.2.
If the cutting deck is currently on the unit,
remove it.
4.3.
1/2” JIC COUPLER
VALVE
Remove the rear wheels using a 3/4” socket.
See Figure 4.3.
18” HYDRAULIC
LINE
PRESSURE
GUAGE
FLOW
METER
1/2” JIC
ELBOW
Figure 4.8
HIGH PRESSURE LINES:
TOP: in-forward / out-reverse
BOTTOM: out-forward / in-reverse
4.9.
BRAKE DRUM
HYDRO MOTOR
Position a catch pan beneath the hydro motor.
Have the hydraulic pressure and flow test kit and
two 1/2” JIC plugs within reach.
NOTE: The fittings on the ends of the test kit are
all 1/2” JIC.
Figure 4.3
4.10. Disconnect the upper line from the hydro motor
and quickly install a 1/2” JIC plug in the line. It
only needs to be finger tight.
NOTE: The fittings on the lines that connect the
hydro pumps to the hydro motors are 1/2” JIC.
NOTE: 7/8” and 13/16” wrenches will be needed
for this test. A 1” wrench may be needed to hold
the connector that joins the JIC line connection
to the O ring connection on the hydro motor.
4
K&T Saw Shop 606-678-9623 or 606-561-4983
www.mymowerparts.com
M48 Tank
4.15. Remove the stop bolt that sets the end of the
travel of the lap bar that controls the hydro pump
to be tested. See Figure 4.15.
NOTE: The test can be performed at either line
between the pump and the motor. The top line
on the motor is the in line from the pump when
driving forward. The linkage has more travel in
forward than it does in reverse, so the test is
most easily done on the top line of the pump,
driving the pump in the forward direction forward.
JAM NUT
4.11. Connect the flow meter end of the test kit to the
hydro motor.
4.12. Remove the plug from the line coming from the
outboard port on the hydro pump. Use the 18”
test kit line to connect the pressure gauge end of
the hydraulic test kit to the line coming from the
hydro pump. See Figure 4.12.
STOP BOLT
Figure 4.15
4.16. Confirm that the valve on the test kit is fully
open.
4.17. Start the engine and purge the hydraulic system as follows:
4.18. Cycle the lap bar from full forward to full reverse
5 times at 10 second intervals.
4.19. Close the relief valve on the hydro pump and
repeat the cycling process to purge any remaining air from the system.
4.20. Check for and repair any leaks.
4.21. Check the fluid level in the hydraulic reservoir.
Top it up if necessary.
Figure 4.12
4.13. Tighten all the fittings.
4.22. Continue to operate the drive system to warm-up
the hydraulic fluid.
4.14. Insure that no unsafe conditions will result from
starting the engine and operating the drive system.
NOTE: Performing the test with cold fluid will
make a significant difference in the flow readings
obtained. The test will not be valid.
CAUTION: The technician will be exposed to
moving parts during this procedure. They
should not reach past or around any moving
parts during this test, nor should they place
themselves in any position where a loss of footing or balance might bring them into contact with
rotating components. Loose hair or garments
should be secured to avoid the possibility of
entanglement with rotating components.
5
K&T Saw Shop 606-678-9623 or 606-561-4983
www.mymowerparts.com
M48 Tank
4.27. Interpretation: flow droop greater than 1.5 GPM
indicates a pump that is not performing as well
as it should.
4.23. When the fluid is between 160-210 deg. f.
(71-90 deg. c.) apply full forward drive pressure
to the lap bar with the engine running at full
speed (3600 RPM) while an assistant closes the
valve to the point where pressure reaches 300
PSI (21 Bar.). See Figure 4.23.
10 GPM
NOTE: A blocked filter may account for some
loss of performance.
4.28. Within the two year Cub Cadet Commercial warranty period, replace the pump if it does not perform as specified and all other factors have been
eliminated.
CONTROL
CONSOLE INSET:
3600 RPM
SPINNING
4.29. If a hydro pump requires repair, refer to HydroGear publication “BLN-51337” for complete service instructions.
4.30. If the hydro pump and all other factors are O.K.,
replace the hydro motor.
FLOW
NOTE: The hydro motor is not serviceable.
Replace it as a unit if it fails.
300 PSI
CLOSE VALVE TO
BUILD PRESSURE
Figure 4.23
NOTE: It may be necessary to over-shoot 300
PSI slightly, then open the valve to reduce pressure to 300 PSI.
4.24. Take note of the reading on the flow meter portion of the test kit when the pressure gauge
reads 300 PSI.
4.25. Continue closing the valve until the pressure
reading reaches 1,100 PS I (76 bar.). Take note
of the flow reading. See Figure 4.25.
9 GPM
5.
REPLACING THE HYDRO PUMP
5.1.
If the cutting deck is currently on the unit,
remove it.
5.2.
Safely lift and support the rear of the tank.
5.3.
Remove the rear wheels using a 3/4” socket.
5.4.
Tilt the seat up, and disconnect the negative battery cable.
5.5.
Remove the screen that covers the opening over
the cooling fans on the hydro pump to be
removed using a 3/8” wrench. See Figure 5.5.
1100 PSI
VALVE CLOSED
FURTHER
Figure 4.25
REMOVE DEBRIS SCREEN
4.26. Subtract the 1,100 PSI flow reading from the 300
PSI flow reading. The resulting figure is called
“flow droop”.
Figure 5.5
6
K&T Saw Shop 606-678-9623 or 606-561-4983
www.mymowerparts.com
M48 Tank
5.6.
Remove the nut, washer, and cooling fan from
the hydro pump to be replaced, using a 9/16”
wrench. See Figure 5.6.
FAN
5.10. Use a small two-jaw puller to remove the pulley
from the tapered and keyed input shaft of the
hydro pump. See Figure 5.10.
NUT
PULLER
WASHER
PULLEY
Figure 5.10
Figure 5.6
5.7.
Use a 3/8” breaker bar to move the belt tensioner pulley arm, slipping the belt off of the pulley. See Figure 5.7.
5.11. Disconnect the rod end on the back of the hydro
control rod from the control arm on the hydro
pump using a 9/16” wrench, and a 1/2” wrench.
See Figure 5.11.
NUT
SPRING
ROD END
TENSIONER
PULLEY ARM
BOLT
LOCK WASHER
CONTROL ARM
Figure 5.7
Figure 5.11
5.8.
5.9.
Unhook the spring that maintains tension on the
arm. This will provide more freedom of movement.
NOTE: There is a lock washer positioned
between the rod end and the control arm.
Slip the belt over the drive pulley of the hydro
pump to be removed.
5.12. Thoroughly clean the area surrounding any
hydraulic fittings to be loosened or removed.
5.13. If the unit has been run recently, allow it to cool
before doing loosening any hydraulic fittings.
WARNING: Hot hydraulic fluid can cause serious burns.
WARNING: Release of pressurized hydraulic
fluid can cause serious of fatal injury.
7
K&T Saw Shop 606-678-9623 or 606-561-4983
www.mymowerparts.com
M48 Tank
5.20. Disconnect the two lines that connect the hydro
motor to the back of the hydro pump using a pair
of 7/8” wrenches. Plug the lines.
See Figure 5.20.
5.14. Open the relief valve on the hydro pump that is
to be tested. This will relieve any residual
hydraulic pressure. See Figure 5.14.
RETURN LINE
FEED LINE
CLOSE
OPEN
HYDRO
PUMP
ELBOW
PRESSURE LINES
BETWEEN PUMP
AND MOTOR
HYDRO
MOTOR
RELIEF VALVE
ADAPTORS
Figure 5.14
Figure 5.20
5.15. Confirm that the hydraulic pressure has been
relieved by rotating the brake drum / hub assembly. If the it will not rotate, confirm that the brake
is released and that the brake linkage is not
bound.
5.21. Remove the two O ring to JIC adaptors from the
back of the hydro pump. Replace them with the
yellow shipping plugs from the replacement
hydro pump.
5.22. Remove the 90 deg. elbow fitting that the return
line was connected to using an 11/16” wrench
and a 3/4” wrench. Plug the port using a yellow
shipping plug removed from the replacement
pump.
5.16. If there is any possibility of fluid contamination,
drain and flush the system, and replace the filter
before installing the new hydro pump.
5.17. Position a catch pan beneath the hydro pump to
be removed. Have four 1/2” JIC plugs and two
1/2” JIC caps within reach.
5.23. Remove the O ring to JIC adaptor that the feed
line was connected using a 13/16” wrench. Plug
the port using a yellow shipping plug removed
from the replacement pump.
See Figure
5.23.
5.18. Disconnect the feed line that runs from from the
front of the hydro pump to the filter manifold
using a 7/8” wrench on the nut, and a 13/16”
wrench to hold the fitting on the hydro pump.
Plug the line, cap the fitting on the pump.
5.19. Disconnect the return line that runs from from
the outboard side of the hydro pump to the reservoir using a 7/8” wrench on the nut, and an 11/
16”” wrench to hold the fitting on the hydro
pump. Plug the line, cap the fitting on the pump.
See Figure 5.14.
Figure 5.23
8
K&T Saw Shop 606-678-9623 or 606-561-4983
www.mymowerparts.com
M48 Tank
5.24. Remove the handle from the relief valve using a
7/16” wrench and a 3/16” allen wrench.
5.29. Position the pulley over the opening in the hydro
pump support plate that the pump input shaft will
pass through.
5.25. Remove the nuts from the carriage bolts that
hold the hydro pump to the hydro pump mounting plate. See Figure 5.25.
MOUNTING NUT
5.30. Position the pump so that the two bolts that
secure it in position line-up with the two mounting ears on the pump, and the input shaft slips
into the pulley as the pump is raised up to the
hydro pump support plate. See Figure 5.30.
RELIEF VALVE
HANDLE REMOVED
MOUNTING BOLT
PULLEY WITH KEY
FITTINGS REMOVED
AND PLUGGED
NEW PUMP
Figure 5.25
5.26. Carefully lower and remove the hydro pump. If it
is to be returned to Cub Cadet, remove the yellow plugs and allow it to drain completely before
packing and shipping it.
Figure 5.30
5.31. Start both nuts that hold the pump onto their carriage bolts.
5.27. Inspect all of the fittings and O rings prior to
installation in the replacement pump.
See Figure 5.27.
DEFORMED O RING
5.32. As the pump is tightened into position, rotate the
pulley to align the keyways, allowing the pulley
to seat on the input shaft.
GOOD O RING
5.33. Install the fittings and lines, working quickly to
minimize fluid loss.
NOTE: Use care not to over-tighten the O ring
fittings, damaging the O rings.
NOTE: The lines may be installed finger tight to
establish their positions, then tightened fully.
5.34. Install the belt, tension arm spring, steering linkage.
5.35. Install the fan, washer and nut to the input shaft.
Torque the nut to 240 inch/lbs.
CHECK
THREADS
5.36. Install the debris screen.
5.37. Check the fluid level in the reservoir, purge the
system as described in the test instructions.
CHECK TAPERED SEATS
Figure 5.27
5.38. If the hydraulic system has been drained and
flushed with 20W50, install a new filter and follow the instructions for refilling the hydraulic system in the “Operator’s and Service Manual”.
5.28. Prior to installation, pour oil directly into the
pump inlet and high-pressure ports, then transfer yellow plugs back to the replacement pump.
9
K&T Saw Shop 606-678-9623 or 606-561-4983
www.mymowerparts.com
M48 Tank
5.39. Install the wheels, lower the TANK to the ground,
and test run it in a safe area. Make any necessary adjustments before installing the cutting
deck.
6.
REPLACING THE HYDRO MOTOR
6.1.
If the cutting deck is currently on the unit,
remove it.
6.2.
Safely lift and support the rear of the tank.
6.3.
Remove the rear wheels using a 3/4” socket.
6.4.
Tilt the seat up, and disconnect the negative battery cable.
6.5.
Thoroughly clean the area surrounding any
hydraulic fittings to be loosened or removed.
6.6.
If the unit has been run recently, allow it to cool
before doing loosening any hydraulic fittings.
WARNING: Hot hydraulic fluid can cause serious burns.
WARNING: Release of pressurized hydraulic
fluid can cause serious or fatal injury.
6.7.
Open the relief valve on the hydro pump. This
will relieve any residual hydraulic pressure.
See Figure 6.7.
OPEN
Figure 6.7
6.8.
Confirm that the hydraulic pressure has been
relieved by rotating the brake drum / hub assembly. If the it will not rotate, confirm that the brake
is released and that the brake linkage is not
bound.
10
K&T Saw Shop 606-678-9623 or 606-561-4983
www.mymowerparts.com
M48 Tank
6.9.
If the brake assembly is to be transferred to the
new hydro motor: remove the cotter pin from the
castle nut that holds the hub to the axle.
6.13. Disconnect the high pressure lines from the the
hydro motor one at a time using a 7/8” wrench.
A 1” wrench may be required to hold the fittings
on the hydro motor. Plug the lines.
See Figure 6.13.
6.10. Loosen, but do not remove the castle nut from
the axle using a 11/2” socket.
NOTE: It may be necessary to set the parking
brake while loosening the nut. Release the
parking brake afterward.
MOUNTING
BOLTS
DISCONNECT
NOTE: The studs are pressed into the brake
drum. The brake drum effectively is the drive
hub. The drive hub mounts on an narrow taper.
6.11. Remove the hairpin clip that secures the brake
link to the brake arm. Pivot the arm out of the
way. See Figure 6.13.
BRAKE
LINK
HAIRPIN CLIP
HIGH
PRESSURE
LINES
BRAKE
ARM
Figure 6.13
COTTER
PIN
6.14. Remove the four sets of nuts and bolts that hold
the hydro motor to the hydro motor frame
assembly using 3/4” wrenches.
CASTLE
NUT
6.15. Lift the motor slightly and carefully pull it out far
enough to remove the motor plate from the end
of the four bolts. See Figure 6.15.
MOTOR
PLATE
Figure 6.11
6.12. Place a catch pan under the hydro motor, and
have two 1/2” JIC plugs within reach.
MOTOR SPACERS
Figure 6.15
NOTE: The hydro motor weighs nearly 50 lbs.
11
K&T Saw Shop 606-678-9623 or 606-561-4983
www.mymowerparts.com
M48 Tank
6.19. Safely fixture the hydro motor and brake assembly in a minimum 20 Ton press so that the ram
presses against the end of the axle, and the
assembly is supported by the edge of the brake
drum. Press the drum off of the tapered shaft.
6.16. Withdraw the hydro motor, along with the three
motor spacers, and place them gently on a work
bench. See Figure 6.16.
6.20. Remove the castle nut and brake drum from the
axle. See Figure 6.20.
ORIENTATION MARKS
(ARROW TO FITTINGS)
BRAKE
DRUM
Figure 6.16
BRAKE
ASSEMBLY
6.17. If the brake is to be removed, remove the clip
that holds the brake arm on the splined shaft,
and mark the location of the brake arm on the
splined shaft.
Figure 6.20
6.21. Mark the orientation of the brake assembly on
the hydro motor.
6.22. Remove the four socket head cap screws that
hold the brake assembly to the hydro motor
using a 1/4” allen wrench.
6.23. Transfer the four mounting bolts from the old
hydro motor to the new one. Replace any that
show signs of wear or damage.
6.24. Position the three motor spacers on the bolts,
and install the hydro motor in the TANK.
6.25. Place the motor plate over the end of the bolts,
apply Loctite 242 (blue) the the bolts, and install
the four nuts. Tighten the bolts to 450-550 in.lbs.
Figure 6.17
6.26. Inspect the brake assembly. If there are not
signs of significant wear or damage, install the
brake on the new hydro motor, using the match
marks to maintain the same orientation.
6.18. Remove the brake arm from the splined shaft.
NOTE: The Hydro motor can be ordered with or
without the brake assembly. If an appropriate
size press is not available, the dealer should
consider ordering hydro motor with the brake
assembly attached.
6.27. Use new lock washers and / or Loctite 242 (blue)
when installing the brake assembly. Torque the
socket head cap screws to 160-200 in.-lbs.
12
K&T Saw Shop 606-678-9623 or 606-561-4983
www.mymowerparts.com
M48 Tank
6.28. Install the brake arm and clip on the new hydro
motor. See Figure 6.28.
7.
BRAKE LINKAGE ADJUSTMENT
7.1.
With the TANK parked on firm level ground, lift
and safely support the back of the unit.
7.2.
Remove the hairpin clips that hold the floor panel
in position.
7.3.
Lift the floor panel up using the grip opening at
the top rear edge, slide it to the left, and remove
it. See Figure 7.3.
Figure 6.28
6.29. Transfer the O ring to flare adaptor fittings from
the old hydro motor to the new hydro motor,
using a 1” wrench. Inspect the fittings and O
rings. If there is any doubt about their condition,
replace them. Lightly lubricate the O rings with
oil on assembly.
Figure 7.3
6.30. Apply a small amount of anti-seize compound to
the taper of the brake drum, and install the brake
drum on the axle.
7.4.
Release the hydro relief valves and release the
parking brake.
6.31. Install the castle nut on the axle, and lock it with
a fresh cotter pin.
7.5.
Rotate each wheel to confirm that the brakes are
not dragging or binding.
6.32. Connect the brake linkage.
7.6.
Remove the rear wheels using a 3/4” socket.
6.33. Install the rear wheels, and torque the lug nuts to
50-70 ft.-lbs.
NOTE: It may be necklaces to set the parking
brake while loosening the lug nuts.
6.34. Check the fluid level in the reservoir, purge the
system as described in the pressure and flow
test instructions.
NOTE: If the hydraulic system has been drained
and flushed with 20W50, install a new filter and
follow the instructions for refilling the hydraulic
system in the “Operator’s and Service Manual”.
6.35. Install the wheels, lower the TANK to the ground,
and test run it in a safe area. Make any necklaces adjustments before installing the cutting
deck.
13
K&T Saw Shop 606-678-9623 or 606-561-4983
www.mymowerparts.com
M48 Tank
7.7.
7.11. Remove the hairpin clip and clevis pin that
secures the clevis on the end of the brake connector rod to the rear brake arm assembly on
both sides. See Figure 7.11.
Loosen the jam nut that locks the shoulder nut in
position on the brake connector rod using a
9/16” wrench and a 3/4” wrench. See Figure 7.7.
REAR
BELLCRANK
SHAFT
BRAKE
LINK
ROD
SHOULDER NUTS
BUSHING
JAM NUTS
REAR BRAKE
ARM ASSEMBLY
BRAKE CONNECTOR RODS
BRAKE
CONNECTOR ROD
Figure 7.7
Figure 7.11
7.8.
7.9.
Remove the hairpin clip that secures the brake
link rod to the brake arm on the brake assembly.
7.12. Confirm that the rear brake arm assembly
moves freely on the rear bellcrank shaft, is sufficiently well lubricated, and is free from excessive
play caused by worn busings. See Figure 7.12.
Repeat on other side.
7.10. Disconnect the brake link rods (left and right).
See Figure 7.10.
BRAKE LINK ROD
REAR BRAKE
ARM ASSEMBLY
Figure 7.12
Figure 7.10
NOTE: If rear brake arm assembly service is
needed, the rear bell crank shaft that the arms
pivot on can be easily removed by unbolting the
brake shaft holders, removing the cotter pins
and washers that locate the brake arm assemblies on the shaft.
NOTE: Both washers that fit next to each rear
brake arm go between the arm and the cotter
pin.
14
K&T Saw Shop 606-678-9623 or 606-561-4983
www.mymowerparts.com
M48 Tank
7.13. Confirm that the brake bearing hub, brake handle, and the brake rod that connects them move
freely on the front bellcrank shaft.
7.16. Check the brake arm on the brake assembly for
freedom of movement. It should return to center.
7.17. Reconnect the brake link rods and brake connecting rods to the rear brake arm assemblies.
7.14. Confirm the position of the brake bearing hub:
the top of the arm that the brake rod (to the
brake handle) connects to should line-up directly
with the parking brake switch, and the brake rod
should be parallel to the frame. When this is
true, the front brake connector rods should also
be parallel to the frame. See Figure 7.14.
7.18. Apply light rearward pressure to each brake connecting rod. The clevis pin at the rear end of the
rod should just contact the back of the hole that
it passes through to connect the clevis to the
rear brake arm assembly.
7.19. Loosen or tighten the nylock nut at the front of
the connecting rod to bring the heavy spring
lightly into contact with the brake bracket.
See Figure 7.19.
BRAKE
HANDLE
BRAKE ROD
BRAKE
SWITCH
LIGHT
SUFFICIENT
CONTACT
FORCE TO
RETURN LINKAGE
ARM
ADJUST
HEAVY
SPRING
HERE
BRAKE BEARING HUB
Figure 7.14
ADJUST RETURN
SPRING HERE
7.15. If adjustment is necklaces, loosen the two collars
on the front bellcrank shaft using a 1/8” allen
wrench. Re-position the bearing hub and collars
as necklaces, and tighten the collars.
See Figure 7.15.
Figure 7.19
7.20. Apply the parking brake. The gap between the
bottom edges of the brake bracket and the cross
member that it rests against in the released position should be roughly 1 3/4”. See Figure 7.20.
COLLAR
FRONT
BELLCRANK
SHAFT
BRAKE
BEARING
HUB
1 3/4”
ADJUST
HERE
Figure 7.15
NOTE: The left edge of the brake bearing hub
will usually be even with the inner edge of the
frame when correctly adjusted.
Figure 7.20
15
K&T Saw Shop 606-678-9623 or 606-561-4983
www.mymowerparts.com
M48 Tank
7.21. Release the parking brake.
8.
7.22. The brake bracket should draw up against the
frame cross member. If this reaction is not consistent, tighten the shoulder nut slightly. There
should be roughly 1 1/2” between the head of
the shoulder nut and the brake bracket when the
brakes are applied.
The M72 is based on the same frame design as the
smaller members of the TANK series. Some changes
have been made to accommodate the larger deck.
8.1.
M72 TANK
Heavier brackets to suspend the deck.
See Figure 8.1.
7.23. Tighten the jam nut.
7.24. If brake application is uneven from left to right,
adjust the length of the short connector rods
between the brake bracket and the brake bearing hub.
7.25. If brake release action is inconsistent, check for
bent or misaligned rods and links.
7.26. Install the rear wheels, tightening the lug nuts to
50-70 ft.-lbs. Lower the TANK to the ground.
7.27. Install the floor panel.
7.28. Test run the TANK in a safe area before returning it to service. Check the function of the parking brakes.
Figure 8.1
NOTE: A dragging parking brake will cause
tracking issue and drive noise on the effected
side.
8.2.
Heavier duty deck belt tension release mechanism. See Figure 8.2.
Figure 8.2
16
K&T Saw Shop 606-678-9623 or 606-561-4983
www.mymowerparts.com
M48 Tank
8.3.
8.5.
The deck lift goes has finer increments of adjustment. See Figure 8.3.
Figure 8.3
8.4.
Heavier hardware connects the deck to the
hangers. See Figure 8.5.
Figure 8.5
8.6.
The larger, heavier decks have a foot assist
pedal to help raise and lower the deck.
See Figure 8.4.
Heavier front pivot bar and wider front track.
See Figure 8.6.
Figure 8.6
Figure 8.4
17
K&T Saw Shop 606-678-9623 or 606-561-4983
www.mymowerparts.com
M48 Tank
8.7.
8.9.
The track at the rear has also increased. Extra
brackets have been added to the frame to step
the hydro motors out. See Figure 8.7.
The parking brake lever has been moved up to a
more convenient location.
Figure 8.9
Figure 8.7
8.8.
8.10. A larger engine is required to power the larger
deck and heavier total weight of the mower. A
28 H.P. Generac Guardian engine is employed.
See Figure 8.10.
To enable the brake linkage to reach the repositioned hydro motor, the rear brake arm assemblies have been doubled-up on each side.
Instead of a single rear brake arm assembly per
side, two are used in tandem. See Figure 8.8.
Figure 8.10
Figure 8.8
18
K&T Saw Shop 606-678-9623 or 606-561-4983
www.mymowerparts.com
M48 Tank
9.
OTHER TANK FEATURES
9.1.
Honda Power is offered on the M48-HN and
M54-HN. The M48-HN has a 20 H.P. Honda Vtwin engine. The M54-HN has a 24 H.P. Honda
V-twin. See Figure 9.1.
9.3.
The TANK exhaust systems all feature a new
aluminized finish. This finish resists corrosion
better than the heat paint that is more commonly
used. It also dissipates heat more effectively,
producing noticeable improvements on chassis
dynamometers. See Figure 9.3.
Figure 9.1
Figure 9.3
9.2.
ROPS is offered on the M60-KW (Kawasaki) and
M60-KH (Kohler). This is not a bolt-on option. It
is integrated into the frame. The option is primarily aimed at government bid specifications. See
Figure 9.2.
9.4.
Some features of the 72” deck have been
extended throughout the TANK model range.
Looking at the 60” model as an example, these
features include:
9.5.
More easily adjustable hydro control link.
See Figure 9.5.
Figure 9.2
Figure 9.5
19
K&T Saw Shop 606-678-9623 or 606-561-4983
www.mymowerparts.com
M48 Tank
9.6.
1/4” increments on the height adjuster, with foot
assist deck lift.
See Figure 9.6.
9.8.
Figure 9.8
Figure 9.6
9.7.
Heavy duty spherical rod ends on the arms at
the front of the deck. See Figure 9.8.
The deck belt release operates in a vertical
plane. It can be tensioned with foot pressure,
and the rear wheel does not interfere with its
travel. See Figure 9.7.
9.9.
The arms themselves are cast iron, and the liftshaft is heavier. See Figure 9.9.
Figure 9.9
Figure 9.7
20
K&T Saw Shop 606-678-9623 or 606-561-4983
www.mymowerparts.com
M48 Tank
9.10. The deck itself features reversible caster wheel
brackets. The same part number applies to both
the left and the right brackets. See Figure 9.10.
9.12. The deck support plates are larger this year, to
prevent plate bending and separation.
See Figure 9.12.
Figure 9.10
Figure 9.12
9.13. The baffling, airflow, and strength of the deck
have all received some improvements this year.
9.11. Improved self-aligning pillow blocks now suspend the deck. See Figure 9.11.
9.14. The trailing edge of the discharge opening has
been swept back, and the bar that prevents foot
penetration has been modified. Both changes
improve strength and airflow. See Figure 9.14.
Figure 9.11
Figure 9.14
21
K&T Saw Shop 606-678-9623 or 606-561-4983
www.mymowerparts.com
M48 Tank
9.17. The under-deck baffling has been reinforced,
and a “stealth baffle” has been added between
the second and third blades. See Figure 9.17.
9.15. A guiding baffle near the rear of the opening
helps direct the clippings out from under the
deck. See Figure 9.15.
Figure 9.17
Figure 9.15
9.16. The addition of a “California Gap” at the leading
edge also improves airflow, and products the
internal shape of the deck from damage if something is hit hard enough to bend the reinforced
leading edge. See Figure 9.16.
Figure 9.16
22
K&T Saw Shop 606-678-9623 or 606-561-4983
www.mymowerparts.com
M48 Tank
10.
10.1. For 2004, one model of TANK will be offered
with a Kohler 28 H.P. EFI engine. That unit is a
60” Wide-Track model. That model is built on
the widened M72 frame, but features a 60” deck.
KOHLER EFI
Fuel injection is nothing new. The Wright flyer that
made history above the dunes at Kitty hawk, North
Carolina was fuel injected. That was a hundred years
ago this past summer. That system was only slightly
more complex than a cam-driven Windex bottle. All
diesel engines are fuel injected, though the principles
of operation are considerably different.
10.2. The fuel injection system used on the the Kohler
powered TANK uses a high pressure electric fuel
pump. The pump generates 3 bars. of pressure
(roughly 40 PSI.), and is capable of moving 25
liters per hour of fuel. This is more fuel volume
than the engine will consume, but it is necessary
in order to maintain pressure under all fuel
demand conditions.
Electronic fuel injection is not an especially recent
development either. In 1956, Chrysler marketed the
first car with electronic fuel injection. The fuel injection
system used was made by Bendix, and was called
“The Bendix Electrojector System”. It was operated by
a large Electronic Control Module that took up most of
the trunk. The ECM used relatively delicate tubes,
generated a lot of heat, and was susceptible to moisture, temperature changes, vibration, and shock. Most
of these systems were discarded, and the cars retrofitted with carburetors.
10.3. Because there is more fuel supplied to the injectors than the engine will consume, return lines
route the excess volume back to the fuel tanks.
See Figure 10.3.
Left fuel tank
(1 of 2)
There were mechanical gasoline fuel injection systems
on the market before the Bendix system was introduced. Rochester and Bosch were fairly prominent.
Fuel pick-up
and valve
Fuel return line
The auto industry made the transition to electronic fuel
injection in the 1970s and 80s, in response to emission
control and fuel economy standards.
Even the best-tuned carburetion system only offers and
approximation of the correct fuel mixture for any given
operating condition. They can be tuned to provide
“sweet spots”, but generally cannot maintain an ideal
mixture for all speeds, loads, temperatures, and conditions.
Figure 10.3
Carburetors also cost efficiency by “working” the air.
the venturi effect that is used to atomize the fuel
requires a pressure drop within the throat of the carburetor. The venturi that creates this pressure drop is a
partial obstruction of the path into the engine.
10.4. The fuel lines from each tank Tee into a single
line that feeds the fuel pump. See Figure 10.4.
Until recently, the advantage offered by fuel injection
have not been worth the expense that they add to outdoor power equipment. Fuel injection systems have
become less expensive and more dependable in the
past two decades. At the same time, commercial turf
equipment in specific, and outdoor power equipment in
general have become more sophisticated and more
expensive. Performance and expectations have
improved. The final factor is the increase in the price of
fuel.
From left tank
From right
tank
To pump
All of these factors combine to make EFI worthwhile for
some applications. The improved fuel economy
reduces fuel expense for heavy (Commercial) users. It
also increases range, requiring fewer stops to replenish
fuel.
Figure 10.4
23
K&T Saw Shop 606-678-9623 or 606-561-4983
From pump
to filter
www.mymowerparts.com
M48 Tank
10.5. The return lines each lead back to the tank from
a tee fitting just beneath the tee fitting for the fuel
feed lines. The return fuel comes from the fuel
pressure regulator.
NOTE: The fuel pump is protected by an internal
60µ filter.
10.7. The pump sends pressurized fuel to the fuel
pressure regulator. The regulator maintains a
constant down-stream pressure of between 36
and 42 PSI. See Figure 10.7.
NOTE: If one branch of the return line becomes
crushed, kinked, or blocked, a disproportionate
amount of fuel will return the the opposite tank.
•
If one fuel tank consistently empties before the
other, check the return lines.
•
If this situation should occur with full tanks, an
over-flow will result.
Fuel pump
10.6. The fuel feed line leads from the tanks and tee
down to a high pressure fuel pump located
beneath the ECM. See Figure 10.6.
Fuel
pressure
regulator
Figure 10.7
Electronic
Control
Module
NOTE: High pressure fuel lines (SAE R9 rating)
and Oetiker style hose clamps must be used
between the fuel pump, pressure regulator, fuel
filter, and fuel injector rail.
Fuel pump
CAUTION: Substitution of fuel system components that are not capable of handling the pressure generated by this fuel system will lead to
rapid failure of those components. Component
failure (hose, clamps, filter, etc...) in the high
pressure portion of the system poses a significant fire hazard.
Figure 10.6
CAUTION: Before disconnecting any fuel line:
•
Allow the engine to cool, and be sure the area is
clear of any potential fire hazards, and has adequate ventilation.
•
Have a catch pan handy to contain any spillage
•
Relieve pressure from the any fuel lines between
the fuel pump and the fuel rail.
NOTE: The fuel pump uses the fuel as a coolant.
If the engine runs out of fuel, turn the key off
immediately. Running dry will damage the
pump.
NOTE: The fuel pump will run briefly each time
the key switch is turned on. This pressurizes the
system. If fuel pressure is absent, and the fuel
pump cannot be heard when the key switch is
turned on, the fuel pump may not be getting
electricity. Check for power before condemning
the fuel pump.
24
K&T Saw Shop 606-678-9623 or 606-561-4983
www.mymowerparts.com
M48 Tank
10.8. There are two lines exiting the pressure regulator. One is a regulated pressure line that feeds
the fuel rail via the fuel filter. The second line is
a return line. The third line is a high pressure
feed from the fuel pump. See Figure 10.8.
10.9. The fuel filter is easily accessible.
See Figure 10.9.
Regulated pressure
to rail, via filter
Vacuum barb
(not used
for this
application)
From
pump
To fuel rail
Fuel filter
Return
to tanks
Figure 10.9
High pressure
from fuel pump
NOTE: Use only identical factory replacement
fuel filters. Filters that are not capable of functioning at 3 bar. may rupture, leak, or disintegrate internally.
Figure 10.8
NOTE: There are two potential failure modes for
pressure regulators. They may reduce the pressure too far, or they may not reduce the pressure
far enough. The second mode is more common.
NOTE: Prime the fuel filter with a few ounces of
fuel when installing it. The initial pressure surge
into a dry filter may damage filtering medium.
NOTE: If too much pressure is delivered to the
injectors, the engine will run extremely rich. The
problem will be very pronounced at idle, but will
clear up to some extent under high load / open
throttle conditions.
NOTE: Fuel filters should be replaced at regular
intervals specified in the Operator’s Manual. A
blocked fuel filter puts extra load on the pump.
creating extra heat. This may lead to shortened
fuel pump life. Fuel pumps are much more
expensive than fuel filters. A blocked filter may
not present symptoms until the blockage is substantial enough to damage the fuel pump.
NOTE: When an engine has run dramatically
rich, correct the core problem and change the oil
before continued operation. Oil dilution that may
result from the rich condition may cause hydrolock and/or catastrophic engine failure.
10.10. After the filter, the fuel reaches the fuel rail. The
fuel rail feeds the injectors. See Figure 10.10.
NOTE: Check fuel pressure by connecting a fuel
pressure gauge of adequate range (eg. NAPA /
Balkamp part number BK.700-1089) to the
shrader valve on the fuel rail. This will check
regulated fuel pressure. If fuel pressure at the
shrader valve is below 36 PSI, isolate the fuel
pump, and check output pressure and volume.
25
K&T Saw Shop 606-678-9623 or 606-561-4983
www.mymowerparts.com
M48 Tank
11.
Cap for
shrader
valve
Fuel
rail
EFI CONTROLS
The Fuel injection system used by Kohler is an
adapted version of the Bosch Motronic automotive system.
NOTE: Do not connect or disconnect any electrical components with the key switch in the “on”
position. The resulting arc could cause immediate and sever damage to the ECU.
electrical
connection
for injector
NOTE: If using a circuit tester, use only a high
impedance tester (eg. Thexton model 125).
Conventional testers pass the current they are
checking through a small incandescent bulb. In
some cases, the bulb draws more power than
the circuit in the computer, over-loading the circuit and complicating the diagnostic process by
inducing a circuit failure. High impedance
testers do not actually pass much current, and
the LED indicator will not draw enough power to
damage the circuitry.
See Figure 11.0.
Fuel injector
Figure 10.10
10.11. The shrader valve can be used for checking fuel
pressure. Fuel pressure readings obtained at
the shrader valve can help pin-down problems
with the fuel pump or the fuel pressure regulator.
See Figure 10.11.
Figure 11.0
11.1. The EFI engine has a throttle valve or “air valve”
similar to that of a carburetor. There is no fuel
mixed into the air at this point. The throttle valve
only regulates the amount of air that enters the
engine.
Figure 10.11
10.12. Before any service is performed on the pressurized portion of the fuel system, the engine must
be allowed to cool, and the pressure should be
relieved.
11.2. The throttle responds to the governor just like it
would with a carburetor.
10.13. To relieve pressure from the fuel system:
•
Turn the key switch off.
•
Remove the 10A in-line fuse that protects the
fuel pump.
•
Start the engine normally. It will run for only a
few seconds.
•
Turn the key switch off.
11.3. The computer (ECU) takes in information from
various sensors, and decides how much fuel the
engine should have to maintain a correct fuel/air
mixture. The ECU then sends electrical pulses
to the individual injectors, triggering them to
spray fuel into the intake tract.
26
K&T Saw Shop 606-678-9623 or 606-561-4983
www.mymowerparts.com
M48 Tank
11.4. The fuel pressure at the injectors is held constant by the fuel pressure regulator. The amount
of fuel delivered to the cylinders is controlled by
the length of time that the individual fuel injectors
are triggered. The length of time the injectors
are triggered varies from 1.5 to 8.0 milliseconds.
11.9. The ignition coils are also controlled by the ECU.
Each cylinder has its own coil. See Figure 11.9.
11.5. Both injectors are triggered simultaneously.
Each triggering causes the injector to spray half
the amount of fuel required by the corresponding
cylinder on the next cycle.
11.6. The injectors are “hot” as long as the key switch
is on. The injection is triggered by the completion of a ground path within the ECU.
11.7. The injectors make an audible “click” each time
they are triggered. If this click cannot be heard
or felt, there may be a problem with the injector
itself, or there may be a problem in the wiring
harness.
Figure 11.9
11.10. The plastic-cased ECU is mounted to the frame,
above the fuel pump. See Figure 11.10.
Figure 11.7
11.8. If a fuel injector is suspect, the circuit may be
tested with a commonly available “noid” light, or
the injector may be triggered using an electronic
fuel injection pulse timer (eg. Thexton model
number 139) in conjunction with a fuel pressure
gauge. With the key switch off, triggering the
injector should result in a measured drop in fuel
pressure.
Figure 11.10
11.11. The ECU is the brain of the engine control system. It is very durable, but there are some rules
to follow in order to avoid damage to the ECU:
•
If you diagnose a faulty ECU, do not replace it
without calling Cub cadet Technical Support for
specific handling instructions.
•
Previously mentioned: do not use a conventional
test light to look for power in the engine control
circuit.
•
Previously mentioned: do not disconnect any
electrical devices while the engine is running.
•
Do not reverse the battery terminal connections.
27
K&T Saw Shop 606-678-9623 or 606-561-4983
www.mymowerparts.com
M48 Tank
•
Do not connect a battery charger to the TANK
with the key switch turned on.
•
The ECU requires at least 7.0 volts to function.
•
If the battery goes dead, or is disconnected, the
adaptive memory in the ECU will be cleared. It
will take 10-15 minutes of running, at normal
operating temperatures, under a variety of loads
and throttle settings to re-learn the full envelope
of performance. Clearing the memory will also
clear diagnostic trouble codes.
•
The ECU receives signals from a variety of sensors. These include: crankshaft speed and position, throttle position, engine temperature,
oxygen content of the exhaust gas, battery voltage.
•
There is an indicator light that flashes diagnostic
codes in the event that there is a malfunction. If
the signal from any of the sensors are not in the
range that the ECU is expecting from comparison to its adaptive memory, a code will flash.
•
The TPS can be checked with an Ohm meter,
looking for “jumps” as the throttle is swept
through its full range of travel.
•
If the TPS mounting is disturbed for any reason,
there is a Kohler-specified initialization procedure that must be performed.
11.13. The engine temperature has a bearing on the
fuel/air mixture and ignition timing. The ECU
“takes the engine’s temperature” with a thermometer in the engine oil.
In the event of a malfunction, the ECU has a
“limp home” mode that will allow it to plug in a
fixed value in place of the reading from the malfunctioning sensor.
•
When the engine is cold, the oil temperature is
the same as the ambient temperature. Being an
air-cooled engine, as the engine warms-up, the
oil temperature reflects a balance between
engine load and ambient temperature when
operating normally. This is sufficient for the purposes of the ECU.
•
A bad temperature sender may result in rich fuel/
air mixture accompanied by an erratic idle and
somewhat reduced WOT power.
•
At 68deg. f, (20deg. c), the Ohm reading across
the terminals of the oil temperature sensor
should be in the 2375-2625 υ range.
11.14. In order to coordinate the timing of the fuel injector triggering, as well as tune the fuel delivery
and ignition timing to match the load applied to
the engine, the ECU needs to know the speed
that the crankshaft is spinning and the position
of the crankshaft.
11.12. The Throttle Position Sensor tells the ECU what
the position of the throttle plate is. It is essentially a potentiometer. See Figure 11.12.
Figure 11.12
•
•
If a TPS fails, it will result in rough or erratic
engine performance. If a “dead” spot develops
in the potentiometer, the engine will run badly
whenever the throttle is in a position that corresponds with the “dead” range of the TPS.
•
There is a 60 tooth ferrite ring gear on the flywheel. This ring gear is separate from the
starter motor ring gear. A Hall-effect pick-up
mounted .049”-.069” from the ring gear generates a pulse as each tooth passes by. The ECU
counts the pulses to determine engine RPM.
•
There are two consecutive teeth missing from
the ring gear. The ECU gets a signal from each
of the present teeth every 6 degrees of crankshaft rotation. The 12 degree gap is positioned
84 degrees before cylinder #1 reaches TDC.
This tells the ECU where the engine is in terms
of piston position.
•
Each time the engine is started, it will take 720
degrees of crankshaft rotation for the ECU to
“find” the piston and begin working.
•
Comparing engine speed to throttle position, the
ECU can interpolate the engine load.
•
If the cranks trigger signal fails to reach the
ECU, the engine will not run.
28
K&T Saw Shop 606-678-9623 or 606-561-4983
www.mymowerparts.com
M48 Tank
•
Crank triggers are generally an all-or-nothing
proposition: they work perfectly or not at all. In
extremely rare instances, a failed crankshaft trigger will not keep-up with the speed of the
engine. It will work at low speed, but cause
intermittent ignition and injector action at higher
speeds. This will result in staccato misses and
backfires.
11.15. The exhaust gas oxygen (O2) sensor contains a
palladium insert. When oxygen passes by palladium, an electrical current is generated.
Depending on the amount of oxygen flowing by
the sensor, it will generate between 0.10 and
1.00 volts.
See Figure 11.15.
•
Reaching a conclusion from the previous two
bullet points, a bad oxygen sensor will not cause
idle problems or cold-running problems.
•
There is only one wire on the oxygen sensor
used in this application. It does not have a heating element in it, nor does it have a ground wire.
Some automotive applications have both of
these features. Because it does not have a
ground wire, it grounds through the body of the
sensor, and back through the engine exhaust
system.
•
Oxygen sensors are susceptible to contamination from: leaded fuel, some RTV silicone sealants, some cleaning solvents. Look for the
words “02 Sensor safe” on any of these products
to be introduced up-stream of the oxygen sensor.
11.16. Oxygen sensors can be easily tested using a
good quality, high impedance DVOM or an oscilloscope.
•
Engine turned off, hot sensor (normal operating
temperature) should have a resistance from the
disconnected wire to the housing or 2.0KΩ.
Cold sensor should have a resistance of 1.0MΩ.
•
Engine running, (above idle speed) voltage measured from the disconnected wire (remember, do
not disconnect or connect an wires while the
engine is running), should fluctuate between 0.1
volt and 1.0 volt. This roughly approximates a
sine-wave on on oscilloscope. A “blip” of the
throttle should produce a momentary increase in
voltage as the engine leans-out slightly then reestablished correct mixture.
•
A steadily declining voltage that recovers from a
throttle blip without fluctuating may indicate an
improperly positioned TPS.
Figure 11.15
•
By measuring the amount of oxygen in the
exhaust gas, the ECU knows how much air is
passing through the engine un-burned. It can
make adjustments to the injector pulse length to
adjust the mixture until the ideal fuel air proportions are reached. This ratio is known as “stochiometric ratio” and is theoretically 14.7 parts
air to 1 part fuel (14.7:1).
•
Adjustments the ECU makes to the fuel/air mixture are the result of what is called “closed loop”
operation. The ECU is getting feedback on its
performance from the oxygen sensor, and making adjustments based on that feedback.
•
Oxygen sensors do not work below about 700
deg. F (375 deg. C). Because of this the engine
will not go into closed-loop operation until it is
warmed-up.
•
Because of inconsistent gas flow at idle speed,
most engines fall out of closed-loop operation at
idle speed.
11.17. This is a simplified introduction to the EFI system used on the Kohler engine found on the
TANK. Complete diagnostic and service instructions can be found in the Kohler CH26 manual,
section 5B.
29
K&T Saw Shop 606-678-9623 or 606-561-4983