1
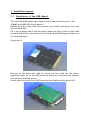
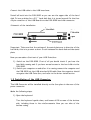
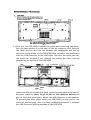
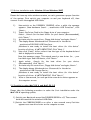
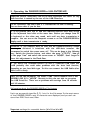
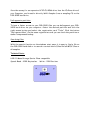
PSR-9000
USB Interface
Installation and operating manual:
1. Installation manual
2. Installation of the windows drivers
3. Operating manual
4. Applications
Important Notice: a qualified service technician should only do the
installation of the USB-Interface. We cannot be held responsible or
liable for direct or indirect damages caused by incorrect installation
of the USB-Interface board.
C 2000, 2001 musitronics GmbH - Rev. 2.6.2002
1. Installation manual:
1.1 Installation of the USB-Board:
Turn the PSR-9000 upside down. Remove all 6 screws from the cover of the
SIMMS and HARD DISK and remove it.
Remove the four screws from the hard disk cover inside, and remove the cover
with the hard disk.
Put it on the upper side of the hard disk, remove the four screws of that holds
the hard disk and turn the metal cover of the hard disk 180 degree and put it on
the Hard disk again.
See picture 1:
Now put on the holes that used for fasten the hard disk the four plastic
separation rings. Put on the USB-Interface board on it and mount all together
with the four attached screws.
Attach the flat cable to the USB-Interface board and hard disk (picture 2):
Connect the USB cable to the USB board now.
Install all back into the PSR-9000 so you can see the upper side of the hard
disk. It is no problem for a 2,5`` hard disk that it is turned around. Put the free
44-pin connector of the USB-Board into the PSR-9000 hard disk connector.
Schematic of the installation:
Harddisk
Flatcable
Important: Take care that the raisings of the metal plate are in direction of the
hard disk, this is to prevent a short circuit between the hard disk and the metal
plate.
Now you can make a first test of your USB-Interface:
1.) Switch on the PSR-9000. First of all you should check if you hear the
hard disk running and if you have normal access to the hard disk via the
PSR-9000.
2.) Switch your computer on and after it is running connect the computer and
the PSR-9000 via the USB attached USB cable. Now the computer should
recognize the USB-Interface, and refer to the driver install section.
1.2 Installation of the USB Connector:
The USB Connecter will be installed directly on the free place in the near of the
power connector.
Make the following steps:
1.) Open the keyboard:
Turn the keyboard upside down, and loosen all 28 screws of the bottom
side, including these in the reinforcements. Now you can take of the
bottom casing.
2.) First put the USB Cable between the green main-board and the metalbox, the best position is in the near of the fat connector CN2. Now put
the cable into the slot that lies between the loudspeaker and the big
metal box in the middle of the PSR-9000. Now reconnect the small board
with the USB-Connector on the USB Cable. Don’t put the cable just over
the metal box, because if you reinstall the bottom the cable could be
wounded by the bottom of the PSR-9000.
-connector
cable
Loosen now the two screws that holds the black metal-plate in the near of
the power connector (don’t forget to pull out the connector before) and
put out the black metal plate. Mount the USB Conector on this position.
To prevent that dust comes inside your PSR-9000 you can cut off the
stencil of the last page, clue it on some cardboard and mount it between
the USB Connector and the backside of the PSR-9000.
2. Driver installation under Windows
2.1 Driver Installation under Windows XP
Switch on the computer, switch off the keyboard and connect both with the
USB-cable.
Now turn on the keyboard. The drivers will be installed
automatically. This will be displayed by some Pop-up-windows, like “new hardware
found”.
Look upon Start-Button Æ Control-Panel Æ Classic-View please open the
System-Folder and go to the Registration-Card “Hardware”.
Open the Device-Manager and open disk drives. Select your 9000 Harddisk,
press the right mouse-button and click on properties, under position “policies”,
select
.
2.2 Driver Installation under Windows Millenium and Windows 2000
Windows 2000 and Windows Millenium has the USB-Mass Storage Device Class
drivers integrated. The drivers are installed automatically after you have
connected the USB-cable.
1.)
2.)
3.)
4.)
Switch on the computer, switch off the keyboard and connect both with
the USB-cable.
Now turn the PSR9000/ 9000PRO. After a while the message “New
hardware found – USB Mass Storage Device” appears, then “New
hardware found – Your Harddisk Type USB Device”. After this, for each
partition of your PSR9000/ 9000PRO a window appears.
In the right lower corner of your monitor you will see a symbol
at your Task Bar. If you want to uninstall the Usb Interface right click on
the mouse and click on “Stop USB disk –Drive (:)”, click on this message
and confirm the message box: “The ‘USB Disk :’ device can now be safely
removed from the system with “OK”
Now you can switch off the keyboard or disconnect the USB-cable.
2.3 Driver installation under Windows 98 and Windows 98SE
Please don’t use any older windows versions, we can’t guarantee a proper function
of the system. First switch your computer on and your keyboard off, than
connect it with the supplied USB-Cable.
1.)
2.)
3.)
4.)
5.)
6.)
7.)
8.)
9.)
Now switch on the PSR9000/ 9000PRO, after a while the message
appears: „New hardware found – „ musitronics USB Interface“, click
„Next >„.
Insert the Driver Disk in the floppy drive of your computer.
Select: „Search for the best driver for your device. (Recommended),
click “Next >“.
Activate only the control box „Floppy disk drives“ and again „Next >“.
The display shows: Windows driver file search for the device:
- musitronics PSR 9000 USB Interface „Windows is now ready to install the best driver for this device“.
Location of driver: A:\MTUSBINT.INF. Click “Next >”.
Now click „Finish“. After a short time the type of the keyboards hard
disk is displayed in a window.
Now the message comes: This wizard search a new driver for, - your
hard disk type- and USB device, click “Next >“
Again select: „Search for the best driver for your device.
(Recommended), click “Next >“.
Activate only the control box „Floppy disk drives“ and again „Next >“.
The display shows: Windows driver file search for the device:
- musitronics USB Storage Device „Windows is now ready to install the best driver for this device“.
Location of driver: A:\MTNTMAP.INF. Click “Next >”.
After a few seconds, for each partition a new drive letter appears on
the computer screen.
2.4 Installation under MAC OS X and MAC OS 9.2
Please take the following procedure to make the first installation under the
MAC OS X operating system.
1.) Switch your Macintosh on and the PSR9000/9000Pro off. Then connect
both devices with the attached USB Cable.
2.) Switch the PSR9000/9000Pro on after a view seconds every Partition
appears as a new drive letter on the computer screen.
3. Operating the PSR9000/9000Pro USB-INTERFACE:
Important Notice: musitronics can not be held responsible nor liabile for any
data loss that is caused by the use of the USB-Interface
Do not disconnect the USB-Cable if a transmission via USB is running!
You can loose data if you do that.
It is not possible that the PC and the PSR9000/9000Pro have data access
on the keyboards hard disk at the same time. Before you change from PC
to keyboard or the other way round, wait until any data transmission is
complete. You can see on the Computer screen or on the PSR9000/9000Pro
display until a data transmission is ready.
Attention: If you transfer data via USB and the PSR9000/9000Pro screen
saver gets activated it interferes with the USB-data transfer. We
recommend to switch the screen saver off. This can be done in the following
way: Switch the function button, and select the menu “UTILITY”. Now go
to the page “time” and switch the screen saver to “NEVER”. Don’t forget to
store this adjustment in the Flash-Rom.
If you switch the PSR9000/9000Pro on with a connected USB cable this
could probably also could make problems with the Auto load function,
depending on your hard disk type. In this case connect the USB Cable after
Auto Load is ready.
Don’t set the the parameter “HD SLEEP TIME” (since PSR9000 OS3.0 and
9000PRO OS2.0) to “NEVER”. Because in this case not able to recognize
the USB Interface. There are no problems with settings from 15 seconds
until 60 minutes.
Information about the PSR9000/9000Pro File System:
Don’t use any special signs like Ö, Å, ć etc for the file names. In the most menus
of the PSR9000/9000Pro only 10 characters are displayed, and you can’t use
more than 250 Files in one folder.
Important settings for removable device (Win 98 an Win ME)
Open Control Panel Æ System Æ Device Manager and open drives.
Select your 9000 Harddisk, and click on the “Properties” button. Select
“Accordings” and enable the removable device box. Afterwards you have to
restart your computer. The PSR9000/ 9000PRO will be displayed as removable
devices.
Refresh the Computer Display:
If you have stored data from the PSR-9000 on the PSR-9000 hard disk drive,
the new content is displayed after you selected View/Refresh. If you need this
function you has to change the following setting: Open the Control Panel select
System/Device Manager and then Disk drives chose the hard disk of your PSR9000 and then the registration card “Settings”. Now select removable device
click “OK” and restart your Computer. All PSR-9000 partitions are now
“Removable Devices”
Refresh the PSR-9000 Displays:
If you have transferred data from the PC to the PSR-9000 you also have to
refresh the display of your PSR-9000 to make the new data on the hard disk
visible:
1) In all file menu change on time back and forth between two partitions or
between a partition and the floppy disk.
2) In the Song menu just switch between two song displays for example
SONGII and SONGV.
Attention: Particularly after you have transferred many data files, the PSR9000 system sometimes displayed the “Disk I/O Error”. This does not mean
there is a bad data transfer; only some internal system pointers must be
actualised.
In this case go to the disk menu and perform the „Check Disk“ function,
In the corresponding partition. After that you can directly play the downloaded
data.
4. Applications
Backup of your PSR-9000 partitions on a computer:
Make a new folder on your PC (f.e. PSR9000HD-01). Open the PSR-9000
Partition assigned drive Letter. Now choose Edit / Select All and after that Edit
/ Copy now open your new folder and select Edit / Paste.
Now you make a backup of PSR-9000 internal hard drive (this can take some
minutes). If you have a CD-ROM Writer you can also make a backup directly on
CD.
Working with files on the hard disk:
With the USB-Interface you can easy transfer data between your PC and your
keyboard and the other way round. You can Copy, Rename, Delete and sort files
from your computer on the hard disk of your PSR-9000.
Direct download from the Internet to your PSR-9000 Hard Disk:
Easy with the USB Interface! After you selected a MIDI FILE or a Sample
from the Internet, click on the right mouse button and than “Save Target as”.
Now directly select your PSR-9000 Partition and than your desired folder. Now
you can download on your PSR-9000 hard disk.
Data exchange between two and more PSR-9000:
Do you want easy exchange data between your musical colleges? No problem –
You can connect up to 10 Keyboards to on Computer at the same time and now
you can transfer files via your the Computer directly from one Keyboard to the
other one.
Working with Sequencers (f.e. XG Works) or Sample editors (TW-Edit):
With the USB interface you can directly edit a MIDI File or a Sample on the
PSR-9000 hard disk. Directly load the MIDI-FILE or Sample into the Computer
program to edit it. After you are ready store the for example MIDI File back on
the PSR-9000 hard drive and start the MIDI-File Player to hear the result.
Transfer the content of a Sample CD:
Save the money for an expensive SCSI CD-ROM drive. Use the CD-Rom drive of
your Computer, and transfer directly WAV-Samples from a sampling CD on the
PSR-9000 hard drive.
Defragment a partition:
To have a faster access to your PSR-9000 files you can defragment your PSR9000 hard drive via your computer. Select the desired partition and click the
right mouse button and select the registration card “Tools”. Click the button
“Defragment Now”. On the same registration card you can check the partition or
make a compressed backup.
Searching files:
With the search function on the windows start menu it is easy to find a file on
the PSR-9000 hard disk or to search a certain kind of files like all MIDI files or
all samples.
Technical Data:
USB 1.1 Mass Storage Device Class compatible
Speed: Read – 1000 Kbytes/sec Write - 1000 Sec/sec