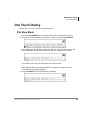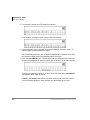
1
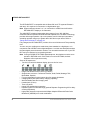
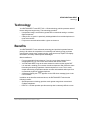
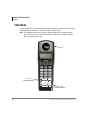
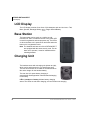
TOSHIBA
Telecommunication Systems Division
DKT2404-DECT
User Guide
April 2009
Publication Information
Toshiba America Information Systems, Inc.
Telecommunication Systems Division
Publication Information
Toshiba America Information Systems, Inc., Telecommunication Systems Division, reserves
the right, without prior notice, to revise this information publication for any reason, including,
but not limited to, utilization of new advances in the state of technical arts or to simply change
the design of this document.
Further, Toshiba America Information Systems, Inc., Telecommunication Systems Division,
also reserves the right, without prior notice, to make such changes in equipment design or
components as engineering or manufacturing methods may warrant.
CIX-UG-DKT2404-DECT-VA-E
Version A2, April 6, 2009
Our mission to publish accurate, complete and user accessible documentation. At the time of
printing the information in this document was as accurate and current as was reasonably
possible. However, in the time required to print and distribute this manual additions,
corrections or other changes may have been made. To view the latest version of this or other
documents please refer to the Toshiba FYI web site.
Toshiba America Information Systems shall not be liable for any commercial losses, loss of
revenues or profits, loss of goodwill, inconvenience, or exemplary, special, incidental, indirect
or consequential damages whatsoever, or claims of third parties, regardless of the form of any
claim that may result from the use of this document.
THE SPECIFICATIONS AND INFORMATION PROVIDED HEREIN ARE FOR
INFORMATIONAL PURPOSES ONLY AND ARE NOT A WARRANTY OF ACTUAL
PERFORMANCE, WHETHER EXPRESSED OR IMPLIED. THE SPECIFICATIONS AND
INFORMATION ARE SUBJECT TO CHANGE WITHOUT NOTICE. ACTUAL
PERFORMANCE MAY VARY BASED ON INDIVIDUAL CONFIGURATIONS, USE OF
COLLATERAL EQUIPMENT, OR OTHER FACTORS.
© Copyright 2009
This document is copyrighted by Toshiba America Information Systems, Inc. with all rights
reserved. Under the copyright laws, this document cannot be reproduced in any form or by any
means—graphic, electronic, or mechanical, including recording, taping, photocopying, without
prior written permission of Toshiba. No patent liability is assumed, however, with respect to the
use of the information contained herein.
Trademarks
Strata and CIX are registered trademarks of Toshiba Corporation.
Stratagy, eManager, My Phone Manager and Info Manager are registered trademarks of
Toshiba America Information Systems, Inc.
Windows and Microsoft are registered trademarks of Microsoft.
Trademarks, registered trademarks, and service marks are the property of their respective
owners.
Toshiba America Information Systems, Inc.
Telecommunication Systems Division
Limited Warranty
Toshiba America Information Systems, Inc., (“TAIS”) warrants that:
•
The CIX Attendant Console equipment, such as the PC (except for fuses, lamps, and other consumables) will, upon delivery
by TAIS or an authorized TAIS dealer to a retail customer in new condition, be free from defects in material and
workmanship for twelve (12) months after delivery.
•
And that the Toshiba telephone equipment (except for fuses, lamps, and other consumables) will, upon delivery by TAIS or
an authorized TAIS dealer to a retail customer in new condition, be free from defects in material and workmanship for
twenty-four (24) months after delivery.
This warranty is void (a) if the equipment is used under other than normal use and maintenance conditions, (b) if the equipment is
modified or altered, unless the modification or alteration is expressly authorized by TAIS, (c) if the equipment is subject to abuse,
neglect, lightning, electrical fault, or accident, (d) if the equipment is repaired by someone other than TAIS or an authorized TAIS
dealer, (e) if the equipment’s serial number is defaced or missing, or (f) if the equipment is installed or used in combination or in
assembly with products not supplied by TAIS and which are not compatible or are of inferior quality, design, or performance.
The sole obligation of TAIS or Toshiba Corporation under this warranty, or under any other legal obligation with respect to the
equipment, is the repair or replacement by TAIS or its authorized dealer of such defective or missing parts as are causing the
malfunction with new or refurbished parts (at their option). If TAIS or one of its authorized dealers does not replace or repair such
parts, the retail customer’s sole remedy will be a refund of the price charged by TAIS to its dealers for such parts as are proven to
be defective, and which are returned to TAIS through one of its authorized dealers within the warranty period and no later than
thirty (30) days after such malfunction, whichever first occurs.
Under no circumstances will the retail customer or any user or dealer or other person be entitled to any direct, special, indirect,
consequential, or exemplary damages, for breach of contract, tort, or otherwise. Under no circumstances will any such person be
entitled to any sum greater than the purchase price paid for the item of equipment that is malfunctioning.
To obtain service under this warranty, the retail customer must bring the malfunction of the machine to the attention of one of
TAIS’ authorized dealers within the twenty-four (24) month period and no later than thirty (30) days after such malfunction,
whichever first occurs. Failure to bring the malfunction to the attention of an authorized TAIS dealer within the prescribed time
results in the customer being not entitled to warranty service.
THERE ARE NO OTHER WARRANTIES FROM EITHER TOSHIBA AMERICA INFORMATION SYSTEMS, INC., OR
TOSHIBA CORPORATION WHICH EXTEND BEYOND THE FACE OF THIS WARRANTY. ALL OTHER WARRANTIES,
EXPRESS OR IMPLIED, INCLUDING THE WARRANTIES OF MERCHANTABILITY, FITNESS FOR A PARTICULAR
PURPOSE, AND FITNESS FOR USE, ARE EXCLUDED.
No TAIS dealer and no person other than an officer of TAIS may extend or modify this warranty. No such modification or
extension is effective unless it is in writing and signed by the vice president and general manager, Telecommunication Systems
Division.
WARRANTIES FOR NON-TOSHIBA BRANDED
THIRD PARTY PRODUCTS
A valuable element of Toshiba’s product strategy is to offer our customers a complete product
portfolio. To provide this value to our customers at the most optimal prices, we offer both
Toshiba-branded and third-party manufactured products that support our Toshiba Strata CIX
product portfolio. Similar to other resellers of software, hardware and peripherals, these thirdparty manufactured products carry warranties independent of our Toshiba limited warranty
provided with our Toshiba-branded products. Customers should note that third-party
manufacturer warranties vary from product to product and are covered by the warranties
provided through the original manufacturer and passed on intact to the purchaser by Toshiba.
Customers should consult their product documentation for third-party warranty information
specific to third-party products. More information may also be available in some cases from the
manufacturer’s public website.
While Toshiba offers a wide selection of software, hardware and peripheral products, we do
not specifically test or guarantee that the third-party products we offer work under every
configuration with any or all of the various models of the Toshiba Strata CIX. Toshiba does not
endorse, warrant nor assume any liability in connection with such third party products or
services. If you have questions about compatibility, we recommend and encourage you to
contact the third-party software, hardware and peripheral product manufacturer directly.
Contents
Chapter 1 – STRATA DKT2404-DECT
Technology .........................................................................................................................3
Benefits...............................................................................................................................3
Handset ..............................................................................................................................4
LCD Display........................................................................................................................6
Base Station .......................................................................................................................6
Charging Unit......................................................................................................................6
Cordless Digital Telephone Standard Parts........................................................................7
Chapter 2 – Installation
Base Unit .......................................................................................................................14
Charging Unit.................................................................................................................14
Standard Wall Plate Mounting .......................................................................................15
Direct Wall Mounting .....................................................................................................16
Charging Unit Wall Mounting.........................................................................................17
Chapter 3 – Operation & Setup
Power Up.......................................................................................................................21
Power Down ..................................................................................................................21
Operation with the Strata CIX ...........................................................................................21
Making a Call to Another Extension ..............................................................................22
Receiving a Call from Another Extension ......................................................................23
Making an Outside Call .................................................................................................24
Receiving an Outside Call .............................................................................................24
Finish Talk Mode ...........................................................................................................25
Redial (Option) ..............................................................................................................25
Channel Change............................................................................................................25
Strata CIX DKT2404-DECT User Guide 04/09
i
Contents
Chapter 4 – Feature Access Codes
CIX No Service ..............................................................................................................25
Out of Range .................................................................................................................26
Low Battery....................................................................................................................27
Mute...............................................................................................................................27
Hands Free....................................................................................................................28
Volume Setting ..............................................................................................................28
Ring Volume Setting......................................................................................................28
Ringer Mute ...................................................................................................................29
Menu Setting Mode...........................................................................................................30
Change Ringer Type .....................................................................................................30
End of Range Alarm ......................................................................................................31
Registration ...................................................................................................................32
Deregistration ................................................................................................................33
Base Registration PIN ...................................................................................................34
Base Key Option (Option)..............................................................................................34
One Touch Dialing ............................................................................................................35
Dial Store Mode.............................................................................................................35
Dial Out..........................................................................................................................37
F9~F12 Feature Buttons...................................................................................................37
Place a Call on Hold .........................................................................................................37
Transfer a Call ..................................................................................................................37
Redial a Number...............................................................................................................38
Conference a Call .............................................................................................................38
Switch a Call to Your Cordless Digital Telephone ............................................................38
Switch a Call to the Desk Telephone ................................................................................38
Chapter 4 – Feature Access Codes
Feature Access Codes .....................................................................................................39
Call Forward Codes ..........................................................................................................43
Chapter 5 – Troubleshooting and Specifications
Troubleshooting ................................................................................................................47
DKT Mode.........................................................................................................................48
Cleaning Charging Unit Contacts .....................................................................................48
Charging Spare Battery Packs .........................................................................................49
Range and Performance...................................................................................................49
Radio Interference ............................................................................................................49
ii
Strata CIX DKT2404-DECT User Guide 04/09
Contents
Chapter 5 – Troubleshooting and Specifications
Telephone Line Problems.................................................................................................50
Privacy ..............................................................................................................................50
Specifications....................................................................................................................51
Strata CIX DKT2404-DECT User Guide 04/09
iii
This page intentionally left blank.
STRATA DKT2404-DECT
1
Your DKT2404-DECT delivers next generation DECT functionality for the Strata series
of cordless digital telephones. DECT technology minimizes any interference between
base stations in proximity or any surrounding WLAN access points. It is also
engineered to work with your Toshiba digital telephone system and provide you with
reliability, long life, and outstanding performance.
TOSHIBA
Front
Strata CIX DKT2404-DECT User Guide 04/09
Side and Back
with Belt Clip
1
STRATA DKT2404-DECT
The DKT2404-DECT is compatible with all Strata CIX and CTX systems Release 2
and later). All it requires for connection is a digital station port.
Note System software release 2 or 3, or connection to a PDKU card will limit the
DKT2404-DECT display to 16 characters.
The 2404-DECT telephone base station has a range of up to 300 ~400 feet.
Combined with the optional DKT2404-UDR100 Repeater, the new DECT technology
provides wide range operation. Up to six repeaters can be linked per base station,
extending operation range up to greater than 1000 feet in open areas. Refer to
“Range and Performance” on page 49.
Fully charged, the DKT2404-DECT provides 16 hours of talk time and 7 days standby
time.
You can use your cordless as a stand-alone phone attached to a digital port, or in
conjunction with a DP/DKT-series digital telephone—in which case both phones share
the same digital port and extension number. You can switch between use of your DP/
DKT and your cordless, by just pressing a button.
Note If using a DP5000 or DKT3000 digital telephone, the telephone must be set to
operate in DKT2000 mode. If the mode is not set to DKT2000, the desk
telephone will not operate correctly.
Some of its features are:
• Two-line LCD with 24 character display, plus one line for icons
•
•
•
•
•
•
•
•
•
•
2
Ringer and handset volume control (or vibrate)
Single button access to: Conference/Transfer, Hold, Redial, Message, Talk,
Menu/Mute, Speaker
Four programmable function buttons plus four speed dial buttons
Charging stand (with spare battery charging capability)
Wall-mountable base and charging units
Headset jack (2.5mm)
Three ring tones
Hands free speakerphone operation
Repeater option for extended range (optional Repeater Programming Kit for daisychaining Repeaters)
High quality ultra-secure speech with 32Kbps Adaptive Differential Pulse Code
Modulation (ADPCM) voice code combination.
Strata CIX DKT2404-DECT User Guide 04/09
STRATA DKT2404-DECT
Technology
Technology
Your DKT2404-DECT uses DECT 6.0 1.9 GHz technology, which represents state-ofthe-art design and engineering. This technology provides:
•
•
•
Unsurpassed range, several times greater than conventional analog or cordless
digital telephones.
Clarity that is so good it is practically indistinguishable from corded telephones in
most environments.
Fully secure communications within a given environment.
Benefits
Your DKT2404-DECT uses advanced technology and provides important features
placing it far above the competition in functionality and value by giving you better
sound quality, longer range, greater security, multi-line access, helpful LCD display
information, and many other important advantages.
Other benefits are:
•
•
•
Four programmable feature buttons. If you do not use these buttons for the
assigned features, you can invoke other features with access codes.
Your DKT2404-DECT rings to the same extension number as the regular DKT
it is used with, enabling you to answer via either telephone. Both follow the same
forwarding and hunting regardless of which telephone is in use. This is much
simpler than having a separate extension number and standard station port for a
conventional single-line cordless telephone.
A Message Waiting icon
appears on the LCD when message(s) are in the
user’s mailbox.
In addition to the benefits mentioned above, the DKT2404-DECT also has the
following benefits:
•
•
Spread-spectrum technology provides much greater range than conventional
cordless telephones.
DECT 6.0 1.9 GHz operation provides security that is extremely difficult to scan.
Strata CIX DKT2404-DECT User Guide 04/09
3
STRATA DKT2404-DECT
Handset
Handset
The DKT2404-DECT cordless handset has special function buttons and an LCD that
shows operating conditions. A setting example is shown below.
Note The handset and base unit of your cordless telephone is equipped with the
same security code. In order for this handset to operate, it must be installed
with the matching base unit.
Vol +/-
F1 ~ F4
Function Buttons
F9 ~ F12
Feature Buttons
4
Strata CIX DKT2404-DECT User Guide 04/09
STRATA DKT2404-DECT
Handset
Table 1. DKT2404-DECT Handset LCD Icons
Button
+/-
Description
Selects ringer volume in standby mode and speaker volume in talk mode.
Handset talk mode
With slash Mute is on
Without slash Mute is off
Hands-free icon - Hands-free talk or ear speaker talk
Shows when message(s) exist; off when there are no messages.
With slash - ringer is muted
Without slash - ringer will sound
Battery Full - indicator is 3
Battery Level 2 - indicator is 2
Battery Level 1 - indicator is 1
Battery Low - blinking indicator
Charge On - Charge Indicator as Low > Level 1 > Level 2 > Full > Low
When the handset is on the charger with the battery at full, the battery status
icon shows battery full.
Strata CIX DKT2404-DECT User Guide 04/09
5
STRATA DKT2404-DECT
LCD Display
LCD Display
The LCD display consists of two lines of 24 characters each and six icons—Talk,
Mute, Speaker, Message Waiting
, Ringer Off and Battery.
Base Station
The base station can be used on a surface or wallmounted unit. SW1 is located to the left of the power LED
is used for registration and test purposes only. The LED is
on when the base unit is powered on and blinks when the
base unit is in registration mode.
Note The handset and base unit of the DKT2404-DECT
are equipped with the same security code. For the
base unit to operate, it must be installed with the
matching handset.
Charging Unit
The handset comes with a charging unit (shown at right),
which can be wall-mounted or not, and has two slots.
The front slot functions as a cradle for the handset when
idle and a charger for the handset battery.
The rear slot is for spare battery charging. It
automatically discharges when it detects that discharging
is necessary.
LEDs - handset and battery indicate battery charging
status. The LEDs are red when charging, and are off when not charging.
6
Strata CIX DKT2404-DECT User Guide 04/09
STRATA DKT2404-DECT
Cordless Digital Telephone Standard Parts
Cordless Digital Telephone Standard Parts
Your Toshiba cordless digital telephone includes the following items:
•
•
•
•
•
•
•
•
Base unit
Base unit stand
Base unit wall plate adapter
Handset
Rechargeable handset battery
Charging unit
Two AC adapters
Belt clip
If any of these items are missing or damaged, contact your System Administrator.
Strata CIX DKT2404-DECT User Guide 04/09
7
This page intentionally left blank.
Installation
2
Step 1: Review Safety Instructions
WARNING!
Toshiba DOES NOT intend this unit to be waterproof. To reduce
the risk of fire, electrical shock, or damage to the unit, DO NOT
expose this unit to rain or moisture.
ä Read and understand all product instructions.
ä Follow all warnings and instructions marked on the product.
ä Cleaning precautions:
• Disconnect from power source before cleaning.
• Do not use liquid cleaners or aerosol cleaners.
• Use a dry cloth for cleaning.
ä Do not use this product near water; for example, near a sink, or in any wet area.
ä Do not place this product on an unstable cart, stand, or table. The telephone could
fall, causing serious damage to the unit.
ä To protect the product from overheating, do not:
• Block or cover any slots or openings in the base unit.
• Place near or over a radiator or heat register.
• Place in an enclosed cabinet unless proper ventilation is provided.
ä Operate this product only from the type of power source indicated on the marking
label.
Strata CIX DKT2404-DECT User Guide 04/09
9
Installation
Step 1: Review Safety Instructions
ä Never push objects of any kind into the base unit slots, as the objects could touch
dangerous voltage points or short out parts that could cause fire or electric shock.
ä To reduce the risk of electric shock, do not disassemble this product. Opening or
removing covers could expose you to dangerous voltages or other risks. Incorrect
re-assembly can cause electric shock when the appliance is subsequently used.
Contact qualified service personnel when service or repair work is required.
ä Unplug this product from the wall outlet and refer servicing to qualified service
personnel under the following conditions:
•
•
•
•
When the power supply cord is damaged or frayed.
If liquid has been spilled into the product.
If the product has been exposed to rain or water.
If the product does not operate normally when following the operating
instructions. Adjust only those controls that are covered by the operating
instructions. Improper adjustment of other controls may result in damage, and
will often require extensive work by a qualified technician to restore the product
to normal operation.
• If the product has been dropped, or the cabinet has been damaged.
• If the product exhibits a distinct change in performance.
ä Do not use the telephone to report a gas leak in the vicinity of the leak.
WARNING!
Do not attempt to install or unplug this or any device or
appliance during an electrical storm.
CAUTION! Changes or modifications to this product not expressly approved by
Toshiba, or operation of this product in any way other than as
detailed by this User Guide, could void your authority to operate this
product.
10
Strata CIX DKT2404-DECT User Guide 04/09
Installation
Step 1: Review Safety Instructions
WARNING!
ä Use only battery model BT-1009. Use of any other battery could
cause a safety hazard.
ä Do not dispose of the battery in a fire. The cell will explode.
Under federal, state and local laws, it could be illegal to
dispose of old batteries by placing them in the trash. Check
with your local government for information on where to recycle
or dispose of old batteries. If you cannot find the information
you need, contact Toshiba for assistance.
ä Do not remove or damage the battery casing.
ä Do not short circuit the battery. Exercise care in handling the
battery in order not to short the battery with rings, bracelets,
and keys or other conductive materials. The battery or
conductor could overheat and cause burns.
ä Charge the battery only in accordance with the instructions
and limitations specified in the instruction manual provided for
this product.
ä Do not charge the rechargeable battery in any charger other
than the one designed to charge it as specified in this user
guide. Using another charger may damage the battery, or
cause the battery to explode.
ä Observe proper polarity orientation between the battery and
charging unit.
Strata CIX DKT2404-DECT User Guide 04/09
11
Installation
Step 2: Select Location
Step 2: Select Location
1. Select a location that is not subject to excessive heat or humidity. Keep the base
unit and handset away from sources of electrical noise, such as motors and
fluorescent lighting.
2. Determine if the base unit will sit on your desk or be wall mounted. If wall mounted,
go to Step 6: “Wall Installation (Optional)”.
3. Place the base unit on a desk or tabletop near a standard 120VAC outlet and
within reach of the Strata CIX digital line connection.
Important!
Place the base unit to the right of the DKT. If placed on the left, the cordless antenna picks up a tone due to its close proximity to the DKT
speaker and electronic parts.
Step 3: Place DP/DKT-series Telephones
into 2000-Mode
You must place your DP/DKT-series telephone into 2000-mode before connecting the
cordless telephone; otherwise, the telephone will not work.
In 2000-mode, the DKT3000 telephone operation changes are:
•
•
•
Only 16 characters by two lines display on the LCD.
LCD Feature button does not work
Spdial button does not work
ä To change DKT3000-series telephones into 2000-mode
1. On the DKT3000 telephone, press 3+6+9+Hold (simultaneously).
2. Press #.
3. Press FB7 (or FB10 on the DKT3014). LED On = 2000 mode. LED Off = 3000
mode.
Note Flexible Buttons (FB) are numbered from the bottom up and left to right.
FB7 for example would be the seventh button up on the left.
4. Press Hold.
5. Lift the handset to exit programming mode. Wait a few seconds for the telephone
to reset itself.
12
Strata CIX DKT2404-DECT User Guide 04/09
Installation
Step 4: Connect Telephone Cables
Step 4: Connect Telephone Cables
Your cordless telephone must be connected to a Strata CIX digital line port.
WARNING!
Never install telephone wiring during a lightning storm.
ä To connect as a stand-alone telephone
ä Connect the modular jack labeled “Line
In” directly to the telephone wall jack
using one of the supplied cables (shown
at right).
ä To connect to a Strata DP/DKT
1. Unplug the cable from the DP/DKT and
plug into the “Line In” jack of cordless
telephone base unit (shown at right).
2. Plug the additional two-foot cable into
the “Line Out” jack of the base unit and
into the DP/DKT jack located on the
bottom of the telephone.
Strata CIX DKT2404-DECT User Guide 04/09
13
Installation
Step 5: Connect and Apply Power
Step 5: Connect and Apply Power
Base Unit
1. Plug the AC adapter cord into the AC
adapter input jack on the base unit (shown
at right).
2. Plug the AC adapter into a standard
120VAC wall outlet.
3. Check to see that the power LED is lit.
Charging Unit
1. Plug the AC adapter cord into the input
jack on the charging unit.
2. Plug the AC adapter into a standard
120VAC wall outlet.
3. Check to see that the handset LED is lit.
Note You can place the handset in the charging unit with or without the belt clip
attached.
Important!
•
•
14
Use only the supplied AC adapter.
If the handset LED on the charging unit and/or the battery LED on the base unit
do not light, return everything to your Authorized Dealer.
Strata CIX DKT2404-DECT User Guide 04/09
Installation
Step 6: Wall Installation (Optional)
Step 6: Wall Installation (Optional)
Important!
You must place your DP/DKT-series telephone into 2000-mode before
connecting the cordless telephone; otherwise, the DP/DKT-series telephone will not work. See “Step 3: “Place DP/DKT-series Telephones
into 2000-Mode”.
Standard Wall Plate Mounting
These telephones are designed to be mounted on a standard wall plate. To attach the
wall mount stand to the base unit:
1. Select a wall location near a 120VAC outlet and within reach of the Strata CIX
digital line connection.
2. Slide the wall mount stand into the notches at the
top of the base unit, push the wall mount stand
down and snap it into place (shown right).
3. Plug the AC adapter into the base unit.
4. Place the AC adapter cord inside the molded
channel of the wall mount stand.
5. Plug one end of the telephone cord into the LINE
jack on the base unit. Optionally, plug one end of a
Strata DP/DKT telephone into the PHONE jack.
Then place the telephone cord(s) inside the
molded channel(s) on the bottom of the wall
mount stand.
6. Plug the other end of the telephone cord into the modular wall jack.
7. Place the base unit on the posts of the wall plate and
push down until it’s firmly seated (shown right).
8. Plug the AC adapter into a standard 120VAC wall
outlet.
Note Do not use an outlet controlled by a wall switch.
Strata CIX DKT2404-DECT User Guide 04/09
15
Installation
Step 6: Wall Installation (Optional)
Direct Wall Mounting
If you do not have a standard wall plate, you can mount your telephone directly on a
wall. Before mounting your telephone, consider the following:
•
•
•
Select a location away from electrical cables, pipes, or other items behind the
mounting location that could cause a hazard when inserting screws into the wall.
Make sure the wall material is capable of supporting the weight of the base unit.
Use #10 screws with anchoring devices suitable for the wall.
ä To wall mount the base unit
1. Insert two mounting screws 3-15/16 inches apart. Allow about
3/16 of an inch between the wall and screw heads for mounting
the telephone (shown right).
2. Plug and secure the AC adapter cord by following Steps 2 and
3 of the “Standard Wall Plate Mounting” on page 15.
3. Plug one end of the telephone line cord into the LINE jack on
the base unit. Optionally, plug one end of a Strata DKT
telephone into the PHONE jack. Then place the telephone
cord(s) inside the molded channel(s) on the bottom of the wall
mount stand.
4. Place the base unit on the posts of the wall screws
and push down until it’s firmly seated.
5. Plug the other end of the telephone cord into a
telephone wall jack.
6. Plug the AC adapter into a standard 120VAC wall
outlet by following Step 7 of the Standard Wall Plate
Mounting.
16
Strata CIX DKT2404-DECT User Guide 04/09
Installation
Step 6: Wall Installation (Optional)
Charging Unit Wall Mounting
The charging unit is also designed to be wall mounted. Before mounting your charging
unit, consider the following:
•
•
•
Select a location away from electrical cables, pipes, or other items behind the
mounting location that could cause a hazard when inserting screws into the wall.
Make sure the wall material is capable of supporting the weight of the charging
unit.
Use #10 screws with anchoring devices suitable for the wall material where the
charging unit will be placed.
1. Insert two mounting screws 2 inches apart. Allow
about 3/16 of an inch between the wall and screw
heads for mounting the telephone.
2. Plug the AC adapter into the charging unit as
previously described. Wrap the AC adapter cord
around the strain relief (shown right).
3. Place the charging unit on the posts of
the wall screws and push down until it is
firmly seated (shown right).
4. Plug the AC adapter into a standard
120VAC wall outlet.
Strata CIX DKT2404-DECT User Guide 04/09
17
Installation
Step 7: Install Handset Battery Pack
Step 7: Install Handset Battery Pack
1. Remove the battery cover by pressing the latch and sliding the cover down and off
the handset.
2. Slide the battery pack down into the handset
(shown right) making sure the connectors on
the battery and handset meet.
3. Securely close the battery compartment cover
by sliding it up until it snaps into place.
4. Securely close the battery compartment cover
by sliding it up until it snaps into place.
CAUTION! Rechargeable Nickel-Metal-Hydride batteries must be disposed of
properly.
Step 8: Charge Batteries for First Time
Important!
Before using your DKT2404-DECT, the battery must be continuously
charged without interruption for 15 -20 hours. Either the handset or the
charging unit can be used.
1. Place the handset in the charging unit.
2. Ensure that the handset LED lights. If it does not,
make sure that the AC adapter is plugged in and that
the handset is making good contact with the charging
unit contacts.
Handset
LED
18
Strata CIX DKT2404-DECT User Guide 04/09
Installation
Step 8: Charge Batteries for First Time
Step 9: Install Headset (Optional)
The optional headset provides hands-free option.
With the headset installed, you can use the belt clip to
carry the handset and conduct a conversation. All
feature operations remain the same except the
handset earphone and microphone are disconnected.
ä Open the cover over the headset jack that is
located on the top of the handset and plug in the
headset as shown at right.
Important!
Only use headsets especially designed
or modified for use with radio frequency
equipment.
Step 10: Attach Belt Clip (Optional)
Note The belt clip is designed to fit snugly onto the handset.
1. Snap the tab out of the belt clip notch on the top of the handset.
2. Slide the belt clip into the space where the belt clip tab was,
carefully aligning the belt clip sides to the notches.
3. Press firmly until it snaps into place.
4. Use the belt clip to attach the handset to your belt or pocket.
ä To remove the belt clip
1. Carefully pry the tabs loose and remove the belt clip.
2. Reinstall the cover tab.
Strata CIX DKT2404-DECT User Guide 04/09
19
This page intentionally left blank.
Operation & Setup
3
Power Up
ä Handset - When the battery is put into the handset it starts operation. Upon powerup the handset searches for RF communication from the base station.
ä Base Station - The base station starts operation when the AC adapter is plugged in
(there is no On/Off switch).
Power Down
ä Handset - If the handset loses battery or the battery level is less than a threshold
set in the handset software, it goes to power-down mode and no talk function is
supported.
ä Base Station - If the base station loses power no talk function is supported.
Operation with the Strata CIX
The operation described below is an example of using the DKT2404-DECT with a
Strata CIX telephone system and may differ from your particular installation (details
depend on your Strata CIX configuration).
Strata CIX DKT2404-DECT User Guide 04/09
21
Operation & Setup
Operation with the Strata CIX
Making a Call to Another Extension
1. Press the TALK button or the speaker-icon button on the handset. The handset
blinks ACQUIRING LINK on the handset LCD and dial tone is heard.
During this time the current volume is displayed for two seconds.
2. Enter the number of the desired party (102), for instance. The LCD shows the
dialed numbers and rings the extension.
3. When the called party answers, the LCD shows successful connection by
displaying the handset icon as shown.
If you walk out of range of the base station, the handset emits an error tone and Out of
Range is displayed as shown for five seconds. The handset then goes into idle mode.
22
Strata CIX DKT2404-DECT User Guide 04/09
Operation & Setup
Operation with the Strata CIX
Receiving a Call from Another Extension
1. When you receive a call from another extension the handset rings a tone and
shows the information of the calling party (e.g., name and ext. number in place of
the INCOMING CALL display) on the LCD.
2. Press TALK or any of the dialing buttons, or if the handset is in the charger, just
pick it up. The handset connects to the base station and may show the following
message (depends on how quickly the RF connection is established:
3. The current volume shows for two seconds, then the talk screen displays.
The talk screen displays the calling party information for the duration of the call.
Strata CIX DKT2404-DECT User Guide 04/09
23
Operation & Setup
Operation with the Strata CIX
Making an Outside Call
1. Press the outside line button (usually the F1 button). The handset connects to the
base station, Receives the enable command from the Strata CIX and goes into talk
mode - the line button lights, the current volume shows for two seconds and dial
tone is heard.
2. Any entered digits show in the LCD.
Receiving an Outside Call
1. Dependent upon the Strata CIX settings, when an outside call comes in the
handset goes into incoming call mode, ringing a tone and indicating the call on the
LCD.
2. Press one of the following:
•
•
•
•
the blinking outside line button (dependent on the Strata CIX)
the TALK button
any dialing button
or just pick up the handset if it is in the charger.
3. The current volume shows for two seconds, then the talk screen displays.
24
Strata CIX DKT2404-DECT User Guide 04/09
Operation & Setup
Operation with the Strata CIX
Finish Talk Mode
When your call is complete, end the connection by pressing the TALK button on the
handset, or just place the handset on the charger.
Redial (Option)
If the Redial option is enabled, the Redial (F8 button) is used to invoke the operation.
Press the TALK or the speaker-icon button to get dial tone and then press the Redial
button. The last number dialed is shown in the LCD and the number is sent to the
Strata CIX for processing.
Redial digit length can be up to 32 digits. If, after talk mode is established, F8 is the
first button pressed, it acts as redial; in other cases, F8 operation is ignored (see
example below):
Channel Change
Channel change occurs automatically.
CIX No Service
In cases when the TALK or speaker-icon button is pushed and connection to the CIX
cannot be established, or if the base station doesn’t respond, the handset goes to idle
mode after blinking the following message for seven seconds:
Strata CIX DKT2404-DECT User Guide 04/09
25
Operation & Setup
Operation with the Strata CIX
Out of Range
ä When the handset is in the idle mode, it will show this screen when it cannot find
the base station (Out of Range).
ä If the TALK, speaker-icon or one of the F1-F12 buttons are pressed but the
handset cannot establish an RF link with the base station, the handset will sound
an error tone and show the Out of Range message.
ä While talking, if the handset cannot receive a signal from the base station for
appox. five seconds, it goes to idle mode - conversation is dropped - with an error
tone. In this case, the LCD shows the message below.
26
Strata CIX DKT2404-DECT User Guide 04/09
Operation & Setup
Operation with the Strata CIX
Low Battery
Your DKT2404-DECT comes equipped with one rechargeable BT1009 battery that
provides 16 hours of talk time and seven days standby time (fully charged). The LCD
shows the battery according to the remaining capacity.
Low battery symptoms are:
•
On a call
• Battery status icon changes to battery low.
• Handset keeps talk mode and the battery low alert tone is emitted every 30
seconds.
•
In standby mode
• Battery status icon changes to battery low.
• Charge Battery message blinks on and off on the display.
To restore your battery capacity, return the handset to the charging unit or replace the
handset battery with a charged one. After the handset is on the charging unit for one
minute he battery icon stops blinking and the battery low tone stops.
For more information on installing and charging the battery, see Step 7: “Install
Handset Battery Pack”.
Mute
ä During talk mode, press the menu/MUTE button on the front of the handset. The
MUTE icon displays on the screen and the microphone is dead.
ä Press the menu/MUTE button again to cancel the mute condition. Finishing the
conversation also cancels the mute condition.
Strata CIX DKT2404-DECT User Guide 04/09
27
Operation & Setup
Operation with the Strata CIX
Hands Free
ä Press the speaker-icon button in either standby mode or during a call. The
handset goes to hands-free operation and the speaker icon displays on the screen.
ä Press TALK to return to return to “non-speaker” (normal) operation.
ä Press the speaker-icon button (or TALK button twice) to end the call and return to
idle.
Volume Setting
ä Volume setting can be changed from Levels 1 to 6 (highest). Talk mode, handsfree mode and headset mode each have volume settings. When the +/- buttons
are pressed, the handset immediately goes to volume setting mode, sounding the
ringer and displaying the current volume for five seconds. During this time use the
+/- buttons to change the volume.
Ring Volume Setting
When the + (up) button is pressed when the handset is idle, the handset goes to the
Ringer Volume setting and displays the current setting. The Ring volume is changed
as follows:
Press the up button to show the next screen
28
Strata CIX DKT2404-DECT User Guide 04/09
Operation & Setup
Operation with the Strata CIX
Pressing the up button again shows this screen
Pressing the up button a third time shows this screen
ä When the ringer volume is Off (Vibrate), the handset vibrates instead of ringing. If
the handset is on the charger and a call comes in, the ringer outputs the low tone
instead of vibrating.
ä If the ringer mute is on, the handset will output a ringer tone or it will vibrate in
Ringer Volume Setting mode.
ä Pressing TALK or the speaker-icon buttons in Ring Volume setting mode cancels
the ringer volume setting and the handset goes idle.
Ringer Mute
ä If the - (down) button is pressed and held for two seconds in standby mode or in
incoming call mode, the handset sets the Ringer mute on, turns on the Ringer
mute icon and stops the ringer. Press and hold the - button for two seconds to turn
the Ringer mute off (unmute).
ä Any incoming call will blink on the handset.
ä The setting will be saved until it is changed.
Strata CIX DKT2404-DECT User Guide 04/09
29
Operation & Setup
Menu Setting Mode
Menu Setting Mode
The Menu setting mode can change various settings such as ring type, registration
and deregistration.
ä Press TALK or the speaker-icon button in any menu setting mode to cancel the
operation and go into idle mode.
ä If there is no key operation for one minute, the menu setting cancels and goes to
idle mode.
ä Select Exit and press the menu/MUTE button to go to idle mode.
Change Ringer Type
1. Press the menu/MUTE button in idle mode. The LCD shows the menu list.
2. Select Change Ringer Type by the + or - button and press menu/MUTE.
3. The LCD shows tone types and sounds each one as the + or - button is pressed.
4. Press the menu/MUTE button at the desired tone.
30
Strata CIX DKT2404-DECT User Guide 04/09
Operation & Setup
Menu Setting Mode
5. The handset will emit a confirmation tone and show Saved on the LCD and then go
to the menu list mode.
End of Range Alarm
1. Press the menu/MUTE button while the handset is in idle mode. The LCD shows
the menu list and the handset goes to menu list mode.
2. Select End of Range Alarm using the + or - buttons and press menu/MUTE.
3. The LCD will show On and Off. Select either one by the + or - button and press
menu/MUTE.
4. The handset will emit a confirmation tone and show Saved on the LCD and then go
to the menu list mode.
Strata CIX DKT2404-DECT User Guide 04/09
31
Operation & Setup
Menu Setting Mode
Registration
1. Press the menu/MUTE button while idle. The LCD shows the menu list mode.
Press the - button to go to the next screen.
2. Select Register using the + or - button and press menu/MUTE.
3. The LCD shows the message below. Select No or Yes by the + or - buttons and
press menu/MUTE. If you choose No the handset goes to the menu list mode.
4. If you choose Yes, the LCD shows the message below.
5. On the base station, press the button (if your base station has two buttons, this is
the left button as you are facing the front of the base station) and hold for 3
seconds. The POWER light will blink and you have 1 minute to perform the next
step.
6. Enter the base PIN (default base PIN is 1234).
To clear the last digit, press the - button. To clear all the digits hold the - button
down for 2 seconds. After all digits are gone, press the - button. The handset goes
to the menu list mode.
32
Strata CIX DKT2404-DECT User Guide 04/09
Operation & Setup
Menu Setting Mode
7. The handset is registered to the base station after the LCD shows the message
below and goes idle.
Deregistration
1. Press the menu/MUTE button in idle mode. The LCD shows the menu list and the
handset goes to menu list mode.
2. Select Deregister by pressing the + or - button and pressing menu/MUTE.
3. The LCD shows the message below. Select No or Yes by pressing the + or - button
and pressing menu/MUTE.
4. Press the menu/MUTE button when the pointer indicates No and the handset
returns to idle.
5. The handset will be deregistered from the base station. The handset emits a
confirmation tone, shows the message below and goes to the menu list mode.
Strata CIX DKT2404-DECT User Guide 04/09
33
Operation & Setup
Menu Setting Mode
Base Registration PIN
1. Press the menu/MUTE button while in standby mode. The LCD shows the menu
list and the handset goes into menu list mode.
2. Use + or - button to go through the screens to the Base Registration PIN screen as
shown below and press the menu/MUTE button.
3. The LCD shows base registration PIN. In the example below, 1234 is the base PIN
default.
To change the PIN: To back up one digit, press the - button; hold the - button to
return to the first digit and enter the new PIN.
4. Press the menu/MUTE button to save the Base PIN. The handset emits a
confirmation tone, displays the saved message and goes to menu list mode.
Base Key Option (Option)
When the handset is in base key option mode, the F11 and F12 buttons on the
handset are used as base buttons one and two (your base unit may have just one
button). When both the Base Key option and One Touch Dialing options are enabled,
the One Touch Dial buttons are F9 and F10.
34
Strata CIX DKT2404-DECT User Guide 04/09
Operation & Setup
One Touch Dialing
One Touch Dialing
Buttons F9 - F12 can be as One Touch Dial buttons.
Dial Store Mode
1. Press the menu/MUTE button in standby mode. The LCD shows the menu list.
2. Select One Touch Dial Setting using the + or - buttons and press menu/MUTE.
3. The handset goes to Dial Store mode and shows One Touch Dial button name and
the number that is stored. Select One Touch Dial 1-4 using the + or - buttons.
If a number is not stored, the second line of the LCD is blank.
When both the Base Key Option and One Touch Option are enabled, the One
Touch Dial 3 and 4 options disappear.
4. Press menu/MUTE. The LCD shows the edit display.
Strata CIX DKT2404-DECT User Guide 04/09
35
Operation & Setup
One Touch Dialing
5. If no number is stored, the LCD shows the following:
If, for instance, a 24 digit number is stored, the LCD displays:
6. Use the keypad to enter a number. To delete the last digit, press the - button. To
delete all digits, press and hold the - button.
One Touch Dialing can store up to 24 digits. If keypad button is pressed when there
are already 24 digits entered, the handset emits an error tone.
7. Press the menu/MUTE button. The handset emits the confirmation tone, the LCD
shows the message below and the handset goes to the One Touch Dial List mode.
To delete the registered number in the One Touch Dial menu, press menu/MUTE
after deleting all the digits at Step 5.
If TALK or the speaker-icon button is pressed during a One Touch Dial number
entry, the handset aborts the store operation and the handset goes to idle.
36
Strata CIX DKT2404-DECT User Guide 04/09
Operation & Setup
F9~F12 Feature Buttons
Dial Out
1. Press the TALK button on the handset (the current volume shows for 2 seconds)
to get dial tone.
2. Press a One Touch Dial button - the number registered will be shown and the digits
sent to the Strata CIX.
ä An error tone is emitted when the handset does not have a One Touch button.
ä During a conversation you can send a One Touch dial number at any time. When
the One Touch number is sent, the current dial display disappears.
ä When a function button is pressed while the digits are being sent, the dial output is
canceled.
F9~F12 Feature Buttons
The F9~F12 buttons on your cordless telephone can be assigned as one-touch dial
buttons and were preassigned upon system installation. If you are not using these
buttons for the assigned features, you can invoke features with access codes. See
Step 4: “Feature Access Codes” for access code sequences that match your Toshiba
telephone system.
Place a Call on Hold
ä Press the Hold button. HOLD displays on the LCD.
ä To resume the call
ä Press the flashing function button.
Transfer a Call
ä Press Cnf/Trn. The dialed numbers saved in transfer memory is shown on the
display after two seconds. When the receiving party answers, press Cnf/Trn to
complete the transfer.
Strata CIX DKT2404-DECT User Guide 04/09
37
Operation & Setup
Redial a Number
Redial a Number
ä Press Talk and then Redial. The last number called is redialed.
Note If you are using the Strata CTX system, the Redial button works only with the
last dialed number that was answered. If you dial a number and receive no
answer, the Redial button will not use that number as the last one dialed.
Conference a Call
ä Press Cnf/Trn. The dialed numbers saved in conference memory is shown on the
display after two seconds. When the other party answers, press Cnf/Trn to have a
three-way conversation.
Switch a Call to Your Cordless Digital
Telephone
1. Press Hold on the desktop telephone, then press Talk on the DKT2404-DECT
handset.
2. Press the flashing Line LED. The call is now transferred to the DKT2404-DECT
handset, and the desktop telephone is disconnected.
Switch a Call to the Desk Telephone
1. Press Hold on the DKT2404-DECT handset.
2. Pick up the desktop telephone and press the flashing Line LED. The cordless
telephone is disconnected.
38
Strata CIX DKT2404-DECT User Guide 04/09
Feature Access Codes
4
Feature Access Codes
This chapter gives you all of the cordless digital telephone features in alphabetical
order. Your cordless digital telephone provides many of the same features as a 2000series corded digital telephone.
In addition to the Msg, Hold, Cnf/Trn and Redial functions, your cordless digital
telephone’s F1~F4 buttons perform the same way as the first four buttons on your
3000- or 2000-series digital telephone. They are assigned during system installation.
See your System Administrator for the features that have been assigned.
If you are not using these buttons for the assigned features, you can invoke the
features with access codes. Please see Table 2 below for access code sequences
that match your Toshiba telephone system.
For detailed feature descriptions, see the Strata CTX DKT/IPT Telephone User Guide.
Table 2. Feature Access Codes
Feature
Feature Access Code Sequences
Account Code
Cnf/Trn + #46 + Account code digits
Attendant Console
0
Automatic Busy Redial - On
#441
Automatic Busy Redial - Off
#442
Automatic Callback Cancel
#431
Background Music
Telephone Speaker On
Ext. button + #490 + source number + #
Telephone Speaker Off
Ext. button + #491
Strata CIX DKT2404-DECT User Guide 04/09
39
Feature Access Codes
Feature Access Codes
Table 2. Feature Access Codes (continued)
Feature
Feature Access Code Sequences
External Speaker On
Ext. button + #492 + source number + #
External Speaker Off
Ext. button + #493
Call Forward - Refer to Table 3
Call Park
Activate
Cnf/Trn + #33 + Orbit Number (or #33#)
Retrieve
Ext. button + #32 + Orbit Number (or #32#)
System Orbits
7000~7019
Call Pickup
Incoming - Group Pickup
Ext. button + #5#34
Incoming - Directed Extension
Pickup
Ext. button + #5#5 + Ext. Number to be picked up
Incoming - Directed Group Pickup
Ext. button + #5#32 + Group Number to be picked up
Incoming - Directed Extension
Pickup
Ext. button + #5#22 + Ext. Number
Directed DN Pickup of either Ringing
or Held Call
Ext. button + #5#6 + Ext. Number
On hold - Local Retrieve
Ext. button + #5#71
On hold - Remote Retrieve
Ext. button + #5#72 + Remote Ext. No.
On hold - Outside line Retrieve
Ext. button + #5#73 + Line on hold
On hold - Directed Extension
Retrieve
Ext. button + #5#74 + Ext. No. on hold
Conferencing - Three Way
#494
Dialing
Dial
*
Dial #
DISA Security Code - Change
40
441
440
#658 + old Security Code (1~15 digits) + # + new Security
Code (1~15 digits) + #
Strata CIX DKT2404-DECT User Guide 04/09
Feature Access Codes
Feature Access Codes
Table 2. Feature Access Codes (continued)
Feature
Feature Access Code Sequences
Do Not Disturb
Local - On
#6091
Local - Off
#6092
Remote - On
#6191 + ext. no. + Pass Code Number + #
Remote - Off
#6192 + ext. no. + Pass Code Number + #
Door Lock Control
#12 + Door Lock Number
Door Phone Calling
#15 + Door Phone No. (01~24, depending on system size)
Emergency Call
#911
Flash - Short
#450
Flash - Long
#451
LCD Language (Change)
#495 + Language No.
LCR (Outgoing Call)
9
Message Waiting (MW)
Release a received MW
#409
Retrieve a received MW
#408
Activate MW at another Station
without Ringing
#63 + Ext. no.
Cancel MW at another Station
without Ringing
#64 + Ext. no.
Messaging - Advisory
Advisory Message - Activation
#411 + Message No.
Advisory Message - Cancellation
#412
Network Access Code (Private
Network)
8 + Private Network No.
Night Ring Answer
#5#39
Off-hook Call Announce (Manual
Mode)
Voice First: 2; Tone First: 1, 21, or 12
Override
Strata CIX DKT2404-DECT User Guide 04/09
41
Feature Access Codes
Feature Access Codes
Table 2. Feature Access Codes (continued)
Feature
Feature Access Code Sequences
Busy, Do Not Disturb
2
Executive
3
Paging
Page All Groups
#30
Page Individual Groups
#31 + Group Number
Emergency Page - Individual Group
#38 + Group Number
Emergency Page - All Groups
#37
Answer for External Group Page
#5#36 + Zone Number
Repeat Last Number Dialed
*0
Speed Dial Register
#66
Station (00~99)
System
*1
+ Index Number (00~99)
*2
+ Index Number (000~099)
*3
+ Index Number (100~199)
*4
+ Index Number (200~299)
*5
+ Index Number (300~399)
*6
+ Index Number (400~499)
*7
+ Index Number (500~599)
*8
+ Index Number (600~699)
*9
+ Index Number (700~799)
Start Application
#18
Substitution of Dial “#”
440
Substitution of Dial “*”
441
Travelling Class Override
Enter Code
#471
Change Code
#69 + Index Number + old Code + # + new Code + #
User Programming Mode
42
#9876
Strata CIX DKT2404-DECT User Guide 04/09
Feature Access Codes
Call Forward Codes
Table 2. Feature Access Codes (continued)
Feature
Feature Access Code Sequences
Voice Mail (VM)
Direct Transfer to Voice Mail
#407 + Ext. Number
Volume Control - Beep
#6101
Volume Control - Ringing
#6102
Call Forward Codes
Table 3. Call Forward Procedure
Feature
Button Sequence
Call Forward Any Call - Internal and Incoming Line Calls:
Forwards any call, whether an internal call or incoming line call.
All Calls to an ext.
Press ext. button + #6011 (tone) + dial the dest. ext. no. (tone)
All Calls to outside
telephone no.
Press ext. button + #6011 (tone) + outside line access code + dest. telephone
no. + # (tone)
Busy to an ext.
Press ext. button + #6021 (tone) + dial the dest. ext. no. (tone)
Busy to outside
telephone no.
Press ext. button + #6021 (tone) + outside line access code + dest. telephone
no. + # (tone)
No Answer to an
ext.
Press ext. button + #6031 (tone) + dial the dest. ext. no. + timer (08~60) (tone)
No Answer to
outside telephone
no.
Press ext. button + #6031 (tone) + outside line access code + dest. telephone
no. + # (tone) + timer (08~60) (tone)
Busy No Answer to
an ext.
Press ext. button + #6041 + dial the dest. ext. no. (tone) + timer (08~60) (tone)
Busy No Answer to
outside telephone
no.
Press ext. button + #6041 + outside line access code + dest. telephone no. + # +
timer (08~60) (tone)
Cancel
Press ext. button + #6051 (tone)
Strata CIX DKT2404-DECT User Guide 04/09
43
Feature Access Codes
Call Forward Codes
Table 3. Call Forward Procedure (continued)
Feature
Button Sequence
Call Forward - Incoming Line Calls:
Forward incoming line calls only.
All Calls to an ext.
Press ext. button + #6013 (tone) + dial the dest. ext. no. (tone)
All Calls to outside
telephone no.
Press ext. button + #6013 (tone) + outside line access code + dest. telephone
no. + # (tone)
Busy to an ext.
Press ext. button + #6023 (tone) + dial the dest. ext. no. (tone)
Busy to outside
telephone no.
Press ext. button + #6023 (tone) + outside line access code + dest. telephone
no. + # (tone)
No Answer to an
ext.
Press ext. button + #6033 + dial the dest. ext. no. (tone) + timer (08~60)
No Answer to
outside telephone
no.
Press ext. button + #6033 + outside line access code + dest. telephone no. + #
(tone) + timer (08~60)
Busy No Answer to
an ext.
Press ext. button + #6043 + dial the dest. ext. no. (tone) + timer (08~60) (tone)
Busy No Answer to
outside telephone
no.
Press ext. button + #6043 + outside line access code + dest. telephone no. + #
(tone) + timer (08~60) (tone)
Cancel
Press ext. button + #6053 (tone)
Call Forward Any Call - Set for Another Station:
Enables you to set call forwarding for another telephone within your telephone system. You will need
the other telephone’s CF pass code in order to do this. CF Pass Codes are created in system
programming.
44
All Calls to an ext.
Press ext. button + #6012 (tone) + dial the other telephone’s ext. no. + enter
other telephone’s CF pass code + # + dest. telephone no. (tone)
All Calls to outside
telephone no.
Press ext. button + #6012 (tone) + dial the other telephone’s ext. no. + enter
other telephone’s CF pass code + # + outside line access code + dest.
telephone no. + # (tone)
Busy to an ext.
Press ext. button + #6022 (tone) + dial the other telephone’s ext. no. + enter
other telephone’s CF pass code + # + dest. telephone no. (tone)
Busy to outside
telephone no.
Press ext. button + #6022 (tone) + dial the other telephone’s ext. no. + enter
other telephone’s CF pass code + # + outside line access code + dest.
telephone no. + # (tone)
Strata CIX DKT2404-DECT User Guide 04/09
Feature Access Codes
Call Forward Codes
Table 3. Call Forward Procedure (continued)
Feature
Button Sequence
No Answer to an
ext.
Press ext. button + #6032 (tone) + dial the other telephone’s ext. no. + enter
other telephone’s CF pass code (tone) + # + dest. telephone no. (tone) + timer
(08~60) (tone)
No Answer to
outside telephone
no.
Press ext. button + #6032 (tone) + dial the other telephone’s ext. no. + enter
other telephone’s CF pass code (tone) + # + outside line access code + dest.
telephone no. + # (tone) + timer (08~60) (tone)
Busy No Answer to
an ext.
Press ext. button + #6042 + dial the other telephone’s ext. no. + enter other
telephone’s CF pass code + # (tone) + dest. telephone no. (tone) + timer
(08~60) (tone)
Busy No Answer to
outside telephone
no.
Press ext. button + #6042 + dial the other telephone’s ext. no. + enter other
telephone’s CF pass code + # (tone) + outside line access code + dest.
telephone no. + # (tone) + timer (08~60) (tone)
Cancel
Press ext. button + #6052 (tone) + dial the other telephone’s ext. no. + enter
other telephone’s CF pass code + # (tone)
Strata CIX DKT2404-DECT User Guide 04/09
45
Feature Access Codes
Call Forward Codes
Table 3. Call Forward Procedure (continued)
Feature
Button Sequence
Call Forward - Incoming Line Call - Set for Another Station:
Enables you to set forwarding of incoming line calls for another telephone within your telephone system
All Calls to an ext.
Press ext. button + #6014 (tone) + dial the other telephone’s ext. no. + enter
other telephone’s CF pass code + # (tone) + dest. telephone no. (tone)
All Calls to outside
telephone no.
Press ext. button + #6014 (tone) + dial the other telephone’s ext. no. + enter
other telephone’s CF pass code + # (tone) + outside line access code + dest.
telephone no. + # (tone)
Busy to an ext.
Press ext. button + #6024 (tone) + dial the other telephone’s ext. no. + enter
other telephone’s CF pass code + # (tone) + dest. telephone no. (tone)
Busy to outside
telephone no.
Press ext. button + #6024 (tone) + dial the other telephone’s ext. no. + enter
other telephone’s CF pass code + # (tone) + outside line access code + dest.
telephone no. + # (tone)
No Answer to an
ext.
Press ext. button + #6034 (tone) + dial the other telephone’s ext. no. + enter
other telephone’s CF pass code + # (tone) + dest. telephone no. (tone) + timer
(08~60)
No Answer to
outside telephone
no.
Press ext. button + #6034 (tone) + dial the other telephone’s ext. no. + enter
other telephone’s CF pass code + # (tone) + outside line access code + dest.
telephone no. + # (tone) + timer (08~60) (tone)
Busy No Answer to
an ext.
Press ext. button + #6044 (tone) + dial the other telephone’s ext. no. + enter
other telephone’s CF pass code + # (tone) + dest. telephone no. (tone) + timer
(08~60) (tone)
Busy No Answer to
outside telephone
no.
Press ext. button + #6044 (tone) + dial the other telephone’s ext. no. + enter
other telephone’s CF pass code + # (tone) + outside line access code + dest.
telephone no. + # (tone) + timer (08~60) (tone)
Cancel
Press ext. button + #6054 (tone) + dial the other telephone’s ext. no. + enter
other telephone’s CF pass code + # (tone)
Change Call Forward Pass Code:
Your telephone must be enabled in programming to have the ability to change pass codes.
Change Pass Code
46
Press ext. button + #670 (tone) + dial the dest. ext. no. (tone) + old pass code +
# (tone) + new pass code (tone) + #
Strata CIX DKT2404-DECT User Guide 04/09
Troubleshooting
and Specifications
5
Troubleshooting
If your cordless telephone is not performing to your expectations, try the suggestions
in Table 4. If you are still unable to resolve the problem, contact your telephone
System Administrator.
Important!
Do not attempt to service this unit yourself. All service must be done by
qualified service personnel.
Table 4. Troubleshooting Suggestions
Condition
CHARGE LED does not light when
handset is placed on charging unit.
Conversation is interrupted frequently.
Warning tone and Out of Range
message.
Suggestion
•
Make sure the AC adapter is plugged into the charging
unit and wall outlet.
•
Make sure handset is properly seated in charging unit.
•
Make sure the battery pack is properly placed in the
handset.
•
•
Make sure that the charging contacts on the handset
and charging unit are clean.
Make sure the base unit is positioned correctly.
•
Move closer to the base unit.
•
Check for low battery warning.
•
Move closer to the base unit.
Strata CIX DKT2404-DECT User Guide 04/09
47
Troubleshooting and Specifications
DKT Mode
Table 4. Troubleshooting Suggestions (continued)
Condition
Handset doesn’t ring.
Suggestion
•
The battery pack may be weak. Charge the battery pack
for five~six hours.
•
Make sure the base unit is positioned correctly.
•
The handset may be too far away from the base unit.
•
The ringer may be set to Off.
•
Make sure the AC adapter is plugged into the base unit
and wall outlet.
DKT Mode
When a Toshiba DKT is connected to the Base of a cordless handset, the cordless
telephone LCD will display “DKT Mode” whenever the digital telephone is in use.
Important!
If the cordless telephone is in a stand-alone configuration and its LCD
displays “DKT Mode” the Off-hook Preference assignment in Program
204-13 is probably not set correctly; the Off-hook Preference of all cordless telephones must be set to “Ringing” or “No Preference.”
Cleaning Charging Unit Contacts
To maintain a good charge, it is important to clean
all charging contacts on the handset, spare battery
pack and charging unit about once a month
(shown right). Use a pencil eraser or a soft dry
cloth. Do not use any liquids or solvents.
48
Strata CIX DKT2404-DECT User Guide 04/09
Troubleshooting and Specifications
Charging Spare Battery Packs
Charging Spare Battery Packs
The charging unit of your cordless telephone is equipped to charge the spare battery
pack with or without the handset in the front slot.
1. Slide the spare battery pack into the second slot in the charging unit until the
retaining clip snaps over the top of the pack.
2. Make sure the battery indicator lights. If the indicator doesn’t light, check to see
that the AC adapter is plugged in, and that the battery pack is making good contact
with the unit’s charging contacts.
Note Charge the battery pack without interruption for 12~15 hours.
3. When charging is complete, press out on the latch and remove the battery pack for
use. If you don’t need the battery pack immediately, leave it in the charging
compartment. It will not overcharge.
Range and Performance
Ranges of 300 to 400 feet are possible depending on the building structure in which it
is used. The range is affected by the operating environment and base station
placement, and can be impacted by factors including metal walls, walls with metal
studs, office partitions, cabinets, other RF sources in the area, and nearby equipment.
For optimum range and performance from your handset, try the following:
•
•
•
•
Place the base units at least three to six feet away from the DKT; three feet from
metal structures; and six feet from computers, fax machines or other electronic
equipment.
Place the base unit as high as possible in the room
Use an AC outlet not associated with computer or electromagnetic equipment.
Wherever possible, put the base unit in the middle of the coverage area.
Radio Interference
Radio interference occasionally interrupts conversations, which does not mean that
your unit is defective. Move to a different location while you are talking. If the
interference continues, move the base unit. If there is still interference, contact your
System Administrator.
Strata CIX DKT2404-DECT User Guide 04/09
49
Troubleshooting and Specifications
Telephone Line Problems
Telephone Line Problems
The FCC and IC have granted the telephone company the right to disconnect service
in the event that your telephone causes problems on the telephone line. Also, the
telephone company may make changes in facilities and services which may affect the
operation of your unit. However, your telephone company must give adequate notice
in writing prior to such actions to allow you time for making necessary arrangements
to continue uninterrupted service.
If you are having trouble with your telephone service, you must first disconnect your
telephone to determine if it is the cause of your problem. If you determine that it is the
cause, you must leave it disconnected until the trouble has been corrected.
Privacy
Cordless telephones are radio devices. Communications between the handset and
base unit of your cordless telephone are accomplished by means of radio waves
which are broadcast over the open airways. Because of the inherent physical
properties of radio waves, your communications can be received by radio receiving
devices other than your own cordless telephone unit. Consequently, any
communications using your cordless telephone may not be private.
50
Strata CIX DKT2404-DECT User Guide 04/09
Troubleshooting and Specifications
Specifications
Specifications
For frequencies, power requirements, weight and size specifications, see Table 5.
Table 5. Specifications
General
Frequency Control
Phase Lock Loop
Cordless Telephone Technology
DECT 6.0
Operating Temperature
+32° F to + 104°F (0° to 40° C)
Audio Codec
G.726
Net Bit Rate
32kbit/s
Carriers
5 (1,728 kHz spacing) - US
Time Slots
2 x 12 (up/down stream)
Channel Allocation
Dynamic
Average Transmission Power
4mW (100 mW peak) - US
Base Unit
Receive/Transmit Frequency
1.9 GHz
Power Requirements
10VDC from supplied AC adapter
Size
Width – 8½ inches (216 mm)
Depth – 2¼ inches (57.15 mm)
Height – 5 inches (127 mm)
Weight
Approximately 15.4 oz. (0.44 kg)
Handset
Receive/Transmit Frequency
1.9 GHz
Power Requirements
NI-MH Battery Pack (BT1009)
Size
Width – 2¼ inches (57.15 mm)
Depth – 1 inches (25.4 mm)
Height – 6½ inches (165 mm)
Weight
Approximately 8.8 oz. with battery (0.25 kg)
Battery
Capacity – 910 mAh, 2.4 V
Talk Mode – 16 hours (typical)
Standby Mode – 7 days (typical)
Strata CIX DKT2404-DECT User Guide 04/09
51
This is the last page of the document.