1
J ENGLISH
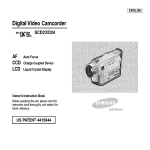
DVD Camcorder
SC-DC171/DCl 73(U)/DC175/DC575
AF
Auto Focus
CCD
Charge Coupled Device
LCD
Liquid Crystal Display
Owner's Instruction Book
Before operating the unit, ptease read this Instruction Book
thoroughly, and retain it for future reference.
[ US PATENT 4415844
]
Use only approved battery packs.
Otherwise, there is a danger of overheating, fire or explosion.
Samsung is not responsible for problems occurring due to
using unapproved batteries.
m
_rw
DW+r_i_ab_
OVD+_OL
AD68-01230A
J
L ENGLISH
Contents
-
_
t, aoi
o
_
- H
o
e -
Features ............................................................................... 9
Learning about available Discs and Their Features ...........
How to use the DVD Camcorder easily ..............................
Accessories Supplied with the DVD Camcorder ................
Front & Left View ................................................................
Left Side View .....................................................................
10
12
13
14
15
Right & Top View ................................................................ 16
Rear & Bottom View ........................................................... 17
Remote Control (SC-DC175/DC575 only) .......................... 18
Using the Hand Strap & Lens Cover .................................. 19
Lithium Battery installation ................................................. 20
Using the Lithium Ion Battery Pack .................................... 21
Connecting a Power Source ............................................... 25
About the Operating Modes ............................................... 26
Using the Joystick .............................................................. 26
Using the Q.MENU ............................................................. 27
OSD (On Screen Display) in Camera Mode/Player Mode ... 28
OSD (On Screen Display) in M.Cam Mode/M.Player Mode
(SC-DC173(U)/DC175/DC575 only) ................................... 29
Turning the OSD (On Screen Display) On/Off .................... 29
A
Setting the Clock (Clock Set) .............................................
Setting the Wireless Remote Control Acceptance
(Remote) (SC-DC175/DC575 only) ....................................
Setting the Beep Sound (Beep Sound) ..............................
Setting the Shutter Sound (Shutter Sound)
(SC-DC173(U)/DC175/DC575 only) ...................................
Selecting the OSD Language (Language) .........................
Viewing the Demonstration (Demonstration) ......................
30
31
32
33
34
35
Adjusting the LCD Screen (LCD Bright/LCD Color) ........... 36
Displaying the Date/Time (Date/Time) ................................ 37
Setting the TV Display (TV Display) ................................... 38
|
|
.
*
0-
:-
*
-
_-
*
*
_o
Using the Viewfinder ...........................................................
Using the LCD ENHANCER ...............................................
Various Recording Techniques ...........................................
inserting and Removing a Disc ..........................................
Selecting the Record Mode (Rec Mode) ............................
"
39
39
40
4t
43
[ ENGLISH
J
Contents
Making your First Recording .............................................. 44
Recording with Ease for Beginners (EASY.Q Mode) .......... 45
Zooming In and Out ............................................................ 46
Using the Fade in and Out (FADE) .................................... 47
Using Back Light Compensation Mode (BLD) .................... 48
Using the Color Nite ........................................................... 49
Using the LIGHT (SC-DD173U/DD175/DC575 only) ......... 50
Dutting Off Wind Noise (Wind Dut) ..................................... 51
Setting the Shutter Speed & Exposure (Shutter/Exposure).. 52
Auto Focus / Manual Focus ................................................ 53
Programed Automatic Exposure Modes (Program AE) ...... 54
Setting the White Balance .................................................. 56
Applying Digital Effects ....................................................... 58
Setting the 16:9 Wide mode (16:9 Wide) ........................... 60
Setting the Digital Image Stabilizer (DIS) ........................... 61
Zooming In and Out with Digital Zoom (Digital Zoom) ....... 62
What is the Thumbnail Index? ............................................ 63
What's a Playtist? .............................................................. 63
Playing Title Scenes .......................................................... 64
Adjusting the Volume ......................................................... 64
Various Functions while in Player Mode ............................ 65
Deleting a Title Scene (Delete) .......................................... 67
Deleting a Section of a Title Scene (Partial Delete) ........... 68
Creating a New Playtist (New Playlist) .............................. 69
Playing the Playlist ............................................................ 70
Deleting a PIaylist (Delete) ................................................ 71
Adding Scenes to Playlist (Scene-Add) ............................. 72
Changing the Order of Scenes within a Playlist
(Scene-Move) .................................................................... 73
Deleting Scenes from a Playlist (Scene-Delete) ............... 74
Deleting a Section of a Playiist (Scene-Partial Delete) ..... 75
Disc Information (Disc Info) ............................................... 77
Editing the Disc Name (Disc Info-Rename) ....................... 78
Formatting a Disc (Disc Format) ........................................ 79
Finalizing a Disc (Disc Finalize) ........................................ 80
Playing Back on a PC with DVD drive ................................ 81
Playing back a finalized disc on a DVD Player/Recorder .. 81
Unfinalizing a Disc (Disc Unfinalize) ................................. 82
A
[ ENGLISH
J
Contents
Setting the AV In/Out (SC-DC175/DC575 only) .................. 83
Viewing Recordings on a TV .............................................. 84
Copying a Disc onto a Tape................................................ 86
Using the Voice Plus .......................................................... 87
Recording (Copying) a TV Program or Video Tape onto a
Disc (SC-DC175/DC575 only) ............................................ 88
Using a Memory Card (Usable Memory Card)
(not supplied)...................................................................... 89
Memory Card Functions ............................................... 89
inserting a Memory Card .............................................. 89
Ejecting a Memory Card ............................................... 89
Structure of Folders and Files on the Memory Card .......... 90
Selecting the Photo Quality (Photo Quality) ....................... 91
Setting the Photo Size (Photo Size) (SC-DC575 only) ....... 92
Setting the File Number (File No.) ...................................... 93
Taking a Photo Image (JPEG) on a Memory Card ............. 94
Viewing Photo Images (JPEG) ........................................... 95
Protection from accidental Erasure (Protect) ..................... 96
Deleting Photo Images and Moving Images (Delete) ......... 97
Formatting the Memory Card (Format) ............................... 99
Recording Moving images (MPEG) on a Memory Card ... 100
Playing the Moving images (MPEG) on a Memory Card .. 101
Recording Still images onto a Memory Card during
DVD playback .................................................................. 102
Marking images for Printing (Print Mark) .......................... 103
Printing Your Pictures-Using PictBridge TM ........................
Connecting To a Printer (USB Connect) .....................
Setting the Number of Prints .......................................
Setting the Date/Time imprint Option ..........................
Printing images ...........................................................
Canceling the Printing .................................................
105
105
106
106
106
106
Using USB interface ......................................................... 107
Using the Camcorder as a USB Device (USB Connect).. 109
installing DV Media PRO Program .................................... 110
Connecting to a PC ........................................................... 112
Disconnecting the USB Cable ..................................... 112
Using the DVD Camcorder as a PC Camera ............... 113
Using the USB Streaming Function ............................. 114
Using the DVD Camcorder as a Removable Disk ....... 114
[ ENGLISH
Contents
Using Your DVD Camcorder Abroad ................................. 115
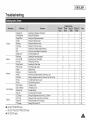
Troubleshooting ................................................................. 116
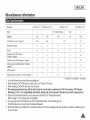
Setting menu items........................................................... 121
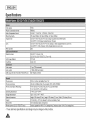
Disc Type Description ....................................................... 123
A
J
I ENGLISH
I
Notes and Safety instructions
Please rotate the LCD Screen carefully as illustrated.
Over-rotation may cause damage to the inside of the hinge
that connects the LCD Screen to the DVD Camcorder.
1. Open the LCD Screen 90 degrees with your finger.
2. Rotate it to the best angle to record or play.
• If you rotate the LCD Screen 180 degrees to the lens
side, you can close the LCD Screen with it facing out.
• This is convenient during playback operations.
180 °
= Refer to page 36 to adjust brightness and color of the LCD Screen.
i
Make sure not to contact the magnetic stripe of your credit card near the LCD panel. Your credit card information may be
removed.
1. Direct sunlight can damage the LCD Screen, the inside of
the Viewfinder or the Lens. Take pictures of the sun only in
low light conditions, such as at dusk.
2. The LCD Screen has been manufactured using high
precision technology.
However, there may be tiny dots (red, blue or green in
color) that appear on the LCD Screen. These dots are
normal and do not affect the recorded picture in any way.
3. Do not pick up the DVD Camcorder by holding the
Viewfinder, LCD Screen or Battery Pack.
4. Applying excessive force to the Viewfinder may damage it.
A
v
I ENGLISH
Notes and Safety instructions
= Take care not to touch the recording side (the rainbow colored side) of the disc with your
fingers. Discs contaminated by fingerprints or foreign substances may not play properly.
= Use a soft cloth to clean the disc.
= Clean lightly from the center of a disc to the outside edge. Circling or cleaning too hard
may create scratches on the disc and further cause the disc to play abnormally.
= Do not use benzene, thinner, detergent, alcohol or anti-static spray when cleaning the disc.
It may cause a malfunction.
= Press the supporting holder in the center of the disc case for easy removal of the disc.
= Handle discs by the edges and the center hole to avoid finger marks on the recording side.
= Do not bend or apply heat to the disc.
= Always store discs vertically in their plastic cases when not in use.
= Store discs away from direct sunlight, heating elements, moisture or dust.
A
I
[ ENGLBH
Notes and Safety instructions
= Do not leave the DVD Camcorder exposed to high temperatures (above 60 °C or 140 °F).
For example, in a parked car in the sun or exposed to direct sunlight.
= Do not let the DVD Camcorder get wet. Keep the DVD Camcorder away from rain, sea water, and any other form of
moisture.
The DVD Camcorder may get damaged if it gets wet. Sometimes a malfunction due to exposure to liquids cannot be
repaired.
= A sudden rise in atmospheric temperature may cause condensation to form inside the DVD Camcorder.
- When you move the DVD Camcorder from a cold location to a warm location (e.g. from outside to inside during the
winter.)
- When you move the DVD Camcorder from a cool location to a hot location (e.g. from inside to outside during the
summer.)
Television programs, video tapes, DVD titles, films, and other program materials may be copyrighted.
Unauthorized copying of copyrighted material may be against the law.
All the trade names and registered trademarks mentioned in this manual or other documentation provided with your Samsung
product are trademarks or registered trademarks of their respective holders.
=
=
=
=
Do not attempt to service this DVD Camcorder yourself.
Opening or removing covers may expose you to dangerous voltage or other hazards.
Refer all servicing to qualified service personnel.
When replacement parts are required, be sure the service technician has used replacement parts specified by the
manufacturer that have the same characteristics as the original parts.
= Unauthorized substitutions may result in fire, electric shock or other hazards.
A
[ ENGLISH
Getting to Know Your DVD Camcorder
DVD Disc Camcorder
DVD-VIDEO recording with 3 1/2 inch (8cm) DVD-RW/
+RW/DVD-R/+R DL(Dual Layer) discs.
High Power Zoom Lens
Offers you High Power Zoom Lens with 34x (SCDC171/DC173(U)/DC175 only) Zoom Lens, 26x Zoom
Lens (SC-DC575 only).
USB Interface for Digital Image Data Transfer
(SC-DC173(U)/DC175/DC575 only)
You can transfer images to a PC using the USB interface
without an add-on card.
Photo Capture
(SC-DC173(U)/DC175/DC575 only)
The Photo Capture function lets you capture the scene
you want while the disc is in play, and save as a still
image on a Memory Card.
1200x Digital Zoom
Altows you to magnify an image up to 1200 times its
original size.
Color TFT LCD
A high-resolution color TFT LCD gives you clean, sharp
images as welt as the ability to review your recordings
immediately. Also 2.7 inch Wide LCD. (SC-DC173(U)/
DC175/DC575 only).
LCD Enhancer
Gives you a clear quality image on the LCD Screen; even
in bright daylight.
Mega-pixel CCD (SC-DC575 only)
Your DVD Camcorder incorporates a 1.0 mega-pixel
CCD. High-resolution photo images can be recorded to a
Memory Card.
Digital Image Stabilizer (DIS)
The DIS compensates for any handshake, reducing
unstable images particularly at high magnification.
Various Digital Effects
The Digital Effects allow you to give your recordings a
special look.
Digital Still Camera Function
(SC-DC173(U)/DC175/DC575 only)
- Using a Memory Card, you can easily record and
playback standard photo images.
- You can transfer standard photo images on a
Memory Card to your PC using the USB interface.
Moving Image Recording
(SC-DC173(U)/DC175/DC575 only)
Moving image recording makes it possible to record video
onto a Memory Card.
MMC/SD Card Slot
(SC-DC173(U)/DC175/DC575 only)
MMC/SD card slot can use MMC (Multi Media Cards) and
SD cards.
Multi OSD Language
You can select the desired OSD language from OSD list.
A
I ENGLISH
I
Getting
to Know Your DVD Camcorder
This DVD Camcorder can record or play back by using 3 1/2 inch (8cm) DVD-R/+R DL/-RW/+RW discs (not supplied) only.
Please check whether your disc is proper for use.
Which discs can be used in the DVD Camcorder?
DVD-R
DVD-RW
DVD+R
DL
You can make only one
recording on a disc,
You cannot
dele[e or ec [ [ne
"ecordlngs.
After finalizing the disc, you
can play it back in most
DVD players/recorders/drives,
_-
You can record and edit repeatedly,
YOUcan delete recorded image f:{es or format _nedisc and
reuse it again.
DVD+RW
You can record on the disc
repeatedly,
Youcan deleteandformat._)u]
yOU
Format the disc in the mode you want according to
your needs.
Video mode: Once finalized [ne recordings on _ne e_sc
WIHpIa_ in most DVD p{ayers/recoraers/anves
VR (Video RecordJ mode: You can easily edit the
recordings on your DVD Camcorder out you can p_ayme
disc only on a DVD Recorder mat suppoRs VR mode.
•
cannot
ea![
recordings.
You can play back a
DVD+RW disc on other DVD
playerslrecordersldrives
without finalizing it.
You may not use 5 inch (t2cm) CD/DVD discs.
d_y Yd.c,,,,,,o*,,.e- Unusable
31_2_nch
18cm)
discs.
/_,,_
the re#owing
I ._J discs.
CD/CD-R/CD-RWIDVD-ROMIDVD+R (Single Layer _IDVD-RAM/DVD-R(Dual Layer)
-
Floppy Disk, MO, MD, iD, LD
J ENGLISH
Getting to Know Your DVD Camcorder
Which discs recorded on the DVD Carncorder can be played in
DVD players/recorders/drives?
Discsmust be finalized before they can be playedin regular DVDplayers/recorders/drives.
Finalizingis a processrequired to make the DVDdiscsyou recordedon the camcorderplayable in DVDplayers/
recorders/drives.
DVD-R
D
,
•
•
DVD+R
_
DL
DVD player
DVD recorder
DVD drive-eauiDDed PC
DVD-RW
in Video mode
•
DVD player
DVD recorder
• DVDdrive-equlpped PC
In VR mode
DVDrecoraerma_supportsDVD-RWVR mode.
_DVD+RW
•
,
-
DVD player
DVD recorder
DVD drive-equipped PC
Youcan play Pack DVD+RW discs on
other DVD players/recoraers/anves
_!ithoutfinalizing them.
Notes
We are not resoonsibte for data lOSS on a also.
You may not Deable Io play alscs recorded from a PC or DVD recorder. When such a case occurs, me message Bad
Disc! may Dedlsplayea.
_/e do not warranty any aamage or loss incurred due to recoralng ana ptayback failure caused bj disc or card matfunc[ion
• We take no responsiDllt[yand offer no comDensauonfor any recording failure, toss of recordea or eaaea matenai ana/o[
aamage to tile recorder arlslng from the misuse of discs.
• For stable and perpetual recording aria playback use the TDK. MKM Verbatim disks ma_nave the sign "for VIDEO
CAMERA TM"If yOUdon't use them. operations for recording and playback may not work properly or you may not eject the
inserted disc from the DVD Camcorder.
• You cannot oven_vnte,eaa. or format the fin _lized disc. tf needed unfinatize the disc DVD-RW on Yt '-*page 82
- it is no[ guaranteed that all DVD players/recorders/drives can play discs finalized in this DVD Camcorder.
For compatibility details refer to the DVD players/recorders/drives owner's manual.
• For more information about the categories of available discs see page 123.
•
•
J
I ENGLISH
Getting
I
to Know Your DVD Camcorder
You can record any desired image and edit and playback the disc on a DVD Camcorder, most common DVD players, and PCs
after finalizing the disc.
I
A
- Discs must be finalized before they can be played on standard DVD players/recorders/drives.
,, You may play back DVD÷RW discs on other devices without finalizing them.
I ENGLISH
Getting to Know Your DVD Camcorder
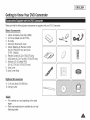
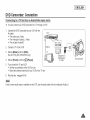
Make sure that the following basic accessories are supplied with your DVD Camcorder.
Basic Accessories
1.
2.
3.
4.
5.
Lithium Ion Battery Pack (SB-LSMS0)
AC Power Adapter (AA-E9 TYPE)
AV Cable
instruction Book/Quick Guide
Lithium Batteries for Remote Control
6.
7.
8.
(SC-DC175/DC575 only) and Clock.
(TYPE: CR2025)
Remote Control (SC-DC175/DC575 only)
USB Cable (SC-DC173(U)/DC175/DC575 only)
Software CD (DV Media PRO)
(SC-DC173(U)/DC175/DC575 only)
Lens Cover
9.
10. Lens Cover Strap
Optional
Accessories
11.3 1/2 inch (8cm) DVD-RW Disc
12. Carrying Case
= The contents can vary depending on the sales
region.
= Parts and accessories are available at your local
Samsung dealer.
J
I
I ENGLISH
Getting
I
to Know Your DVD Camcorder
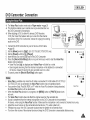
3
4
5
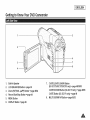
IlIustrations of model SC-DCI73U are used
in this owner's instructions. Although
the models covered in this manual look
different, they all operate in a similar way,
1.
ACCESS indicator '-*page 41
2.
3.
OPEN Switch '-*page 41
Lens
4.
LIGHT (SC-DC173U/DC175/DC575 only) "*page 50
5.
6.
Remote Sensor (SC-DC175/DC575 only)
Internal MIC
7.
EASY.Q Button =page 45
8.
Q.MENU Button'-*page
9.
Joystick(Up/Down/Left/Right/OK)/FADE
(page 47)/
' <M,Player Mode> : Memory Player Mode
Mode
<M.PMyer Mode>
<pIayer
27
Mode:"
Up
Down
<Camera
Mode>
(SC-DCi73(U)/DC175/DC575onty)
Photo image
Moving image
FADE
(1)
Left (14_)
Stop
Stop
Backward SearcM Sk p
Backward
Right ( _.J )
Fo_ard SearcM Skip
Forward
OK (_.H)
Play/Still
10. TFT LCD Screen
Skip
Skip
Sackwsrd
Forward
Search
Search
Flay/St II
[ ENGLISH
Getting
to Know Your DVD Camcorder
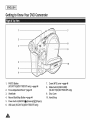
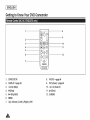
2.
LCD ENHANCER Button '=,page 39
C.NITE/LIGHT/S.SHOW Button
(SC-DC173U/DC175/DC575 only) '-,page 49150195
3.
Zoom (W/T)NOL (A/Y)
C.NITE/S.SHOW Button (SC-DC173 only) _page 49/95
4.
5.
Record Start/Stop Button ".page 44
MENU Button
6.
DISPLAY Button ".page 29
1.
7.
Built-In Speaker
Button _page 46164
C.NITE Button (SC-DC171 only) "*page 49
8.
MULTI DISP./MF/AF Button ".page 95153
[
I ENGLISH
I
Getting to Know Your DVD Camcorder
1
7
2
8
3
9
4
10
5
6
1.
PHOTO Button
(SC-DC173(U)/DC175/DC575 onty) ",page 94
7.
Zoom (W/T) Lever '=,page 46
8.
Mode Switch (DISC/CARD)
(SC-DC173(U)/DCi75/DC575 only)
Disc Cover
2.
3.
Focus Adjustment Knob ='page 39
Viewfinder
9.
4.
Record Start/Stop Button =,page 44
i0. Hand Strap
5.
Power Switch (ONlOFFl_
6.
USB Jack (SC-DC173(U)/DC175/DC575 only)
(Camera)ll-_-I(Player))
I ENGLISH
Getting
to Know Your DVD Camcorder
1
2
1.
Charging Indicator
2.
3.
Lithium Battery Cover
AV Jack
4.
DCIN Jack
5.
Hand Strap Hook
6.
Tripod Receptacle
7.
8.
Memory Card Slot (SC-DC173(U)/DC175/DC575 only)
BATT. RELEASE Switch
Usable Memory Cards (2GB Max)
(SC-DC173(U)/DC175/DC575
only)
SD
MMC
I
I ENGLISH
Getting
I
to Know Your DVD Camcorder
1,
START/STOP
8.
PHOTO "*page 94
2,
DISPLAY _page29
9.
W/T (Zoom) "*page 46
3,
I_,q/ _-I (Skip)
10. _
4,
[] (Stop)
5,
6,
_,N (Play/Still)
MENU
11, I_ (Slow)
12. Q-MENU
7,
Up(^)lDown(v)lLeft(
< )lRight( >)lOK
/ _,_,(Search)
I ENGLISH
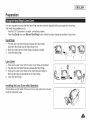
Preparation
It is very important to ensure that the Hand Strap has been correctly adjusted before you begin your recording.
The Hand Strap enables you to:
Hold the DVD Camcorder in a stable, comfortable position.
Press the [Zoom] lever and [Record Start/Stop] button without having to change the position of your hand.
Hand Strap
1. Pull and open the Hand Strap and release the Hand Strap.
Insert the Hand Strap into the Hand Strap Hook.
2. Insert your hand into the Hand Strap and adjust its length.
3. Close the Hand Strap.
Lens Cover
1. Hook up the Lens Cover with the Lens Cover Strap as illustrated.
2. Pull and open the Hand Strap and release the Hand Strap.
3. Hook up the Lens Cover Strap to the Hand Strap and adjust it
following the steps as described for the Hand Strap.
4. Close the Hand Strap.
Instaltinq
the Lens Cover
after Operation
Press buttons on both sides of the Lens Cover, then insert it so it covers
the DVD Camcorder Lens.
,A
I
I ENGLISH
I
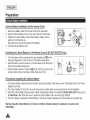
Preparation
Lithium
Batterv
installation
for the internal
Clock
1. Remove the Battery Pack from the rear of the DVD Camcorder.
2. Open the Lithium Battery Cover on the rear of the DVD Camcorder.
3. Position the Lithium Battery in the Lithium Battery Holder, with the
positive (+) terminal face up.
Be careful not to reverse the polarity of the Battery.
4. Close the Lithium Battery Cover.
Installing
the Lithium
Battery
in the Remote
Control
(SC-DCI75/DC575
using your fingernail or a coin to open it. The battery holder opens.
2. insert the battery while the positive (+) terminai faces down and press it
firmly until you hear locking sound.
3. Place the battery holder to match its [(_] mark with the [O] mark on the
remote control, and turn the battery holder clockwise to fix it.
Precautions
re ardin
the Lithium
1
only)
2
_
_ :
:
3
Battery
Holder
Battery
1. The Lithium Battery maintains the clock function and preset contents of the memory; even if the Battery Pack or AC Power
adapter is removed.
2. The Lithium Battery for the DVD Camcorder lasts about 6 months under normal operation from time of installation.
3. When the Lithium Battery becomes weak or dead, the date/time indicator will display 12:00 AM JAN.01.2007 when you set
the Date/Time to On. When this occurs, replace the Lithium Battery with a new one (type CR2025).
4. There is a danger of explosion if Lithium Battery is incorrectly replaced. Replace only with the same or equivalent type.
Warning: Keep the Lithium Battery out of reach of children. Should a battery be swallowed, consult a doctor
immediately.
I ENGLISH
Preparation
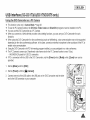
*:* Use the SB-LSM80 or SB-LSM160 (not supplied) Battery Pack only.
*:o The Battery Pack may be charged a little at the time of purchase.
Charging
the Lithium
Ion Battery
Pack
1.
2.
3.
4.
5.
Turn the [Power] switch to [OFF].
Attach the Battery Pack to the DVD Camcorder.
Connect the AC Power adapter(AA-E9 TYPE) to a walt socket.
Open the DC IN Jack Cover.
Connect the DC cable to the DC IN jack on the DVD Camcorder.
= The charging indicator will start to blink, showing that the Battery
is charging.
6. When the Battery is fully charged, disconnect the Battery Pack and
the AC Power Adapter from the DVD Camcorder. Even with the
Power switched off, the Battery Pack will still discharge.
Blinking
time
Charging rate
Once per second
_ess than 50%
Twice per second
50% ~ 75%
Three times per second
75% ~ 90%
Blinking stops and stays on
30% ~ 100%
On for a second and off for a
second
Error - Reset the Battery Pack and
he DO Cable
<Charging indicator>
I
[ ENGLISH
[
Preparation
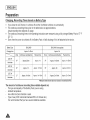
Charging,
Recording
Times
based on Battery
Type
= If you close the LCD Screen, it switches off and the Viewfinder switches on automatically.
, The continuous recording times given in the table below are approximations.
Actual recording time depends on usage.
, The continuous recording times in the operating instructions are measured using a fully charged Battery Pack at 77 °F
(25 °C).
, Even when the power is switched off, the Battery Pack wilt still discharge if it is left attached to the device.
Battery Type
SB-LSM80
Charging time
Approx.lhr
Mode
LCD ON
Viewfinder
xP
Continuous recording time
Appro×:55m!n
SB-LSM160 (not supplied)
30rain
Approx. 3hr
Playback time
Mode
Continuous recording time
Appro×thr
XP
Approx lhr 5min
SP
Approx. 2hr
LP
A#prox: 2hr 101"n!n
Approx:
!hrS01"n!n
PEaybacktime
Approx
lhr 55rain
Approx
2hr 5rain
LCD ON
SP
Approx. lhr
LP
Approx, !hr5m!n
View4inder
LCD ON
Approx
lhr 1groin
Approx 2br 15rain
Viewfinder
= Measured times shown above are based on model SC-DCI73U
The amount of continuous recording time available depends on;
The type and capacity of the Battery Pack you are using.
Ambient temperature.
How often the Zoom function is used.
Type of use (DVD Camcorder/Camera/With LCD Screen etc.).
It is recommended that you have several batteries available.
A
]ENGLISH]
Preparation
Battery
Level
Display
I
The battery level display indicates the amount of power remaining in the Battery Pack.
a. Fully charged
b. 20~40% used
c. 40~80% used
d. 80~95% used (red)
e. Completely used (Blinking)
(The DVD Camcorder will turn off soon, change the battery as soon as possible.)
The Finalize/Format functions are not available when the battery level is between _
, At batterylevel 'e'
The battery becomes low in capacity and the <_>
indicator blinks on the display.
The screen wilt turn blue when the battery is almost completely discharged.
Battery
a
b
f,
c
e
and _,
Pack Management
= The Battery Pack should be recharged in an environment between 32 °F (0 °C) and 104 °F (40 °C).
= The Battery Pack should never be charged in a room with a temperature that is below 32 °F (O°C).
= The life and capacity of the Battery Pack will be reduced if it is used in temperatures below 32 °F (0 °C) or left in
temperatures above 104 °F (40 °C) for a long period of time, even when it is fully recharged.
= Do not put the Battery Pack near any heat source (i.e. fire or a heater).
= Do not disassemble, apply pressure to, or heat the Battery Pack.
= Do not altow the + and - terminals of the Battery Pack to be short-circuited. It may cause leakage, heat generation, induce
overheating or fire.
[ ENGLISH
Preparation
Maintaining
the Battery
Pack
= Please refer to the Table on page 22 for approximate continuous recording time.
, The recording time is affected by temperature and environmental conditions.
, The recording time shortens dramatically in a cold environment.
The continuous recording times in the operating instructions are measured using a fully charged Battery Pack at 77 °F (25 ° C).
The remaining battery time may differ from the approximate continuous recording times given in the instructions.
, When replacing the battery pack, only use the same type as is supplied with this DVD Camcorder and is available from
your SAMSUNG retailer.
, When the Battery reaches the end of its life, please contact your local dealer.
The batteries have to be dealt with as chemical waste.
, Make sure that the Battery Pack is fully charged before starting to record.
, A brand new Battery Pack is not charged. Before using the Battery Pack, you need to charge it completely.
, Fully discharging a Lithium Ion Battery damages the internal cells.
The Battery Pack may be prone to leakage when fully discharged.
, To preserve battery power, keep your DVD Camcorder turned off when you are not operating it.
, If your DVD Camcorder is in Camera Mode, and it is left in STBY mode without being operated for more than 5 minutes
with a disc inserted, it wilt automatically turn itself off to protect against unnecessary battery discharge.
, Make sure that the Battery Pack is fitted firmly into place.
Do not drop the Battery Pack. Dropping the Battery Pack may damage it.
J ENGLISH
Preparation
+ There are two types of power source that can be connected to your DVD Camcorder.
- The AC Power adapter: used for indoor recording.
- The Battery Pack: used for outdoor recording.
Using
a Household
Power
Source
Connect to a household power source to use the DVD Camcorder without having to worry about the battery power. You can
keep the Battery Pack attached; the battery power wilt not be consumed.
1. Connect the AC Power adapter (AA-E9 TYPE) to a walt
socket.
The plug and walt socket type may differ according to
your resident country.
2. Open the DC IN Jack Cover.
3. Connect the DC cable to the DC IN jack of the DVD
Camcorder.
4. Set the DVD Camcorder to each mode by holding down
the Green Tab on the [Power] switch and turning the
[Power] switch to [ON] or [OFF].
Power Switch
J
I ENGLISH
I
Preparation
*:o The operating modes are determined by the position of the [Power] and [Mode] (SC-DC173(U)/DC175/DC575only) switch.
°:- Set the Operation Mode by adjusting the [Power] and [Mode] (SC-DC173(U)/DC175/DC575 only) switches before
operating any functions.
°:o Each time you move the [Power] switch downward, it toggles between [l_[Camera)]
and [_(Player)]
mode.
Mode Name
<Camera Mode> <Player Mode>
<M.Cam Mode>
<M.Player Mode>
[Power] Switch
[Mode] Switch
_
DC575 only)
_
_
Isc-Dc173(u)/DClTS/
_
_
_lm
_
_
_
_
= The <M.Cam Mode> and the <M.Player Mode> are only avaiMble on SC-DC173(U)/DO175/DO575
= M.Cam Mode : Memory Camera Mode / M.Player Mode : Memory Player Mode
°:o The Joystick is used to make a selection and to move the cursor left,
right, up and down. Using the Joystick, you can easily make your
selection and navigate the menu.
1.
2.
3.
4.
5.
Move to a previous menu item/Adjust the selected item (to the left).
Move to a sub menu item/Adjust the selected item (to the right).
Move to a lower menu item.
Move to an upper menu item.
Press to select the chosen item (OK).
I ENGLISH
I
Preparation
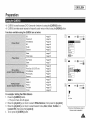
-:o Q.MENU is used to access DVD Camcorder functions by using the [Q.MENU] button.
-:* Q.MENU provides easier access to frequently used menus without using the [MENU] button.
Functions available using the Q.MENU are as below:
DIS
_page 61
Program AE
White Balance
_page 54
BLC
_page 48
Shutter
_page 52
Exposure
_page 52
Delete
_page 67
Partial Delete
_page 68
New P]aylist
Delete
_page 69
BLC
_page 48
Photo Size (SC-DC575 only)
White Balance
_page 92
_page 56
Photo Quality
_page 91
Exposure
_page 52
,ere
DeleteAll
Protect
r_--LU_
STB¥[]
ooooo_
30mir_]
_page 56
Exit
_page 71
30 min []
_page 97
Exit
_page 98
_page 96
Print Mark
_page
Format
_page 99
STBY []
103
For example: Setting the White Balance
11 Press the [Q.MENU] button.
= The quick menu list wilt appear.
2. Move the [Joystick] up or down to select <White Balance>, then press the [Joystick].
3. Move the [Joystick] up or down to select desired mode (Auto, Indoor, Outdoor, or
Custom WB), then press the [Joystick].
4. To exit, pressthe [Q.MENU] button.
0:00:00</,!_
30 Ilin
@
/6:9 Wide
I
<When the White Balance option in
Camera mode is selected>
,,&
I ENGUSH
I
Preparation
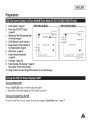
1.
2.
Battery Level -`page 23
Manual focus -`page 53 •
20. Remaining Time
21. Record Mode -page
EASY.Q '=,page 45 •
22. Operating Mode
7.
DiS '=,page 81
Program AE '=,page 54
White Balance Mode
_page 56
Digital Effects Mode
_page 58
16:9 Wide -page 60
Shutter Speed -page 52 •
23. Zoom Position _page 46
Digital Zoom Position
-page 62
24. LCD Enhancer '-*page 39
25. Volume Control -page 64
26. Message Line -page 117
27. Voice Plus indicator
"*page 87
8.
Exposure ",page 52 •
28. AV IN (SC-DC175/DC575 only)
".*page 83
29. Playback Speed "*page 66
3.
4.
5.
6.
9. Date/Time -`page 37
10. Color Nite -pages 49~50
11. USB (SC-DC173(U)/DC175/
DC575 only) "*page 109
12. Remote (SC-DC175/DC575
only) =page 31
13. Wind Cut "*page 51
14. BLC (Back Light
Compensation) -`page 48
15. LIGHT (SC-DC173U/DC175/
DC575 only) -page 50
16. Title scene number
17. Disc Format '-,page 79
18. Disc Type
19. Counter
- _:i_
_raM_
43
24 2322
2_F]
21 20 19
!VY_::_D
5+
0
6
Sepia
NO disc!
/200AM
2 ......
6--/t
30rain _17
9 Wicte
_'
_14
[P]
JAN 01 2007
Cob_ N /_30
I
I
9
10
4[]
13
ooooo_
-/ -29
N_te_
= Functions not marked with
wilt be retained when the DVD
Camcorder is powered on after
turning it off.
, OSD (On Screen Display) items
shown here are based on model
SC-DC173U.
P
/ '°1
/
26
27
I ENGUSH
I
Preparation
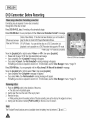
1,
2.
3.
4.
5,
Photo Quality _page 91
Photo Size (SC-DC575 only)
-`page 92
Remaining Time (Recordable time
of moving images)
CARD (Memory Card) Indicator
--5
600
8 nin--
--4
--3
_10
5s/0
6
Slide
/152X864
7
8
,_5
image Counter [Total number of
recordable photo images)
6, Slide Show -page 95
7, Erase Protection Indicator
-`page 96
8. Print Mark "page 103
g, Folder Number-File Number '-page 93
File number of the moving image
10. image Counter (Current Image/Total number of recorded images)
Turning
OSD
No memon/cald!
12 00 AM JAN 0_ 2007
Sr,_OV001 --9
OnlOff
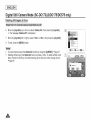
Press the [DISPLAY] button on the left side control panel.
= Each press of the button toggles the OSD function on and off.
the
DatelTirne
To turn the Date/Time
OnlOff
on or off, access
the menu and change the Date/Time
[[_
_00 0005_-9
mode. ",page
37
2
I ENGLISH
I
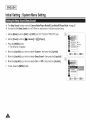
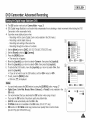
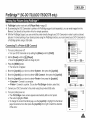
Initial Setting • System Menu Setting
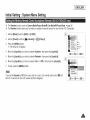
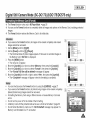
-:o Clock setup works in Camera Mode/Player Mode/M.Cam Mode/M.Player Mode. '-*page 26
°:* The date/time is automatically recorded onto a disc. Before recording, please set the date/time.
1. Set the [Mode] switch to [DISC] or [CARD]. (SC-DC173(U)/DC175/DC575 only)
2. Set the [Power] switch to [1_ (Camera}] or [(J_(Player)]
3. Press the [MENU] button.
= The menu list will appear.
4. Move the [Joystick] up or down to select <System>, then press the [Joystick].
5. Move the [Joystick] up or down to select <Clock Set>, then press the [Joystick].
= The month will be highlight first.
_Move
_Select
_ExJt
6. Move the [Joystick] up or down to set current month, then press the [Joystick].
= The day will be highlighted.
= To adjust the clock, select the Year, Month, Day, Hour, Min, or AM/PM by pressing the
[Joystick], then move the [Joystick] up or down to set respective values.
7. You can set the day, year, hour, minute, and AM/PM following the same procedure after
setting the month.
8. Press the [Joystick] after setting minute.
_Adiust
_Seiect
_Exit
_
_
• A message <Complete!> is displayed.
9. To exit, press the [MENU] button.
= After the Lithium Battery loses its charge (after about 6 months), the date/time appears
on the screen as 12:00 AM JAN.01.2007.
= You can set the year up to 2040.
= If the Lithium Battery is not installed, data inputted wilt not be backed up.
= Display illustrations in this manual
OSD illustrations of model SC-DC173U are used in this manual. Some of the OSD
items shown in this manual may differ slightly from the actual items on your DVD Camcorder.
Move
Select
Exit
I ENGLISH
I
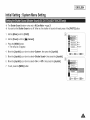
Initial Setting : System Menu Setting
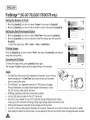
*:o The Remote function works in Camera Mode/Player Mode/M.Cam Mode/M.Player Mode. =page 26
*:* The Remote function allows you to enable or disable the remote control for use with the DVD Camcorder.
1. Set the [Mode] switch to [DISC] or [CARD].
2. Set the [Power] switch to [1_ (Camera}] or [l_(Player)]
3. Press the [MENU] button.
= The menu list will appear.
4. Move the [Joystick]
up or down to select <System>, then press the [Joystick].
5. Move the [Joystick]
up or down to select <Remote>, then press the [Joystick].
6. Move the [Joystick]
up or down to select <On> or <Off>, then press the [Joystick].
_Move
_Select
_ExJt
".....
7. To exit, press the [MENU] button.
I_t
If you set the Remote to Off in the menu and try to use it, the remote control icon ((<_l) will
blink for 3 seconds on the LCD Screen and then disappear.
Demonstration
im
_Move
\
_Se_ect
_Exit
/
,,A
I ENGLISH
I
Initial Setting : System Menu Setting
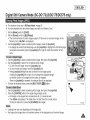
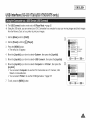
4° The Beep Sound function works in Camera Mode/Player Mode/M.Cam Mode/M.Player Mode. ",page 26
*'.* You can turn the Beep Sound on or off. When on, each press of a button sounds a beep.
1. Set the [Mode] switch to [DISC] or [CARD]. (SC-DC173(U)/DO175/DC575 only)
2. Set the [Power] switch to [ I_ (Camera)] or [I'iii_(Player)]
3. Press the [MENU] button.
= The menu list will appear.
4. Move the [Joystick]
up or down to select <System>, then press the [Joystick].
5. Move the [Joystick]
up or down to select <Beep Sound>, then press the [Joystick].
6. Move the [Joystick]
up or down to select <On> or <Off>, then press the [Joystick].
_Move
7. To exit, press the [MENU] button.
.A
"....
_Selec:
_KxJt
I ENGLISH
Initial Setting : System Menu Setting
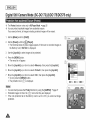
*:o The Shutter Sound function works only in M.Cam Mode. '='page 26
+ You can turn the Shutter Sound on or off. When on, the shutter wifl sound with each press of the [PHOTO] button.
1. Set the [Mode] switch to [CARD].
2. Set the [Power] switch to [ _
(Camera)]
3. Press the [MENU] button.
= The menu list will appear.
4. Move the [Joystick]
up or down to select <System>, then press the [Joystick].
5. Move the [Joystick]
up or down to select <Shutter Sound>, then press the [Joystick].
6. Move the [Joystick]
up or down to select <On> or <Off>, then press the [Joystick].
_Move
7. To exit, press the [MENU] button.
".....
_Selec:
_KxJt
I
I ENGLISH
I
InitiaJ Setting • System Menu Setting
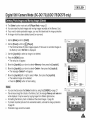
-:- The Language function works in Camera Mode/Player Mode/M.Cam Mode/M.Player Mode. ",page 26
-:- You can select the desired language to display the menu screen and the messages.
1. Set the [Mode] switch to [DISC] or [CARD]. (SC-DC173(U)/DC175/DC575 only)
2. Set the [Power] switch to [1_ (Camera}] or [(]_(Player)].
3. Press the [MENU] button.
= The menu list will appear.
4. Move the [Joystick]
up or down to select <System>, then press the [Joystick].
_Move
5. Move the [Joystick] up or down to select <Language>, then press the [Joystick].
= The available language options are listed.
6. Move the [Joystick] up or down to select the desired OSD language, then press the [Joystick].
= The OSD language is refreshed inthe selected language.
7. To exit, press the [MENU] button.
Language options may be changed without prior notice.
.,&
_Select
_Exit
I ENGLISH
I
Initial Setting • System Menu Setting
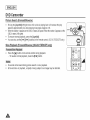
*:* The Demonstration function may only be used in the Camera Mode with no disc inserted in the unit. '=,page 26
*:* Before you begin: Make sure that there is no disc inserted in the DVD Camcorder. "*page 41
*:o Demonstration automatically shows you the major functions that are included with your DVD Camcorder so that you may
use them more easily.
*:* The Demonstration operates repeatedly until it is switched off.
1. Set the [Mode] switch to [DISC]. (SC-DC173(U)/DC175/DC575 only)
2. Set the [Power] switch to [ I_l_ (Camera)].
3. Press the [MENU] button.
. The menu list will appear.
4. Move the [Joystick]
up or down to select <System>, then press the [Joystick].
5. Move the [Joystick]
up or down to select <Demonstration>,
6. Move the [Joystick]
up or down to select <On>, then press the [Joystick].
_Move
[]Select
_ExJt
J
then press the [Joystick].
7. To quit the Demonstration, press the [Joystick].
If you press other buttons (FADE, C.NtTE, EASY.Q, MF/AF, etc.) during the Demonstration
operation, the Demonstration function wilt be deactivated and the function of the button
pressed will be activated.
[]
_Move
[]Select
_ExJt
A
I ENGLISH
I
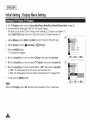
Initial Setting • Display Menu Setting
+ Adjusting the LCD Screen works in Camera Mode/Player Mode/M.Cam Mode/M.Player Mode. "-.page 26
*:* Your DVD Camcorder is equipped with a 2.5 inch (SC-DC171 only) / 2.7 inch wide (SC-DC173(U)/DC175/DC575 only)
color Liquid Crystal Display (LCD) Screen, which enables you to view what you are recording or playing back directly.
*:* Depending on the conditions under which you are using the DVD Camcorder (indoors or outdoors for example), you can
adjust;
- LCD Bright
- LCD Color
1. Set the [Mode] switch to [DISC] or [CARD]. (SC-DC173(U)/DC175/DC575 only)
2. Set the [Power] switch to [1_ (Camera}] or [[_(Player)].
3. Press the [MENU] button.
, The menu list will appear.
4. Move the [Joystick]
up or down to select <Display>, then press the [Joystick].
5. Move the [Joystick] up or down to select the item you want to adjust (LCD Bright or
LCD Color), then press the [Joystick].
6. Move the [Joystick] left or right to adjust the value of the selected item (LCD Bright or
LCD Color), then press the [Joystick].
• You can set values for <LCD Bright> and <LCD Color> between <00> ~ <35>.
7. To exit, press the [MENU] button.
• Adjusting the LCD Screen does not affect the brightness and color of the image to be
recorded.
.,&
_Move
_Select
_ExJt
/
J
(_
f
"\
TV Display
I ENGLISH
InitiaJ Setting • Display Menu Setting
-:o The Date/Time function works in Camera Mode/Player Mode/M.Cam Mode/M.Player Mode. ",page 26
°:* The date and time are automatically recorded on a special data area of the disc.
1. Set the [Mode] switch to [DISC] or [CARD]. (SC-DC173(U)/DC175/DC575 only)
2. Set the [Power] switch to [1_ (Camera)] or [l_(Player)]
3. Press the [MENU] button.
= The menu list will appear.
4. Move the [Joystick]
up or down to select <Display>_ then press the [Joystick].
5. Move the [Joystick]
up or down to select <Date/Time>_ then press the [Joystick].
6. Move the [Joystick] up or down to select the Date/Time display type, then press the
[Joystick].
= Date/Time display type: <Off>, <Date>, <Time>, <Date&Time>.
7. To exit, press the [MENU] button.
= The Date/Time will read 12:00 AM JAN.01.2007 in the following conditions.
- During playback of a blank section of a disc.
- If the disc was recorded before setting the Clock function in the DVD Camcorder.
- When the Lithium Battery becomes weak or dead.
= Before you use the Date/Time function, you must set the clock. "*page 30
A
I
I ENGLISH
I
Initial Setting • Display Menu Setting
-:o The TV Display function works in Camera Mode/Player Mode/M.Cam Mode/M.Player Mode. _page 26
°:* You can select the output path of the OSD (On Screen Display).
This allows you to set the OSD for viewing on the viewfinder, LCD screen or an external TV.
Use the [DISPLAY] button to turn the OSD on/off on the LCD ScreenNiewfinder/TV.
1. Set the [Mode] switch to [DISC] or [CARD]. (SC-DC173(U)/DO175/DC575 only)
2. Set the [Power] switch to [lf_ (Camera}] or [[_(Player)]
3. Press the [MENU] button.
= The menu list will appear.
4. Move the [Joystick]
up or down to select <Display>, then press the [Joystick].
5. Move the [Joystick]
up or down to select <TV Display>, then press the [Joystick].
6. Move the [Joystick] up or down to select <On> or <Off>, then press the [Joystick].
= <Off>: The OSD appears in the LCD Screen and Viewfinder only.
= <On>: The OSD appears in the LCD Screen, Viewfinder and TV. "-,pages 84~87
7. To exit, press the [MENU] button.
When the TV Display is set to Off, the menu does not appear on the TV screen also.
.,&
I ENGLISH
DVD Camcorder:
I
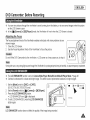
Before Recording
+ You can view pictures through the viewfinder to avoid running down the battery, or to see correct images when the picture
on the LCD Screen is poor.
*:* In the [11_ (Camera)] or [[_E](Player}] mode, the Viewfinder will work when the LCD Screen is closed.
AcFustin
the Focus
The focus adjustment knob of the Viewfinder enables individuals with vision problems to see
clearer images.
1. Close the LCD Screen.
2. Use the Focus Adjustment Knob of the Viewfinder to focus the picture.
Do not lift the DVD Camcorder by the viewfinder or LCD screen as it may cause you to drop it.
Viewingthe sun or any stronglight source throughthe Viewfinderfor a prolongedperiod may be harmful, or causetemporaryimpairment.
*:* The LCD ENHANCER function works in Camera Mode/Player Mode/M.Cam Mode/M.Player Mode. '=,page26
*:o Contrast is enhanced for a clear and bright image. This effect is also implemented outdoors in bright daylight.
1. Set the [Mode] switch to [DISC] or [CARD].
(SC-DC173(U)/DC175/DC575 only)
2. Set the [Power] switch to [1_ (Camera}] or [[)_(Player)].
3. Press the [LCD ENHANCER] button.
= LCD ENHANCER icon ([_) is displayed.
4. To exit LCD ENHANCER, press the [LCD ENHANCER]
button again.
LCD ENHANCER function does not affect the quality of the image being recorded.
20 nir
16 9Wde
_
[]
STBY
[]
OOO00/R_/)
[ ENGLISH
]
DVD Camcorder:
Before Recording
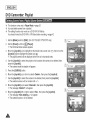
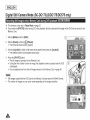
*:o In some situations, different recording techniques may be required for more dramatic results.
1. General recording.
2. Downward recording.
Making a recording with a top view of the LCD Screen.
3. Upward recording.
Making a recording viewing the LCD Screen from below.
4. Self recording.
Making a recording viewing the LCD Screen from the front.
5. Recording with the Viewfinder.
In circumstances where it is difficult to use the LCD
Screen, the Viewfinder can be used as a convenient
alternative.
Please rotate the LCD Screen carefully as excessive rotation
may cause damage to the inside of the hinge that connects
the LCD Screen to the DVD Camcorder.
f
%.
I ENGLISH
DVD Camcorder:
Before Recording
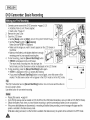
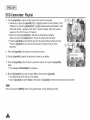
+ When inserting a disc or closing the disc cover, do not apply excessive force. It may cause
a malfunction.
*:° You cannot open the disc cover while loading.
*:* Set the [Mode] switch to [DISC] (SC-DC173(U)/DC175/DC575 only) and the [Power] switch
to [l_(Camera)]
to view menus and messages displayed on the LCD Screen ",page 28
1. Push the [OPEN] switch in the direction of the arrow.
= The disc cover wilt partially open.
2. Gently open the cover the rest of the way by hand.
3. Push the disc into the disc compartment until a click is heard.
= The recording side of the disc must face the inside of the DVD Camcorder.
= Do not touch the pickup tens.
4. Gently push the section marked [PUSH CLOSE] on the disc cover to close it.
• Once inserted, the disc is recognized and the [ACCESS] indicator blinks. Do not cut off the
power supply during this time. Do not shake nor apply impact. It may cause a malfunction.
= Move the Hand Strap so it does not interfere with inserting or ejecting the disc.
= The disc cover can be opened when the device is connected to an AC power adapter or the
battery pack, even if the power is off.
Caution
This product utilizes a laser Use of controls or adjustments or performance of procedures other than those
specified herein may result in hazardous radiation exposure. Do not open covers and do not look inside the
product if interlock mechanism is damaged.
_lens
Warning
Be careful not to damage the interlockmechanism.
I
[ ENGLISH
]
DVD Camcorder:
Before Recording
Formatting may be required if a new disc is inserted.
Recognition of the disc will start.
For a DVD-R/+R DL disc: Formatting wilt automatically begin.
For a DVD-RW disc: You are prompted with the <Disc is not formatted. Format?> message.
Differences between
Video and VR mode
Video (Video Mode) : If the disc has been finalize& you will be able to
play the disc on most DVD Players/Recorders/Drives.
VR (VR Mode) : You can edit the disc on a DVD Camcorder, but
playback is only possible on a DVD Recorder that supports VR mode.
, Refer to page 11 for Finalized disc compatibility
Move the [Joystick] left or right to select <Video> or <VR>, then press [Joystick].
, Please refer to page 123 for disc type descriptions and usage.
<When a DVD-RW
, Upon completion, the <Complete!> message wilt appear.
, If you select <Cancel>, the <Not formatted!> warning message wilt appear.
Formatting a new disc is required to record on it. To format later, use the <Disc Manager> menu. -page 79
For a DVD+RW disc: You are prompted with the <Disc format? All files will be deleted!> message.
Move the [Joystick] left or right to select <Yes>, then press [Joystick].
, Upon completion the <Complete!> message wilt appear.
, tf you select <No>, the <Not formatted!> warning message will appear.
Formatting a new disc is required to record on it. To format later, use the <Disc Manager> menu. '-page 79
1. Push the [OPEN] switch in the direction of the arrow.
• The disc cover wilt partially open.
2. Gently open the cover the rest of the way by hand.
3. Remove the disc.
• While pushing downthe center portion ofthe disc spindle, pick up the disc by the edges to remove.
4. Gently push the section marked [PUSH CLOSE] on the disc cover to close it.
The Finalize/Format
functionsarenot availablewhenthe batterylevelis between_
and_.
disc is formatted.>
I ENGLISH
DVD Camcorder:
I
Before Recording
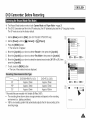
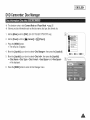
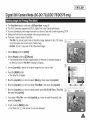
+ The Record Mode function works in both Camera Mode and Player Mode. _page 26
*:* This DVD Camcorder can film in the XP (extra play), the SP (standard play) and the LP (long play) modes.
The SP mode is set as the factory default.
1. Set the [Mode] switch to [DISC]. (SC-DC173(U)/DC175/DC575 only)
2. Set the [Power] switch to [1_ (Camera)] or [_(Player)]
3. Press the [MENU] button.
= The menu list will appear.
4. Move the [Joystick]
up or down to select <Record>, then press the [Joystick].
5. Move the [Joystick]
up or down to select <Rec Mode>, then press the [Joystick].
6. Move the [Joystick] up or down to select the desired record mode (XP, SP or LP), then
press the [Joystick].
_Move
[]Setect
_Exit
\
J
7. To exit, press the [MENU] button.
• The icon oft[] selected mode is displayed.
pe
DVD-RW/+RW/-R (1.4G)
DVD+R DL (2.6G)
XP
Approx. 20min
Approx. 35rain
•SP
Approx. 30min
Approx. 53rain
•LP
Approx. 60min
Approx.106min
Move
" El
• Recorded files are encoded with Variable Bit Rate (VBR).
= The recording times shown above are approximate and depend on the recording
environment (i.e. lighting conditions).
= VBR is an encoding system that automatically adjusts the bit rate according to the
recording image.
/6 9 Wide
[]
STBY
Select
[]
_
O00OO
Exit
_'Z_
[ ENGLISH
]
DVD Camcorder:
Basic Recording
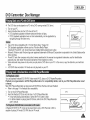
1. Connect a power source to the DVD Camcorder. '-pages 2% 25
= (A Battery Pack or a AC Power adapter)
= Insert a disc. ",page 41
2. Remove the Lens Cover.
3. Open the LCD Screen
= Set the [Mode] switch to [DISC]. (SC-DC173(U)/DC175/DC575 only)
= Set the [Power] switch to [_ (Camera)].
Make sure that <STBY> is displayed.
= Make sure the image you want to record appears on the LCD Screen or
= Make sure the Battery Level indicatesthat there is enough
remainingpower for your expectedrecording time.
4. ToViewfinder.
start recording_ press the [Record Start/Stop] button. _,_
= <RECe> is displayed on the LCD Screen.
The record mode, recording time_the disc type_the
...................................................................
f
format mode, and the title scene number are displayed on the LCD Screen.
5. To stop recording, press the [Record Start/Stop] button again.
• <STBY> is displayed on the LCD screen after blinking.
= If you press the [Record Start/Stop] button to record again, a new title scene will be
created. The title scene number will not appear in the STBY mode but in the REC mode.
REC
• _
ooo20<R!,,_
30 Ilir'
[]
O01
_69Wide
This DVD Camcorder has two [Record Start/Stop] buttons. One on the rear and the other on
the LCD screen's frame.
Use either button for convenient recording.
=
•
=
=
Playing title scenes. ",page 64
Up to 253 title scenes can be created on DVD-R/+RW/+R DL/-RW(Video Mode)discs, and up to 999 on DVD-RW(VR Mode).
Detach the Battery Pack when you have finished recording to prevent unnecessary battery power consumption.
If the power cable/batteriesare disconnected, or recording is disabled during recording, an error messagewitl appear and the
system is switched to the data recovery mode.
While data is being recovered, no other function is enabled After data recovery,the system wilt be switched to the STBY mode.
I ENGLISH
DVD Camcorder:
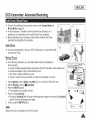
Basic Recording
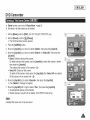
+ The EASY.Q function works only in Camera Mode. ",page 26
+ The EASY.Q function allows a beginner to easily make good recordings.
1. Set the [Mode] switch to [DISC]. (SC-DC173(U)/DC175/DC575 only)
2. Set the [Power] switch to [ _ (Camera)]
3. By pressing the [EASY.Q] button, all functions on the DVD Carncorder will be set to off
and the recording settings will be set to the following basic modes (DIS, AF(Auto Focus),
AWB(Auto White Balance), AE(Auto Exposure)) On.
= The word <EASY.Q> and DIS (_) appear on the display at the same time.
4. Press the [Record Start/Stop] button to start recording.
= Recording will begin using the basic automatic settings.
5. Press the [EASY.Q] button again in the STBY mode to turn the EASY.Q mode off.
= The EASY.Q function will not turn off while you are recording.
• The DVD Camcorder will return to the settings that were set prior to activating EASY.Q
mode.
= Unavailable buttons during operation
During operation EASY.Q, the following buttons are unavailable because the items are
automatically set. The corresponding messages may appear if unavailable operations are
attempted.
- [MENU] button
- [C.NtTE] button
- [Q.MENU] button
- [MF/AF] button, etc.
= The EASY.Q mode settings are released when the Battery Pack is removed from the DVD
Camcorder and must be reset when the Battery Pack is replaced.
= 16:9 Wide is not available in the EASY.Q mode. (SC-DC171 only)
= Digital Effect and Digital Zoom is not available in the EASY.Q mode.
Q
16:9 Wide
30 mill
[]
I
[ ENGLISH
]
DVD Camcorder:
Basic Recording
+
*:*
*:o
*:*
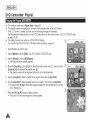
The Zoom function works in both Camera Mode and M,Cam Mode. "'page 26
Zooming is a recording technique that lets you change the size of the subject in a scene.
You can zoom using variable zoom speeds.
Use these features for different shots. Please note that over-use of the zoom feature can lead to unprofessional looking
results and a reduction of battery usage time.
*:o This DVD Camcorder allows you to record using optical 34x(SC-DC171/DC173(U)/DC175 only) or 26x(SC-DC575 only)
power zoom and digital zoom.
1. Move the [Zoom] lever or press the [Zoom] button slightly for a
gradual zoom, move it further for a high-speed zoom.
• Your zooming is monitored on the OSD.
2. [T] (Telephoto) side: Subject appears closer.
3. [W] (Wide angle) side: Subject appears farther away.
• You can record a subject that is about 10mm (about 0.5 inch)
away from the lens surface in the Wide position.
TELE
WIDE
I ENGLISH
DVD Camcorder:
Basic Recording
+ The Fade function works only in Camera Mode. -page 26
4- You can give your recording a professional look by using special
effects such as fade in at the beginning of a sequence or fade out
at the end of a sequence.
To Start
Recording
1. Set the [Mode] switch to [DISC].
(SC-DC173(U)/DC175/DC575 only)
2. Set the [Power] switch to [ I_ (Camera)]
3. Before recording, move the [Joystick] up and hold.
• The picture and sound gradually disappear (fade out).
4. Press the [Record Start/Stop] button and at the same time
release the [Joystick].
• Recordingstartsand the pictureand soundgraduallyappear(fadein).
To Stop
Recording
5. When you wish to stop recording, move the [Joystick] up and
hold.
• The picture and sound gradually disappear (fade out).
6. When the picture has disappeared, move the [Record Start/Stop]
button to stop recording.
Move the [Joystick] up and hold.
a. Fade Out
Gradual disappearance
II
a. Fade Out (Approx. 4 seconds)
b. Fade In (Approx. 4 seconds)
Gradualappearance
b. Fadeln
Release the [Joystick]
I
[ ENGLISH
]
DVD Camcorder:
Basic Recording
-:o BLC works in both Camera Mode and M.Cam Mode. '-page 26
-:* Back lighting exists when the subject is darker than the background:
- The subject is in front of a window.
- The person to be recorded is wearing white or shiny clothes and is
placed against a bright background; the person's face is too dark to
distinguish his/her features.
- The subject is outdoors and the background is overcast.
- The light sources are too bright.
- The subject is against a snowy background.
<BLC Off>
1. Set the [Mode] switch to [DISC] or [CARD]. (SC-DC173(U)/DC175/DC575 only)
2. Set the [Power] switch to [ _
(Camera)].
3. Press the [MENU] button.
= The menu list will appear.
4. Move the [Joystick]
up or down to select <Camera>, then press the [Joystick].
5. Move the [Joystick]
up or down to select <BLC>, then press the [Joystick].
6. Move the [Joystick]
up or down to select <On>, then press the [Joystick].
7. To exit, press the [MENU] button.
• BLC icon (2) is displayed.
= You can directly access the BLC function by using the [Q.MENU] button. ",page 27
= The BLC function will not operate in EASY.Q mode.
<BLC On>
I ENGLISH
DVD Camcorder:
I
Basic Recording
+:o Color Nite function works only in Camera Mode. '=,page26
+:* You can make the subject recorded appear to be in stow motion by controlling the shutter
speed, or a brighter image in dark places without a compromise in colors.
*:* Please disable 16:9 Wide mode to use the Color Nite function. (SC-DC173(U)/DC175/
DC575 only) ",page 60
SII
_
i
_
ii
DISpLAy
ililI
©
MULTI
OISP,
1. Set the [Mode] switch to [DISC]. (SC-DC173(U)/DC175/DC575 only)
2. Set the [Power] switch to [ _
(Camera)].
(SC-DC171/DC173
only)
3. Press the [C.NITE] (SC-DC171/DC173 only) or [C.NITEILtGHT] (SC-DC173U/DC175/
DC575 only) button.
4. Each time you press the [C.NITE] (SC-DC171/DC173 only) or [C.NITE/LIGHT]
(SC-DC173U/DC175/DC575 only) button, shutter speed is changed to;
_- <Color N. 1/30>, <Color N. 1/15> and off. (SC-DC171/DC173 only)
1_<Color N. 1/30>, <Color N. 1/15>, <Color N. 1/15([_}> and off.
(SC-DC 173U/DC175/DC575 only)
(SC-DC173U/DC175/DC575
= When using Color Nite, the image takes on a slow motion like effect.
= When using Color Nite, the focus adjusts slowly and white dots may appear on the
screen, this is not a defect.
= Color Nite function is not available with the fotowing functions: 16:9 Wide, Program
AE, Shutter, Exposure, Digital Zoom, Mosaic, Mirror, Emboss2 and Pastel2.
= if DIS is set, Color Nite mode wilt be released.
only)
[ ENGLISH
]
DVD Camcorder:
+
*:*
*:o
*:*
Basic Recording
The LIGHT function works only in Camera Mode. -page 26
The LIGHT enables you to record a subject in dark places.
The LIGHT can be used with Color Nite function only.
Please disable 16:9 Wide mode to use this function. ",page 60
1. Set the [Mode] switch to [DISC].
!.......
2. Set the [Power] switch to [1_ (Camera)]
3. Press the [C.NITE/LIGHT] button until <Color N. 1/15([_)>
,
,
,
,
o1/lill
appears.
The LIGHT can become extremely hot.
Do not touch it while in operation or soon after turning it off_otherwise serious injury may
result.
Do not place the DVD Camcorder into the carrying case immediately after using the LIGHT,
since it remains extremely hot for some time.
Do not use near flammable or explosive materials.
30 Ilir'
"_
STBY
[]
[]
00000_/_
Color N hi5
= The LIGHT wilt not turn on or off while you are recording.
, The range of the LIGHT is limited. (up to 6.6ft (2m))
, 16:9 Wide mode is not available in the LIGHT mode.
I ENGLISH
DVD Camcorder: Advanced
Recording
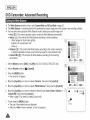
+ The Wind Cut function works only in Camera Mode. '='page 26
+ Use the Wind Cut when recording in windy places such as the beach or near buildings.
+ The Wind Cut function minimizes wind noise or other noise while recording.
- When the Wind Cut is on, some low pitched tones are efiminated along with the sound of the wind.
1. Set the [Mode] switch to [DISC]. (SC-DC173(U)/DC175/DC575 only)
2. Set the [Power] switch to [ !_1_(Camera)].
3. Press the [MENU] button.
4. Move the [Joystick]
up or down to select <Record>, then press the [Joystick].
5. Move the [Joystick]
up or down to select <Wind Cut>, then press the [Joystick].
_Move
_Se_ect
_Exit
6. To activate the Wind Cut function, move the [Joystick] up or down to select <On>,
then press the [Joystick].
7. To exiL press the [MENU] button.
• Wind Cut icon ([1_]) is displayed.
Make sure Wind Cut is set to Off when you want the microphone to be as sensitive as
possible.
30 rain
16:9 Wide
[_]
I
[ ENGLISH
]
DVD Camcorder: Advanced Recording
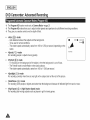
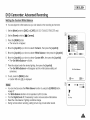
o._,The Shutter Speed function works only in Camera Mode. _page 26
The Shutter Speed refers to to the amount of time it takes the shutter to open and close. The faster the speed is set, the less light
enters the lens.
+ The Exposure function works in both Camera Mode and M.Cam Mode. _page 26
Setting the Exposure allows you to adjust the amount of light that enters the lens.
1. Set the [Model switch to [DISC] or [CARD] (SC-DC173(U)/DC175/DC575
only)
2. Set the Power] switch to [1_ Camera
3. Press the [MENU] button.
• The menu list will appear.
4. Move the [Joystick]
up or down to select <Camera>, then press the [Joystick].
Move the Joystick] up or down to select <Shutter> or <Exposure>, then ress the
5. [Joystickf
P
6. Move the [Joystick]
up or down to select <Manual>, then press the [Joystick].
7. Move the [Joystick]
left or right to select the desired shutter speed or exposure value, then
press
the [Joystick].
Shutter
speed can be set to <1/60>, <11100>, <11250>, <11500>, <l/lOgO>,
<114000> or <1110000> of a second.
• Exposure value can be set between <go> and <29>
8. To exit, press the [MENU] button.
• Selected settings are displayed.
<l/2OOO>,
Recommended
Shutter
Speeds
When
Recordincj
+ Outdoor sportssuch asgelfortennis:
1/2OOOor 1/4000
+ Moving carser trainsor other rapidly moving vehicles such as roller coasters: 1/1000, 1/500
or 1/250
+ Indoor sports such as basketball: 1/100
i
_
ProgramAE
W
Exposure
16 9 Wide
_Move
'\
_Select
/_ _#pS4s$ _
_Ext
/
,Adjusting
the Ex osure When Recordin
+ When you set the Exposure to Manual, the amount of light that enters the lens can be
adjusted to match the surrounding light conditions.
=
=
=
=
You can directly accessthe Shutter and Exposure function by using the [Q.MENU] button '-,page 27
If you manually change the Shutter Speed and the Exposure value when Program AE option is selected.
manual
changes
(. _o_o
The
image
may are
notapplied
seem first
as smooth when a high Shutter Speed is set.
The DVD Camcorder returns to the auto shutter and auto exposure settings when you change
to the EASY.Q mode.
When recording with a Shutter Speed of l/lOgO or higher, make sure the sun is not shining into the lens
J
I ENGLISH
DVD Camcorder: Advanced
Recording
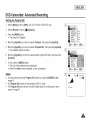
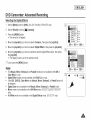
+ The Auto Focus/Manual Focus function works in both Camera Mode and
M.Cam Mode. '_page 26
*:o In most situations, it is better to use the automatic focus feature, as it
enables you to concentrate on the creative side of your recording.
*:* Manual focusing may be necessary under certain conditions that make
automatic focusing difficult or unreliable.
Auto
Focus
*:o If you are inexperienced in the use of DVD Camcorders, we recommend that
you use Auto Focus.
Manual Focus
#
*:o In the following situations, you may obtain better results by adjusting the
focus manually.
a. A picture containing several objects, some closeto the DVD Camcorder,othersfurther away.
b. A person enveloped in fog or surrounded by snow.
c. Very shiny or glossy surfaces like a car.
d. People or objects moving constantly or quickly like an athlete or a crowd.
1. Set the [Mode] switch to [DISC] or [CARD]. (SC-DC173(U)/DC175/DC575 only)
2. Set the [Power] switch to [ I_ (Camera)].
3. Press the [MF/AF] button.
= The manual focus icon (_MF_)
witl blink.
4. Focus with the [Joystick].
= Moving the [Joystick] left witl focus on the foreground image while moving the [Joystick]
right wilt focus on the background image.
5. To exit, press the [MF/AF] button.
STBY
_F]
O:O0:O0{RV))
30 rain []
16:9 Wide
E_
Manual Focus is not available in the EASY.Q mode.
[]
Near
Far [_
I
[ ENGUSH
]
DVD Camcorder: Advanced Recording
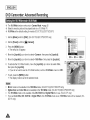
-.'. The Program AE function works only in Camera Mode. '-.page 26
+ The Program AE mode allows you to adjust shutter speeds and apertures to suit different recording conditions.
-:- They give you creative control over the depth of field.
<Auto (1_])> mode
- Auto balance between the subject and the background.
- To be used in norma{ conditions.
- The shutter speed automatically vades from 1/60 to 1/250 per second, depending on the
scene.
=
=
<Sports (23,)> mode
For recording people or objects moving quickly.
30 rni_/ []
!
8TBY []
0:00:o0(r/_
<Portrait ( _!_)> mode
- For focusing on the background of the subject, when the background is out of focus.
- The Portrait mode is most effective when used outdoors.
- The shutter speed automatically varies from 1/60 to 1/1000 per second.
=
<Spotlight (Q )> mode
For recording correctly when there is only light on the subject and not the rest of the picture.
=
<Sand/Snow ( 4_ )> mode
For recording when people or objects are darker than the background because of reflected light from sand or snow.
=
<High Speed (4)> (High Shutter Speed) mode
For recording fast-moving subjects such as players in golf or tennis games.
I ENGLBH
DVD Camcorder: Advanced
Setting
the Program
I
Recording
AE
1. Set the [Mode] switch to [DISC]. (SC-DC173(U)/DC175/DC575 only)
2. Setthe [Power] switch to [_(Camera)]
3. Press the [MENU] button.
= The menu list will appear.
4. Move the [Joystick]
up or down to select <Camera>, then press the [Joystick].
5. Move the [Joystick] up or down to select <Program AE>, then press the [Joystick].
= The available options are listed.
6. Move the [Joystick]
[Joystick].
up or down to select desired program AE option, then press the
7. To exit, press the [MENU] button.
• The icon of the selected mode is displayed.
• When the <Auto> mode is selected, no icon is displayed.
_l_love
_Select
_Ext
J
= You can directly access the Program AE function by using the [Q.MENU] button.
"*page 27
= The Program AE function wilt not operate in EASY.Q mode.
= The Program AE cannot be set when the Shutter Speed or the Exposure is set to
manual. _page 52
30 mill []
_Wlc_/e
STBY []
O:O0:O0 _/@
[ ENGUSH
]
DVD Camcorder: Advanced Recording
****The White Balance function works in both Camera Mode and M.Cam Mode. _page 26
*:* The White Balance is a recording function that preserves the unique image color of the subject in any recording condition
*:o You may select the appropriate White Balance mode to obtain good quality image color.
= Auto ( [] ): This mode is generally used to control the White Balance automatically.
, Indoor ( _ }: This controls the White Balance according to indoor ambience.
- Under halogen or studio/video lighting
- Subject is of one dominant color
- Close up
= Outdoor ( (!_): This controls the White Balance according to the outdoor ambience.
- In daylight, especially for close up and where the subject is of one dominant color.
= Custom WB (_z_): This controls the White Balance according to the recording
environment.
'\
j
1. Set the [Mode] switch to [DISC] or [CARD]. (SC-DC173(U)/DC175/DC575 only)
2. Set the [Power] switch to [ !_ (Camera)].
Plogram AE
3. Press the [MENU] button.
= The menu list will appear.
4. Move the [Joystick]
up or down to select <Camera>, then press the [Joystick].
5. Move the [Joystick]
up or down to select <White Balance>, then press the [Joystick].
6. Move the [Joystick]
up or down to select the desired mode (Auto, Indoor, Outdoor or
v
_Move
_Select
_Ext
\ .................................................................................................
[Z] {
STBY []
Custom WB), then press the [Joystick].
Refer to page 57 for details on setting Custom WB.
7. To exit, press the [MENU] button.
= The icon of the selected mode is displayed.
When the <Auto> mode is selected, no icon is displayed.
@r
_6:9w_de
0:00:00 _%,_
30 Ilir []
I ENGLISH
DVD Camcorder: Advanced
Setting
the Custom
Recording
White Balance
*:* You can adjust the white balance as you wish based on the recording environment.
1. Set the [Mode] switch to [DISC] or [CARD]. (SC-DC173(U)/DC175/DC575 only)
2. Set the [Power] switch to [ i_ (Camera)]
3. Press the [MENU] button.
• The menu list will appear.
4. Move the [Joystick]
up or down to select <Camera>, then press the [Joystick].
5. Move the [Joystick]
up or down to select <White Balance>, then press the [Joystick].
Program AE
v
_Select
_Move
_Exit
6. Move the [Joystick] up or down to select <Custom WB>, then press the [Joystick].
• The <Set White Balance> will blink.
7. Place the subject under the desired lighting, then press the [Joystick].
• The <Set White Balance> will disappear and the white balance setting will
commence.
8. To exit, press the [MENU] button.
• Custom WB icon (_) is displayed.
Set White Balance
Select
_
STBY []
= You can directly access the White Balance function by using the [Q.MENU] button.
"*page 27
= The White Balance function will not operate in EASY.Q mode.
= Turn the Digital Zoom off (if necessary) to set a more accurate white balance.
= Reset the white balance if lighting conditions change.
= During normal outdoor recording, setting to Auto may provide better results.
/6:9 Wide
Exit
0:00:00 _RA_
30 Ilin []
I
[ ENGLISH
]
DVD Camcorder: Advanced Recording
*:*
*:*
*:o
°:*
The Digital Effect function works only in Camera Mode. ",page 26
The Digital Effects enable you to give a creative look to your recording.
Select the appropriate Digitat Effect for the type of picture that you wish to record and the effect you wish to create.
There are 10 Digital Effect modes.
1. <Art> mode
This mode gives the images a coarse effect,
2. <Mosaic> mode
This mode gives the images a mosaic effect,
3. <Sepia> mode
This mode gives the images a reddish-brown pigment.
4. <Negative> mode
This mode reverses the colors, creating a negative image.
5. <Mirror> mode
This mode cuts the picture in half, using a mirror effect.
6. <BLK & WHT> mode
This mode changes the images to black and white.
7. <Emboss1> mode
This mode creates a 3D effect (embossing).
8. <Emboss2> mode
This mode creates a 3D effect (embossing) on the surrounding area of an
image.
9. <Pastell> mode
This mode applies a pate pastel drawing effect to an image.
10. <Pastel2> mode
This mode applies a pate pastel drawing effect to the surrounding area of an
image.
I ENGLISH
DVD Camcorder: Advanced
Selecting
I
Recording
the Digital Effects
1. Set the [Mode] switch to [DtSC]. (SD-DC173(U)/DC175/DC575 only)
2. Set the [Power] switch to [_(Camera)]
3. Press the [MENU] button.
= The menu list will appear.
4. Move the [Joystick]
up or down to select <Camera>, then press the [Joystick].
5. Move the [Joystick]
up or down to select <Digital Effect>, then press the [Joystick].
\
J
6. Move the [Joystick] up or down to select the desired Digital Effect option, then press
the [Joystick].
= The disptay mode is set to the selected mode.
7. To exit, press the [MENU] button.
= The Mosaic, Mirror, Emboss2, and Pastel2 modes are not available while DIS or
Color Nite is in use.
= Digital Effect modes are not available while EASY.Q is in use.
= Once DIS, EASY.Q, Color Nite is set, Mosaic, Mirror, Emboss2, or Pastel2 mode will
be released.
= Digital Zoom is not available in the Mosaic, Mirror, Emboss2, or Pastel2 mode.
= Mirror mode is not available in the 16:9 Wide mode. (SC-DC173(U)/DC175/DC575
only)
= 16:9 Wide mode is not available in the Digital Effects mode. (SC-DC171 only)
\
J
STBY
[]
O000Odi_
30 nir
[]
An
,,A
[ ENGLISH
]
DVD Camcorder: Advanced Recording
+ The 16:9 Wide function works only in Camera Mode. '-page 26
*:* Select to record a picture to be played back on a 16:9 Wide TV.
*:o 16:9 Wide is the default setting for models SC-DC173(U)/DC175/DC575.
1. Set the [Mode] switch to [DISC]. (SC-DC173(U)/DC175/DC575 only)
2. Set the [Power] switch to [ i_ (Camera)].
3. Press the [MENU] button.
. The menu list will appear.
4. Move the [Joystick]
up or down to select <Camera>, then press the [Joystick].
5
up or down to select <16:9 Wide>, then press the [Joystick].
Move the [Joystick]
6. To activate the 16:9 Wide functiom move the [Joystick] up or down to select <On>_
then press the [Joystick].
, If you do not want to use the 16:9 Wide functiom set the <16:9 Wide> menu to <Off>.
CO
7. To exit, press the [MENU] button.
• The disptay mode is set to the selected mode.
=
=
=
=
Mirror mode is not available in the 16:9 Wide mode. (SC-DC173(U)/DC175/DC575 only)
Digital Zoom and Color Nite is not available in the 16:9 Wide mode. (SC-DC173(U)/DC175/DC575 only)
The 16:9 Wide mode is not available while DIS, EASY.Q or Digital Effect is in use. (SC-DC171 only)
if you set Color Nite, DI& EASY.Q or Digital Effect while 16:9 Wide mode is set, 16:9 Wide mode will be released. (SCDC171 only)
z&
I ENGLISH
DVD Camcorder: Advanced
I
Recording
+ The DIS function works only in Camera Mode. '-'page 26
+ DIS (Digital image Stabilizer) is a function that compensates for any shaking or hand movement while holding the DVD
Camcorder (within reasonable limits).
+ It provides more stable pictures when:
- Recording with the zoom (Digital Zoom is not available in the DIS mode.)
- Recording a small object close-up
- Recording and walking at the same time
- Recording through the window of a vehicle
1. Set the [Mode] switch to [DISC]. (SC-DC173(U)/DC175/DC575 only)
2. Set the [Power] switch to [1_ (Camera)].
3. Press the [MENU] button.
= The menu list will appear.
4. Move the [Joystick] up or down to select <Camera>, then press the [Joystick] .........
5 Move the [Joystick] up or down to select <DIS>, then press the [Joystick].
6. To activate the DtS function, move the [Joystick] up or down to select <On>, then
press the [Joystick].
• If you do not want to use the DIS function, set the <DIS> menu to <Off>.
7. To exit, press the [MENU] button.
• DIS icon (_) is displayed.
.....
_
_"
_Move
_Se/ect
_Exit
= You can directly access the DIS function by using the [Q.MENU] button. -page 27
,
=
=
=
"
=
It is recommended that you deactivate the DIS function when using a tripod.
If you use the DIS function, the picture quality may deteriorate.
EASY.Q mode automatically sets the DIS to On.
16:9 Wide mode is not available in the DIS mode. (SC-DC171 only)
DIsDigitalmode.Z°°m'
Color Mite, Mosaic, Mirror, Emboss2, or Pastel2 is not available in the
DIS function in 16:9 Wide mode may produce lower quality than in normal mode.
(SC-DC173(U)/DC175/DC575 only)
%o
(_
_:9w_
_ _,_STBY
l
[]
0:00:00(F/_'_30
rnN/[] "
A
[ ENGLISH
]
DVD Camcorder: Advanced Recording
+ The Digital Zoom works only in Camera Mode. "page 26
+ Zooming more than 34x (SC-DC171/DC173(U)/DC175 only) or 26x (SC-DC575 only) is achieved digitally, up to 1200x
when combined with optical zoom.
+ The picture quality may deteriorate depending on how much you zoom in on the subject.
+ Please disable 16:9 Wide mode to use this function. ",page 60
Selecting
the Digital
Zoom
1. Set the [Mode] switch to [DISC]. (SC-DC173(U)/DC175/DC575 only)
2. Set the [Power] switch to [il_ (Camera)].
3. Press the [MENU] button.
• The menu list will appear.
4. Move the [Joystick] up or down to setect <Camera>, then press the [Joystick].
5. Move the [Joystick] up or down to select <Digital Zoom>, then press the [Joystick].
6. Move the [Joystick] up or down to select desired zoom value (Off, 1OOx,2OOx,4OOxor [_
1200x), then press the [Joystick].
7. To exit, press the [MENU] button.
• When using the [Zoom] lever or [Zoom] button, an digital zoom indicator appears on
the screen.
.............................................................
Dm
_Move
,
,
,
,
Maximum zooming may result in lower picture quality.
Digital Zoom is not available while DI& EASY.Q, Color Nite_ 16:9 Wide, Mosaic_
Mirror, Emboss2, or Pastel2 is in use.
Once Color Nite_EASY.Q, 16:9 Wide, Mosaic, Mirror, Emboss2, or Pastel2 is
selected, Digital Zoom mode will be released.
(The Digital Zoom mode wilt be backed up.)
Once DIS is selecte& Digital Zoom mode wilt be released.
z&
_Select
_Exit
I ENGLISH
DVD Camcorder:
Thumbnail index and Playlist
+ The thumbnailindex displays multiple titles scenes that have been
recorded.
*:o Atitle scene is created between the points where you start and stop a
recording. Once deleted, you cannot recover the title scene again.
Current title scene/-Total title scenes
Thumbnail view-
Previous page
Nextpage
*:* You can create a playlist on the same disc by gathering your favorite scenes from the
recorded title scenes.
You can edit the ptayiist without changing the original recordings.
+ Even if the playlist is deleted, the original title scenes remain undeleted.
*:o Up to 999 title scenes (chapters) can be registered on a playtist.
Example: You have recorded a few scenes on a DVD-RW in VR mode You want to save the
original recording, but you also want to create a digest by putting your favorite scenes together.
In this case, you can create a playlist by selecting your favorite scenes, leaving the original
recording as it is.
I A title scene is created between the points where you start and stop a recording.
Current playlist/
Total playlist
Once deleted, you cannot recover the title scene again.
Title scene
12 JAN 2007
Titte scene 2
t
_
Title scene
3
r
Titte scene
@
10:00
L
10:30
4
Titte scene
30 JAN 2007
5
Title scene
g;
L _ 11:30
14:00
16:10
_ ._
6
"
18:20
:
20:00
:
z&
I
[ ENGLISH
]
DVD Camcorder
The recordedtitle scenes are displayedas a thumbnailindex (multipleimages)on the LCD Screen. (_
You can find the desired scene quickly using this convenient index.
If the TFT LCD screen is closed_ you can view the recording through the viewfinder.
Usethe Playback related buttons on the DVD Camcorder or on the remote control. (SC-DC175/
DC575 only) '=,pages 65~66
1. insert the disc you want to view.
2. Open the LCD Screen.
3. Set the [Mode] switch to [DISC]. (SC-DC173(U)/DC175/DC575 only)
4. Set the [Power] switch to [[_(Player)].
• The thumbnail index screen appears.
• To change the current thumbnail page, use the [Joystick] to highlight the thumbnail
page movement arrows then press the [Joystick] left or right to match the direction
of the arrow.
• Usethe[MENU]buttontoadjustbrightnessorcolorofthe
LCD Screen. _page 36
5. Use the [Joystick] to select a title scene to be played, then press the [Joystick].
• To stop playback, move the [Joystick] down.
[_
_:ot_
During playback, a displayed image may be paused for a while until the next image is shown.
+ When you use the LCD Screen for playback_ you can hear recorded sound from the built-in
speaker.
+ When you hear sound once the disc is in play_use the [VOL A,V] buttons to adjust the
voIunle.
• A volume level display will appear on the LCD Screen.
• Levels may be adjusted from anywhere between 00 to 19.
• If you close the LCD Screen while playing, you will not hear sound from the speaker.
I ENGLISH
DVD Camcorder
*:o These functions work only in Player Mode. =page 26
*:* Play, Stilt, Stop, Fast Forward, Rewind, Forward Skip, and Reverse Skip functions are accessible using the remote control.
(SC-DC175/DC575 only)
+ Slow playback is accessible only using the remote control. (SC-DC175/DC575 only)
Playback/Still/Sto_
=
=
=
=
Ski
Press the [Joystick] to pause during playback.
To resume playback, Press the [Joystick].
To stop playback, move the [Joystick] down.
You can also use the [_H]/[I]
buttons on the remote control. (SC-DC175/DC575 only)
Pla back
Forward/Reverse
= Move the [Joystick] left/right and hold during playback.
= When playing a disc, if you move the [Joystick] right and hold, it moves to the next scene.
If you Move the [Joystick] left and hold, it moves to the beginning of the scene. One
more press and hold makes it move to the beginning of the previous scene. If you move
the [Joystick] left and hold at a portion 3 seconds from the start of scene, it moves to the
beginning of the previous scene.
= You can also use the [l_,q ]/[ _,_1] buttons on the remote control. (SC-DC175/DC575 only)
Portion
Move the [Joystick] left and
hold one more time
Portion being played back
Move the [Joystick]
I Move the [Joystick]
right and hold
Move the [Joystick] right and
hold one more time
...................
1
left and
hold one m?r£t21e
being played back
Move the [Joystick]
left and hold
__
i
_
Move the [Joystick]
right and hold
Move the [Joystick]
hold .........
right and
time
I
[ ENGLISH
]
DVD Camcorder
Picture Search
(Forward/Reverse)
= Moving the [Joystick] left/right once while a disc is playing back wilt increasethe play
speed to approximately X2, and pressing twice plays at approx xl 6.
= When the number 1 appearson the OSD, it means X2 speed.When the number2 appears onthe
OSD, it meansX16 speed.
= To resume normal playback, press the [Joystick].
= You can also use the [ 44 ]/[ b,_] buttons on the remote control. (SC-DC175/DC575 only)
_
(Forward/Reverse
SC-DC175/DC575
only
= Press the [1_'] button on the remote control during playback.
- To resume normal playback, press the [_*11] button.
= No sound wilt be heard during picture search or stow playback.
= In forward slow or playback, a rapidly moving subject in an image may be distorted.
I ENGLISH
DVD Camcorder
-:o Delete function works only in Player Mode. '=,page 26
-:* Individual or all title scenes can be deleted.
1. Set the [Mode] switch to [DISC]. (SC-DC173(U)/DC175/DC575 only)
(_
2. Set the [Power] switch to [[]_(Player)].
= The thumbnail index screen appears.
3. Press the [Q.MENU] button.
4. Move the [Joystick) up or down to select <Delete>, then press the [Joystick).
5. Move the [Joystick] up or down to select <Select> or <Select All>, then press the
[Joystick).
= Select: Deletes individual title scenes.
To delete individual title scenes, use the [Joystick) to select title scenes to delete,
then press the [Joystick].
The selected title scenes will be marked < _>.
= SelectAIh Deletes all title scenes.
To delete alt title scenes, simply press the [Joystick] after <Select All> is selected.
All title scenes wilt be marked with < _>.
6. Move the [Joystick] up to select <Execute>, then press the [Joystick].
= The <Delete?> message will appear.
(_0
(_
7. Move the [Joystick] left or right to select <Yes>, then press the [Joystick).
= All selected title scenes wilt be deleted.
• Related scenes in playlist will be deleted. (DVD-RW(VR mode only))
A deleted title scene can not be recovered.
z&
I
[ ENGLISH
]
DVD Camcorder
+ Partial Delete function works only in Player Mode. '-,page 26
*:* Atitle scene can be partially deleted.
*:* The editing function only works on a DVD-RW (VR Mode).
You should format the DVD-RW to VR Mode before recording. '-page 42
1.
2.
3.
4.
5.
Set the [Mode] switch to [DISC]. (SC-DC173(U)/DC175/DC575 only)
Set the [Power] switch to [[_(Player)].
Press the [Q.MENU] button.
Move the [Joystick] up or down to select <Partial Delete>, then press the [Joystick].
Move the [Joystick] to select a title scene you want to delete partially from the thumbnail
index screen, then press the [Joystick].
, The Partial Delete screen will appear.
6. Use the [Joystick] to search the start point of deletion.
, Whenever you press the [Joystick] right, it toggles between forward at speed 1 and 2.
Whenever you press the [Joystick] left, it toggles between backward at speed 1 and 2.
(When the number 1 appears on the OSD, it means X2 speed. When the number 2
appears on the OSD, it means X16 speed.)
, When you press the [Joystick] up_the picture will advance one frame.
When you press the [Joystick] down_the picture will go back one frame.
, Press the [Joystick] up and hold to play back the picture frame-by-frame forward.
Press the [Joystick] down and hold to play back the picture frame-by-frame backward.
7. Press the [Joystick] at the start point to pause the screen.
8. Use the [Joystick] to search the end point of deletion.
9. Press the [Joystick] at the end point to pause the screen, then press the [Joystick] again.
, The message <Partial Delete?> witl appear.
10. Move the [Joystick] Ieft or right to select <Yes>, then press the [Joystick].
, The selected part of the title scene will be deleted.
, Use the [Joystick] to select <Back>, then press the [Joystick] to return to the
thumbnail index screen.
= A deleted part of the title scene can not be recovered.
= When you press the [MENU] button during partial delete_ it stops deleting and exits.
[_
[_
[_
[m
I ENGLISH
DVD Camcorder:
Playlist
*:o This function works only in Player Mode. _page 26
°:* The editing function only works on a DVD-RW (VR Mode).
You should format the DVD-RW to VR Mode before recording. "-,page 42
[_
1. Set the [Mode] switch to [DtSC]. (SC-DC173(U)/DC175/DC575 only)
2. Set the [Power] switch to [[_(Player}].
• The thumbnail index screen appears.
3. Move the [Joystick] up to highlight the thumbnail index screen icon (_!_)_then move the
[Joystick] right to highlight the playlist icon ([L'I).
_]
4. Press the [Q.MENU] button.
5. Move the [Joystick] up or down to select <New Playlist>_ then press the [Joystick].
• The thumbnail index screen appears.
6. Use the [Joystick] to select a scene to create, then press the [Joystick].
• The selected scene wilt be marked with <,/>.
[_
7. Move the [Joystick] up to <Add>, then press the [Joystick].
• A new playtist will be created.
= Up to 99 playtist can be created.
= Up to 999 title scenes (chapters) can be registered on a playlist.
,,&
I
[ ENGLISH
]
DVD Camcorder:
Playlist
+ This function works only in Player Mode. "page 26
*:* The playlist scenes are displayed in the form of a thumbnail index on the LCD Screen.
If the LCD Screen is closed, you can view the recording through the viewfinder.
Use the playback related buttons on the DVD Camcorder or on the remote control. (SC-DC175/DC575 only)
",pages 65~66
*:o The editing function only works on a DVD-RW (VR Mode).
You should format the DVD-RW to VR Mode before recording. ",page 42
1. insert the disc you want to view.
2. Set the [Mode] switch to [DtSC]. (SC-DC173(U)/DC175/DC575 only)
3. Set the [Power] switch to [[_(Player)].
= The thumbnail index screen appears.
4. Move the [Joystick]
up to highlight the thumbnail index screen icon (_), then move the [_
[Joystick] right to highlight the playlist icon (_).
= The playtist scenes wilt be displayed in the form of a thumbnail index.
5. Use the [Joystick] to select a playlist to be played, then press the [Joystick].
6. Use the [Joystick] to select a playlist scene to be played, then press the [Joystick].
= It moves to the <Scene> menu after playing scenes from the selected one to the last
one in the playiist.
7. Press the [VOL A,T] buttons to adjust volume.
= The sound will be heard through the built-in speaker.
%
I ENGLISH
DVD Camcorder:
Playlist
*:* Delete function works only in Player Mode. ",page 26
*:* You can delete undesired ptaylists.
*:o The editing function only works on a DVD-RW (VR Mode).
You should format the DVD-RW to VR Mode before recording. ",page 42
%
1. Set the [Mode] switch to [DISC]. (SC-DC173(U)/DC175/DC575 only)
2. Set the [Power] switch to [[_](Player)].
= The thumbnail index screen appears.
3. Move the [Joystick] up to highlight the thumbnail index screen icon (_), then move the
[Joystick] right to highlight the playlist icon (_).
= The playlist scenes wilt be displayed in the form of a thumbnail index.
4. Press the [Q.MENU] button.
5. Move the [Joystick]
up or down to select <Delete>, then press the [Joystick].
6. Move the [Joystick] up or down to select <Select> or <Select All>, then press the
[Joystick].
= Select: Deletes an individual playlist.
To delete a playlist, use the [Joystick] to select a playflst to delete, then press the
[Joystick].
The selected playiist wilt be marked with < _>.
= SelectAIh Deletes all playlists.
To delete all playlists, simply press the [Joystick] after <Select All> is selected.
All the selected playlists will be marked with < _>.
7. Move the [Joystick] up to select <Execute>, then press the [Joystick].
= <Delete?> message will appear.
8. Move the [Joystick] left or right to select <Yes>, then press the [Joystick].
= All selected playtists wilt be deleted.
A
I
[ ENGLISH
]
DVD Camcorder:
Playlist
+ This function works only in Player Mode. '-*page 26
*:o You can add more scenes to an existing playlist.
*:* The editing function only works on a DVD-RW (VR Mode).
You should format the DVD-RW to VR Mode before recording. "*page 42
1. Set the [Model switch to [DISC]. (SC-DC173(U)/DC175/DC575 only)
2. Set the [Power] switch to [[_(Player)].
= The thumbnail index screen appears.
3. Move the [Joystick] up to highlight the thumbnail index screen icon (_), then move the
[Joystick] right to highlight the playlist icon (IL--_).
= The piaytist scenes wilt be displayed in the form of a thumbnail index.
4. Use the [Joystick] to select the playtist to which you wish to add scenes, then press the
[Joystick].
= The scenes inside the playlist wilt appear.
5. Press the [Q.MENU] button.
6. Move the [Joystick] up or down to select <Add>, then press the [Joystick].
= The title scenes to be added to the playlist will appear.
7. Use the [Joystick] to select the title scenes to be added to the playlist, then press the
[Joystick].
= The selected scenes will be marked with <,/>.
8. Move the [Joystick] up to select <Execute>, then press the [Joystick].
= The message <Want to add?> will appear.
9. Move the [Joystick] left or right to select <Yes>, then press the [Joystick].
= The message <Now adding...> will appear.
• The selected scenes will be added to the ptaylist. The new scene witl be added as
the last scene.
[_
I ENGLISH
DVD Camcorder:
Playlist
+ This function works only in Player Mode. _page 26
****You can change the order of scenes within a playlist.
*:° The editing function only works on a DVD-RW (VR Mode).
You should format the DVD-RW to VR Mode before recording. ",page 42
1. Set the [Mode] switch to [DISC]. (SC-DC173(U)/DC175/DC575 only)
2. Set the [Power] switch to [[ii_(Player)].
= The thumbnail index screen appears.
%
3. Move the [Joystick] up to highlight the thumbnail index screen icon (_), then move the
[Joystick] right to highlight the playlist icon (_).
= The playtist scenes wilt be displayed in the form of a thumbnail index.
4. Use the [Joystick] to select the ptayiist which contains the scenes whose order you
want to change, then press the [Joystick].
= The scenes inside the playlist wilt appear.
5. Press the [Q.MENU] button.
6. Move the [Joystick] up or down to select <Move>, then press the [Joystick].
7. Use the [Joystick] to select the scene to be moved, then press the [Joystick].
= The selected scene wilt be marked with <,/>.
Also a bar next to the scene will appear.
8. Use the [Joystick] to move the bar to the position of your choice, then press the
[Joystick].
= The selected scene will be moved to the new position.
9. Move the [Joystick] up to select <Execute>, then press the [Joystick].
= The message <Want to move,'?>wilt appear.
10. Move the [Joystick] left or right to select <Yes>, then press the [Joystick].
= The message <Now moving...> will appear.
= You can move the scenes as many times as you wish.
/Edit>Move
I
[ ENGLISH
]
DVD Camcorder:
Playlist
+ This function works only in Player Mode. ",page 26
****You can delete scenes from a playtist.
*:o The editing function only works on a DVD-RW (VR Mode).
You should format the DVD-RW to VR Mode before recording. ",page 42
1. Set the [Mode] switch to [DISC]. (SC-DC173(U)/DC175/DC575 only)
2. Set the [Power] switch to [[__;_](Player)].
= The thumbnail index screen appears.
3. Move the [Joystick] up to highlight the thumbnail index screen icon (_)_ then move the
[Joystick] right to highlight the playlist icon (_).
= The playtist scenes wilt be displayed in the form of a thumbnail index.
4. Use the [Joystick] to select the ptaylist which contains the scenes to be deleted_then
press the [Joystick].
= The scenes inside the playlist wilt appear.
5. Press the [Q.MENU] button.
6. Move the [Joystick]
up or down to select <Delete>, then press the [Joystick].
7. Use the [Joystick] to select the scenes to be deleted_then press the [Joystick].
= The selected scenes witl be marked with <,/>.
8. Move the [Joystick]
up to select <Execute>_ then press the [Joystick].
= The message <Delete?> will appear.
9. Move the [Joystick] left or right to select <Yes>, then press the [Joystick].
= The message <Now deleting...> will appear.
= The selected scenes will be deleted.
[_
I ENGLISH
DVD Camcorder:
Playlist
+ This function works only in Player Mode. -page 26
****A scene inside the playlist can be partially deleted.
*:o The editing function only works on a DVD-RW (VR Mode).
You should format the DVD-RW to VR Mode before recording. ",page 42
1. Set the [Mode] switch to [DISC]. (SC-DC173(U)/DC175/DC575 only)
2. Set the [Power] switch to [[_EJ(Player)].
= The thumbnail index screen appears.
3. Move the [Joystick] up to highlight the thumbnail index screen icon (C_>),
then move the
[Joystick] right to highlight the playlist icon ([_).
= The playlist scenes wilt be displayed in the form of a thumbnail index.
4. Use the [Joystick] to select the ptaytist which contains the scenes to be partially
deleted, then press the [Joystick].
= The scenes inside the playlist wilt appear.
5. Press the [Q.MENU] button.
6. Move the [Joystick]
up or down to select <Partial Delete>, then press the [Joystick].
7. Use the [Joystick] to select the scene to be partially deleted, then press the [Joystick].
= The Partial Delete screen will appear.
Continued ,-
I
[ ENGLISH
]
DVD Camcorder:
Playlist
8. Use the [Joystick] to search the start point of the scene to be deleted.
Whenever you press the [Joystick] right, it toggles between forward at speed 1 and 2.
Whenever you press the [Joystick] left, it toggles between backward at speed 1 and 2.
(When the number 1 appears on the OSD_it means X2 speed. When the number 2
appears on the OSD, it means X16 speed.)
= When you press the [Joystick] up, the picture will advance one frame.
When you press the [Joystick] down, the picture will go back one frame.
= Press the [Joystick] up and hold to play back the picture frame-by-frame forward.
Press the [Joystick] down and hold to play back the picture frame-by-frame
backward.
9. Press the [Joystick] at the start point to pause the screen.
10. Use the [Joystick] to search the end point of scene to be deleted.
11. Press the [Joystick] at the end point to pause the screen_then press the [Joystick]
again.
= The message <Partial Delete?> will appear.
12. Move the[Joystick] left or right to select <Yes>, then press the [Joystick].
= The selected part of the scene witl be deleted.
= Use the [Joystick] to select <Back>_ then press the [Joystick] to return to the thumbnail index screen.
When you press the [MENU] button during partial delete_ it stops deleting and exits.
I ENGLISH
DVD Camcorder:
Disc Manager
-:o This function works in both Camera Mode and Player Mode. =page 26
°'.* It shows you disc information such as the disc name, disc type, disc format, etc.
1. Set the [Mode] switch to [DISC]. (SC-DC173(U)/DC175/DC575 only)
2. Set the [Power] switch to [ I_ (Camera)] or [I'iiii_(Player)]
3. Press the [MENU] button.
= The menu list will appear.
4. Move the [Joystick]
up or down to select <Disc Manager>, then press the [Joystick].
5. Move the [Joystick] up or down to select <Disc Info>, then press the [Joystick].
= <Disc Name>, <Disc Type>, <Disc Format>, <Used Space> and <Free Space>
will be displayed.
6. Press the [MENU] button to return to Disc Manager menu.
I
[ ENGLISH
]
DVD Camcorder:
Disc Manager
4° This function works in both Camera Mode and Player Mode. ",page 26
-:* You can specify a disc name.
1. Set the [Mode] switch to [DISC]. (SC-DC173(U)/DC175/DC575 only)
2. Set the [Power] switch to [l_t_ (Camera)] or [(];'](Player)]
3. Press the [MENU] button.
= The menu list will appear.
4. Move the [Joystick]
up or down to select <Disc Manager>, then press the [Joystick].
5. Move the [Joystick]
up or down to select <Disc Info>, then press the [Joystick].
6. Move the [Joystick] teft or right to select <Rename>, then press the [Joystick].
= Disc Name screen will appear.
7. Use the [Joystick] to move the cursor to <Delete>, then press the [Joystick] to delete
the existing disc name.
8. Use the [Joystick] to select the desired characters and items, then press the [Joystick].
9. Use the [Joystick] to select <Done>, then press the [Joystick].
= The Disc Name witl be changed.
= Press the [MENU] button to return to Disc Manager menu.
I ENGLISH
DVD Camcorder:
I
Disc Manager
-:o This function works only in Camera Mode. '-',page 26
°:* You can format a recorded disc to be used again. By formatting, alt existing data wilt be deleted.
1. Set the [Mode] switch to [DISC]. (SC-DC173(U)/DC175/DC575 only)
2. Set the [Power] switch to [ !_1_(Camera)].
3. Press the [MENU] button.
= The menu list will appear.
4. Move the [Joystick] up or down to seIect <Disc Manager>, then press the [Joystick].
5. Move the [Joystick] up or down to seIect <Disc Format>, then press the [Joystick].
6. Move the [Joystick] up or down to select <Video Mode> or <VR Mode>, then press the
[Joystick]. (DVD-RW only) Set the mode depending on the application.
= If you insert DVD-RW disc, the message <Disc format? (Video or VR) All files will be
deleted!> will appear
_,_ove _
SeLect
_
Exit
J
Video (Video Mode) if the disc has been finalized, it enables the disc to be played
back on other DVD Players/Recorders/Drives.
VR (VR Mode)
You can edit the disc on a DVD Camcorder, but playback is
only possible on a DVD Recorder that supports VR mode.
Move
_
Select
_
= Refer to page 11 for Finalized disc compatibility.
= If you insert DVD+RW disc message <Disc format? All files will be deletedt> wilt
appear.
7. Move the [Joystick] left or right to select <Yes>, then press the [Joystick].
• When formatting is complete, the message <Complete!> will appear.
= The Finalize/Format functions are not available when the battery level is between (_1 and
i
i
i
Formatting win delete all the recorded contents on a disc. Be careful not to delete data by mistake.
Do not turn the power off in the middle of the formatting. The data recorded in disc may be damaged.
Be sure to use the AC power adapter when formatting a disc so that the DVD Camcorder does not turn off midway. ,_
Exit
[ ENGLISH
]
DVD Camcorder:
Disc Manager
+ This function works only in Camera Mode. ",page 26
*:* To play the contents of a DVD-RW/-R/+R DL on other DVD Players/Recorders/Drives, you must finalize the disc. When
finalizing, there should be enough power in the batteries. If an the AC Power adapter is to be used, make sure that the jack
is properly connected. A power cut during finalizing may disrupt the disc from replaying.
1. Set the [Mode] switch to [DISC]. (SC-DC173(U)/DC175/DC575 only)
2. Set the [Power] switch to [ i_ (Camera)]
3. Press the [MENU] button.
, The menu list will appear.
4. Move the [Joystick] up or down to seIect <Disc Manager>, then press the [Joystick].
5. Move the [Joystick] up or down to select <Disc Finalize>, then press the [Joystick].
6. Move the [Joystick] teft or right to select <Finatize>_ then press the [Joystick].
, The message <Finalizing, please wait...> will appear. When finalizing is complete_
the message <Complete!> wilt appear.....
_ove
_Se_ect_Exit
J
i
During finalizing, do not cause impact or vibration to your DVD Camcorder. This could
cause a malfunction.
,
,
,
,
,
,
,
,
The Finalize/Format functions are not available when the battery level is between (_1
and _.
Once finatized_the titlescenes or playlists in the disc cannot be deleted or edited.
Time required for finalizing may differ by disc type.
Refer to page 11for finalized disc compatibility.
Playback is not guaranteed in all DVD Players/Recorders/Drives. For compatibility
details, refer to your DVD Players/Recorders/Drives owner's manual,
Once the DVD-R/+R DL disc is finalized, you cannot re-record it in the DVD Camcorder.
You may play back DVD+RW discs on other devices without finalizing them.
You can not make an additional recording on a DVD-RW disc without unfinalizing it after
it is finalized.
_o,,_
_Select _Exit
j
I ENGLISH
DVD Camcorder:
Disc Manager
+ The DVD disc can be played on a PC with a DVD running media (DVD drive).
1. Turn on your PC.
2. Insert a finalized disc into the DVD drive of the PC.
• DVD playback application software starts and the disc will play.
• If DVD playback application does not start automatically, run the application by
navigating through the Start menu.
•
•
•
•
•
•
................................
\\
PC
Use a DVD drive compatible with 3 1/2 inch (8cm) discs. ",page 123
DVD playback application software such as 'Windows Media Player',
'CyberLink PowerDVD', etc. should have been installed before playing back a disc.
Microsoft, Windows and Windows logo are registered trademarks of Microsoft Corporation incorporated in the United States and/or
other countries.
PowerDVD and other company and product names mentioned in this manual are registered trademarks used for identification
purposes only, and remain the exclusive property of their respective owners.
Video and audio may pause or skip when you play back a DVD disc on your PC In this occurs, copy the data into your hard disk
drive.
A DVD-RW disc recorded in VR mode can not play back on your PC.
You can playback finalized DVD-R/-RW (Video mode)/+R DL discs on DVD Players/Recorders.
Playback is not guaranteed in all DVD Players/Recorders.
For compatibility
details, refer to your DVD Player/Recorder
s manual,
Most DVD Players/Recorders can play back a DVD+RW disc that has not been finalized.
• Refer to the page 11 for finalized disc compatibility.
1. Turn on the DVD Player/Recorder.
2. Insert the finalized DVD disc into the tray of a DVD Player/Recorder.
• It may start playing automatically or press the PLAY button to start.
• For further details on playing back DVD discs, refer to the DVD Player/Recorder
user's manual.
e:
A finalized DVD-RW in VR mode can be played back using a DVD Recorder which is
capable of playing VR mode DVD-RW discs in VR mode.
DVD
@@@@@_
owner'
I
[ ENGLISH
]
DVD Camcorder:
Disc Manager
+ This function works only in Camera Mode. "*page 26
*.** If a DVD-RW disc had been finalized in the VR mode or Video mode, you can unfinaiize the disc for further recording.
*:o When unfinatizing, there should be enough power in the batteries. If an AC Power adapter is to be used, make sure that
the jack is properly connected.
1. Set the [Mode] switch to [DISC]. (SC-DC173(U)/DC175/DC575 only)
2. Set the [Power] switch to [ !_ (Camera)].
3. Press the [MENU] button.
= The menu list will appear.
4. Move the [Joystick]
up or down to select <Disc Manager>, then press the [Joystick].
5. Move the [Joystick]
up or down to select <Disc Unfinalize>, then press the [Joystick].
6. Move the [Joystick] left or right to select <Unfinalize>, then press the [Joystick].
= The message <Unfinalizing, please wait...> will appear. When unfinafizing is
complete, the message <Complete!> wilt appear.
= The Finalize/Format functions are not available when the battery level is between
and _.
= During unfinalizing, do not cause impact or vibration to your DVD Camcorder. This could
cause a malfunction.
I ENGLISH
DVD Camcorder:
I
Connection
*:o AM In/Out function works only in Player Mode. '-page 26
-:* AMIn/Out setting enables you to record signals from external sources.
Also you can send your videos to external devices for recording or playback.
1. Set the [Mode] switch to [DISC].
(_ _-
"
2. Set the [Power] switch to [[_(Player)].
3. Press the [MENU] button.
= The menu list will appear.
4. Move the [Joystick]
up or down to select <Record>, then press the [Joystick].
5. Move the [Joystick]
up or down to seIect <AM In/Out>, then press the [Joystick].
_l/Iove
_Select
_Ext
" ...........................................................
6. Move the [Joystick] up or down to select <Out> or <AV In>, then press the [Joystick].
= <Out>: Select this when copying or playing back the contents of this camcorder onto
=
the external device.
<AV In>: Select this when recording the contents of an external device to the DVD
Camcorder.
= To exit, press the [MENU] button.
_,love
_SeJect
_Ext
',
j
[]
AV In
8TBY
[]
000/0,@¢_
[ ENGLISH
]
DVD Camcorder:
Connection
+ The Playback function works only in Player Mode. ",page 26
Playing
back on a TV Monitor
+ To play back a disc, the television must be NTSC compatible. '-',page 115
*:o We recommend that you use the AC Power adapter as the power source for the DVD Camcorder.
a TV that has AudioNideo
Input
1. Connect the DVD Camcorder to your TV with the
AV cable.
,
,
,
,
Jacks
TV
The yellow jack: Video
The white jack: Audio(L)-mono
The red jack: Audio(R)
If you connect to a mono TV_connect the yellow
jack (Video) to the video input of the TV and the
white jack (Audio L) to the audio input of the TV.
DVD Camcorder
2. Set the [Mode] switch to [DISC].
(SC-DC173(U)/DC175/DC575 only)
AV Cable
3. Set the [Power] switch to [[_(Player)].
4. Turn on the TV and set the TV/VIDEO selector on the TV to Video.
• Refer to the TV user's manual.
5. Play the disc. '-'pages 65~66
If you connect the cable to the AVjack, you will hear sound from the DVD Camcorder's speakers.
I ENGLISH
DVD Camcorder:
Connecting
Connection
to a TV that has no Audio/Video
input Jacks
*:* You can connect your DVD Camcorder to a TV through a VCR
1. Connect the DVD Camcorder to your VCR with the
AV cable.
VCR
• The yellow jack: Video
• The white jack: Audio(L)- Mono
• The red jack: Audio(R)
2. Connect a TV to the VCR.
3. Set the [Mode] switch to [DISC].
(SC-DC173(U)/DC175/DC575 only)
4. Set the [Power] switch to [[_(Player}].
5. Turn on both the TV and VCR
• Set the input selector on the VCR to Line.
• Select the channel reserved for your VCR on the TV set.
6. Play the disc. ",pages 65~66
If only a mono audio input is available on the VCR, use the audio cable with the white jack (Audio L).
I
[ ENGLISH
]
DVD Camcorder:
Connection
+ The copying function works only in Player Mode. _'page 26
+ Connect your DVD Camcorder to a VCR using the AV jack to dub the recording from a disc onto a VCR tape.
*:o Set the <AV In/Out> to <Out> before copying to an external device. '-,page 83
1. Set the [Mode] switch to [DISC].
(SC-DC173(U)/DC175/DC575 only)
VCR
2. Set the [Power] switch to [[._i](Player}].
3. insert the disc you want to copy in your DVD Camcorder.
4. insert a new tape in your VCR.
5. Connect the DVD Camcorder to your VCR with AV cable.
= Connect the AV cable to the input jack on your VCR
= The yellow jack: Video
= The white jack: Audio(L)-mono
= The red jack: Audio(R)
AV Cable
6. Press the Record button on your VCR to start recording. ",pages 65~66
7. Play the disc on your DVD Camcorder. Please refer to page 64 for details on playback.
= Set the <TV Display> to <Off> in the menu. ",page 38
Stop recording on your VCR_then move the [Joystick] down on your DVD Camcorder.
DVD Camcorder
I ENGUSH
DVD Camcorder:
I
Connection
*:o The Voice Plus function works only in Player mode. -page 26
*:o This function enables you to narrate over a pre-recorded disc via
the DVD Carncorder's microphone.
*:o When dubbing a DVD to other AV devices (DVD Recorder,
VCR), the Voice Plus feature dubs your voice from the internal
microphone of the DVD Camcorder, instead of copying the existing
audio on the DVD.
1. Connect the DVD Carncorder to your AV device with AV cable.
'-page 86
"
2. Set the [Mode] switch to [DISC]. (SC-DC173(U)/DC175/DC575 only)
3. Set the [Power] switch to [[_(Player)].
4. insert the disc you wish to play back in this DVD Camcorder.
5. Press the [Record Start/Stop] button on a point where you want to start the Voice Plus
feature during playback.
= Voice Plus icon ([_) is displayed and <Voice Plus> will blink for a while.
= Sound signals incoming from the internal microphone will be dubbed to a connected
AV device, instead of copying the pre-recorded sound on a disc.
6. To cancel, press the [Record Start/Stop] button again.
DVD CamcolxJe_
AV Cable
_ll
i_ []
00020@#
30 rain
li
\
001
/
3@rain
•
=
=
=
=
=
=
=
Voice Plus is available only when the AV cable is connected. If a USB cable (SC-DC173(U)/
II
OOI
DC175/DC575 only) is connected, the Voice Plus function may not operate properly.
Voice Plus
if you perform Stop, Play/Still, REW, or FF while the Voice Plus function is being executed,
the Voice Plus function witl be deactivated.
_ll
i_ [] 00020(@
When the Voice Plus function is in progress, the [MENU] button or [PHOTO] button does
not work.
\
/
The Voice Plus function does not affect the original sound on the recorded disc.
Sound is transferred from the internal microphone on this DVD Camcorder to the connected
AV device, when using the Voice Plus function. Make sure the microphone is not covered or blocked in any way.
Adjust the sound volurne on the connected external device. (TV, audio system etc.)
Feedbackmay occur if the DVD Camcorderis placed near the speaker of an externaldevice.
Turn down the volume of the external device and keep the DVD Camcorder a reasonable distance away.
[ ENGLISH
]
DVD Camcorder:
Connection
o:. The Recording (Copying)function works only in Player Mode. '..,page26
¢ Connect your DVD Camcorder to a VCR or a TV using the AV jack to record a TV program or copy a video tape to a disc. Set
the AV In!Out before Recording (Copying) _page 83
Recording (Copying)
onto a Disc
1. Get your TV or VCR ready.
2 Connect the DVD Camcorder to your VCR or TV with AVc; l_iel
• Connect the AVcable to the output jack on your VCR or
• The yellowjack: Video
• The white jack:Audio (L)- Mono
• The red jack: Audio (R)
3 Insert an empty disc in your DVD Oamcorder.
• Please refer to page 123 for selecting and formatting di._
4
Insert the tape to be played in your VCR.
• Pause at the starting point of playing,
5 Start copying by pressing the [Record Start/Stop] button _n your DVD Camcorder.
6. Press the PLAY button on your VCR to play the tape.
ovo Camcorder
AVCabEe
4 Select a TV channel to be recorded.
5. Start recording by pressing the (Record Start/Stop] button on your DVD Camcorder
Press the (Record Start/Stop] button on your DVD Camcorder to stop recording(copying)
N_tes:
a
If you operate the DVD Camcorder connected to another device, atways connect the DVD Camcorderto an AC outlet using the
AC power adapter.
Oopy-protected contents such as Macrovision or unstable TV signals cannot be recorded on this DVD Camcorder.
I ENGLISH
Digital Still Camera Mode (SC=DC173(U)/DCI75/DC575
+ This DVD Camcorder can use SD memory cards and MMC (Multi Media Cards).
Some cards are not compatible depending on the memory card manufacturer and
memory card type.
+ The Memory Card stores and manages Photo/Moving images recorded by the DVD
Camcorder.
*:o Before inserting or ejecting the Memory Card, set the [Power] switch to [OFF] and
open the LCD Screen.
Memory
a Memory
Card
1. Open the Memory Card Cover.
2. insert the Memory Card into the slot until it softly clicks.
3. Close the Memory Card Cover.
Ejecting
<MMC/SD>
Card Functions
-:o Recording/Viewing Photo/Moving Images
*:o Protecting Images from accidental erasure (except MMC)
*:- The MMC does not have a Protection Tab. When using the MMC_ be careful notto edit
or delete data by mistake.
*:- Deleting Photo/Moving images stored in Memory Card.
*:- Marking Photo Images with Print Information
*:o Formatting Memory Cards
Inserting
only)
a Memory
Card
1. Open the Memory Card Cover.
2. Slightly push the Memory Card inwards to pop it out.
3. PulI the Memory Card out of the slot and close the Memory Card Cover.
/¸¸=¸¸==¸==:=:¸_:¸t¸
: g t¸?¸¸¸¸_¸¸¸:¸¸¸i
::?T a
B=::?
?= B=?='=??
i???i _ii
1Ga=f,000,000,000bytes;
actual formatted capacity may be
]ess as the internal firmware uses a portion of the memory.
i
<RS MMC/Mini SD>
RS MMC or Mini aa should be inserted by
using an Adapter (not supplied).
I
ENGLISH
]
Digital Still Camera Mode (SC-DC173(U)/DCI75/DC575
only)
NQt_;
Do not apply excessive force when you insert/eject the Memory Card.
Do not turn the power off while recording, loading, erasing photo images or formatting the Memory Card.
Do not place the Memory Card near a strong electro-magnetic device.
Do not allow metal substances to come in contact with the terminals on the Memory Card.
Do not bend, drop or apply strong shock to Memory Card.
After removing the Memory Card from the DVD Camcorder, keep it in a soft case to prevent static shock.
The data stored on the Memory Card may be changed or lost as a result of misuse, static electricity_electric noise or repair.
Save important images separately. Samsung is not responsible for data loss due to misuse.
= The DVD Camcorder supports 2GB SD/MMC and lower. SD/MMC above 2GB may not record or play properly.
= 16:9 Wide mode is not available in M.Cam Mode and M.Player Mode. Because wide LCD supports only 4:3 mode.
*:* The photo images that you recorded are saved in JPEG file
format on the Memory Card.
DQN
MSAMSUNG
+ The moving images that you recorded are saved in MPEG4 file
format on the Memory Card.
[?CAN0001
S_MOV
IOOSSMOV
*:* Each file has a file number and atl files are assigned to a folder.
DCAM0002
_
I00SSDVC
- Afile numberfrom DCAM0001 is sequentialty assigned to
each recorded image.
101SSDVC
- Each folder is numbered from 1OOSSDVCand recorded on
<Photo Image>
<Moving Image>
the Memory Card.
+ Afile name is stipulated by DCF(Design rule for Camera File system).
DCF is an integrated image fite format for digital cameras: Image files can be used on all digital devices conforming to DCR
Image Format
Photo Image
= images are compressed in JPEG (Joint Photographic Experts Group) format.
= The picture size is 8O0x60Oor 1152x864 (SC-DC575 only). ",page 92
Moving Image
= images are compressed in MPEG4 (Moving Picture Experts Group) format.
= The picture size is 720X480.
Folder number
<M.Player Mode>
I ENGLISH
Digital Still Camera Mode (SC=DC173(U)/DCI75/DC575
only)
-:o Photo Quality function works in both Player Mode and M.Cam Mode. '-*page 26
-:* You can select the quality of a photo image to be recorded.
Select
the Photo
Quality
1. Set the [Mode] switch to [DISC] or [CARD].
2. If the [Mode] switch is set to [DISC], set the [Power] switch to [_(Player)].
If the [Mode] switch is set to [CARD], set the [Power] switch to [1_ [Camera)].
3. Press the [MENU] button.
= The menu list will appear.
4. Move the [Joystick] up or down to select <Memory>, then press the [Joystick].
5. Move the [Joystick] up or down to select <Photo Quality>, then press the [Joystick].
6. Move the [Joystick] up or down to select the desired photo quality (Super Fine, Fine
or Normal), then press the [Joystick].
7. To exiL press the [MENU] button.
• The icon of the selected option is displayed.
Number
Quality
of Images
Photo Size
8OOxSOO
<Super Fine>
<Fine>
"1152X864
8OOxSOO
that
can be stored
on a Memory
Card
128MB
256MB
512MB
IGB
Approx 8OO
Approx. 1200
Approx 2400
Approx 4830
Approx
2GB
Approx 300
Approx 800
Approx
1200
Approx 2420
Approx 4850
Approx 790
Approx. 1570
Approx 3159
Approx 8409
Approx 12800
Approx 1270
Approx 640
Approx. 2530
Approx. 1270
Approx 5070
Approx 2530
Approx 11000
Approx 5060
Approx 20000
Approx 10000
9740
_l/Iove
_Select
_Exit
"1152X864
<Normal>
8OOxSO8
"1152X864
_
790
_t, 8min
* : SC-DC575 only
,
You can directly access the Photo Quality function by using the [Q.MENU] button.
Approx 400
Approx 800
Approx 1580
Approx 3200
Approx 6400
'-page 27
, The above approximate figures are based on number of images under normal recording
conditions.
= Up to 20,000 Photo images (JPEG) can be stored in a memory card.
ULJ(T7
f
_b.
I
[ ENGLISH
]
Digital Still Camera Mode (SC-DC173(U)/DCI75/DC575
only)
*:o Photo Size function works only in M.Cam Mode. ",page 26
°:* You can select the size of a photo image to be recorded.
1. Set the [Mode] switch to [CARD].
2. Set the [Power] switch to [_,(Camera)].
3. Press the [MENU] button.
= The menu list will appear.
4. Move the [Joystick]
up or down to select <Memory>, then press the [Joystick].
5. Move the [Joystick]
up or down to seIect <Photo Size>, then press the [Joystick].
Photo Quality
_ Supe] Fine
6. Move the [Joystick] up or down to seiect the desired photo size (1152x864 or
800x600), then press the [Joystick].
7. To exit, press the [MENU] button.
• The icon of the selected option is displayed.
= You can directly access the Photo Size function by using the [Q.MENU] button.
'-*page 27
= The number of recordable images varies depending on the recording environment.
= Regarding detailed image capacity, see page 91.
= Photo images that are recorded at 1152X864 on your DVD Carncorder may not
playback properly on other digital devices that do not support this photo size.
= High resolution images use more memory than lower resolution images. Therefore the
higher the resolution selected, the fewer wilt be the number of images available.
Move
[_
_
_
Seiect
_
Exit
300 [El
8 rain
I ENGLISH
Digital Still Camera Mode (SC=DC173(U)/DCI75/DC575
only)
-:* File Number setting works only in M.Cam Mode. "*page 26
-:* File Numbers are given to images in the order they were recorded when they are stored on the Memory Card.
-:o File numbers may be set as follows:
- Series: When there are existing flies, the new image will be named as the next number in the sequence.
- Reset: When there are no flies stored on the Memory Card, the fite numbering starts from 0001.
1. Set the [Mode] switch to [CARD].
2. Set the [Power] switch to [1_ (Camera)].
3. Press the [MENU] button.
= The menu list will appear.
4. Move the [Joystick]
up or down to select <Memory>, then press the [Joystick].
5. Move the [Joystick]
up or down to select <File No.>, then press the [Joystick].
_Jove
6. Move the [Joystick] up or down to select the desired option (Series or Reset), then
press the [Joystick].
= The selected option is applied.
7. To exit, press the [MENU] button.
When you set <File No.> to <Series>, each fite is assigned with a different number so as to
avoid duplicating file names.
It is convenient when you want to manage your flies on a PC.
_Select
_Exit
I
[ ENGLISH
]
Digital Still Camera Mode (SC-DC173(U)/DCI75/DC575
+
*:*
+
+
only)
You may take photo images while in M.Cam Mode and store the images on the Memory Card. ",page 26
You can take photo images using the remote control. (SC-DC175/DC575 only)
Audio will not be recorded with a photo image on to the Memory Card.
Please check the protection tab setting on your memory card before recording. You may not be able to record when it is set
to lock.
1. lnsertthe Memory Card. '-page 89
2. Set the [Mode] switch to [CARD].
3. Set the [Power] switch to [ _
(Camera)]
4. After framing your subject, fully press the [PHOTO] button to take the picture.
= The picture is taken and saved into the Memory Card within a few seconds.
• Taking another picture within this interval is not possible.
= The <Photo capture> indicator appears during the time it takes to save the image.
= Saved photo images will appear slightly larger than what is shown on the LCD screen when
the photos are taken.
= Photo images are saved in the Memory Card in an 800x600 or 1152x864 (SC-DC575 only)
format.
= The number of photo images that can be stored depends on the quality of the image.
I ENGLISH
Digital Still Camera Mode (SC=DC173(U)/DCI75/DC575
only)
+ This function works only in M.Player Mode. '-*page 26
*:* You can playback and view photo images recorded on a Memory Card.
1. Set the [Mode] switch to [CARD].
2. Set the [Power] switch to [[_(Player}].
= The thumbnail index of photo images appears. If there are no recorded images on the
Memory Card, <No file!> is displayed.
3. Use the [Joystick] to select a desired photo images, press the [Joystick].
= To change the current thumbnail page, use the [Joystick] to highlight the thumbnail page
movement arrows then press the [Joystick] left or right to match the direction of the
arrow.
1. Use the [Joystick] to select a desired photo image, then press the [Joystick].
2. Use the [Joystick] to search for the desired photo image.
= To view the next image: move the [Joystick] right.
= To view the previous image: move the [Joystick] left.
= Press [Joystick] left/right and hold to search for an image quickly.
Holding the [Joystick] left or right will not change the displayed image,
but the file number will change untit the button is released.
When the [Joystick] is released, the selected file will be displayed.
3. To return to thumbnaiI index, press the [MULTI DISR (_"-_)] button.
Side
1. Use the [Joystick] to select a desired photo image, then press the [Joystick].
2. Press the IS.SHOW] button in the single image display mode.
= All images will be played back consecutively for 2~3 seconds each.
• The <Slide> is displayed. The Slide Show will start from the current picture.
To stop the slide show, press the IS.SHOW] button again.
= Loading time may vary depending on the image size.
= Any large sized image taken with another camera will be displayed as a thumbnail image.
/ O0 0005
I
[ ENGLBH
]
Digital Still Camera Mode (SC-DC173(U)/DCI75/DC575
only)
*:* The Protect function works only in M.Player Mode. "*page 26
*:* You can protect important images from accidental erasure.
If you execute format, all images including protected images wilt be erased.
1. Set the [Mode] switch to [CARD].
2. Set the [Power] switch to [[]E](Player)].
= The thumbnail index of photo images appears. If there are no recorded images on
the Memory Card, <No file!> is displayed.
3. Use the [Joystick] to select images to be protected.
4. Press the [MENU] button.
= The menu list will appear.
5. Move the [Joystick]
up or down to select <Memory>, then press the [Joystick].
6. Move the [Joystick]
up or down to select <Protect>, then press the [Joystick].
7. Move the [Joystick] up or down to select <On>, then press the [Joystick].
• To exit, press the [MENU] button.
• The protection icon (_) is displayed.
= You can directly access the Protect function by using the [Q.MENU]. '-page 27
= Protected images will show the (_ ) mark when they are displayed.
= If the write protection tab on the Memory Card is set to LOCK, you cannot set image
protection.
_Jave
_Select
_Exit
I ENGLISH
Digital Still Camera Mode (SC-DC173(U)/DCI75/DC575
only)
+ The Delete function works only in M.Player Mode. ",page 26
+ You can erase the photo images and moving images recorded on the Memory Card.
*:o If you want to delete protected images, you must first deactivate the image protection.
*:* An image which has been deleted cannot be recovered.
1. Set the [Mode] switch to [CARD].
2. Set the [Power] switch to [[__i_(Player)].
• The thumbnail index of photo images appears. If there are no recorded images on
the Memory Card, <No file!> is displayed.
3. Use the [Joystick] to select an image to be deleted.
4. Press the [MENU] button.
• The menu list will appear.
5. Move the [Joystick]
up or down to select <Memory>, then press the [Joystick].
6. Move the [Joystick] up or down to select <Delete>, then press the [Joystick].
• The message <Delete?> will appear.
7. Move the [Joystick] left or right to select <Yes>, then press the [Joystick].
• The selected image will be deleted.
• Press the [MENU] button to finish setting.
,
,
,
,
,
You can directly access the Delete function by using the [Q.MENU]. "-,page 27
If an erroneousimagefile is foundon the MemoryCard,the messageMemorycard read error
will be displayed.It may be causedby copyingimagesfromdifferentdigital devices.
Formatting the Memory Card will delete all the stored images. ",page 99
To protect important pictures from accidental deletion, activate the image protection.
_page 96
Protected image cannot be deleted.
%
I
[ ENGLBH
]
Digital Still Camera Mode (SC-DC173(U)/DCI75/DC575
Deleting
AH images
at Once
6. Move the [Joystick] up or down to select <Delete All>, then press the [Joystick].
• The message <Delete all?> is dispJayed.
7. Move the [Joystick]
left or right to seJect <Yes> or <No>, then press the [Joystick].
8. To exit, press the [MENU] button.
= You can directly access the Delete All function by using the [Q.MENU]. -page 27
= Deleting all rites using the Delete All menu may take a whiJe.To delete alt flies much
faster, format the Memory Card after backing up the flies onto other storage device.
"*page 99
only)
I ENGLISH
Digital Still Camera Mode (SC=DC173(U)/DCI75/DC575
only)
*:o The Format function works only in M.Player Mode. "*page 26
°:* You can use the Format functions to completely delete all images and options on the Memory Card, including protected
images.
°:* The Format function restores the Memory Card to its initial state.
°:* If you execute the Format function, all images will be erased completely and erased
images cannot be recovered.
1. Set the [Mode] switch to [CARD].
2. Set the [Power] switch to [[_}(Player)].
= The thumbnail index of photo images appears. If there are no recorded images on
the Memory Card, <No file!> is displayed.
3. Press the [MENU] button.
= The menu list will appear.
4. Move the [Joystick] up or down to select <Memory>, then press the [Joystick].
5. Move the [Joystick] up or down to select <Format>, then press the [Joystick].
= The <Format? All files will be deleted!> message wilt appear.
6. Move the [Joystick] to the left or right to select <Yes>, then press the [Joystick].
• The <Completer> message wilt appear when the formatting is completed.
= You can directly access the Format function by using the [Q.MENU]. "'page 27
= If you execute the Format function, all photo/moving images will be erased completely.
Erased photo/moving images cannot be recovered.
= Formatting the Memory Card using a different device wilt cause Memory Card read
errors.
= Do not turn the power off in the middle of the formatting.
= A Memory Card with the protection tab set to save wilt not be formatted. '-,,page 89
= Do not format the Memory Card on a PC. Not formatted! message may appear if a
Memory Card formatted on a PC is inserted.
_l_love
_Select
_Ext
I
[ ENGLISH
]
Digital Still Camera Mode (SC-DC173(U)/DCI75/DC575
only)
+ You can record moving images while in M.Cam Mode. "-,page 26
*:. You can record moving images with audio on the Memory Card.
*:o The screen format of the moving image to be recorded is 720X480.
Saving Moving Images onto a Memory Card
1. insert the Memory Card.
2. Set the [Mode] switch to [CARD].
3. Set the [Power] switch to [ i_ (Camera)].
4. Press the [Record Start/Stop] button_the moving images are recorded on the Memory
Card in MPEG4.
= You can record a photo image on a Memory Card by pressing the [PHOTO] button
instead of the [Record Start/Stop] button. '-.page 94
5. Press the [Record Start/Stop] button to stop the recording.
Recording
[_+
time
available
128MB !
Approx. 8min
on a Memory
256MB
16rnin !
Approx
Card
512MB !
Approx 32rain
IGB
64mJn !
Approx
2GB
Approx. 120rain
_
t
= These times are approximate as recording capacities can be affected by variables such as
subject matter and memory card type.
REC
O
/6 rain
00030
The DVD Camcorder supports memory cards ranging up to 2GB.
Recording time is limited to one minute ifa 16MB memory card (or less) is used.
Up to 2000 MPEG files can be stored on a memory card.
MPEG files (Moving images) can be recorded up to 2GB per file.
Movingimages that you recorded are saved in *.avi (avi t .0) file format on the Memory Card.
The moving images on a Memory Card are a smaller size and lower definition than images on a Disc.
The sound is recorded in stereo.
The following functions are not available in M.Cam Mode: DIS, Digital Zoom, Fade, Program AE, Digital Effect, Color Nite.
While recording on a Memory Card, don't insert or eject the disc as it may record noise.
While recording on a Memory Card, don't eject the Memory Card or it may break the data on the Memory Card or Memory
Card itself.
= Turning the power off while accessing the Memory Card may damage the data stored on the Memory Card.
I ENGLISH
Digital Still Camera Mode (SC-DC173(U)/DCI75/DC575
only)
+ The moving images playback function works only in M.Player Mode. '-',page 26
*:* You can play the moving images stored on a Memory Card. Stereo audio is played back at the same time.
*:o The moving images wilt look better when played back on a PC.
1. Set the [Mode] switch to [CARD].
2. Set the [Power] switch to [[_(Player}].
= The thumbnail index of photo images appears. If there are no recorded images on
the Memory Card, the <No fil!!> message will appear.
3. Move the [Joystick] up to highlight the photo image icon (@), then move it right to
highlight the moving image icon (t:2_).
4. Use the [Joystick] to select the moving image that you want to play, then press the
[Joystick].
= To change the current thumbnail page, use the [Joystick] to highlight the thumbnail
page movement arrows then press the [Joystick] left or right to match the direction of
the arrow.
• You can control playback using the [Joystick].
• During the playback, use the [VOL A/'V] button to increase or decrease the volume.
= [MENU] and [Q.MENU] buttons are not available during moving image playback.
= There may be broken or mosaic pictures while playing the moving images, but it is not
malfunction.
= The moving images that you recorded on the Memory Card in this Camcorder may not play on other manufacturer's
devices.
= The moving images recorded by another DVD Camcorder may not play on this DVD Camcorder.
= To playback moving images on a PC, the Video Codec (in the CD provided with the DVD Camcorder) should be installed.
- You need Microsoft Windows Media Player Version 9 or higher in order to play moving images on the Memory Card on
your PC.
- You can download the Microsoft Windows Media Player applied each languages on Microsoft Website,
"http://www.microsoft.comlwindows/windowsmedia/download/default.asp'.
= Moving images recorded on memory card can not be played back on Macintosh.
I
[ ENGLISH
]
Digital Still Camera Mode (SC-DC173(U)/DCI75/DC575
only)
+ This function works only in Player Mode. "-page 26
*:- If you press the [PHOTO] button during DVD disc playback, the disc stops and the image on the DVD disc is saved on the
Memory Card.
1. Set the [Mode] switch to [DISC].
2. Set the [Power] switch to [IJ_(Player}].
• The thumbnail index screen appears.
3. Use the [Joystick] to select a title scene to be played, then press the [Joystick].
• The selected scene wilt be played continuously.
4. Press the [PHOTO] button.
• The stilt image is recorded on the Memory Card.
• During the time it takes to save an image, the playback screen is paused and the OSD
is dispIayed.
• You can playback and view the still images stored on the Memory Card. '-page 95
,
,
Still images copied from the DVD disc to the Memory Card are saved in 640x480 format.
The number of images you can save varies depending on the image resolution.
I ENGLISH
Digital Still Camera Mode (SC=DC173(U)/DCI75/DC575
*:*
¢
¢
*:*
*:*
only)
The Print Mark function works only in M.Player Mode. ",page 26
This DVD Camcorder supports the DPOF (Digital Print Order Format) print format.
You can automatically print images recorded on a Memory Card with a printer supporting DPOF.
Setting the Print Mark is only available when using a memory card.
There are 2 ways to make a Print Mark.
- This File: You can set a print mark on the photo image displayed on the LCD Screen.
Photo
Up to 999 copies can be set to print of each image.
- Atl Files: To print 1 copy each of all of the stored images.
1. Set the [Mode] switch to [CARD].
2. Set the [Power] switch to [[_[Player}].
= The thumbnail index of photo images appears. If there are no recorded images on
the Memory Card, the <No filet> message will appear.
3. Use the [Joystick] to search for the photo image that you want to mark.
4. Press the [MENU] button.
= The menu list will appear.
5. Move the [Joystick]
up or down to select <Memory>, then press the [Joystick].
6. Move the [Joystick]
up or down to select <Print Mark>, then press the [Joystick].
_Move _Select
7. Move the [Joystick] up or down to select desired option (All Off, All Files or This File), (_ ('Photo
then press the [Joystick].
8. if you select <This File>, move the [Joystick]
press the [Joystick].
up or down to select the quantity, then
9. To exit, press the [MENU] button.
= Print Mark icon( _ ) and number of prints are displayed.
,A
I
[ ENGLISH
]
Digital Still Camera Mode (SC-DC173(U)/DCI75/DC575
Removing
only)
the Print Mark
To remove all Print Marks, select <All Off>.
To remove an individual file's Print Mark, select the file and set <This File> to <000>.
=
=
=
=
You can directly access the Print Mark function by using the [Q.MENU] button. "-page 27
If the Print Mark is set to This File, you can set the number of copies from 001 to 999.
If the Print Mark is set to All Files_ you can set the number of copies to 1.
The All Files option may require extended operation time depending on the number of stored images.
I ENGLISH
PictBridgeTM (SC-DC173(U)/DC175/DC575
I
only)
*:o PictBridge function works only in M.Player Mode. =page 26
*:* By connecting the DVD Camcorder to printers with PictBridge support (sold separately), you can send images from the
Memory Card directly to the printer with a few simple operations.
*:* With the PictBridge Support, you can control the printer directly through your DVD Camcorder in order to print out stored
pictures. For direct printing of your stored pictures using the PictBridge function, you must connect your DVD Camcorder to
a PictBridge printer using a USB cable.
Connecting
To a Printer
(USB Connect)
1. Turn your printer power off.
= Turn your DVD Camcorder on by setting the [Mode] switch to [CARD].
USB Connect
2. Set the [Power] switch to [[_(Player)].
= Move the [Joystick] to select an image to print.
_,love
_Select
_*Computer
_- English
_Ext
3. Press the [MENU] button.
= The menu list will appear.
4. Move the [Joystick) up or down to select <System>, then press the [Joystick).
5. Move the [Joystick) up or down to select <USB Connect>, then press the [Joystick].
6. Move the [Joystick) up or down to select <Printer>, then press the [Joystick].
= <Computer>: Connect to a computer.
= <Printer>: Connect to a printer. (To use the <Pict Bridge> function, select this.)
\
J
7. Connect your DVD Camcorder to the printer using the provided USB cable.
8. Turn your printer power on.
= The <Pict Bridge> menu screen appears automatically after a short period.
= The cursor highlights <Print>.
= To change the current thumbnail page, use the [Joystick] to highlight the thumbnail
page movement arrows then press the [Joystick] left or right to match the direction
of the arrow.
5/10
,A
[ ENGLBH
]
PictBridgeTM (SC-DC173(U)/DC175/DC575
Setting
the Number
only)
of Prints
1. Move the [Joystick]
up or down to seiect <Copies>, then press the [Joystick].
2. Move the [Joystick]
up or down to set the number of prints, then press the [Joystick].
Settin
the Date/Time Im tint O tion
3. Move the [Joystick] up or down to setect <Date/Time>, then press the [Joystick].
4. Move the [Joystick] up or down to select the Date/Time display type, then press the
[Joystick].
• Date/Time display type: <Off>, <Date>, <Time>, <Date&Time>
Printing
_
_
i
I_{vl
PEayel Mode
_
5_0
I_l
r_
_
m
D_°_r'm_
_
images
Move the [Joystick] up or down to select <Print>, then press the [Joystick], and selected
image files wilt be printed.
Canceling
the Printing
To cancel the image printing, press [Joystick] button again.
The message <Cancel> appears and the image printing will be cancelled.
= The Date/Time Option may not be supported by all printers. Check with your
printer manufacturer. The Date/Time menu cannot be set up if the printer
does not support this option.
= The PictBridge T" is a registered trademark of CIPA(Camera & Imaging
Products Association), an image transfer standard developed by Canon,
Fuji, HP, Olympus, Seiko Epson, and Sony.
PictBridge supporting printers are commercially available.
Use the USB cable provided with the DVD Camcorder.
= Use the AC power adapter for your DVD Camcorder during PictBridge Direct Printing.
Turning your DVD Camcorder off during printing might damage data on the Memory Card.
= Printing photo images is supported. Moving images cannot be printed.
= You can set various printing options depending on the printer. Please refer to the user's manual of the printer for details.
= When setting the Date/Time imprint option, you can display the time (24-hour format) when the image has been recorded.
J
I ENGLISH
USB interface (SC=DC173(U)/DC175/DC575
Transferring
a Digital
Image through
onJy)
a USB Connection
+ The DVD Camcorder supports both USB 1.1 and 2.0 standards. (Depends on the PC specification)
-:o You can transfer a recorded file in memory Card to a PC via a USB connection.
-:* if you transfer data to a PC, you need to installthe software (DV Driver, Video Codec, DirectX 9.0) supplied with the DVD
Camcorder.
USB Connection
Speed
(depending
on the System)
High speed USB connection is supported by Microsoft (Windows) device drivers only.
, Windows 2000 - High speed USB on a system with Service Pack 4 or later installed.
, Windows XP - High speed USB on a system with Service Pack 1 or later installed.
, Windows VISTA- High speed USB on a system with Service Pack 1 or later installed.
System
Requirements
Windows System
cPu
Intel_ Pentium 4TM, 2GHz
OS(Operating System)
Windows ®2000/XP/VISTA(32bit)
* Standard installation is recommended
Memory
512MB
HDD capacity
2GB or more
Resolution
1024 x 768 dots 24bit Color
USB
USB2.0 High Speed
Operation may not assured if the above OS has been upgraded.
USB interface is not supported on Windows® VISTA(64bit) and Macintosh operating systems.
System requirements mentioned above are recommendations. Even on a system that satisfies the requirements may not
ensure the operation depending on the system.
I
ENGLISH
]
USB interface (SC-DC173(U)/DC175/DC575
.
.
.
only)
On a slower PC than recommended, movie playback may not be smooth or video editing may take a long time.
On a slower PC than recommended, movie playback may skip frames or operate unexpectedly.
Intel® Pentium III TMor Pentium 4 TMisa trademark of the Intel Corporation.
Windows® isa registered trademark of the Microsoft® Corporation.
All other brands and names are property of their respective owners.
in M.Cam Mode or M.Player Mode, be sure that the Memory Card is inserted into the DVD Camcorder before connecting
USB cable. If no Memory Card or an unformatted Memory Card is inserted, the PC will not recognize your DVD Camcorder
as a removable disk.
USB Streaming requires Video Codec, DV Driver and DirectX g.o.
If you disconnect the USB cable from the PC or the DVD Camcorder during the data transfer, the data transfer wilt stop and
the data may be damaged.
if you connect the USB cable to a PC using a USB HUB or with other devices at the same time, it may cause conflict and
may not work properly. If this occurs, remove atl other USB devices and try the connection again.
I ENGLISH
USB interface (SO=DO173(U)/DC175/D0575
I
only)
+ The USB Connect function works only in M.Player Mode. '-*page 26
+ Using the USB cable, you can connect your DVD Camcorder to a computer to copy your moving images and photo images
from the Memory Card, or to a printer to print your images.
1. Set the [Mode] switch to [CARD].
2. Set the [Power] switch to [[._iii_J(Player)].
3. Press the [MENU] button.
• The menu list will appear.
4. Move the [Joystick]
up or down to select <System>, then press the [Joystick].
5. Move the [Joystick]
up or down to select <USB Connect>, then press the [Joystick].
_Move
_Select
_Ext
_Move
_Se]ect
_Ext
6. Move the [Joystick] up or down to select <Computer> or <Printer>, then press the
[Joystick].
• You can select <Computer> to use the DVD Camcorder as a PC Camera, USB
Stream or removable disk.
• You can select <Printer> to use the PictBridge feature. ",page 105
7. To exit, press the [MENU] button.
[ ENGLISH
]
USB interface (SC-DC173(U)/DC175/DC575
.._._i: li_il_
_'_
E _'_ WI
_P_!'i
_
f'_J
only)
_:. When you nsta the DV Med a PRO software on your W ndows computer you can enjoy the
following operations by connecting your DVD camcorder to your Computer via a USB cable.
- V ew Movie Recordings and Photos on PC: DV Driver _ DirectX9.0 - Video Codec
- PC CameralUSB Streaming function:
- Photo Editing: Photo Express
DV Driver _ DirectX9.0 _ Video C0dec
+ Turn on your PC. Exit all other running applications.
+ insert the provided CD into the CD-ROM drive.
The setup screen appears automatically soon after the CD is inserted. If the setup screen does not appear, click on "Start"
on the bottom left corner and select "Run" to display a dialog. Type "D:\autorun.exe" and then press ENTER, if your
CD-ROM drive is mapped to "D:Drive".
*:o DV Driver is a software driver that is required to support connection to a PC.
(if it is not installed, some functions wilt not be supported.)
1. Click on
. Driver
- PC
2. Click on
<DV Driver> on the Setup screen.
software is installed automatically. Following drivers will be installed:
Camera/USB Streaming driver(Capture Driver)
<Confirm> to finish driver installation.
3. If the <DirectX 9.0> is not installed, it is installed automatically after setting <DV Driver>.
. After installing <DirectX 9.0>, please restart your PC.
. If <DirectX 9.0> is installed already, there is no need to restart the PC.
= Click on <Video Codec> on the Setup screen.
<Video Codec> is required to play movie files recorded by this DVD Camcorder on a PC.
;
J ENGLISH
USB interface (SC=DC173(U)/DC175/DC575
only)
1. Click <Photo Express> on the Setup screen.
• It is a photo editing tool that allows users to edit images.
1. Click <Quick Time> on the Setup screen.
• QuickTime is Apple's technology for handling movie, sound, animation, graphics, text, music, and even 360-degree
virtual reality (VR) scenes.
= Please instalI by using the Software CD that came with this DVD Camcorder.
We do not guarantee compatibility for different CD versions.
= For photo editing, use Photo Express.
= For movie playback on a PC, install software in this order: DV Driver - DirectX 9.0 - Video Codec
= For PC Cam use, instalt software in this order: DV Driver - DirectX 9.0 - Video Codec
= You have to install DV Driver, Video Codec and DirectX 9.0 to run DV Media Pro properly.
= If a message saying "Digital Signature not found" or something similar appears, ignore the message and continue with the
installation.
= During installation, if the Microsoft LOGO test warning is shown, just click 'Continue(C).'
J
[ ENGLISH
]
USB interface (SC-DC173(U)/DCI75/DC575
only)
1. Connect a USB cable to the USB jack on the PC.
2. Connect the other end of the USB cable into the USB
jack on the DVD Camcorder. (USB jack)
• If a PC is connected to the DVD Camcorder with
a USB cable, only [Power] switch_[Mode] switch_
[Zoom] lever can be operated.
Disconnectinq
the USB Cable
-:- After completing the data transmission, you must
disconnect the cable in the following way:
1. Select the removable disc icon and click the right mouse button to select "Eject".
2. Select "Confirm" and disconnect the USB cable when the Windows Splash screen appears.
= If you disconnect the USB cable from the PC or the DVD Camcorder while transferring_ the data transmission will stop and
the data may be damaged.
= If you connect the USB cable to a PC via a USB HUB or simultaneously connect the USB cable along with other USB
devices, the DVD Camcorder may not work properly. If this occurs, remove all USB devices from the PC and reconnect the
DVD Camcorder.
= You should set the USB Connect to Computer to connect to a PC via USB cable. ",page 109
I ENGLISH
USB interface (SC-DC173(U)/DC175/DC575
Using the DVD Camcorder
I
only)
as a PC Camera
*:* This function works only in Camera Mode. "-,page 26
*++*To use the PC Camera function, the DV Driver, Video Codec and DirectX 9,0 programs must be installed in the PC.
*++*You can use this DVD Camcorder as a PC Camera.
*:+ When you connect to a Web site that provides video chatting functions, you can use your DVD Camcorder for such
functions.
*:+ When using this DVD Camcorder for video conferencing (such as NetMeeting), voice communication may not be supported
depending on the video conferencing software. In this case, connect an external microphone to the soundcard of the PC to
enable voice communication.
*:* Using the DVD Camcorder with PC Net-meeting program installed, you can participate in a video conference.
+ The PC Camera's screen size (Transferred video frame rate for the PC Camera function is max 15 fps.)
- 640X480(VGA) pixels for USB 2.0 connection.
*:+ If PC is connected with the USB to the DVD Camcorder, only the [Power] switch, [Mode] switch, [Zoom] lever can be
operated.
1. Set the [Mode] switch to [DISC].
2. Set the [Power] switch to [1_ (Camera)].
3. Connect one end of the USB cable to the USB jack on the DVD Camcorder and the other
end to the USB connector on your computer.
[ ENGLISH
]
USB interface (SC-DC173(U)/DC175/DC575
Using the USB Streaming
-:*:*
*:*
*:*
only)
Function
This function works in both Camera Mode and Player Mode. "-,page 26
To use USB streaming, the DV Driver, Video Codec and DirectX 9.0 programs must be installed in the PC.
You can view DVD Carncorder video on your PC using USB streaming.
You can also store it as a moving image in the "avi" file format on a PC.
1. Connect one end of the USB cable to the USB jack on the DVD Camcorder and the other end to the USB jack on your
computer.
2. Setup and execute Windows Movie Maker.
, Windows Movie Maker is used for Windows XP users. (C:\program flies\Movie maker\moviemk.exe)
Using
the Camcorder
as a Removable
Disk
-:o You can easily transfer data from a Memory Card inserted in the DVD Camcorder to a PC via a USB connection.
1. Set the [Mode] switch to [CARD], set the [Power] switch to [ _
(Camera)] or [[_(Player)].
2. Connect one end of the USB cable to the USB jack on the DVD Camcorder and the other end to the USB jack on your
computer.
3. To verify whether the removable disk has been properly recognized, open Windows Explorer and locate the removable
disk.
[ ENGLISH
J
Maintenance
*:o Each country or region has its own electric and color systems.
*:* Before using your DVD Camcorder abroad, check the following items.
Power sources
,
,
Youcan use your DVD Camcorder in any country or area with the supplied AC Power adapter within 100V to 240V. 50/60 Hz.
Use a commercially available AC jack adapter, if necessary, depending on the design of the local wait outlet.
Color
system
You can view your recordings using the built-in LCD screen and viewfinder.
However, to view your recordings on a television set or to copy it to an external device as a video cassette recorder (VCR)/
DVD Recorder / Player, the television set or an external device must be NTSC-compatible and have the appropriate Audio/
Video jacks. Otherwise, you may need to use a separate Video Format Transcoder (NTSC-PAL format Converter).
PAL-compatible Countries/Regiorls
Australia, Austria, Belgium, Bulgaria. China. ClS. Czech Republic. Denmark. Egyp[, FinIand. Fiance. Germany. Greece.
Great Britain. Holland. Hong Kong, Hungary, India, Iran, Iraq, Kuwait. Libya Malaysia. Mauritius. Norway Romania.
Saudi Arabia. Singapore. Slovak RePuBlic. Spain. Sweden. Swi_.eriand, Syria, Thailand. Tunisia. e_c.
NTSC-compatible Countries/Regions
Bahamas. Canada. Central America, Japan. Korea. Mexico. PhiiiDDines. Taiwan. United States of America. e[c.
Note
You can make recordings wl[n _our DVD Camcorder ana view pictures on the LCD Screen from anywhere 1 the world.
[ ENGLISH
]
Troubleshooting
-:o Before contacting a Samsung authorized service center, perform the following
They may save you the time and expense of an unnecessary call.
Self
Diagnosis
Display
in <Camera/Player>
simple checks.
Modes
Change to a charged one.
insert a disc.
Change to a new disc.
Erase recorded image.
Eject and re-insert the disc.
Try another disc.
Format the disc. (DVD-RW/+RW)
To record on a DVD-RW/+RW disc, unfinafize it
Close the cover.
Don't eject a disc when the disc detection is in progress
because the data recovery stops.
Follow the directions displayed on the screen with
taking care of the items below.
The data recovery completes within a few minutes
but sometimes it may take more time. Use the AC
adapter when recovering data. (Don't turn off the
power when the data recovery is in progress. The
disc may have a damage.)
The data recovery may not be successful depending
on the timing of the power down.
When recordings from the other DVD Camcorders or
recorders are present on the disc, the data recovery
may not be successful.
I ENGLISH
Troubleshooting
Self
Diagnosis
Display
in <M.CamlM.Player>
(SC-DC173(U)/DC175/DC575
only)
No memory card!
Slow (M.Cam)
(M.Player)
There is no Memory Card inthe DVD
Camcorder.
insert a Memory Card.
Memory card full
Stow
There is not enough memory to
record.
Change to a new Memory Card.
Erase recorded image.
Memory card read error
Stow
The DVD Camcorder can not
playback.
Format a Memory Card or insert Memory
Card recorded on this DVD Camcorder.
Memory card write error
Slow
The DVD Camcorder can not record.
Format a Memory Card or change to a
new Memory Card.
Not formatted!
Stow
The Memory Card needs to format.
Format a Memory Card. ",page 99
There are no images recorded on the
Memory Card.
Record new images.
No file!
Write protect !
When
•
Modes
there
What
Stow
is dew condensation,
The Memory Card is record protected. Release the write protect tab on the
Memory Card.
put
aside
for
a while
before
usinq
is Dew Condensation?
Dewcondensationhappenswhen a DVDCamcorderis movedto a place wherethere is a significanttemperaturedifferencefrom the previousplace in other
words, the water vapor in the air turns into dew becauseof the temperature difference, and it condensates like dew on the external or internal lenses of
the DVDCamcordarand on the reflection lens and the surfaceof the disc which are related to playback When this happens, you temporarilymay not
use the record or play functions of the DVD Camcorder. Also, it may cause a malfunctionor damageto the DVDCamcorderwhen using the device with
the power on while there is dew condensation
• What can I do?
Turn the power off and detach the battery pack, and leave it in a dry area for 1~2 hours before using it
• When does the dew condensation occur?
When the device is relocatedto a place with a higher temperature than the previous location, or when using it in a hot area suddenly,it will cause
condensation
1) When recording outside in cold weather during the winter and then using it in indoors.
2) When recording outside in hot weather after being indoors or inside a car where the AC was running
I
[ ENGLISH
]
Troubleshooting
*:_ tf these instructions do not solve your problem, contact your nearest Samsung authorized service certre.
You cannot switch the DVD Camcorder on.
•
•
Check the Battery Pack or the AC Power adapter.
Replace it with a fully charged battery pack.
•
You have left the DVD Camcorder set to STBY for more than 5 minutes
without using it. To turn on the DVD Camcorder_ press the [Record Start/
Stop] button.
The Battery Pack is fully exhausted. Replace it with a fully charged battery
pack.
The DVD Camcorder shuts off automatically.
•
•
The atmospheric temperature is too low.
•
•
The Battery Pack has not been charged fully.
The Battery Pack is completely dead_ and cannot be recharged_ use
another Battery Pack.
•
A verticat strip appears on the screen when
recording a dark background,
The contrast between the subject and the background is too great for
the DVD Camcorder to operate normally. Make the background bright to
reduce the contrast or use the BLC function while you are recording in
bright surroundings.
The image in the Viewfinder is blurred.
The Viewfinder lens has not been adjusted.
Adjust the Viewfinder control lever until the indicators displayed on the
Viewfinder come into sharp focus.
Charge runs out quickly.
I ENGLISH
I
Troubleshooting
Auto focus does not work.
When the power is turned off and then
turned on, a blue screen appears instead of
Check the Manual Focus menu.
Auto focus does not work in the Manual Focus mode.
= If the DC Adapter is connected, remove the cord, turn on the Power switch,
and then connect it again. If the battery is connected, disconnect iL turn
...............
!hi P°_f2!
Pressing the [Record Start/Stop] button
does not start recording.
i!aga!n:
........................................
Check the [Power] switch is set to [j_(Camera)].
There is not enough free space in the disc. Replace the disc with a new
one or format the disc.
Disc was finalized.
Make sure the disc is writable to record additional pictures.
DVD Camcorder is too hot. Turn off the power and cool it down a while.
Disc is not recognized and the disc cover
opens.
Pressing the [Joystick]
playing.
does not start
= The disc is a damaged one. Replace with a new disc.
Check the [Power] switch is set to [[_(Player)].
Check the disc compatibility.
Make sure the disc was inserted with its writable side facing the
DVD Camcorder.
A disc with data that had been recorded using other devices may not
properly work with this DVD Camcorder.
Do not store the DVD Camcorder in a place subject to strong magnetism.
The LCD is turned off.
Keep away from magnetic materials.
When magnetic material is near the left side of the DVD Camcorder, the
LCD may be turned off but it is not a malfunction.
[ ENGLISH
]
Troubleshooting
,
Check the Power supply (Battery Pack or AC Power Adapter) is properly
connected and stable.
•
A disc with data that had been recorded using other devices may not
Playback screen interrupted unexpectedly,
Cannot play back a recorded DVD-RW/
+RW/-R/+R DL disc.
•
Cannot play back a recorded DVD-RW/
+RW/-R/+R DL disc on a PC.
•
•
properly work with this DVD Camcorder.
A DVD-RW disc recorded in VR mode cannot be played back using a
recorder that does not support VR mode. Refer to the user's manual of
playback device to check compatibility.
Clean the disc using a cleaning cloth.
Finalize the disc (except DVD+RW).
Pushing the [OPEN] switch does not open
the Disc Cover.
Check the Power supply (Battery Pack or AC Power Adapter)is properly
connected and stable.
Detach the Battery Pack from the DVD Camcorder and install it again.
Make sure the Battery Pack is charged.
Disc fanalisation was interrupted by turning the DVD Camcorder off. Turn
the DVD Camcorder on_and take out the disc after finalizing the disc.
Cannot close the Disc Cover.
Make sure the hand strap is not entangled.
Make sure the disc was inserted properly.
When the cover is not closed by an exceptional case, please contact the
local service center.
I ENGLISH
Troubleshooting
Camera
Record
Memory*
Disc Manager
Display
Program AE
White Balance
Selecting the Program AE Function
Setting White Balance
,/
Digital Effect
Setting the Digital special effect
,/
Shutter
Setting the Shutter speed
,/
Exposure
Setting the Exposure value
,/
16:9 Wide
Setting the 16:9 Wide mode
,/
DIS
Selecting the Digital Image Stabilizing
,/
BLC
Performing the backlight compensation
,/
Digital Zoom
Selecting Digital Zoom
,/
Rec Mode
Selecting the recording speed
,/
AV In/Out Im
Wind Cut
Selecting the AV input/output
Minimizing wind noise
Photo Size •
Selecting the Photo Size
Photo Quality
Selecting image Quality
Delete
Deleting Files
'/
97
Delete All
Protect
Deleting all Files
Preventing Accidental Erasure in Memory Card
,/
'/
98
96
Print Mark
Marking images recorded on a Memory Card for Printing
,/
103
Format
Formatting the Memory Card
'/
99
File No
File Numbering Options
Disc Finalize
Finalizing a Disc
,/
80
Disc Unfinalize
Disc Format
Unfinalizing a Disc
Formatting Disc
,/
,/
82
79
Disc Info
LCD Bdght
Providing a Disc Information
Setting the Brightness tone of the LCD Screen
,/
,/
_/
_/
,/
,/
77
36
LCD Color
Date/Time
Setting the Color tones of the LCD Screen
Setting the Date and Time Display
,/
,/
'/
,/
,/
,/
'/
,/
36
37
TV Display
Setting OSD on/off of TV
I: SC-DC175/DC575 only
* : SC-DC173(U)/DC175/DC575 only
o: SC-DC575 only
54
56
,/
58
52
,/
52
60
61
,/
48
62
_/
43
_/
83
51
,/
,/
,/
92
,/
91
,/
93
38
A.
I
[ ENGLISH
]
Troubleshooting
'
System
I
Clock Set
Setting the date/time
,/
,/
,/
,/
3o
Remote III
Using the remote control
v_
'/
v_
'/
31
Beep Sound
Setting the Beep sound
,z
,z
,z
,/
32
Shutter Sound*
Setting the Shutter sound
USB Connect*
Selecting the USB device
Language
Selecting the OSD language
Demonstration
Demonstration
v_
,z
[]: SC-DC175/DC575 only
* : SC-DC173(U)/DC175/DC575 only
•
miniSD TM is a trademark of SD cardAssoclatton
= Manufactured under license from Dolby Laboratories.
= "Dolby" ana the double-D symboI are trademarks of Dotby Laboratories.
•
Othe[ names ana proaucts no[ 11entionedabove may DetraaemarKs or regis[erea
trademarks of their respective com_ anles.
,z
,z
33
'/
109
,/
34
35
I ENGLISH
Miscellaneous information
Disc Type
DVD-R (3 i/2 ")
DVD+R OL (3 I/2 ")
DVD+RW (3 I/2 ")
I
Mode
_
-
_
-
VR (Video Recording)
1.4G
Video
-
Capacity
1.4G
2.EG
Forma_ing a new disc : _page 42
Auto
Auto
Recording '_page 44
O
O
O
O
O
Rewrite
X
X
O
O
O
Playback on other DVD Players _
(FinaEize_ ) '_page 80
O
O
X
O
O '
Playback on other DVD Recorders _ '=page 81
O
O
O
O
O °
Additional recording after finalization (Unfinalize)
_page 82
X
X
O
O
- "[
Editing _page
X
X
O
X
X
X
X
O
O
O
72
Reusing a disc by formatting
(Format) _page 79
1.4G
I
_
O :::
1.4G
O •
= O: possible / X: not possible / -: not needed
d) You must format a new disc before recording on it.
(z; When loading a DVD-RW disc you must format it in Video or VR mode.
G) When loading a DVD+RW disc you must format it.
(,0 We cannot guarantee that you will be able to play back in all other manufacturer's DVD Camcorders, DVD Players/
Recorders, or PC's. For compatibility information, please refer to the manual of the device you wish to play back on.
G) Discs must be finalized before it can be played on standard DVD Players/Recorders.
Refer to page 11for Finalized disc compatibility.
C; You can play back DVD+RW discs on DVD Players/Recorders without finalizing them.
DVD+RW discs do not need to be Finalized/Unfinatized.
(7; When formatting a recorded disc, the data recorded on the disc is deleted and disc capacity is restored, enabling you to
re-use the disc.
I
[ ENGLISH
]
Specifications
_i_
Video signal
PictureCompressionformat
Audio Compressionformat
RecordingQuality
Imagedevice
_i_i_i_i_i_i_i_i_i_i_i_i_i_i_i_i_i_i_i_i_i_i_i_i_i_i_i_i_i_i_i_i_i_i_i_i_i_i_i_i_i_i_i_i_i_i_i_i_i_i_i_i_i_i_i_i_i_i_i_i_i_i_i_i_i_
NTSC
MPEG-2
DOLBY DIGITAL STEREO CREATOR
XP (about9Mbps),SP(about6Mbps),LP (about3Mbps)
SC-DC171/DC173(U)/DC175:
CCD(ChargeCoupledDevice)680Kpixels
SC-DC575:CCD(ChargeCoupledDevice)1M pixels
SC-DC17I/DC173(U)/DC175:F1.634x(Optical),1200x(Digital)Electroniczoomlens
SC-DC575:F1.626x(Optical),1200x(Digital)Electroniczoom lens
_30
Lens
Filterdiameter
Size/dotnumber
LCDScreenMethod
Viewfinder
SC-DO171:25incbs112k
SC-DC173(U)/DC175/DC575:2
7inch 112k
TFT LCD
Color LCD
Video output
Audio output
USBoutput(SC-DC173(U)/DO175/DC575
only)
lVp-p (750 terminated)
-7 5dBs(6000 terminated)
MJni-Btype connector
Powersource
Powersourcetype
Powerconsumption(Recording)
DC84V, LithiumIon BatteryPack74V
LithiumIon BatteryPack,Powersupply (100V_24OV)
50/60Hz
47W ($0-D0171,SC-DC173(U)/DC175,
LCD/VJevvfmder)
51W (SC-D0575,LOD/Viewfinder)
0~40C (32 F~104F)
-20C ~ 60C (-4F ~ 140F)
Height343 inches (87ram),Length476 inches(121ram),Width213 inches(54 ram)
079 Ib (360g, 12.70oz) (Exceptfor LithiumIon BatteryPack)
Omni-directionalstereomicrophone
Indoors:greaterthan49ft (15m) (straightline),Outdoors:about 164 ft (5 m) (straightline)
Operatingtemperature
Storagetemperature
Externaldimensions
Weight
InternalMID
Remotecontrol(SC-DC175/DC575
only)
- These technical
specifications
and design may be changed without notice.
[ ENGLISH
index
Accessories ......................................
Add ....................................................
AF/MF ................................................
AV in/Out ...........................................
13
72
53
83
Hand Strap ....................................... 19
Beep Sound ....................................... 32
BLC .................................................. 48
Joystick .............................................. 26
Clock Set .......................................... 30
Color Nite .......................................... 49
Connection ....................................... 83
Copying ........................................ 86,88
Date/Time ......................................... 37
Delete ...................................... 67,71,74
Demonstration .................................. 35
Digital Effect ..................................... 58
Digital Zoom ...................................... 62
DIS ................................................... 61
Disc Cleaning ...................................... 7
Discs.................................................. 10
EASY.Q Mode ................................... 45
Exposure .......................................... 52
Fade ................................................. 47
Fite No............................................... 93
Finalize .............................................. 80
Format .......................................... 79,99
information ........................................ 77
LCD ..................................................
LCD Enhancer ..................................
LIGHT ................................................
Lithium Ion Battery Pack ...................
36
39
58
21
Print Mark ........................................ 103
Program AE ...................................... 54
Protection ......................................... 96
Q.MENU ............................................ 27
Record Mode ..................................... 43
Remote ............................................. 31
Remote control ................................. 18
Shutter Sound ................................... 33
Shutter Speed .................................. 52
LI
Memory Card .................................... 89
Move .................................................. 73
Moving Image ................................. 100
Thumbnail index ................................ 63
TV Display ......................................... 38
Name ................................................. 78
Unfinatize ........................................... 82
USB interface .......................... 107~114
Operating Modes ............................... 26
OSD ............................................. 28,29
OSD Language .................................. 34
Viewfinder ......................................... 39
Voice Plus ......................................... 87
Partial Delete ................................ 68,75
Photo images ................................... 95
Photo Quality .................................... 91
Photo Size ........................................ 92
PictBridge ........................................ 105
Playlist ............................................... 63
Power Source .................................... 25
White Balance .................................. 56
Wind Cut ........................................... 51
Zoom ................................................ 46
[ ENGLISH
]
Warranty
(SEA users only)
SAMSUNG
LIMITED WARRANTY
SAMSUNG Electronics America Inc. (SEA), warrants that this product is free from defective material and workmanship.
SEA further warrants that if product fails to operate properly within the specified warranty period and the failure is due to
improper workmanship or defective material, SEA wilt repair or replace the product at it's option.
Atl warranty repairs must be performed by a SEA authorized service center. The name and address of the location nearest you
can be obtained by calling toil flee: 1-800 SAMSUNG (1-800-726-7864).
Labor
90 days carry-in
Parts
1 year
On carry-in models, transportation to and from the service center is the customer's responsibility.
The original dated sales receipt must be retained by the customer and is the only acceptable proof of purchase.
It must be presented to the authorized service center.
EXCLUSIONS (WHAT IS NOT COVERED)
This warranty does not cover damage due to accident, fire, flood and/or other acts of God; misuse, incorrect line voltage,
improper installation, improper or unauthorized repairs, commercial use, or damage that occurs in shipping.
Exterior and interior finish, lamps, and glass are not covered under this warranty.
Customer adjustments which are explained in the instruction manual are not covered under the terms of this warranty.
This warranty will automatically be voided for any unit found with a missing or altered serial number. This warranty is valid only
on products purchased in the United States and Puerto Rico.
Some States do not allow the exclusions or limitations of incidental or consequential damages, or allow limitations on
how long an implied warranty lasts, so the above limitations or exclusions may not apply to you.
This warranty gives you specific legal rights, and you may also have other rights which vary from State to State.
I ENGLISH
Contact SAMSUNG WORLD WIDE
If you have any questions or comments relating to Samsung products, please contact the SAMSUNG customer care center.
Reqion
Noah America
Latin America
Country
CANADA
MEXICO
USA
ARGFNTINE
BRAZIL
CHILE
COSTA RICA
ECUADOR
EL SALVADOR
GUATFMALA
JAMAICA
PANAMA
PUERTO RICO
RER DOMINICA
TRINIDAD & TOBAGO
VENEZUFLA
COLOMBIA
BELGIUM
CZECH REPUBLIC
Kulope
CIS
Asia Pattie
Middle East & AIiica
DENMARK
FINLAND
FRANCF
GERMANY
HUNGARY
_TALIA
LUXEMBURG
NETHERLANDS
NORWAY
POLAND
PORTUGAL
SLOVAK A
SPAIN
SWEDEN
UK
Repubic of Ireand
Sw tzedand
RUSSIA
KAZAHSTAN
UZBEt(]STAN
UKRAINE
LITHUANIA
LATVIA
ESTONIA
AUSTRAUA
CHINA
HONG KONG
_ND]A
_NDONESIA
JAPAN
MALAYS A
PH]UPPINES
SINGAPORE
THAILAND
TAIWAN
VIETNAM
SOUTH AFRICA
UAE
Customer Care Center
/ 800 SAMSUNG 17267864)
01 800 SAMSUNG 17267864)
/ 800 SAMSUNG 17267864)
0800 333 3733
0800 124 421 4004 0%0
800 726 7864 (SAMSUNG)
0 800 507 7267
/ 800 /0 7267
800 6225
/ 800 299 0013
/ 800 234 7267
800 7267
/ 800 682 3/80
/ 800 75/ 2676
/ 800 7267 864
0 800 100 5303
01 8000112112
02 201 24/8
844 000 844
Distl butor pro 0esko_ republiku Samsuna Z_, _eska olaan za_ni slczka Vysko_ilova 4 14000 Praha 4
38 322 887
09 693 7g 554
3260 SAMSUNG or 08 25 08 65 65/€ 015/Mn)
01805 1212/3 l{ 0/4/Mini
06 80 SAMSUNG 17267864)
800 SAMSUNG 17267864/
003210/2 201 24/8
0900 20 200 88 (_ 0 10/Min/
23/ 627 22
0 801 80/ 88/
80 8 200/28
0800 SAMSUNG (7267861
902/0//
30
08 585 367 87
0870 SAMSUNG (72678641
08/8 717/00
0800 7267864
8 800 200 0400
8 800 080//88
8 800 120 0400
8 800 502 0000
8 800 77777
800 7267
800 7267
/300 362 603
800 8/0 5858 010 6475/880
3698 4698
3030 8282,/800110011
0800 112 8888
0/20 327 527
/800 88 9999
1800 I 0 SAMSUNG {7267864/
/800 SAMSUNG (7267864)
/800 29 3232 02 689 3232
0800 329 999
I 800 588 889
0860 7267864 (SAMSUNG)
800SAMSUNG 172678641 8000 4726
Web Site
www samsuna corn/ca
www samsuna corn/rex
wvcwsamsuna corn
wvcwsamsuna com/ar
www samsuna com/br
www samsuna com/d
wvcwsamsuna corn/latin
wvcwsamsuna corn/latin
www samsuna corn/latin
www samsuna corn/latin
wvcwsamsuna corn/latin
wvcwsamsuna corn/latin
www samsuna corn/latin
www samsuna corn/latin
wvcwsamsuna corn/latin
wvcwsamsung corn/latin
www samsung corn co
wvcwsamsuna corn/be
wvcwsamsung
wvcwsamsuna
www samsuna
www samsuna
wvcwsamsuna
wvcwsamsuna
www samsuna
www samsuna
wvcwsamsuna
wvcwsamsuna
www samsuna
www samsuna
wvcwsamsuna
wvcwsamsuna
www samsuna
www samsuna
www samsung
www samsung
wvcwsamsung
wvcwsamsung
wvcwsamsung
wvcwsamsung
www samsung
www samsung
www samsuna
www samsung
wvcwsamsuna
wvcwsamsung
www samsuna
www samsung
wvcwsamsuna
wvcwsamsung
www samsuna
www samsung
wvcwsamsuna
wvcwsamsung
www samsuna
www samsung
wvcwsamsuna
com/cz
com/dk
com/f_
com/fr
de
com/h_
corn/it
lu
com/n_
corn/no
com/_
com/_t
com/sk
com/es
com/se
com/uk
com/uk
corn/oh
ru
kz
uz
com/u_
It
corn/Iv/index htm
ee
com/au
corn cn
com/hk
corn/in
com/id
corn@
corn/my
com/_h
com/sg
com/th
com/tw
com/vn
com/za
com/mea
I
[ ENGLISH
]
THiS DVD CAMCORDER
IS MANUFACTURED
BY:
If you have any questions or comments relating to
Samsung products, please contact the SAMSUNG
customer care center Samsung Electronics America, inc.
1-8OO-SAMSUNG(726-7864)
www.samsung.con_
RollS compliant
Our product complies with "The Restriction Of the use of certain
Hazardous Substances in electrical and electronic equipment", and we
do not use the 6 hazardous materials- Cadmium(Cd), Lead (Pb), Mercury
(Hg), Hexavalent Chromium (Or÷6), Poly arominated aiphenyls
Poly arominated Diphenyl Ethers(PBDEs}- in our products,
(PBas),