1
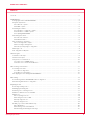
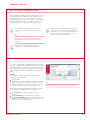
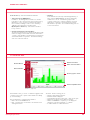
3.0
DATA CENTER
FOR TOPLINE 2009/2012, THE ROX SERIES and running watches
www.sigmasport.com
SIGMA Data Center 3
Contents
1 Foreword. . . . . . . . . . . . . . . . . . . . . . . . . . . . . . . . . . . . . . . . . . . . . . . . . . . . . . . . . . . . . . . . . . . . . . . . . . . . . . . . . . . . . . . . . . . . . . . . . . . . . . . . . . . . . . . 3
2 DATA CENTER 3 . . . . . . . . . . . . . . . . . . . . . . . . . . . . . . . . . . . . . . . . . . . . . . . . . . . . . . . . . . . . . . . . . . . . . . . . . . . . . . . . . . . . . . . . . . . . . . . . . . . . . . . . 4
2.1Using Sigma devices with DATA CENTER 3. . . . . . . . . . . . . . . . . . . . . . . . . . . . . . . . . . . . . . . . . . . . . . . . . . . . . . . . . . . . . . . . . . . . . . . . . . . . 4
2.2System requirements. . . . . . . . . . . . . . . . . . . . . . . . . . . . . . . . . . . . . . . . . . . . . . . . . . . . . . . . . . . . . . . . . . . . . . . . . . . . . . . . . . . . . . . . . . . . . . 4
2.2.1 Windows computer. . . . . . . . . . . . . . . . . . . . . . . . . . . . . . . . . . . . . . . . . . . . . . . . . . . . . . . . . . . . . . . . . . . . . . . . . . . . . . . . . . . . . . . . . . . 4
2.2.2 MAC computer. . . . . . . . . . . . . . . . . . . . . . . . . . . . . . . . . . . . . . . . . . . . . . . . . . . . . . . . . . . . . . . . . . . . . . . . . . . . . . . . . . . . . . . . . . . . . . . 5
2.3Installing the software. . . . . . . . . . . . . . . . . . . . . . . . . . . . . . . . . . . . . . . . . . . . . . . . . . . . . . . . . . . . . . . . . . . . . . . . . . . . . . . . . . . . . . . . . . . . . . 5
2.3.1 Installation on a Windows computer . . . . . . . . . . . . . . . . . . . . . . . . . . . . . . . . . . . . . . . . . . . . . . . . . . . . . . . . . . . . . . . . . . . . . . . . . . . . 5
2.3.2 Installation on a MAC computer. . . . . . . . . . . . . . . . . . . . . . . . . . . . . . . . . . . . . . . . . . . . . . . . . . . . . . . . . . . . . . . . . . . . . . . . . . . . . . . . 5
2.3.3 Updating DATA CENTER. . . . . . . . . . . . . . . . . . . . . . . . . . . . . . . . . . . . . . . . . . . . . . . . . . . . . . . . . . . . . . . . . . . . . . . . . . . . . . . . . . . . . . . 5
2.4Activating the software . . . . . . . . . . . . . . . . . . . . . . . . . . . . . . . . . . . . . . . . . . . . . . . . . . . . . . . . . . . . . . . . . . . . . . . . . . . . . . . . . . . . . . . . . . . . . 6
2.4.1 Automatic activation. . . . . . . . . . . . . . . . . . . . . . . . . . . . . . . . . . . . . . . . . . . . . . . . . . . . . . . . . . . . . . . . . . . . . . . . . . . . . . . . . . . . . . . . . . 6
2.4.2 Manual activation. . . . . . . . . . . . . . . . . . . . . . . . . . . . . . . . . . . . . . . . . . . . . . . . . . . . . . . . . . . . . . . . . . . . . . . . . . . . . . . . . . . . . . . . . . . . . 6
2.5Connecting the docking station . . . . . . . . . . . . . . . . . . . . . . . . . . . . . . . . . . . . . . . . . . . . . . . . . . . . . . . . . . . . . . . . . . . . . . . . . . . . . . . . . . . . . . 7
2.5.1 Connecting a bike computer . . . . . . . . . . . . . . . . . . . . . . . . . . . . . . . . . . . . . . . . . . . . . . . . . . . . . . . . . . . . . . . . . . . . . . . . . . . . . . . . . . . 7
2.5.2 Connecting a running watch . . . . . . . . . . . . . . . . . . . . . . . . . . . . . . . . . . . . . . . . . . . . . . . . . . . . . . . . . . . . . . . . . . . . . . . . . . . . . . . . . . . 7
2.5.3 Retrospectively using a docking station. . . . . . . . . . . . . . . . . . . . . . . . . . . . . . . . . . . . . . . . . . . . . . . . . . . . . . . . . . . . . . . . . . . . . . . . . . 8
2.6Data type icons. . . . . . . . . . . . . . . . . . . . . . . . . . . . . . . . . . . . . . . . . . . . . . . . . . . . . . . . . . . . . . . . . . . . . . . . . . . . . . . . . . . . . . . . . . . . . . . . . . . . 8
2.7Docking station’s LED panel. . . . . . . . . . . . . . . . . . . . . . . . . . . . . . . . . . . . . . . . . . . . . . . . . . . . . . . . . . . . . . . . . . . . . . . . . . . . . . . . . . . . . . . . . 8
3 Quick start guide . . . . . . . . . . . . . . . . . . . . . . . . . . . . . . . . . . . . . . . . . . . . . . . . . . . . . . . . . . . . . . . . . . . . . . . . . . . . . . . . . . . . . . . . . . . . . . . . . . . . . . . . 9
3.1Evaluation in five steps. . . . . . . . . . . . . . . . . . . . . . . . . . . . . . . . . . . . . . . . . . . . . . . . . . . . . . . . . . . . . . . . . . . . . . . . . . . . . . . . . . . . . . . . . . . . . . 9
3.2Interface description . . . . . . . . . . . . . . . . . . . . . . . . . . . . . . . . . . . . . . . . . . . . . . . . . . . . . . . . . . . . . . . . . . . . . . . . . . . . . . . . . . . . . . . . . . . . . 10
3.3Key terms, icons and functions . . . . . . . . . . . . . . . . . . . . . . . . . . . . . . . . . . . . . . . . . . . . . . . . . . . . . . . . . . . . . . . . . . . . . . . . . . . . . . . . . . . . 10
3.3.1 Functions for all SIGMA devices . . . . . . . . . . . . . . . . . . . . . . . . . . . . . . . . . . . . . . . . . . . . . . . . . . . . . . . . . . . . . . . . . . . . . . . . . . . . . . 10
3.3.2 Functions for devices with a LOG function . . . . . . . . . . . . . . . . . . . . . . . . . . . . . . . . . . . . . . . . . . . . . . . . . . . . . . . . . . . . . . . . . . . . . 11
4 Before training for the first time. . . . . . . . . . . . . . . . . . . . . . . . . . . . . . . . . . . . . . . . . . . . . . . . . . . . . . . . . . . . . . . . . . . . . . . . . . . . . . . . . . . . . . . . . 11
4.1 Creating a new device. . . . . . . . . . . . . . . . . . . . . . . . . . . . . . . . . . . . . . . . . . . . . . . . . . . . . . . . . . . . . . . . . . . . . . . . . . . . . . . . . . . . . . . . . . . . 11
4.1.1 With a docking station . . . . . . . . . . . . . . . . . . . . . . . . . . . . . . . . . . . . . . . . . . . . . . . . . . . . . . . . . . . . . . . . . . . . . . . . . . . . . . . . . . . . . . 12
4.1.2 Without a docking station . . . . . . . . . . . . . . . . . . . . . . . . . . . . . . . . . . . . . . . . . . . . . . . . . . . . . . . . . . . . . . . . . . . . . . . . . . . . . . . . . . . 12
4.2Configuring the device settings with DATA CENTER 3 . . . . . . . . . . . . . . . . . . . . . . . . . . . . . . . . . . . . . . . . . . . . . . . . . . . . . . . . . . . . . . . . 13
5 After training. . . . . . . . . . . . . . . . . . . . . . . . . . . . . . . . . . . . . . . . . . . . . . . . . . . . . . . . . . . . . . . . . . . . . . . . . . . . . . . . . . . . . . . . . . . . . . . . . . . . . . . . . . 14
5.1Transferring data into DATA CENTER 3 with a docking station. . . . . . . . . . . . . . . . . . . . . . . . . . . . . . . . . . . . . . . . . . . . . . . . . . . . . . . . . 14
5.2 Transferring data without a docking station . . . . . . . . . . . . . . . . . . . . . . . . . . . . . . . . . . . . . . . . . . . . . . . . . . . . . . . . . . . . . . . . . . . . . . . . . 15
6 Organizing the data. . . . . . . . . . . . . . . . . . . . . . . . . . . . . . . . . . . . . . . . . . . . . . . . . . . . . . . . . . . . . . . . . . . . . . . . . . . . . . . . . . . . . . . . . . . . . . . . . . . . 16
6.1Selecting a training session . . . . . . . . . . . . . . . . . . . . . . . . . . . . . . . . . . . . . . . . . . . . . . . . . . . . . . . . . . . . . . . . . . . . . . . . . . . . . . . . . . . . . . . 16
6.2Managing the training data. . . . . . . . . . . . . . . . . . . . . . . . . . . . . . . . . . . . . . . . . . . . . . . . . . . . . . . . . . . . . . . . . . . . . . . . . . . . . . . . . . . . . . . . 16
6.3Entering notes on training sessions . . . . . . . . . . . . . . . . . . . . . . . . . . . . . . . . . . . . . . . . . . . . . . . . . . . . . . . . . . . . . . . . . . . . . . . . . . . . . . . . 17
6.4Difference between memories and LOGs. . . . . . . . . . . . . . . . . . . . . . . . . . . . . . . . . . . . . . . . . . . . . . . . . . . . . . . . . . . . . . . . . . . . . . . . . . . . 17
6.5Memories. . . . . . . . . . . . . . . . . . . . . . . . . . . . . . . . . . . . . . . . . . . . . . . . . . . . . . . . . . . . . . . . . . . . . . . . . . . . . . . . . . . . . . . . . . . . . . . . . . . . . . . 18
6.5.1 Comparing memories. . . . . . . . . . . . . . . . . . . . . . . . . . . . . . . . . . . . . . . . . . . . . . . . . . . . . . . . . . . . . . . . . . . . . . . . . . . . . . . . . . . . . . . 18
6.5.2 Saving memories as a PDF . . . . . . . . . . . . . . . . . . . . . . . . . . . . . . . . . . . . . . . . . . . . . . . . . . . . . . . . . . . . . . . . . . . . . . . . . . . . . . . . . . 18
6.5.3 Exporting memories . . . . . . . . . . . . . . . . . . . . . . . . . . . . . . . . . . . . . . . . . . . . . . . . . . . . . . . . . . . . . . . . . . . . . . . . . . . . . . . . . . . . . . . . 19
6.5.4 Importing memories . . . . . . . . . . . . . . . . . . . . . . . . . . . . . . . . . . . . . . . . . . . . . . . . . . . . . . . . . . . . . . . . . . . . . . . . . . . . . . . . . . . . . . . . 19
6.6LOGs (only for devices with a LOG function) . . . . . . . . . . . . . . . . . . . . . . . . . . . . . . . . . . . . . . . . . . . . . . . . . . . . . . . . . . . . . . . . . . . . . . . . . 20
6.6.1 LOG interface. . . . . . . . . . . . . . . . . . . . . . . . . . . . . . . . . . . . . . . . . . . . . . . . . . . . . . . . . . . . . . . . . . . . . . . . . . . . . . . . . . . . . . . . . . . . . . 20
6.6.2 Creating a customized LOG view. . . . . . . . . . . . . . . . . . . . . . . . . . . . . . . . . . . . . . . . . . . . . . . . . . . . . . . . . . . . . . . . . . . . . . . . . . . . . . 21
6.6.3 Delimiting and trimming the value range. . . . . . . . . . . . . . . . . . . . . . . . . . . . . . . . . . . . . . . . . . . . . . . . . . . . . . . . . . . . . . . . . . . . . . . 21
www.sigmasport.com
2
SIGMA Data Center 3
Contents
6.6.4 Selecting the values for the chart. . . . . . . . . . . . . . . . . . . . . . . . . . . . . . . . . . . . . . . . . . . . . . . . . . . . . . . . . . . . . . . . . . . . . . . . . . . . . 22
6.6.5 Editing a break . . . . . . . . . . . . . . . . . . . . . . . . . . . . . . . . . . . . . . . . . . . . . . . . . . . . . . . . . . . . . . . . . . . . . . . . . . . . . . . . . . . . . . . . . . . . . 22
6.6.6 Editing a lap. . . . . . . . . . . . . . . . . . . . . . . . . . . . . . . . . . . . . . . . . . . . . . . . . . . . . . . . . . . . . . . . . . . . . . . . . . . . . . . . . . . . . . . . . . . . . . . . 23
6.6.7 Printing a LOG . . . . . . . . . . . . . . . . . . . . . . . . . . . . . . . . . . . . . . . . . . . . . . . . . . . . . . . . . . . . . . . . . . . . . . . . . . . . . . . . . . . . . . . . . . . . . 23
6.6.8 Exporting a LOG. . . . . . . . . . . . . . . . . . . . . . . . . . . . . . . . . . . . . . . . . . . . . . . . . . . . . . . . . . . . . . . . . . . . . . . . . . . . . . . . . . . . . . . . . . . . 24
6.6.9 Importing a LOG. . . . . . . . . . . . . . . . . . . . . . . . . . . . . . . . . . . . . . . . . . . . . . . . . . . . . . . . . . . . . . . . . . . . . . . . . . . . . . . . . . . . . . . . . . . . 24
6.6.10 Comparing LOGs. . . . . . . . . . . . . . . . . . . . . . . . . . . . . . . . . . . . . . . . . . . . . . . . . . . . . . . . . . . . . . . . . . . . . . . . . . . . . . . . . . . . . . . . . . 25
6.6.11 Transferring a GHOST RACE (ROX 9.1 and above) . . . . . . . . . . . . . . . . . . . . . . . . . . . . . . . . . . . . . . . . . . . . . . . . . . . . . . . . . . . . 25
7 Statistics . . . . . . . . . . . . . . . . . . . . . . . . . . . . . . . . . . . . . . . . . . . . . . . . . . . . . . . . . . . . . . . . . . . . . . . . . . . . . . . . . . . . . . . . . . . . . . . . . . . . . . . . . . . . . 26
7.1 Statistics area. . . . . . . . . . . . . . . . . . . . . . . . . . . . . . . . . . . . . . . . . . . . . . . . . . . . . . . . . . . . . . . . . . . . . . . . . . . . . . . . . . . . . . . . . . . . . . . . . . . 26
7.2 Activating or deactivating memories or LOGs for the statistics . . . . . . . . . . . . . . . . . . . . . . . . . . . . . . . . . . . . . . . . . . . . . . . . . . . . . . . . 27
7.3 Updating and viewing total values . . . . . . . . . . . . . . . . . . . . . . . . . . . . . . . . . . . . . . . . . . . . . . . . . . . . . . . . . . . . . . . . . . . . . . . . . . . . . . . . . . 27
8 Filtering data. . . . . . . . . . . . . . . . . . . . . . . . . . . . . . . . . . . . . . . . . . . . . . . . . . . . . . . . . . . . . . . . . . . . . . . . . . . . . . . . . . . . . . . . . . . . . . . . . . . . . . . . . . 28
8.1 Saving new filters . . . . . . . . . . . . . . . . . . . . . . . . . . . . . . . . . . . . . . . . . . . . . . . . . . . . . . . . . . . . . . . . . . . . . . . . . . . . . . . . . . . . . . . . . . . . . . . . 28
8.2 Using saved filters. . . . . . . . . . . . . . . . . . . . . . . . . . . . . . . . . . . . . . . . . . . . . . . . . . . . . . . . . . . . . . . . . . . . . . . . . . . . . . . . . . . . . . . . . . . . . . . . 28
8.3 Modifying filters. . . . . . . . . . . . . . . . . . . . . . . . . . . . . . . . . . . . . . . . . . . . . . . . . . . . . . . . . . . . . . . . . . . . . . . . . . . . . . . . . . . . . . . . . . . . . . . . . . 29
8.4 Deleting filters. . . . . . . . . . . . . . . . . . . . . . . . . . . . . . . . . . . . . . . . . . . . . . . . . . . . . . . . . . . . . . . . . . . . . . . . . . . . . . . . . . . . . . . . . . . . . . . . . . . 29
9 Maintenance. . . . . . . . . . . . . . . . . . . . . . . . . . . . . . . . . . . . . . . . . . . . . . . . . . . . . . . . . . . . . . . . . . . . . . . . . . . . . . . . . . . . . . . . . . . . . . . . . . . . . . . . . . 30
9.1 Checking the battery status . . . . . . . . . . . . . . . . . . . . . . . . . . . . . . . . . . . . . . . . . . . . . . . . . . . . . . . . . . . . . . . . . . . . . . . . . . . . . . . . . . . . . . . 30
9.2 Deleting the LOG memory. . . . . . . . . . . . . . . . . . . . . . . . . . . . . . . . . . . . . . . . . . . . . . . . . . . . . . . . . . . . . . . . . . . . . . . . . . . . . . . . . . . . . . . . . 30
9.3 Modifying device settings and copying them to the device. . . . . . . . . . . . . . . . . . . . . . . . . . . . . . . . . . . . . . . . . . . . . . . . . . . . . . . . . . . . . 31
9.4 Exporting device settings. . . . . . . . . . . . . . . . . . . . . . . . . . . . . . . . . . . . . . . . . . . . . . . . . . . . . . . . . . . . . . . . . . . . . . . . . . . . . . . . . . . . . . . . . . 31
9.5 Importing device settings . . . . . . . . . . . . . . . . . . . . . . . . . . . . . . . . . . . . . . . . . . . . . . . . . . . . . . . . . . . . . . . . . . . . . . . . . . . . . . . . . . . . . . . . . 31
9.6 Modifying the storage location for the database . . . . . . . . . . . . . . . . . . . . . . . . . . . . . . . . . . . . . . . . . . . . . . . . . . . . . . . . . . . . . . . . . . . . . 32
9.7 Optimizing the database . . . . . . . . . . . . . . . . . . . . . . . . . . . . . . . . . . . . . . . . . . . . . . . . . . . . . . . . . . . . . . . . . . . . . . . . . . . . . . . . . . . . . . . . . . 32
10 FAQ – frequently asked questions. . . . . . . . . . . . . . . . . . . . . . . . . . . . . . . . . . . . . . . . . . . . . . . . . . . . . . . . . . . . . . . . . . . . . . . . . . . . . . . . . . . . . . 33
1 Foreword
Congratulations on choosing a SIGMA SPORT® device and opting
to use DATA CENTER 3. DATA CENTER 3 enables you to evaluate
your training sessions and conveniently monitor the success of
your training on your computer.
www.sigmasport.com
To quickly grasp the DATA CENTER 3 functions, please read this
software manual carefully. We at SIGMA SPORT® hope you enjoy
using DATA CENTER 3 and monitor your training successfully.
3
SIGMA Data Center 3
2 Data Center 3
The DATA CENTER 3 software enables you to evaluate your
SIGMA device’s data on a computer or MAC. There are three
types of data:
–Memory
–LOGs
– Device settings
Note:
For information about which data your device provides, please
see your device’s operating instructions. To optimally use
this data with the software, we recommend that you use an
optionally available docking station. This enables you to directly
transmit the data between your device and DATA CENTER 3.
2.1 Using Sigma devices with Data Center 3
You can use DATA CENTER 3 with the following Sigma devices:
Bike computers:
– BC 509
– BC 512
– BC 8.12 and 8.12 ATS
– BC 1009 and BC 1009 STS
– BC 12.12 and BC 12.12 STS
– BC 14.12 ALTI
– BC 1609 and BC 1609 STS
– BC 16.12 and BC 16.12 STS/CAD
– BC 1909 HR
– BC 2209 TARGA/MHR
– ROX 8.0
– ROX 8.1
– ROX 9.0
– ROX 9.1
whether used manually or automatically, DATA CENTER 3
always only displays the data that goes with the devices.
Use your keyboard to enter the values into the software.
Depending on the product, the following values can be entered
in DATA CENTER 3:
–Cumulative totals values for the device – for example total
distance.
– Memory with all the values recorded for the device –
for example the training time.
– LOGs – for example the route’s elevation profile
DATA CENTER 3 provides the following options:
–
–
–
–
Running watches:
– RC 1209
– RC 14.11
If you have a docking station, your device will be automatically
identified and you can import the values into the software.
If you do not have a docking station, you need to create a SIGMA
device manually. DATA CENTER 3 will then only display the
functions of relevance to the selected SIGMA product as
View and print total values
View, compare and print training sessions and add notes
View detailed statistics
The docking station enables you to conveniently change the
device settings in DATA CENTER 3 and transmit these to
the device.
Note:
For information about which values are displayed and saved
in your SIGMA device, please see the device operating
instructions.
2.2 System requirements
2.2.1 Windows computer
The following software and hardware is required to use DATA CENTER 3:
Minimum
–
–
–
Recommended
x86-compatible processor with at least 2.33 GHz or Intel
Atom™ with at least 1.6 GHz for netbooks
512 MB RAM
Microsoft® Windows® XP Home, Professional or Tablet PC
Edition with Service Pack 3, Windows Server® 2003,
Windows Server 2008, Windows Vista® Home Premium,
Business, Ultimate or Enterprise (also 64 Bit) with Service
Pack 2 or Windows 7
www.sigmasport.com
®
– Intel® Pentium® IV processor
– 1 GB RAM
4
SIGMA Data Center 3
2.2.2 MAC computer
The following software and hardware is required to use DATA CENTER 3:
–Intel Core™ Duo or a faster processor
– 512 MB RAM (1 GB recommended)
–MacOs X Version 10.6 or 10.7
2.3 Installing the software
2.3.1 Installation on a Windows computer
1 Before
starting the installation, close all running applications.
Start the file DataCenter_3.exe.
3 Follow the on-screen installation instructions.
4 Start the application.
2
2.3.2 Installation on a MAC computer
1 Before
starting the installation, close all running applications.
Start the file DataCenter3Setup.dmg.
3 Follow the on-screen installation instructions.
4 Start the application.
2
2.3.3 Updating Data Center
DATA CENTER 3.0 is installed alongside an existing
DATA CENTER. The data in the existing DATA CENTER
is not affected.
When you start DATA CENTER for the first time, a database
update may be automatically started.
1
Start DATA CENTER 3.
Start update.
3 Wait until the update is complete.
4 Click Start Data Center.
2 Select
www.sigmasport.com
Important:
Depending on your computer and the volume of data, the
data transfer may take several minutes. Do not cancel the
database update once it has started as not all the data may
be transferred into the new database.
Updating from version 1 to version 3
It is not possible to automatically transfer data from
DATA CENTER 1 to DATA CENTER 3. However, you can
simply import the memory and LOGs into DATA CENTER 3
once installation is complete.
5
SIGMA Data Center 3
2.4 Activating the software
Activation is only required once per installation and can occur
automatically (recommended) via the Internet. If your computer
does not have an Internet connection, activate the software
manually. You can use all the DATA CENTER 3 functions without
activating it but will only be able to start the software 20 times.
After that, it must be activated.
The activation is always valid for the current operating system.
If a new operating system is installed, nothing prevents
re-activation.
For information on the number of systems on which activation is
possible, please see the license terms.
2.4.1 Automatic activation
To activate the software, you need the license key that you have
received from the online shop or have been provided in the CD
cover. As a registered user, you can also view the license key in
the online shop.
DATA CENTER 3. The Software activation window is
displayed.
2 Enter the license key.
3 Click Automatic.
4 Click Next. Once the key has been successfully validated,
the software is activated. You can now start DATA CENTER
or terminate the activation.
Note:
If you receive an error message, please check the license key
that you have entered.
1 Start
Tip:
If you register in the online shop and enter your license key
from the CD cover in the shop, you will receive free updates.
2.4.2 Manual activation
If you have installed DATA CENTER 3 on a computer without an
Internet connection, you can manually activate DATA CENTER 3.
To activate the software, you need the license key that you have
received from the online shop or have been provided in the CD
cover.
Prerequisite: you need access to the SIGMA online shop as this
is the only place from which you can receive the unlock code.
Generate the activation code in DATA CENTER 3
1 Start DATA CENTER 3. The software activation window is
displayed.
2 Enter the license key.
3 Click Manual. You will receive an activation code.
4 Click Print. A PDF with the activation code is displayed and
can be printed.
www.sigmasport.com
Obtain the unlock code from the SIGMA online shop
1 Use another computer or a smartphone to connect to the
online shop.
2 LOG in.
3 Enter the activation code in the online shop. You will receive
an unlock code.
Complete the activation process in DATA CENTER 3
1 Enter the unlock code from the online shop into the
DATA CENTER 3 activation window.
2 Click Next. Activation is complete. You can now start
DATA CENTER 3.
6
SIGMA Data Center 3
2.5 Connecting the docking station
A docking station is available for many SIGMA SPORT devices.
Depending on the device, the docking station either comes with
the product or can be purchased as
an accessory. The docking station
enables you to transmit the values
from your SIGMA device to DATA
CENTER 3 and copy device settings.
You can connect the docking station
to your computer via a USB interface.
Important:
Do you use Sony Ericsson PC Suite or Nokia PC Suite? Before
connecting the docking station, end and deactivate the process
PCSuite.exe or SEPCSuite.exe and ensure that DATA CENTER 3
has been installed.
2.5.1 Connecting a bike computer
Prerequisite: DATA CENTER 3 has already been installed.
You have a ROX: the device must not be in the setting menu.
You have a TOPLINE device: the device must not be in sleep
mode or the setting menu.
2
Twist the SIGMA device into the
docking station.
1 Connect the docking station to your computer’s USB
interface.
PC
USE
Note:
If you are connecting the
docking station to your
computer for the first
time, it will be identified
as new hardware and the
driver will be installed.
You must agree to the
driver’s installation.
3 Start DATA CENTER 3. The device will be automatically
detected as a new device and the New device window will be
displayed.
4 Enter a name.
5 Save the new device.
2.5.2 Connecting a running watch
Prerequisite: DATA CENTER 3 has already been installed.
You have a running watch:
The device must be in sleep mode.
2
3
Open the docking station’s bracket.
Insert the running watch.
Tip:
1
Connect the docking station to your computer’s USB
interface.
PC
USE
Note:
If you are connecting the
docking station to your
computer for the first time,
it will be identified as new
hardware and the driver will
be installed. You must agree
to the driver’s installation.
www.sigmasport.com
Ensure that the two noses on the top
of the bracket lock into place on the
left and right.
4
If the connection has been correctly
made, the LED will illuminate as a
steady green light.
5 Start DATA CENTER 3. The device will be automatically
detected as a new device and the New device window will be
displayed.
6 Enter a name.
7 Save the new device.
7
SIGMA Data Center 3
2.5.3 Retrospectively using a docking station
Docking stations are available for many SIGMA devices from
specialist retailers or at www.sigma-data-center.com. The
docking station drivers are automatically installed when you
install DATA CENTER 3. If you have previously used your keyboard
to enter your training data for your SIGMA device, this will not be
lost. The new data that you now import using the docking station
will be assigned to the manually created device.
Example:
You have already manually entered training data for your SIGMA
device in DATA CENTER 3 and are now using a docking station
for the first time.
1
Start DATA CENTER 3.
Connect the docking station to the computer
(see ‘Connecting a docking station’ on page 8).
3 Connect your SIGMA device to the docking station.
DATA CENTER 3 automatically identifies your SIGMA device
as a new device and checks whether you have already created
devices of the same type.
4 Select the existing SIGMA device from the Save as
drop-down menu.
5 Click Save. The data is displayed on the dashboard.
2
Note:
If DATA CENTER 3 only contains one device with the same
device type, this is automatically entered.
2.6 Data type icons
Memory
Indicates the memory in lists and windows
LOG
Indicates LOGs in lists and windows
Device settings
Indicates data for the device settings
2.7 Docking station’s LED panel
An LED panel that informs you about the docking station’s mode can be found on its front or top.
LED panel on the Topline docking station
Docking station LED panel for the ROX series and
running watches
Docking station
mode
Green LED
Red LED
Docking station
mode
Green LED
Red LED
Sleep mode
Flashing
Off
Sleep mode
Off
On
Waiting for communication
On
Off
Waiting for communication
On
Off
Communication
with PC
On
On
Communication
with PC
Flashing
Off
www.sigmasport.com
8
SIGMA Data Center 3
3 Quick start guide
The quick start guide provides experienced computer users
with the key information about DATA CENTER 3. It guides you
through the evaluation process in five steps, describes the
interface structure and explains the important icons and
functions.
3.1 Evaluation in five steps
Without a docking station
With a docking station
1
Start the software.
2 Manually create the Sigma device.
3 Manually enter the values.
4 Select the training session.
5 Evaluate, compare or edit the training data etc.
1 Start
Start screen without a docking station
Start screen with a docking station
www.sigmasport.com
the software.
Insert the Sigma device into the docking station.
3 Import the data.
4 Select the training session or LOG.
5 Evaluate, compare or edit the training data or LOG etc.
2
9
SIGMA Data Center 3
3.2 Interface description
Area functions
Menu
Dashboard with the data
of the connected SIGMA
device
Area displaying values
The example shows
the dashboard with
a connected ROX 9.0
Dashboard
3.3 Key terms, icons and functions
3.3.1 Functions for all Sigma devices
Back
Go back to the previous page.
Import data from file
Import a file with training data or device settings.
Export selected data
Export device settings or training data as a file.
Print
Print the evaluation displayed – training session,
LOG or statistics
Generate a memory
Manually create a memory or a new set for device
settings.
Create copy
Create an editable copy of the device settings
displayed.
Set filter
Create a new filter or edit or delete existing filters for
evaluations in the Training data and Statistics areas.
Open or close all tabs
Upload from device
Import data into DATA CENTER 3 from your
SIGMA device using a docking station
Export to device
Transfer device settings from DATA CENTER 3
to your SIGMA device using a docking station.
www.sigmasport.com
Comparison
Compare two memories or LOGs
Switch between speed and pace
The data is displayed in km/h or min/km. The unit on
the Y-axis changes in the LOG file window.
10
SIGMA Data Center 3
3.3.2 Functions for devices with a LOG function
Special functions are available for evaluating LOGs.
Drag elements
The drag elements can be dragged and dropped into the upper and lower content areas (drop zone) to create the interface.
Target and intensity zone
The evaluation is displayed in table format plus as
a pie chart or bar chart.
Values
Drag and drop a value table into the content area
(drop zone).
Chart
Drag and drop a chart into the content area
(drop zone).
Chart functions
Zoom slider
Click a point on the scale or drag the arrow to
zoom in and out of the chart. To finely adjust the
zoom, click the plus or minus buttons.
Timeline
Move the green arrow to a specific point to view the
values for it. Use the red arrows to set the limits for
the value range.
Menu with LOG functions
Click Menu to view additional functions.
Time/distance icon
Switch between the units hours and kilometers
on the X-axis.
Adjust altitude
Retrospectively correct the start altitude and
recalculate the elevation profile.
Speed/pace
Switch between km/h and min/km for your
speed/pace.
Previous or next LOG entry
Move the green arrow on the timeline from LOG entry
to LOG entry to specifically select individual LOG entries in the record.
Trim LOG
Trim the LOG at the start and end to shorten the
distance.
The example ‘Delimiting and trimming the value range’ (page 21) shows how you can use the functions effectively.
4 Before training for the first time
Before starting training for the first time, you should create the
device in DATA CENTER 3. The docking station also enables you
to check and modify the device settings and transfer these to
your SIGMA device again.
4.1 Creating a new device
If you use a docking station, DATA CENTER 3 will automatically
detect which SIGMA device you have connected. If you do not have
www.sigmasport.com
a docking station, you must manually create the SIGMA device in
DATA CENTER 3.
11
SIGMA Data Center 3
4.1.1 With a docking station
The docking station connects your SIGMA device to the computer.
–
Import the memory or LOGs into DATA CENTER 3.
–Manage the device settings in DATA CENTER 3 and transfer
these to your SIGMA device.
How to create a new device with a docking station:
1 Start
DATA CENTER 3.
the docking station to the computer.
3 Connect the device to the docking station (see ‘Connecting
a docking station’ on page 7). DATA CENTER 3 automatically
identifies your SIGMA device as a new device and opens a
window.
4 Enter a name for the device.
5 Save the new device.
2 Connect
Tip:
You already use DATA CENTER 3 for your SIGMA device and
have retrospectively purchased a docking station.
DATA CENTER 3 identifies your SIGMA device as a new device.
Assign the new device to an existing device and all existing
data will be retained.
4.1.2 Without a docking station
You have a SIGMA device without a docking station. You can
also use DATA CENTER 3 with this. You create your SIGMA
device manually.
How to create a new device without a docking station:
1
Start DATA CENTER 3.
Click the plus sign next to My Computers.
The Add Computer window is displayed.
3 Select your device from the list.
4 Enter a name for your device.
5 Click Save. The new device has been created.
2
Tip:
If you want to make data exchange more convenient or quicker,
you can purchase a docking station. Docking stations are
available from specialist retailers or www.sigma-data-center.
com.
www.sigmasport.com
Docking station
Reference number
BC
BC
BC
BC
BC
BC
BC
Ref. No. 00120
509, BC 5.12, BC 8.12,
8.12 ATS, BC 1009, BC 1009 STS,
12.12, BC 12.12 STS,
14.12 ALTI, BC 1609,
1609 STS, BC 16.12,
16.12 STS/CAD, BC 1909 HR,
2209 TARGA/MHR
ROX 8.0, ROX 8.1, ROX 9.0, ROX 9.1
Ref. No. 00119
RC 14.11
Ref. No. 20232
12
SIGMA Data Center 3
4.2 Configuring the device settings with Data Center 3
If you use a docking station, you can conveniently change the
device settings in DATA CENTER 3 and copy these to the device.
You can also save the device settings and export them as a file.
Example:
You want to set a different language for your SIGMA device
using DATA CENTER 3.
1
Start DATA CENTER 3.
Connect the docking station to the computer.
3 Connect your device to the docking station.
4 Click My Computers. All SIGMA devices are displayed.
5 Move the mouse to your SIGMA device and select
Device settings. The list of device settings is displayed.
6 Click the Import from device button. An input window is
displayed.
7 Enter a name for the device setting.
8 Click Import. Your current settings are imported and
displayed.
9 Click the Computer tab. The setting options are opened.
10 Select a different language in the Language field.
11 Enter any other settings in the other areas.
12 Click the Export to device button. The settings on your
SIGMA device will be changed.
2
www.sigmasport.com
Device settings
Note:
With some devices, the connection with the docking station
must be severed following the export in order for all data to be
correctly stored. Please follow the DATA CENTER instructions.
13
SIGMA Data Center 3
5 After training
The docking station can be used to import the values from your
SIGMA device into DATA CENTER 3. All the values recorded by
your SIGMA device are displayed in the Training data area.
You can enhance the training data in this area by adding notes
and compare two training sessions. The export function enables
data exchange.
5.1 Transferring data into Data Center 3 with a docking station
If you have a docking station, importing the data from your
device into DATA CENTER 3 is simple.
Example:
You want to transfer your training session from July 03, 2012
into DATA CENTER 3.
You have started the software and connected the docking
station to your computer.
1
Insert the SIGMA device into the docking station. The
SIGMA device is identified and displayed on the dashboard.
The green ticks indicate memories and LOGs that you have
already imported.
2 Click Import data. The Import data window opens. You can
see which memories and LOGs are stored on your SIGMA
device. The green ticks indicate memories and LOGs that
you have already imported.
3 Selected the desired training session from July 03.
4 Enter a name for the training session.
5 Click Import data. The training session is imported and
displayed in DATA CENTER 3.
www.sigmasport.com
Tip – the training session is not displayed:
Is your most recent training session missing from the list?
Please check that you have ended the training session on your
device. You can only import completed training sessions and
LOGs.
14
SIGMA Data Center 3
5.2 Transferring data without a docking station
Even if you do not have a docking station, you can still use
DATA CENTER 3 to evaluate your training sessions. To do this,
manually create your training sessions and enter the data using
your keyboard. If you purchase a docking station at a later date,
you can still continue to use the manually entered training data.
Tip:
You can also manually enter training data if you have trained
without using the device. This keeps your training record up to
date at all times.
Example:
You want to evaluate your most recent training session in
DATA CENTER 3. You have already started the software.
Your SIGMA device is ready.
My Computers. All SIGMA devices are displayed.
2 Move the mouse to the relevant SIGMA device and select
Training data. The training data is displayed in list view.
3 Click the Generate a memory button. The Generate
a memory window is displayed.
4 Select the training date.
5 Enter a name for the training session.
6 Click the Generate a memory button. The memory details
are displayed.
7 Copy the values from your SIGMA device.
1 Click
www.sigmasport.com
Training data
15
SIGMA Data Center 3
6 Organizing the data
6.1 Selecting a training session
You can select memories and LOGs from various places:
–Dashboard
The dashboard always displays the last seven training
sessions. Move the mouse over a training session to see
which device was used to record the data. Click to open the
training session. Right-click a bar in the week or month view
to open a pop-up window with all the training sessions from
this period.
–Statistics
Click on the graph in the Statistics area and select a day in
the week view.
–My Computers
View the device list, move the mouse over a device and
select Training data. A list view of the memories and LOGs
appears. Double-click to open a training session.
6.2 Managing the training data
Go to Device > Training data to view a list of all the imported
training sessions. This also includes older memories and LOGs.
Tip:
Use the filter function (see ‘Filtering data’ on page 16) to find
memories or LOGs more quickly.
The following options are available in the list view:
–
–
–
–
–
Sort the list, e.g. by name, date etc.
Display training sessions for editing.
Activate or deactivate memories or LOGs for the statistics.
Delete individual memories or LOGs.
Import or export LOGs or memories.
www.sigmasport.com
16
SIGMA Data Center 3
6.3 Entering notes on training sessions
In addition to the pure performance data for a training session,
you can also enter information about the weather, the profile or
the intensity.
–
Enter a description
Enter text describing the training session or anything in
particular that occurred.
Example:
You want to enter notes about your most recent training
session. DATA CENTER 3 is active, you have imported the
training data and the dashboard is open.
–
Add a training partner/group
Click on the plus sign in the training partner area to add a
new training partner. The new training partner is saved and
can be selected in future notes. You can also add and select
a training group.
1 Click the most recent training session. The training data is
displayed.
2 Open the Notes tab.
3 Enter your notes. The notes are automatically saved when
you close the window.
Tip:
–
Delete a training partner
Move the mouse to a training partner to delete his/her
assignment to a training session (recycle bin).
–
Enter training type
Enter a training type.
If you want to enter notes about a training session from longer
ago, open the training session by going to My Computer >
Device > Training data.
–
Weather, trip distance profile and rating
Click the applicable area to view the available options. Select
the appropriate rating. For devices that do not record the
temperature, you can also enter the temperature.
How to use the Notes area
–
External link
Add a link to photos of the trip online or a film of your
descent, for example.
Trip data – Notes
6.4 Difference between memories and LOGs
A memory contains all cumulative values from the start of the
recording until the training is manually completed on the SIGMA
device. A new memory then starts. Most SIGMA devices have
a memory. Some devices such as those in the ROX series have
several memories and can also record LOGs.
Note:
You can only import training sessions and LOGs into the software from the SIGMA device once these have been ended on
the device. For information on how to end a training session on
your device, please see its operating instructions.
In the LOG, individual values are saved at specific intervals. The
values are then displayed in the DATA CENTER 3 evaluation as
a graph. The memory capacity for the individual values depends
on the LOG interval (see the device’s operating instructions). You
can LOG an entire training session or individual sections of a
training session.
www.sigmasport.com
17
SIGMA Data Center 3
6.5 Memories
6.5.1 Comparing memories
The memory comparison enables you to compare two memories.
In doing so, it does not matter which SIGMA device was used
to record the memories. This means that you can even import
and compare memories from training partners, friends and
acquaintances.
5 Select
the appropriate SIGMA device from the drop-down
menu. The memories for the relevant device are listed.
6 Double-click to select a memory.
The two memories are displayed side by side so that you
can compare the values.
Example:
You have trained on a specific route both at the start of the
season and after a long training period and now want to compare
the two memories to see how effective your training was.
My Computers. All SIGMA devices are displayed.
the mouse to the relevant SIGMA device and select
Training data. The training data is displayed in list view.
3 Open a memory.
4 Click the Compare with another memory button.
The Memory comparison window opens.
1 Click
2 Move
6.5.2 Saving memories as a PDF
You can export individual memories as a printable PDF. To do this,
all the data and notes for a memory are consolidated.
the Generate a printable PDF function.
The print preview appears as a PDF.
My Computers. All SIGMA devices are displayed.
Move the mouse to the relevant SIGMA device and select
Training data. The training data is displayed in list view.
3 Select a memory.
5
Print the PDF or save it as a file.
4 Click
1 Click
2
www.sigmasport.com
18
SIGMA Data Center 3
6.5.3 Exporting memories
You can export individual memories in various file formats for
data exchange purposes.
File format
Exported
Reason
smf
Data and
notes
–Import into DATA
CENTER 3 e.g. for
data exchange
csv
Data and notes
–Import into
table calculation
–Import into other
software
Example:
You have trained with a teammate. Your teammate wants to
conduct a data comparison. You therefore export your training
session as an smf file.
My Computers. All SIGMA devices are displayed.
Move the mouse to the relevant SIGMA device and select
Training data. The training data is displayed.
3 Select a memory.
4 Click the Export selected data function.
The Export multi data window is displayed.
5 Select ‘smf’ as the File format and click Export.
6 Select a storage location.
7 Enter a meaningful name in the File name field.
8 Click Save. The training session is exported with all the
data and notes.
1 Click
2
Tip – Multi-export:
Hold down CTRL to select and export multiple memories.
6.5.4 Importing memories
All memories that you have exported as smf files can be
imported back into DATA CENTER 3.
Note:
Memories that have been exported with an earlier version of
DATA CENTER 3 can also be imported into the current version.
Go to the dashboard and click the Import data from file
button. The file selection window is displayed.
2 Select the smf file to be imported. The Import files window
opens.
3 Enter a name for the file.
4 Assign the file to a device.
5 Click Import. The file is imported and the training session
is assigned to the selected device.
1
www.sigmasport.com
Tip – Multi-import:
Hold down CTRL to select and import multiple memories when
selecting files.
19
SIGMA Data Center 3
6.6.2 LOGs (only for devices with a LOG function)
Some SIGMA devices also record LOGs. LOGs enable you to view
and analyze your performances in great detail. The graph and
the option of showing and hiding individual parameters assist
you with this. LOGs can be exported, compared and edited in
other applications.
Note:
To use clear examples, the examples refer to devices in the
ROX series or running watches. The values shown cannot be
recorded by all devices.
6.6.1 LOG interface
Drag elements
Area functions
Selection menu
for the Y-axis
Upper drop zone
In the default setting
with a LOG diagram,
chart options and zoom
slider
Y-axis left and right
Timeline
Lower drop zone
In the default setting
with a data table
LOG
The diagram’s interface is interactive. You have the following
options:
–
Show additional LOG functions
Click Menu to display additional LOG functions (see ‘Functions for devices with a LOG function’ on page 11).
–
Highlight a line on the chart
Hover the mouse over a line to view it in bold. You can now
apply the highlighted line’s unit to the Y-axis. If you left-click,
DATA CENTER 3 will apply the unit to the left-hand Y-axis;
if you right-click, the unit will change on the right-hand Y-axis.
–
–
Modify the Y-axis
The Y-axes are located on the left and right of the chart.
A drop-down menu can be found next to each axis, which you
can use to set the unit. If you have selected speed/pace for
the Y-axis, you can also use a LOG function to change the
unit from km/h to min/km.
iew values at specific points on the line
V
Use the green sliding ruler to select a time on the timeline.
This is displayed on the graph as a vertical line. Hover the
mouse over the green sliding rule to display the values for
this time as a tool tip. Hover the mouse over any point on
the line to view the individual value as a tool tip.
–
Chart options
You can open and close the Chart options window.
–
Modify the X-axis
On clicking Menu, you can see the LOG function time/distance. Use this to change the X-axis unit from kilometers to
hours and vice-versa.
www.sigmasport.com
20
SIGMA Data Center 3
6.6.2 Creating a customized LOG view
In the default view for LOGs, the chart appears in the top half of
the window and the value table in the bottom half. These areas
are known as drop zones. You can drag and drop the various
drag elements into the drop zones to create your own LOG view.
Use the drag and drop function to change the positions of the
chart and the table or to display two charts or two tables.
Drag and drop the drag element into the upper or
lower drop zone. The chart is displayed in the drop
zone.
Drag and drop the drag element into the upper or
lower drop zone to view a table and a graph of the
heart rate zones. You can see which heart rate zone
you trained in and for how long and can choose
between a pie chart and a bar chart.
Tip:
Compare two LOGs and position the charts one above
the other. The chart options for the graph can be
used to dim the charts so that the lines can be
compared.
Drag and drop the drag element into the upper or
lower drop zone. The value table is displayed.
6.6.3 Delimiting and trimming the value range
You can also analyze parts of a LOG in the LOG view. The delimitation also changes the values displayed in the lower area of the
window. These values only relate to the restricted area. You can
also trim the LOG to delete unimportant sections of the training
session. Only the data in the delimited value area is saved in the
LOG.
Example:
You only want to analyze a specific section of the training
session by trimming the LOG.
1
Open the LOG.
the timeline, click the left-hand red slider arrow and hold
down the mouse button to drag it to the start of the section.
3 Drag the right-hand slider arrow on the timeline to the end
of the section. Parts of the graph are now grayed out.
2 On
Tip:
Use the zoom slider to enlarge your view of the chart.
All the data in the tabs displayed below the graph now relate to
the non-grayed-out area between the two slider arrows.
4 Click the Menu button. The chart editing options are
displayed.
5 Select Trim LOG. An information window is displayed.
6 Click Trim marked LOG entries. The grayed-out areas in the
graph are deleted. The LOG now only contains data from the
selected section of the training session.
www.sigmasport.com
21
SIGMA Data Center 3
6.6.4 Selecting the values for the chart
You have selected a LOG and only want to display certain values
as lines on the chart. In DATA CENTER 3, you can show or hide
the values, rest periods and laps plus display average lines and
heart rate zones.
Note:
The contents of the chart options adjust to the selected
devices and only show information that the device actually
provides.
Example:
You have completed a hill training session on your racing bike.
Afterwards, you want to compare your heart rate, speed,
altitude and ascent on the chart. The graph should also display
your average heart rate and the heart rate zones.
Note:
If you have selected a comparison between two different
devices, the chart options display all the information provided
by both devices.
2
3
4
5
Go to the Average tab.
Activate the Heart rate checkbox.
Go to the Heart rate zones tab.
Activate the Show checkbox. The heart rate zones are
displayed in the background of the graph.
Activate the values that should be displayed on the chart in
the Chart options.
1
6.6.5 Editing a break
Example: the LOG is already displayed and you want to enter
further information about a break.
1
Move the mouse over the break indicator to view a small
blue information box.
2 Click the Edit marker icon and enter the information.
3 Click Save.
Tip:
All rest periods can also be viewed in the LOG view Values
table. You can use this area to select and delete multiple rest
periods.
www.sigmasport.com
22
SIGMA Data Center 3
6.6.6 Editing a lap
Activate the Lapscheckbox in the chart options.
Move the mouse over the lap indicator to view a small
green information box.
3 Click the Edit marker icon and enter the information.
4 Click Save.
1
2
Tip:
All laps can also be viewed in the LOG view Values table. You
can use this area to select and delete multiple laps.
6.6.7 Printing a LOG
You can print complete LOGs or parts of LOGs or save these
as a PDF. Use the print options to specify which data should be
printed.
5
6
Click the Print button.
Select the values and unit for the left and right Y-axes in the
LOG chart tab.
Example:
You have completed a hill training session. You want to print
the values and graph for your heart rate, speed and altitude
between kilometers 7.5 and 12.5.
My Computers. All SIGMA devices are displayed.
Move the mouse to the relevant SIGMA device and select
Training data. The training data is displayed in list view.
3 Select the LOG from the list. The LOG is displayed.
4 Restrict the value range to kilometer 7.5 to 12.5.
1 Click
2
7 Use the LOG values tab to specify how the data should be
prepared.
8 Activate the Selected region radio button so that only the
selected area is considered.
9 Click Print Preview. A PDF is generated and displayed.
10 Print the PDF.
www.sigmasport.com
23
SIGMA Data Center 3
6.6.8 Exporting a LOG
You can export individual LOGs in various file formats for data
exchange purposes.
File format
Exported
Reason
smf
Data and notes
–The LOG is exported
as a memory
slf
Individual values,
waypoints,
breaks and
notes
– Import into
DATA CENTER 3 e.g.
for data exchange
Individual values
– Import into the table
calculation
– Import into other
software
csv
My Computers. All SIGMA devices are displayed.
Move the mouse to the relevant SIGMA device and select
Training data. The training data is displayed in list view.
3 Select a LOG.
4 Click the Export button. The Export multi data window is
displayed.
5 Select ‘smf’ as the File format and click Export.
6 Select a storage location.
7 Enter a meaningful name in the File name field.
8 Click Save. The LOG is exported with all the data.
1 Click
2
Tip – Multi-export:
Hold down CTRL or Shift to select and export multiple LOGs in
the list view.
Example:
You have trained with your teammate. You have both recorded
a LOG of your training session and now want to compare the
values. You therefore export the LOG as an slf file.
6.6.9 Importing a LOG
All LOGs that you have exported as slf files can be imported back
into DATA CENTER 3 as LOGs.
Example:
You have trained with your teammate. You have both recorded
a LOG of your training session and now want to compare the
values. Your teammate gives you his exported LOG ‘Training .slf’.
Go to the dashboard and click the Import data from file
button. The file selection window is displayed.
2 Select the slf file to be imported. The Import files window is
displayed.
3 Enter a name for the file.
4 Assign the file to a device.
5 Click Import. The file is imported and the LOG is assigned to
the selected device. The LOG is now available for the value
comparison.
1
Tip – Multi-import:
Hold down CTRL to select and import multiple LOGs when
selecting files.
www.sigmasport.com
24
SIGMA Data Center 3
6.6.10 Comparing LOGs
You can compare either two of your own LOGs or one of your
own LOGs with an imported LOG from a teammate.
Example:
You have completed a hill training session with a teammate
and have both recorded LOGs of the ascent. You now want to
compare the heart rate values. You have already imported your
LOG into DATA CENTER 3. You have received a LOG export from
your teammate and imported it into DATA CENTER 3.
1
Open the LOG file for your ascent.
Click the Comparison button.
3 Select the device to which you have assigned the imported
LOG.
4 Double-click to select your training partner’s LOG. The two
LOGs are now evaluated one above the other or next to each
other.
2
Tip:
The sliding ruler in the Chart options window enables you to
set which chart is more greatly emphasized or hidden.
6.6.11 Transferring a GHOST RACE (ROX 9.1 and above)
To use the ROX 9.1’s GHOST RACE function, transfer
a recorded LOG back to the ROX 9.1.
Tip:
If you want to ride against a training partner’s LOG, first
import his/her LOG and then transfer this to your ROX 9.1 as
the GHOST RACE.
1
Use the docking station to connect your ROX 9.1 to
DATA CENTER 3.
2 Click My Computers in DATA CENTER 3. All SIGMA devices
are displayed.
3 Move the mouse to a SIGMA ROX 9.1 and select
Training data. A list of training data is displayed.
4 Select the LOG. The LOG is displayed.
Note:
The LOG for a GHOST RACE can be no longer than 5 hours.
5
6
Click the Transfer GHOST RACE function.
Enter a name for the GHOST RACE. The LOG is then stored
on the connected ROX 9.1.
www.sigmasport.com
25
SIGMA Data Center 3
7 Statistics
DATA CENTER 3 provides several different statistics.
–Total values for the SIGMA device
In addition to the training data, each device records the
total values for the connected sensors in an extra memory.
Whenever you use your device, it adds the new values to
the total values, including for rides to the local bakery or
calibration rides. Select the total values under
My Computers > Device. Import the latest total values
from your device.
–Statistics
In the Statistics area, the imported training data that you
have collated in DATA CENTER over time is statistically
evaluated. You can choose between a graph, a value
comparison and a year comparison. Clicking on an entry
again takes you directly to the training session details.
The statistics only relate to the activated training sessions
for the active devices.
–Summarized statistics on the dashboard
The last seven training sessions and the weekly and monthly
values are displayed on the dashboard as bar charts. Click
on a bar to jump straight to the training session details. The
summarized statistics only relate to the activated training
sessions for the active devices.
7.1 Statistics area
Statistics functions
Activate devices
Select and create filters
Select statistics
Area for graph or values
Various drop-down menus
Statistics – graph view
In the Statistics area, you can choose between a graph, a value
comparison and a year comparison. The statistics are always
processed similarly.
The following data is considered in the statistics:
– Data from all active SIGMA devices.
– Data on training sessions activated for the statistics in the
Training data screen.
www.sigmasport.com
The views offer the following options:
– Filter by certain figures/features.
– Print the statistics displayed.
– Select between the various time axes – week, month, year.
– Display various values such as distance and time.
– With some SIGMA bike computers, you can display the
statistics for two bikes separately or combined.
– Combine statistics for different devices.
26
SIGMA Data Center 3
7.2 Activating or deactivating memories or LOGs for the statistics
You can activate and deactivate individual memories and LOGs
for the statistics. My Computers > Device > Training data >
Checkbox in the Statistics column
NOTE:
If a device has both memories and LOGs, only the memories
are automatically activated for the statistics.
Example:
You only want to see your training sessions in the statistics and
therefore deactivate all races.
My Computers. All SIGMA devices are displayed.
the mouse to the relevant SIGMA device and select
Training data. The training data is displayed in list view. All the
memories that are incorporated into the statistics are marked
with a tick in the Statistics column.
3 C lick the tick next to your race. The tick disappears and the
memory is not incorporated into the statistics.
1 Click
2 Move
7.3 Updating and viewing total values
The total values are the cumulative data for a SIGMA device.
You can import the total values from your SIGMA device into
DATA CENTER 3.
Note:
This function is only available for devices with a docking
station.
Once you have connected the docking station to your PC, you
can update the total values for a device. Total values are only
the values that are actually stored on the device. Manual entries
in DATA CENTER 3 will only be considered if they have been
transmitted back to the device.
www.sigmasport.com
1
Start DATA CENTER 3.
Connect the device to the docking station.
3 Click My Computers. All SIGMA devices are displayed.
4 Move the mouse to the relevant SIGMA device and select
Total computer values. The total values for the SIGMA
device are displayed.
5 Click the Import from device button. The total values are
updated.
2
Note:
Use the Statistics area if you want to evaluate your data
records in DATA CENTER.
27
SIGMA Data Center 3
8 Filtering data
Over time, more and more memories and LOGs are collated in
DATA CENTER 3. In the Statistics area and the training data
list view, you can use filters to find certain data faster or only
evaluate certain data.
8.1 Saving new filters
You can create filters in the Statistics area and the Training
data screen. If you create a filter without saving it, it is displayed
as a new filter and you can use it until the program is closed.
Save regularly required filter settings as a filter.
Example:
You want to create a filter that only displays training sessions
that you have rated as having three or more stars. You want
to save a filter for this.
1
Open the Statistics area or the Training data screen.
Click the Set filter button. The Filter window is displayed.
3 Go to the Advanced tab.
4 Activate the Rating checkbox.
5 Click the middle star. Three stars are now lit up.
6 Click the Save button. The Save filter window is displayed.
7 Enter a meaningful name.
8 Click Save. The Filter window reappears with your filter
displayed in the drop-down menu.
9 Close the window.
2
Prerequisite:
No filter is selected.
8.2 Using saved filters
Example:
You have saved a three-star rating filter and want to view a list
of only the training sessions that you have given three or more
stars.
My Computers. All SIGMA devices are displayed.
Move the mouse to the relevant SIGMA device and select
Training data. The training data is displayed in list view.
3 Select the three-star rating filter from the drop-down menu.
The filtered list is displayed together with the number of data
records that fulfill the filter criterion.
1 Click
2
www.sigmasport.com
28
SIGMA Data Center 3
8.3 Modifying filters
You can modify existing filters in the Statistics area and the
Training data screen.
Example:
You have created a three-star rating filter and want to extend
this to only include training sessions from the current year.
Activate the Date checkbox.
Enter 01.01.2012 in the from field.
6 Enter 31.12.2012 in the to field.
7 Click Save. The new setting is saved.
8 Click Close. The filter window closes and the filter is set.
4
5
1
Open a training data list or the Statistics area.
Click the Set filter button.
3 Select the three-star rating filter from the Saved filters
drop-down menu.
2
8.4 Deleting filters
You can delete existing filters in the Statistics area and the
Training data screen.
Example:
You have created a three-star rating filter but no longer need it.
1 Display
a list of training data or the Statistics area.
the Set filter button.
3 Select the three-star rating filter from the Saved filters
drop-down menu.
4 Click the Delete button. The filter is deleted.
5 Close the window.
2 Click
www.sigmasport.com
29
SIGMA Data Center 3
9 Maintenance
You should check the battery status of the individual components
at regular intervals. If your device supports this function, you
can conveniently do this in DATA CENTER 3 using the docking
station. If you use a device with LOGs, you should regularly delete
the LOG memory.
9.1 Checking the battery status
Connect your device to the computer. You can see an overview
of the current battery status in the dashboard.
In the example, the first three batteries are ok but the bike
computer’s battery needs to be changed.
Note:
For information on how to change the battery, please refer to
your device’s instruction manual.
9.2 Deleting the LOG memory
The LOG memory’s capacity depends on the recording intervals.
On devices with several recording intervals ( 5, 10, 20 and
30 secs), a longer interval extends the recording period. If the
memory is full, no further LOGs can be recorded.
Caution:
Only delete the LOG memory once you are certain that you
have transferred all the LOGs to your computer. Display the
training data and click the
Import data button. Check the memory and the LOGs. Files that
are not ticked have not yet been imported.
Example:
You want to delete the LOG memory for a longer training
session. You have connected the docking station to the SIGMA
device and the computer. DATA CENTER 3 has been started.
1 Connect
your device to the computer. The current status of
the LOG memory is displayed in the overview. You can see
the amount of memory available for the various LOG times.
2 Click Delete. After a confirmation query, all the LOGs on your
SIGMA device are deleted.
www.sigmasport.com
30
SIGMA Data Center 3
9.3 Modifying device settings and copying them to the device
You can modify the device settings either directly on the device
or via DATA CENTER 3. Information on how to modify the
settings directly on your SIGMA device can be found in its
instruction manual. For how to modify the settings using
DATA CENTER 3, please see the example below.
Example:
You want to set a different language for your device.
DATA CENTER 3 has been started and the docking station is
connected to the device.
My Computers. All SIGMA devices are displayed.
the mouse to your SIGMA device and select Device
settings. The list of device settings is displayed.
3 Click the Import from device button.
4 Enter a name for the device settings.
5 Click Save.
6 The device settings are displayed.
7 Go to the Computer tab.
8 Select a different language.
9 Click the Transfer to device button to save the setting on
your device.
1 Click
2 Move
9.4 Exporting device settings
You can export the device settings that you have stored in
DATA CENTER 3 as an ssf file.
Example:
You have stored the device settings in DATA CENTER 3.
Your training partner likes the set up. She has the same device
and wants to copy the settings to hers. You export the device
settings as an ssf file and give this to your training partner.
My Computers. All SIGMA devices are displayed.
Move the mouse to your SIGMA device and select
Device settings.
3 Select the device settings from the list. The device settings
are displayed.
4 Click the Export selected data button.
5 Select a storage location.
6 Enter a meaningful name in the File name field.
7 Click Save. The device settings are saved as an ssf file.
1 Click
2
9.5 Importing device settings
The device settings are exported as an ssf file and can be
imported again.
Example:
You have received special device settings from your
training partner as an ssf file and want to import them into
DATA CENTER 3.
Go to the dashboard and click the Import data from file
button. The file selection window is displayed.
2 Select the ssf file to be imported. The Import files window
is displayed.
3 Enter a name for the file.
4 Assign the file to a device.
5 Click Import. The file is imported and the device settings
are assigned to the selected device.
1
www.sigmasport.com
31
SIGMA Data Center 3
9.6 Modifying the storage location for the database
DATA CENTER 3 saves all the values in a database. You can
specify where on your computer this database should be stored.
Saving the database
Go to Settings > Options and click Move to.
Note:
Opening a saved database
Go to Settings > Options and click Open.
You only need this function if you want to select a storage
location other than the one preselected by DATA CENTER 3.
9.7 Optimizing the database
The DATA CENTER 3 database only needs to be optimized if
you delete a large amount of data. The optimization process
compresses the database.
www.sigmasport.com
Go to Settings > Options and click Start optimization.
32
SIGMA Data Center 3
10 FAQ – frequently asked questions
I can’t connect my device to the computer (red LED illuminates on the docking station).
–Check whether the SIGMA device is correctly connected to the docking station.
I can’t connect my device to the computer (green LED illuminates on the docking station).
–Check whether the mobile software Sony Ericsson PC Suite or Nokia PC Suite is installed on your computer.
If so, end and deactivate the process PCSuite.exe or SEPCSuite.exe.
Where on the PC is the data stored?
–
The default data storage location is My Documents > SigmaDataCenter3.
Can I select a different storage location for the database?
–
You can also select a different storage location (see ‘Modifying the storage location for the database’ on page 33).
How can I back up the data?
–
Copy the database to another location and overwrite the current database with a backup copy.
Why can only the memory or only the LOG be read?
–
Check whether you have completed the training session on the device and whether you have started and completed a LOG.
Where do I find the driver for my docking station?
– The drivers for both the ROX docking station and the TOPLINE docking station are installed at the same time as the
DATA CENTER software. After this has occurred, the docking station is automatically detected and installed.
The software must therefore be installed first.
www.sigmasport.com
33