1
Safety • Assembly • Operation • Tips & Techniques • Maintenance • Troubleshooting • Parts Lists • Warranty
OF
A
O
AL
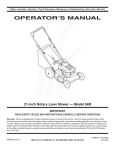
21" Rotary Mower-
Model 44M
iMPORTANT
READ SAFETY
RULES AND iNSTRUCTiONS
CAREFULLY
BEFORE
OPERATION
Warning: This unit is equippedwithan internalcombustionengineand shouldnot be usedon or nearany unimprovedforest-covered,brushcoveredor grass-coveredland unlesstheengine'sexhaustsystemis equippedwith a sparkarrestermeetingapplicablelocalor statelaws(if any).
If a sparkarresteris used,it shouldbe maintainedin effectiveworkingorder by the operator.In theState of Californiathe aboveis requiredbylaw
(Section4442 of the CaliforniaPublicResourcesCode). Otherstatesmay havesimilarlaws.Federallaws applyon federallands.A sparkarrester
for the muffleris availablethroughyour nearestengineauthorizedservicedealeror contactthe servicedepartment,RO. Box361131Cleveland,
Ohio 44136-0019.
PRINTEDIN U.S.A.
MTD LLC, P.O. BOX 361131 CLEVELAND, OHIO 44136-0019
FORMNO.769-02768
10/13/2006
This Operator's Manual is an important part of your new lawn mower, it will help you assemble,
prepare and maintain the unit for best performance.
Please read and understand what it says.
Table of Contents
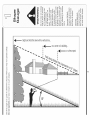
Slope Gauge ........................................................
3
Safe Operation Practices ...................................
4
Setup and Adjustment .......................................
6
Operating Your Lawn Mower ..............................
8
Maintaining Your Lawn Mower .........................
10
Trouble Shooting ..............................................
12
Off Season Storage and Safety Labels ........... 13
Engine Appendix ..............................................
Engine Safe Operation Practices .................
Operating Your Engine ..................................
Maintaining Your Engine ...............................
Parts List ...........................................................
Warranty .............................................
14
14
16
18
22
Back Cover
MTDLLCreservesthe rightto changeproductspecifications,designs,and equipmentwithoutnotice and withoutincurringobligation.
Finding and Recording Model Number
BEFOREYOU BEGINTO ASSEMBLEYOUR NEW
EQUIPMENT,please locatethe model plateon the
equipmentand copy the informationto the sample
Model Number
model plate providedto the right. You can locatethe
model plateby standingat the operatingpositionand
lookingdown at the rear of the deck. This information
will be necessaryto use the manufacturer'sweb
site,to obtain assistancefrom the CustomerSupport Department,or when contactingan authorized
service dealer. www.mtdproducts.com
Serial Number
MTD LLC
P.O= BOX
CLEVELAND,
330-220-4683
361131
OH 44136
800-800-7310
Customer Support
Please do NOTreturn
purchased,
without
the unit to the retailer from
first contacting
Customer
which
it was
Support.
If you havedifficulty assemblingthis productor haveany questions regardingthe controls,operation,or
maintenanceof this unit, you can seek help from the experts. Choosefrom the options below:
= Visit www.mtdproducts.com
• Call a CustomerSupport Representativeat 1-800-800-7310.
2
!i!_i!il
<
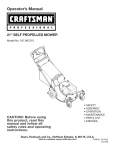
Sight and hold this levelwith a vertical tree...
_
z_
I
I
d_
o9
or a corner of a building...
__
_D
I
_D
or a fence post
I
I
O
O
--
E
=5
O
d_
_0
o6
d_
o
O9
d_
_
_D
O
o3
-5
C5
O3
C
o
o
_
E
_D
C5
c_
0
o3
c_
_,_
c'_
_
fir_e (repros
_ _ er_ts a 15o
15°
WARNING: Engine Exhaust, some of its constituents, and certain vehicle components contain or emit chemicals known to State of Californiato cause cancer and
birth defects or other reproductiveharm.
DANGER: This machine was built to be operated according to the rules for safe operation in this
manual. As with any type of powerequipment, carelessness or error on the part of the operator
can result in serious injury. This machine is capable of amputating hands and feet and throwing
objects. Failure to observe the following safety instructions could result in serious injury or death.
Children
WARNING
This symbol points
out importantsafety
instructionswhich, if
not followed,could
endangerthe personal
i safety and/or property
I ofyourselfand others.
Read and follow all
instructionsin this
manual beforeattemptingto operate
i this machine. Failure
I to complywith these
instructionsmay result
i in personalinjury.When
you see this symbol.
i HEED ITS WARNING!
i Your Responsibility
Restrict the use
of this power machine
to personswho read.
i understand
and follow the warnings
and instructions
I.
=nthis manual
and on the machine.
Tragicaccidentscan occur if operatoris not alert to presence
of children.Childrenare oftenattractedto mowerand mowing
activity.Theydo not understandthe dangers.Neverassume
thatchildrenwill remainwhereyou lastsawthem.
1. Keepchildrenout of the mowingareaand underwatchful
careof a responsibleadultotherthanthe operator.
2. Be alert andturn moweroff if a childentersthe area.
3. Beforeand whilemovingbackwards,look behindanddown
forsmallchildren.
4. Useextremecare when approachingblind corners,
doorways,shrubs,trees,or otherobjectsthat may obscure
yourvisionof a child whomay run intothe mower.
5. Keepchildrenawayfrom hot or runningengines.Theycan
sufferburnsfrom a hot muffler.
6. Neverallowchildrenunder14 yearsoldto operatea power
mower.Children14 yearsoldand overshouldreadand
understandoperationinstructionsandsafetyrulesinthis
manualandshouldbe trainedandsupervisedbya parent.
General Operation
1. Readthis operator'smanualcarefullyin its entiretybefore
attemptingto assemblethis machine.Read,understand,
andfollowall instructionson the machineandin the
manual(s)beforeoperation.Be completelyfamiliar with
the controls andthe proper useof this machinebefore
operatingit. Keepthis manualin a safe place forfuture
and regularreferenceand for orderingreplacementparts.
2. This machineis a precision pieceof powerequipment,
not a plaything.Therefore,exerciseextremecautionat all
times.Yourunit has beendesignedto performonejob: to
mowgrass. Do not use it for any otherpurpose.
3. Neverallow childrenunder 14yearsold to operatethis
machine.Children 14yearsold and overshould readand
understandthe instructionsinthis manualandshould
be trainedand supervisedby a parent.Onlyresponsible
individualswho arefamiliar withthese rulesof safe
operationshould be allowedto usethis machine.
4. Thoroughlyinspectthe area wherethe equipmentis to
be used. Removeall stones,sticks,wire, bones,toys
andotherforeignobjects, whichcould be trippedover or
picked up andthrown bythe blade.Thrownobjects can
causeseriouspersonalinjury.Plan your mowingpattern
to avoid dischargeof materialtoward roads,sidewalks,
bystandersandthe like.Also,avoid dischargingmaterial
againsta wall or obstruction,whichmay causedischarged
materialto ricochetback towardthe operator.
5. Tohelp avoid bladecontact or a thrown objectinjury,
stay inoperatorzone behindhandlesand keepchildren,
bystanders,helpersand pets at least 75 feetfrom mower
whileit is inoperation.Stop machineif anyoneenters
area.
4
6. Alwayswearsafetyglasses or safetygogglesduringoperation andwhile performingan adjustmentor repairto protect
youreyes. Thrownobjectswhich ricochetcan causeserious
injury to the eyes.
7. Wearsturdy, rough-soledworkshoesand close-fitting
slacksandshirts. Shirtsand pantsthatcoverthe arms and
legs andsteel-toedshoesare recommended.Neveroperate
this machinein bare feet,sandals, slipperyor light-weight
(e.g. canvas)shoes.
8. Do not put hands or feet near rotatingparts or undercutting
deck. Contactwithblade can amputatehands andfeet.
9. A missingor damageddischargecovercan cause blade
contactor thrownobject injuries.
10. Manyinjuriesoccuras a resultof the mowerbeing pulled
overthe foot duringa fall causedby slippingor tripping.
Do not hold on to the mower if you are falling; releasethe
handle immediately.
11. Neverpullthe mowerback towardyou whileyou are
walking.If you must backthe mowerawayfrom a wall or
obstructionfirst look down and behindto avoid trippingand
thenfollowthese steps:
a. Stepback from mowerto fully extend yourarms.
b. Be sure youare well balancedwithsurefooting.
c. Pullthe mowerback slowly,no morethan half way
toward you.
d. Repeatthesesteps as needed.
12. Do not operatethe mowerwhileunderthe influenceof
alcoholor drugs.
13. Do not engagethe self-propelledmechanismon unitsso
equippedwhilestartingengine.
14. The bladecontrol handle is a safetydevice.Neverattempt
to bypassits operation.Doingso makesthe safetydevice
inoperativeandmay result in personalinjurythrough
contactwiththe rotatingblade. The bladecontrol handle
mustoperateeasily in bothdirectionsandautomatically
returnto the disengagedpositionwhen released.
15. Neveroperate the mowerinwet grass. Alwaysbe sure of
yourfooting. A slip and fall can causeseriouspersonal
injury.If you feel you are losing yourfooting,releasethe
bladecontrol handle immediatelyand the bladewill stop
rotatingwithinthreeseconds.
16. Mowonly in daylightor good artificial light. Walk,never run.
17. Stopthe bladewhen crossinggraveldrives, walksor roads.
18. If the equipmentshouldstartto vibrateabnormally,stop the
engineand check immediatelyfor the cause.Vibrationis
generallya warningof trouble.
19.Shutthe engine off and waituntil the bladecomesto a
completestop beforeremovingthe grasscatcheror unclogging the chute.
The cutting bladecontinuesto rotatefora few secondsafter
the engine is shut off. Neverplace any partof the body in
the bladearea until you are surethe bladehas stopped
rotating.
20. Neveroperate mowerwithoutpropertrail shield, discharge
cover,grasscatcher,bladecontrol handle or othersafety
protectivedevices in placeand working.Neveroperate
mowerwith damagedsafetydevices.Failureto do so can
result in personalinjury.
21. Mufflerand engine becomehot andcan causea burn.Do
not touch.
6. Extinguishall cigarettes,cigars, pipesand othersources
of ignition.
7. Neverfuel machineindoorbecauseflammablevapors will
accumulatein the area.
8. Neverremovegas cap or add fuel whileengine is hot or
running. Allow engineto cool at least two minutesbefore
refueling.
9. Neveroverfill fuel tank. Filltank to no morethan Y2inch
below bottomof filler neckto providefor fuel expansion.
10. Replacegasoline cap andtighten securely.
11. If gasolineis spilled,wipe it off the engine and equipment.
Moveunit to another area.Wait 5 minutesbeforestarting
engine.
12. Neverstorethe machineor fuel containernear an open
flame,sparkor pilot light as on a water heater,space
heater,furnace, clothesdryeror othergas appliances.
13. Toreducefire hazard,keepmowerfree of grass, leaves,
or other debrisbuild-up.Clean up oil or fuel spillage and
removeany fuel soakeddebris.
14. Allow a mowerto cool at least5 minutesbeforestoring.
22. Only use parts andaccessoriesmade forthis machineby
manufacturer.Failureto do so can resultin personalinjury.
23. Ifsituationsoccur whichare not coveredinthis manual,
use care and goodjudgment.Contactyour dealerfor
assistance.
Slope Operation
Practices
General Service:
Slopesare a majorfactor relatedto slip andfall accidents,which
can result insevereinjury.Operationon slopes requiresextra
caution.If youfeel uneasyon a slope,do not mowit. Foryour
safety,use the slope gaugeincludedas part of this manualto
measureslopes beforeoperatingthis uniton a slopedor hilly
area.Ifthe slope is greaterthan 15 degrees,do not mow it.
1. Neverrun an engine indoorsor in a poorlyventilatedarea.
Engineexhaustcontainscarbonmonoxide,an odorless
anddeadlygas.
2. Beforecleaning,repairing,or inspecting,makecertainthe
bladeandall movingparts havestopped.Disconnectthe
sparkplug wire andgroundagainstthe engineto prevent
unintendedstarting.
3. Checkthe bladeandengine mountingbolts atfrequent
intervalsfor propertightness.Also,visuallyinspectblade
fordamage(e.g.,bent,cracked,worn) Replacebladewith
the originalequipmentmanufacture's(O.E.M.)bladeonly,
listedin this manual."Useof partswhichdo not meetthe
originalequipmentspecificationsmay leadto improper
performanceand compromisesafety!"
4. Mowerbladesare sharp andcan cut.Wrap the bladeor
weargloves,anduse extracautionwhen servicingthem.
5. Keepall nuts,bolts, andscrewstight to be surethe equipmentis insafe workingcondition.
6. Nevertamperwithsafetydevices.Checktheir proper
operationregularly.
7. After strikinga foreignobject,stop the engine,disconnect the sparkplug wire andgroundagainstthe engine.
Thoroughlyinspectthe mowerfor any damage.Repairthe
damagebeforestartingandoperatingthe mower.
8. Neverattemptto makea wheel or cuttingheightadjustmentwhilethe engine is running.
9. Grasscatchercomponents,dischargecover,andtrail
shield aresubjectto wear anddamagewhichcould
exposemovingparts or allowobjectsto be thrown.For
safetyprotection,frequentlycheck componentsand replace immediatelywithoriginal equipmentmanufacturer's
(O.E.M.)parts only, listedin this manual."Use of parts
whichdo not meetthe originalequipmentspecifications
may lead to improperperformanceand compromise
safety!"
10. Do not changethe enginegovernorsettingor over-revthe
engine.The governorcontrolsthe maximumsafe operating
speedof the engine.
11. Maintainor replacesafetylabels,as necessary.
12. Observeproperdisposallawsand regulations.Improper
disposalof fluidsand materialscan harmthe environment.
Do:
1. Mow acrossthe face of slopes;neverupand down.Exercise
extremecautionwhen changingdirectionon slopes.
2. Watchfor holes,ruts, rocks,hidden objects,or bumps
which can causeyouto slip or trip. Tallgrasscan hide
obstacles.
3. Alwaysbe sure of yourfooting.A slip and fallcan cause
serious personalinjury.If youfeel you are losingyour
balance,releasethe bladecontrol handle immediately,and
the bladewill stop rotatingwithin3 seconds.
Do Not:
1. Do not mow near drop-offs,ditchesor embankments,you
could loseyourfooting or balance.
2. Do not mow slopes greaterthan 15degreesas shown on
the slope gauge.
3. Do not mow on wet grass. Unstablefooting could cause
slipping.
Service
Safe Handling Of Gasoline:
1. Toavoid personalinjury or propertydamageuse extreme
care in handlinggasoline. Gasolineis extremelyflammable
and the vapors are explosive.Serious personalinjury can
occur when gasolineis spilled on yourselfor your clothes,
which can ignite.Washyourskin andchangeclothes
immediately.
2. Use onlyan approvedgasolinecontainer.
3. Neverfill containersinside a vehicleor on a truck or trailer
bed witha plasticliner.Alwaysplacecontainerson the
ground awayfrom yourvehicle beforefilling.
4. Removegas-poweredequipmentfrom the truckor trailer
and refuel it on the ground. If this is not possible,then refuel
such equipmenton atrailer witha portable container,rather
than from a gasolinedispensernozzle.
5. Keepthe nozzle in contactwiththe rim of the fuel tank or
containeropeningat all times untilfueling is complete.Do
not use a nozzle lock-opendevice.
5
WARNING
This symbol points
out important safety
instructions, which if
not followed, could
endangerthe personal
safety and/or property
of yourselfand others.
Read and follow all
instructions in this manual before attempting to
operate this machine.
Failureto comply with
these instructions may
result in personal injury.
When you see this
symbol.
HEED
iT'S WARNING!
Your Responsibility
Restrictthe use
of this power machine
to persons who read.
understand
and follow the warnings
and instructions
in this manua
and on the machine.
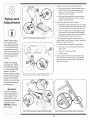
1. Followthe stepsbelowto positionthe handle.
a. Lift the upper handleup from the foldedposition
and pull it backto the extendedposition.See
Figure3-1.Donot crimpcables.Thehandle
shouldclick into this position.
b. Makesurethe carriageboltis seated properlyin
the handle.Tightenstar knobsto secure upper
handleto the lowerhandle.
2. Followthese stepsto securethe handle:
a. Removethe hairpinclipfrom the pivot rod. Usinga
pair of pliers, inserthairpinclip intothe otherhole
on the rod.Repeaton otherside. See Figure3-2.
b. Inserta carriagebolt fromthe hardwarepack into
the upperhole on the handle mountingbracket.
Securewith one plasticwing nut,also includedin
the hardwarepack. Repeaton otherside.
Figure3-1:Unfoldhandleand tightenhardware.
NOTE:Standbehind
themowerasifyou
weregoingtooperate
it.Yourrighthandcorresponds
tothe right
sideofthemower;your
lefthandcorresponds
totheleftsideofthe
mower.
NOTE:Forshipping
purposes
yourmower
is setwiththewheels
ina lowcuttingheight
position.Forbest
I resultsraisethecutting
positionuntilit isdeterminedwhichheightis
bestforyourlawn,refer
toAdjustment
section
forinstructions.
3. The ropeguide is attachedto the right sideof the
upperhandle.Loosenthe wingnut which securesthe
rope guide.Referto Figure3-3.
a. Holdthe blade controlagainstupperhandle.
HardwarePack
b. Pull starterropeout of the engine.Releasethe
bladecontrol.
c. Slip starterrope into ropeguide.
Wing Nuts (2)
Carriage Bolts (2)
d. Tightenwingnut.
.
Securecables to the lowerhandle usingthe cable
ties.See Figure3-4. insert postson cable ties into
holesprovidedon the lowerhandle.Pullcableties
tight and trim excess.
Figure3-2:Securehandleto handlemountingbrackets.
iMPORTANT
Thisunitisshipped
withoutgasolineor oil
intheengine.Fillup
gasolineandoilas
i instructed
intheengine
operation
section
BEFORE
operating
i yourmower.
!
Figure3-3:Pullrecoilstarterthroughropeguideandtighten.
Figure3-4:Usecabletiestosecurecablestolowerhandle.
6
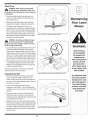
5. Followstepsbelowto assemblethe grasscatcher:
a. Placebag overframe sothat its black plasticside
is at the bottom.Checkthat the bag is turnedright
side out beforeassembling(warninglabelwill be
on the outside).See Figure3-5.
b. Slip plasticchannelof grass bagoverhooks on the
frame.All the plasticchannelsexceptcentertop of
bag attachfrom outsideof bag.
ustment
c. Attachcentertop of bag from insideof bag.
6. Toattachthe grass catcher:
a. Lift rear dischargedoor.See Figure3-6.
b. Placegrass catcheron thepivot rod. Letgo
of dischargedoor sothat it restson thegrass
catcher.
Figure3-5:Assemblethe grasscatcher(if needed)
WARNING
Adjustments
Cutting
Height
An adjustingplateand thumb leverat each wheel
providescuttingheightadjustment.Eachlevermustbe
movedto the same positionto ensurean evencut.
nless the hooks on
; grass catcher are
rrnly seated onthe
pivot rod and the rear
discharge door rests
firmly against top of
1. Pullthe leverout and awayfromthe mower.See
Figure3-7.
2. Movetheleverforwardor backfor desiredcutting
height.
3. Releaselevertowardsmowerdeck.
the grass catcher,
Figure3-6:Attachthegrasscatcher.
cuTTING HEIGHT:
Forroughoruneven
lawnsl move the height
adjustment leverto a
higher positionl Thiswill
help prevent scalping of
Figure3-7:Useleverateachwheelto adjustcuttingheight.
7
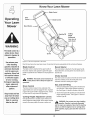
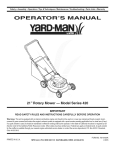
Blade Control
i
_._ :_i_ii_\!_i_ii_i
¸
Drive
Control
Control
Recoil Starter
Cutting
Height
Adjustment
Lever(one at
each wheel)
WARNING
Thebladecontrolisa
safetydevice. Never
attempttobypass its
operations.
J
Use extremecare
Figure4-1:Themaincomponents
onthemower.
when handling
gasoline. Gasoline is
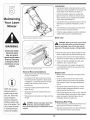
Now thatyou haveset up your lawnmower,it's importantto becomeacquaintedwith its controlsand features.
Blade Control
Recoil
extremely
Theblade controlis attachedto the upperhandleof
the mower,Depressand squeezeit againstthe upper
handleto operatethe unit, Releaseit to stop engineand
blade.
The recoilstarteris attachedto the rightupper handle.
Standbehindthe unitand pullthe recoilstarterropeto
startthe unit.
flammable
i themachineindoors
Choke
Starter
Control
Thechokecontrol is locatedon the left sideof the handle
i orwhiishotorrunning.lethe
engine
_
aWARNING:safety
device.
ThisNever
blade controlmechaniSmbypass
attempt to
itsiS and whenactivated,closesthe choke plateon the
carburetorand aidsin startingthe engine,
Extinguishcigarettes,
operations.
cigars,pipesand
othersourcesof
ignition.
i
i Keep hands and feet
_ away from thechute
i areaon cutting deck.
Referto warning
label on theunit.
Gas and Oil Fill-Up
Drive Control
1. Add oil providedbeforestartingunitfor the firsttime
out d the box. Followengineoperationsectionfor
this.See Figure44 abovefor locationd the oil fill.
Thedrivecontrol islocatedon the undersideof the
upperhandleand is usedto engagethe drive.Squeeze
it againstthe upper handleto engagethedrive; release
it to slow downor stop mowerfrom propelling.
Cutting
Height
Adjustment
2. Servicethe enginewith gasolineas instructedin the
engineoperationsection. See Figure4-1abovefor
locationd gas fill.
Levers
One adjustmentleveris locatedat eachwheeland is
usedto adjustthe cuttingheight.All fourlevers mustbe
movedto the samepositionto ensurea uniformcut.
,_
WARNiNG:gasoline.
GasolineUSe
extremeis
extremelyCare
when
handlingflammaM
e
and the vapors are explosive. Never fuel the machine
indoors or while the engine is hot or running. Extinguish cigarettes, cigars, pipes and other sources of
ignition.
8
_
ARNING:The operationof any lawnmower
can result in foreign objects beingthrown
intothe eyes,whichcan damageyoureyes severely.
Alwayswear safetyglasseswhileoperatingthe
mower,or while performingany adjustmentsor
repairson it.
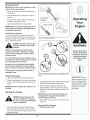
Starting
Engine
_
WARNING:Be
sureno one lawn
otherthanthe
operator is standingnearthe
mower while
startingengineor operatingmower.Never
run engineindoorsor in enclosed,poorly ventilated
areas. Engine exhaustcontainscarbon monoxide, an
odorlessand deadly gas. Keep hands,feet, hair and
looseclothing awayfrom any movingpartson engine
and lawn mower.
Figure4-2:Stepsto start mower.
WARNING
,d_!
WARNING:Alwayskeep handsand feet clear
ARNING:if you strike a foreign object,
of equipmentmoving parts.Do not use a pres- _
stop the engine.Removewire from the spark
surized starting fluid. Vapors are flammable.
plug,thoroughly inspectmower for any damage,
and repair damage before restarting and operating.
1. Pullout the chokeknob locatedon the left sideof the Extensive vibration of mower during operation is an
indicationof damage. The unit should be promptly
upper handle,See Figure4-2,
inspectedand repaired.
NOTE: Useof the chokemay not be necessaryif the
engine is warmor theair temperatureis high.
1. Oncethe engineis running,squeezethedrive
controlto propel mower.For best results,do not cut
2. Standingbehindthe mower,depressthe bladecontrol
wet grassand nevercut off morethanone-thirdof
and hold it againstthe upperhandle.
the total lengthof thegrass.
3. Pullthe startergrip lightly untilresistanceis felt,
then pull rapidlyto overcomecompression,prevent
Using as Mulcher
kickbackand startengine.Repeatif necessary.See
Formulchinggrass,removethe grasscatcherfrom the
Figure4-2.
mower.Therear dischargedoor shouldbe closed.
The operation of
any lawn mower
can result in foreign
objects being thrown
into the eyes, which
can damage your
eyes severely.
Always wear safety
glasses while operating the mower, or
while performing
any adjustments or
repairs on it.
• Foreffectivemulching,do notcut wet grass.
IMPORTANT:Donot allowthe startergrip to snap
back againstthe rope guide.Returnit gentlyto prevent
damageto the starter.
• Newor thick grassmay requirea narrowercut.
Adjustgroundspeedaccordingto conditionof lawn.
4. Whenenginewarmsup,push in the chokeknob. See
Figure4-2.
• if thegrass has beenallowedto growin excessof
fourinches,mulchingis not recommended.Use the
grasscatcherto bag clippingsinstead.
Stopping
Using
Engine
Grass Catcher
1. Releasebladecontrol to stop theengineand blade.
Youcan usethe grass catcherto collectclippingswhile
youare operatingthe mower.
Using Your Lawn Mower
1. Attachgrasscatcherfollowinginstructionsin the
Setupsection.Grassclippingswillautomatically
_ik
ARNING:Never operate yourmower without
collectin bagas you run mower.Operatemowertill
either the rear door or the entire grass catcher
grass bag is full.
assembly firmly secured.
2. Stopenginecompletelyby releasingthe blade
control.Makesurethat the unithas cometo a
completestop.
Be surelawnisclearof stones,sticks,wire,or other
objectswhich coulddamagelawnmoweror engine.
Such objectscouldbe accidentlythrownby the mower
in anydirectionand cause seriouspersonalinjuryto the
operatorand others.
3. Lift dischargedoor and pull grass bagup and away
fromthe mowerto disposeof the grass clippings.
9
Be sure no one other
than the operator is
standing near the
lawn mower while
starting engine or
operating mower.
Never run engine indoors or in enclosed,
poorly ventilated areas. Engine
exhaust contains
carbon monoxide, an
odorless and deadly
gas. Keep hands,
feet, hair and loose
clothing away from
any moving parts
on engine and lawn
mower.
Lubrication
• Lubricatepivot pointson theblade and drivecontrol
at least oncea seasonwith lightoil. Thecontrolsmust
operatefreely in both directions.See Figure5-1.
• Lubricatethe wheelsat least oncea seasonwith
lightoil (or motoroil). If wheelsare removedfor any
reason,lubricatesurfaceof the pivotarm and inner
surfaceof thewheelwith light oil.
Your Lawn
Lubricatethe torsionspringand pivot pointon the rear
dischargedoor periodicallywith lightoil to prevent
rust.
• Thetransmissionis pre-lubricatedand sealedat the
factoryand does not requirelubrication.
Followtheengine maintenancesectionfor lubrication
scheduleand instructionfor enginelubrication.
Deck Care
Figure5-1:Areasto lubricateon mower.
,_
WARNING:Never tip the mower more than 90°
in any direction and do not leavethe mower
tipped for any length of time. Oil can drain intothe
upper partof the engine causing a starting problem.
WARNING
A ,vays
stop
eng,"e;
disconnect
spark
1. Disconnectsparkplug wire. Draingasolinefrom lawn
mower,or placea pieceof plasticunderthe gas cap.
plug, and ground
against engine before
2. Tip mowersothat it restson the housing.Keepthe
sidewith the air cleanerfacingup. Hold mowerfirmly.
cleaning,lubricating
3. Scrapeand cleanthe undersideof the deck with a
suitabletool. Do notspraywith water.
or doing any kind of
maintenanceonyour
machinel
4. Putthe mowerback on its wheelson the ground.If
youhad putplasticunderthe gas capearlier,make
sureto removeit now.
J
Figure5-2:Cut wireto removerearflap.
General
Recommendations
Engine
• Alwaysobservesafetyruleswhen performing
anytype of maintenance.
NOTE: Do not use a
pressure Washeror
garden hose t0 clean
y0ur uniL Thesemay
cause damage to
electric components;
spindles pulleys bear:
ings 0rthe enginel The
use of Wate[will result
in shortened life and
Care
• Maintainoil levelas instructedin the enginemaintenancesection.
• Thewarrantyon this lawnmowerdoesnot cover
itemsthat havebeen subjectedto operatorabuse
or negligence.To receivefull valuefromwarranty,
operatormustmaintainthelawn moweras
instructedhere.
Serviceair cleanerevery25 hoursundernormal
conditions.Cleaneveryfew hoursunderextremely
dustyconditions.Referto the engine maintenance
section.
• Changingof engine-governedspeedwill void
enginewarranty.
Cleansparkplug and resetthegap once a season.
Checktheengine maintenancesectionfor correct
plug type and gap specifications.
• All adjustmentsshouldbe checkedat leastonce
eachseason.
• Periodicallycheckall fastenersand makesurethese
are tight.
• Cleanengineregularlywith a cloth or brush. Keepthe
coolingsystem(blowerhousingarea) cleanto permit
properair circulation.Removeall grass,dirt and
combustibledebrisfrom mufflerarea.
Replacing
ARNING:Alwaysstop engine,disconnect
spark plug,and groundagainst engine
before performingany type of maintenance on your
machine.
Rear Flap
1. Toremoverearflap, cut off the flat end of the wire rod
which securesit to the deck.See Figure5-2.
_1
2. Attachthe newflapand newrod to deck, bendingthe
endsof the new rod overto secureto deck.
reduce serviceability.
10
=,
f
Blade Care
_
ARNING:Whenremovingcuttingblade
for sharpeningor replacement,protectyour
handswith a pairof heavygloves or use a heavyrag
to holdblade.
1. Disconnectsparkplug wirefrom spark plug.Turn
moweron its side makingsurethat the air filter and
the carburetorare up.
2. Removebolt, bell blade support,blade,and blade
adapterfrom the enginecrankshaft.See Figure5-3.
3. The bladecan be sharpenedwith a fileor on a
grindingwheel. Donot attemptto sharpenthe blade
while it is still on the mower.Whensharpeningblade,
followoriginal angleof grind. Removemetalfrom the
heavy sideand grind cuttingedgesequallyto keep
blade balanced.Balancethe blade on a round shaft
screwdriverto checkfor balance.
J
Figure5-3:Remove
bladeandrelatedhardware.
_
ARNING:An unbalanced blade will cause
excessivevibrationwhen rotating at high
speeds.It may causedamageto mower,and could
break causingpersonal injury.
WARNING
4. Lubricatetheenginecrankshaftand the inner surface
of the blade adapterwith lightoil. Slide the blade
adapteronto the enginecrankshaft.Placethe blade
on theadaptersuch that the sideof the blade marked
"Bottom"(or with part number)facesthe groundwhen
the mowerisin the operatingposition.Makesurethat
blade is alignedand seatedon bladeadapterflanges.
When removing
the cutting blade
for sharpening or
replacement or
when sliding the belt
around it, protect
your hands with a
pair of heavy gloves
or use a heavy rag to
hold the blade.
5. Placeblade bell supporton the blade.Align notches
on the bladebell supportwith smallholesin blade.
Replacehex boltand tightenhex boltto torque:450
in.Ibs. rain.,600 in.Ibs.max.
Toensuresafe operationof yourmower,periodically
checkthe blade boltfor correcttorque.
Changing
Figure5-4:Remove
coverandloosentransmission
screw.
the Belt
1. Removetwo shoulderscrewssecuringfrontdrive
cover to mowerdeck.Referto Figure5-4. Press
inwardon sides of front drivecoverand releasetabs
that secureitto the heightadjusterbrackets.Remove
drivecover from mower.
.
.
.
f
Loosenscrewholdingbelttensionspringto
transmission.See Figure5-4. Do not removescrew
completely.As youloosenit, tensionon the belt will be
released.
Pushtransmissionup a little and slidebelt off the
transmissionpulley.Lift mowerto access beltfrom
undersideof mower.Slide beltoff of enginepulleyand
aroundthe blade.See Figure5-5.
Replacewith newbelt, workingaroundblade.Make
sure belt isfirmly seatedon enginepulleywhilepulling
from the othersideand slidingit aroundthetransmission pulley.Tightenscrewloosenedearlierto secure
Figure5-5:Remove
beltfromaroundblade.
belt tensionspringto the transmission.Reassemble
front drivecover.
11
An unbalanced blade
will cause excessive
vibration when rotat=
ing at high speeds. It
may cause damage
to mower, and could
break causing personal injury.
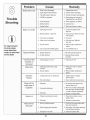
Problem
Cause
Enginefalt'ls to star
Trouble
Engineruns erratic
1....Bade contro d sengaged
1 Engagebade contro
2. Sparkplug bootdisconnected•
2. Connectwire tosparkplug•
3. Fue tank emptyor stalefuel.
3. Filltank with clean,fresh gasoline•
4. CHOKEnotactivated,
4. Chokeengineas instructedin
"OperatingYourLawnMower•
5 Faultyspark plug.
5• Clean,adjust gap,or replace•
6, Blockedfuel line.
7. Engineflooded•
6. Cleanfuel line.
7, Wait a few minutesto restart•
1. Sparkplug bootloose.
1. Connectand tightenspark
plug boot.
2. Blockedfuel lineor stale fuel.
2. Cleanfuel line;fill tank with clean,
fresh gasoline.
3. Ventingas cap plugged.
3. Clearvent.
4. Wateror dirt infuel system.
4. Drainfuel tank. Refillwith
fresh fuel.
5. Dirty air cleaner.
5. Referto enginemaintenance
section.
6. Unit runningwith CHOKEapplied.
6. PushCHOKEknob in.
For repairs beyond
the minor adjust'
Remedy
ments listed here,
contact an authorized
service
Engine overheats
I 1, Engineoil levellow.
Occasional skips
(hesitates) at
high speed
Idles Poorl Y
I
Excessive
Vibration
1. Fillcrankcasewith properoil.
1. Sparkplug gap too close.
1. Adjust gap to .030".
1• Sparkpug foued fau ty or gap
toowide.
1. Resetgap to .030" or repace
spark plug.
2. Dirty air cleaner.
2. R:;_rotnO
" enginemantenance
1. Cuttingbladelooseor unbalanced.
1. Tightenblade and adapter.
Balanceblade.
2. Bentcuttingblade.
2. Seean authorizedservicedealer.
Mower will not
I 1. Wet grass.
1. Donot mowwhengrass is wet;
mulch grass (If
I
wait until laterto cut
2. Mowonceat a high cuttingheight,
then mowagain at desiredheight
or makea narrowercuttingpath•
Equipped)
2. Excessivelyhighgrass.
I
i¸
Unevencut
Mower w not
r
I
se If pope
3 Dull blade
•
"
3. Sharpenor replaceblade•
1. Wheelsnot positionedcorrectly.
1. Placeall fourwheelsin same
heightposition.
2. Dull blade.
2. Sharpenor replaceblade.
1. Belt notinstalledproperly.
1. Checkbeltfor properpulleyinstalat on and movement
'
2. Debriscogging driveoperation,
2. Stopengine,disconnectspark plug
3. Damagedorworn belt.
bootand cleanout debris•
3. Inspectand replacebelt.
12
S".............
Off=Season
Storage
The followingstepsshouldbe taken to prepareyour lawn
mowerfor storage.
1. Cleanand lubricatemowerthoroughlyas describedin
the lubricationinstructions.
2. We do not recommendthe useof a pressurewasher
or gardenhoseto cleanyour unit.
3. Referto enginemanualfor correctengine
storageinstructions.
4. Coat mower'scuttingblade with chassisgreaseto
preventrusting.
5. Storemowerin a dry, cleanarea. Donot storenext
to corrosivematerials,suchas fertilizer.
Whenstoringanytype of powerequipmentin a poorly
ventilatedor metal storageshed, careshouldbe taken
to rust-prooftheequipment.Usinga lightoil or silicone,
coat theequipment,especiallycablesand all moving
parts of yourlawnmowerbeforestorage.
Safety Labels Found On Your Lawn Mower
WARNING
DO NOT remove safety
(or any) labels from
mower for any reason.
REPLACEIMMEDIATELY.
J Engines emit carbon monoxide. DO NOT run in enclosed
• _',3_ J aroa.
|
,)
13
WARNING: Gasoline and itsvapors are extremely flammable and explosive. Fire or
explosion can cause severe burns or death. If gasoline isspilled on yourself or your
clothes, wash your skin and change clothes immediately.
Whenoperatingequipment,do not tip engineor
equipmentat anglewhich causesgasolineto spill.
Gasoline and its vapors are
extremely flammable and
explosive. Fire or explosion can
cause severe burns or death. If
Do notchoke carburetorto stopengine.
Whentransportingequipment,transportwith fuel tank
EMPTY.
gasoline is spilled on yourself
or your clothes, wash your skin
and change clothes immediately.
Whenstoringgasolineor equipmentwith fuel in tank,
storeawayfrom furnaces,stoves,waterheatersor
otherappliancesthat havepilot lightor other ignition
sourcebecausethey can ignitegasolinevapors.
Whenaddingfuel, turnengineOFF and let engine
coolat least2 minutesbeforeremovinggas cap.
o
Fill fueltank outdoorsor in wellventilatedarea.
o
Use onlyan approvedgasolinecontainer.
o
WARNING
Gasolineand itsvapors
areextremelyflammable
andexplosive. Fireor explosioncancausesevere
burns or death. If gasoline
is spilledon yourselfor
yourclothes,washyour
skinand changeclothes
immediately.
Startingenginecreates
sparking.Sparkingcart
ignitenearby flammable
gases. Explosionand fire
could result.
Unintentional sparking
can result in fire or electric shock. Unintentional
start-upcan resultin
I entanglement,traumatic
amputation, or laceration.
,_
__
Neverfill containersinsidea vehicleor on a truck or
trailerbed with a plasticliner.Alwaysplacecontainers on the groundawayfrom yourvehiclebefore
filling.
ing. Sparking
can
ignite sparknearby
Starting
engine
creates
flammable gases. Explosion and
fire could result,
If thereis a naturalor LP gas leakagein area,do not
startengine.
• If possible,removegas-poweredequipmentfrom the
• Do not usepressurizedstartingfluidsbecausevapors
truckor trailerand refuelit on theground.If this is
are flammable.
not possible,then refuelsuch equipmenton a trailer
with a portablecontainer,ratherthan froma gasoline
dispensernozzle.
Keepthe nozzlein contactwith the rimof thefuel
tank or containeropeningat all timesuntilfueling is
complete.Do notuse a nozzlelock-opendevice.
_
Do notoverfillfuel tank. Filltank to approximately
2 cm belowlowestportionof neckto allowfor fuel
expansion.
Start and run engineoutdoors.
Keepgasolineawayfrom sparks,open flames,pilot
lights,heat,and other ignitionsources.
Do not startor run enginein enclosedarea,evenif
doorsor windowsare open.
Neverfuelequipmentindoorsbecauseflammable
vaporswill accumulatein the area.
Extinguishall cigarettes,cigars,pipes,and other
sourcesof ignition.
_
Checkfuelline,tank, cap, andfittings frequentlyfor
cracksor leaks.Replaceif necessary.
Whenstartingengine,makesurespark plug,muffler,
fuelcap and air cleanerare in place.
Do notcrank enginewith spark plug removed.
If fuelspills,wait untilit evaporatesbeforestarting
engine.
oxide,
angive
odorless,
colorless,
ngines
off carbon
monpoisonous gas. Breathing carbon
monoxide can cause nausea,
fainting, or death.
in fire or electric shock. Uninnintentional sparking can result
tentional start-up can result in
entanglement, traumatic amputation, or laceration.
• Beforeperformingadjustmentsor repairs,disconnect
sparkplug wireand keepit awayfrom spark plug.
• Whentestingfor spark,use approvedspark plug
tester.
Do notcheckfor spark with sparkplug removed.
14
Running engine produces heat.
Engine parts, especially muffler,
become extremely hot. Severe
thermal burns can occur on
• Tie up long hairand removejewelry.
Do notwear loose-fittingclothing,danglingdrawstringsor itemsthat couldbecomecaught.
contact. Combustibledebris,
such as leaves, grass, brush, etc., _
can catch fire.
(kickback)
will pull
apid retraction
of hand
starterand
cord
arm toward engine faster than
you can let go. Broken bones,
fractures, bruises or sprains
could result.
• Allow muffler,enginecylinder,and fins to cool before
touching.
•
Keepchildrenawayfrom hot or runningengines.They
can sufferburnsfrom a hot muffler.
Removeaccumulatedcombustiblesfrom mufflerand
cylinderarea.
_
• Whenstartingengine,pull cordslowlyuntil resistance isfelt,then pull rapidly.
• Removeall externalequipment/engineloadsbefore
startingengine.
contact
entangle
hands,
Rotatingorengine
parts
can feet,
hair, clothing, or accessories.
Traumaticamputation or severe
laceration can result.
Operateequipmentwithguardsin place.
Keephandsand feet awayfrom rotatingparts.
International
• Directcoupledequipmentcomponentssuchas, but
not limitedto blades,impellers,pulleys,sprockets,
etc., mustbe securelyattached.
Safety
Symbols
A
SafetyAlert
ReadOwner's
Manual
Label Location
This labelwarns youof potentialhazardsthat can
causeseriousinjury. Readit carefully.Referto Figure
8-1for explanationof symbols.If the labelcomesoff or
becomeshardto read,contact thedealer for replacement.
HotSurface
UnleadedFuel
Start
Figure8-1: Internationalsymbolsandmeanings.
15
Running engine produces
heat. Engineparts, especiallymuffler, become
extremely hot. Severe
thermal burns can occur
on contact.Combustible
debris,such as leaves,
grass,brush, etc., can
catchfire.
Rotatingengine parts
can contactor entangle
hands, feet, hair, clothing,
or accessories. Traumatic
amputation or severe
laceration can result.
and Meanings
ToxicFumes
WARNING
GasolineIs
Flammable
Run
Rapidretractionof starter
cord(kickback) willpull
handand armtoward
enginefaster than you
cartlet go. Broken bones,
fractures, bruises or
sprainscould result.
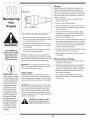
Know Your Engine
Fuel Cap
Air Cleaner
Starter
Gri
Oil Fill Ca
Oil Drain----_
Spark Plug
Muffle_
Figure9-1:Themajorcomponents
oftheengine.
IMPORTANT:This
engine is sh pped
Readthis sectionbeforestartingyourlawnmowerengine.Comparethe illustrationin Figure9-1 with your lawnmower
engineto familiarizeyourselfwith the locationof variouscontrolsandadjustments.
without gasoline or oil
in the engine. Running
the engine with insufficient oil can cause
Pre-Operation
serious engine damage
and void the engine
warranty.
IMPORTANT:Using
non- detergentoil or 2stroke engine oil could
shorten the engine's
service life.
Be sure to check the
engine on a level
surface with the engine
stopped.
Check
__
lOw
Oil Recommendations
___
iMPORTANT:This engineis shippedwithout gasoline or oil in the engine.Running the enginewith
insufficientoil can causeseriousenginedamage
and void the enginewarranty.
20w
m__
20
mmu30
• Beforestartingengine,fill with oil. Donot over-fill.Oil
capacityis about20 oz.
40 IIm_
I
20w40, 20w50 ____mh_,
I
Use a 4-stroke,or an equivalenthigh detergent,
premiumquality motoroil certifiedto meet or exceed
U.S.automobilemanufacturer'srequirementsfor service
classificationSG, SE Motoroils classifiedSG,SF will
showthis designationon thecontainer.
v
15w40, 15w50 ______
®, 10w40 _____mhk,
10w30 _____1
.L
("C)-30 ° -20 ° -10 ° 0 °
SAE 10W-30is recommendedfor general,all temperatureuse. If singleviscosityoil is used, selectthe
appropriateviscosityfor theaveragetemperaturein your
area fromthe chart to the right.
(°F)-20 °
0°
200
10 °
400
200 300 400
600 800
100 °
Ambient Temperature
1. SingleViscosity
2. Multi Viscosity
iMPORTANT:Usingnon detergent oil or 2-stroke
engineoil couldshortenthe engine'sservicelife.
16
Check Oil Level
iMPORTANT:Be sure to checkthe engine on a level
surface with the engine stopped.
1. Removethe oil fillercap and wipethe dipstickclean.
See Figure9-2.
2. Insertthe dipstickintothe oil fillerneck, butdo not
screwit in.
3. If the levelis low, slowlyadd oil to the upperlimit on
thedipstick.See Figure9-2 inset.
Dipstick
Oil
Fill Cap/
_
.
4. Tightendipstickfirmlybeforestartingengine.
IMPORTANT:Do not overfill. Overfilling with oil may
causesmoking,hardstarting, spark plug fouling, or
oil saturation of air cleaner.
Fuel Recommendations
Use automotivegasoline(Unleadedor lowleadedto
minimizecombustionchamberdeposits).Neverusean
oil/gasolinemixtureor dirty gasoline.Avoidgettingdirt,
dust,or waterin the fuel tank.
,_bl=
J
Figure9-2:Checkingthe oil level.
mable and is explosiveunder
certain
WARNING:Gasoline
is extremelyflamconditions.
Refuel in a well-ventilatedarea with the engine
stopped. Do not smoke or allow flames or sparks
in the area where the engine is refueledor where
gasoline is stored.
Always keephands and
feet clear of equipment
moving parts.Do not use
a pressurizedstarting
fluid. Vapors are flare,
mable.
Do not overfill the fuel tank (there should be no fuel
in the filler neck). After refueling, make sure the tank
cap isclosed properlyand securely.
i
Be careful not to spill fuel when refueling. Spilled
fuel or fuel vapor may ignite.If any fuel is spilled,
make sure the area is dry before starting the engine.
Avoidrepeatedor prolongedcontact with skin or
breathing of vapor.
Check
Figure9-3:Startingthemower.
(Yourmowermaydifferfromthat
shown)
Fuel Level
IMPORTANT:Do not
1. Cleanaroundfuelfill beforeremovingcap to fuel.
2. Filltank to approximately1-inchbelowlowestportion
of neck to allowfor fuelexpansion.Be carefulnot to
overfill.
2. Standingbehindthe mower,depressthe bladecontrol
handleand hold it againstthe upperhandle.
3. Pullthe startergrip lightlyuntil resistanceis felt,
thenpull rapidlyto overcomecompression,prevent
kickback,and start engine.Repeatif necessary.See
Figure9-3.
iMPORTANT:Before refueling,allow engineto cool
2 minutes.
Starting
,__1i=
The Engine
IMPORTANT:Do not allow the starter grip to snap
back against the ropeguide. Return it gently to
preventdamage to the starter.
feet
clear of equipmentmoving
parts.
WARNING:Alwayskeep
hands and
Do not use a pressurizedstarting fluid.
Vapors are flammable.
4. Whenenginewarmsup, pushin the choke knob.See
Figure9-3.
Stopping
1. Pull out thechoke knoblocatedon the left sideof
the upperhandle.See Figure9-3. Use of the choke
may notbe necessaryif the engine iswarm or the air
temperatureis high.
The Engine
1. Releasethe bladecontrol.
17
allow the starter grip to
snap back against the
engine. Return it gently
to preventdamage to
the starter.
WARNING:Shut off the engine before
performingany maintenance. To
preventaccidental start-up, disconnect
the spark plug boot.
Periodicinspectionand adjustmentof theengine is
essentialif high levelperformanceis to be maintained.
Regularmaintenancewillalso ensurea long servicelife.
The requiredserviceintervalsand the kindof maintenanceto be performedare describedin thetable below.
Followthe hourlyor calendarintervals,whicheveroccur
first. Morefrequentserviceis requiredwhenoperatingin
adverseconditions.
IMPORTANT:If enginemustbe tippedto transport
equipmentor to inspector removegrass,keepspark
plug sideof engine up.Transportingor tippingengine
spark plugdownmay causesmoking,hardstarting,
spark plugfouling,or oil saturationof air cleaner.
Maintenance
First5 hours
Tasks
ChangeEngine
Oil
Eachuseor
every5 hours
Schedule
Everyseason Everyseason
or 25 hours
or 50 hours
v"
Everyseason
or 100 hours
Service Dates
v"
Service Air
Cleaner
WARNING
Shut off the engine
v"
Service Spark
Plug
beforeperforming
type of maintenance,
Clean Finger
ro.roveo ,oo!doo
Guardo!
........
start-upidisconnect
t,e parkp boot:
Beforetipping engine
Muffler
CleanAround
1-Servicemorefrequentlywhenusedin dustyareas.
ff If operatingunder heavyload or highambienttemperature.
drain oil, drain fuel
f
Oil Change
Oil Fill Cap
from tank by running
engine until fuel tank
is empty;
IMPORTANT:Be sureto checkengineon a level surface
with the enginestopped.Drainthe oil whilethe engine is
still warmto assurerapidand completedraining.
Removeoil fill cap and drain oil by eitherremoving
drain plugor turningmoweron its side (air cleanerside
up) and allowingoil to drain intoa suitablecontainer.
See Figure10-1.
WARNING: Before tipping engineor
equipmentto drain oil, drain fuel from
tank by runningengine until fuel tank is
empty.
P
iMPORTANT:Be sure
to check engineon a
Drain
level surfaceW th the
engine stopped Drain
the oil while the engine
is still warm to assure
rapid and complete
J
i
Figure10-1:Changing
theoil.
Oil Service
• Checkoil level regularly.
draining:
i
Be sure correctoil levelis maintained.Checkevery
five hoursor daily beforestartingengine.See oil
checkingprocedurein the Operationsection.
2. Reinstallthe drain plug(if removed),and tightenit
securely.
3. Refillwith the recommendedoil (see Operation
section)and checkthe oil level.See Figure10-1.
4. Reinstallthe oil fill cap securely.
18
IMPORTANT:Usedmotoroil may causeskin cancer
if repeatedlyleft in contactwith the skin for prolonged
periods.Althoughthis is unlikelyunlessyou handleused
oil on a dailybasis,it is still advisableto thoroughlywash
yourhandswith soapand wateras soon as possible
after handlingusedoil.
PaperElement
NOTE:Pleasedisposeof usedmotoroil in a mannerthat
is compatiblewith the environment.We suggestyoutake
it in a sealedcontainerto yourlocal servicestationfor
reclamation.Donot throwit in the trash or pourit on the
ground.
Air Cleaner
Service
Foam Element
A dirty air cleanerwill restrictair flow to the carburetor.
Topreventcarburetormalfunction,servicethe air cleaner
regularly.Servicemorefrequentlywhenoperatingthe
enginein extremelydustyareas.
Figure10-2:Servicing
theair cleaner.
Spark Plug
__k
flash pointsolventsfor cleaningthe
ARNING:Never use gasolineor low
air cleaner element.A fire or explosion
could result.
WARNING
Never use gasoline
or low flash point solvents for cleaning the
air cleaner element.
IMPORTANT:Neverrunthe enginewithouttheair
cleaner.Rapidenginewearwill result.
1. Removethe wing boltand the air cleanercover.
Removethe elementsand separatethem. See Figure
10-2.Carefullycheck bothelementsfor holesor tears
and replaceif damaged.
A fire or explosion
could result.
2. Foam element: Wash theelementin a solutionof
householddetergentand warm water,then rinse
thoroughly,or wash in nonflammableor high flash
pointsolvent.Allowtheelementto dry thoroughly.
Soakthe elementin cleanengineoil and squeezeout
theexcessoil. The enginewill smokeduring initial
start-upif too muchoil is left in the foam.
3. Paper element: Taptheelementlightly severaltimes
on a hard surfaceto removeexcessdirt, or blow
compressedair throughthe filterfrom the insideout.
Nevertry to brushthedirt off; brushingwillforce
dirt intothe fibers.Replacethe paperelementif it is
excessivelydirty.
Spark Plug
DO NOT check for
Figure10-3:Thesparkplugandboot.
Spark
Plug Service
spark with spark plug
removed. DO NOT
crank engine with
spark plug removed.
__i=
with spark plugremoved. DONOT crank
ARNING:DONOT check for spark
engine with spark plug removed.
Toensureproperengineoperation,thespark plug must
be properlygappedand free of deposits.
1. Removethe spark plug bootand usea sparkplug
wrenchto removethe plug.See Figure10-3.
,_
running, the muffler will be very hot. Be
WARNING:if
engine
has been
carefulnot to the
touch
the muffler.
2. Visuallyinspectthe spark plug.Discardthe sparkplug
if thereis apparentwear,or if the insulatoriscracked
or chipped.Cleanthe sparkplug with a wirebrushif it
is to be reused.
19
if the engine has
been running, the
muffler will be very
hot. Be careful not to
touch the muffler.
f
Storage
Electrode
Maintaining
Enginesstoredover30 daysneed to be drainedof fuel
to preventdeteriorationand gumfrom formingin fuel
systemor on essentialcarburetorparts. If the gasolinein
yourenginedeterioratesduringstorage,you mayneed to
havethe carburetor,and otherfuel systemcomponents,
servicedor replaced.
1. Removeall fuel fromtank by runningengineuntil it
stopsfrom lack of fuel.
2. Changeoil. See Oil Changesection.
--,,- *-- 0.030 in.
Figure10-4:Measurethepluggapwitha feelergauge.
3. Measurethe plug gap with a feelergauge.Correct
as necessaryby bendingsideelectrode.See Figure
10-4.Thegap shouldbe set to 0.030in.
WARNING
Accumulation of
debris around muffler
cause afire:
b foovery
o o
4. Checkthat the sparkplug washeris in good conditionand threadthe spark plug in by handto prevent
cross-threading.
5. Afterthe sparkplug is seated,tightenwith a spark
plug wrenchto compressthe washer.
6. If possible,alsoavoidstorageareaswith high humidity,
becausethat promotesrustand corrosion.
IMPORTANT:The sparkplug mustbe securelytightened.An improperlytightenedsparkplug can become
very hotand maydamagethe engine.
Clean
IMPORTANT:
DO
not
7. Keepthe enginelevelin storage.Tiltingcan causefuel
or oil leakage.
Removing
2. If the fuelwas drainedduringstoragepreparation,fill
the tank with freshgasoline.If you keepa container
of gasolinefor refueling,makecertain it containsonly
freshfuel. Gasolineoxidizesand deterioratesover
time,causinghard starting.
3. If the cylinderwas coatedwith oil duringstorage
preparation,the enginewill smokebrieflyat startup.
This is normal.
Using a garden hose
IMPORTANT: Do not spray engine with water to clean
because water could contaminate fuel. Using a garden
hose or pressure washing equipment can also force
water into the air cleaner or muffler opening. Water in
the air cleaner will soak the paper element, and water
that passes through the element or muffler can enter the
cylinder, causing damage.
or pressure Washing
equipment Cana so
force water into the
air cleaner ormuffler
opening:Water in the
air cleane! will soak
the paper e!emen
and water that Passes
through the element
or muffler canenter
__lk
From Storage
1. Checkyourengineas describedin the Pre-Operation
Checksectionof this manual.
Engine
If theengine hasbeen running,allowit to coolfor at
least halfan hour beforecleaning.Periodicallyremove
grassand dirt build-upfrom engine.Cleanfingerguard
and aroundmuffler.Cleanwith a brushor compressed
air.
spray engine Withwater
to clean because water
could contaminatefuel
4. Cleangrassand debrisfrom aroundengine,under
fingerguard,and under,aroundand behindmuffler.
Touchup anydamagedpaint, and coatother areas
that may rust with a lightfilm of oil.
5. Storein a clean, dry and wellventilatedarea awayfrom
anyappliancethat operateswith a flame or pilotlight,
such as a furnace,waterheater,or clothesdryer.Also
avoidanyarea with a sparkproducingelectricmotor,
or wherepowertoolsare operated.
NOTE:Wheninstallinga newspark plug,tighten 1/2
turnafter the spark plug seatsto compressthewasher.
Whenreinstallinga usedsparkplug,tighten 1/8-1/4turn
after the sparkplug seatsto compressthe washer.
Inspect and clean
3. Removesparkplug and pour about1/2 an ounceof
engineoil intocylinder.Replacespark plug and crank
slowlyto distributeoil.
around muffler could causea fire.
ARNING:Accumulationof debris
Inspect and clean before every use.
the cylinder;causing:
damage:
i
2O
NOTES
21
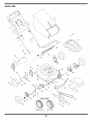
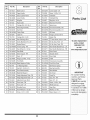
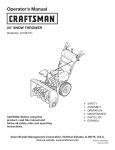
Model 44M
I
W
\
S-WaveTread
Bar Tread
22
i
Fief.
No.
Part No.
Description
Fief.
No.
Part No.
Description
1
747-1161A BladeControl
34
746-04299
ControlCaNe-48"
2
749-1092A UpperHandle
35
710-0606
Screw,1/4-20x 1.50
3
747-04080 Grass CatcherFrame
36
731-05642 Trailshield
4
749-0928A LowerHandle
37
732-0700
TrailshieldWire
5
720-0279
Wing Nut
38
712-0397
Wing Nut, 1/4-20
6
710-1205
RopeGuide
39
747-04587
RearDoorPivot Rod
7
710-1174
CarriageBolt,5/16-18x 2
40
732-04175
SpringLever
8
664-04007
Grass Bag Assembly
41
687-02071A PivotArmAssembly-RH
9
720-04072 Star Knob
10
746-04239A Choke Cable
42
710-1652
AB Screw
11
726-0240
CableTie
43
712-04065
FlangeLock Nut,3/8-16
12
710-0703
CarriageBolt,I/4-20
44
714-0104
HairpinClip
13
631-04225
RearDischargeDoor
45
710-0654A TTSems Screw,3/8-16x 1.00
14
710-04577 Screw,Machine,M-4x 10
46
687-02193
Ht.Adj. Assy.Front- LH
15
731-05401
687-02194
Ht.Adj. Assy.Front- RH
16
732-04090A TorsionSpring-RH
687-02270
RearHandleBracketAssy.- LH
17
734-04087
687-02271
RearHandleBracketAssy.- RH
18
731-04150C RearBaffle
48
747-1214
DriveControl
19
750-04594 SleeveSpacer- RH
49
710-1650
ShoulderScrew
20
787-01277
Deck- 21"
50
746-04303
DriveCable
21
712-04064
FlangeLock Nut, 1/4-20
51
754-0637A V-Belt
22
782-5002B FrontBaffle
52
618-04376A TransmissionAssembly
23
748-04015A BladeAdapterw/Pulley
53
731o05021A FrontDriveCover
24
742-0741
21" MulchingBlade
54
732-1043
BeltTensionSpring
25
710-1257
Hex Bolt, 3/8-24 x2.5
55
682-0015
BearingAssembly
26
687-02044
PivotPlateAssembly
56
736-0447
WaveWasher
710-0216
HexScrew
IMPORTANT
For a proper working
machine, use Factory
Approved Parts.
V-BELTS are specially
designed to engage
and disengage safely.
A substitute (non OEM)
V-Belt can be dangerous by not disengaging
completely.
Parts List
687-02070A PivotArmAssembly- LH
EngineShroud
47
RearWheel,8x 1.8, Bar
27
736-0524B BladeBell Support
57
28
787-01298
HeightAdjustmentPlate- RH
58
715-0221
DowelPin
787-01299
HeightAdjustmentPlate- LH
59
717-1762
Gear,14T- RH
29
720-0426
AdjustmentLeverKnob
717-1761
Gear,14T- LH
30
732-0706
FrontLever- RH
60
710-04531
Screw,1/4-20x.390
732-0707
FrontLever- LH
61
782-7551A Wheel DustCap
31
738-0507B ShoulderScrew
62
716-0102
SnapRing
32
634-04100
FrontWheel,8 x 1.8, Bar
63
736-0474
Washer,1.5"0D
33
710-1241
Screw,1/4-15x 1.000
64
750-04595
SleeveSpacer- LH
23
parts, contact
1=800,800'7310
www,mtdproducts,com
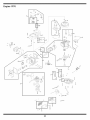
Engine IP70
21-
1
@
1
14-
@
I
22
24
Ref.
No.
PartNo.
Description
1.
951-10368
FuelTank
2.
951-10369
FlywheelShroud
3.
951-10335
RubberFuelTankMountingWasher
4.
951-10334
Oil FillerTubeAssembly
5.
951-10333
DipstickAssembly
6.
951-10413
CylinderHeadComplete
7.
951-10414
ShortBlockAssembly
8.
951-10321
StopSwitchand BrakeAssembly
9.
951-10319
RecoilSpringand PulleyAssembly
10. 951-10344
PushRodKit
11. 951-10345
ValveKit
12. 951-10370
Oil DrainPlugand WasherAssembly
13. 951-10366
IgnitionCoil
14. 951-10310
CarburetorAssembly
15. 951-10307
FlywheelKey
16. 951-10412
Air CleanerHousingAssemblyComplete
17. 951-10342
MufflerStudAssembly
18. 951-10364
FuelLine Kit- Inc.hoses,clamps& filter
19. 951-10358
FuelFilter
20.
951-10300
FuelCapAssembly
21.
951-10299
RecoilStarterAssembly
22.
951-10298
Air CleanerKit
23.
951-10297
Air CleanerThumbScrew
24.
951-10411
MufflerGuard
25.
951-10403
Muffler
26.
951-10402
MufflerGasket/Heat Shield
27.
951-10387
GovernorReturnSpring
28.
951-10292
SparkPlug
-
952Z1P70FU
Engine- Complete
-
951-10326
CarburetorKit- Major
-
951-10323
CarburetorKit - Minor
-
951-10416
GasketKit- Complete
-
951-10417
GasketKit- External
-
951-10351
SparkArrestor
Illustrated
CTORY PARTS
NOTE:Illustrated
partswithouta numericcall-outarenotservicable
components.
25
To order replacement
parts, contact
1=800-800-7310
or visit
www.mtdproducts.com.
MTD LLC (MTD), The United States Environment
Protection Agency (U. S. EPA)
Emission Control System Warranty Statement
(Owner's Defect Warranty Rights and Obligations)
The U. S. EPAand MTDare pleasedto explaintheemissionscontrolsystemwarrantyon your modelyear2005and latersmalloff-roadengine.
New smalloff-roadenginesmust be designed,built and equippedto meet the stringentanti-smogstandards.MTDmustwarrantytheemission
controlsystemon your enginefor the periodof time listed below,providedthere hasbeen no abuse,neglector impropermaintenanceof your small
off-roadengine.
Youremissioncontrolsystemmay includeparts suchas the carburetor,air cleaner,ignitionsystem,exhaustsystem,and otherassociatedemission-relatedcomponents.
Wherea warrantableconditionexists,MTDwill repairyour smalloff-roadengineat no cost to yourincluding
diagnosis,parts and labor.
MANUFACTURER'S
WARRANTY COVERAGE:
This emissionscontrolsystemiswarrantedfor two years.If anyemission-relatedparton your engineisdefective,the partwill be repairedor
replacedby MTD.
OWNER'S WARRANTY
RESPONSIBILITIES:
As the smalloff-roadengineowner,youare responsiblefor the performanceof the requiredmaintenancelistedin yourOwner'sManual.MTD
recommendsthat you retainall your receiptscoveringmaintenanceson yoursmall off-roadengine,but MTDcan notdenywarrantysolely for the
lack of receiptsor for yourfailureto ensurethe performanceto all scheduledmaintenance.
As the smalloff-roadengineowner,youshouldhoweverbe awarethat MTDmaydenyyour warrantycoverageifyoursmall off-roadengineor part
hasfaileddue to abuse,neglect,impropermaintenanceor unapprovedmodifications.
Youare responsiblefor presentingyoursmalloff-roadengineto an AuthorizedMTDServiceDealeras soonas a problemexists.The warranted
repairsshouldbe completedin a reasonableamountof time,notto exceed30 days.
If youhaveanyquestionsregardingyour warrantyrightsand responsibilities,you shouldcontact a MTDServiceRepresentativeat 1-800-800-7310
and addressisMTDLLC, EO. Box361131,ClevelandOH,44136-0019.
DEFECTS WARRANTY
REQUIREMENTS
FOR 1995 AND LATER SMALL OFF=ROAD ENGINES:
This sectionappliesto 1995and latersmalloff-roadengines.Thewarrantyperiod beginson the datetheengine or equipmentisdeliveredto an
ultimatepurchaser.
(a) GeneralEmissionsWarrantyCoveracj#_
MTDmustwarrantto the ultimatepurchaserand eachsubsequentpurchaserthat the engineis:
(1) Designed,built,and equippedso as to conformwith all applicableregulationsadoptedbythe Air ResourcesBoardpursuantto itsauthorityin
Chapters1 and 2,Part 5, Division26 of the Healthand SafetyCode;and
(2) Freefrom defectsin materialsand workmanshipthat causethe failureof a warrantedpartto be identicalinall materialrespectsto the part as
describedin the enginemanufacturer'sapplicationfor certificationfor a periodof two years.
.(b)The warrantyon emissions-relatedpartswill be interpreted
as follows:
(1) Anywarrantedpart that isnot scheduledfor replacementas requiredmaintenanceinthe writteninstructions
requiredby Subsection(c)
mustbe warrantedfor the warrantyperioddefinedinSubsection(a)(2). If anysuch partfails during the periodof warrantycoverage,it mustbe
repairedor replacedby MTDaccordingto Subsection(4) below.Any such partrepairedor replacedunderthewarrantymustbe warrantedfor
the remainingwarrantyperiod.
(2) Any warrantedpartthat isscheduledonlyfor regularinspection
in the writteninstructions
requiredby Subsection(c) mustbe warrantedfor
thewarrantyperioddefinedin Subsection(a)(2).A statementinsuch writteninstructions
to the effect of "repairor replaceas necessary"will
not reducethe periodof warrantycoverage.Anysuch part repairedor replacedunderwarrantymustbe warrantedforthe remainingwarranty
period.
(3) Anywarrantedpartthat whichis scheduledfor replacementas requiredmaintenancein the writteninstructions
requiredby Subsection(c)
mustbe warrantedfor the periodof time prior to the first scheduledreplacementpointfor that part. If the partfails prior to the first scheduled
replacement,the part mustbe repairedor replacedby MTDaccordingto Subsection(4) below.Any such part repairedor replacedunder
warrantymustbe warrantedfor the remainderof the period priorto thefirst scheduledreplacementpointfor the part.
(4) Repairor replacementof any warrantedpart underthe warrantyprovisionsof this article mustbe performedat no chargeto the ownerat a
warrantystation.
(5) Notwithstandingthe provisionsof Subsection(4) above,warrantyservicesor repairsmustbe providedat all MTDdistributioncentersthat
are franchisedto servicethe subjectengines.
(6) Theownermustnot be chargedfordiagnosticlabor that leadsto the determinationthat a warrantedpart isinfact defective,providedthat
such diagnosticwork isperformedat a warrantystation.
EPA-1
(7) The enginemanufactureris liable fordamagesto otherenginecomponentsproximatelycausedbya failureunderwarrantyof anywarranted
part.
(8) Throughoutthe engine'swarrantyperioddefinedin Subsection(a)(2), MTDwill maintaina supplyof warrantedparts sufficientto meet the
expecteddemandfor such parts.
(9) Any replacementpart maybe usedin the performanceof any warrantymaintenanceor repairsand mustbe providedwithoutchargetothe
owner.Such usewill not reducethe warrantyobligationsof MTD.
(10) Add-onor modifiedparts that are not exemptedby theAir ResourcesBoardmay not be used.The useof anynon-exemptedadd-onor
modifiedpartsshall be groundsfor disallowinga warrantyclaimmade in accordancewith this article.The enginemanufacturershall notbe
liable underthis article to warrantfailuresof warrantedpartscausedby the useof non-exemptedadd-on or modifiedpart.
(c) MTDwill includea copy of the followingemissionwarrantyparts list with each newengine,usingthose portionsof the list applicableto the
e__&gine.
(1) FuelMeteringSystem
• Coldstart enrichmentsystem(soft choke)
• Carburetorand internalparts
• Fuel Pump
(2) Air InductionSystem
• Air cleaner
• Intakemanifold
(3) IgnitionSystem
• Sparkplug(s)
• MagnetoIgnitionSystem
(4) ExhaustSystem
(5) MiscellaneousItemsUsed in AboveSystem
• Vacuum,temperature, position,time sensitivevalvesand switches
• Connectorsand assemblies
EPA-1
MANUFACTURER'S
LiMiTED WARRANTY
The limitedwarrantyset forth belowisgivenby MTDLLCwith respectto
newmerchandisepurchasedand usedin the UnitedStates,its possessionsand territories.
"MTD"warrantsthis productagainstdefectsin materialand workmanship
for a periodof two (2) yearscommencingon the dateof originalpurchase
and will, at its option,repairor replace,free of charge,anypart foundto
be defectivein materialsor workmanship.This limitedwarrantyshallonly
applyif this producthas beenoperatedand maintainedin accordance
with the Operator'sManualfurnishedwith the product,and has not been
subjectto misuse,abuse,commercialuse, neglect,accident,improper
maintenance,alteration,vandalism,theft, fire,water,or damagebecause
of otherperil or naturaldisaster.Damageresultingfrom the installationor
useof any part, accessoryor attachmentnotapprovedby MTDfor use
with the product(s)coveredbythis manualwill voidyourwarrantyas to
any resultingdamage.
Normalwearparts are warrantedto be free fromdefects in materialand
workmanshipfor a periodof thirty (30) days fromthe dateof purchase.
Normalwearparts include,butare notlimitedto itemssuch as belts,
blades,bladeadapters,grass bags,wheels,engineoil, air filters,and
spark plugs.
NOWTO OBTAINSERVICE:Warrantyserviceis available,WITH
PROOFOF PURCHASE,throughyour localauthorizedservicedealer.To
locatethe dealerin yourarea,checkyourYellowPages,or contact MTD
LLCat RO. Box 361131,Cleveland,Ohio44136-0019,or call 1-800-8007310or logon to our Website at www.mtdproducts.com.
This limitedwarrantydoesnot providecoveragein the followingcases:
a.
b.
c.
Log splitterpumps,valves,and cylindershavea separateone
yearwarranty.
Routinemaintenanceitemssuch as lubricants,filters, blade
sharpening,tune-ups,brakeadjustments,clutch adjustments,
deck adjustments,and normaldeteriorationof the exteriorfinish
due to use or exposure.
Servicecompletedby someoneotherthanan authorizedservice
dealer.
d.
e.
f.
FOR
MTDdoes notextendany warrantyfor productssoldor
exportedoutsideof the UnitedStates,its possessionsand
territories,exceptthose soldthroughMTD'sauthorized
channelsof exportdistribution.
Replacementpartsthat are not genuineMTDparts.
Transportationchargesand servicecalls.
No impliedwarranty, includingany impliedwarranty of merchantability of fitness for a particularpurpose,applies after the applicable
periodof express written warranty above as to the partsas identified. No other express warranty, whether written or oral, except as
mentionedabove, given by any personor entity,includinga dealer
or retailer,with respect to any product,shallbind MTD. Duringthe
periodof the warranty, the exclusive remedyis repairor replacement
of the productas set forth above.
The provisionsas set forth in this warrantyprovidethe sole and
exclusiveremedy arising from the sale. MTDshallnot be liable
for incidentalor consequentialloss or damage including,without
limitation, expensesincurredfor substituteor replacement lawncare
servicesor for rentalexpenses to temporarily replacea warranted
product.
Somestatesdo not allowtheexclusionor limitationof incidentalor
consequentialdamages,or limitationson howlong an impliedwarranty
lasts, so the aboveexclusionsor limitationsmay notapplyto you.
In no eventshall recoveryof any kind be greaterthan theamountof the
purchasepriceof the productsold. Alterationof safety features of the
productshall void this warranty. Youassumethe risk and liability for
loss, damage,or injuryto youand your propertyand/orto others and their
propertyarisingout of the misuseor inabilityto use theproduct.
This limitedwarrantyshall notextendto anyoneotherthanthe original
purchaseror to the personfor whom itwas purchasedas a gift.
HOW STATELAWRELATESTO THiSWARRANTY: This limitedwarrantygives youspecificlegalrights,and you mayalso haveother rights
which vary from stateto state.
IMPORTANT: OwnermustpresentOriginalProofof Purchaseto obtain
warrantycoverage.
MTD LLC, P.O. BOX 361131 CLEVELAND,
OHiO 44136=0019; Phone: 1=800=800=7310