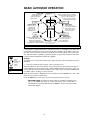
1
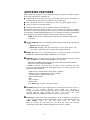
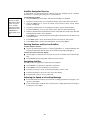
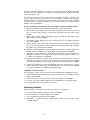
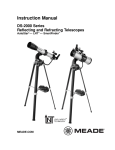
Instruction Manual
#497 AutoStar Handbox
for use with the DS-2090AT-TC and DS-2102AT-TC
MEADE.COM
1
B
L
4
3
5
1 LCD Display
2 ENTER Key
6
7
3 MODE Key
4 GO TO Key
K
Fig. 1: AutoStar keys
® The name “Meade,” “AutoStar,” and the Meade logo are
trademarks registered with the U.S. Patent Office and in
principal countries throughout the world. All rights
reserved.
Patents:
US 6,392,799
Other Patent Pending
© 2005 Meade Instruments Corporation.
6 Number Keys
7 Scroll Keys
8
9
5 Arrow Keys
J
8 ? Key
9 RS232 Port
10 Coil Cord
11 Light key
12 Utility Light
AUTOSTAR FEATURES
Nearly all telescope operations are accomplished with just a few pushes of AutoStar’s buttons.
Some of the major features of AutoStar are:
N
Automatically move the telescope to any of the 30,000 objects stored in the database or
manually enter the astronomical coordinates of any celestial object.
N
Take a guided tour of the best celestial objects to view on any given night of the year.
N
Access a glossary of astronomical terms.
N
Calculate which eyepiece to use for optimum viewing of a celestial object.
The AutoStar Computer Controller provides control of virtually every telescope operation.
AutoStar has soft-touch keys designed to have a positive feel. The LCD (Liquid Crystal Display)
is backlit with a red LED (Light Emitting Diode) for easy viewing in the dark. The backlit display,
key arrangement, and sequential database make AutoStar extremely user friendly.
NOTE: AutoStar does not require batteries; the telescope’s batteries supply power
to AutoStar.
B
2-Line LCD Display: This screen displays AutoStar's menus and information about the telescope.
•
•
c
d
Top line: Lists the primary menu.
Bottom line: Displays other menus that may be chosen, menu options, telescope status or information about a function that is being performed.
ENTER Key: Press to go to the next menu level or to choose an option in a menu. The
ENTER key is similar to the RETURN or ENTER key on a computer.
MODE Key: Press to return to the previous menu or data level. The top menu level is “Select
Item." The MODE key is similar to the ESCAPE key on a computer.
Note: Pressing MODE repeatedly while in the “Select Item” level moves AutoStar to
the topmost screen: “Select Item: Object.”
If MODE is pressed and held for two seconds or more, information about the
telescope's status displays. When the status displays, press one of the Scroll keys to display the following information:
• Right Ascension and Declination (astronomical) coordinates
• Altitude (vertical) and Azimuth (horizontal) coordinates
• Local Time and Local Sidereal Time (LST)
• Timer and Alarm Status
• Date
• Site coordinates
• Battery status
Press MODE again to return to the previous menu.
e
f
GO TO Key: After the telescope is aligned, press to slew (move) the telescope to the coordinates
of
the
currently
selected
object. While
the
telescope
is
slewing, the operation may be aborted at any time by pressing any key except GO TO.
Pressing GO TO again resumes the slew to the object. Also, press
during the alignment or GO TO procedures to activate a "spiral search."
Arrow Keys: The Arrow keys have several functions. Press an Arrow key to slew the telescope in a specific direction (up, down, left and right), at any one of nine different speeds. See
the
to
move
keys
Use
the
Arrow
page
16.
SLEW
SPEEDS,
telescope vertically up and down. The Left Arrow key rotates the telescope
horizontally counterclockwise, while the Right Arrow key rotates it clockwise.
3
Additionally, use the Arrow keys to to move the cursor across the display: Use the Right or
Left Arrow key to move the cursor from one number to the next in the display.
g
h
Number Keys: Press to input digits 0 to 9. To change the speed at which the
telescope moves (known as the “slew” speed) press a NUMBER KEY from 1 through 9. 1
is the slowest speed and 9 is the fastest.
Scroll Keys: Press to access options within a selected menu. The menu is
displayed on the first line of the screen. Options in the menu are displayed, one at a time,
on the second line. Press the Scroll keys to move through the options. Press and hold a
Scroll key to move quickly through the options.
The Scroll keys also control the speed of text scrolling on the AutoStar display. When text
is scrolling, press and hold the Up Scroll key for a faster display speed and the Down Scroll
key for a slower display speed.
i
? Key: Press to access the "Help" file. "Help" provides on-screen information on how to
accomplish whatever task is currently active.
Press the ? key and then follow the prompts on the display to access details of AutoStar
functions in the Help feature. The Help system is essentially an
on-screen instruction manual.
If you have a question about an AutoStar operation, e.g., INITIALIZATION, ALIGNMENT, etc.,
press
the
?
key
and
follow
the
directions
that
scroll
on
the
second line. When satisfied with the Help provided, press MODE to return to the original
screen and continue with the chosen procedure.
j
1)
1!
1@
RS232 Port: Plug in optional cable to download the latest satellite data and
software revisions directly from the Meade website (www.meade.com). You can also
share software with other AutoStar enthusiasts or control your telescope remotely from
your PC. (Requires optional #505 AstroFinder™ Software and Cable Connector Kit. See
the Meade General Catalog or go to www.meade.com for more information.)
Coil Cord Port/Coil Cord: Plug one end of the supplied AutoStar coil cord into this port
located at the bottom of the handbox and the other end into the HBX port of the Computer
Control Panel.
Light/0 Key: Press to turn on Utility light.
Utility Light: Use this built-in red light to illuminate star charts and accessories without
disturbing your eye's adaptation to darkness. Press "0" to turn the light on and off.
4
Initializing AutoStar
This section describes how to initialize AutoStar. Perform this procedure the first time you use
AutoStar.
1.
Tighten Locks: Tighten the Altitude lock and tripod base lock knob.
2.
Plug in AutoStar: Make sure the telescope power switch is in the OFF position. Plug
AutoStar into the HBX port of the Control Panel.
3.
Turn on AutoStar: Flip the telescope power switch to the ON position.
4.
Sun Warning: A message displays that warns you not to look at the Sun. At the end of this
message, press the key prompted by AutoStar to signify that the message has been read
and understood.
5.
Bypass Getting Started: The Getting Started menu displays a scrolling message. Press
ENTER to bypass the Help tutorial.
6.
Daylight Savings Time: The next screen requests the status of Daylight Savings Time.
Press one of the Scroll keys to toggle between the YES/NO settings. When the desired setting displays, press ENTER.
Set Your Location or Zip Code: The Location screen displays. This screen asks you if you
wish to choose either the zip code of your observing location or the location (i.e.,entering
the city and state or country of your observing location). Press Up to select the zip code
option or down to enter the city and state.
Note: The location settings (country/state/province and city, or zip code) are only
asked for the first time you turn on the control panel. If you wish to change this setting later on, use the Site menu.
If you chose the zip code option, the leftmost “0” is highlighted. Use the Scroll keys to scroll
through the digits. When you reach the desired number, use the Right Arrow key to move
to the next digit position. Repeat this process until all 5 digits of your zip code are entered.
Press ENTER.
If you chose the location option, the next screen asks for the country or state/province (listed alphabetically) of the observing site.
Use the Scroll keys to scroll through the list of countries, states, and provinces. Press
ENTER when the correct location displays.
The next screen asks for the city (listed alphabetically) closest to the observing site. Use
the Scroll keys to scroll through the list of cities. Press ENTER when the correct city
appears on screen.
AutoStar then requests the telescope model number. Use the Scroll keys to cycle through
the database of models. Press ENTER when your model number displays.
System initialization is complete. The Easy Alignment feature begins automatically after
the control panel is initialized.
7.
a.
b.
8.
9.
Observe a Star using the Automatic Tracking Feature
In this example, the AutoStar Arrow keys are used to find a star, and then AutoStar's tracking
capability automatically keeps the star centered in your telescope's eyepiece.
1.
Set in Home Position: Level the optical tube and point it North. Make sure that the Altitude Lock
and tripod base lock knob are secured as described previously.
2.
Plug in AutoStar: Make sure the telescope power switch is in the OFF position. Plug
AutoStar into the HBX port of the Control Panel.
3.
Turn on AutoStar: Flip the telescope power switch to the ON position.
4.
Sun Warning: A message displays that warns not to look at the Sun. At the end of this
message, press the key prompted by AutoStar to signify that the message has been read
and understood.
5.
Select Daylight Savings: Set Daylight Savings, if prompted.
6.
Select Setup: Align Option: Press MODE. "Setup: Align" displays.
7.
Select Setup: Targets Option: Press the Scroll Down key repeatedly until "Setup: Targets"
displays. Press ENTER.
5
8.
Select Targets: Astronomical Option: "Targets: Terrestrial" displays. Press either of the
Scroll keys once. "Targets: Astronomical" now displays.
9.
Locate a Bright Star: Use the Arrow keys to locate a bright star in the night sky. You may
choose any unobstructed, bright star for the purposes of this example. Use AutoStar's
Arrow keys to center the star in the eyepiece.
10. To Start Tracking: Once the star is centered, press ENTER to select "Astronomical." The
telescope's tracking motors then engage. It may take the tracking motors several seconds
to begin tracking. When they do, it may be necessary to once again center the star in the
eyepiece. The tracking motors will then keep the star you have chosen in the center of the
eyepiece.
If you wish to track another star, use the Arrow keys to slew the telescope to the star.
Center the star. The tracking motors will then keep that star in the center of the eyepiece.
11. To Stop Tracking: Press ENTER. "Setup: Targets" displays. Press ENTER. "Targets:
Astronomical" now displays. Press either of the Scroll keys once. "Targets: Terrestrial" displays. Press ENTER. Tracking is now turned off.
Easy (Two-Star) Align
The fastest and easiest way to locate objects with Autostar's GO TO capabilities is to use Easy
Align.
Autostar automatically picks two stars from its database for the Easy Align procedure. During
this procedure, Autostar slews the telescope to a first alignment star. The user is asked to verify that the telescope is pointed at the chosen star and then prompted to center the star in the
eyepiece. The process is repeated with a second star to complete the alignment.
NOTE: Before aligning the telescope, first verify that INITIALIZING AUTOSTAR, page
16, has been performed. See MOVING THROUGH AUTOSTAR’S MENUS, page 16, if
you wish to learn how to operate Autostar’s keys.
How to Easy Align Your Telescope
If you have just applied power to Autostar, perform steps 1 through 3. If you have already performed the initialization procedure, go to step 4.
1.
Sun Warning - Press the key prompted by Autostar to accept.
2.
Getting Started - Press ENTER to continue.
3.
Daylight Savings - Select “Yes” or “No,” then press ENTER.
4.
Alignment Option Screen - “Setup: Align” displays. Press ENTER.
5.
Select Alignment - “Align: Easy” displays. Press ENTER.
Set Alt/Az Home Position - Autostar then prompts you to set the telescope in the Alt/Az
Alignment home position.
To Set the Home Position:
6.
•
Loosen the telescope’s Altitude lock.
•
Level the optical tube: Line up 0° on the Altitude setting circle with the
molded triangular pointer next to the circle.
•
Tighten the Altitude lock to a firm feel only.
•
Point the telescope North. Use a compass or the North Star, Polaris as a guide to locating
North.
7.
Star Alignment - Autostar then chooses two stars to align upon. When the telescope slews
to the first star for alignment, it may not appear in the field of view in the eyepiece. The
alignment star should be easily recognized and be the brightest star in the area of the sky
where the telescope is pointing. Use the Arrow keys to move the telescope until the star is
visible and centered in the eyepiece. Press ENTER. Repeat procedure for the second
alignment star.
6
When the procedure is performed correctly, "Alignment Successful" displays. If Autostar
does not display this message, perform this procedure again.
NOTE: Autostar locates alignment stars based on the date, time, and location
entered. The alignment stars may change from night to night. All that is required is
for the observer to center the selected stars in the eyepiece when prompted.
NOTE: The GO TO key also allows you to perform a "spiral search." A spiral search
is useful when the telescope slews to an object, but that object is not visible in the
eyepiece after the telescope finishes its search. (This sometimes occurs during an
alignment procedure.) Press GO TO when the slew is finished and the telescope
starts slewing in a spiral pattern at a very slow speed around the search area. Look
through the eyepiece and when the object does become visible, press MODE to
stop the spiral search. Then use the Arrow keys to center the object.
Two other methods of alignment are available to the observer: Two-Star and One-Star. These
methods are included in case the observer prefers to pick out his or her own alignment stars.
Two-Star Alt/Az Alignment
Two-Star Alignment requires some knowledge of the night sky. Two-Star Alignment is identical
to Easy: Align (see EASY (TWO-STAR) ALIGN, above), except Autostar displays a database of
bright stars and two stars are chosen by the observer from this database for alignment. It is recommended that you choose stars with which you are familiar from this database when first trying out this method or the One-Star Alignment method.
One-Star Alt/Az Alignment
One-Star Alignment also requires some knowledge of the night sky. One-Star Alignment is identical to Easy: Align (see EASY (TWO-STAR) ALIGN, above), except Autostar displays a database
of bright stars and one star is chosen by the observer from this database for alignment.
IMPORTANT NOTE: The accuracy of One-Star Alt/Az Alignment, unlike the TwoStar Alignment procedures, depends on how well the observer levels the telescope
and how close to North the telescope is pointed when setting the Home Position
(Fig. 16). Because the Two-Star Alignment methods use two stars to align upon,
they are more precise than One-Star Alignment.
Go To Saturn
After performing the Easy Align procedure, the motor drive begins operating and the telescope
is aligned for a night of viewing. Objects in the eyepiece should maintain their position even
though the Earth is rotating beneath the stars.
IMPORTANT NOTE: Once aligned, only use GO TO or the Arrow keys to move the
telescope. Do not loosen the telescope locks, or move the base manually, or alignment will be lost.
This exercise shows how to select a celestial object (Saturn) for viewing from AutoStar’s database.
1
2.
3.
4.
5.
NOTE: Saturn is not visible all the time and you may need to choose another object
from AutoStar's Object database; however, the procedure, as described below,
remains the same; just choose a different object in step #3.
After the telescope is aligned, “Select Item: Object” displays. Press ENTER.
“Object: Solar System” displays. Press ENTER.
“Solar System: Mercury” displays. Keep pressing the Scroll Down key until “Solar System:
Saturn” displays.
Press ENTER. “Calculating” displays. Then “Saturn” and a set of coordinates displays.
Note that Saturn’s (and other planets’) coordinates change throughout the year.
Press GO TO. “Saturn: Slewing...” displays and the telescope slews until it finds Saturn. You
may need to use the Arrow keys to center Saturn precisely in the eyepiece. AutoStar then
automatically moves the telescope so that it "tracks" Saturn (or whatever other object you
may have chosen); i.e., Saturn remains centered in the eyepiece.
7
Slew Speeds
AutoStar has nine slew speeds that are directly proportional to the sidereal rate (this is the
speed at which stars move) and have been calculated to accomplish specific functions.
Pressing the SPEED/? key changes the slew speed, which is then shown for about two seconds on AutoStar’s display.
The nine available speeds are:
Number
Number
Number
Number
Number
Number
Number
Key
Key
Key
Key
Key
Key
Key
1
2
3
4
5
6
7
=
1x =
=
2x =
=
8x =
=
16x =
=
64x =
= 128x =
= 1.0° =
1
2
8
16
64
30
60
x sidereal (0.25 arc-min/sec or 0.004°/sec)
x sidereal (0.5 arc-min/sec or 0.008°/sec)
x sidereal (2 arc-min/sec or 0.033°/sec)
x sidereal (4 arc-min/sec or 0.067°/sec)
x sidereal (16 arc-min/sec or 0.27°/sec)
arc-min/sec or 0.5°/sec
arc-min/sec or 1.0°/sec
Number Key 8 = 1.5° =
90 arc-min/sec or 1.5°/sec
Number Key 9 = Max =
approx. 4.5°/sec
Speeds 1, 2, or 3: Best used for fine centering of an object in the field of view of a higher power
eyepiece, such as a 12mm or a 9mm eyepiece.
Speeds 4, 5, or 6: Enables centering an object in the field of a low-to-moderate power eyepiece, such as a standard 25mm eyepiece.
Speeds 7 or 8: Best used for rough centering of an object in the eyepiece.
Speed 9: Moves the telescope quickly from one point in the sky to another.
DS-2000 TIPS
Which One’s the
Alignment Star?
If Autostar has chosen an alignment star with
which you are unfamiliar, how can you be
sure if the star in your eyepiece is really the
alignment star?
The rule of thumb is that an alignment star is
usually the brightest star in that area of the
sky. When you view an alignment star in an
eyepiece, it stands out dramatically from the
rest of the stars in that portion of the sky.
If you have an obstruction, such as a tree or
a building blocking your view of the alignment
star, or if you have any doubts at all about the
star that has been chosen, no problem. Just
press the Scroll Down key and Autostar will
find another star to align upon.
8
BASIC AUTOSTAR OPERATION
SETUP MENU
Automatic alignment
permits all telescope
operations with only
minimal setup.
Select Item:
Object
Select Item:
Setup
UTILITIES MENU
Calculate eyepiece
magnifications;
set timer alerts;
create your own
landmark survey.
OBJECT MENU
Want to see Mars? The Orion nebula?
The Andromeda galaxy? Select from
over 30,000 objects and press
GO TO to move the telescope
automatically to an object.
Select Item:
Event
EVENT MENU
Display the time of
past, present and future
astronomical events,
such as Moon phases
or meteor showers.
The Universe of
Autostar
A
utostar
uto
star
Select Item:
Utilities
Select Item:
Guided Tour
GLOSSARY
What is an elliptical galaxy?
How far away is the Sun?
Expand your knowledge of
astronomy by displaying terms
and definitions, and other information.
Select Item:
Glossary
GUIDED TOUR
Autostar escorts you
on a tour of tonight's
best celestial objects
at your viewing location.
Fig. 2: The AutoStar Universe: The six primary categories listed in the Select Item menu of AutoStar.
It is important to understand that menu selections are set in a loop (Fig. 3). This means that
pressing the Scroll Down key cycles down through all the available options within a given category, then returns to the first option. The Scroll Up key cycles up through the options in the opposite order. Note that this capability is a quick way to get to an option that is near the bottom of the
list. The following example demonstrates this capability.
Object
Event
Guided Tours
Glossary
Utilities
Setup
Fig. 3: Menus set in a
loop.
Example:
To navigate to the “Select Item: Setup” menu option when the “Select Item: Object” menu is
displayed:
1.
Press the Scroll Down key four times or the Scroll Up key once.
AutoStar displays two lines of information. The top line shows the current menu level. The second line displays an option which may be selected within that menu level. Some options are
choices that select the next menu level down. The Scroll keys move up and down within the list
of available options, showing one option at a time.
When the desired option is displayed on the second line, press the ENTER key to choose that
option and move down one menu level.
Press the MODE key to leave a level (e.g., the wrong menu option is chosen).
IMPORTANT NOTE: No matter how many levels into AutoStar are traveled, each
press of the MODE key moves up a level, until the top level, "Select Item," is
reached. Once in the Select Item level, press MODE to return to the topmost level,
"Select Item: Object."
9
AutoStar Navigation Exercise
To demonstrate how the AutoStar menu structure works, the following exercise calculates
Sunset time so an evening observing session can be planned.
TIP: When multiple
choices are available within a menu
option, the option
that is currently
selected is usually
displayed first and
highlighted by a
right pointing arrow
(>).
To Calculate Sunset time:
1. Press the MODE key several times, until “Select Item: Object” is displayed.
2.
Press the Scroll Down key once to display the “Event” option in the “Select Item” menu.
3.
Press the ENTER key to choose the "Event" option and move down a level. "Event:
Sunrise" is displayed.
4.
Press the Scroll Down key once to display the "Sunset" option in the Event menu.
5.
Press the ENTER key to choose the "Sunset" option and move down another level.
6.
AutoStar calculates the Sunset time based on the current date, time, and location. AutoStar
then displays the results of the calculation.
7.
Press MODE once to start moving back up through the AutoStar levels. The first level up
is the Event menu.
8.
Press MODE again to move up another level. This is the top level, "Select Item."
9.
Press MODE again to return to the starting point of "Select Item: Object."
Entering Numbers and Text into AutoStar
To enter numbers and text:
N
Use the Up and Down Arrow keys to scroll through numbers 0 - 9 and the alphabet. The
Down Arrow key begins with the letter "A;" the Up Arrow key begins with digit "9."
To move the cursor across the display:
N
Use the Right or Left Arrow key to move the cursor from one number to the next in the display
N
Press ENTER when the desired information has been entered.
Navigating AutoStar
AutoStar's menus are organized for quick and easy navigation:
N
Press ENTER to go deeper into AutoStar's menu levels.
N
Press MODE to move back toward the top menu level.
N
Press the Scroll keys to move up and down through the options or lists
N
Press the Arrow keys to move the cursor across the display.
N
Press the Help (?) key to access on-line help.
Adjusting the Speed of a Scrolling Message
N
Press and hold the Scroll Up key to increase the scrolling speed when a message is scrolling across the display.
N
Press and hold the Scroll Down key to decrease the scrolling speed when a message is
scrolling across the display.
10
11
Sunrise
Sunset
Moonrise
Moonset
Moon Phases
Next Full Moon
Next New Moon
Next 1st Qtr
Next 3rd Qtr
Meteor Showers
Quadrantids
Lyrids
Eta Aquarids
Delta Aquarids
Perseids
Orionids
Taurids
Leonids
Geminids
Ursids
Solar Eclipses
Lunar Eclipses
Autumn Equinox
Vernal Equinox
Winter Solstice
Summer Solstice
Select Item:
Event
Fig. 4: The Complete AutoStar Menu Structure.
Solar System
Mercury
Etc.
Moon
Asteroids
Comets
Constellations
Andromeda
Etc.
Deep Sky
Named Object
Galaxies
Nebulae
Messier
Etc.
Star
Named
SAO Catalog
Double
Variable
Etc.
Satellite
Select
Add
Delete
Edit
User Objects
Select
Add
Delete
Edit
Landmarks
Select
Add
Delete
Identify
Select Item:
Object
Tonight's Best
How Far is Far
A Star's Life
Downloaded Tours
User-created Tours
Tour Objects
Select Item:
Guided Tour
Accretion Disk
Etc.
B...
C...
D...
E...
F...
G...
H...
I...
J...
K...
L...
M...
N...
O...
P...
Q...
R...
S...
T...
U...
V...
W...
X...
Y...
Z...
A...
Select Item:
Glossary
Timer
Set
Start & Stop
Alarm
Set
On & Off
Eyepiece Calc.
Field of View
Magnification
Suggest
Display Options
Sun Warning
Getting Started
Brightness Adj.
Contrast Adj.
Beep
Sleep Scope
Park Scope
Cord Wrap
Select Item:
Utilities
Align
Easy
One Star
Two Star
Date
Time
Daylight Saving
Telescope
Telescope Model
Focal Length
Az/RA Ratio
Alt/Dec Ratio
Mount
Az/RA Percent
Alt/Dec Percent
Train Drive
Tracking Rate
Reverse L/R
Reverse Up/Dn
Calibrate Sensors
Quiet Slew
Max Elevation
Min AOS
Calibrate Motor
High Precision
Targets
Astronomical
Terrestrial
Site
Select
Add
Delete
Edit
Download
Statistics
Reset
Select Item:
Setup
MENUS AND MENU OPTIONS
Object Menu
Almost all observing with AutoStar is performed using the Object menu category. (NOTE:
Exceptions include Guided Tour and Landmark Survey.)
Many AutoStar menu categories contain databases. An AutoStar database is a list of viewable
objects, such as stars, planets, comets, nebulae, and so forth. When one of these objects is
selected from a database, AutoStar moves your telescope (if properly aligned) and points it at
the selected object.
The Object Menu options include:
Solar System is a database of the eight planets (Earth is not included) in order out from the
Sun, followed by the Moon, asteroids, and comets.
Constellation is a database of all 88 Northern and Southern Hemisphere constellations. When
this menu option is chosen and a constellation name appears on the first line of the screen,
press GO TO once to change the second line to the name of the brightest star in the constellation. Press GO TO a second time to slew the telescope to that star. Use the Scroll keys to
cycle through the list of stars in the constellation, from brightest to dimmest.
Deep Sky is a database of objects outside our Solar System such as nebulae, star clusters,
galaxies, and quasars.
Star is a database of stars listed in different categories such as named, double, variable, or
nearby.
Satellite is a database of Earth-orbiting objects such as the International Space Station, the
Hubble Space Telescope, Global Positioning System (GPS) satellites, and geosynchronous
orbit satellites.
User Objects allows the user to define and store in memory deep-sky objects of specific interest that are not currently in the AutoStar database. See "Appendix B" for more information.
Landmarks stores the location of terrestrial points of interest in the permanent AutoStar database.
IMPORTANT NOTE: To use the Landmark function, the telescope must be located
and aligned exactly as when the landmark was added to the database.
N
Select: To select a Landmark already in the database (see ADD below), choose the
"Select" option and scroll through the list. Press ENTER to select a Landmark, then press
GO TO and the telescope slews to the object.
N
Add: To add a Landmark, choose the "Add" option. Enter a name for the Landmark. Locate
and center the Landmark in the eyepiece, then press ENTER.
Identify is an exciting feature for an observer who wants to scan the night sky and start exploring. After the telescope has been properly aligned, use the AutoStar Arrow keys to move about
in the sky. Then follow this procedure:
IMPORTANT NOTE: Only use the Arrow keys to move the telescope during the
Identify procedure. Do not loosen the telescope locks or move the base or alignment is lost.
1.
When a desired object is visible in the eyepiece, keep pressing MODE until the “Select
Item: Object” menu is displayed. Press ENTER to select this menu.
2.
Scroll through the Object menu options until the “Object: Identify” screen appears.
3.
Press ENTER. AutoStar searches the database for the identity of the object being
observed.
4.
If the telescope is not directly on an AutoStar database object, the nearest database object
is located and displayed on the screen. Press GO TO and the telescope slews to that
object.
12
Event Menu
The Event menu provides access to dates and times of astronomical events. The Event database includes:
Sunrise and Sunset calculates the time that the Sun rises or sets on the current date. Find
rise and set times for other dates by entering a new date into the “Setup: Date” menu. See
DATE, page 11.
Moonrise and Moonset calculates the time that the Moon rises or sets on the current date.
Find rise and set times for other dates by entering a new date into the “Setup: Date” menu. See
DATE, page 11.
Moon Phases displays the date and time of the next Full, New, 1st Quarter, and 3rd Quarter
Moon.
Meteor Showers provides information on upcoming meteor showers, such as the Perseids, the
Leonids, etc. Also lists the dates of the showers and when they reach maximum.
NOTE: Meteor showers cover large areas of the sky and are usually best observed
with the naked eye.
WARNING!
Never use a
Meade
Telescope to look at
the Sun! Looking at
or near the Sun will
cause instant and
irreversible damage
to your eye. Eye
damage is often
painless, so there is
no warning to the
observer that damage has occurred
until it is too late. Do
not point the telescope or its viewfinder at or near the Sun.
Do not look through
the telescope or its
viewfinder as it is
moving. Children
should always have
adult supervision
while observing.
Solar Eclipse lists upcoming Solar Eclipses, including the date and type (total, annular, or partial) of eclipse, and the location and time of the first and last contacts of the Moon's shadow.
Use the Scroll Up and Down keys to display the available data. Remember, never use a telescope to look at the Sun! See “WARNING!” to the left.
Lunar Eclipse lists upcoming Lunar Eclipses, including the date and type (total, partial,
penumbral) of eclipse. Use the Scroll Up and Down keys to display the available data.
Min. (Minimum) of Algol is the minimum brightness of the dramatic eclipsing binary star system, Algol. It is relatively close at a distance of 100 light years. Every 2.8 days during a 10-hour
period, Algol undergoes a major change in apparent magnitude as one of the two stars passes behind the other. The combined magnitude of the two stars thus dips from +2.1 to a minimum of +3.4 halfway through the eclipse as the second star is hidden. AutoStar calculates minimum magnitude time at mid-eclipse.
Autumn and Vernal Equinox calculates the time and date of the fall or spring equinox of the
current year.
Winter and Summer Solstice calculates the time and date of the winter or summer solstice of
the current year.
Glossary Menu
The Glossary menu provides an alphabetical listing of definitions and descriptions for common
astronomical terms and AutoStar functions. Access directly through the Glossary menu or
through hypertext words embedded in AutoStar. A hypertext word is any word in [brackets],
usually found when using the AutoStar Help function or when reading a scrolling message such
as a description of a planet or star. Press ENTER whenever a hypertext word is on screen and
AutoStar goes to the glossary entry for that word.
To access directly from the Glossary menu, use the Scroll keys to scroll through the alphabet.
Press ENTER on the desired letter. Scroll to the desired entry and then press ENTER to read
the description.
Utilities Menu
The Utilities menu provides access to several extra features within AutoStar, including a countdown timer and an alarm. The Utilities functions include:
Timer selects a countdown timer. This feature is useful for functions such as astrophotography
and tracking satellites. To use the Timer, press ENTER, then choose “Set” or “Start/Stop."
N
Set: Enter the time to be counted down, in hours, minutes, and seconds, then press ENTER.
N
Start/Stop: Activates the timer set previously. Use the Scroll keys to toggle between ON and
OFF. When ON is displayed, press ENTER to activate the timer. When the timer runs out, four
beeps sound and the timer is deactivated.
13
Alarm selects a time for an alarm signal as a reminder. To use the Alarm, press ENTER, then
choose "Set" or "Start/Stop."
N
Set: Enter the time of day for the alarm to sound, in hours, minutes, and seconds, then press
ENTER.
N
Start/Stop: Activates the alarm set previously. Use the Scroll keys to toggle between ON
and OFF. When ON is displayed, press ENTER to activate the alarm. When the alarm time
arrives, AutoStar beeps. Press ENTER to deactivate the alarm.
Eyepiece Calc calculates information about an eyepiece for the specific telescope to which
AutoStar is connected.
N
Field of View: Scroll through a list of available eyepieces. When an eyepiece is selected,
the field of view is calculated.
N
Magnification: Scroll through a list of available eyepieces. When an eyepiece is selected, the
magnification is calculated.
N
Suggest: AutoStar calculates and suggests the best eyepiece for viewing, based on the
telescope and the object being viewed.
Display Options enables or disables AutoStar’s two initial displays. If both displays are disabled, AutoStar begins with the Date display.
N
Sun Warning: Turns the “Sun Warning” message on or off.
N
Getting Started: Turns the “Getting Started” message on or off.
Brightness Adj: Adjusts the brightness of the display using the Scroll keys. When complete, press
ENTER.
Contrast Adj: Adjusts the contrast of the display using the Scroll keys. When complete, press
ENTER. NOTE: This feature is usually only required in very cold weather.
Beep: Turns the beep on or off.
Sleep Scope is a power saving option that shuts down AutoStar and the telescope without forgetting its alignment. With "Sleep Scope" selected, press ENTER to activate the Sleep function.
AutoStar goes dark, but the internal clock keeps running. Press any key, except ENTER, to reactivate AutoStar and the telescope.
Park Scope is designed for a telescope that is not moved between observing sessions. Align
the telescope one time, then use this function to park the telescope. Next time it is powered up,
enter the correct date and time – no alignment is required. Pressing ENTER causes the telescope to move to its pre-determined Park position. Once parked, the screen prompts to turn off
power.
IMPORTANT NOTE: When the "Park Scope" option is chosen and the display prompts you
to turn off the telescope's power, AutoStar is unable to be returned to operation without
turning the power off and then back on.
Cord Wrap, when set to "On," moves the telescope in such a way as to prevent the cords and
cables attached to your telescope assembly from getting wound around the assembly and tangled as the telescope slews to objects. "Off" is the default setting.
Setup Menu
Manual Alignment Menus: The telescope must be initialized and aligned before AutoStar can
find stars in the sky. If you wish to align the telescope manually, you may do by choosing Easy
Two Star Align, Two Star Align or One Star Align from the Set up menu. Otherwise AutoStar performs the default alignment, Easy Alignment.
To Set the Home Position for manual alignment methods::
1.
Loosen the telescope’s Altitude lock.
2.
Level the optical tube: Line up 0° on the Altitude setting circle with the
molded triangular pointer next to the circle.
3.
Tighten the Altitude lock (Fig. 17) to a firm feel only.
14
4.
Point the telescope North. Use a compass or the North Star, Polaris as a guide to locating
North.
During EASY TWO-STAR ALIGN, AutoStar automatically chooses two bright stars from its database. The user is then requested to center the stars in the eyepiece and press ENTER.
Two-Star Alignment requires some knowledge of the night sky. AutoStar displays a database
of bright stars and two stars are chosen by the observer from the database for alignment. It is
recommended that you choose stars with which you are familiar the first trying out this method.
One-Star Alignment also requires some knowledge of the night sky. One-Star Alignment is
identical to Easy: Align (see EASY (TWO-STAR) ALIGN, above), except AutoStar displays a database of bright stars and only one star is chosen by the observer. The accuracy of One-Star
Alt/Az Alignment, unlike the Two-Star Alignment procedures, depends on how well the observer levels the telescope and how close to North the telescope is pointed when setting the Home
Position (Fig. 16). Because the Two-Star Alignment methods use two stars to align upon, they
are more precise than One-Star Alignment.
Note: The time and
date information is
kept by a high
precision internal
clock, which is set
at the factory and
held by a long-life
lithium battery.
Replace the internal
clock’s battery with a
CR2023 lithium
battery. This battery is
located in the battery
compartment.
The battery is available from Meade,
photographic supply
houses or any place
lithium batteries are
sold.
Date changes the date used by AutoStar. This function is useful to check events in the past or
future. For example, set the Date menu for a day three months in the future. Then check the
"Select Item: Event" menu for the Sunset time on that date. See EVENT MENU, page 24.
Time changes the time entered into AutoStar. Setting the correct time is critical for AutoStar to
properly calculate locations and events. Time may be set to 24-hour mode (military time) by
selecting the "blank" option which follows the "AM" and "PM" options.
Daylight Saving is used to enable or disable Daylight Savings time.
NOTE: Daylight Savings Time may be referred to by different names in various areas
of the world. Check local time to verify.
Telescope accesses the several options, including:
N
Model: Allows you to select the telescope model connected to AutoStar.
N
Focal Length: Displays the focal length of the selected telescope.
N
Az Ratio and Alt Ratio: The Az (Azimuth) ratio and Alt (Altitude) ratio refers to the gears
of the telescope's motors. Do not alter these numbers.
N
Az Percent: The Az (Azimuth) Percent allows you to change the azimuth backlash, i.e., the
way the Arrow keys move the telescope along the azimuth (horizontal) axis. If you enter a
value near 100, the telescope tube responds more quickly (it responds immediately at
100%) as you hold down an Arrow key and also slews (moves) the tube more quickly. If
you enter a value near 0, it takes longer for the tube to respond as you hold down an Arrow
key and also slews the tube more slowly. Experiment with this option. Try changing the percent value until you get a "feel" for the Arrow keys that is comfortable for you.
N
Alt Percent: The Alt (Altitude) Percent operates identical to the AZ Percent option (see
above), but allows you to change the altitude backlash, i.e., the way the Arrow keys move
the telescope when moving along the altitude (vertical) axis.
Train Drive: Trains the Altitude and Azimuth motors to locate objects with more precision.
If you are experiencing any problems with pointing accuracy, select the Tarin the Drive
procedure and follow the on-screen instructions, to insure accurate pointing and tracking.
N
Tracking Rate: Changes the speed at which the telescope tracks targets in the sky.
Sidereal: The default setting for AutoStar; sidereal rate is the standard rate at which
stars move from East to West across the sky due to the rotation of the Earth.
b. Lunar: Choose this option to properly track the Moon over long observing sessions.
c. Custom: Allows entry of user-defined tracking rates.
Reverse L/R: Reverses the functions of the Left and Right Arrow keys (i.e., the Right key
moves the telescope to the left).
a.
N
N
Reverse UP/DOWN: Reverses the functions of the Up and Down Arrow keys (i.e., the Up
key moves the telescope down).
15
N
Quiet Slew: Sets the maximum slew rate to 1.5° for quieter operation.
N
Max Elevation: Allows you to enter a value in degrees that sets a limit as to how far the
optical tube can swing upward during a programmed slew. (Note that it does not prevent
you
from
performing
a
manual
slew
past
this
limit.)
This
is
useful when you have a camera or other peripheral attached to the telescope—you can
prevent it from striking the telescope base.
N
Min AOS (Acquisition of Signal): Allows you enter a value in degrees. This value represents the altitude at which your telescope begins to slew when
acquiring a satellite track. This is useful when you are observing satellites, but a tall tree or
building is obstructing the telescope. For example, you might begin to track the satellite at
15° altitude, instead of 5°.
N
Calibrate Motor: If the telescope motors appear to have a problem, use this option to
retest the motors before performing a Reset. This option is also used if an AutoStar unit is
moved between telescopes, to match AutoStar to the new telescope. To calibrate the
motors, select this option and press ENTER.
N
High Precision: If High Precision is turned on, when looking for a faint celestial object (i.e.,
a nebula or galaxy), AutoStar first slews to a nearby bright star and displays "ENTER to
Sync." Center the star in the eyepiece, then press ENTER. At that point the telescope has
a high precision alignment to that part of the sky and it then slews to the object that was
originally requested.
Targets switches between Astronomical targets and Terrestrial targets. If "Astronomical" is
selected, the telescope tracking motor is activated and any object you observe will remain centered in the eyepiece. If "Terrestrial" is selected, the tracking motor is turned off.
Site provides access to several options including:
Time Zone
Atlantic
Eastern
Central
Mountain
Pacific
Hawaii
Shift
-4 Hours
-5 Hours
-6 Hours
-7 Hours
-8 Hours
-10 Hours
Table 1: Time Zone Shift.
N
Select: Displays the currently selected observing site. Use the Scroll keys to cycle through
all available sites (see ADD below). Press ENTER when the site you wish to select displays.
Use this option when you move to a different geographic location.
N
Add: Allows you to add new observing sites to the database (up to six sites may be stored).
Scroll through the list of Countries/States. Press ENTER when the site you wish to add displays. Then choose the desired city in the same manner.
N
Delete: Deletes a stored site from the database.
N
Edit: Edits a selected site, including: the name, latitude, longitude, and time zone. Time
Zone refers to the Greenwich Mean Time (GMT) time zone shift. Users West of Greenwich,
England use “-” hours, East of Greenwich use “+” hours. For the United States, look up the
time zone shift in Table 1.
Download transfers information from a personal computer or another AutoStar. During the
operation, the warning “Downloading Do Not Turn Off” appears.
NOTE: The Download function requires the optional #505 Astrofinder Software and
Cable Connector Kit. See the instruction sheet included with the kit for more information on how to download. See the Meade General Catalog or go to
www.meade.com for more information.
Statistics provides basic statistical data about AutoStar, including:
N
Characters Free: Shows how much room is available in user-defined object memory.
N
Version: Shows the current version of the AutoStar software.
Reset completely resets AutoStar. Most values entered into the menus revert to factory defaults.
AutoStar requires initialization again after a Reset before proceeding with observations.
Using AutoStar to Find Objects Not in the Database
Although AutoStar contains a database of more than 30,000 celestial objects (stars, nebulae,
planets, etc.) that you can observe, you may eventually want to view objects that are not part
of the database. AutoStar provides a feature that allows you to enter an object's R.A (Right
Ascension) and Dec. (Declination) coordinates in the "User: Objects" option of the Object menu
16
and allows automatic slewing of the telescope to the user-entered coordinates. R.A (Right
Ascension) and Dec. (Declination) are similar to latitude and longitude, except that they are
used to find objects in sky.
In order to use this menu option, you first need to look up the R.A and Dec. coordinates of the
object or objects you wish to observe. Check out your local library, computer store, bookstore,
CD Roms, Internet, or magazines (such as Sky & Telescope or Astronomy), to find coordinates
of celestial objects. The objects/coordinates you enter become part of your own permanent
database, called "User Objects."
To enter coordinates of an object into the "User: Objects" option of the Object menu:
1.
Make sure AutoStar has been initialized and the telescope has been aligned.
2.
After the telescope is aligned, "Select Item: Object" displays. (If necessary, use the Scroll
keys to scroll through the menus, as previously described, to find this option.) Press
ENTER.
3.
"Object: Solar System" displays. Keep pressing the Scroll Up key until "Object: User
Object" displays and press ENTER.
4.
"User Object: Select" displays. Press the Scroll Down key once. "User Object: Add" displays. Press ENTER.
5.
"Name" displays on the top line and a blinking cursor on the second line. Use the Arrow
keys, as previously described, to enter the name of the object you wish to add to the database. When you are finished, press ENTER.
6.
"Right Asc.: 00.00.0" displays. Use the Up and Down Arrow keys to enter the digits for the
Right Ascension coordinate of your object. When you are finished, press ENTER.
7.
"Declination: +00°.00'" displays. Use the Up and Down Arrow keys to enter the digits for the
Declination coordinate of your object. If necessary, use the Scroll Keys to change "+" to
"-." When you are finished, press ENTER.
8.
AutoStar then prompts you to enter the size of the object. This step is optional. Use the Up
and Down Arrow keys to enter the size (in arc-minutes), if so desired, and press ENTER
to go to the next display. If you do not wish to enter this information, simply press ENTER.
9.
AutoStar then prompts you to enter the magnitude of the object. This step is also optional.
Use the Up and Down Arrow keys to enter this information, if so desired, and press ENTER
to go to the next display. "User Object: Add" displays again.
To GO TO a user-entered object:
In this procedure, you will choose an object from the User Object list and GO TO the object.
1.
With "User Object: Add" displayed, press the Scroll Up key once. "User Object: Select"
displays. Press ENTER.
2.
Use the Scroll keys (if necessary) to scroll to the desired object. Press ENTER.
3.
The name of the object and the Right Ascension and Declination coordinates display.
4.
Press GO TO and the telescope slews to the object.
Observing Satellites
In this procedure, you will prepare your telescope to observe a satellite pass.
1.
Go to the "Object: Satellite" menu option and press ENTER.
2.
Use the Scroll keys to scroll through the list of satellites.
3.
Select a satellite from the list and press ENTER.
4.
"Calculating...." and then "Tracking..." displays. If the satellite is going to make a pass,
"Located" displays.
17
5.
Use the Scroll keys to display data about the pass: aos – acquisition of signal and los –
loss of signal. If you subtract the aos from the los, you can calculate how long the satellite
will be visible. Location information also displays.
6.
"Alarm" displays after the location information. Press ENTER and AutoStar automatically
sets the alarm to sound a minute before the satellite's scheduled appearance. You may
return to regular observations until the alarm goes off.
7.
When the alarm goes off, return to the Satellite menu and press a Scroll key until the
desired satellite is on the top line of the display.
8.
Press GO TO. AutoStar slews the telescope to where the satellite should appear. The motor
drive stops and a countdown is displayed.
NOTE: If the scheduled appearance position of the satellite is obstructed (i.e., by a
building, tree, or hill), press ENTER and AutoStar starts to move the telescope
along the expected satellite track. When the track clears the obstruction, press
ENTER again to pause the telescope, then continue with this procedure.
9.
With about 20 seconds left on the countdown timer, start watching through the telescope
viewfinder for the satellite to enter the field of view.
10. When the satellite enters the viewfinder field of view, press ENTER. The telescope starts
to track with the satellite.
11. Use the AutoStar Arrow keys to center the object in the viewfinder, then look through the
eyepiece to view the object.
Satellite orbits change and new satellites (including the Space Shuttle) are launched. Visit the
Meade website (www.meade.com) approximately once a month to get updated information
and instructions on how to download this data to AutoStar. If orbital parameters are more than
one month old, the satellite pass may not happen at the time predicted by AutoStar.
Downloading requires the optional #505 AstroFinder™ Software and Cable Connector Kit.
Note: Satellite observing is an exciting challenge. Most satellites are in low orbit, travelling
at approximately 17,500 mph. When visible, they move quickly across the sky and are only
in the field of view for a few minutes, requiring AutoStar to slew the telescope rapidly. Best
viewing is near Sunrise or Sunset when the sky is still dark. Viewing in the middle of the
night can be problematic because the satellite may pass overhead, but not be visible as it
is in the Earth's shadow.
Meade Consumer Solutions
If you have a question concerning your #497 AutoStar, contact the Meade Instruments
Consumer Solutions Department at:
Telephone: (800) 626-3233
Consumer Solutions hours are 8:00 AM to 5:00 PM, Pacific Time, Monday through Friday. In the
unlikely event that your DS-2000 telescope requires factory servicing or repairs, write or call the
Meade Consumer Solutions Department first, before returning the telescope to the factory, giving full particulars as to the nature of the problem, as well as your name, address, and daytime
telephone number. The great majority of servicing issues can be resolved by telephone, avoiding return of the telescope to the factory.
18
19
MEADE LIMITED WARRANTY
Every Meade AutoStar accessory is warranted by Meade Instruments Corporation (“Meade”) to be free of defects in materials and workmanship for a period of ONE YEAR from the date of original purchase in the U.S.A. and Canada. Meade will repair
or replace a product, or part thereof, found by Meade to be defective, provided the defective part is returned to Meade, freightprepaid, with proof of purchase. This warranty applies to the original purchaser only and is non-transferable. Meade products
purchased outside North America are not included in this warranty, but are covered under separate warranties issued by
Meade international distributors.
RGA Number Required: Prior to the return of any product or part, a Return Goods Authorization (RGA) number must be
obtained from Meade by writing, or calling (800) 626-3233. Each returned part or product must include a written statement
detailing the nature of the claimed defect, as well as the owner’s name, address, and phone number.
This warranty is not valid in cases where the product has been abused or mishandled, where unauthorized repairs have been
attempted or performed, or where depreciation of the product is due to normal wear-and-tear. Meade specifically disclaims
special, indirect, or consequential damages or lost profit which may result from a breach of this warranty. Any implied warranties
which cannot be disclaimed are hereby limited to a term of one year from the date of original retail purchase.
This warranty gives you specific rights. You may have other rights which vary from state to state.
Meade reserves the right to change product specifications or to discontinue products without notice.
This warranty supercedes all previous Meade product warranties.
(800) 626-3233
www.meade.com
14-2005-00 05/06