1
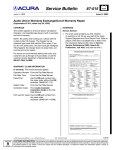
Agilent Technologies 34980A Multifunction Switch/Measure Unit Getting Started Guide Contents of Your Shipment.................................................1 Front Panel at a Glance.......................................................2 Rear Panel at a Glance........................................................3 Supplemental Safety Notices.............................................4 Removing a Slot Cover ........................................................5 Installing a Module ..............................................................5 Installing a Module for Use with Cables.................... 5 Installing a Module for Use with Terminal Blocks... 6 Wiring and Installing a Terminal Block............................7 Wiring a Terminal Block................................................ 7 Installing a Terminal Block........................................... 8 Operating the Front Panel Keyboard.................................9 Menu Example: Selecting a Channel and Operating the Channel Relay .................................... 9 Menu Example: Setting the Date and Time............. 10 Using the Measure Keys............................................. 10 Menu Example: Configuring the Internal DMM for a Measurement ................................................... 11 Menu Example: Configuring a Channel for a Measurement ......................................................... 12 Connecting the 34980A to Your Computer ................... 15 Connecting Over LAN ..................................................15 Selecting the LAN Network Type.........................15 Connecting Via Site LAN........................................16 Connecting Via Isolated (Non-Site) LAN.............17 Connecting Over GPIB .................................................18 Connecting Over USB...................................................19 Communicating with the 34980A ................................... 20 Exploring the 34980A Web Interface Over LAN........... 21 Launching the Web Interface.....................................21 Displaying the Browser Web Control Page .............22 Selecting the “Allow Full Control” Mode.................22 Closing and Opening Channel Relays .......................23 Modifying the Channel Configuration.......................23 Sending SCPI Commands Via the Web Interface...24 34980A Documentation Map............... Inside Rear Cover Notices © Agilent Technologies, Inc. 2004, 2005 No part of this manual may be reproduced in any form or by any means (including electronic storage and retrieval or translation into a foreign language) without prior agreement and written consent from Agilent Technologies, Inc. as governed by United States and international copyright laws. Manual Part Number 34980-90004 Edition Second edition, April 2005 Printed in Malaysia Agilent Technologies, Inc. Warranty The material contained in this document is provided “as is,” and is subject to being changed, without notice, in future editions. Further, to the maximum extent permitted by applicable law, Agilent disclaims all warranties, either express or implied, with regard to this manual and any information contained herein, including but not limited to the implied warranties of merchantability and fitness for a particular purpose. Agilent shall not be liable for errors or for incidental or consequential damages in connection with the furnishing, use, or performance of this document or of any information contained herein. Should Agilent and the user have a separate written agreement with warranty terms covering the material in this document that conflict with these terms, the warranty terms in the separate agreement shall control. Technology Licenses The hardware and/or software described in this document are furnished under a license and may be used or copied only in accordance with the terms of such license. Restricted Rights Legend If software is for use in the performance of a U.S. Government prime contract or subcontract, Software is delivered and licensed as “Commercial computer software” as defined in DFAR 252.2277014 (June 1995), or as a “commercial item” as defined in FAR 2.101(a) or as “Restricted computer software” as defined in FAR 52.227-19 (June 1987) or any equivalent agency regulation or contract clause. Use, duplication or disclosure of Software is subject to Agilent Technologies’ standard commercial license terms, and non-DOD Departments and Agencies of the U.S. Government will receive no greater than Restricted Rights as defined in FAR 52.227-19(c)(1-2) (June 1987). U.S. Government users will receive no greater than Limited Rights as defined in FAR 52.227-14 (June 1987) or DFAR 252.2277015 (b)(2) (November 1995), as applicable in any technical data. Safety Notices CAUTION A CAUTION notice denotes a hazard. It calls attention to an operating procedure, practice, or the like that, if not correctly performed or adhered to, could result in damage to the product or loss of important data. Do not proceed beyond a CAUTION notice until the indicated conditions are fully understood and met. WARNING A WARNING notice denotes a hazard. It calls attention to an operating procedure, practice, or the like that, if not correctly performed or adhered to, could result in personal injury or death. Do not proceed beyond a WARNING notice until the indicated conditions are fully understood and met. Contents of Your Shipment The following items are shipped with your 34980A mainframe: • Agilent 34980A User’s Guide • Agilent 34980A Getting Started Guide • Agilent 34980A Product Reference CD-ROM. This CD-ROM is located on the inside back cover of the 34980A User’s Guide and contains: • • • • • Software and Drivers Product Documentation Product Data Sheet Application Notes Other product information • LAN Crossover Cable for isolated (non-site) LAN connections • Power cord for your country or geographical region • Small flatblade screwdriver to connect field wiring to optional terminal blocks • Agilent E2094 IO Libraries Suite Any plug-in modules that you ordered will be shipped separately from the 34980A mainframe. If you ordered optional terminal blocks or cables with your modules, they will be included in the shipment with your modules. You will find information about the modules in the 34980A User’s Guide. If you have questions about your shipment, or if you need information about warranty, service, or technical support, please contact Agilent Technologies: In the United States: (800) 829-4444 In Europe: 31 20 547 2111 In Japan: 0120-421-345 Or, go to www.agilent.com/find/assist for more information on contacting Agilent in your specific location. You can also contact your Agilent Technologies representative. 34980A Getting Started Guide 1 Front Panel at a Glance 1 2 3 4 5 6 7 8 9 10 11 12 13 On/Standby Switch. WARNING: This switch provides standby only. To disconnect the mains from the instrument, be sure to remove the power cord. Utility Menu. Configures the remote interface (LAN, GPIB, and USB), date and time, and other system-related parameters. Store/Recall Menu. Allows you to store and recall instrument states in non-volatile memory. Control Keys. Provide access to immediate execute actions such as closing and opening channels. Number Keypad. Allows you to enter numeric values such as channel numbers. Exponent Key. Allows you to enter exponential values (e.g., 10E3). Cancel Key. Exits a menu without saving any changes. Arrow Keys. Move the cursor positions within a displayed menu item. Knob. Enters alphanumeric characters, selects slots, channels, and navigates menus. Enter Key. Steps you through a menu or stores a number entry. Local Key. Returns the instrument to the “local” mode and enables the front-panel keyboard. Configure Key Group. Select functions and set various measurement parameters on the selected channel. Measure Key Group. Execute and monitor measurements. Depending on which measurement key you select, you can have complete/direct control over the switching and measurement operations, or you can let the 34980A automatically control the switching and measurement. For more information on using the front-panel menus, see the 34980A User’s Guide. 2 34980A Getting Started Guide Rear Panel at a Glance Safety Symbols Located on Rear Panel Warning, risk of electric shock Caution, refer to accompanying description Alternating Current Frame or chassis terminal Safety Symbols Located on Rear Panel: Warning. Risk of electric shock. Caution. Refer to accompanying description. Alternating current. Mainframe chassis ground. 1 2 3 4 5 6 7 8 9 10 11 12 Access to Analog Buses (shown with cover installed). See 34980A User’s Guide for connector pinout. Module shown installed in Slot 1 Slot Identifier (slots are numbered 1 through 8) Module Chassis Ground Screw Slot Cover AC Power Connector LAN Connector (10BaseT/100BaseTx) USB 2.0 Connector External Trigger/Alarm/Digital I/O Connector. See 34980A User’s Guide for connector pinout. Internal DMM Option Marking. If you ordered the internal DMM option, this circle is marked black. IEEE 488.2 GPIB Connector Mainframe Chassis Ground Screw 34980A Getting Started Guide 3 Supplemental Safety Notices In addition to safety notices and safety symbols mentioned elsewhere in this guide, the following general safety precautions must also be observed during all phases of operation of this instrument. Failure to comply with these precautions or with specific warnings or instructions elsewhere in this guide violates safety standards of design, manufacture, and intended use of the instrument. Agilent Technologies assumes no liability for the customer’s failure to comply with these requirements. General Do not use this instrument in any manner not specified by the manufacturer. The protective features of this instrument may be impaired if it is used in a manner not specified in the operating instructions. Before Applying Power Verify that all safety precautions are taken. Make all connections to the unit before applying power. Ground the Instrument This product is provided with protective earth terminals. To minimize shock hazard, the instrument must be connected to the ac power mains through a grounded power cable, with the ground wire firmly connected to an electrical ground (safety ground) at the power outlet. Any interruption of the protective (grounding) conductor or disconnection of the protective earth terminal will cause a potential shock hazard that could result in personal injury. Do Not Operate in an Explosive Atmosphere Do not operate the instrument in the presence of flammable gases or fumes. Do Not Remove the Instrument Cover Only qualified, service-trained personnel who are aware of the hazards involved should remove instrument covers. Always disconnect the power cable and any external circuits before removing the instrument cover. Do Not Modify the Instrument Do not install substitute parts or perform any unauthorized modification to the instrument. Return the instrument to an Agilent Sales and Service Office for service and repair to ensure that safety features are maintained. In Case of Damage Instruments that appear damaged or defective should be made inoperative and secured against unintended operation until they can be repaired by qualified, service-trained personnel. 4 34980A Getting Started Guide Removing a Slot Cover Your 34980A is shipped from the factory with one slot uncovered and the remaining seven slots covered. When performing tasks in this guide to become familiar with the instrument, you will install a plug-in module into Slot 1. When you are ready to install additional modules, follow the procedure below to remove a slot cover. Using a flatblade screwdriver, pry each side of the slot cover until the cover releases from the slot. With the slot cover removed, you can now install a module in this slot. Hazardous voltages may be exposed on analog bus connectors. For proper module cooling, all unused slots must be covered. Do not block air intake or exhaust vents at the sides of the instrument. Installing a Module The Safety Interlock feature prevents connections to the Analog Buses if no terminal block or properly-wired cable is connected to a module (available on the multiplexer and matrix modules only). If the proper connections are not present, the Analog Bus relays will be disabled on that module and the front panel “Safety Interlock” display annunciator will turn on. See the 34980A User’s Guide for additional information. Installing a Module for Use with Cables If you are planning to use cables for your external connections, follow the procedure below to install a plug-in module. If you are planning to use an optional terminal block to connect your external wiring, see the procedure on page 6. 1. Install the module into a mainframe slot until it fully seats with the backplane connector. 2. Using a Pozidriv #1 screwdriver, tighten the two screws to secure the module in the mainframe. Installation is now complete. NEXT STEP: Go to “Operating the Front Panel Keyboard” on page 9. 34980A Getting Started Guide 5 Installing a Module for Use with Terminal Blocks All of the 34980A plug-in modules, except the RF and microwave modules, can be used with a compatible terminal blocks (optional accessories 349xxT). The optional terminal blocks provide screw terminals or solder cup connections for your external wiring. If you plan to use an optional terminal block, follow the procedure below. Step 1a. Using a Pozidriv #1 screwdriver, remove the panhead grounding screw located between the module connectors. Module Step 1b. Remove the two flathead screws from the support sleeve. Support Sleeve Step 2. Fit the terminal block support sleeve against the module so the openings on the sleeve line up with the connectors and the center screw hole as shown. Step 3. Replace the panhead screw. Then replace and tighten the two flathead screws to secure the sleeve to the module. Step 4. Install the module into a mainframe slot until it fully seats with the backplane connector. Using a Pozidriv #1 screwdriver, tighten the two screws to secure the module in the mainframe. Installation is now complete. NEXT STEP: Go to “Wiring and Installing a Terminal Block” on page 7. 6 34980A Getting Started Guide Wiring and Installing a Terminal Block If you are planning to use an optional terminal block with your plug-in modules, refer to the instructions below to connect your external wiring and install a terminal block. Wiring a Terminal Block Before you begin this task, make sure you have disconnected power from all external field wiring you will be connecting to the terminal block. For plug-in module pinout diagrams and additional information, refer to the 34980A User’s Guide, which is shipped with your 34980A mainframe. Step 1. To remove the terminal block cover, insert a screwdriver through the hole in the cover as shown. Gently push the tab in the direction of the arrow. Step 2. While pushing the tab (Step 1), lift the clear plastic cover from the edge near the D-sub connectors. Slide the cover from under the tab holders and remove the cover. NOTE: If you are wiring to screw-type terminals, use the small flathead screwdriver included with your 34980A. Step 3. Use a 2.5 mm cable tie as shown for additional strain relief. Step 4. To replace the terminal block cover, slide the cover tabs into the tab holders on the terminal block as shown. Press down on the cover until it snaps securely into place. Wire Size: 20 AWG Typical 6 mm 34980A Getting Started Guide 7 Installing a Terminal Block Use the following steps to install an optional terminal block to a plug-in module. See page 7 to connect your external field wiring to the terminal block. Step 1. Push the levers on the terminal block to the fully-open position as shown below. Then slide the terminal block into the instrument-mounted support sleeve... …until the terminal block stops at the two points indicated by the arrows below. Terminal Block Support Sleeve 34980A Mainframe Step 2. Carefully rotate the levers upward as shown… …until both levers are locked in the closed position. NEXT STEP: Go to “Operating the Front Panel Keyboard” on page 9. 8 34980A Getting Started Guide Operating the Front Panel Keyboard This section gives an overview on operating the 34980A from the front panel keyboard. For additional information, see the 34980A User's Guide. Before you can operate the front panel keyboard, connect the power cord to the 34980A and turn on the power. If the instrument does not power on properly, contact Agilent Technologies (see page 1 for more information). At power on, all segments on the front panel are displayed and all lighted keys temporarily turn on. The front panel is ready for operation when the keys are no longer lit and the green channel field on the display shows the first slot in which a module is installed. Menu Example: Selecting a Channel and Operating the Channel Relay Use the following instructions for any of the multiplexer modules (34921A, 34922A, 34923A, 34924A, or 34925A). The example illustrations below show the 34921A module installed in slot 1. 1. Using the number keypad, press 1 to select the slot containing the multiplexer module. 2 2. Select channel 27 on the module by pressing 2 and then 7. 3. Press the lighted ENTER key to complete your channel selection. 4. With channel 1027 selected (shown in green channel field on display), toggle the Close and Open keys to close and open the selected channel. Note that the display shows OPEN or CLOSED, indicating the status of the channel. 1 3 4 4 34980A Getting Started Guide 9 Menu Example: Setting the Date and Time In this example, you will learn the fundamentals of using the 34980A front-panel menus by setting the date and time. Begin by pressing the Utility menu key as shown in the diagram to the right. Follow the menu prompts as they are displayed. ... REMOTE I/O Additional Choices DATE / TIME Use the knob to scroll through the choices on the same level. Utility YEAR and Also use the knob to enter alphanumeric characters. Utility MONTH ... A list of menu hints is provided below. Use this information as you navigate through the menu structure. For an overview of the front panel keys, see page 2. Utility MINUTE and Use the arrow keys to move the display cursor position. Menu Hints: • • The navigation structure of the front panel menus is hierarchical, and the menus are self-guiding; as you use the front panel, you may be prompted to enter specific parameters. To make another choice at the same level within a menu, use the knob. • To select a displayed parameter and move to the next parameter, press either the lighted menu key (e.g., Utility key) or the ENTER key. • • • • To save changes, keep other parameters at their same value, and immediately exit the menu, press the EXIT MENU key. To exit a menu without saving any changes, press the CANCEL key (located next to number keypad). To select slots and channels so they appear in the green channel field, use the knob. To enter alphanumeric characters, use the knob. To enter numbers, use the number keypad or knob. • • To move the display cursor position, use the left and right arrow keys. When you have entered all required parameters, the lighting on the menu key will turn off. Using the Measure Keys In the following examples, you will use keys in the front-panel Measure group. The three keys in the Measure group control the initiation of measurements (conversely, the menu keys in the Configure group allow you to set parameters for measurements). Depending on which measurement key you select, you can have complete/direct control over the switching and measurement operations, or you can allow the 34980A to automatically control the measurement to capture the desired data. DMM When you press DMM, the internal DMM takes continuous measurements on whatever signal you have routed to the DMM (allows the most flexibility). In this mode, you must manually control the opening and closing of relays. Channel When you press Channel, the 34980A controls the relays needed for the internal DMM to make continuous measurements on a single selected channel. The measurement configuration used for a particular channel (as specified in the Channel menu in the Configure group) is stored and recalled whenever you select that channel. Scan When you press Scan, the 34980A controls all the relays required to make a series of sequential measurements, even across multiple channels with unlike measurement functions. Scan takes the measurements and stores the results in volatile memory. 10 34980A Getting Started Guide Menu Example: Configuring the Internal DMM for a Measurement This example uses the internal DMM for a measurement. If you have disabled your internal DMM, or don’t have one installed in your 34980A, skip this example. Use the following instructions for any of the multiplexer modules (34921A, 34922A, 34923A, 34924A, or 34925A). 1. Make sure you have a multiplexer module installed in slot 1. Select any channel on this module (the channel number is shown in green channel field on display). 2 2. Within the Configure key group, press the DMM key to set the measurement parameters for the internal DMM. Note that the DMM key lights. 3. Using the knob to navigate through the menu choices, select the AC VOLTS function. 7 3 4. Press the lighted DMM menu key to accept the ac voltage function. 5. Using the knob, select 10V, which indicates the range parameter for ac voltage. 6. Press the EXIT MENU key to save your selections (ac voltage, 10 volt range) and immediately exit the menu. All unmodified parameters within the menu remain unchanged. 7. Within the Measure key group, press the DMM key. Note that the key lights and continuous ac voltage measurements are made using the internal DMM. 8. To stop the measurements, press the DMM key (in the Measure key group). 34980A Getting Started Guide 5 7 In This Example: • You configured the internal DMM for ac voltage measurements. • You started measurements, viewed continuous measurement results, and stopped the measurements. Since you didn’t open or close any channels, no module or Analog Bus relays were exercised in this example. The internal DMM acted as a stand-alone instrument and measured whatever ac voltages happened to be present on the Analog Buses. Pressing the DMM key (in Measure key group) also allowed you to continuously monitor measurements on the front panel. 11 Menu Example: Configuring a Channel for a Measurement Use the following instructions for any of the multiplexer modules (34921A, 34922A, 34923A, 34924A, or 34925A). 1. Make sure you have a multiplexer module installed in slot 1. 2 2. Using the knob to navigate or using the number keypad, select Channel 1016 (the green channel field displays 1016). 3. Press the Channel key (in the Configure key group) to access the configure menu for Channel 1016. Note that the Channel key lights while in the menu. 3 4 4. Using the knob to navigate through the menu choices, select the DC VOLTS function. 6 5. Press the lighted Channel key to select this function and proceed to the next parameter in the menu. 7 6. Use the knob to select the 100 mV range for the dc voltage function. 7. Continue pressing the lighted Channel key until CHANNEL LABEL is shown. 8. At the CHANNEL LABEL choice, use the knob (to select alphanumeric characters) and the arrow keys (to select the cursor position) to enter a custom channel label. 8 9 9. Press the lighted Channel key to save the assigned channel label and all other changes you made. Continued on next page… 12 34980A Getting Started Guide 10. Press the Channel key in the Measure key group. Note that the Channel key lights, the required relays automatically close, and dc voltage measurements begin. 11. To stop the continuous measurements, press the Channel key again. Note that as you press the Channel key, you will hear the relays automatically opening. 12. Using steps 1 through 6 on the previous page, set the following configuration for Channel 1014. For this example, don’t change any other measurement parameters. • Channel 1014 10 10 14 • AC VOLTS function • 1V range 13. Press the EXIT MENU key to accept the new settings and retain all other parameters in this menu. 14. With Channel 1014 selected, press the Channel key in the Measure key group. The Channel key lights, the required relays automatically close, and measurements begin. 15. With the Channel key still lighted, turn the knob to display channel 1016. You should see measurements start for DC VOLTS (your previously configured function for channel 16). Continued on next page… 34980A Getting Started Guide 13 16. With the Channel key still active, turn the knob between channels 1016 and 1014 to monitor the measurement results for each channel. As you pass Channel 1015, which is not configured for a measurement, notice that the associated channel relay is open and measurement is off. 16 17 17. Press the Channel key so the light is off. Notice that Monitoring is now turned off, but you can continue to view the measurement parameters on channels 1014 and 1016. In This Example: • You configured channel 16 for dc voltage measurements. • With the Channel key (in Measure key group), you started, viewed results, and stopped continuous dc voltage measurements on channel 16. • You configured channel 14 for ac voltage measurements. • With the Channel key (in Measure key group), you started, viewed results, and stopped continuous ac voltage measurements on channel 14. • You monitored channels with the Channel key (in Measure key group) activated. Using the knob, you scrolled between channels 14 and 16 to alternatively start, view, and stop continuous measurements on the channels. 14 34980A Getting Started Guide Connecting the 34980A to Your Computer To easily connect the 34980A to your PC, configure and verify your connection, you can use the Agilent IO Libraries Suite, the E2094M Agilent IO Libraries for Windows, or an equivalent. • Agilent IO Libraries Suite for Windows 98/2000/ME/XP. For information and to install, use the Automation-Ready CD with Agilent IO Libraries Suite, which is shipped with the 34980A. • E2094M Agilent IO Libraries for Windows 98/NT/2000/ME/XP. You can find information and install this application via the Web at www.agilent.com/find/iolib. • You can also access other information about Agilent IO Libraries at www.agilent.com/find/iolib. The procedures in this section refer to the Agilent Technologies USB/LAN/GPIB Interfaces Connectivity Guide. If you have installed the IO Libraries Suite, you can access the Connectivity Guide via the Agilent IO Libraries Control icon. Or, you can access the Connectivity Guide via the Web at www.agilent.com/find/connectivity. Connecting Over LAN Selecting the LAN Network Type You can connect and configure your 34980A for Site LAN or Isolated (non-site) LAN operation. • • A Site LAN network is defined as a local area network (LAN) in which computers and LAN-enabled instruments are connected to a site LAN (workgroup LAN, Intranet, or enterprise LAN) via optional routers, hubs, and/or switches. An Isolated LAN network is defined as a local area network (LAN) in which computers and LAN-enabled instruments are not connected to a site LAN. Use the crossover cable provided with the 34980A to make a direct connection between the 34980A and your computer. Crossover cables are also supported by many newer LAN switches or routers. The diagrams to the right show examples of typical site LAN and isolated LAN networks. Select the LAN network type that you will use to connect the 34980A to your computer. Then follow the corresponding procedures shown on page 16 or 17. Typical Site LAN Networks To Site LAN Example Direct Connection PC Ethernet Hub or Switch Example Switch Connection To Site LAN PC Instrument Instrument Instrument Instrument Typical Isolated (Non-Site) LAN Networks Example Direct Connection CAT5 Crossover Cable PC Instrument Ethernet Hub or Switch Example Switch Connection PC Instrument 34980A Getting Started Guide Instrument Instrument Instrument Instrument 15 Connecting Via Site LAN To Network Interface Card (NIC) To LAN Port To Site LAN Example Site LAN Connection PC 34980A 1. Using a standard LAN patch cable, connect your computer and the 34980A to LAN wall outlets. 2. Make sure power is applied to your computer and verify that the operating system is fully booted. Then apply power to the 34980A. Front-Panel Navigation 3. Using the flow diagram shown to the right, navigate through the 34980A front-panel Utility menu to verify that DHCP is ON (ON is the factory default state). NOTE: If your LAN does not support DHCP, refer to the Connectivity Guide. Utility Remote I/O Utility 4. Press EXIT MENU, which saves any changes and defaults all other parameters in the Utility menu. I/O PORT LAN GPIB USB (Use knob to select LAN) 5. Wait for the DHCP server to assign a valid address (this operation can take between 30 seconds and one minute to complete). Utility ENABLE LAN NO YES (Use knob to select YES) 6. From the Utility menu, navigate to the LAN SETTINGS choice and select VIEW. Using the flow diagram as a guide, view the instrument’s IP address and other LAN settings. Write down the IP address in the space below: Utility LAN SETTINGS VIEW MODIFY Utility 34980A IP Address: ___________________________ 7. Press EXIT MENU. 8. Now you can use the 34980A Web Browser Interface to access and control the instrument. See page 21 for more information on using the Web Interface. 9. If you plan to program the instrument over LAN or use such programs, make sure you have installed the required I/O software on your computer. Utility (Use knob to make selection) LAN STATUS DHCP BOOT DHCP OFF ON (Use knob to select IP_ADDRESS) (Use knob to select ON) EXIT MENU IP_ADDRESS xxx.xxx.xx.xx EXIT MENU 10. Use the Connection Expert utility of the Agilent IO Libraries Suite to add the 34980A and verify a connection. When identifying the instrument, it is easiest if you use the IP address noted in step 6 above. NOTE: If you have installed any other I/O software, refer to documentation included with that software. 11. Now you can use various programming environments to control the 34980A. For an overview on programming instruments via LAN, refer to the Connectivity Guide. 16 34980A Getting Started Guide Connecting Via Isolated (Non-Site) LAN To Network Interface Card (NIC) Example Isolated (Non-Site) LAN Connection To LAN Port CAT5 Crossover Cable PC 34980A 1. Using the CAT5 crossover cable provided with the 34980A, connect your computer to the 34980A. 2. Make sure power is applied to your computer and verify that the operating system is fully booted. Then apply power to the 34980A. 3. Using the flow diagram on page 16, navigate through the 34980A front-panel Utility menu and set DHCP to OFF. 4. Press EXIT MENU, which saves any changes and defaults all other parameters in the Utility menu. 5. From the Utility menu, navigate to the LAN SETTINGS choice and select VIEW. Using the flow diagram as a guide, view the instrument’s IP address and other LAN settings. Write down the IP address in the space below: 34980A IP Address: ___________________________ 6. Press EXIT MENU. 7. Now you can use the 34980A Web Browser Interface to access and control the instrument. See page 21 for more information on using the Web Interface. 8. If you plan to program the instrument over LAN or use such programs, make sure you have installed the required I/O software on your computer. 9. Use the Connection Expert utility of the Agilent IO Libraries Suite to add the 34980A and verify a connection. When identifying the instrument, it is easiest if you use the IP address noted in step 5 above. NOTE: If you have installed any other I/O software, refer to documentation included with that software. 10. Now you can use various programming environments to control the 34980A. For an overview on programming instruments via LAN, refer to the Connectivity Guide. 34980A Getting Started Guide 17 Connecting Over GPIB 1. Make sure you have installed the required I/O software on your computer. 2. Follow the instructions included with your GPIB interface card to install the GPIB hardware in your computer. 3. Connect a GPIB cable (not provided) between your computer and the 34980A. Front-Panel Navigation Utility Remote I/O Utility 4. Make sure power is applied to your computer and verify that the operating system is fully booted. Then apply power to the 34980A. 5. Configure your GPIB hardware as instructed by the documentation provided the hardware vendor. I/O PORT GPIB USB LAN (Use knob to select GPIB) Utility 6. Use the Connection Expert utility of the Agilent IO Libraries Suite to add the 34980A and verify a connection. NOTE: If you have installed any other I/O software, refer to documentation included with that software. 7. The 34980A is shipped from the factory with a default GPIB address of 9. To change the address, refer to the flow diagram shown to the right. 8. Now you can use various programming environments to control the 34980A. For an overview on programming instruments via GPIB, refer to the Connectivity Guide. ENABLE GP-IB NO YES (Use knob to select YES) Utility GPIB ADDRESS 9 Factory Address: 9 (Use knob and arrow keys to select different address) Utility 18 34980A Getting Started Guide Connecting Over USB Before connecting the USB cable (not provided), make sure that I/O software is installed on your computer. See page 15 for more information on installing the Agilent IO Libraries software. 1. After installing the required I/O software on your computer, connect a standard USB cable between your computer and the 34980A. 2. Make sure power is applied to your computer and verify that the operating system is fully booted. Then apply power to the 34980A. 3. The Found New Hardware Wizard will automatically start and guide you through configuring the 34980A as a USB device. To install the software automatically, accept all defaults. NOTE: If you installed the Agilent IO Libraries software, this also installed the required low-level software drivers. Therefore, you do not need to insert the CD when the Found New Hardware Wizard instructs you to do so. 4. Use the Connection Expert utility of the Agilent IO Libraries Suite to verify that the 34980A is displayed under the USB interface. NOTE: If you have installed any other I/O software, refer to documentation included with that software. 5. Now you can use various programming environments to control the 34980A. For an overview on programming instruments via USB, refer to the Connectivity Guide. 34980A Getting Started Guide 19 Communicating with the 34980A You can use either instrument drivers or SCPI commands (in any programming environment) to communicate with the 34980A. However, Agilent has designed drivers that work best in recommended environments, as shown in the table below. To install drivers and their associated Help files, refer to the 34980A Product Reference CD-ROM, which is included with the 34980A User’s Guide. This CD-ROM also contains a collection of example programs for your reference. Programming Environment Driver(s) Microsoft Visual C version 6.0, Visual C++, and ANSI C IVI-C, IVI-COM Microsoft Visual Basic version 6.0 Microsoft Visual Studio .NET for C#, C, and Visual Basic Agilent VEE National Instrument’s LabVIEW National Instrument’s LabWindows/CVI 20 IVI-C, IVI-COM IVI-COM IVI-C LabVIEW Plug and Play (native mode), IVI-C IVI-C 34980A Getting Started Guide Exploring the 34980A Web Interface Over LAN You can use the 34980A’s Web Browser Interface for remote access and control of the instrument via a ® Java-enabled Web browser, such as Microsoft Internet Explorer. Using the Web Interface, you can configure, troubleshoot, and monitor your system remotely. This section provides an overview of the 34980A Web Interface. The Web Interface works with the 34980A mainframe and all installed plug-in modules. For the examples provided in this section, the 34921A multiplexer module is used for illustration purposes. The following tasks assume you have configured the 34980A for LAN communication and have verified connection to a LAN network. See pages 16 and 17 for more information. Launching the Web Interface 1. Open your Internet browser from your computer. 5 2 2. From the Tools>Internet Options menu, navigate to Connections (exact navigation depends on your browser), and then select LAN Settings. 3. From the LAN Settings dialog, select/activate bypass proxy server for local addresses (exact terminology depends on your browser). 4. Exit the Options window. 5. Enter the IP address of the 34980A in the Address field and press return. Either refer to the IP address you wrote on page 16 or 17, or use the 34980A’s front panel Utility menu to read the IP address. Click here for Help 6. After entering the appropriate IP address, the 34980A Web Interface’s Welcome Window should appear. The procedures in this section will help you understand tasks commonly performed using the 34980A’s Web Interface. For additional help on using the interface, click the ?Help with the Page tab on the lower-left corner of the Web Interface window. 34980A Getting Started Guide 21 Displaying the Browser Web Control Page 1. From the Welcome Window, click the Browser Web Control tab on the left side of the window to display the Brower Web Control page. 1 2. From this page, you can view and modify the configuration of the modules currently installed in the 34980A. When you first launch this page, the configuration of the module in the lowest numbered slot is shown (shown in bold text). To view the configuration of a different module, click on the desired module name from the list (slots are numbered 1 through 8). 2 Selecting the “Allow Full Control” Mode Select the Allow Full Control radio button as shown. Once enabled, this mode allows you to open and close channel relays and modify the state of the installed modules. If desired, you can use the 34980’s front panel Utility menu to assign a password for use with the 34980A Web Interface. Once specified, the password must be provided to transition from the Observe Only mode to the Allow Full Control mode. 22 34980A Getting Started Guide Closing and Opening Channel Relays You must be in the Allow Full Control mode to close and open channels. 1. To close a channel, left-click directly on the graphic of the desired relay. To open a closed channel, click again on the relay graphic. 2 2. You can also open and close the four Analog Bus relays by left-clicking the graphics of these relays. The Analog Bus Overview display located near the top of the window shows the slot-by-slot status of the four Analog Buses. 1 Modifying the Channel Configuration You must be in the Allow Full Control mode to modify the channel configuration. 1. To modify the measurement configuration of individual channels (e.g., add channel labels, select function and range, etc.), right-click directly on the graphic of the desired relay. The Channel Configuration dialog box for that channel is displayed. 1 2. As an example, change the label on Channel 1001 to “DUT_1”. Click OK. 2 34980A Getting Started Guide 23 Sending SCPI Commands Via the Web Interface You must be in the Allow Full Control mode to send instrument commands to the 34980A. The Web Interface provides a utility to send SCPI commands to the 34980A via the SCPI Command Interface window. The procedure below shows how to access this window and send commands. 1. Press the Commands button at the top of the Web Browser Control page to launch the SCPI Command Interface window. 1 2. The SCPI Command Interface window allows you to: a. Set the time to wait for a command response from the instrument. b. Select commonly used commands to send to the instrument. 2a c. Enter SCPI commands to send to the instrument: 1. Use Write to send the command to the instrument. 2. Use Read to read the response back from the instrument. 3. Use Write & Read to send a query to the instrument and read back the response. 2b 3. In the Command History field, you can view the last 20 commands sent to the instrument. 4. You can use the SCPI Quick Reference button to access a syntax summary of all SCPI commands for the 34980A. 2c 3 4 24 34980A Getting Started Guide Agilent 34980A Documentation Map If you want to… Go here… Additional Comments Install Agilent IO Libraries Suite Automation-Ready CD The Automation-Ready CD is shipped with the 34980A. Install 34980A instrument drivers Read the Agilent Connectivity Guide Learn more about the 34980A Web Browser Interface Learn about the 34980A frontpanel menu content and operation Learn more about the 34980A mainframe and the available plug-in modules 34980A Product Reference CD-ROM Automation-Ready CD Web Interface On-Line Help system 34980A User’s Guide 34980A User’s Guide You can find installation instructions and additional information at: www.agilent.com/find/iolib. The 34980A Product Reference CD-ROM is shipped with the 34980A. Or download the 34980A drivers from the Agilent Web site at: www.agilent.com/find/drivers. The Automation-Ready CD is shipped with the 34980A. Or download the Connectivity Guide from the Agilent Web site at: www.agilent.com/find/connectivity. Click on the ?Help with this Page tab on the Web Interface window. Shipped as a printed manual with the 34980A and a PDF file on the 34980A Product Reference CD-ROM. Or download the User’s Guide from the Agilent Web site at: www.agilent.com/find/34980A. Shipped as a printed manual with the 34980A and a PDF file on the 34980A Product Reference CD-ROM. Or download the User’s Guide from the Agilent Web site at: www.agilent.com/find/34980A. Learn about the SCPI programming commands used with the 34980A 34980A Programmer’s Reference On-line Help Quick Reference Guide You can find the Programmer’s Reference Help file and the Quick Reference Guide on the 34980A Product Reference CD-ROM. Or download the information from the Agilent Web site at: www.agilent.com/find/34980A. Update 34980A instrument firmware www.agilent.com/find/34980A Agilent Technologies, Inc. Printed in Malaysia Edition 2 April 2005 E0405 *34980-90004* 34980-90004 Getting Started Guide