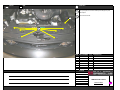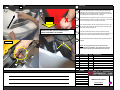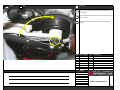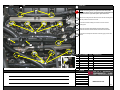
1
SALEEN SERIES VI.5 SUPERCHARGER KIT
INSTALLATION MANUAL: Saleen S-Series / H-Series / Mustang GT
(S281 3V, H281 3V, & Mustang GT )
2005 - 2009 Model Year
P/N: 10-8002-C11517M
Saleen Performance Vehicles
1-800-888-8945
www.saleen.com
* Please keep this manual with the vehicle.
This manual contains maintenance, service, and parts information important to the operation of the motor and supercharger.
STOP
IF YOU ARE NOT EXPERIENCED IN THE AREA
OF AUTOMOTIVE MECHANICS, WE
STRONGLY URGE THAT YOU REFER THIS
INSTALLATION TO A CERTIFIED INSTALLER
OR TECHNICIAN.
ENSURE THE VEHICLE PARKING BRAKE IS
ON AND THE TRANSMISSION IS IN PARK OR
IN GEAR WHEN WORKING ON IT.
STOP
DO NOT INSTALL ANY AFTERMARKET CHIPS OR
PROGRAMMERS, OR HAVE YOUR PCM REPROGRAMMED
ANYWHERE BUT AT SALEEN FOR THIS SUPERCHARGER
KIT. THE 2005 to 2009 MUSTANG USES AN ELECTRONIC
THROTTLE CONTROL (ETC), WHICH IS CONTROLLED BY
THE POWERTRAIN CONTROL MODULE (PCM) AND THE
CALIBRATION INSIDE. AFTERMARKET CHIPS DO NOT
PROPERLY RECALIBRATE THE ENGINE MANAGEMENT
SYSTEM; THIS CREATES A DANGEROUS SITUATION
THAT COULD RESULT IN A STUCK THROTTLE AND CAN
LEAD TO INJURY OR DEATH. SALEEN FULLY
REPROGRAMS THE PCM TO FORD STANDARDS, AND
ENSURES THAT ALL ENGINE SAFETY CONTROLS ARE
FULLY FUNCTIONAL.
STOP
THE SALEEN SERIES VI.5 SUPERCHARGER AND
ACCOMPANYING PROGRAMMING ARE DESIGNED
AROUND THE USE OF 91 OCTANE FUEL OR
HIGHER ONLY. BEFORE YOU RUN YOUR
MUSTANG WITH THE SERIES VI KIT INSTALLED
EVEN ONCE, YOU MUST EITHER DRAIN THE FUEL
TANK COMPLETELY AND FILL IT UP WITH 91
OCTANE, OR BEGIN USING 91 OCTANE IN YOUR
MUSTANG TWO COMPLETE FILLUPS BEFORE
INSTALLATION.
Table of Contents
A
B
(2005 to 2006 Model)
(2007 to 2008 Model)
C
D
(Saleen Naturally Aspirated Pulley Kit - S281 3V & H281 3V)
E
F
(Stock Mustang GT Model)
(S - Series Model)
G
(2009 Model)
(H - Series Model)
I. Table of Contents
Pg. I to II
II. Precautions (PLEASE READ CAREFULLY)
Pg. III
III. Introduction
Pg. IV
IV. Requirements
Pg. V to VIII
Pg. IX
1. Parts List
2. Tool List
V. Tear-Down Instructions
Battery & Tray Removal
PCM Removal
PCM Questionnaire
Hood Removal
E Front Fascia Removal (Stock)
F Front Fascia Removal (Saleen S-Series)
G Front Fascia Removal (Saleen H-Series)
Front Bump Isolator Removal
Air Intake Tube & Air Box Removal
Stock Serpentine Belt Removal
Engine Coolant Removal
Throttle Body Removal
Fuel Rail Removal
Intake Manifold Removal
Alternator Removal
A Upper Radiator Hoses Disconnection (2005 to 2006 Model)
B & C Upper Radiator Hose Removal (2007 to 2009 Model)
Water Crossover Removal
Water Tube Assembly Removal
D Pulleys Replacement Process (Saleen N/A Pulley Kit Only)
Pulleys & Fasteners Removal
A Coolant Hose Assembly Removal (2005 to 2006 Model)
RH (Passenger) Front Wheel Removal
RH (Passenger) Front Fender Well Removal
Pg. 1
Pg. 2
Pg. 3
Pg. 4
Pg. 5E to 7E
Pg. 5F to 7F
Pg. 5G to 7G
Pg. 8
Pg. 9
Pg. 10
Pg. 11
Pg. 12
Pg. 13 to 14
Pg. 15 to 16
Pg. 17 to 18
Pg. 19A
Pg. 19BC
Pg. 20
Pg. 21
Pg. 22D
Pg. 23
Pg. 24A
Pg. 25
Pg. 26
VI. Parts Assembly & Modification Instructions
Fuel Rail & Injectors Installation
Water Crossover Assembly
A & B Alternator Pulley Replacement (2005 to 2008 Model)
C Alternator Pulley Replacement (2009 Model)
A & B Alternator Harness Modification (2005 to 2008 Model)
C Alternator Harness Modification (2009 Model)
Air Box Modification & Lid Assembly
Pg. 27 to 28
Pg. 29
Pg. 30AB to 31AB
Pg. 30C to 31C
Pg. 32AB to 35AB
Pg. 32C to 36C
Pg. 37 to 38
Page I
Table of Contents
A
B
(2005 to 2006 Model)
(2007 to 2008 Model)
C
D
(Saleen Naturally Aspirated Pulley Kit - S281 3V & H281 3V)
E
F
(Stock Mustang GT Model)
(S - Series Model)
G
(2009 Model)
(H - Series Model)
VI. Installation Instructions
Water Pump Harness Installation: Routing
RH (Passenger) Front Fender Well Installation
RH (Passenger) Front Wheel Installation
Water Pump Harness Installation: Wiring
Idler Pulley Installation
A Radiator Plumb. Conversion Kit (2005 to 2006 Model)
B & C I/C Recovery Tank Bracket Installation (2007 to 2009 Model)
Lower Heater Core Hose Replacement
B & C Heat Exchanger Installation (2007 to 2009 Model)
A Heat Exchanger Installation (2005 to 2006 Model)
Intercooler Water Pump Installation
Alternator Idler Pulley & Bracket Installation
Water Tube Assembly Installation
Engine Compartment Bulkhead Modification
Engine Head Port Inspection
Supercharger Assembly Installation
Water Crossover Installation
Alternator Installation
Alternator Harness Installation
Serpentine Belt Installation: Routing
Vacuum Hoses Modification
ACT Harness Installation
Intercooler Water Pump to Recovery Tank Hose Installation
Recovery Tank Installation
Heat Exchanger Hose Installation
Intercooler to Recovery Tank Hose Installation
Throttle Body Installation
Supercharger Assembly to Engine Connections
Air Box & Intake Snorkel Installation
E Front Fascia Installation (Stock)
F Front Fascia Installation (Saleen S-Series)
G Front Fascia Installation (Saleen H-Series)
Hood Installation
Saleen Programmed PCM Installation
Battery & Tray Installation
Intercooler Coolant Fill
Engine Coolant Fill
Vehicle Decal Installation
Pg. 39 to 40
Pg. 41
Pg. 42
Pg. 43 to 45
Pg. 46
Pg. 47A
Pg. 48BC
Pg. 49
Pg. 50BC
Pg. 50A
Pg. 51 to 53
Pg. 54 to 55
Pg. 56
Pg. 57
Pg. 58
Pg. 59 to 60
Pg. 61 to 62
Pg. 63
Pg. 64
Pg. 65
Pg. 66 to 67
Pg. 68
Pg. 69
Pg. 70
Pg. 71
Pg. 72
Pg. 73
Pg. 74
Pg. 75
Pg. 76E to 78E
Pg. 76F to 78F
Pg. 76G to 78G
Pg. 79
Pg. 80
Pg. 81
Pg. 82
Pg. 83
Pg. 84
VII. Post-Installation
Post Installation Information
Pg. 85
Page II
Pre-Installation Precautions:
To help ensure the proper operation of your vehicle, follow the guidelines below:
IF YOU ARE NOT EXPERIENCED in the area of automotive mechanics, we strongly
urge that you refer this installation to a certified installer or technician.
STOP
PAY ATTENTION TO VEHICLE TYPE NOTATION because there are installation
steps in this manual that differ based on whether your vehicle is a Saleen S-Series
product, Saleen H-Series product, or a factory Mustang GT*. Installation procedures
also vary depending on the model year. There will be clear markings at the lower RH
corner of the page (A - G designations). Taking the time to read these instructions
along with following the notes will ensure a smooth, easy, and successful
installation**.
*This instruction manual consists of the three most likely vehicle types for this kit (Saleen S-Line, Saleen H-Line, & Factory
Stock Mustang). Saleen cannot anticipate what modifications may be done to every vehicle, so there may be an installation
conflict with some aftermarket equipment.
**This manual was created during the production process, using the Saleen S281SC as an example. Any form of aftermarket
body kits may require different or additional steps when removing body components (such as the front fascia or hood) may be
different then the instructions listed in this manual. If the vehicle does contain other aftermarket body components, contact that
aftermarket supplier for disassembly and assembly instructions.
Safety Precautions:
To help guarantee your safety, please follow the guidelines listed below:
NO SMOKING, FLAMES, OR SPARKS around the battery or fuel system. Batteries
can give off fumes that are flammable and may ignite if there is any form of spark or
open flame near it.
WEAR THE APPROPRIATE SAFTEY GEAR such as safety glasses and gloves
during the vehicle tear down and installation of new components. Always follow the
safety instructions that come with the tools you are using.
USE CAUTION AROUND VEHICLE when working on it. Make sure the vehicle is
turned OFF, is properly secured (in park or in gear with the parking brake on), and is
sitting on a level surface.
If a hoist or floor jack is required, make sure the vehicle is in park or in gear and the
parking brake on. If using a floor jack, make sure the vehicle is on a level surface,
the rear tires are chocked, and the vehicle is being supported by jack stands. Follow
ALL safety guidelines & operational instructions spelled out in the hoist or floor jack’s
owners manual. Failure to do so may result in serious injury.
Avoid wearing loose clothing or jewelry, as these items might get caught in moving
parts resulting in injury. When instructed to operate your vehicle, make sure you do
so in a well-ventilated area (to prevent carbon monoxide poisoning).
Be safe and use proper care and precautions. Saleen wants you to have a safe and rewarding
experience.
Page III
Installation Guide
475 H.P. Series VI.5 Supercharger Kit
2005 to 2009
WELCOME!
Thank you for buying the newly improved Saleen 475HP Series VI.5 Supercharger Kit for your 2005
to 2009 Mustang (4.6 Liter, 3-Valve engine).
The new kit contains an improved water crossover design now with an integrated thermostat. The kit
also includes a more efficient supercharger housing for improved flow characteristics. We appreciate
your business, and we hope you enjoy your product.
For your benefit, please read the following instructions completely and thoroughly before attempting
to install the supercharger kit. Many questions we have received from customers about the
installation of our products could have been easily solved by information listed in this installation
guide. We want you to enjoy this product in its fully functional state, and reading this tutorial is a
great first step to getting you on your way to a more unique and powerful Mustang.
Please review the VERY IMPORTANT instructions below before proceeding with the kit installation.
•
Please note that if you have ANY aftermarket parts already installed on your Mustang, or own
a S281 3-Valve or H281 3-Valve (both naturally aspirated) you will need to return the vehicle
to Stock Ford Mustang Status. This includes pulley, chips, programmers, etc… The vehicle
will not function properly, and kit components may not fit properly if the vehicle is not returned
to stock.
•
Saleen recommends the use of HTO spark plugs (Saleen Part# 00-1601-C13394*) with this
kit, if your vehicle is produced from 2005 to early model year 2008. The HTO spark plug will
not fit vehicles produced after December 1st 2007. To verify if your vehicle will accept HTO
spark plugs, inspect a spark plug coil. If the coil has a brown plastic sleeve, HTO plugs are
not available. If the coil is all black and does not have a brown sleeve, HTO plugs can be
ordered through Saleen for your vehicle.
•
We strongly urge that you have at least one person to help you install the supercharger, as
the supercharger assembly is heavy, and the hood is too awkward to position alone. With
enough help and at least one read of this installation guide, you should be well on your way
to one hot Mustang!
•
Finally, be sure that you fill out the processor questionnaire and return it to Saleen with your
PCM! We cannot flash the PCM without that questionnaire!
Again, thank you for choosing Saleen!
Installation Manual Created: 2005
Revised: 03/21/2010 By: AJF
Revision# 12 Revision Level M
Page IV
PARTS INCLUDED IN SERIES VI.5 S/C KIT ~ 475 HP (2005 to 2006)
Below is a list of kit items and parts unique to the 2005 to 2006 model year kit. Page V will display all of the kit items and parts
universal to all kits (2005 to 2009). If you have ordered a 2005 to 2006 Mustang Series VI Supercharger Kit, the parts below are
included in your kit.
A 10-1607-B138260
SERIES VI.5 SC KIT, 475 HP, 2005-06 MUSTANG
1
EACH
06-2001-B095680
06-2001-C09599
00-9003-C001370
HEAT EXCHANGER KIT
HEAT EXCHANGER S/C S197 MUSTANG
JETNUT M8 x 1.25
1
1
4
EACH
EACH
EACH
06-2001-B095710
00-2001-C099940
06-2001-C10212
00-9001-C101410
00-9004-C120070
00-9003-C109360
RECOVERY TANK KIT
CAP TANK
TANK INTERCOOLER RECOVERY
CAPSCRW HEX FLNG M6x1.0mm 25mm FULL THRD Zn PL
WASHER, M6 ID 18MM OD, 18-8 SS
NUT NYLOC M6 10mm WIDTH 6mm HEIGHT
1
1
1
3
2
2
EACH
EACH
EACH
EACH
EACH
EACH
06-1604-B098630
06-1604-C09864
00-9003-C157270
00-9004-C157320
00-9002-C110890
00-9002-C110900
00-2002-C100910
00-9001-C106650
00-1706-C153230
00-1703-C070870
ALTERNATOR MOUNTING KIT
ALTERNATOR MOUNT MACHINED
NUT M8 X 1.25 DISTORTED THREAD LOCKNUT ZN PLATED
WASHER AN SS 5/16" ALTERNATOR MOUNT
STUD ST BLCK OX M8x1.25x110mm UNEQUAL 31mm&12mm THD LGTH
STUD, ST BLACK OXIDE, M8 x 1.25 x 65mm 20mm THRD LNGTH
STUD, ST BLACK OXIDE, M8 x 1.25 x 110mm
CAPSCRW HEX FLNG M8x1.25mm 40mm CL 8.8 FULLY THRD Zn PL
STANDOFF, ALTERNATOR WIRE
DUAL WALL HEAT SHRINK 1/2" RED
1
1
3
3
1
1
1
2
1
1
EACH
EACH
EACH
EACH
EACH
EACH
EACH
EACH
EACH
INCH
06-1604-C09936
00-9004-C111460
00-9003-C102610
00-3105-C115760
06-2003-C143820
00-2003-C19338
00-2003-C19363
06-2003-C143810
00-1703-C070870
00-1704-C110830
00-1704-C063000
00-1703-C070810
00-1703-C162470
00-1703-C070900
00-1704-C093820
00-1704-C129750
00-1704-C157540
00-1704-C092600
ALTERNATOR PULLEY S/C S197 MUSTANG
WASHER 17mm ID 40mm OD 1.6mm THICK Zn PL
NUT HEX JAM M16x1.5x8mm Zn PL
ALT PULLEY TOOL
GASKET, WATER CROSSOVER, DRVR, 2007 MUSTANG
COOLANT HOSE ASSEMBLY
THERMOSTAT 2007 to 2010
O-RING, THERMOSTAT
DUAL WALL HEAT SHRINK 1/2" RED
SLEEVING, CONVOLUTED 1/2" BLACK
HEAT SHRINK, DUAL WALL 1/8" BLACK
WIRE, 4 AWG RED
SPLICE, NON-INSULATED SEAMLESS 6 AWG BUTT
TERMINAL, RING 4 AWG FOR 1/4" STUD
WIRE, 20 AWG YELLOW
WIRE, 20 AWG YELLOW/BLUE
WIRE, 20 AWG ORANGE/BLUE
SPLICE, NON-INSULATED SEAMLESS 18-20 AWG BUTT
1
1
1
1
1
1
1
1
3
8.5
13.5
10
1
1
12.25
12.25
12.25
9
EACH
EACH
EACH
EACH
EACH
EACH
EACH
EACH
INCH
INCH
INCH
INCH
EACH
EACH
INCH
INCH
INCH
EACH
Page V
PARTS INCLUDED IN SERIES VI.5 S/C KIT ~ 475 HP (2007 to 2008)
Below is a list of kit items and parts unique to the 2007 to 2008 model year kit. Page V will display all of the kit items and parts
universal to all kits (2005 to 2009). If you have ordered a 2007 to 2008 Mustang Series VI Supercharger Kit, the parts below are
included in your kit.
B 10-1607-B150580
SERIES VI.5 SC KIT, 475 HP, 2007-08 MUSTANG, A/M
1
EACH
06-2001-B150880
06-2001-C09599
00-9003-C157270
00-9004-C001740
00-9001-C135810
00-9004-C114890
HEAT EXCHANGER KIT
HEAT EXCHANGER S/C S197 MUSTANG
NUT M8 X 1.25 DISTORTED THREAD LOCKNUT ZN PLATED
WASHER FLAT M8 ST
BOLT M8x1.25mm 30mm CL 8.8 Zn PL FLANGE
WASHER FLAT M8 24mm OD 2mm THK Zn PL
1
1
4
4
2
2
EACH
EACH
EACH
EACH
EACH
EACH
06-2001-B095710
00-2001-C099940
06-2001-C10212
00-9001-C101410
RECOVERY TANK KIT
CAP TANK
TANK INTERCOOLER RECOVERY
CAPSCRW HEX FLNG M6x1.0mm 25mm FULL THRD Zn PL
1
1
1
3
EACH
EACH
EACH
EACH
06-1604-B098630
06-1604-C09864
00-9003-C157270
00-9004-C157320
00-9002-C110890
00-9002-C110900
00-2002-C100910
00-9001-C106650
00-1706-C153230
00-1703-C070870
ALTERNATOR MOUNTING KIT
ALTERNATOR MOUNT MACHINED
NUT M8 X 1.25 DISTORTED THREAD LOCKNUT ZN PLATED
WASHER AN SS 5/16" ALTERNATOR MOUNT
STUD ST BLCK OX M8x1.25x110mm UNEQUAL 31mm&12mm THD LGTH
STUD, ST BLACK OXIDE, M8 x 1.25 x 65mm 20mm THRD LNGTH
STUD, ST BLACK OXIDE, M8 x 1.25 x 110mm
CAPSCRW HEX FLNG M8x1.25mm 40mm CL 8.8 FULLY THRD Zn PL
STANDOFF, ALTERNATOR WIRE
DUAL WALL HEAT SHRINK 1/2" RED
1
1
3
3
1
1
1
2
1
1
EACH
EACH
EACH
EACH
EACH
EACH
EACH
EACH
EACH
INCH
06-1604-C09936
00-9004-C111460
00-9003-C102610
00-3105-C115760
06-2003-C143790
00-1703-C070870
00-1704-C110830
00-1704-C063000
00-1703-C070810
00-1703-C162470
00-1703-C070900
00-1704-C093820
00-1704-C129750
00-1704-C157540
00-1704-C092600
ALTERNATOR PULLEY S/C S197 MUSTANG
WASHER 17mm ID 40mm OD 1.6mm THICK Zn PL
NUT HEX JAM M16x1.5x8mm Zn PL
ALT PULLEY TOOL
HOSE, UPPER RAD PASS, 2006 MUSTANG
DUAL WALL HEAT SHRINK 1/2" RED
SLEEVING, CONVOLUTED 1/2" BLACK
HEAT SHRINK, DUAL WALL 1/8" BLACK
WIRE, 4 AWG RED
SPLICE, NON-INSULATED SEAMLESS 6 AWG BUTT
TERMINAL, RING 4 AWG FOR 1/4" STUD
WIRE, 20 AWG YELLOW
WIRE, 20 AWG YELLOW/BLUE
WIRE, 20 AWG ORANGE/BLUE
SPLICE, NON-INSULATED SEAMLESS 18-20 AWG BUTT
1
1
1
1
1
3
8.5
13.5
10
1
1
12.25
12.25
12.25
9
EACH
EACH
EACH
EACH
EACH
INCH
INCH
INCH
INCH
EACH
EACH
INCH
INCH
INCH
EACH
Page VI
PARTS INCLUDED IN SERIES VI.5 S/C SUPPLEMENTAL KIT ~ 2009
Below is a list of kit items and parts unique to the 2009 model year. Page V will display all of the kit items and parts universal
to all kits (2005 to 2009). If you are installing a Saleen Series VI.5 Supercharger Kit on a 2009 Mustang, the parts below are
included in the supplemental kit. Otherwise, the kit is the same as a 2007-2008 kit.
C 06-1604-B19222
06-1604-C18921
00-9004-C18923
00-9003-C18922
00-1607-C146160
2009 SUPPLEMENTAL KIT, SUPERCHARGER
1
EACH
ALTERNATOR PULLEY S/C S197 2009
WASHER, M14 FLAT
NUT, HEX M14x1.50
GASKET, INTAKE MANIFOLD TO HEAD, MUSTANG
1
1
1
8
EACH
EACH
EACH
EACH
Page VII
PARTS INCLUDED IN SERIES VI.5 S/C KIT ~ 475 HP (UNIVERSAL)
Below is a list of kit items and parts that are universal to all model year kits (2005 to 2009)
06-2002-B095960
00-2002-C099910
06-2002-C09888
00-9001-C100640
00-9003-C157270
00-9004-C001740
00-9001-C114650
00-9004-C114890
06-2002-C11237
06-1704-B16574
WATER PUMP KIT
INTERCOOLER WATER PUMP, '05 S281
BRACKET WATER PUMP 05 S281
CAPSCRW HEX FLNG M8x1.25mm 20mm CL 8.8 FULL THRD Zn PL
NUT M8 X 1.25 DISTORTED THREAD LOCKNUT ZN PLATED
WASHER FLAT M8 ST
CAPSCRW HEX HD M8x1.25x50 FULL THRD Cl 10.9 Zn PL
WASHER FLAT M8 24mm OD 2mm THK Zn PL
SPACER WATER PUMP BRACKET
HARNESS, '05-'09 MUSTANG (S281 SC & S281 E) WATER PUMP
06-2003-B098560
06-2003-C09857
069-950
06-2003-C09860
06-2003-C09861
00-2003-C100680
HOSE KIT S/C 4.6 3V
MOLDED HOSE S/C TANK TO PUMP
3/4" HEATER HOSE
MOLDED HOSE S/C INTERCOOLER TO TANK
MOLDED HOSE S/C H.E TO INTERCOOLER
HOSE CLAMP MOLDED HOSE S/C 2005 MUSTANG
06-2003-B19367
00-9001-C101410
00-9001-C19336
00-9001-C19335
00-9004-C19337
069-950
00-2003-C100680
00-2003-C19335
00-2003-C19336
WATER CROSSOVER KIT - SERIES VI.5
CAPSCRW HEX FLNG M6x1.0mm 25mm
CAPSCRW HEX FLNG M6x1.0mm 80mm
CAPSCRW HEX FLNG M6x1.0mm 60mm
M6 WASHER
¾” HEATER HOSE
¾” HOSE CLAMP
WATER NECK, WATER CROSSOVER
WATER CROSSOVER SERIES VI.5
00-1607-B19330
06-1704-B12563
06-1602-C15559
06-1602-C13093
00-1701-C120760
00-9001-C101410
00-9005-C18840
00-1604-C111700
06-2003-C09925
178-428
00-1604-C099580
10-8003-C12466
10-8003-C12239
06-9101-C11353
069-703
00-9007-C10122*
SUPERCHARGER SERIES VI.5 ASSEMBLY, 475 H.P., S197 MUSTANG
HARNESS, ’05-‘09 MUSTANG (S281 SC & S281 E) ACT CONNECTOR
AIR INLET DUCT
AIR BOX COVER 2006 S281
FUEL INJECTOR
CAPSCRW HEX FLNG M6x1.0mm 25mm FULL THRD Zn PL
SPRING CLAMP, 7/16IN SS
GOODYEAR GATERBACK 109.0" 6 RIB BELT
WATER TUBE MUSTANG
ALTERNATOR IDLER PULLEY, 76MM
IDLER PULLEY, 76MM, GUIDED
STICKER NEON ORANGE 3"x11.5" PCM BOX
(BOX) PCM 2005 MUSTANG
LABEL BELT DIAGRAM SC
14" ZIP TIE
7" ZIP TIE
1
1
1
1
2
2
2
2
2
1
EACH
EACH
EACH
EACH
EACH
EACH
EACH
EACH
EACH
EACH
1
1
7.5
1
1
8
EACH
EACH
INCH
EACH
EACH
EACH
1
4
1
1
2
6
2
1
1
EACH
EACH
EACH
EACH
EACH
INCH
EACH
EACH
EACH
1
1
1
1
8
12
1
1
1
1
1
1
1
1
1
4
EACH
EACH
EACH
EACH
EACH
EACH
EACH
EACH
EACH
EACH
EACH
EACH
EACH
EACH
EACH
EACH
Page VIII
TOOLS REQUIRED FOR KIT INSTALLATION:
3/8" Drive - Torque Wrench
3/8" Drive - Ratchet
3/8" Drive - 6" Extension
5mm Socket
12mm Deep Socket
13mm Deep Socket
15mm Socket
3/8" Deep Socket
13mm Ratcheting wrench
1/4" Drive - Torque Wrench
1/4" Drive - Ratchet
1/4" Drive - 8" Extension
5.5mm Socket (1/4" Drive)
8mm Socket (1/4" Drive)
8mm Deep Socket (3/8" Drive)
10mm Socket (1/4" Drive) Deep Socket
10mm Socket (1/4" Drive) Shallow Swivel Socket
3/8" Drive 5/16" Allen Tool
3/8" Drive 5mm Allen Tool
3/8" Drive 6mm Allen Tool
1/4" Drive 3/16" Allen Tool
1/4" Drive 4mm Allen Tool
T15 Torx Bit
90 Degree Pick
Panel Puller
Short Phillips Head Screwdriver
Flat Blade Screwdriver
Wire Stripper / Crimper
Heat Gun (For Heat Shrink)
Air Saw or Hack Saw
Coolant System Pressure Tool
2 Gallon Bucket
Hose Clamp Pliers
Pliers
Fiber Stick
1/2" Drive Impact
1/2" Drive Breaker Bar
1/2" Drive 17mm Impact Socket
1/2" Drive 24mm Impact Socket
1/2" Drive 22mm Impact Socket
Fuel Line Disconnect Tool
Blue Loctite
Red Loctite
Pen Light
Mechanics Magnet
NOTE: If you do not have any of the tools listed above, you may be able to obtain them from your local tool
lending service
Page IX
TORQUE
ITEM
OPERATION
NOTICE: No smoking, flames, or sparks around the battery.
Batteries can give off fumes that are flammable and may ignite if
there is any form of spark or open flame near it.
10
Disconnect battery ground (negative) terminal from battery by loosening
the clamp with an 8mm socket.
20
Disconnect battery positive terminal from the battery with an 8mm
socket.
30
Remove the battery heat shield.
40
Remove the battery hold down clamp with an 8mm socket. Then remove
battery.
50
Using the panel puller, disconnect the Christmas tree holding the wire
harness to the battery tray.
60
Remove the three 10mm bolts holding in the battery tray and remove
tray.
20
10
30
50
40
60
ITEM
60
PART NUMBER
QTY. DESCRIPTION
60
THE BATTERY, BATTERY TRAY, HEAT SHIELD, HOLDDOWN, AND FASTENERS WILL BE SET ASIDE TO BE
INSTALLED LATER
TORQUE
NOTES:
PROCESS
PAGE
REMOVE BATTERY AND TRAY
1
TORQUE
ITEM
OPERATION
20
10
The PCM is located under the hood next to the fuse box and forward of
the battery.
20
Pull back on the grey plastic locking tab for each electrical connector and
disconnect the connectors from the PCM by carefully pulling on them.
30
With a 10mm socket, remove the 2 bolts holding the PCM to its
mounting bracket.
40
Pull the PCM towards the front of the vehicle to remove.
50
Fill out the PCM questionnaire on the following page COMPLETELY,
including the address to which you want the PCM returned to, and send
it to the following address…
30
Saleen, Attn: PCM Programming
33603 Dequindre Rd.
Troy, MI 48083
40
If you have any issues, please call 1.800.888.8945 ext 2101
ITEM
PART NUMBER
QTY. DESCRIPTION
A
B
10-8003-C12466
1
Sticker Orange 3"x11.5" PCM Box
10-8003-C12239
1
(BOX) PCM Mustang
TORQUE
NOTES:
PROCESS
PAGE
REMOVE PCM
2
TODAYS DATE:
/
/
PROCESSOR QUESTIONNAIRE
2005 - 2009 MUSTANG
SHIP TO ADDRESS FOR PCM (PLEASE NO P.O. BOXES)
CONTACT
NAME:
SHIPPING
ADDRESS:
CITY:
DEALER
NAME:
PHONE NUMBER:
STATE:
ZIP:
EMAIL:
TECH SUPPORT
SALEEN REPORT#:
CUSTOMERS
NAME:
(IF ONE WAS GIVEN)
VIN:
VEHICLE
YEAR:
TIRE
MANUFACTURER:
VEHICLE
MODEL:
5 SPEED
TRANSMISSION>
AUTO
6 SPEED
MANUAL
VEHICLE
BUMPER#:
REAR
TIRE SIZE:
ENGINE
SIZE:
VEHICLE
MILEAGE:
REAR GEAR RATIO:
(please look at vehicle)
SELECT THE SALEEN PERFORMANCE LEVEL THAT IS INSTALLED ON YOUR VEHICLE
S281
S281 SC
S281 SC
3V
BLACK INJ. 435 HP
BLUE INJ. 465 HP
S281 SC
AMERICAN FLAG
S281 EXTREME
S281 EXTREME
S281 EXTREME
550 HP
575 HP
600 HP
H281
3V
H302
3V
H302
SC
S281 SC
RED FLAG
S302 3V
PARNELLI JONES
SUPERCHARGE
KIT 475 HP
>
S281 SC
DAN GURNEY
S302 SC
EXTREME
S281 SC
SLEEPER
S302 SC
25TH STERLING
OTHER
NOT LISTED
SALEEN AIR INTAKE MODIFICATION INFORMATION
SHAPE OF INTAKE TUBE AT AIRBOX:
OVAL
ROUND
OTHER MODIFICATION / AFTERMARKET PARTS INSTALLED - NON SALEEN
e.g. HEADERS, INTAKES, AIR OR FUEL MANAGEMENT, EXHAUST, OTHER CAL. 'TUNERS'
PLEASE LIST
ALL ITEMS:
REASON FOR PROGRAMMING --- DO NOT LEAVE BLANK
PLEASE
EXPLAIN:
SHIP PCM TO >
"SEND PCM"
"OVERNIGHT"
SALEEN - PCM PROGRAMMIG
33603 Dequindre Rd.
Troy MI, 48083
CONTACT NUMBERS:
SALEEN USE ONLY
SHIP (N) (G)
SL (Y) (N)
REC
OLD
SENT
NEW
DIRECT: 1.800.888.8945 ext 2101
TAG
FAX: 1.248.499.5333
10/21/2009
** PLEASE INCLUDE THIS WITH THE PCM YOU ARE SHIPPING **
Page 3
TORQUE
ITEM
OPERATION
10
10
10
20
30
Locate the windshield washer sprayer hose (located underneath the
hood liner) and disconnect the line from the sprayers. There is a rubber
T-fitting on the RH side (passenger) and an elbow on the LH side
(driver). Then remove the sprayers.
Remove the two clips holding the windshield washer sprayer line to the
hood with a panel puller. The clips are located near the RH side
(passenger) hood hinge. Once the sprayer line is fully disconnected
from the hood, set the hose aside out of the way.
While another person helps hold the hood, carefully remove the four
10mm bolts (2 per side) that attach the hood to the hinge. Once the
hood is free of the hinges, carefully set the hood aside where it cannot
get damaged.
NOTICE: The hood liner may need to be partially removed to reach
the sprayer T-fittings. To remove the tree clips, use a panel puller.
20
30
ITEM
PART NUMBER
QTY. DESCRIPTION
TORQUE
NOTES:
PROCESS
PAGE
REMOVE HOOD
4
TORQUE
ITEM
OPERATION
10
With a panel puller, remove the 6 retainer pins holding the top aero
shield in place.
20
Remove the aero shield.
20
10
ITEM
PART NUMBER
QTY. DESCRIPTION
TORQUE
NOTES:
PROCESS
PAGE
REMOVE FRONT FASCIA
STOCK MUSTANG GT
E
5
TORQUE
ITEM
OPERATION
20
10
10
20
Both wheel wells have Philips screws (3 per side) that need to be
removed. The front wheels may need to be turned left or right to obtain
the necessary clearance for the screw driver.
Once the screws are removed, pull the fender liners back towards the
front wheels enough to see the 10mm nuts (2 per side) fastening the
front fascia to each fender. Remove all 4 of the nuts.
20
30
40
Underneath the front fascia in the front along the leading edge
are four 5.5mm bolts attaching the lower aero shield to the
bottom of the fascia. Remove the bolts.
Remove the 10mm bolts (1 per side) attaching the top of the front fascia
to the car. Each bolt is located just inboard of the headlight.
40
30
ITEM
PART NUMBER
QTY. DESCRIPTION
TORQUE
NOTES:
PROCESS
PAGE
REMOVE FRONT FASCIA
STOCK MUSTANG GT
E
6
TORQUE
ITEM
OPERATION
10
10
20
20
30
DO NOT WEAR WATCHES, RINGS, BRACLETS, OR OTHER
JEWELERY THAT MAY SCRATCH PAINTED PARTS
DURRING DISASSEMBLY OR ASSEMBLY
40
Once all of the fasteners are removed, remove the front fascia by
placing the palm of your hand on each side of the front fascia and push
down until the fascia loosens. Let the fascia sit on the front bumper in
order to disconnect harnesses.
Press in the tab located on the side of each fog lamp connector (1 per
side). Once the tab is depressed, pull each fog lamp connector away
from the lamp housing to disconnect.
Disconnect the side marker lamp connectors and the turn signal
connectors (1of each per side, located underneath each head lamp). To
disconnect each connector, depress the tab and pull to separate.
Remove front fascia and set it where it will not get scratched or
damaged.
30
30
ITEM
PART NUMBER
QTY. DESCRIPTION
TORQUE
NOTES:
PROCESS
PAGE
REMOVE FRONT FASCIA
STOCK MUSTANG GT
E
7
TORQUE
ITEM
OPERATION
10
With a panel puller, remove the 4 retainer pins holding the top aero
shield in place.
20
Remove the aero shield.
20
10
ITEM
PART NUMBER
QTY. DESCRIPTION
TORQUE
NOTES:
PAGE
PROCESS
REMOVE FRONT FASCIA
SALEEN S-SERIES
F
5
TORQUE
ITEM
OPERATION
20
10
10
20
Both wheel wells have Philips screws (3 per side) that need to be
removed. The front wheels may need to be turned left or right to obtain
the necessary clearance for the screw driver.
Once the screws are removed, pull the fender liners back towards the
front wheels enough to see the 10mm nuts (2 per side) fastening the
front fascia to each fender. Remove all 4 of the nuts.
20
30
40
Underneath the front fascia in the front along the leading edge
are two 5.5mm bolts attaching the lower aero shield to the
bottom of the fascia. Remove the bolts.
Remove the 10mm bolts (1 per side) attaching the top of the front fascia
to the car. Each bolt is located just inboard of the headlight.
40
ITEM
PART NUMBER
QTY. DESCRIPTION
30
TORQUE
NOTES:
PROCESS
PAGE
REMOVE FRONT FASCIA
SALEEN S-SERIES
F
6
TORQUE
ITEM
OPERATION
10
20
20
30
40
ITEM
Once all of the fasteners are removed, remove the front fascia by
placing the palm of your hand on each side of the front fascia and push
down until the fascia loosens. Let the fascia sit on the front bumper in
order to disconnect harnesses.
Locate the turn signal harness (located behind each turn signal, at each
side of the front grille). Disconnect each connector by depressing the
tab and pulling the connector away from the turn signal housing.
Disconnect the side marker lamp connectors (located underneath each
head lamp). To disconnect each connector, depress the tab and pull to
separate.
Remove front fascia and set it where it will not get scratched or
damaged.
PART NUMBER
QTY. DESCRIPTION
30
TORQUE
NOTES:
PROCESS
PAGE
REMOVE FRONT FASCIA
SALEEN S-SERIES
F
7
TORQUE
ITEM
OPERATION
10
With a panel puller, remove the 6 retainer pins holding the top aero
shield in place.
20
Remove the aero shield.
20
10
ITEM
PART NUMBER
QTY. DESCRIPTION
TORQUE
NOTES:
PROCESS
PAGE
REMOVE FRONT FASCIA
SALEEN H-SERIES
G
5
TORQUE
ITEM
OPERATION
20
10
10
20
Both wheel wells have Philips screws (3 per side) that need to be
removed. The front wheels may need to be turned left or right to obtain
the necessary clearance for the screw driver.
Once the screws are removed, pull the fender liners back towards the
front wheels enough to see the 10mm nuts (2 per side) fastening the
front fascia to each fender. Remove all 4 of the nuts.
20
30
40
Underneath the front fascia in the front along the leading edge
are four 5.5mm bolts attaching the lower aero shield to the
bottom of the fascia. Remove the bolts.
Remove the 10mm bolts (1 per side) attaching the top of the front fascia
to the car. Each bolt is located just inboard of the headlight.
40
ITEM
PART NUMBER
QTY. DESCRIPTION
30
TORQUE
NOTES:
PROCESS
PAGE
REMOVE FRONT FASCIA
SALEEN H-SERIES
G
6
TORQUE
ITEM
10
OPERATION
10
10
20
30
DO NOT WEAR WATCHES, RINGS, BRACLETS, OR OTHER
JEWELERY THAT MAY SCRATCH PAINTED PARTS
DURRING DISASSEMBLY OR ASSEMBLY
40
50
LH SHOWN
Retrieve some plastic fishing line. Feed the fishing line behind each
headlamp bar, and move the line in a saw like motion (up and down)
while pulling the line across the headlamp. Continue this process until
each headlamp bar is separated from the headlamps.
Remove the front fascia by placing the palm of your hand on each side
of the front fascia and push down until the fascia loosens. Let the fascia
sit on the front bumper in order to disconnect harnesses.
Press in the tab located on the side of each fog lamp connector (1 per
side). Once the tab is depressed, pull each fog lamp connector away
from the lamp housing to disconnect.
Disconnect the side marker lamp connectors and the turn signal
connectors (1of each per side, located underneath each head lamp). To
disconnect each connector, depress the tab and pull to separate.
Remove front fascia and set it where it will not get scratched or
damaged.
40
NOTICE: Use only plastic fishing line to remove the each
headlamp bar from its headlamp. Once the fascia is removed,
clean any tape residue from the headlamp and the fascia bar.
ITEM
PART NUMBER
QTY. DESCRIPTION
30
TORQUE
NOTES:
PROCESS
PAGE
REMOVE FRONT FASCIA
SALEEN H-SERIES
G
7
TORQUE
ITEM
OPERATION
10
Remove the top isolator pad by lifting up on it.
20
With a panel puller, remove the 4 tree clips holding the main front
bumper isolator to the front bumper.
30
There are foam studs on the back side of the isolator that locate into the
bumper, so pull the main isolator forward to remove.
10
20
20
30
ITEM
PART NUMBER
QTY. DESCRIPTION
TORQUE
NOTES:
PROCESS
PAGE
REMOVE ISOLATOR
8
TORQUE
ITEM
OPERATION
10
10
Pull the red tab on the top of the MAF connector away from the air box
lid to un-lock the connector. Depress the tab on the top of the
connector, and disconnect.
20
30
20
Disconnect the crankcase vent tube from the snorkel (just forward of the
throttle body). Push on the green locking tab, and pull the vent tube
away from the snorkel.
30
With a flat blade screwdriver, loosen the clamp that secures the air box
snorkel to the throttle body.
40
Using a 10mm socket, remove the bolt securing the air box to the driver
side inner fender. Save the bolt, it will be re-used later.
50
Lift the intake assembly (snorkel and air box together) out of the vehicle
and set aside.
40
10
ITEM
PART NUMBER
QTY. DESCRIPTION
TORQUE
NOTES:
PROCESS
PAGE
REMOVE INTAKE SNORKEL AND
AIR BOX
9
TORQUE
ITEM
OPERATION
10
Insert a 1/2" drive breaker bar into the arm of the belt tensioner. and
remove the belt.
20
Pull the breaker bar towards the driver side of the vehicle to release the
tension on the belt.
30
While the tensioner is engaged, slide the belt off of the pulleys and
removed.
20
10
ITEM
PART NUMBER
QTY. DESCRIPTION
TORQUE
NOTES:
PROCESS
PAGE
REMOVE SERPENTINE BELT
10
TORQUE
ITEM
OPERATION
10
10
Release the pressure in the coolant system by locating the pressure
relief cap and slowly turning it 1/2 turn counter-clockwise.
20
Once pressure is relieved, remove cap.
30
Find a suitable container below the radiator petcock drain (located
bottom passenger side), and use a 19mm to open the valve and drain
coolant.
20
NOTICE: If a coolant vacuum machine is available, it can be used
to extract the coolant by hooking the vacuum line to the petcock
and then vacuuming out the coolant reservoir bottle.
40
Once the coolant is done draining, re-tighten the petcock drain.
30
40
ITEM
PART NUMBER
QTY. DESCRIPTION
TORQUE
NOTES:
PROCESS
PAGE
REMOVE ENGINE COOLANT
11
TORQUE
ITEM
OPERATION
20
10
10
Disconnect the throttle position sensor electrical connector by sliding the
red shield on the connector towards the front of the car. Push down on
the now exposed tab, and pull the connector towards the front of the
vehicle to remove.
20
Disconnect the electronic throttle control electrical connector by pulling
the red locking tab outward. Pull the connector outward.
30
Remove the 2 studded bolts at the top of the throttle body and remove
the 2 nuts at the bottom. Remove the throttle body.
40
Once the throttle body is removed, remove the orange gasket from the
intake manifold. Both the gasket and throttle body will be re-used.
30
ITEM
PART NUMBER
QTY. DESCRIPTION
30
40
TORQUE
NOTES:
PROCESS
PAGE
REMOVE THROTTLE BODY
12
TORQUE
ITEM
OPERATION
10
NOTICE: No smoking, flames, or sparks around the fuel system.
The fuel line and fuel rail can give off fumes that are flammable and
may ignite if there is any form of spark or open flame near it.
10
Detach the two wiring harness retainers from the fuel rail mounting stud
bolts and position the harness to the side.
20
Disconnect the retainer holding the vacuum hose to the fuel rail
mounting stud.
30
Disconnect the fuel rail temperature and pressure sensor
electrical connector and the vacuum hose from the fuel rail.
40
Disconnect the 8 fuel injector electrical connectors (grey) from the fuel
injectors.
40
30
20
30
ITEM
PART NUMBER
QTY. DESCRIPTION
40
40
TORQUE
NOTES:
PROCESS
PAGE
REMOVE FUEL RAIL
13
TORQUE
ITEM
OPERATION
NOTICE: No smoking, flames, or sparks around the fuel system.
The fuel line and fuel rail can give off fumes that are flammable and
may ignite if there is any form of spark or open flame near it.
10
40
10
Remove the safety clip from the fuel line connector on the fuel rail.
20
Place a rag over the fuel line connection to protect against escaping fuel
and vapors.
30
Place the fuel line disconnect tool on the fuel rail side of the fuel rail.
Slide the fuel line disconnect tool towards the rear of the vehicle until the
tool locks in place. Disconnect the fuel line.
40
Remove the 8mm fuel rail stud bolts and save two of them (they will be
used later).
50
Lift the fuel rail assembly with injectors out of the vehicle.
30
50
60
60
60
Remove each fuel injector (8 total) with a flat blade screwdriver. Set the
tip of the screwdriver between the flange in the fuel rail (where the fuel
injector connects), and one of the ears of the injector retaining clip. Use
the screwdriver to disengage the tab on the clip ear, and pry away from
the injector connector. Once the clips are removed, pull each injector
out of the fuel rail.
NOTICE: The injector clips have tension on them. When removing
them with a screwdriver, they may want to pop off the injector and
go flying. Try to contain the clips when removing and make sure
to wear safety glasses. Save the 8 injector clips, they will be reused.
TORQUE
NOTES:
PROCESS
PAGE
REMOVE FUEL RAIL
14
TORQUE
ITEM
OPERATION
REAR OF INTAKE MANIFOLD SHOWN
10
Disconnect the evaporative emissions tube and the crankcase
ventilation tube from the front driver's side of the intake manifold.
20
Disconnect the charge motion control valve electrical connector located
at the rear of the intake manifold.
10
20
30
40
Using hose clamp pliers, disconnect the vacuum hose that runs from the
rear driver's side of the intake manifold to the T-fitting (the 3/8" hose on
the other side of the T-fitting runs to the vacuum brake booster).
Disconnect the retainer holding the main engine wire harness to the rear
driver's side intake manifold stud bolt.
30
40
ITEM
PART NUMBER
QTY. DESCRIPTION
TORQUE
NOTES:
PROCESS
PAGE
REMOVE INTAKE MANIFOLD
15
TORQUE
10
ITEM
PASSENGER SIDE
OPERATION
10
DRIVER SIDE
10
Remove the ten 10mm bolts (5 per side) to loosen the intake manifold
from the cylinder heads.
20
Remove the tree clip (on the alternator power wire) from the passenger
side fire wall to allow the manifold more room for removal.
30
Remove the intake manifold.
40
Remove the 8 intake manifold gaskets (4 per side), they will be used
with the new supercharger assembly.
NOTICE: If the engine is a high mileage engine, it is recommended
that new intake manifold gaskets be used.
REMOVE 5 BOLTS RETAINING THE INTAKE MANIFOLD TO
THE PASSENGER (RH) CYLINDER HEAD. THE CENTER
BOLT IS LOCATED TO THE INSIDE OF THE INTAKE
RUNNERS.
REMOVE 5 BOLTS RETAINING THE INTAKE MANIFOLD TO
THE DRIVER (LH) CYLINDER HEAD. THE CENTER BOLT IS
LOCATED TO THE INSIDE OF THE INTAKE RUNNERS.
40
C
20
ITEM
NOTICE: 2009 model year vehicles have different intake manifold
gaskets than the 2005 to 2008. The intake manifold gaskets for the
2009 model are 1 piece for each side of the manifold (2 total), 2005
to 2008 gaskets are 1 individual ring for each runner (8 total). If
your vehicle is a 2009, the gaskets will not be re-used.
PART NUMBER
QTY. DESCRIPTION
TORQUE
NOTES:
PROCESS
PAGE
REMOVE INTAKE MANIFOLD
16
TORQUE
ITEM
OPERATION
10
With a tree puller, remove the alternator power wire from the top
alternator bracket.
20
Disconnect the alternator power wire from the main engine harness.
They are connected on the passenger side of the motor.
30
Remove the alternator power wire from the positive battery cable clamp.
It is fastened to the clamp with one 10mm nut.
20
30
ITEM
PART NUMBER
QTY. DESCRIPTION
TORQUE
NOTES:
PROCESS
PAGE
REMOVE ALTERNATOR WITH
HARNESS
17
TORQUE
ITEM
OPERATION
10
10
10
Remove the top alternator bracket by removing the 4 bolts (two 8mm
bolts and two 10mm bolts). Save the two 8mm bolts, they will be reused later.
20
Remove the two 13mm nuts (1 per side) holding the bottom of the
alternator to the engine. Then lift the alternator with the attached power
wire off of the 2 studs.
30
Remove the 2 studs from the engine block with a 6-point, 5mm socket.
30
NOTICE: 2009 model vehicles have a different alternator than the
one pictured (2005 to 2008). Both alternators remove the same
way.
ITEM
PART NUMBER
QTY. DESCRIPTION
20
REMOVE THE 2 STUDS FROM THE ENGINE BLOCK
TORQUE
NOTES:
PROCESS
PAGE
REMOVE ALTERNATOR WITH
HARNESS
17
TORQUE
ITEM
OPERATION
10
Use tension clamp pliers to release the tension clamp securing the driver
(LH) side upper radiator hose to the water cross over. Once the clamp
is released, pull the LH upper radiator hose off of the water crossover.
20
Use tension clamp pliers to release the tension clamp securing the
passenger (RH) side upper radiator hose to the water cross over. Once
the clamp is released, pull the RH upper radiator hose off of the water
crossover.
30
Tuck the disconnected passenger side hose off to the side. Keep the
clamps on the hose, it will be used for the new water crossover.
10
20
ITEM
PART NUMBER
QTY. DESCRIPTION
TORQUE
NOTES:
PROCESS
DISCONNECT UPPER RADIATOR
HOSES
2005- 2006 VEHICLES
PAGE
A
19
TORQUE
ITEM
OPERATION
10
Remove the two 8mm bolts holding the thermostat cover onto the water
crossover.
20
Release the clamp and remove the upper rad hose from the thermostat
cover.
30
Remove the thermostat with the rubber o-ring from the water crossover.
30
10
20
50
NOTICE: Save both the thermostat and the o-ring for re-installation
into the new crossover in a later step.
40
50
40
Release the tension clamp securing the upper radiator hose to the
radiator. Pull the radiator hose off of the radiator and remove.
Once the upper radiator hose is removed from the vehicle, remove the 2
tension clamps from the hose. Save the clamps, they will be re-used
later.
50
ITEM
PART NUMBER
QTY. DESCRIPTION
TORQUE
NOTES:
PROCESS
REMOVE UPPER RADIATOR HOSE
2007- 2009 VEHICLES
PAGE
B
C
19
TORQUE
ITEM
OPERATION
10
Before removing the water crossover, plug the weep hole at the back of
the engine block. This will contain the coolant on the top of the block for
easier clean up and less mess.
20
Disengage the locking clip on the heater return and supply hose and
disconnect the hose from the back of the water crossover.
30
Remove the two remaining 10mm bolts retaining the water crossover to
the engine (the other two bolts were shared with the intake manifold).
Remove the water crossover.
40
Save the round blue gasket found on the underside of the water
crossover. It will be used on the new crossover.
NOTICE: For 2007 to 2009 vehicles, see below.
20
10
2007 to 2009 WATER CROSSOVER SHOWN 2005 to 2006 CROSSOVERS ARE SIMILAR
50
30
40
After the water crossover is removed, cover the exposed head ports with
masking tape.
NOTICE: If your vehicle is a 2007 to
2009, you will also need to save the
other water crossover gasket (pictured
next to this notice).
50
ITEM
PART NUMBER
QTY. DESCRIPTION
TORQUE
NOTES:
PROCESS
PAGE
REMOVE WATER CROSSOVER
20
TORQUE
ITEM
OPERATION
10
Locate the heater hoses behind the passenger (RH) side valve cover,
and use a hose clamp tool to remove them. The hoses may be glued
onto the water tube, so heat may be needed to break down the glue. If
heat is used, make sure that the wires are out of the way to prevent
damage.
20
Set the heater hoses out of the way so the harnesses and water tube
stud bolt can be accessed.
30
Remove the 2 engine harness connectors from the back of the water
tube assembly if they are still attached.
40
Remove the 13mm stud bolt holding the water tube to the back of the
passenger (RH) side head.
50
Pull the water tube rearward to slide the water tube off of the coolant
fitting in the engine block. Remove the water tube.
20
10
30
ITEM
PART NUMBER
QTY. DESCRIPTION
50
40
TORQUE
NOTES:
PROCESS
PAGE
REMOVE WATER TUBE
21
TORQUE
OPERATION
ITEM
REMOVE THESE
PULLEYS IF EQUIPPED
NOTICE: If your vehicle is a S281 3-Valve, H281 3-Valve, or any
other vehicle that has this pulley system (shown at the top left),
these pulleys need to be removed and returned to stock. The same
goes for any other aftermarket pulley system your vehicle may
have. The Saleen Series VI.5 Supercharger System only works
with the stock pulley system.
20
10
Remove the water pump pulley by removing the four 10mm bolts. Once
the bolts are removed, the pulley will slide right off the water pump.
10
20
30
40
REPLACE WITH STOCK
PULLEYS
50
40
50
Remove the crankshaft damper pulley by holding the damper from
moving, and then with a breaker bar or impact, remove the one 18mm
center bolt.
Using a crank pulley puller, remove the crank pulley from the engine.
Obtain the Ford water pump pulley (XL3E-8A528-AA) and set it onto the
water pump. Retrieve the four 10mm bolts removed from OPERATION
10 and apply blue Loctite to the threads. Re-install the 4 bolts. With a
torque wrench, tighten each bolt to 18 Lb-ft +/- 2.7 Lb-ft.
Install the Ford crank damper pulley ( 6316 ) by sliding it onto the end of
the cranks shaft (line up the crank key with the crankshaft keyway).
Apply a dab of sealant to the keyway, and install 1 new 18mm torque-toyield bolt ( FR5Z-6A340-B ) and tighten with a torque wrench using the
following process....
The torque sequence is as follows…
1. 66 +/- 9.9 Lb-ft
2. Loosen 360°
3. 37 +/- 5.5 Lb-ft
4. + 90° Rotation
1
2
TORQUE
NOTES:
1
18 +/- 2.7 Lb-ft
PROCESS
2
1. 66 +/- 9.9Lb-ft
2. Loosen 360°
3. 37 +/- 5.5Lb-ft
4. + 90°
PAGE
REPLACE SALEEN 3-VALVE
PULLEYS WITH STOCK PULLEYS
VEHICLES EQUIPPED WITH UNDERDRIVE
PULLEYS
D
22
TORQUE
ITEM
OPERATION
2007 to 2009 MODELS
10
10
Remove the 15mm nut holding the driver side ignition interference
capacitor. Slide the capacitor off of the stud and let it hang. Remove
the 18mm hex stud from the front engine cover.
NOTICE: The 2005 & 2006 Model Vehicles will have a water hose
support brackets behind the ignition interference capacitor. This
will need to be removed with the items above as well.
20
10
20
Remove the front engine cover 13mm bolt located just inboard of the
driver side upper idler pulley.
30
Remove the top Idler pulley (mounted on the driver side of the motor) by
removing the 13mm center bolt.
40
Remove the bottom Idler pulley (mounted on the driver side of the motor)
by removing the 13mm center bolt.
30
NOTICE: Save the pulley bolt and washer. It will be re-used.
40
ITEM
PART NUMBER
QTY. DESCRIPTION
10
2005 to 2006 MODELS: REMOVE THE
WATER HOSE UPPER SUPPORT BRACKET
TORQUE
NOTES:
PROCESS
PAGE
REMOVE ACCESSORY DRIVE
PULLEYS & FASTENERS
23
TORQUE
ITEM
OPERATION
20
10
Using tension clamp pliers to compress the tension clamp, remove the
lower thermostat outlet hose from the lower radiator inlet.
20
Remove the large thermostat side inlet hose from the engine block
outlet.
30
Remove the small thermostat side inlet hose from the lower outlet of the
coolant reservoir.
40
Remove coolant hose assembly.
10
NOTICE: Remove all of the tension clamps from the end of each
hose. These clamps will be re-used in a later process. Some
clamps might be glued to the hose. The glue can be softened with
heat.
30
ITEM
PART NUMBER
QTY. DESCRIPTION
TORQUE
NOTES:
PROCESS
PAGE
REMOVE COOLANT HOSE
ASSEMBLY
2005 - 2006 VEHICLES
A
24
TORQUE
ITEM
OPERATION
NOTICE: For the next few steps, the front end of the vehicle will
need to be elevated off of the ground. All vehicles when being
lifted should be on flat solid ground. If a jack is being used, make
sure the vehicle is supported on jack stands (at least 1 at each
front corner, at a solid place on the frame). Make sure the rear
wheels are chocked, the parking brake is set, and the vehicle is in
park or in gear. REMEMBER, when lifting any vehicle whether it
be with a hoist, jack, etc.. follow all safety guidelines in the
equipment's manual.
40
10
10
Break loose the 5 lug nuts on the RH front wheel with a breaker
bar and a 13/16" socket.
20
Elevate the front of the vehicle off of the ground, so that the front
tires no longer touch the ground (READ NOTICE ABOVE).
30
30
40
ITEM
Remove the 5 lug nuts on the RH front wheel with a 13/16" socket.
Make sure to hold the wheel, it may want to fall off the hub once all lug
nuts are removed.
Remove the RH front wheel and set it aside where it will not be
damaged.
PART NUMBER
QTY. DESCRIPTION
TORQUE
NOTES:
PROCESS
PAGE
REMOVE RH FRONT WHEEL
25
TORQUE
ITEM
OPERATION
6 of 7 RETAINERS SHOWN
FENDER LINER
RETAINER PIN
NOTE: The fender liner is made up of 2 pieces
20
10
20
With a Philips screw driver, rotate the head of each pin retainer to pop
loose the head and then pull to remove. There are 7 retainer pins
holding each half of the front fender liner into place.
Remove each front fender liner and set aside.
10
ITEM
PART NUMBER
QTY. DESCRIPTION
TORQUE
NOTES:
PROCESS
PAGE
REMOVE RH FRONT FENDER
LINERS
26
TORQUE
ITEM
OPERATION
20
NOTICE: No smoking, flames, or sparks around the fuel system.
The fuel line and fuel rail can give off fumes that are flammable and
may ignite if there is any form of spark or open flame near it.
10
10
30
Retrieve the fuel rail (removed on Page 11-1 to 11-2). Rotate the
passenger (RH) side fuel rail 180 degrees so that the injector ports are
facing upward.
20
Retrieve the supercharger assembly. Take the upside-down portion of
the fuel rail (RH rail), and insert it into the LH side of the gap in the lid.
30
Slide the RH fuel rail through the gap in the lid until it come out the RH
side.
40
Once the RH fuel rail has passed through the lid, rotate it back into its
previous position (fuel injector ports facing downward).
40
ITEM
PART NUMBER
QTY. DESCRIPTION
TORQUE
NOTES:
PROCESS
PAGE
INSTALL FUEL RAIL & INJECTORS
27
TORQUE
ITEM
OPERATION
NOTICE: No smoking, flames, or sparks around the fuel system.
The fuel line and fuel rail can give off fumes that are flammable and
may ignite if there is any form of spark or open flame near it.
40
10
10
20
20
Retrieve the 8 fuel injector clips removed on Page 11-2, and the 8 new
fuel injectors (A) from the kit. Wipe silicone lubricant onto each fuel
injector o-ring (Dow Corning #111 Valve Lubricant & Sealant)
Install the fuel injector retainer clips onto each injector. The clip will slide
into the channel on top of each injector. The 2 ears of each clip will
need to face upward.
30
30
40
1
DRIVER (LH) SIDE SHOWN -
60
THE 2 BOLTS ARE FROM THE STOCK
ALTERNATOR MOUNTING BRACKET
50
50
60
PASSENGER (RH) SIDE SHOWN -
50
THE 2 STUD BOLTS ARE FROM THE FUEL
RAIL MOUNTING TO THE OLD MANIFOLD
1
Once there is a clip on each injector, insert each injector into the fuel
rail. Make sure the connector portion of each injector faces outboard,
and that both ears of the locking clip engage the fuel rail port.
When all 8 injectors are installed, carefully press the injectors into the
supercharger assembly. When the injectors are seated, the mounting
tabs for each fuel rail will line up with the mounting holes in the
supercharger assembly.
Fasten the fuel rail to the supercharger assembly with four 8mm bolts.
Two of the bolts are the old fuel rail mounting stud bolts, they will be
used to mount the passenger (RH) side fuel rail. The remaining 2 bolts
are from the factory alternator mounting bracket (removed on Page 132). Those bolts will be used to mount the driver (LH) side fuel rail.
Tighten the 4 fuel rail bolts with a torque wrench to
91 Lb-in +/- 13.6 Lb-in.
NOTICE: If the 8mm alternator mounting bolts were not saved, all
four fuel rail stud bolts can be used. The alternator bolts were
used for appearance purposes.
60
ITEM
PART NUMBER
A
00-1701-C120760
QTY. DESCRIPTION
8
Fuel Injector, 2005 S281 E
TORQUE
NOTES:
1
91 +/- 13.6 Lb-in
PROCESS
PAGE
INSTALL FUEL RAIL & INJECTORS
28
TORQUE
ITEM
OPERATION
30
30
10
Retrieve the brass 45 degree fitting (A) and apply pipe dope to the
threads.
20
Thread the fitting into the bottom of the water crossover (B) until it is
snug.
30
Use a 21mm wrench to tighten the fitting. Turn the wrench until the fitting
is positioned as shown.
40
2005 to 2006 Models: Retrieve the new thermostat (C) and o-ring (D),
and re-install it into the water crossover. First set the thermostat into the
water crossover, and then set the o-ring in place as shown.
2007 to 2009 Models: Retrieve the thermostat and o-ring (removed on
Page 20), and re-install it into the water crossover. First set the
thermostat into the water crossover, and then set the o-ring in place as
shown.
10
40
50
50
1
Set the thermostat housing cover (water neck) onto the crossover (E)
and line up the mounting holes (the bottom of the cover should be
applying firm pressure to the o-ring to create a good seal). Install 2 bolts
(F) and tighten to 91 Lb-in +/- 13.6 Lb-in.
ITEM
PART NUMBER
QTY. DESCRIPTION
A
B
C
D
E
F
00-2003-C104470
1
Brass Fitting 45 Degree, 3/4" Barb
00-2003-C19336
1
Water Crossover Series VI.5
00-2003-C19363
1
Thermostat Mustang 2007 to 2009
06-2003-C143810
1
O-Ring, Thermostat
00-2003-C19335
1
Water Neck, Water Crossover
00-9001-C101410
2
Capscrw Hex M6x1.0mm 25mm
TORQUE
NOTES:
1
91 +/- 13.6 Lb-in
PROCESS
PAGE
ASSEMBLE WATER CROSSOVER
29
TORQUE
ITEM
OPERATION
STOCK PULLEY SHOWN
30
10
50
20
Retrieve the take-off alternator with attached alternator harness.
Disconnect the alternator harness electrical connector. There is a tab
that needs to be depressed on the connector. Push in the tab and pull
the connector away from the alternator.
30
Remove the 10mm nut holding the alternator harness ring terminal to the
alternator. Remove the alternator harness.
40
With a flat blade screwdriver, pry the black plastic cover off of the factory
alternator pulley.
40
20
SALEEN NATURALLY ASPIRATED UNDERDRIVE
PULLEY KIT PULLEY SHOWN
50
Retrieve the alternator pulley tool and attach it to a 3/8" drive impact.
Insert the tool into the center of the pulley and operate the impact to
remove the pulley.
60
Saleen Underdrive Pulley Removal: If your vehicle has the naturally
aspirated pulley kit installed (if so make sure you perform the process on
Page 22D also), remove the alternator pulley by loosening the nut with
an impact and a 24mm socket. Remove the nut, washer, and pulley.
70
Slip the new alternator pulley (A) over the alternator input shaft (where
the original pulley was installed). Make sure the raised boss of the new
pulley is facing the alternator.
70
60
ITEM
PART NUMBER
A
06-1604-C09936
QTY. DESCRIPTION
1
Alternator Pulley S/C S197 Mustang
TORQUE
NOTES:
PROCESS
REPLACE ALTERNATOR PULLEY
2005 - 2008 VEHICLES
PAGE
A
B
30
TORQUE
ITEM
OPERATION
10
10
Retrieve the washer (A) and the nut (B) for the alternator. Apply a dab
of red Loctite to the threads of the alternator nut.
20
Slide the washer over the alternator input shaft and onto the pulley.
Then thread the nut onto the alternator input shaft and while holding the
pulley, run the 24mm nut down with an impact.
30
Obtain 1 alternator stand-off (C) and a 1" section of red heat shrink (D).
Slide the heat shrink over the stand-off and apply heat to form the heat
shrink to the stand-off.
20
40
Thread the stand-off onto the stud on the back of the alternator (where
the harness attached). Tighten the stand-off to spec, and then re-install
the stock 10mm nut.
40
30
ITEM
PART NUMBER
QTY. DESCRIPTION
A
B
C
D
00-9004-C111460
1
00-9003-C102610
1
Nut Hex Jam M16x1.5x8mm
00-1706-C153230
1
Standoff, Alternator Wire
00-1703-C070870
1"
Dual Wall Heat Shrink 1/2" Red
Washer 17mm ID 40mm OD
TORQUE
NOTES:
PROCESS
REPLACE ALTERNATOR PULLEY
2005 - 2008 VEHICLES
PAGE
A
B
31
TORQUE
ITEM
OPERATION
30
10
10
20
30
40
Retrieve the take-off alternator with attached alternator harness.
Disconnect the alternator harness electrical connector. There is a tab
that needs to be depressed on the connector. Push in the tab and pull
the connector away from the alternator.
Remove the 13mm nut holding the alternator harness ring terminal to the
alternator. Remove the alternator harness.
Retrieve the Ford alternator pulley tool and attach it to an impact. Insert
the tool into the center of the pulley and operate the impact to remove
the pulley.
NOTICE: A pulley removal kit (not included) will be needed to
remove the factory alternator pulley for 2009 vehicles.
20
50
40
50
ITEM
A
Slip the new alternator pulley (A) over the alternator input shaft (where
the original pulley was installed). Make sure the raised boss of the new
pulley is facing the alternator.
PART NUMBER
06-1602-C18921
QTY. DESCRIPTION
1
Alternator Pulley S/C S197 2009
TORQUE
NOTES:
PROCESS
PAGE
REPLACE ALTERNATOR PULLEY
2009 VEHICLES
C
30
TORQUE
ITEM
OPERATION
10
20
20
10
Retrieve the washer (A) and the 22mm nut (B) for the alternator. Apply
a dab of red Loctite to the threads of the alternator nut.
20
Slide the washer over the alternator input shaft and onto the pulley.
30
Thread the 22mm nut onto the alternator input shaft and while holding
the pulley, run the nut down with an impact.
30
ITEM
PART NUMBER
QTY. DESCRIPTION
A
B
00-9004-C18923
1
Washer 14mm
00-9003-C18922
1
Nut Hex Jam M14x1.5mm
TORQUE
NOTES:
PROCESS
PAGE
REPLACE ALTERNATOR PULLEY
2009 VEHICLES
C
31
TORQUE
ITEM
OPERATION
20
10
Retrieve a stock take-off alternator harness. Starting at the alternator
end of the harness, cut the tape holding the convoluted sleeving
together. Peel back the sleeving enough to remove the small 3-wire
harness with the connector on each end.
20
Remove the grey rubber boot off of the alternator side of the harness.
With large wire cutters, cut the alternator side ring terminal off of the red
power wire.
30
Once the ring terminal is removed, strip the wire back as shown.
40
Retrieve the 10" section of red power wire (A), with the attached ring
terminal (B) and splice (C).
10
30
40
THE POWER WIRE EXTENSION WILL COME PACKAGED
WITH THE RING TERMINAL AND SPLICE ATTACHED
ITEM
PART NUMBER
QTY. DESCRIPTION
A
B
C
00-1703-C070810
10"
00-1703-C070900
1
Terminal, Ring 4 AWG
00-1703-C162470
1
Splice, Non-Insulated 6 AWG Butt
Wire, 4 AWG Red
TORQUE
NOTES:
PROCESS
MODIFY ALTERNATOR HARNESS
2005 - 2008 VEHICLES
PAGE
A
B
32
TORQUE
10
ITEM
OPERATION
20
10
20
Clamp the newly extended power wire into a vise so that the small hole
in the crimp is facing up. With a torch, heat up the splice and apply
soldier. Keep applying heat until the soldier draws into the hole in the
crimp.
30
Reposition the power wire in the vise so that the ring terminal is facing
upward. With a torch, heat up the ring terminal and apply soldier to the
exposed copper wire. Keep applying heat until the soldier draws into the
wire and ring terminal.
40
30
Take the power wire extension from the previous page, and slide it onto
the alternator harness power wire. With a crimping tool, attach the
section to the alternator harness.
Allow both the splice and the ring terminal to cool. Once cool, slide two
1.5" sections of red heat shrink (A) onto the power wire. One section will
cover the splice while the other section will cover the crimped portion of
the ring terminal. Apply heat to until each section of heat shrink is fully
seated to the wire.
40
POSITION THE HEAT SHRINK
AS SHOWN
ITEM
PART NUMBER
A
00-1703-C070870
QTY. DESCRIPTION
3"
Heat Shrink, Dual Wall 1/2" Red
TORQUE
NOTES:
PROCESS
MODIFY ALTERNATOR HARNESS
2005 - 2008 VEHICLES
PAGE
A
B
33
TORQUE
30
ITEM
OPERATION
30
EACH WIRE EXTENSION WILL COME PACKAGED WITH A
SPLICE ATTACHED TO EACH END
10
Retrieve the signal harness that was removed from the alternator
harness on Page 32AB, and cut the 3 wires near the barrel connector.
Start by cutting the yellow wire 2" back from the connector, and then cut
the remaining 2 wires farther down the harness. Make sure to stagger
each cut so that the splices will not overlap.
20
After cutting the signal harness into two pieces, strip the wires. Slide
heat shrink (A) onto each of the wires. There will be pieces of heat
shrink total (2 per wire extension).
30
Obtain the three 12.25" signal wire extensions (a yellow wire (B), yellow
wire w/ blue stripe (C), and an orange wire w/ blue stripe (D)). Each
extension will come packaged with a splice (E) crimped on each end.
40
Attach each wire extension to the matching wire color of the signal
harness (ex. Yellow harness wire to yellow extension wire). Use a tool
to crimp each splice.
50
40
50
Once all three extensions are spliced into the signal harness, slide each
piece of heat shrink over each butt splice. Apply heat to each piece of
heat shrink to seat it in place.
50
ITEM
PART NUMBER
A
B
C
D
E
00-1704-C063000
QTY. DESCRIPTION
9"
Heat Shrink, Dual Wall 1/8" Black
00-1704-C093820
12.25" Wire, 20 AWG Yellow
00-1704-C129750
12.25" Wire, 20 AWG Yellow w/ Blue
00-1704-C157540
12.25" Wire, 20 AWG Orange w/ Blue
00-1704-C092600
6
Splice, Non-Insulated 18-20 AWG Butt
TORQUE
NOTES:
PROCESS
MODIFY ALTERNATOR HARNESS
2005 - 2008 VEHICLES
PAGE
A
B
34
TORQUE
ITEM
OPERATION
20
10
10
Wrap the signal harness from end to end in electric tape.
20
With electric tape, fasten the alternator signal harness to the power wire.
Make sure the rectangular connector (that plugs into the alternator) overreaches the alternator ring terminal by 2.5".
30
Once the alternator signal harness is placed and taped to the power
wire, slide the convoluted tubing (A) over both harnesses. Tape the
entire length of the new tubing with electric tape.
40
Make sure the barrel connector end of the signal harness protrudes from
the alternator harness convolute sleeving by 6.25". Tape the
convoluted tubing on both sides of the wire to keep it in place.
30
30
40
ITEM
PART NUMBER
A
00-1704-C110830
QTY. DESCRIPTION
8.5"
Sleeving, Convoluted 1/2" Black
6.25"
TORQUE
NOTES:
PROCESS
MODIFY ALTERNATOR HARNESS
2005 - 2008 VEHICLES
PAGE
A
B
35
TORQUE
10
ITEM
OPERATION
EACH CLIP NEEDS TO BE MOVED TOWARDS THE
BATTERY RING TERMINAL - 9.5"
9.5"
10
9.5"
9.5"
NOTICE: Repeat OPERATION 20 to OPERATION 40 for each of the
3 clips on the alternator harness.
BATTERY RING
TERMINAL
30
Retrieve the take-off alternator harness. Set the harness on the work
bench (stretched out). The 3 attachment clips taped to the harness (2
for the fuel rail, 1 for the bulkhead) will need to be moved towards the
battery ring terminal 9.5".
LINE UP CENTER OF EACH
CLIP WITH EACH PAINT
MARK ( OPERATION 20 )
20
To move the clips, first find the center of each clip. Measure back
towards the battery ring terminal 9.5". Mark that spot on the harness
with a marker. Repeat for all three clips.
30
Start with the clip closest to the battery ring terminal. Look at the
orientation of the clip (the clip will be orientated the same when it is reattached to the harness). Carefully cut the clip free from the alternator
harness, and remove any excess electric tape.
40
Line up the clip with the marker marking from OPERATION 20. Make
sure the orientation of the clip is the same as it was before being
removed. Re-attach the clip with electric tape.
ITEM
PART NUMBER
QTY. DESCRIPTION
40
TORQUE
NOTES:
PROCESS
PAGE
MODIFY ALTERNATOR HARNESS
2009 VEHICLES
C
32
TORQUE
ITEM
OPERATION
10
10
20
20
30
REMOVE
40
30
SIGNAL HARNESS
Proceed to the alternator end of the harness. With side cutters, remove
the small zip tie holding the signal wire to the positive cable wire. The
zip tie is located near the ring terminal boot.
Carefully remove the 2 white tree clips from the harness, by cutting the
electric tape holding them in place with a razor. Remove any excess
electric tape from the harness.
With a razor, carefully cut away any electric tape or label holding the
convoluted tubing together. Peel back the convoluted tubing to expose
the red positive cable and the signal harness. Carefully cut the electric
tape holding the signal harness to the positive cable. Remove the signal
harness.
Line up the alternator connector (signal harness) even with the bottom of
the ring terminal as shown. Once the signal harness is in its new
position, electric tape the signal harness to the positive cable.
POSITION THE SIGNAL
HARNESS CONNECTOR
EVEN WITH THE BOTTOM
OF THE RING TERMINAL
40
ITEM
PART NUMBER
QTY. DESCRIPTION
POSITIVE CABLE
TORQUE
NOTES:
PROCESS
PAGE
MODIFY ALTERNATOR HARNESS
2009 VEHICLES
C
33
TORQUE
ITEM
OPERATION
10
20
10
6"
20
30
THE ALTERNATOR CONNECTOR
PORTION OF THE SIGNAL HARNESS
SHOULD PROTRUDE FROM THE
CONVOLUTE WHERE SHOWN
Once the signal harness is in position and secured to the positive cable,
tuck the wires back into the convoluted tubing. Allow the signal harness
to protrude about 0.5" from the end of the convoluted tubing. Wrap the
harness with electric tape to keep the wires secure inside the convolute.
The engine harness connector on the end of the signal harness should
be protruding 6" from the alternator harness convolute. Apply electric
tape around the signal harness to keep the connector wire in place.
With a razor, cut the electric tape and label holding the convolute onto
the harness on the battery terminal side. Peel back the convoluted
tubing to reveal the positive cable.
40
Use cutters to remove the battery ring terminal from the positive cable.
Make the cut just behind the ring terminal sheathing.
50
Once the ring terminal has been removed from the positive cable, strip
the end of the cable.
APPLY ELECTRIC TAPE
AROUND WIRES
40
50
ITEM
PART NUMBER
QTY. DESCRIPTION
30
TORQUE
NOTES:
PROCESS
PAGE
MODIFY ALTERNATOR HARNESS
2009 VEHICLES
C
34
TORQUE
10
40
ITEM
OPERATION
THE ALTERNATOR POWER WIRE WILL BE PACKAGED
WITH THE RING TERMINAL AND SPLICE ATTACHED
30
10
Retrieve the 10" section of red wire (A), with the attached splice (B) and
ring terminal (C).
20
Take the positive cable extension and slide the open end of the splice
over the stripped positive cable of the alternator harness. When
orientating the extension, make sure the flat ring portion of the ring
terminal is facing the bottom of the harness. this will make it easier for
the operator to install it on the battery clamp.
30
Once the extension is positioned with the ring terminal facing downward,
insert the harness into the crimping tool and crimp the splice. Make sure
the extension is secure.
40
Clamp the newly extended power wire into a vise so that the small hole
in the crimp is facing up. With a torch, heat up the splice and apply
soldier. Keep applying heat until the soldier draws into the hole in the
crimp.
50
50
ITEM
A
B
C
Reposition the power wire in the vise so that the ring terminal is facing
upward. With a torch, heat up the ring terminal and apply soldier to the
exposed copper wire. Keep applying heat until the soldier draws into the
wire and ring terminal.
PART NUMBER
QTY. DESCRIPTION
00-1703-C070810
10"
00-1703-C070900
1
Wire, 4 AWG Red
Terminal, Ring 4 AWG
00-1703-C162470
1
Splice, Non-Insulated 6 AWG Butt
TORQUE
NOTES:
PROCESS
PAGE
MODIFY ALTERNATOR HARNESS
2009 VEHICLES
C
35
TORQUE
ITEM
OPERATION
20
10
10
POSITION THE HEAT
SHRINK AS SHOWN
Allow both the splice and the ring terminal to cool. Once cool, slide two
1.5" sections of red heat shrink (A) onto the positive cable. One section
will cover the splice while the other section will cover the crimped portion
of the ring terminal.
20
Apply heat to until each section of heat shrink is fully seated to the
positive cable. Make sure the heat shrink for the ring terminal is
positioned as shown.
30
Retrieve the 10.5" section of 3/8" convoluted tubing (B). Apply the new
convoluted tubing to the exposed portion of the alternator harness.
40
ITEM
A
B
Once the new convolute is in position, secure it to the end of the existing
convolute with electric tape. Electric tape the convolute together every
3". Once to the ring terminal, electric tape the end of the convoluted
tubing to the base of the ring terminal (do not cover the ring portion
itself).
PART NUMBER
QTY. DESCRIPTION
00-1703-C07087*
3"
Heat Shrink, Dual Wall 1/2" Red
00-1704-C12521*
10.5"
Sleeving, Convoluted 3/8" Black
30
40
TORQUE
NOTES:
PROCESS
PAGE
MODIFY ALTERNATOR HARNESS
2009 VEHICLES
C
36
TORQUE
ITEM
OPERATION
20
1
10
Retrieve the stock air box lid, and remove the MAF (Mass Air Flow)
sensor from the neck of the lid with a T15 torx bit. It will be held in with
two fasteners. Do not re-use the fasteners, two new ones are used.
20
Re-install the MAF (Mass Air Flow) sensor onto the new Saleen air box
lid (A) with two screws (B) tightened to 18 Lb-in +/- 2.7 Lb-in. Make
sure the air flow arrow on the sensor is pointing towards the air inlet duct
and motor.
30
With a reciprocating saw, cut and remove the bottom portion of the air
box (flat portion). A pilot hole may need to be drilled in the bottom of the
air box to create a starting point for the blade.
10
FLOW
NOTICE: 2005 to 2008 vehicle air boxes are different then 2009.
Refer to the photo for the correct cut-out for each box.
50
Smooth out the cut edges of the air box with an angle sander. If
necessary, carefully remove any burs with a razor blade.
2005 to 2008 MODEL AIR BOX
2009 MODEL AIR BOX
30
ITEM
PART NUMBER
QTY. DESCRIPTION
A
B
06-1602-C13093
1
Air Box Cover S281
00-9001-C13829*
2
Machine Screw M4x0.7x6 Phil Zn Steel
TORQUE
NOTES:
1
18 +/- 2.7 Lb-in
PROCESS
PAGE
ASSEMBLE AIR BOX AND LID
37
TORQUE
ITEM
OPERATION
10
Set the new air filter (A) into the air box, and make sure it is fully seated.
20
Obtain the assembled air box lid. Slide the edge of the lid over the 3
tabs protruding from the edge of the box.
30
lower the lid onto the air box and engage the 2 clasps that lock the lid
into place.
40
FLOW
Prep the surface of the air box lid for the air filter stop decal (B) with an
alcohol wipe. Install decal on the center of the lid. The decal should be
facing forward.
20
40
30
ITEM
PART NUMBER
QTY. DESCRIPTION
A
B
00-1602-C13944*
1
Air Filter S281
06-9101-B09867
1
Decal, Air Filter Stop
TORQUE
NOTES:
PROCESS
PAGE
ASSEMBLE AIR BOX AND LID
38
TORQUE
ITEM
OPERATION
20
10
Locate the passenger (RH) bulkhead grommet in the RH side wheel well.
20
Locate the nub protruding from the grommet. Remove the nub with side
cutters.
10
30
Retrieve the water pump harness (A). Locate the fuse holder on the
water pump harness. Measure 4" back from the edge of the fuse holder
and mark that spot with a paint marker.
NOTICE: When marking the harness, mark the convoluted tubing
side of the fuse holder (with the water pump connector on the
end). Do not mark the exposed wire side (white w/ yellow stripe).
50
INSIDE VEHICLE
WHEEL
WELL
30
Feed the end of the harness that gets wired into the SJB panel (exposed
white w/ yellow stripe wire) through the bulkhead grommet. Stop feeding
the harness into the vehicle once the paint mark is reached
(OPERATION 30). The paint mark should be lined up with the outer
edge of the grommet.
40
ITEM
PART NUMBER
A
06-1704-B16574
QTY. DESCRIPTION
1
Harness, Mustang, Water Pump
TORQUE
NOTES:
PROCESS
PAGE
ROUTE WATER PUMP HARNESS
39
TORQUE
ITEM
OPERATION
10
Feed the water pump harness along the main harness in the passenger
(RH) wheel well.
20
Feed the water pump harness between the top of the washer fluid bottle
and bottom of the wheel well along the front edge.
MAIN HARNESS
30
10
Continue routing the water pump harness over the washer bottle to the
front of the vehicle. It will get plugged into the pump and grounded at a
later step.
20
50
Once it has been verified that the water pump harness is positioned
correctly, tuck the harnesses behind the larger main harness. Use 3 zip
ties (A) to fasten the Saleen harness to the existing main harness in the
passenger side (RH) wheel well in the three designated locations.
40
WATER PUMP
HARNESS
30
ZIP TIE
ZIP TIE
ITEM
PART NUMBER
A
00-9007-C10122*
QTY. DESCRIPTION
3
7" Zip Tie
ZIP TIE
TORQUE
NOTES:
PROCESS
PAGE
ROUTE WATER PUMP HARNESS
40
TORQUE
ITEM
OPERATION
6 of 7 RETAINERS SHOWN
FENDER LINER
RETAINER PIN
10
10
Set the front fender well liner into place at the front of the wheel well.
20
Line up the holes in the liner with the holes in the inner fender. Install 3
of the 7 retainer clips into the front liner to hold it into place.
30
50
Set the rear fender liner in place. To do so, feed the bottom of the liner
behind the RH rocker cover. Next, overlap the front liner at the top of
the fender well.
Line up the holes in the liner with the holes in the inner fender. Install 4
of the 7 retainer clips into the rear liner to hold it into place.
NOTICE: The 2 top retainers will be inserted into the rear liner and
pass through the front liner before entering the fender.
40
20
ITEM
PART NUMBER
QTY. DESCRIPTION
TORQUE
NOTES:
PROCESS
PAGE
INSTALL RH FRONT FENDER
LINERS
41
TORQUE
ITEM
OPERATION
10
10
Slide the front wheels onto the hub on each side, and hand start each
lug nut to help hold the wheel from sliding off of the hub.
20
Seat each lug nut to the wheel (lightly tightened). Do not completely
torque the lug nuts, but snug them up so that the wheel is held firmly to
the hub.
30
Verify all lug nuts and the wheels are firmly seated into place, and slowly
lower the front of the vehicle onto the ground.
NOTE: When removing items like jack stands from under an
elevated vehicle, use EXTREME CAUTION. Any time a vehicle is
elevated off of the ground it may be unstable and have the
potential to fall. Refer to the jack stand or floor jack owners
manual for proper equipment operation and safety measures.
1
50
3
4
Make sure the parking brake is still set (to help prevent the vehicle from
rolling) With a torque wrench and a 13/16" socket, torque the 5 lug nuts
on each wheel (10 total) to 100 Lb-ft +/- 15 Lb-ft. Make sure to torque
each lug nut in a criss-cross pattern like the one shown (to evenly seat
and secure the wheel).
5
2
40
1
ITEM
PART NUMBER
QTY. DESCRIPTION
TORQUE
NOTES:
1
100 +/- 15 Lb-ft
PROCESS
PAGE
INSTALL RH WHEEL
42
TORQUE
ITEM
OPERATION
REMOVE THE PASSENGER
SIDE DOOR SILL TRIM
10
PASSENGER SIDE
KICK PANEL TRIM
20
COVER LAYING
OVER THE SJB
10
With a fiber stick, come in underneath the door sill trim and pry up until
there is enough room to get a hold of the trim. Pull up on the door sill
trim until it un-clips from the door sill frame. The door sill trim is held in
by 4 clips.
20
Remove the passenger side kick panel trim by pulling directly rearward
once the door sill trim is removed. This will expose the SJB panel. Lift
up on the white weather cover.
30
Disconnect the wide SJB connector (36 pin connector) from the SJB
panel by rotating the grey locking tab towards the rear of the vehicle.
Once the lock is disengaged, pull the connector.
30
ITEM
PART NUMBER
QTY. DESCRIPTION
TORQUE
NOTES:
PROCESS
PAGE
WIRE WATER PUMP HARNESS
INTO SJB MODULE CONNECTOR
43
TORQUE
10
ITEM
OPERATION
20
10
UNRAVEL THE
ELECTRIC TAPE AND
LOCATE THE WATER
PUMP HARNESS
30
40
20
BUTT SPLICE
18-20 AWG
Unwrap the harness going to the SJB connector and locate the water
pump harness.
30
Locate pin # 36 in the SJB connector (located in the corner of the
connector opposite the wires). The wire in pin #36 is white w/ yellow
stripe.
40
Cut and strip the white w/ yellow stripe power wire from pin # 36.
50
Splice the water pump power wire (white w/ yellow) into the white w/
yellow striped wire in the connector (pin 36). Insert the wires into the
butt splice (A) like shown in DIAGRAM 40 (make sure the heat shrink
(B) is added before crimping the splice.
60
Once the splice is crimped on both ends securing all wires, slide the heat
shrink over the splice and apply heat.
VEHICLE WHITE W/ YELLOW STRIPE (PIN 36)
-WIRING DIAGRAMWATER PUMP
WHITE W/ YELLOW
STRIPE - TO
VEHICLE HARNESS
While lightly pulling on the cover, carefully use a flat head screwdriver to
pop the 4 tabs holding the cover to the plug. The tabs are fragile so be
careful.
50
WATER PUMP POWER
WIRE
WHITE W/ YELLOW
STRIPE - TO PLUG
HEAT
SHRINK
1/8"
ITEM
PART NUMBER
QTY. DESCRIPTION
A
B
00-1704-C092600
1
00-1704-C063000
1.5"
Splice, Non-Insulated 18-20 AWG
Heat Shrink 1/8" Black
60
TORQUE
NOTES:
PROCESS
PAGE
WIRE WATER PUMP HARNESS
INTO SJB MODULE CONNECTOR
44
TORQUE
ITEM
OPERATION
20
30
COVER OVER
THE SJB
10
Wrap connector wires (with the water pump wire) with electric tape to
secure them, and then re-install the cover onto the SJB connector.
20
Plug the connector into the SJB panel. Secure the connector to the SJB
panel by engaging the grey locking clip. The connector will lock by
pushing the clip towards the wires feeding the connector.
30
Re-cover the SJB with the white weather shield, and re-install the kick
panel by sliding it forward to seat the clips.
50
50
60
Once the clips & locator pins are lined up with the rocker sill, firmly press
the door sill trim panel into place.
70
Press the outboard edges of the door sill trim panel down against the
rocker sill to help the 2-way tape bond.
INSTALL THE PASSENGER
SIDE DOOR SILL TRIM
PASSENGER
SIDE KICK
PANEL TRIM
Make sure the 4 clips located on the bottom of the door sill trim piece
lines up with the 4 slots in the rocker sill. Also, make sure the locator
pins (one on each side of the door sill trim) go into the holes in the
existing trim.
ITEM
PART NUMBER
QTY. DESCRIPTION
30
60
TORQUE
NOTES:
PROCESS
PAGE
WIRE WATER PUMP HARNESS
INTO SJB MODULE CONNECTOR
45
TORQUE
ITEM
OPERATION
10
Apply red loctite to the threads of the 13mm stock bolt w/ washer that
was removed from the lower pulley boss on Page 23.
20
Retrieve the smooth guided pulley (A) and slide it over the lower driver
side (LH) pulley boss.
30
Thread the bolt w/ washer into the pulley boss.
40
Tighten the bolt with a torque wrench to 18 Lb-ft +/- 2.7 Lb-ft.
40
20
1
ITEM
PART NUMBER
A
00-1604-C09958*
QTY. DESCRIPTION
1
Idler Pulley, 76mm, Guided
TORQUE
NOTES:
1
18 +/- 2.7 Lb-ft
PROCESS
PAGE
INSTALL LOWER IDLER PULLEY
46
TORQUE
ITEM
OPERATION
10
10
50
Using tension clamp pliers, install three tension clamps onto the new
coolant hose assembly (A) removed from the old coolant hose assembly
(Page 24A).
20
Lower the coolant hose assembly into place in front of the motor.
30
Install the hose shown to the oil filter adapter (located behind the power
steering pump). Make sure to position and set the tension clamp
properly to prevent leaks. Once connected, feed the hose into the
retaining bracket.
40
Install the hose shown to the bottom of the radiator. Make sure to
position and set the tension clamp properly to prevent leaks.
50
Install the remaining hose onto the bottom of the coolant reservoir bottle.
Make sure to position and set the tension clamp properly to prevent
leaks.
40
30
ITEM
PART NUMBER
A
00-2003-C19338
QTY. DESCRIPTION
1
Coolant Hose Assy.
TORQUE
NOTES:
PROCESS
PAGE
INSTALL RADIATOR PLUMB.
CONVERSION KIT
2005- 2006 VEHICLES
A
47
TORQUE
ITEM
OPERATION
10
10
Remove the 13mm upper strut nuts that are closest to the engine
(inboard).
10
20
30
30
Once the 2 nuts are removed, retrieve the reservoir tank bracket.
Orientate the bracket so that it steps downward, and then slip it over the
2 inboard strut studs.
Apply blue Loctite to the threads of the two 13mm strut nuts removed in
OPERATION 10. Thread the nuts onto the strut nuts, and torque to
26 Lb-ft +/- 3.9 Lb-ft with a torque wrench.
1
20
ITEM
PART NUMBER
A
06-2001-C14002
QTY. DESCRIPTION
1
Bracket, Tank Intercooler Recovery
TORQUE
NOTES:
1
26 +/- 3.9 Lb-ft
PROCESS
INSTALL INTERCOOLER
RECOVERY TANK BRACKET
2007 - 2009 VEHICLES
PAGE
B
C
48
TORQUE
ITEM
OPERATION
20
10
Locate the lower heater hose and remove it from the heater core tube in
the bulkhead. To release the fitting for the hose, push the fitting towards
the bulkhead and then press in the two side clips. While pressing the
two clips in, Pull the fitting away from the bulkhead.
20
Once the stock lower heater hose is removed, check to make sure the
white locking clip has remained on the heater core tube.
30
Retrieve the new heater hose (A), and remove the white locking clip
from inside the new hose fitting. The clip won't be needed, since the old
locking clip (the one from OPERATION 20) will be used instead.
40
Install the heater hose by pressing it onto the heater core tube. Press
the hose fitting until it clicks (the locking clip fully engages the hose
fitting).
10
30
ITEM
PART NUMBER
A
06-2003-C143800
QTY. DESCRIPTION
1
Hose, Heater, Lower
40
TORQUE
NOTES:
PROCESS
PAGE
REPLACE LOWER HEATER HOSE
49
TORQUE
ITEM
OPERATION
LH SHOWN
10
10
1
20
THIS SIDE UP, THIS SIDE FORWARD
30
RH SHOWN
Install two 13mm bolts (1 per side) (A) with two washers (1 per side) (B)
into the open hole in the bumper mount on each side.
Tighten each bolt to 18 Lb-ft +/- 2.7 Lb-ft.
Slide the heat exchanger (C) (with the brackets pointed up) over the two
bolts just installed in OPERATION 20, and the two stock bolts located
below it.
Slide four washers (D) over the four heat exchanger mounting bolts and
HAND TIGHTEN four 13mm nuts (E). Leave the nuts loose to allow play
in the heat exchanger. This will make installing the hose running
between the heat exchanger and intercooler water pump easier to install.
The nuts will be tightened during the intercooler water pump installation
Page 53.
RH SHOWN
30
20
ITEM
A
B
C
D
E
PART NUMBER
QTY. DESCRIPTION
00-9001-C135810
2
Bolt M8x1.25mm 30mm CL 8.8 Zn
00-9004-C114890
2
Washer M8 24mm OD 2mm THK Zn
06-2001-C09599
1
Heat Exchanger S/C, Mustang
00-9004-C001740
4
Washer Flat M8 ST
00-9003-C157270
4
Nut M8 X 1.25 Distorted Thrd Locknut
TORQUE
NOTES:
1
18 +/- 2.7 Lb-ft
PROCESS
INSTALL HEAT EXCHANGER
2007 to 2009 VEHICLES
PAGE
B
C
50
TORQUE
ITEM
OPERATION
10
10
20
THIS SIDE UP, THIS SIDE FORWARD
Slide the heat exchanger (A) (with the brackets pointed up) over the 4
factory bolts protruding from the back side of the bumper.
Thread on, and HAND TIGHTEN four jet nuts (B) (1 for each bolt).
Leave the nuts loose to allow play in the heat exchanger. This will make
installing the hose running between the heat exchanger and intercooler
water pump easier to install. The nuts will be tightened during the
intercooler water pump installation Page 53.
RH SHOWN
20
ITEM
PART NUMBER
QTY. DESCRIPTION
A
B
06-2001-C09599
1
Heat Exchanger S/C, Mustang
00-9003-C001370
4
Jetnut M8x1.25
10
20
TORQUE
NOTES:
PROCESS
PAGE
INSTALL HEAT EXCHANGER
2005 to 2006 VEHICLES
A
50
TORQUE
ITEM
OPERATION
10
Retrieve the intercooler water pump (A) and insert the pump into the
intercooler water pump bracket (B).
20
Orientate the intercooler water pump as shown.
30
Once positioned, secure the intercooler water pump in the bracket with
one 12mm bolt (C). With a torque wrench, tighten the bolt to
18 Lb-ft +/- 2.7 Lb-ft.
40
Remove the protective cap off of the pump outlet fitting.
50
Attach the 7.5" long 3/4" Dia. Hose (D) to the pump outlet fitting and
attach with one clamp (E).
50
20
40
30
1
ITEM
A
B
C
D
E
PART NUMBER
QTY. DESCRIPTION
00-2002-C09991*
1
Intercooler Water Pump
06-2002-C09888
1
Bracket, Intercooler Water Pump
00-9001-C10064*
1
Capscrw Hex Flng M8x1.25mm 20mm
069-950
1
3/4" Heater Hose
00-2003-C10068*
1
Hose Clamp
TORQUE
NOTES:
1
18 +/- 2.7 Lb-ft
PROCESS
PAGE
INSTALL WATER PUMP
51
TORQUE
ITEM
OPERATION
10
Remove the two stock outside 13mm bolts attaching the bumper to the
RH bumper mount.
20
Slide the washer (A) onto the 13mm bolt (B) (two total) and install them
into the bumper where the two stock bolts were removed in
OPERATION 10. Tighten the bolts to 18 Lb-ft +/- 2.7 Lb-ft with a
torque wrench.
20
30
Retrieve the intercooler water pump assembly (built on page 1) and
attach the open end of the hose from the water pump onto the heat
exchanger with one clamp (C).
1
10
40
Slide two spacers (D) (1 per bolt) over the bolts installed in OPERATION
20. Slide the ring terminal for the water pump harness ground over the
bolt as shown. The ground will sit between the spacer and the water
pump bracket.
50
Slide the intercooler water pump bracket onto the bolts. Install two
washers (E) and two 13mm nuts (F) to lock the assembly into place.
Tighten the nuts to 18 Lb-ft +/- 2.7 Lb-ft with a torque wrench.
BOTTOM BOLT SHOWN
30
40
50
1
ITEM
A
B
C
D
E
F
PART NUMBER
QTY. DESCRIPTION
00-9004-C11489*
2
Washer Flat M8 24mm OD 2mm Thk
00-9001-C11465*
2
Capscrw Hex HD M8x1.25x50 Full Thrd
00-2003-C10068*
1
Hose Clamp
06-2002-C11237
2
Spacer, Water Pump Bracket
00-9004-C00174*
2
Washer Flat M8 ST
00-9003-C15727*
2
Nut M8 X 1.25 Dist. Thrd Locknut Zn
TORQUE
NOTES:
1
18 +/- 2.7 Lb-ft
PROCESS
PAGE
INSTALL WATER PUMP
52
TORQUE
ITEM
10
OPERATION
10
Now tighten down the four 13mm nuts holding the heat exchanger to the
bumper mount bolts installed in an earlier process. Tighten the nuts to
18 Lb-ft +/- 2.7 Lb-ft with a torque wrench.
20
Re-install the front bumper upper isolator and lower isolator. The lower
isolator is retained by four tree push pins that push into the bumper
beam. The upper isolator drops onto the top of the bumper beam and
locks into the lower isolator.
1
1
10
20
ITEM
PART NUMBER
QTY. DESCRIPTION
TORQUE
NOTES:
1
18 +/- 2.7 Lb-ft
PROCESS
PAGE
INSTALL WATER PUMP
53
TORQUE
ITEM
OPERATION
10
Apply a dab of red Loctite to the 65mm stud (A), and thread into the top
right idler pulley boss.
20
Apply a dab of red Loctite to the 110mm unequal threaded stud (B), and
thread the short end into the front cover bolt hole located to the upper
left of the top right idler pulley boss.
NOTICE: The exposed portion of the 110mm equal thread stud
cannot exceed 63mm in length past the face of the front cover. If
the stud sticks out farther than 63mm, remove that portion of the
stud that exceeds the length requirement, and tap the threads.
Repeat OPERATION 20.
30
THE STUD CANNOT
STICK OUT FROM THE
FRONT COVER MORE
THAN 63mm
20
30
10
40
Apply a dab of red Loctite to the 110mm equal thread stud (C), and
thread into the front cover bolt hole located directly above the top right
idler pulley boss. Thread the stud in until it hits the end of the threads in
the engine block.
Slip the new smooth idler pulley (D) over the top right idler boss.
30
40
ITEM
PART NUMBER
QTY. DESCRIPTION
A
B
C
D
00-9002-C110900
1
Stud Black M8x65mm
00-9002-C110890
1
Stud Black M8x110mm, Unequal
00-2002-C100910
1
Stud Black M8x110mm
178-428
1
Alternator Idler Pulley
TORQUE
NOTES:
PROCESS
PAGE
INSTALL ALTERNATOR BRACKET
AND IDLER PULLEY
54
TORQUE
ITEM
OPERATION
10
20
10
Retrieve the alternator bracket (A) and the serpentine belt (B). Loop the
belt around the alternator bracket as shown.
20
Slide the alternator bracket and serpentine belt over the three studs
installed on Page 41-1. The Bracket should be orientated as shown.
30
Retrieve 3 washers (C) and slide 1 over each stud once the alternator
bracket is in place. Retrieve the three 13mm nuts (D), and add a dab of
red Loctite to the threads of each nut. Thread 1 nut onto each stud after
applying the Loctite.
40
Tighten each nut to 18 Lb-ft +/- 2.7 Lb-ft with a torque wrench.
30
ITEM
40
1
A
B
C
D
PART NUMBER
QTY. DESCRIPTION
06-1604-C09864
1
Alternator Mount Machined
00-1604-C11170*
1
Goodyear Gatorback 109.0"
00-9004-C15732*
3
Washer 5/16" Alternator Mount
00-9003-C15727*
3
Nut M8 X 1.25 Dist Thrd Locknut
TORQUE
NOTES:
1
18 +/- 2.7 Lb-ft
PROCESS
PAGE
INSTALL ALTERNATOR BRACKET
AND IDLER PULLEY
55
TORQUE
ITEM
OPERATION
10
10
Retrieve the new water tube assembly (A) and set it into the valley on
the top of the engine. Slide the straight portion of the water tube onto
the coolant fitting at the front of the engine block.
20
Re-install the 13mm water tube stud bolt by inserting it through the
mounting tab in the water tube assembly, and threading it into the
passenger (RH) head. Tighten the bolt to 91 Lb-in +/- 13.6 Lb-in with a
torque wrench.
30
Attach the 2 electrical connectors back into the water tube assembly.
40
Re-install the 2 heater core hoses onto the water tube assembly. Slide
each hose to the stop, and then re-install the tension clamps (1 per
hose).
50
Retrieve a 3" piece of rubber coolant hose (B) and install it onto the upturned end of the water tube assembly (at the front of the engine block).
Make sure the hose and clamp (C) are properly seated.
30
50
40
ITEM
A
B
C
PART NUMBER
QTY. DESCRIPTION
06-2003-C09925
1
Water Tube 05 Mustang
069-950
3"
¾” Heater Hose
00-2003-C10068*
1
¾” Hose Clamp
TORQUE
NOTES:
1
91 +/- 13.6 Lb-in
PROCESS
PAGE
INSTALL WATER TUBE
ASSEMBLY
56
TORQUE
ITEM
OPERATION
10
Use a plastic mallet to flatten the bulkhead in the section highlighted.
20
After the supercharger is lowered onto the motor, measure the clearance
between the supercharger assembly and engine compartment bulkhead.
10
TOLERANCE
Minimum 3mm - Between bulkhead and supercharger
30
Measure the clearance between the top of the supercharger assembly
and the lip (cowl) protruding from the top of the bulkhead (just below the
cowl trim). The cowl lip can be bent upward to create room as needed.
TOLERANCE
Minimum 5mm - Between cowl and supercharger
20
NOTICE: OPERATION 20 & 30 cannot be completed until after the
supercharger assembly is installed. It is stated on this page to
represent how much room needs to be made to accommodate the
supercharger.
30
ITEM
PART NUMBER
QTY. DESCRIPTION
TORQUE
NOTES:
PROCESS
PAGE
MODIFY THE ENGINE
COMPARTMENT BULKHEAD TO
ACCOMMODATE THE
SUPERCHARGER ASSEMBLY
57
TORQUE
10
ITEM
OPERATION
LH SIDE SHOWN - RH SIDE TYPICAL
10
20
30
Remove the Masking tape covering the head ports.
Look down inside each intake port with a flash light. Look for fasteners,
plastic caps, or any other foreign debris. While looking in each port,
insert a mechanics magnet into each port to pick up any metallic debris
that might be present..
Clean the top of each head (where the supercharger will sit), with glass
cleaner and a lint free cotton rag to clean off any dirt or residue on the
head.
LH SIDE SHOWN - RH SIDE TYPICAL
ITEM
PART NUMBER
QTY. DESCRIPTION
20
TORQUE
NOTES:
PROCESS
PAGE
INSPECT HEAD PORTS
58
TORQUE
ITEM
OPERATION
10
Retrieve the supercharger assembly (A).
20
With a large zip tie (B), fasten the bypass actuator arm up into the
bypass valve.
30
2005 to 2008 MODEL: Inspect the 8 gaskets that were removed from
the stock intake manifold on Page 16. Install each gasket into the
supercharger (make sure the gaskets are fully seated).
20
30
NOTICE: If the gaskets show signs of wear or deterioration, they
will need to be replaced.
2009 MODEL: This kit comes with 8 new intake manifold gaskets (C)
(due to the different design of the '09 manifold). Install each gasket into
the supercharger (make sure the gaskets are fully seated).
40
40
Remove the bypass stop screw from the supercharger assembly.
NOTICE: DO NOT change the position of the nut on the bypass
screw. It is a pre-determined stop for the bypass valve arm.
60
50
60
70
70
Do a last minute check of the assembly. Verify that the fuel rail with
correct injectors are installed and that all 8 manifold gaskets are in place
and properly seated ( OPERATION 30 ).
Slowly lower the supercharger assembly onto the top of the engine. Lift
up on the front of the assembly as it is lowered to keep the nose
assembly from getting damaged.
Re-install the bypass stop screw until the nut attached to the screw
contacts the assembly casting. Then cut the large zip tie.
ITEM
PART NUMBER
A
B
C
00-1607-B19330
QTY. DESCRIPTION
1
Supercharger Assy, Series VI.5
069-703
1
14" Zip Tie
00-1607-C14616*
8
Gasket, Intake Manifold To Head
TORQUE
NOTES:
PROCESS
PAGE
INSTALL SUPERCHARGER
59
TORQUE
20
ITEM
OPERATION
1
7
1
3
8
4
5
2
6
10
Retrieve the 8 bolts (A) required to fasten the supercharger assembly to
the motor. Hand start each bolt, but do not tighten the bolts. Once
completed, pull the supercharger assembly as far forward as the hand
started bolts will allow.
20
Tighten each supercharger assembly mounting bolt to
91 Lb-in +/- 13.6 Lb-in with a torque wrench. Make sure to torque the
SC assembly in the following torque order shown.
ITEM
PART NUMBER
A
00-9001-C10141*
QTY. DESCRIPTION
8
Capscrw Hex M6x1.0mm 25mm
TORQUE
NOTES:
1
91 +/- 13.6 Lb-in
PROCESS
PAGE
INSTALL SUPERCHARGER
60
TORQUE
ITEM
OPERATION
ORIENTATE THE
GASKET SO THE
NUB SETS INSIDE
THE MACHINED
NOTCH
10
Install a tension clamp (A) onto the 3" section of hose coming off of the
water tube. Keep the clamp tool engaged on the clamp.
20
2005 to 2006 Vehicles: Retrieve the water cross over and install the
new gasket (B). Install it onto the bottom of the crossover. Make sure
the gasket is fully seated.
10
2007 to 2009 Vehicles: Retrieve the water cross over and install the
take-off gasket onto the bottom of the crossover. Make sure the gasket
is fully seated.
20
30
Then retrieve the round take-off gasket from the old crossover, and
install it on the other side of the new water crossover. Make sure the
gasket is fully seated.
40
Set the crossover in place in front of the super charger assembly. Make
sure the brass fitting on the bottom of the crossover is inserted into the
3" hose section.
40
NOTICE: Test fit the crossover before bolting it down on the next
page. The brass fitting may have to be turned so that the hose in
OPERATION 10 does not make hard contact to the engine block.
30
ITEM
PART NUMBER
A
B
00-2003-C100680
1
¾” Hose Clamp
06-2003-C143820
1
Gasket, Water Crossover, Driver
QTY. DESCRIPTION
TORQUE
NOTES:
PROCESS
PAGE
INSTALL WATER CROSS OVER
61
TORQUE
ITEM
OPERATION
20
10
30
1
Make sure the hose fully engages the brass fitting on the bottom of the
crossover. The hose should be all the way against the fitting stop.
Install the clamp as shown.
10
20
60mm BOLT (B)
WITH WASHER (C)
25mm BOLT (D)
Apply blue Loctite to the threads of 4 water crossover bolts (one 80mm
bolt (A), one 60mm bolt (B), and 2 shorter 25mm bolts (C)).
30
Slide a M6 washer (C) onto the medium sized 60mm bolt (B), and install
the bolt into the driver (LH) side mounting hole of the the water
crossover. Then install the small 25mm bolt (D) into the back mounting
hole on the driver (LH) side of the crossover. Tighten each bolt to 91 Lbin +/- 13.6 Lb-in with a torque wrench.
40
Slide the remaining M6 washer (C) onto the large sized 80mm bolt (A),
and install it into the passenger (RH) side mounting hole of the the water
crossover. Then install the small 25mm bolt (D) into the back mounting
hole on the passenger (RH) side of the crossover. Tighten each bolt to
91 Lb-in +/- 13.6 Lb-in with a torque wrench.
50
Retrieve the upper radiator hose (E), and install the two take-off clamps.
Slide the one end of the hose over the water crossover outlet, and the
other end over the radiator inlet. Set each clamp by using a flat blade
screwdriver. Release the clamps and make sure both clamps are fully
engaged.
80mm BOLT (A)
WITH WASHER (C)
50
1
40
25mm BOLT (D)
ITEM
PART NUMBER
QTY. DESCRIPTION
A
B
C
D
E
00-9001-C19336
1
Capscrw Hex M6x1.0mm 80mm
00-9001-C19335
1
Capcrew Hex M6x1.0mm 60mm
00-9004-C19337
2
M6 Washer
00-9001-C101410
2
Capcrew Hex M6x1.0mm 25mm
06-2003-C14379
1
Hose, Upper Rad, Passenger
TORQUE
NOTES:
1
91 +/- 13.6 Lb-in
PROCESS
PAGE
INSTALL WATER CROSS OVER
62
TORQUE
ITEM
OPERATION
20
10
NOTICE: The 2005 to 2008 alternator is shown in the photos at the
left. The 2009 alternator installation is similar. If the vehicle is a
2009 model, it will not have a harness stand-off.
RADIO
INTERFERENCE
CAPACITOR
10
Apply red Loctite to the threads of two 12mm bolts (A), and hand start
each bolt into the face of the alternator bracket. Make sure to feed the
top bolt through the radio interference capacitor before threading it into
the alternator bracket.
20
Retrieve the alternator with the new pulley installed on Pages 30AB to
31AB or 30C to 31C) . Slip the alternator onto the hand started bolts
protruding from the alternator bracket. Make sure the interference
capacitor stays between the alternator and the head of the bolt.
ALTERNATOR HARNESS
STAND-OFF - 2005 to 2008 MODELS
30
Once the alternator is in place, run down and tighten each alternator
mounting bolt to 18 Lb-ft +/- 2.7 Lb-ft with a torque wrench.
2005 to 2008 MODEL ALTERNATOR SHOWN
40
2005 to 2008 Models: Remove the 10mm nut at the end of the
alternator wire stand-off and set aside.
2009 Models: Remove the 13mm nut at the back of the alternator and
set aside.
ITEM
PART NUMBER
A
00-9001-C106650
QTY. DESCRIPTION
2
Capscrw Hex M8x1.25mm 40mm
30
1
40
TORQUE
NOTES:
1
18 +/- 2.7 Lb-ft
PROCESS
PAGE
INSTALL ALTERNATOR
63
TORQUE
ITEM
OPERATION
2005 to 2008 MODELS
20
2009 MODELS
20
1
NOTICE: There are slight differences in the installation and routing
of the modified alternator harness depending on model year. Pay
attention to the different photos and instructions for each model
year vehicle.
1
30
30
10
Retrieve the alternator harness.
20
2005 to 2008 Models: Apply a dab of red Loctite onto the threaded end
of the alternator stand-off. Then slip the ring terminal end of the
alternator harness (that is covered by a grey boot) over the end of the
stand-off. Re-install the 10mm alternator stand-off nut and torque it to
71 Lb-in +/- 10.6 Lb-in with a torque wrench.
20
2009 Models: Apply a dab of red Loctite onto the threaded end of the
alternator stud. Then slip the ring terminal end of the alternator harness
(that is covered by a grey boot) over the end of the alternator stud. Reinstall the 13mm alternator nut and torque it to 71 Lb-in +/- 10.6 Lb-in
with a torque wrench.
2005 to 2008 MODEL HARNESS SHOWN 2009 MODEL HARNESS TYPICAL
30
40
40
50
Clip the rest of the alternator harness into place. The 2 forward-most
retaining clips get pressed onto the fuel rail stud bolts, and the last
retainer (tree clip) gets clipped into a sheet metal tab protruding from the
bulkhead.
Connect the alternator harness signal wire connector into the main
engine harness. Make sure the connector is fully engaged.
NOTICE: For 2009 Models, The connector on the main engine
harness will need to be relocated forward on the engine harness to
reach the alternator harness connector.
60
1
Place the grey boot of the alternator harness over the mounting nut and
plug in the electrical connector. Make sure the connector is fully
engaged.
60
Connect the end of the alternator harness to the positive battery cable
clamp. Remove the 10mm nut, slip the ring terminal over the stud on the
clamp, and re-install the nut. Tighten the nut to
71 Lb-in +/- 10.6 Lb-in with a torque wrench.
TORQUE
NOTES:
1
71 +/- 10.6 Lb-in
PROCESS
PAGE
INSTALL ALTERNATOR HARNESS
64
TORQUE
ITEM
OPERATION
10
10
Route the belt (A) as shown in the belt routing decal, but leave the belt
off of the water pump pulley (It is easier to slide the belt on there last).
20
Use a ½” drive breaker bar to relieve the tension on the tensioner by
pulling on the bar clock-wise..
30
Slide the serpentine belt onto the water pump pulley.
40
Once the belt is seated on the water pump pulley, release the belt
tensioner and verify that the belt is routed correctly, sits straight on all
pulleys, and is properly seated on all pulleys.
20
ITEM
PART NUMBER
A
00-1604-C111700
QTY. DESCRIPTION
1
Goodyear Gatorback 109.0" 6 Rib Belt
TORQUE
NOTES:
PROCESS
PAGE
ROUTE SERPENTINE BELT
65
TORQUE
ITEM
OPERATION
20
CAREFULLY
REMOVE THE
CLIP
10
Locate the vacuum hoses connected to the brake booster. Remove the
1/4" hose from the vacuum T-fitting (that was disconnected from the fuel
rail on Page 13).
20
Cut two inches off of the 1/4" line, and remove the clip .
30
Connect one side of the 1/4" line to the fuel pressure transducer. The
other end of the hose will slide over the fitting on the back of the
supercharger assembly on the driver (LH) side. The hose will be held in
place with 1 wire hose clamp (A).
40
Connect the 1/4" line coming off of the bypass actuator (hose coming off
of the back of the supercharger assembly) to the T-fitting on the vacuum
line (where the 1/4" hose was removed from in OPERATION 10).
T-FITTING
2"
10
REMOVE 2"
FROM THE END
OF THE HOSE
30
30
BYPASS
ACTUATOR
VACUUM LINE
ITEM
PART NUMBER
A
00-9005-C18840
QTY. DESCRIPTION
1
Spring Clamp, 7/16IN SS
TORQUE
NOTES:
PROCESS
PAGE
MODIFY THE ENGINE VACUUM
HOSES
66
TORQUE
ITEM
OPERATION
10
10
Remove the brake booster side of the 3/8" vacuum line (at the T-fitting)
and remove a 4 & 1/4" section (including the convoluted sleeving).
20
Once the 4 & 1/4" of vacuum line and convolute is removed, re-insert the
3/8" vacuum line into the T-fitting.
30
Take the piece of convoluted sleeving that was cut and removed in
OPERATION 10, and slide it over the 3/8" vacuum line leading from the
T-fitting to the supercharger manifold.
40
Slide the 3/8" vacuum line over the fitting on the rear LH corner of the
supercharger assembly.
20
4 - 1/4"
30
40
ITEM
PART NUMBER
QTY. DESCRIPTION
TORQUE
NOTES:
PROCESS
PAGE
MODIFY THE ENGINE VACUUM
HOSES
67
TORQUE
ITEM
OPERATION
20
10
20
10
30
40
50
ACT SENSOR
50
Locate the MAF connector, and peel back the convoluted sleeving to
about 6” behind the connector.
Locate both the gray and gray w/red stripe wires, and cut the gray wire
4.5” behind the connector, and the gray w/ red wire 6” behind the
connector.
Strip ¼” of insulation off of the harness ends of the two wires, and then
slide a 1” section of 1/8” heat shrink (B) over each wire. Once the heat
shrink is on each wire, slide the butt connectors (C) of the like colored
wires of the ACT extension kit (A) onto the harness side of the cut wires
and crimp with a compression crimp tool. Add a dab of solder to the
each crimped connection.
Slide each heat shrink piece installed in OPERATION 30 over the butt
splices and apply heat to seal.
Replace the convoluted sleeving that was peeled back in OPERATION
10, and secure with black electrical tape. Plug the ACT connector into
the ACT sensor on the drivers side of the supercharger manifold.
Secure the single pin connector that connects to a gauge pod harness
(not included in this kit) with 1 zip tie (D) to the main engine harness.
GAUGE POD
HARNESS
CONNECTOR
(NOT USED)
ITEM
A
B
C
D
30
PART NUMBER
QTY. DESCRIPTION
06-1704-B12563
1
Harness, ACT Connector
00-1704-C08921*
3"
Heat Shrink, 1/8" Black
00-1704-C09260*
2
Splice, 18-20 AWG Butt
00-9007-C10122*
1
7" Zip Tie
ZIP TIE
TORQUE
NOTES:
PROCESS
PAGE
WIRE IN THE ACT HARNESS TO
THE MAIN ENGINE HARNESS
68
TORQUE
ITEM
OPERATION
FUSE BOX
FASCIA
SUPPORT
BRACKET
A/C LINE
TOWER
10
Starting at the front of the vehicle, route the water pump to recovery tank
hose (A) underneath the passenger (RH) fascia support bracket, and
over the frame rail.
20
Continue routing the hose underneath the fuse box. The end of the
hose should stick up in the air just behind the A/C line tower.
30
With 1 tension clamp (B), connect the hose to the intercooler water
pump. The hose connects to the top fitting.
10
30
ITEM
PART NUMBER
QTY. DESCRIPTION
A
B
06-2003-C09857
1
Molded Hose S/C Tank to Pump
00-2003-C10068*
1
Hose Clamp Molded Hose S/C
TORQUE
NOTES:
PROCESS
PAGE
INSTALL INTERCOOLER HOSE:
WATER PUMP TO
RECOVERY TANK
69
TORQUE
ITEM
OPERATION
2005 to 2006 MODEL VEHICLES ONLY
10
20
10
20
10
30
2005 to 2006 MODEL VEHICLES ONLY
40
30
BATTERY HARNESS RING
TERMINAL BETWEEN THE
RC TANK AND THE FLANGE
1
2005 to 2006 Vehicles: Locate the sheet metal flange protruding from
the top of the passenger (RH) side strut tower. Remove the 10mm bolt
holding the battery harness ground ring terminal to the strut tower flange.
Just remove the bolt, but leave the ring terminal in place.
2005 to 2006 Vehicles: Set the recovery tank (B) on top of the strut
tower flange (so that the tank is positioned in forward of the flange) and
line up the holes. Make sure the recovery tank sits on top of the ground
ring terminal. Install the three 10mm bolts (C) and torque them to
71 Lb-in +/- 10.6 Lb-in with a torque wrench.
NOTICE: Between 2005 and 2006 Ford removed the pressed in
nuts on the strut tower flange. In the 2005 to 2006 kit, 2 washer (D)
and 2 Nyloc nuts (E) are included. If the pressed in nuts are
missing, slip the bolts through the holes in the flange, and use the
washers and nuts to secure the recovery tank. The torque remains
the same as stated above.
2007 to 2009 MODEL VEHICLES ONLY
1
Install the intercooler water pump to recovery tank hose by inserting the
hose onto the bottom nipple of the recovery tank and securing it in place
with a tension clamp (A).
40
2007 to 2009 Vehicles: Set the recovery tank (B) onto the recovery
tank bracket (installed on Page 48BC) and line up the holes. Install the
three 10mm bolts (C) and torque them to 71 Lb-in +/- 10.6 Lb-in with a
torque wrench.
ITEM
PART NUMBER
QTY. DESCRIPTION
A
B
C
00-2003-C10068*
1
Hose Clamp Molded Hose S/C
06-2001-C10212
1
Tank Intercooler Recovery
00-9001-C10141*
3
Capscrw Hex Flng M6x1.0mm 25mm
READ NOTICE BELOW OPERATION 30 CONCERNING ITEMS (D) & (E)
D
E
00-9004-C12007*
2
Washer, M6 ID 18MM OD, 18-8 SS
00-9003-C10936*
2
Nut Nyloc M6 10mm W 6mm H
TORQUE
NOTES:
1
71 +/- 10.6 Lb-in
PROCESS
PAGE
INSTALL THE RECOVERY TANK
70
TORQUE
ITEM
OPERATION
10
20
A/C SENSOR
FITTING
20
30
10
40
10
A/C LINE TO
DRYER CANISTER
Route the heat exchanger to intercooler hose (A) around the cooling
pack (towards the driver (LH) side. The hose will then proceed upward
between the frame rail and the lower radiator hose.
Route the hose upward between the A/C line heading to the dryer
canister, and the A/C Line sensor fitting.
The hose will then cross over the top of the two power steering lines
exiting the reservoir. The hose will then follow the water crossover to
thermostat hose.
40
Connect the heat exchanger to intercooler hose with 1 tension clamp (B)
at the heat exchanger.
50
Connect the heat exchanger to intercooler hose with 1 tension clamp (B)
at the intercooler. The hose will be installed on the driver (LH) side
fitting protruding from the front of the supercharger assembly. Make
sure the tabs of the clamp are facing upward.
50
NOTICE: Make sure the hose and clamps are fully seated on the
fittings, and that the entire clamping area of the clamp is fully
engaging the hose and fitting.
THERMOSTAT HOSE
30
ITEM
PART NUMBER
QTY. DESCRIPTION
A
B
06-2003-C09861
1
Molded Hose S/C H.E To Intercooler
00-2003-C100680
2
Hose Clamp Molded Hose S/C
POWER STEERING
LINES
TORQUE
NOTES:
PROCESS
PAGE
INSTALL HEAT EXCHANGER TO
INTERCOOLER HOSE
71
TORQUE
ITEM
OPERATION
20
10
20
20
THE SALEEN LETTERING
WILL BE FACING UPWARD
30
Retrieve the recovery tank to intercooler hose (A) and 2 hose tension
clamps (B). With tension clamp pliers, slide a clamp onto each end of
the hose.
Install the recovery tank to intercooler hose onto the recovery tank by
sliding the long end of the hose over the recovery tank fitting. Orientate
the hose so that the Saleen lettering is facing upward. Lastly, set the
tension clamp.
Slide the other end of the hose over the passenger (RH) side fitting of
the supercharger assembly. Use tension clamp pliers to set the clamp,
and make sure the tabs of the clamp are facing upward.
30
NOTICE: Make sure the hose and clamps are fully seated on the
fittings, and that the entire clamping area of the clamp is fully
engaging the hose and fitting.
30
HEAT EXCHANGER
HOSE INSTALLED
ON PAGE 55
ITEM
PART NUMBER
QTY. DESCRIPTION
A
B
06-2003-C09860
1
Hose, Rec Tank - Intr Cooler
00-2003-C100680
2
Hose Clamp
TORQUE
NOTES:
PROCESS
PAGE
INSTALL RECOVERY TANK TO
INTERCOOLER HOSE
72
TORQUE
ITEM
OPERATION
20
10
Remove the tape covering the intake port of the supercharger lid.
20
Insert the take-off Ford throttle body gasket (removed on Page 10), into
the groove in the front of the inlet tube. Make sure the gasket is fully
seated into the groove.
30
Using the four 10mm bolts (A), install the stock throttle body onto the
inlet assembly. Tighten the bolts to 91 Lb-in +/- 13.6 Lb-in with a
torque wrench.
30
30
1
1
ITEM
PART NUMBER
A
00-9001-C101410
QTY. DESCRIPTION
4
Capscrw, M6x1.0mmx25mm
TORQUE
NOTES:
1
91 +/- 13.6 Lb-in
PROCESS
PAGE
INSTALL THROTTLE BODY
73
TORQUE
ITEM
OPERATION
10
30
40
20
50
10
30
20
40
1 OF 8 FUEL INJECTORS SHOWN
Plug in the throttle control electrical connector into the passenger (RH)
side of the throttle body. Press the plug onto the throttle body connector
until it is fully seated, and then slide the red locking tab towards the
throttle body to lock the connector into place.
Connect the throttle position connector to the driver (LH) side of the
throttle body. Press the plug onto the throttle body connector until it is
fully seated, and then slide the red locking tab towards the throttle body
to lock the connector into place.
Connect the PCV tube to the driver (LH) side of the supercharger
assembly lid. The fitting is just rearward of the throttle body. Press the
tube onto the fitting until it clicks into place.
Connect the EVAP canister vapor tube into the driver (LH) side of the
supercharger assembly lid. The fitting is located rearward of the PCV
tube. Press the tube onto the fitting until it clicks into place.
50
Connect the fuel rail electrical connector to the fuel rail module located
on the driver (LH) side. Press the connector into the module until the
connector is fully seated.
60
Connect the main engine harness to each of the 8 fuel injectors. Press
each grey connector onto the fuel injector until it clicks into place.
70
Press the fuel line onto the fuel rail fitting located on the driver (LH) side.
Press the locking clip over the connection to lock the fuel line into place.
70
ITEM
PART NUMBER
QTY. DESCRIPTION
70
60
TORQUE
NOTES:
PROCESS
PAGE
MAKE SUPERCHARGER
ASSEMBLY CONNECTIONS
74
TORQUE
ITEM
OPERATION
10
2
30
10
Set the modified air box assembly into the inner fender by lining up the
two studs w/ grommets with the two holes in the inner fender.
20
Line up the air box assembly mounting hole with the J-clip on the inner
fender well and re-install the 10mm air box bolt. With a torque wrench,
tighten the bolt to 71 Lb-in +/- 10.6 Lb-in.
20
30
1
40
50
40
Slip the air inlet duct (A) over the lip of the throttle body. Tighten the
8mm clamp attached to the inlet tube to 27 Lb-in +/- 4 Lb-in with a
torque wrench.
Slip the other end of the air inlet duct (B) over the lip of the air box
assembly. With a torque wrench, tighten the attached 8mm clamp to
27 Lb-in +/- 4 Lb-in.
Reconnect the crankcase vent tube to the passenger side of the air inlet
duct, just in front of the throttle body. Press the tube onto the vent fitting
until it locks into place.
50
2
ITEM
PART NUMBER
A
06-1602-C13094
QTY. DESCRIPTION
1
Air Inlet Duct
TORQUE
NOTES:
1
71 +/- 10.6 Lb-in
2
27 +/- 4 Lb-in
PROCESS
PAGE
INSTALL AIR BOX AND SNORKEL
75
TORQUE
ITEM
OPERATION
LH SIDE SHOWN - RH TYPICAL
RH SIDE SHOWN - LH TYPICAL
30
10
Retrieve the stock factory fascia removed on Page 5E to7E. Loosely
set the front fascia onto the front bumper so that the electrical
connections can be reached.
20
Connect the turn signal connectors (1 per side) and the parking light
connector (1 per side). When connecting the connectors, make sure
they are fully engaged.
20
30
40
50
RH SIDE SHOWN - LH TYPICAL
50
RH SIDE SHOWN - LH TYPICAL
Connect both fog light connectors (If equipped), by pressing the
connector onto the fog light housing. Make sure the connector is fully
seated.
Set the front fascia into place making sure the large flat tabs (1 on each
side of the fascia) feed into the slot located at the bottom of each head
lamp.
Once the front of the fascia is set, proceed to each side of the fascia and
maneuver each side of the fascia into place. There are 2 studs
protruding from the bottom of each fascia, these will feed into 2 holes on
each side of the fascia.
NOTE: To confirm the connectors are properly engaged, push each
connector in, give it a slight pull to make sure the connector
doesn't slip out, and then push the connector back in.
40
ITEM
PART NUMBER
QTY. DESCRIPTION
TORQUE
NOTES:
PROCESS
PAGE
INSTALL FRONT FASCIA
STOCK MUSTANG GT
E
76
TORQUE
ITEM
OPERATION
RH SIDE SHOWN - LH TYPICAL
LH SIDE SHOWN - RH TYPICAL
10
10
Once the edges of the fascia are in place, pull the fender liner out
enough to see the 2 fender studs per side. Re-install the 10mm nuts (2
per side). With a torque wrench, torque all 4 fender nuts to
44 Lb-in +/- 6.6 Lb-in.
1
20
20
Tuck the each wheel well liner into the fascia. Re-install the 3 Philips
screws per side, and tighten.
30
Re- install the four 5.5mm screws used to secure the bottom of the front
fascia to the lower aero shield, and tighten.
40
Re-install the two 10mm bolts (1 per side) holding the top of the fascia to
the upper supports (located just inboard of each head lamp), and tighten
to 44 Lb-in +/- 6.6 Lb-in.
LH SIDE SHOWN - RH TYPICAL
1
40
30
ITEM
PART NUMBER
QTY. DESCRIPTION
TORQUE
NOTES:
1
44 +/- 6.6 Lb-in
PROCESS
PAGE
INSTALL FRONT FASCIA
STOCK MUSTANG GT
E
77
TORQUE
ITEM
OPERATION
10
Feed the leading edge of the upper aero shield inside the channel
molded into the top of the front grille.
20
Once in place, re-install the 6 retainer pins to secure the shield in place.
10
20
ITEM
PART NUMBER
QTY. DESCRIPTION
TORQUE
NOTES:
PROCESS
PAGE
INSTALL FRONT FASCIA
STOCK MUSTANG GT
E
78
TORQUE
ITEM
OPERATION
LH SIDE SHOWN - RH TYPICAL
RH SIDE SHOWN - LH TYPICAL
10
Retrieve the Saleen S-Line fascia removed on Page 5F to 7F. Loosely
set the front fascia onto the front bumper so that the electrical
connections can be reached.
20
Connect the side marker light connector (1 per side). When connecting
the connectors, make sure they are fully engaged.
30
Connect the turn signal harness connectors, by pressing each connector
into the turn signal housing . Make sure the connector is fully seated.
30
20
40
50
RH SIDE SHOWN - LH TYPICAL
50
RH SIDE SHOWN - LH TYPICAL
Set the front fascia into place making sure the large flat tabs (1 on each
side of the fascia) feed into the slot located at the bottom of each head
lamp.
Once the front of the fascia is set, proceed to each side of the fascia and
maneuver each side of the fascia into place. There are 2 studs
protruding from the bottom of each fascia, these will feed into 2 holes on
each side of the fascia.
NOTE: To confirm the connectors are properly engaged, push each
connector in, give it a slight pull to make sure the connector
doesn't slip out, and then push the connector back in.
40
ITEM
PART NUMBER
QTY. DESCRIPTION
TORQUE
NOTES:
PROCESS
PAGE
INSTALL FRONT FASCIA
S-SERIES SALEEN FASCIA
F
76
TORQUE
ITEM
OPERATION
RH SIDE SHOWN - LH TYPICAL
10
LH SIDE SHOWN - RH TYPICAL
1
10
Once the edges of the fascia are in place, pull the fender liner out
enough to see the 2 fender studs per side. Re-install the 10mm nuts (2
per side). With a torque wrench, torque all 4 fender nuts to
44 Lb-in +/- 6.6 Lb-in.
20
Tuck the each wheel well liner into the fascia. Re-install the 3 Philips
screws per side, and tighten.
30
Re- install the two 5.5mm screws used to secure the bottom of the front
fascia to the lower aero shield, and tighten.
20
40
Re-install the two 10mm bolts (1 per side) holding the top of the fascia to
the upper supports (located just inboard of each head lamp), and tighten
to 44 Lb-in +/- 6.6 Lb-in.
RH SIDE SHOWN - LH TYPICAL
40
1
ITEM
PART NUMBER
QTY. DESCRIPTION
30
TORQUE
NOTES:
1
44 +/- 6.6 Lb-in
PROCESS
PAGE
INSTALL FRONT FASCIA
S-SERIES SALEEN FASCIA
F
77
TORQUE
ITEM
OPERATION
10
Set the upper aero shield into place on top of the cooling pack.
20
Once in place, re-install the 4 retainer pins to secure the shield in place.
10
10
ITEM
PART NUMBER
QTY. DESCRIPTION
TORQUE
NOTES:
PROCESS
PAGE
INSTALL FRONT FASCIA
S-SERIES SALEEN FASCIA
F
78
TORQUE
ITEM
LH SIDE SHOWN - RH SIDE TYPICAL
OPERATION
30
20
10
Remove any existing tape residue, and clean the back side of both head
light bars with an alcohol wipe. Apply adhesive promoter to each
headlamp bar while making sure not to get any promoter on the exterior
visible surface.
20
Apply 23" of 3M double sided tape* (11.5" per head light bar) (see the
Notice at the bottom) to the inside of the head light bars. Pull a small
portion of the tape protective backing away to use as a leader, for
removing the tape backing once the bar is in place on the headlamp.
30
Retrieve the Heritage front fascia removed on Page 5G to 7G. Loosely
set the front fascia onto the front bumper so that the electrical
connections can be reached.
40
Re-connect the 2 fog lamps to the vehicle harness in front of the A/C
condenser.
11.5"
50
SQUARE (BLACK)
PLUG
Connect the vehicle harness to the parking light / turn signal housings in
the front fascia. The wide plug (brown) connects to the inboard bulbs in
the parking light housing, and the square (black) plugs connect to the
outboard bulbs in the parking light housing.
WIDE (BROWN)
PLUG
NOTICE: For the headlamp bars, Saleen recommends...
3M VHB #5929 (0.64mm thick x 9.53mm wide) double sided tape.
ITEM
40
PART NUMBER
QTY. DESCRIPTION
50
TORQUE
NOTES:
PROCESS
PAGE
INSTALL FRONT FASCIA
H-SERIES SALEEN FASCIA
G
76
TORQUE
ITEM
OPERATION
10
20
Set the front fascia into place making sure the large flat tabs (1 on each
side of the fascia) feed into the slot located at the bottom of each head
lamp.
Align/install the holes in the upper rear side of the fascia with the studs in
the fender on each side. Install the four 10mm nuts (2 per fender, 1 per
stud) onto the studs at each side of the fascia. With a torque wrench,
tighten each nut to 44 Lb-in +/- 6.6 Lb-in.
10
30
Adjust the front fascia so it fits snug against the foam that runs along the
inboard vertical and lower surface of the head light.
40
Make sure the tab in the upper fascia support brackets sit inside the
rectangular hole at the top of the fascia.
50
Install the two 10mm bolts (1 per side) that hold the top of the fascia to
the upper support brackets, and tighten to 44 Lb-in +/- 6.6 Lb-in.
20
1
30
1
50
40
ITEM
PART NUMBER
QTY. DESCRIPTION
TORQUE
NOTES:
PROCESS
PAGE
INSTALL FRONT FASCIA
H-SERIES SALEEN FASCIA
G
77
TORQUE
ITEM
OPERATION
20
10
Install and tighten the 6 screws (3 per wheel well) through the front
fascia and wheel well liner.
20
Clean each headlamp lens of dirt, dust, or any other debris before
continuing to OPERATION 30.
30
Position each headlamp bar on the face of the headlamp so that it is
even all the way across. To do this, measure each headlamp bar at 2
different points to make sure the bar stays level. Once the bar is in
place, remove the protective backing on the tape and firmly press each
bar to each headlamp.
10
40
MEASURE THE DISTANCE BETWEEN THE BUMPER
AND THE HEADLAMP BAR. MAKE SURE IT IS EVEN
ACROSS THE HEADLAMP.
50
30
Re-fasten the front fascia splitter to the lower aero shield with the four
5.5mm screws. The screws thread into j-clips in the aero shield. Once
the screws are installed, tighten each screw to 44 Lb-in +/- 6.6 Lb-in
with a torque wrench.
50
Feed the leading edge of the upper aero shield inside the channel
molded into the top of the front grille.
60
Once in place, re-install the 6 retainer pins to secure the shield in place.
60
ITEM
PART NUMBER
QTY. DESCRIPTION
40
1
TORQUE
NOTES:
1
44 +/- 6.6 Lb-in
PROCESS
PAGE
INSTALL FRONT FASCIA
H-SERIES SALEEN FASCIA
G
78
TORQUE
ITEM
OPERATION
10
NOTICE: When installing the hood, use at least 1 additional
person to help hold the hood in place. Trying to hold the hood and
start the hinge bolts without help might result in injury or damage
to the hood and vehicle.
10
Lift each hood hinge upward. Position the hood so that the angle of the
hood matches the hinges. Bring the hood in contact with each hinge and
line up the holes. Hand start the four 10mm hinge bolts. Once the bolts
have been started (at least 4 threads per bolt), the hood can then be
held up by the prop rod.
20
Tighten the four 10mm hinge bolts (2 per hinge) to 14 Lb-ft +/- 2 Lb-ft
with a torque wrench.
30
Take the windshield sprayer line and press the 2 line clips back into the
holes in the hood.
40
Press the windshield sprayer line T-fitting and elbow back into the
sprayer nozzles.
40
30
NOTICE: If the hood liner was partially or completely removed,
position the liner and re-install the liner tree clips.
ITEM
20
PART NUMBER
QTY. DESCRIPTION
1
TORQUE
NOTES:
1
14 +/- 2 Lb-ft
PROCESS
PAGE
INSTALL HOOD
79
TORQUE
ITEM
OPERATION
10
Retrieve the Saleen programmed PCM. Slide the PCM back into the
PCM bracket (pushing it rearward).
20
Install the two 10mm bolts holding the module in place. Tighten the bolts
with a torque wrench to 62 Lb-in +/- 9.3 Lb-in
30
Plug the three harness connectors into their respective locations by
pushing them into the connector and pushing the locking tab towards the
PCM. This will lock them into place.
10
20
1
30
STOP
WARNING! Install a Saleen programmed PCM ONLY!
ITEM
PART NUMBER
QTY. DESCRIPTION
TORQUE
NOTES:
1
62 +/- 9.3 Lb-in
PROCESS
PAGE
INSTALL SALEEN PROGRAMMED
PCM
80
TORQUE
ITEM
OPERATION
40
NOTICE: No smoking, flames, or sparks around the battery.
Batteries can give off fumes that are flammable and may ignite if
there is any form of spark or open flame near it.
20
Insert the battery tray into the passenger (RH) inner fender. Install the
three 10mm bolts to retain it in place. Tighten the bolts to
8 Lb-ft +/- 1.2 Lb-ft with a torque wrench.
20
Connect the tree clip from the battery cable harness to the battery tray.
30
10
10
1
10
30
10
2
40
50
60
60
ITEM
Lower the battery into the battery tray with the posts towards the engine
compartment bulkhead. The fasten the battery hold-down to the tray
(make sure the strap goes over the battery). Tighten the hold down to
71 Lb-in +/- 10.6 Lb-in with a torque wrench.
Set the battery heat shield down around the battery with the label facing
the bulkhead.
Connect the positive battery cable to the positive battery post ( The post
nearest the passenger (RH) fender). Using an 8mm socket, tighten the
clamp to 71 Lb-in +/- 10.6 Lb-in with a torque wrench.
Connect the negative battery cable to the negative battery post (the
remaining post). Using an 8mm socket, tighten the clamp to
71 Lb-in +/- 10.6 Lb-in with a torque wrench.
PART NUMBER
QTY. DESCRIPTION
2
50
2
TORQUE
NOTES:
1
8 +/- 1.2 Lb-ft
2
71 +/- 10.6 Lb-in
PROCESS
PAGE
INSTALL BATTERY AND TRAY
81
TORQUE
ITEM
OPERATION
NOTICE: Fill the intercooler system with a 50/50 coolant mix (50%
straight anti-freeze and 50% water).
10
10
Remove the intercooler to recovery tank hose at the intercooler and set
into a drain pan.
20
Cap off the inlet to the intercooler recovery tank using a short
piece of 3/4" hose that is plugged at one end.
30
Fill the reservoir tank with coolant until it is 1" from the top of the bottle.
20
10
NOTICE: See top of operations column before adding coolant.
60
FILL 1"
FROM TOP
30
40
Attach the coolant system pressure tool to the opening of the intercooler
recovery tank.
50
Actuate the pressure tool until coolant flows out of the hose and into the
drain pan. MAKE SURE THE TANK DOES NOT RUN DRY.
60
Remove the capped hose from the inlet, and re-attach the hose reinstalling the designated clamp.
70
Remove the pressure tool and fill the intercooler tank 1" from the top.
Then re-install the intercooler recovery tank cap.
40
ITEM
PART NUMBER
QTY. DESCRIPTION
70
TORQUE
NOTES:
PROCESS
PAGE
FILL INTERCOOLER SYSTEM
WITH COOLANT
82
TORQUE
ITEM
OPERATION
30
10
Make sure that the petcock valve at the bottom of the radiator is closed.
NOTICE: A coolant fill / recovery machine can be used to fill the
coolant system and bleed out any air that might be trapped in the
vehicle coolant system. If one is not available, the steps below can
be used to fill the vehicle coolant system.
20
Refill the coolant system by pouring a 50/50 water/anti-freeze mix into
the radiator recovery tank. Continue to fill the tank until the coolant level
holds steady at the top of the cold fill range.
30
Once the tank is full, attach a radiator pressure test tool to the top of the
radiator recovery tank, and apply pressure. This will help force any
remaining air in the system back to the recovery tank. While performing
this step, the coolant level in the tank may drop. Be sure not to let the
recovery tank run dry (add additional coolant as needed).
40
Fill the recovery coolant level to the top of the "Cold Fill Range"
50
Close the recovery tank cap.
10
50
NOTICE: The steps below may need to be repeated multiple times...
20
40
60
Start the vehicle and let it idle until the vehicle is up to operating
temperature (the thermostat is fully open).
70
Turn the ignition off and let the coolant system FULLY cool. The coolant
level will drop in the recovery tank once the coolant fully cools.
80
Open the recovery tank and bring the coolant level back up to the top of
the cold fill line.
NOTICE: Repeat steps 1 through 3 until the coolant level no longer
drops below the fill mark after the coolant fully cools. Make sure to
monitor the coolant level after every drive for the first few trips,
once the air is fully worked out of the system, the level will hold
steady.
TORQUE
WARNING! ---- PLEASE READ NOTICE BELOW
While the engine is running and right after the engine has been stopped, the coolant will be EXTREMELY
HOT!. DO NOT remove the recovery tank cap and / or radiator cap while the engine is running and / or
right after the vehicle has been running. Doing so will cause a sudden release of scolding hot coolant and
/ or steam which can cause serious burns and injuries. Always make sure the engine coolant has fully
cooled before accessing any portion of the coolant system.
PROCESS
PAGE
FILL ENGINE COOLANT SYSTEM
83
TORQUE
ITEM
TWO HOLES
OPERATION
40
30
30
HOOD STOP
PAD
10
NOTICE: Clean all surfaces with an alcohol wipe, that a decal will
be attached to ensure proper adhesion.
20
Open the fuel door and install the 91 octane fuel label (A) onto the back
side of the fuel door as shown. Make sure the right edge of the sticker
meets the right hole in the inner fuel door skin.
30
Open the hood and locate the oil filler neck cap (on the passenger (RH)
side cam cover). Install the oil weight sticker (B) onto the oil filler neck
cap making sure it is straight.
40
Apply the belt routing decal (C) onto the underside of the hood on the
passenger (RH) side of the hood hoop. The label should be forward of
the hood stop pad between the 2 holes in the inner skin.
50
Apply the CARB E.O. label (D) onto the radiator shroud on the
passenger (RH) side of the existing Ford labels.
ITEM
PART NUMBER
QTY. DESCRIPTION
A
B
C
D
06-9101-C17679
1
Label, 91 Octane Fuel Only
06-9101-C17108
1
Label, Oil Filler Cap 5w-30
06-9101-C11353
1
Label Belt Diagram S281 SC
10-9101-C11315
1
Label, CARB E.O.
40
TORQUE
NOTES:
PROCESS
PAGE
INSTALL VEHICLE LABELS
84
Post-Installation Review
Listed below is important information about your supercharger kit. Please take the time to read the
information provided. If you are installing this kit, and not the vehicle owner, please keep this page
with the vehicle for the vehicle owner to review.
Post-Installation Review:
• Make sure that all electrical connections have been made
•
Check the vehicle for any coolant or fuel leaks
•
Verify that the intercooler water pump is running when the engine is running.
•
Verify that all hazard lights (turn signals, parking lights, fog lights, etc…) are working properly.
Engine Maintenance & Care:
•
Use 91 Octane fuel or higher when re-fueling the vehicle.
•
Use 5w-30 weight motor oil (of the highest SAE rating) in the engine instead of the stock
recommended weight. As long as the engine is past the manufacturer recommended breakin, Saleen recommends synthetic motor oil.
•
Change the motor oil & filter every 3,000 miles. Oil capacity with filter change is 6 quarts.
•
Change the spark plugs* every 50,000 miles.
•
Clean and re-oil the air filter every 50,000 miles.
•
Change the supercharger oil every 50,000 miles. Saleen recommends the use of
NYE Synthetic Oil #605 for the supercharger.
•
Fill the intercooler system with a 50/50 mixture (anti-freeze / water).
*Saleen recommends the use of HTO spark plugs (Saleen Part# 00-1601-C13394*) with this kit, if your
vehicle is produced from 2005 to early model year 2008. The HTO spark plug will not fit vehicles
st
produced after December 1 2007. To verify if your vehicle will accept HTO spark plugs, inspect a spark
plug coil. If the coil has a brown plastic sleeve, HTO plugs are not available. If the coil is all black and
does not have a brown sleeve, HTO plugs can be ordered through Saleen for your vehicle.
Contact Information:
If you have any additional questions or concerns about your new Saleen supercharger kit, please feel
free to contact us.
•
Tech Support: 1-800-888-8945
Again, Saleen would like to thank you for buying a 475HP Series VI.5 Supercharger Kit. We hope
you enjoy your new product, and will consider us for all your future aftermarket needs.
Page 85