1
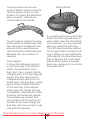
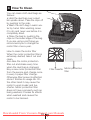
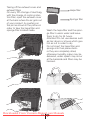
BKS 2123
Vacuum Cleaner
User Manual
Downloaded From Vacuum-Manual.com Manuals
Read this manual prior to initial operation of the product!
Dear Customer,
We hope that your product, which has been manufactured in
modern facilities and passed through a strict quality control
procedure, will give you very good results.
We advise you to read through this manual carefully before
using your product and keep it for future reference.
The User Manual will help you use your machine in a
fast and safe way.
• Read the User Manual before installing and starting your
product.
• In particular, follow the instructions related to safety.
• Keep this User Manual within easy reach for future reference.
• Also read all additional documents supplied with this
product.
Remember that this User Manual is also applicable for several
other models. Differences between models will be identified in
the manual.
This product has been produced in environmentally friendly, modern facilities
Downloaded From Vacuum-Manual.com Manuals
CONTENT
1 Important Safeguards
2
2 Technical Aspects Of Your Machine
3
3 How To Use
4-9
4 How To Clean
10-11
Downloaded From Vacuum-Manual.com Manuals
1
1 Important Safeguards
Basic safety Precautions should
7. Do not unplug it by pulling from
always be followed when using
its cord. Unplug it by holding from
electrical appliances including the
the plug.
following :
8. Do not touch the plug or the
1. If the voltage written under the
device with wet hands.
label of your vacuum cleaner is
9. Do not drop any objects in to
appropriate with the mains voltage
any open parts of your device.
in your house; you can use your
Make sure that the air passage
vacuum cleaner. Otherwise motor
holes and channels are open.
may burn.
10. Keep your hands and hair
2. Do not leave your vacuuzm
away from the working parts of
cleaner plugged. Unplug it when
the machine.
you do not use or when service is
11. Do not use your vacuum
necessary.
cleaner to clean flammable ob3. Do not use your vacuum
jects such as cigarettes, matches,
cleaner on wet surfaces and
hot ashes.
outside the house.
12. Do not use your vacuum
4. This appliance is not intended
cleaner without a paper filter or
for use by persons (including chilother filters are attached.
dren) with reduced physical, sen13. Turn on all of the control
sory or mental capabilities, or lack
buttons on your vacuum cleaner
of experience and knowledge,
before unpluging.
unless they have been given supervision or instruction concerning
14. Do not vacuum burnable or
use of the appliance by a person
flammable liquids. Do not use
responsible for their safety.
your device where these kinds of
liquids exist.
Children should be supervised to
ensure that they do not play with
15. Unplug it when attaching or
the appliance.
changing the accessories delivered with your vacuum cleaner.
5. If the power cord or plug is
damaged, any drop or fall oc16. Do not operate your vacuum
cured, left outside, get wet or your
cleaner while keeping it vertical.
device is not working; consult to
17. Small pieces of dust may
authorized services.
cause clog of dust bag. This will
6. Do not carry your device by
terminate the air passage from
pulling from its cable. Protect
the dust bag. In this case the dust
the cable from sharp edges, hot
bag must be changed altough the
surfaces and be careful to not to
dust bag is not completely filled.
closely pressed between a door
Downloaded
From
Vacuum-Manual.com
Manuals
and a door frame.
2
2 Technical Aspects Of Your Machine
17 18
19 20 21
1234567 8 9 10
16
15
11 12
13
26
22
23
14
24
25
27
24- Dust brush
1- Plug and the power cord
25- Brush park projection
2- Brush parking area
26- Brush control pin
3- Cable twisting button
27- Parquet carpet brush
4- On-Off button with power variator
5- Carrying handle
Max. Power : 2300 W
6- Blue indicator light
Net weight : 6.6 kg
7- Vacuum control button
Voltage and frequency : 2208- Dust indicator
240V AC 50 Hz
9- Front cover
Dust volume : 4 lt
10- Hose inlet
Usage radius : 9 m
11- Exhaust filter area
Filtration layer : 7 levels
12- Wheel
13- Body protection rubber
14- Front cover opening pin
15- 360 degrees turnable hose adaptor
16- Elastic hose
17- Handle
18- Air control slide
19- Telescobic extention pipe
20- Upholstery brush
21- Crevice tool
22- Accessories carrying piece
23- Telescobic
control
pin
Downloaded
From
Vacuum-Manual.com
Manuals
3
3 How To Use
Pull the plug and the cable located
at the back, outside; plug it. Stop
pulling when you see the yellow
sign on the cable, red sign comes
after yellow sign, never pull when
you see the red sign. Otherwise
you may give harm to the cable
twister of your product.
Push the on-off button with power
variator in order to operate your
vacuum cleaner. When the on-off
button with power variator is
pushed, the blue indicator light
around the vacuum control button
will be on.
Push the cable twister button on
the device in order to twist the
cable after the operation of the
vacuum cleaner is finished. Do not
step on the cable twister button.
The mechanism may receive
harm in case of stepping onto it
strongly.
You can control the vacuum
power of your product with the
vacuum power control button
located on the body of your device
while operating.
Note: If your carpet brush sticks
to your carpet because of the high
vacuum power of your product,
you may decrase the vacuum
power by this button.
Downloaded From Vacuum-Manual.com Manuals
4
You may reduce the vacuum
power a little bit without using the
vacuum power control on your
product, by pulling the slide back
when you want, using the air
control slide on the handle.
Do not clean by rubbing the edge
of the handle to carpets and coaches, otherwise the edge will melt
and can not be used anymore.
Use the brushes and accessories
delivered with your product for
cleaning.
Dust indicator
It shows the fullness proportion
of your dust bag. If the indicator
shows the red position more
than %50, then it means that the
changing time of the dust bag has
arrived. The dust bag must be
changed altough dust is not collected fully in the dust bag, if slight
pieces of dust is filled the pores
of the dust bag. If the indicator
shows fully red, change the bag
immedeately, otherwise the motor
protector termostate will operate
to terminate your product and
your product will not work for 30
minutes. In this case change the
dust bag, wait your product to get
cold and then operate.
Dust indicator
If you preferred to use a cloth filter,
empty the cloth bag and wash in
warm water when the dust indicator shows red. You may use soap
when you wash the cloth bag.
The cloth bag should be inserted
into its place after it is dried for 24
hours. While you are inserting the
cloth bag into its place make sure
that no space is left on the backside and fully closed, otherwise
dusts may escape into your motor
and cause harm.
Downloaded From Vacuum-Manual.com Manuals
5
Push the bails on the hose adaptor and pull it backwards in order
to take the hose adaptor out of the
vacuum cleaner.
You can carry your product by
holding from its handle. If you want
to carry it vertically hold it from the
cavity area for carrying located
below the product.
Picture 1
Picture 2
The hose adaptor of your product
has a property of turning 360
degrees. By this property it provides an ergonomic usage during
cleaning.
You can attach the hose adaptor
by pushing the hose adaptor in the
direction of the arrow without pushing the nails as shown in picture
1. Make sure that the nails on the
hose adaptor are fitted into their
places as shown in picture 2.
Downloaded From Vacuum-Manual.com Manuals
6
The sides and the wheels of your
product is covered with protective rubber against crashes. By
this way, straching your product
and harming your furnitures are
prevented.
Crevice tool
It can be used in
crevice places such
as interiors of
furnitures and
coaches.
How to use the extention pipe
The extention pipe of your product
has telescobic property. In order
to extent the pipe, push the pin
shown in the picture and pull it
from the edge by your hand. You
may arrange its lenght as you
wish.
Pin
Upholstery brush
It can be used
to clean floor
coverings, steps,
inside of your
car, coaches,
furniture, etc.
Dust brush
Dust brush is
used for taking
the dusts of
fragile objects
and curtains.
How to use the accessories
There is an accessories carrying
adaptor on the extention pipe. You
can use 2 of the accessorieses
you wish by attaching on it. If you
don’t want to use this adaptor,
you can take its screw with a
screw driver and take the piece
out of the telescobic extention
pipe.
Downloaded From Vacuum-Manual.com Manuals
7
How to use the parquet, carpet
brush
There is a control mechanism on
the left side of the parquet carpet
brush. By the help of this control
mechanism the brush is brought
into the desired conditions suitable
for the surface to be cleaned.
a. In order to clean the rugs and
the carpets, use your brush in
normal condition. (Hair brushes
are hidden.)
b. In order to clean hard floor
coverings such as parquet, vinyl
floor covering, linoleum and flat
surfaces such as walls without
scrating, change the position of
the control mechanism and clean
on the hair brushes.
Do not unplug it immedeately in
order to stop the operation of
your product, first push the on-off
button with power variator to stop
the operation of the product.
You can park
your vacuum
cleaner in two
different ways:
vertical and
horizantal. You
can attach the
brushes
parking place
in to the
parking socket at the back of the
product in order to park vertically.
Warning: The carpet brush may
stick to your carpet closely since
the vacuum power of your vacuum
cleaner is very high. For this reason it may cause exhausting arm
and back aches. In order not to
face such a problem, reduce the
vacuum power of the product.
Turning off and parking
The operation of the vacuum cleaner is stopped by pushing on the
on-off button with power variator
located on the body.
Downloaded From Vacuum-Manual.com Manuals
8
Also you can attach the parking
place at the back of your brush
into the parking socket located at
the back of your product and park
horizontally.
Change your dust bag when the
dust indicator glows red or if the
vacuum power of your vacuum
cleaner is not at the desired level.
In order to change the dust bag,
first open the front cover by lifting
the pin located in the front. After
opening, take it out by sliding it
up over the cradle where full dust
bag is located. The cover will not
be closed before a new dust bag
is inserted. Please do not force to
close the cover otherwise plastic
sections may harm.
Warning: The dust bags purchased from unauthorised places
other than services and dealers
are not original. The dust bags
which are not original are at very
low quality. For this reason they
are torn in a short time and your
product becomes useless. For the
breakdowns stemmed from using
fake dust bags are considered out
of warranty.
Cloth dust bag
If you use cloth dust bags instead
of paper, you may empty it and
reuse for many times. If the dust
bag in your device is cloth then
take the bag out as explained in
“changing the paper filter”.
Cloth filter clips
Downloaded From Vacuum-Manual.com Manuals
9
4 How To Clean
You can clean cloth dust bags as
fallows:
• Hold the dust bag over a dust
bin upside down. Take the clips off
by pushing to the side.
• Wash the cloth bag in warm water by hand. After washing, leave
it to dry and never use before it is
completely dried.
• Close the bag by pushing the
clips on the lower edge of the bag.
If you are using a cloth bag we
recommend you to change the
motor filter once a year.
How to clean the motor filter
When the motor protection filter is
extremely dusted, take it out and
clean.
Also take the motor protection
filter out and shake every time
when the dust bag is changed.
Buy a new motor protection filter
from the service and change once
in every 5 paper filter change.
Otherwise filter looses its effection
since it finishes its usage life. On
the other hand it may cause the
motor to work louder and live
shorter. Motor protection filter
does not have a property such as
being washed, it looses its effects
when washed and causes the
motor to be harmed.
Filter casette Motor protection
filter
Downloaded From Vacuum-Manual.com Manuals
10
Taking off the exhaust cover and
exhaust filters
On every fifth change of dust bag,
with the change of motor protection filter; open the exhaust cover
at the back where the air gets out
of your product, by pushing on
the pin as shown in the picture in
order to take the hepa filter and
sponge filter located inside.
Hepa filter
Sponge filter
Wash the hepa filter and the sponge filter in warm water and leave
them to dry for 24 hours.
Attention! Do not use devices such
as hair dryers or stoves which give
hot air out in order to dry.
Do not insert the hepa filter and
sponge into their places before they are completely dried,
otherwise humidity odour may be
delivered, water splash may occur
at the backside and filters may be
harmed.
Downloaded From Vacuum-Manual.com Manuals
11
Downloaded From Vacuum-Manual.com
www.beko.com Manuals