1
Version 2.8
User manual
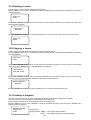
DMX CONTROL 480
Table of contents
1. Safety instructions ........................................................................................................ 4
2. Operating determinations ............................................................................................. 4
3.Before operation ............................................................................................................. 5
3.1.Powering up ............................................................................................................... 5
3.2.Sound-control ............................................................................................................. 5
3.3.Building the DMX-line ................................................................................................. 5
3.4.Connecting PC .......................................................................................................... 6
3.5.Projector addressing .................................................................................................. 6
4.Control elements of the controller ................................................................................ 7
5.Operation ........................................................................................................................ 9
5.1.Browsing the menu ..................................................................................................... 9
5.2.Menu map ................................................................................................................. 9
5.3.Assigning the projectors to the projector buttons ....................................................... 10
5.4.Grouping the projectors ............................................................................................ 10
6.Projector library ............................................................................................................ 11
6.1.Setting up the projectors not defined in the projector library ...................................... 11
6.2.Copying the projectors within the projector library ..................................................... 13
6.3.Deleting the projectors from the projector library ....................................................... 13
6.4.Creating/editing the effect names ............................................................................. 14
7. Special settings ........................................................................................................... 14
7.1.LCD display adjusting .............................................................................................. 14
7.2.User setting .............................................................................................................. 15
7.3.Changing the password ........................................................................................... 15
8. Remote adjusting the projectors ................................................................................ 17
9.Uploading programs to the projectors ....................................................................... 17
10.Operating the memory card ....................................................................................... 18
10.1.Saving data to the memory card ............................................................................. 18
10.2.Loading data from the memory card ....................................................................... 19
11.Manual mode ............................................................................................................... 19
11.1.Manual control of the projectors .............................................................................. 20
11.2.Controlling the pan/tilt position with PAN/TILT wheels .............................................. 20
2
11.3.Editing/creating a chaser ........................................................................................ 21
11.4.Copying a chaser ................................................................................................... 22
11.5.Running a chaser ................................................................................................... 22
11.6.Presetting a macro ................................................................................................. 23
11.7.Running a macro .................................................................................................... 23
12.Programming mode ................................................................................................... 24
12.1.Creating a scene ................................................................................................... 24
12.2.Deleting a scene .................................................................................................... 26
12.3.Copying a scene .................................................................................................... 26
12.4.Creating a program ................................................................................................ 26
12.5.Deleting a program ................................................................................................ 29
12.6.Copying a program ............................................................................................... 29
12.7.Creating a record ................................................................................................... 30
12.8.Deleting a record ................................................................................................... 32
12.9.Copying a record ................................................................................................... 32
16.Runnig mode .............................................................................................................. 33
15.1.Running scenes ..................................................................................................... 33
15.2.Running programs .................................................................................................. 33
15.3.Running records ..................................................................................................... 35
16.Factory default setting ............................................................................................... 37
17. Updating the fixture library ....................................................................................... 37
18.Technical specifications ............................................................................................ 38
19.Cleaning and maintenance ........................................................................................ 39
Appendix - Projector library........................................................................................... 40
3
Keep this device away from rain and moisture!
Unplug mains lead before opening the housing!
FOR YOUR OWN SAFETY, PLEASE READ THIS USER MANUAL CAREFULLY
BEFORE YOU INITIAL START - UP!
1. Safety instructions
Every person involved with installation and maintenance of this device have to:
- be qualilfied
- follow the instructions of this manual
CAUTION!
Be careful with your operations. With a high voltage you can suffer
a dangerous electric shock when touching the wires!
This device has left our premises in absolutely perfect condition. In order to maintain this condition and to ensure
a safe operation, it is absolutely necessary for the user to follow the safety instructions and warning notes written
in this manual.
Important:
The manufacturer will not accept liability for any resulting damages caused by the non-observance of this manual
or any unauthorized modification to the device.
Please consider that damages caused by manual modifications to the device are not subject to warranty.
Never let the power-cord come into contact with other cables! Handle the power-cord and all connections with the
mains with particular caution!
The power plug has to be accessable after installing the device.
Make sure that the power cord is never crimped or damaged by sharp edges. Check the device and the powercord
from time to time.
Always disconnect from the mains, when the device is not in use or before cleaning it. Only handle the power cord
by the plug. Never pull out the plug by tugging the power cord.
This device falls under protection class I. Therefore it is essential to connect the yellow/green conductor to earth.
The electric connection, repairs and servicing must be carried out by a qualified employee.
2. Operating determinations
This device was designed for indoor use only.
If the device has been exposed to drastic temperature fluctuation (e.g. after transportation), do not switch it on
immediately. The arising condensation water might damage your device. Leave the device switched off until it has
reached room temperature.
Do not shake the device. Avoid brute force when installing or operating the device.
When choosing the installation-spot, please make sure that the device is not exposed to extreme heat, moisture
or dust. There should not be any cables lying around. You endanger your own and the safety of others!
Operate the device only after having familiarized with its functions. Do not permit operation by persons not
qualified for operating the device. Most damages are the result of unprofessional operation!
4
Please use the original packaging if the device is to be transported.
Never put any liquids on the device or close to it. Should any liquid enter the device nevertheless, disconnect
from mains immediately. Please let the device be checked by a qualified service technician before you operate it
again. Any damages caused by liquids having entered the device are not subject to warranty!
Please consider that unauthorized modifications on the device are forbidden due to safety reasons!
If this device will be operated in any way different to the one described in this manual, the product may suffer
damages and the guarantee becomes void. Furthermore, any other operation may lead to dangers like shortcircuit, electric shock, etc.
3.Before operation
3.1.Powering up
Check carefully the controller voltage setting switch on the rear panel of the unit to ensure that the input voltage
you are using matches to its setting.The factory setting can be 115V or 230V AC at 50/60Hz.
If you want to change the voltage setting, do not connect the controller to the mains!
Connect the controller with the power cable to the mains.
The polarity of the cable provided conforms with the current international standards; should you need to replace
the cable, please note:
Cable (EU)
Cable (US)
Pin
International
L
Brown
Black
Live
Light blue
White
Neutral
Yellow/Green
Green
Earth
N
3.2.Sound-control
If the DMX CONTROL 480 is supposed to work via a soundsignal, connect the ¼" stereo jack female connector
with the sound signal of your headphones output or a second adjustable output (if existing) of your mixer, or with
the loud-speaker output of your amplifier:
Tip:
Sleeve:
Data +
Ground
By pressing the AUDIO button in run mode,the controller will use the beat signal taken from jack plug.
Caution: Never connect the sound input with the DMX output.
3.3.Building the DMX-line
The DMX CONTROL 480 is equipped with 2 DMX-outputs (3-pin XLR female connectors). In this way, it is easier
for you to connect the lighting effects.
Connect the DMX-output of the DMX CONTROL 480 with the DMX-input of the nearest lighting effect. Splitting
the DMX-line is not possible. Continue the DMX-line by connecting the DMX-output of the projector with the next
DMX-input.
Use a data line appropriate for RS-485 or a shielded quality double-wire cable. As a plug contact use 3-pin XLRconnector:
PIN 1 - Ground
PIN 2 - Data PIN 3 - Data +
5
Caution: At the last projector, the DMX cable has to be terminated with a 120 Ω resistor. Solder the resistance
into a 3 pin XLR-connector and plug it in the DMX-output of the last projector.
3.4.Connecting PC
The 9-pin female connector on the rear panel of the unit is reserved for connection the controller to the PC via RS232 interface.
3.5.Projector addressing
The DMX CONTROL 480 assigns the DMX-starting addresses every 24 steps. You have to address every projector
to the respective starting address. Otherwise, the channel assignment will not be correct. All projectors with the
same starting address will work synchronically.
Projector
Starting address
Projector 1
1
Projector 2
25
Projector 3
49
Projector 4
73
Projector 5
97
Projector 6
121
Projector 7
145
Projector 8
169
Projector 9
193
Projector 10
217
Projector
Projector 11
Projector 12
Projector 13
Projector 14
Projector 15
Projector 16
Projector 17
Projector 18
Projector 19
Projector 20
6
Starting adress
241
265
289
313
337
361
385
409
433
457
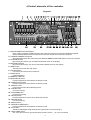
4.Control elements of the controller
Top panel:
1 - DMX CHANNEL/FUNCTION sliders
Every slider represents a DMX-channel of the respective projector and can be individually assigned.
Please take the DMX channel-occupation from the user manual of the respective projector.
2 - CHANNEL RANGE/LOCK button
The button determines the channel range for DMX CHANNEL/FUNCTION sliders or locks the controller.
3 - UP/DOWN buttons
By pressing the buttons you can adjust the desired value on the display.
4 -LEFT/RIGHT buttons
By pressing the buttons you can move between editable items on the display.
5 - MENU button
The button accesses the main menu.
6 - ESCAPE button
For return to the main menu or submenu.
7 - ENTER button
Confirming button
8 - MEMORY CARD slot
9 - NEXT/GROUP button
Function depends on menu where the button is used.
10 - INSERT/COPY button
Function depends on menu where the button is used.
11 - MANUAL button
For manual control of the selected projector.
12 - SCENE button
For scene running.
13 - PROGRAM button
For program running.
14 - RECALL button
Function depends on menu, where the button is used.
15 - RECORD button
For record running.
16 - MACRO button
17 - DELETE/CHASER button
Function depends on menu where the button is used.
18 - INT A slider
A slider for adjusting the light intensity of program(scene,record) running A.
19 - DESK LAMP socket
The 3 pin XLR socket for gooseneck lamp contains 12V AC ; pin 1=not connected
7
pin 2=12 V AC
pin 3= 0 V AC
20 - INT B slider
A slider for adjustment the light intensity of program(scene,record) running B.
21 - FADE TIME slider
The slider adjusts the fade time.
22 - POWER switch
24 - PROJECTOR SELECT buttons
For selecting the desired projector(s)
23 - STEP TIME slider
This slider adjusts the step time.
25 - PAN encoder wheel
26 - TILT encoder wheel
27 - LCD display
28 - PAN/TILT button
For activating the pan/tilt movement with the PAN/TILT encoder weels
29 - NEXT/+1STEP button
With this button, you can jump from one step to another.
Caution: The button works in the run mode only.
30 - AUTO/AUDIO button
For switching to the auto mode or audio mode.
If the LED is off, the controller is in Auto-mode (normal operating mode without sound-control).
If this LED shines, the controller is in Audio-mode (operation with sound control, the sound signal has to be
connected.)
31 - 8/16 BIT button
For switching the pan/tilt movement from 8 to 16-bit resolution.
32 - BLACKOUT button
The blackout function closes the light output of all connected projectors via the shutter. Please note that all
other functions of the projectors are maintained and that the programs keep running.
33 - RUN A button
The button allows to run a program(scene,record) A
34 - RUN B button
The button allows to run a program(scene,record) B
35 - FADE TIME button
The button activates the FADE TIME slider
36 - STEP TIME button
The button activates the STEP TIME slider
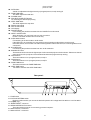
Rear panel:
1 - FUSE holder
2 - VOLTAGE SETTING switch
By the 2-position switch you can set the desired operation AC voltage 230 V/50-60Hz or 115 V/50-60Hz.
3 - POWER cord
4 - AUDIO INPUT connector
5 - SERIAL INTERFACE connector
The 9-pin female connector for connecting personal computer.
6 - DMX-OUTPUT 2 connector
7 - DMX-OUTPUT 1 connector
8
5.Operation
5.1.Browsing the menu
The DMX CONTROL 480 handles 20 independently controlled projectors with a maximum of 24 channels per
projector and with a regular DMX 512 signal output.
Connect built DMX serial link to the controller's output(s).Connect the controller to the mains and switch it on,the
initial screen appears:
Robe
Lighting
DMX Control 480
Now by pressing the MENU button you access the main "MENU" where you can scroll to the desired submenu.
Needed buttons and their main functions:
<UP>,<Down>
- the buttons for browsing the menu items or editing values.
<LEFT>,<RIGHT>
- the buttons for the movement between editable items.
<ENTER>
- the confirming button (for saving the changes you have made)
<ESC>
- the escape button (for returning to the previous menu without saving the changes
you have made).
<MENU>
- the button accesses the main menu.
PAN wheel,TILT wheel
- the rotating wheels for adjusting the values of displayed items
Special buttons and their functions will be described in respective sections.
Caution: When you turn the device on, the controller is in blackout-mode (Blackout-LED shines).
The controller will be locked by pressing the CHANNEL RANGE/LOCK button.We suggest you change the
password after your purchase.This will prevent all anauthorized people from tampering with your programs
or running your fixtures.
Only those buttons are active where the LED shines on or flashes.If you press any others,nothing will hapen.
5.2.Menu map
Make Scene
Make Program
Make Record
Make Chaser
Make Group
Setup
Config unit
Config DMX
Rename effect
LCD Adjust
MM Card Menu
-Load data
-Save data
Rconfig DMX1
-Remote confi.
-Upload program
Rconfig DMX2
-Remote confi.
-Upload program
PC Connection
User setting
Set password
Factory setting
9
5.3.Assigning the projectors to the projector buttons
The first operation which needs to be perfomed on the DMX CONTROL 480 is projector selection.To do this,you
can use the inbuilt library of projectors or create your new projectors.
1.Press <ESC> several times until the display shows the initial screen.
2.Press <MENU> and use <UP>,<DOWN> to scroll to the "Config DMX" menu ("Setup" ==> <ENTER>==>
"Config DMX"==><ENTER>).The following screen appears:
CONFIG DMX
DMX Address: 001
Device name: 003
SPOT 250 XT
Starting DMX address
Device order number in the projector library
Name of the projector
3.By pressing the PROJECTOR SELECT buttons <1>,<2>.....<20> check the projector allocation to all buttons.If
you want to assign another projectors to the buttons <1> - <20>,use this procedure:
1. Press <1> (its LED shine) and by pressing <UP> or <DOWN>select desired projector from the projector
library.
2. Press <2> and select another projector .In this way assign desired projectors to all PROJECTOR
SELECT buttons <1>,<2>.....<20>.
3. Press <ENTER>.The safety question appears:
SAVE CHANGES ?
ESC/ENT
4.Press <ENTER> to save the new allocation of projectors to the PROJECTOR SELECT buttons or <ESC> to
leave this menu without changes.
Note:If you didn´t find your projector in the projector library,see the chapter "Projector library".
5.4.Grouping the projectors
In order to simplify a control of projectors is very useful to define the groups of projectors.E.g.the first group for
the projectors standing on the stage and the second one for hanging projectors.Creation (running) of
scenes,programs and records is simpler .To create the groups,follow the instructions below:
1.Press <ESC> several times until the display shows the initial screen.
2.Press <MENU> and use <UP>,<DOWN> to scroll to the "Make group" menu and press <ENTER>.The
following screen appears:
MAKE GROUP
Group number: 01
Group order number (1-20)
3.Use <UP>,<DOWN> to select the desired group number and by pressing the PROJECTOR SELECT buttons
<1>,<2>.....<20> assign desired projectors to the current group .LEDs of wanted buttons(projectors) shine.
3.Press <ENTER>.The safety question appears:
SAVE CHANGES ?
ESC/ENT
5.Press <ENTER> to confirm the projectors in the current group or <ESC> to leave this menu without saving
changes.
10
6.Projector library
The projector library contains 100 projector positions.Projector positions No.1-50 are reserved for ROBE projectors
and projectors on these positions cannot be edited,deleted or copied.
Note:Copying projectors from positions No.1- 50 is possible to the positions 51-100 only.In this way you can
make a copy of certain projector and this copy you can edit.The projector created this way has all features as
original (you can use special functions as described in sections "Remote control of the projectors" and "Uploading
programs to the projectors".
All ROBE XT series projectors included in the library are defined for one DMX- channels setting (Mode 1).
Example:
Spot 160 XT has 4 DMX- channels settings:
Channel
1
2
3
4
5
6
7
8
9
Mode 1
Pan
Tilt
Fine Pan
Fine Tilt
Speed
Colours
R. gobos
Gobo rotation
Dimmer
Mode 2
Pan
Fine Pan
Tilt
Fine Tilt
Speed
Colours
R.gobos
Gobo rotation
Dimmer
Mode 3
Pan
Tilt
Speed
Colours
R.gobos
Gobo rotation
Dimmer
Mode 4
Pan
Tilt
Colours
R.gobos
Gobo rotation
Dimmer
This fixture is defined for mode 1 in the projector library.If you need mode 2,make a copy of the SPOT 160 XT
to the position No.51 or higher (call it e.g.SPOT 160 XT M2) and set the channels order as required (see the
instructions below).
6.1.Setting up the projectors not defined in the projector library
1.Press <ESC> several times until the display shows the initial screen.
2.Press <MENU> and use <UP>,<DOWN> to scroll to the "Config unit" menu ("Setup" ==> <ENTER>==>
"Config unit"==><ENTER>).The following screen appears:
CONFIG UNIT
Device num: 001
SPOT 150 XT
Device order number in the projector library
Name of the projector
3.Use <UP>,<DOWN> or TILT wheel to select free device position (the 3rd line of the screen displays "NO
DEVICE") and press <ENTER>.The selected device position has to be between No.51 and No.100.
4.Type the name of the new device (max. 16 characters).Buttons used for typing and their functions are the
following:
<UP>,<DOWN>,TILT wheel finds characters
<LEFT>,<RIGHT> moves cursor left and right
<DEL> deletes characters
5.Press <ENTER> and the following screen appears:
CONFIG UNIT
DMX channel: 01
:-------------- Sld: 01
Move: NO BLK: NO
DMX channel No.1
Name of associated effect ("------" means no effect) and associated slider (1-24)
Item Move determines if the channel reacts to the fade-time (NO,YES)
Item BLK determines if the channel has the blackout-function (NO,YES)
You have to know the DMX channel settings for your device-please refer to the projector's user manual.
Now adjust required parameters for all projector DMX channels .Needed buttons and their functions:
<UP>,<DOWN> selects DMX channel, effect or slider
<LEFT>,<RIGHT> moves cursor between editable items
TILT wheel selects effects
You should also determine which channel will have the blackout-function (e.g.shutter channel) and which channel
will react to the fade-time (e.g.zoom channel,focus channel and dimmer channel).
To do so,press <BLACKOUT> or <FADE TIME> (their LED shine) at right channels. The fade-time function will be
assigned to the right channels automatically (without pressing<FADE TIME>) if you use the original abbreviations
PAN,TILT,PANFINE,TILTFINE from the list of effects for describing pan/tilt movement channels. It is important
for controlling the speed of the pan/tilt movement during the program running.
11
The list of created abbreviations (non editable) for describing projector effects :
PAN=coarse pan
PRIS.RO.= prism rotation
Y5
MACRO=macros
TILT= coarse tilt
EFFE.RO.= effect rotation
Y6
COLO.SPD=colour speed
PANFINE= fine pan
COLO.RO.= colour rotation
FUNCTI.1
GOBO.SPD=gobo speed
TILTFINE= fine tilt
EFFECT= effects
FUNCTI.2
EFFE.SPD=effect speed
DIMMER = dimmer
EFFECT1= effects 1
FUNCTI.3
PRIS.SPD=prism speed
COLOR=color
EFFECT2= effects 2
FUNCTI.4
X.SPEED=X-axis speed
GOBO=gobo
EFFECT3= effects 3
FUNCTI.5
Y.SPEED=Y-axis speed
COLOR1= colour 1
SHUTTER= shutter
FUNCTI.6
Z.SPEED=Z-axis speed
COLOR2= colour 2
STROBE= strobe
FUNCTI.7
D.SPEED
COLOR3= colour 3
IRIS= iris
FUNCTI.8
FLSH RAT
COL–GOBO=colour/gobo ZOOM= zoom
FUNCTI.9
LAMP RGT
S.GOBO=static gobo
FOCUS= focus
FUNCTI.10
LAMP LFT
S.GOBO1=static gobo 1 SPEED= speed
FUNCTI.11
MOV.SPEED
S.GOBO2=static gobo 2 TIME=time
FUNCTI.12
GOBO POS.
S.GOBO3=static gobo 3 POWER = powering up
FUNCTION= function
GOBO SAK.
R.GOBO=rotating gobo
FAN SPD.= fan speed
CYAN= cyan
L.R.S.
R.GOBO1=rotating gobo 1 X1
MAGENTA= magenta
CTO
R.GOBO2=rotating gobo 2 X2
YELLOW= yellow
CTB
R.GOBO3=rotating gobo 3 X3
FROST= frost
FOC-ZOOM
R.PRISM=rotating prism X4
M.T.S.= motor speed
DRUM.RO.=drum rotat.
R.COLOR
X5
BEAM= beam
RESERVED
ROTATION= rotation
X6
FILTER= filter
RESERVED
ROTAT.1
Y1
BLACKOUT= blackout
:
ROTAT.2
Y2
GAME= program sel.
:
ROTAT.3
Y3
TRIGGER= trigger
RESERVED
GOBO RO.= gobo rotation Y4
RESET= reset
FREE=no function
Important:
Effect abbreviations which are used in the special functions:
1.PAN.................. used in manual mode
2.TILT................... used in manual mode
3.PANFINE........... used in manual mode
4.TILTFINE........... used in manual mode
5.DIMMER........... must be used on channel with dimmer function( for correct function of sliders INT A,INT B)
6.COLOR............. used in manual mode (macro)
7.GOBO............... used in manual mode (macro)
These abbreviations have to be used original from the list of effects (not created by user) and be used in
the new defined projectors if you want to use the special functions of the controller.
If your defined projector has two color-wheels,call one of them which you wish to use in the macro
function as COLOR.
If your defined projector has two gobo-wheels (with static or rotating gobos) ,call one of them which you
wish to use in the macro function as GOBO.
You can create your personal abbreviations-see the chapter Editing the effect names.
6.After adjusting all DMX channels,press <ENTER>.The screen for setting the range of the dimmer intensity
appears:
Dimmer range:
Min.:000 Max.:255
Blackout:000
DMX values of dimmer positions (minimum and maximum light output)
DMX value at which shutter is closed
Use <UP>,<DOWN> or TILT wheel to adjust the range of DMX values for dimmer,press <RIGHT> and adjust
DMX value for shutter's position when it is closed.
Example: the projector has the following channel settings:
Channel
DMX Values
Functions
8
0 - 63
Light intensity from 0 to 100%
64 - 95
Shutter open
96 - 127
Strobe-effect from slow to fast (max 8 flashes/s)
128 - 139
Reset
140 - 159
Shutter closed
160 - 175
Pulse-effect in sequences with increasing speed
12
176 - 191
192 - 223
224 - 255
You have to set:
Dimmer range:
Min.:000 Max.:63
Blackout:000
Pulse-effect in sequences with decreasing speed
Random strobe effect with increasing speed
Shutter open
The blackout value may be from the range of 140-159 as well
The dimmer intensity range is important for correct function of the sliders INT A and INT B.The DMX value for
blackout is needed for correct function of the BLACKOUT button.
7. Press <ENTER>.The safety question appears:
SAVE CHANGES ?
ESC/ENT
8.Press <ENTER> to save the new created projector or <ESC> to leave this menu without saving changes.
6.2.Copying the projectors within the projector library
The projectors assigned at positions No.1-50 can be copied only to the projector positions No.51-100.Copying
within the range of positions No.1-50 is not possible.
1.Press <ESC> several times until the display shows the initial screen.
2.Press <MENU> and use <UP>,<DOWN> to scroll to the "Config unit" menu ("Setup" ==> <ENTER>==>
"Config unit"==><ENTER>).The following screen appears:
CONFIG UNIT
Device num: 001
SPOT 150 XT
Device order number in the projector library
3.Use <UP>,<DOWN> to select the free projector position where you want to copy a projector (example: 051).
4.Press <INSERT/COPY>, the following screen appears:
COPY UNIT
From: 001 To: 051
NO DEVICE
Target position:051
Copied projector
Use <UP>,<DOWN> to select the projector you want to copy and press <ENTER>.The safety question appears:
SAVE CHANGES ?
ESC/ENT
5.Press <ENTER> to confirm the new projector position or <ESC> to leave this menu without saving changes.
Note: If the target position contains projector,it will be overwritten.
6.3.Deleting the projectors from the projector library
The projectors assigned at positions No.1-50 cannot be deleted.
1.Press <ESC> several times until the display shows the initial screen.
2.Press <MENU> and use <UP>,<DOWN> to scroll to the "Config unit" menu ("Setup" ==> <ENTER>==>
"Config unit"==><ENTER>).The following screen appears:
CONFIG UNIT
Device num: 001
SPOT 150 XT
Device order number in the projector library
3.Use <UP>,<DOWN> to select the desired projector you want to delete (e.g.projector at position 52).
4.Press <DEL>. The safety question appears:
13
Delete unit?
ESC/ENT
5.Press <ENTER> to confirm the projector deleting or <ESC> to leave this menu without changes.After pressing
<ENTER> the following screen appears:
CONFIG UNIT
Device num: 052
NO DEVICE
6.4.Creating/editing the effect names
There are 255 positions for effect names,127 of these are factory assigned and the rest ones are free (editable)
1.Press <ESC> several times until the display shows the initial screen.
2.Press <MENU> and use <UP>,<DOWN> to scroll to the "Rename effect" menu ("Setup" ==> <ENTER>==>
"Rename effect"==><ENTER>).The following screen appears:
RENAME EFFECT
Effect num: 128
PAN
Effect order number
Effect name (abbreviation)
3.Use <UP>,<DOWN>or TILT wheel to select the desired effect name position (128-255) in which you want to
create (edit) the new effect name and press <ENTER>.
4.Type the name of the new abbreviation (max.8 characters).Buttons used for typing and their functions are the
following:
<UP>,<DOWN>TILT wheel finds characters
<LEFT>,<RIGHT> moves cursor left and right
<DEL> deletes characters
5.Press <ENTER> and the safety question appears:
SAVE CHANGES ?
ESC/ENT
6.Press <ENTER> to save the new abbreviation or <ESC> to leave this menu without saving changes.
7. Special settings
7.1.LCD display adjusting
1.Press <ESC> several times until the display shows the initial screen.
2.Press <MENU> and use <UP>,<DOWN> to scroll to the "LCD adjust" menu ("Setup" ==> <ENTER>==> "LCD
adjust"==><ENTER>).The following screen appears:
Adjust LCD param.
Contrast: 13
Backlight:04
3.Use <UP>,<DOWN> to adjust the desired contrast of the LCD (0-15) and presss <RIGHT>.
4.Use <UP>,<DOWN> to adjust the desired backlight of the LCD (0-7) and presss <ENTER>.
The safety question appears:
SAVE CHANGES ?
ESC/ENT
5.Press <ENTER> to save the adjusted LCD parameters or <ESC> to leave this menu without saving changes.
14
7.2.User setting
There are 3 items which determine the controller's behaviour:Start Val ;S.Blackout ;S.Lock.
Item "Start Val."-determines the slider position at which starts program/record its running.
Value limits:0- bottom position of the slider track
255-upper position of the slider track
Adjusted value is accepted for both sliders INT A and INT B.
Example:
"Start Val." = 128
If the slider INT A (INT B) is halfway of its track,the scene/program/record will start its running .
Item "S.Blackout."(Start Blackout)-determines whether blackout mode is active after switching the controller
on("YES"=STROBE button is on,"NO"= STROBE button is off).
Item "S.Lock."(Start Lock)-determines whether the password is active after switching the controller on ("YES"=the
controller is locked,"NO"= the controller is unlocked after switching the controller on).
To set above mentioned items:
1.Press <ESC> several times until the display shows the initial screen.
2.Press <MENU> and use <UP>,<DOWN> to scroll to the "User setting" menu ("Setup" ==> <ENTER>==>
"User setting"==><ENTER>).The following screen appears:
USER SETTING
Start Val.: 100
S.Blackout: YES
S.Lock: NO
3.Use <UP>,<DOWN> or TILT wheel to adjust desired "Start Val" value (1-255),press <RIGHT>and adjust
desired "S.Blackout" value (YES,NO) with <UP>,<DOWN>, then press <RIGHT> and adjust desired "S.Lock"
value (YES,NO) with <UP>,<DOWN>.
4.Press <ENTER> and the safety question appears:
SAVE CHANGES ?
ESC/ENT
5.Press <ENTER> to save the adjusted values or <ESC> to leave this menu without saving changes.
7.3.Changing the password
The controller operating is protected from unauthorized person by the password,which contains a combination of
any of 4 PROJECTOR SELECT buttons <1>,<2>.....<20>.
The default password is <1>,<2>,<3>,<4>.
To be locked the controller after switching it on,set the Item "S.LOCK." to YES in the "User setting" menu).
During its operation the controller can be locked by pressing the CHANNEL RANGE/LOCK button (the initial
screen has to be displayed).
To change the password:
1.Press <ESC> several times until the display shows the initial screen.
2.Press <MENU> and use <UP>,<DOWN> to scroll to the "Set password" menu ("Setup" ==> <ENTER>==>
"Set password"==><ENTER>).The following screen appears:
SET PASSWORD
Please enter
old password
3.Enter the old password by pressing the matching PROJECTOR SELECT buttons and the new password screen
appears:
SET PASSWORD
Please enter
new password
15
4.Enter the new password (combination of any of 4 PROJECTOR SELECT buttons) by pressing the corresponding
buttons and the screen appears:
SET PASSWORD
Please verify
new password
5.Enter the new password again and confirming screen appears:
SAVE CHANGES ?
ESC/ENT
6.Press <ENTER> to save the new password. The controller is locked by pressing the CHANNEL RANGE/LOCK
button (the initial screen has to be displayed).
CAUTION:IF YOU CHANGE THE PASSWORD ,DO NOT FORGET TO MAKE A REMARK FOR THE SAKE OF
OBLIVION !
16
8. Remote adjusting the projectors
The controller enables remote adjusting the projectors - projector's display is "transfered" on controller's display
and with <UP>,<DOWN>,<ESC>,<ENTER> you can set desired projector's functions.
The projectors have to be only from ROBE XT-series or AT-series and have master/slave operation. The projectors
should be operated in controller mode (no master/slave mode) to ensure a proper running of this function.
Before using this function, make sure which projectors are connected to DMX output No.1 (use the function
"Rconfig DMX1") and which ones to the DMX output No.2 (use the function "Rconfig DMX2").
1.Press <ESC> until the display shows the initial screen.
2.Press <MENU> and use <UP>,<DOWN> to scroll to the "Rconfig DMX1" menu ("Setup" ==> <ENTER>==>
"Rconfig DMX1" ("Rconfig DMX2")==> <ENTER>).The following screen appears for a moment:
SEARCHING
DEVICES
Wait a minute
************************
In a while the next screen appears (for example):
SELECT DEVICE
Device No.: 01/05
Device ID: FFFF
Order number of the found projector /total number of the found projectors
ID (identification number) of the found projector
You need to know the identification codes (ID) for all projectors connected to DMX output No.1(No.2).These
values you will find in projector's menu of the current projectors: A001---->SPEC--->Code.The projectors have to
be from ROBE XT-series or AT-series and have master/slave operation.
3.Use <UP> , <DOWN> to select the desired projector (according to its ID) and press <ENTER>.Next menu
appears:
SELECT FUNCTION
Remote config.
Upload program
Menu for controlling the selected projector
Menu for uploading programs to the selected projector
4.Use <UP> , <DOWN> to select the "Remote config."menu and press <ENTER>.The following screen appears:
REMOTE CTRL UNIT
Device ID: FFFF
Display: A001
ID (identification number) of the projector
projector´s display
Now you can use <UP>,<DOWN>,<ESC>,<ENTER> to control the projector.
5.Press <MENU> to leaves this menu.The displayed projector's menu won't be changed.
9.Uploading programs to the projectors
This function enables copying previously created programs to the projectors.
The projectors have to be only from ROBE XT-series or AT-series and have master/slave operation. The projectors
should be operated in controller mode (no master/slave mode) to ensure a proper behaviour of this function.
Before using this function, make sure which projectors are connected to DMX output No.1 (use the function
"Rconfig DMX1") and which ones to the DMX output No.2 (use the function "Rconfig DMX2").
1.Press <ESC> until the display shows the initial screen.
2.Press <MENU> and use <UP>,<DOWN> to scroll to the "Rconfig DMX1" menu ("Setup" ==> <ENTER>==>
"Rconfig DMX1" ("Rconfig DMX2")==> <ENTER>).The following screen appears for a moment:
SEARCHING
DEVICES
Wait a minute
************************
In a while next screen appears (for example):
17
SELECT DEVICE
Device No.: 01/05
Device ID: FFFF
Ordinal number of the found projector /total number of the found projectors
ID (identification number) of the found projector
You need know the IDs for all projectors connected to DMX output No.1(No.2).These values you find in projector's
menu of the current projectors: A001---->SPEC--->Code.The projectors have to be from XT-series or AT-series
and include master/slave operation.If you use a copy of ROBE projector,be sure that you did not change the
names of the channels (e.g. channel name GOBO you change to R.GOBO).
3.Use <UP>,<DOWN> to select the projector (according to its ID) to which you want to send data and press
<ENTER>,next menu appears:
SELECT FUNCTION
Remote config.
Upload program
Menu for controlling the selected projector
Menu for uploading programs to the selected projector
4.Use <UP> , <DOWN> to select the "Upload program"menu and press <ENTER>.The following screen appears:
UPLOAD PROGRAM
Source prog.: 001
Target prog.: 001
Number of the source program (max.of 50 steps) in the controller
Number of target program in the projector,which will be overwritten
Use <UP>,<DOWN> or TILT wheel to select the source program (if program contains a loop,only steps from No.1
to step which included sign Loop in "Sce" field,will be sent) for the current projector. Press <LEFT> and use
<UP>,<DOWN> to select the number of the target program (No.1- 3) in the projector and press <ENTER>.The
message appears on the display:
Select device
from upload
This message allows you to select the projector included in previously selected
program "whose" program will be uploaded. E.g. In step 3 you have selected
program No.10.There are 5 active projectors in this program and you wish to
upload program of projector No.3 to the selected projector .
5.Press the respective PROJECTOR SELECT button and the data transfer begins. Message "UPLOADING
PROGRAM" appears during data transfer.After data transfer last message appears:
Program uploaded
Press <ENTER>.
10.Operating the memory card
Important shows should always be saved on the memory card.Only in this way you can avoid that data are lost
due to misuse or accidental deletion.The controller uses a MultiMedia Card (MM Card). The capacity of the
MultiMedia Card (16,32,64,128MB) is enough to save all scenes,programs,records,chasers,colour/gobo
macros,effect names and assigning projectors to the projector buttons.Data are saved to the banks on the
MultiMedia Card.The number of the banks depends on the capacity of MM Card (32 MB MM Card contains 60
banks).
10.1.Saving data to the memory card
1.Press <ESC> several times until the display shows the initial screen.
2.Press <MENU> and use <UP>,<DOWN> to scroll to the "MM Card Menu" menu ("Setup" ==> <ENTER>==>
"MM Card Menu" ==> <ENTER>).The following message appears on the display:
MM Card Menu
Insert MM Card
Press Enter
Insert a MultiMedia Card into the MEMORY CARD slot.
When inserting the MultiMedia Card to the slot, its skewed side has to aim at POWER switch.
Maximum memory capacity of used MultiMedia Card can be 128MB.
Press <ENTER>.The following menu appears:
18
MM Card Menu
Load data
Save data
3.Use <UP> , <DOWN> to select "Save data" and press <ENTER>.The bank selection screen appears:
MMC Save Data
Select bank:10
No. of bank (0-60 for 32 MB MM Card) to which the data will be saved
4.Use <UP>,<DOWN> or TILT wheel to select suitable bank and press <ENTER>(If the bank is not empty,data
are overwriten).The controller saves data to the Multimedia card.After saving,this screen appears:
Data successfuly
saved!
Press Enter
5.Press <ENTER> to return to the menu.
10.2.Loading data from the memory card
1.Press <ESC> several times until the display shows the initial screen.
2.Press <MENU> and use <UP>,<DOWN> to scroll to the "MM Card Menu" menu ("Setup" ==> <ENTER>==>
"MM Card Menu" ==> <ENTER>).The following message appears on the display:
MM Card Menu
Insert MM Card
Press Enter
Insert MultiMedia Card into the MEMORY CARD slot and press <ENTER>.The following menu appears:
MM Card Menu
Load data
Save data
3.Use <UP>,<DOWN> to select "Load data" and press <ENTER>.The bank selection screen appears:
MMC Load Data
Select bank:10
No. of bank (0-60 for 32 MB MM Card) from which the data will be loaded
4.Use <UP> , <DOWN> or TILT wheel to select suitable bank (0-60 for 32 MB MM Card) and press <ENTER>.The
controller starts loading data to its memory.After loading,the screen appears:
Data successfuly
loaded!
Press Enter
5.Press <ENTER> to return to the menu.
Note:Message "Format data error!" means that the current bank is empty or doesn't contain controller's data.
11.Manual mode
Manual mode allows you to directly control the functions of any projector connected to the controller.
In order to control each projector it is necessary to know what function each individual channel controls on the
respective projectors.This information is normally found in the user manual of each individual projector.
Active buttons,sliders and wheels in the manual mode:
<UP>,<Down>
- the buttons for editing DMX values
<LEFT>,<RIGHT>
- the buttons for selecting channels(effects)
<CH 1-8>
- the button for switching the channel range of the DMX CHANNEL/FUNCTION sliders
<MAN.>
- the button for returning the displayed effect(channel) to the control of the currently
19
active scene/program/record
- the button for returning all manually controlled effects(channels) to the control of
the currently active scene/program/record
<PAN/TILT>
- the button activates the PAN/TILT wheels
<8/16BIT>
- the button activates 16-bit movement resolution
<AUTO/AUDIO>
- the button switches between AUTO mode and AUDIO mode.
<MACRO>
- the button accesses colour/gobo macros
<ENTER>
- the confirming button (for saving the changes you have made)
<ESC>
- the escape button ( for returning to the previous menu without saving the changes
you have made)
DMX CHANNEL/FUNCTION sliders - for adjusting DMX values of the respective effects
PAN/TILT wheels
- for selecting effects(channels),adjusting DMX values and controlling the pan/tilt movement
<RECALL>
11.1.Manual control of the projectors
1.To enter into the manual mode press <MAN.> and the following screen appears:
MANUAL MODE
NO DEVICE
CH:01-08 Sld:001
------------- Val:001
Selected projector
Channel range and matching slider
Effect name and its DMX value
2.Select desired projector by pressing the PROJECTOR SELECT button(its LED shines).
You can select more than one projectors - in this case the selected projectors are controlled together and
the displayed projector name flashes if selected projectors are not the same.This name (and displayed effect)
corresponding to the selected fixture with the highest DMX address.
If you previously defined the groups of projectors ,you can press <NEXT/GROUP> and select desired group by
pressing matching PROJECTOR SELECT button.
3.Select the desired effect (channel):
- by pressing <LEFT>,<RIGHT>
- by moving the matching DMX CHANNEL/FUNCTION slider
- by rotating the PAN wheel (PAN/TILT button LED has to shine)
4.Adjust the DMX value of the selected effect(channel):
- by pressing <UP>,<DOWN>
- by moving the matching DMX CHANNEL/FUNCTION slider
- by rotating the TILT wheel (PAN/TILT button LED has to shine)
The flashing sign "MAN" appears in the top right-hand corner of the screen.
Example:
MANUAL MODE MAN
SPOT 160 XT
CH:01-08 Sld:006
COLOR
Val:050
Flashing sign "MAN" indicates that channel No.6 is in MANUAL mode
Selected projector
Channel range and matching slider
Effect name and its DMX value
If any PROJECTOR SELECT button LED flashes,it means that one or more channels of the respective projector
is in manual mode.To control desired channel of this projector,press the PROJECTOR SELECT button again (its
LED shines).
5.Press <MAN.>to return the displayed channel (its matching PROJECTOR SELECT button LED shines) to the
control of the currently active scene/program/record.
If you manually controlled more effects or projectors(matching PROJECTOR SELECT button LEDs shine),press
<RECALL> to return all manually controlled channels to the control of the currently active scene/program/record.
6.To return to the previous screen,press <ESC>.
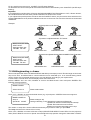
11.2.Controlling the pan/tilt position with PAN/TILT wheels
Enter into manual mode and by pressing the PAN/TILT button (its LED has to flash) you activate the control of the
pan/tilt movement with PAN and TILT wheels .If for example you turn either PAN or TILT wheel the following
screen appears:
MANUAL MODE MAN
SPOT 160 XT
PanH:001 PanL:000
PanH: - coarse pan DMX value , PanL: - fine pan DMX value
TltH:020 TltL:050
TltH: - coarse tilt DMX value , TltL: - fine tilt DMX value
20
For fine pan/tilt movement press <8/16BIT> (its LED starts flashing).
To deactivate the control of the pan/tilt movement with PAN and TILT wheels ,press <PAN/TILT>(its LED stops
flashing).
Important:
If you adjusted the pan/tilt position of fixtures with DMX CHANNEL/FUNCTION sliders or <UP>,<Down> buttons,
all controlled fixtures have the same pan/tilt coordinates as shown on the screen.
If you adjusted the pan/tilt position of fixtures with the PAN/TILT wheels ,only that active fixture which has the
highest DMX address has its pan/tilt coordinates as shown on the screen.The rest of the fixtures has incremental
coordinates.
Example:
Original position of the fixtures:
DMX address=001
DMX address=025
DMX address=049
Tilt position is adjusted with the TILT wheel :
MANUAL MODE MAN
SPOT 160 XT
PanH:066 PanL:000
TltH:128 TltL:050
DMX address=001
DMX address=025
DMX address=049
Tilt position is adjusted with the DMX CHANNEL/FUNCTION slider:
MANUAL MODE MAN
SPOT 160 XT
PanH:066 PanL:000
TltH:128 TltL:050
DMX address=001
DMX address=025
DMX address=049
11.3.Editing/creating a chaser
There are 20 presetted chasers in DMX CONTROL 480 with up to 60 steps per each.The time length of the chaser
step can be from 40 milliseconds to 5.04 seconds but can be extended up to 10.12 seconds during chaser
running.If none of the presetted chaser suit you,you can edit them according to your requirements:
1.Press <ESC> several times until the display shows the initial screen.
2.Press <MENU> and use <UP>,<DOWN> to scroll to the "Make chaser" menu and press <ENTER>.The
following message appears:
MAKE CHASER
Select chaser: 01
Chaser order number
3.Use <UP>,<DOWN> to select the desired chaser (e.g. 01) and press <ENTER>.Next screen appears:
MAKE CHASER 01
Step: 01
Speed:001 CONST
Chaser's step (01-60)
Lasting of the step (1-126) "Speed:001" means 40 milliseconds
"Speed:126" means 5.04 seconds(126 x 40mS)
"Speed: End" means the end of chaser
Speed: Loop" means that chaser runs in loop
The number of steps in the chaser will be determined by the position in which you place End.
The Loop means that the chaser will run in loop.
4.Use <UP>,<DOWN> to browse all chaser's steps (PROJECTOR SELECT button LEDs of active projectors
shine).Press <RIGHT> to move on "Speed" item and adjust the step speed or change the abbreviation "CONST"
21
or "ADJUST" by pressing <UP>,<DOWN> or by rotating the TILT wheel. Active projectors you determine by
pressing matching PROJECTOR SELECT buttons (their LEDs shine).
By pressing <NEXT/GROUP> the current chaser's step is copied to the next step.
Note:
The abbreviation CONCT (constantly) means that the lasting of the chaser step can´t be changed during chaser
running.
The abbreviation ADJUST(adjustable) means that the lasting of the chaser step can be changed during chaser
running.
After editing all chaser's steps,press <ENTER>.The safety question appears:
SAVE CHANGES ?
ESC/ENT
11.Press <ENTER> to save the new chaser or <ESC> to leave this menu without saving changes.
11.4.Copying a chaser
1.Press <ESC> several times until the display shows the initial screen.
2.Press <MENU> and use <UP>,<DOWN> to scroll to the "Make chaser" menu and press <ENTER>.The
following message appears:
MAKE CHASER
Select chaser: 01
Chaser order number
3.Use <UP>,<DOWN> to select the chaser No. (e.g. 20) to which you want to copy another chaser and press
<INSERT/COPY>.The following screen appears:
COPY CHASER
From: 20 To: 20
4.Use <UP>,<DOWN> to select the chaser which you want to copy to previously selected chaser and press
<ENTER>.The safety question appears:
SAVE CHANGES ?
ESC/ENT
5.Press <ENTER> to confirm the copying.
11.5.Running a chaser
The chaser can run during a scene/program/record running or manual controlling of the projectors.The created
chasers (1-20) are assigned to the PROJECTOR SELECT buttons <1>,<2>.....<20>.Please note that all other
functions of the projectors are maintained and that the scenes/programs/records keep running.
1.Press <DEL./CHASER> (its LED starts flashing) and the chaser running screen appears:
RUN CHASER
Speed: +000
Select chaser
Speed for chaser running from -128 to +127,time unit=40 mS
Chaser order number
2.Adjust the speed of the chaser running by pressing <UP>,<DOWN> or by rotating TILT wheel .This speed can
be also changed during chaser runnning (chaser running screen has to be displayed).
3.Select desired chaser (1-20) which you vish to run by pressing the matching PROJECTOR SELECT button and
the chaser starts running.To see the previous screen,press <ESC>.
Note:Adjusted chaser speed affects only the chaser's steps with mark "ADJUST".
Examples:
Adjust time:+ 000.....The chaser will run with speed as was determined during its creation
22
Adjust time:+001......All steps with mark "ADJUST" will be increased by 40 milliseconds
Adjust time:+127......All steps with mark "ADJUST" will be increased by 5.08 seconds (127x40 mS)
Adjust time:-001......All steps with mark "ADJUST" will be decreased by 40 milliseconds
Adjust time:-128......All steps with mark "ADJUST" will be decreased by 5.12 seconds (128x40 mS)
4.To stop the chaser running ,press <DEL./CHASER> (the chaser running screen has to be displayed).
11.6.Presetting a macro
In macro mode you can preset up to 20 color or gobo values for one ore more projectors.
1.Enter into manual mode by pressing <MAN>.and select desired projector or projectors (e.g. SPOT 160 XT) as
described above in "Manual control of the effects".
2.Press <MACRO>.Its LED flashes and the screen shows:
MACRO MODE
COLOR BANK
CH:01-08 Sld:006
COLOR Val:001
Bank of colour macros
Channel range and slider
Matching effect name and its DMX value
3.Select "COLOR" in the effect field:
- by pressing <LEFT>,<RIGHT>
- by rotating the PAN wheel (PAN/TILT button LED has to shine)
- by moving the matching DMX CHANNEL/FUNCTION slider
4.Press the PROJECTOR SELECT button No.1 and adjust desired DMX value for "COLOR":
- by pressing <LEFT>,<RIGHT>
- by rotating the TILT wheel (PAN/TILT button LED has to shine)
- by moving the matching DMX CHANNEL/FUNCTION slider
5.Press <ENTER> to assign the adjusted "COLOR" value to the PROJECTOR SELECT button No.1.
6.Repeat the step 4 and assign next "COLOR" value to the PROJECTOR SELECT button No.2.
In this way assign the desired colours to the buttons No.3-20.
7.Press <MACRO> again.The gobo bank screen appears:
MACRO MODE
GOBO BANK
CH:01-08 Sld:007
GOBO Val:001
Bank of gobo macros
Channel range and slider
Matching effect name and its DMX value
8.Select "GOBO" in the effect field:
- by pressing <LEFT>,<RIGHT>
- by rotating the PAN wheel (PAN/TILT button LED has to shine)
- by moving the matching DMX CHANNEL/FUNCTION slider
9.Assign the gobos to the PROJECTOR SELECT buttons No.1-20 as you have done for colours.
10.To save the macro,press <ESCAPE>.The safety question appears:
SAVE CHANGES ?
ESC/ENT
11.Press <ENTER> to save the macro you have made or <ESC> to leave the macro menu without saving
changes.
Note:You can select more than one projectors - in this case the macro will run with all selected projectors.The
projectors should be of the same type.
The macro mode will run correct only with these effect names:"COLOR" and "GOBO".
11.7.Running a macro
1.Enter into manual mode by pressing <MAN>,select projector(s) you wish to use in a macro running.
2.Enter into macro mode by pressing <MACRO> and by pressing PROJECTOR SELECT buttons No.1-20 you
can activate the previously created colour macros.
3.Use <MACRO> to switch between the colour and gobo macros.
Note:Colour/gobo macros are matched to the PROJECTOR SELECT buttons No.1-20.If you change the projector
assigning to the PROJECTOR SELECT buttons,you will have to make new macros.
4.To stop the macro running,press <ESC>.
23
12.Programming mode
12.1.Creating a scene
Scene consists of various effect created by the lights (colours,figures and positions)
You can create up to 750 scenes.
1.Press <ESC> several times until the display shows the initial screen.
2.Press <MENU> and use <UP>,<DOWN> to scroll to the "Make Scene" menu and press <ENTER>.The following
message appears:
Scene: 001
FREE
Scene number (1-750)
Scene status:FREE or USED
FREE......scene was not edited (it contains data of the scene No.000 )
USED......scene was edited
The scene 000 (its all DMX values are setted onto 0 but you can edit them,its mask included a maximum of
assigned projectors and can´t be changed,scene status is still FREE) is used in this cases:
1.After switching the controller on (data of the scene 000 is transmited to the DMX outputs).
2.After deleting the current scene (data of the scene 000 is copied to the deleted scene).
3.Use <UP>,<DOWN> or Pan wheel to select desired free scene.All LEDs of the PROJECTOR
SELECTbuttons,which have been assigned to the projectors, shine.
Now you have to determine the projectors, which will be used in the scene - the mask.Press the PROJECTOR
SELECT buttons matched to the projectors ,which you don´t want to use in the scene(their LEDs become off).
Only those projectors will be active in the scene where the PROJECTOR SELECT button LEDS shine.
If you wish to create scene for previously defined group of projectors,press <NEXT/GROUP>,select desired
group (1-20) by pressing the respective PROJECTOR SELECT button.If you select more than one group,the last
selected group will be active only.The selected group of projectors can be expanded/reduced by pressing the
respective PROJECTOR SELECT buttons.
Note:The scene should be created with a maximum of active projectors (in run mode,you can simply reduce the
number of active projectors).
Press <ENTER> and the following screen appears:
MAKE SCENE: 001
NO DEVICE
CH: 01-08 Sld:001
------------Val:000
Scene number (1-750)
Name of assigned projector (after pressing PROJECTOR button)
Channel range and slider
Matching effect name , Effect DMX value (0-255)
4.Press the first PROJECTOR SELECT button whose projector is defined in the mask and adjust DMX values for
all projector´s effects.You can use the 3 ways:
1.DMX CHANEL/FUNCTION sliders:
After moving any slider ,the name of assigned effect appears on the 4th row of the screen and its current
DMX value.With CHANNEL RANGE button you can change the channel range (1-8, 9-16 ,17-24) for sliders.
2.UP/DOWN buttons and LEFT/RIGHT buttons:
<UP>,<Down>
- the buttons for editing DMX values
<LEFT>,<RIGHT>
- the buttons for selection of the channels/effects
CHANNEL RANGE button - the button for changing the channels range
3.Wheels (PAN/TILT button LED has to shine):
PAN wheel - for selecting the channels/effects
TILT wheel - for adjusting DMX values
Note :You can select more than one projectors - in this case the selected projectors are controlled together and
the displayed projector name flashes if selected projectors are not the same.This name (and displayed effect)
corresponding to the selected fixture with the highest DMX address.
If you adjust the DMX value for the channel,to which the dimmer is assigned and you want to use the dimmer
function ,make sure that the dimmer value is in the range as defined in "Config unit" menu for correct functions of
the sliders INT A and INT B.If adjusted value is out of the range ,the sign "DIMMER" flashes.
Example:
MAKE SCENE: 001
SPOT 150 XT
CH: 01-08 Sld:008
DIMMER
Val:094
Sign "DIMMER" flashes, the dimmer value has to be between 0-64,because the
dimmer intensity for SPOT 150 XT is defined in "Config unit" menu as follows:
Intensity:000 Max:64
24
The channel setting for SPOT 150 XT (Mode 1):
Channel
DMX Values
Functions
8
0 - 63
Light intensity from 0 to 100%
64 - 95
Shutter open
96 - 127
Strobe-effect from slow to fast (max 8 flashes/s)
128 - 139
Reset
140 - 159
Shutter closed
160 - 175
Pulse-effect in sequences with increasing speed
176 - 191
Pulse-effect in sequences with decreasing speed
192 - 223
Random strobe effect with increasing speed
224 - 255
Shutter open
If you set e.g. DIMMER =30,you will change the DMX values of the dimmer intensity from 0 to 30 with sliders INT
A or INT B.On this account you won´t be able to adjust full intensity of the light (100% intensity=64)!
For controlling the pan/tilt movement you can activate the PAN and TILT wheels :
1.by pressing <PAN/TILT> (its LED has to flash) for coarse pan/tilt movement
2.by pressing both <PAN/TILT> and <8/16 BIT> (their LEDs have to flash) for fine pan/tilt movement
For example,the screen will show :
MAKE SCENE: 001
SPOT 150 XT
PanH:107 PanL:041
TltH :037 TltL:255
Scene number (1-750)
Name of assigned projector
DMX values: coarse pan, fine pan
DMX values:coarse tilt, fine tilt
5.Repeat the step 4 for all projectors in the mask.
6.Press <ENTER>.The safety question appears:
SAVE CHANGES ?
ESC/ENT
7.Press <ENTER> and the scene is recorded or <ESC> to leave this menu without saving changes.
Note 1:
By pressing <RECALL> during creating the scene you can recall previously stored scenes.
Example:
MAKE SCENE: 004
SPOT 250 XT
CH: 01-08 Sld:007
COLOR
Val:064
Current scene No.4
Press <RECALL>,its LED flashes and the following screen appears:
MAKE SCENE: 004
SHOW SCENE: 004
Active scene
Use <UP>, <Down> or TILT wheel to call up previously created scenes.To return to the current scene No.4,press
<RECALL> again.
Note 2:
It is possible "to copy projectors" from previously stored scenes to the current scene:
Press <INSERT/COPY> (its LED starts flashing) and for example this screen appears:
MAKE SCENE: 010
Copy scene: 004
Select copy mask
Select projectors you wish to copy from previously created scene by pressing PROJECTOR SELECT buttons
.Select desired scene with <UP>, <Down> or TILT wheel and press <ENTER>.All DMX values of selected
projectors from desired scene are copied to the current scene.These DMX values are permanently saved after
leaving the current scene with <ENTER>.
25
12.2.Deleting a scene
1.Press <ESC> until the display shows the initial screen.
2.Press <MENU> and use <UP>,<DOWN> to scroll to the "Make Scene" menu and press <ENTER>.The following
message appears:
Scene: 001
USED
3.Use <UP>,<DOWN> or TILT wheel to select the scene you want to delete (e.g.010 ) and press <DEL>.The
safety question appears:
Delete scene ?
ESC/ENT
4.Press <ENTER> to confirm the scene deleting.Data from the scene 000 will be sent to the current scene:
Scene: 010
FREE
12.3.Copying a scene
1.Press <ESC> several times until the display shows the initial screen.
2.Press <MENU> and use <UP>,<DOWN> to scroll to the "Make Scene" menu and press <ENTER>.The following
message appears:
Scene: 001
USED
3.Use <UP>,<DOWN> or TILT wheel to select the scene position (e.g.020) to which you want to copy another
scene and press <INSERT/COPY>.The following screen appears:
COPY SCENE
From:020 To:020
4.Use <UP>,<DOWN> or TILT wheel to select the desired scene you want to copy (e.g.15) to the previously
selected scene position and press <ENTER>.The safety question appears:
SAVE CHANGES ?
ESC/ENT
5.Press <ENTER> to confirm this action.Original scene is overwriten with selected scene.
12.4.Creating a program
Creating a program is simply a matter of assigning each step a previously recorded scene number.
You can create up to 255 programs with a maximum of 50 steps each.
1.Press <ESC> several times until the display shows the initial screen.
2.Press <MENU> and use <UP>,<DOWN> to scroll to the "Make Program" menu and press <ENTER>.The
following message appears:
MAKE PROGRAM
Program: 001
FREE
Program No.1
Program status: FREE......the program was not edited
USED......the program steps have assigned scenes
26
3.Use <UP>,<DOWN> or Pan wheel to select desired free program.All LEDs of the PROJECTOR
SELECTbuttons,which have been assigned to the projectors, shine.
Now you have to determine the projectors, which will be used in the program - the mask.Press the PROJECTOR
SELECT buttons matched to the projectors ,which you don´t want to use in the program(their LEDs become off).
Only those projectors will be active in the program where the PROJECTOR SELECT button LEDS shine.
If you wish to create program for previously defined group of projectors,press <NEXT/GROUP>,select desired
group (1-20) by pressing the respective PROJECTOR SELECT button.If you select more than one group,the last
selected group will be active only.The selected group of projectors can be expanded/reduced by pressing the
respective PROJECTOR SELECT buttons.
Note:The program should be created with a maximum of active projectors (in run mode,you can simply reduce
the number of active projectors).
Press <ENTER> and the following screen appears:
Step: 01 Sce: 001
LStp: -- NLop: --Prg.time:
1.0s
Fati: 10 StTi: 10
Program step(1-50) and matching scene(1-750,End,Loop)
Starting loop step , number of loop repetitions (1- 255;--- means permanent rep.)
Total program time (in seconds) from first step to current step (including a loop)
Fati=fade time (0.1s-9.9s) , StTi=step time (0.1s-9.9s)
Note: 01 means 0.1s ; 99 means 9.9s
Note:The projectors used in the program should be used in the scenes you will assign:
Example:
Projectors mask
in the created program: Projector No.1
Projector No.2
Projector No.3
Projector No.10
Projectors mask
in the scene No.1
Projector No.1
Projector No.2
Projectors mask
in the scene No.2
Projector No.1
Projector No.2
Projector No.3
Projector No.10
These projectors will not be active
during program running:
Projector No.6
Projector No.15
4.Fill items on the screen:
1.Use <UP>,<DOWN> to select desired program step.
2.Press <RIGHT> and use <UP>,<DOWN> or TILT wheel to assign the scene (1-750).If you want to
view effects of the selected scene, press <RECALL> (the slider INT A has to be in upper position of its
track.
3.Press <FADE TIME> (its LED shines) and adjust the fade time with FADE TIME slider (0.1s-9.9s).
4.Press <STEP TIME> button and adjust the step time with the STEP TIME slider(0.1s-9.9s).
5.Press <LEFT> and use <UP>,<DOWN> to select the next program step and repeat steps 1-5 in this
point.
Note: By pressing <NEXT/GROUP> the current program step is copied to the next step.
The maximum viewable range of total program time "Prg. time" is 9999,9s (167 minutes) but in fact the
total program time can be longer.
In many cases,you may not wish to use all 50 program steps. To end the program,choose End in the field
"Sce".The number of steps in your program will be determined by the position in which you place the End.
Examples:
You wish to end the program No.5 at step 30:
Step: 30 Sce: 130
LStp: -- NLop: --Prg.time:
65.5s
Fati: 10 StTi: 20
Step: 31 Sce: End
LStp: -- NLop: --Prg.time:
65.5s
Fati: -StTi: --
If you do not enter End to the field "Sce",the steps No.31-No.50 will be executed.
If you wish executed all 50 steps,do not enter End to the field "Sce" at last step No.50:
Step: 50 Sce: 005
LStp: -- NLop: --Prg.time:
150.5s
Fati: 18
StTi: 25
If you want to play certain steps in a loop,choose Loop in the field "Sce".Use <RIGHT> to move to the
field "LStp" and with <UP> , <DOWN> select the starting step of the loop,press <RIGHT> and with
<UP>,<DOWN> select the number of repetitions.
27
Examples:
You wish to repeat steps from No.20 to No.25 three times:
Step: 25 Sce: 124
LStp: -- NLop: --Prg.time:
320.0s
Fati: 10 StTi: 20
You wish to repeat step No.25 ten times:
Step: 26 Sce: Loop
LStp: 20 NLop: 003
Prg.time:
425.0s
Fati: -StTi: --
Step: 26 Sce: Loop
LStp: 25 NLop: 010
Prg.time:
439.0s
Fati: -- StTi: -This setting repeats steps from No.20 to No.25 permanently:
Step: 26 Sce: Loop
LStp: 20 NLop: --Prg.time: 99999.9s
Fati: -- StTi: -The FADE TIME and STEP TIME sliders are not active in these "Loop"screens.When the loop is running,the fade
and step times are used as were previously defined at each program step.
5.To save the program which has been created,press <ENTER> and the safety question appears:
Save changes ?
ESC/ENT
6.Press <ENTER> to save the program or press <ESC> to leave the menu without saving changes.
Deleting the program step
1.Use <UP>,<DOWN>or TILT wheel to select the program step which you want to delete.
2.Press <DEL>.The safety question appears:
Delete step ?
ESC/ENT
3.Press <ENTER> to remove the program step or press <ESC> if you do not want delete the step.
Example:You want to delete the step No.6.
Step: 05 Sce: 011
LStp: -- NLop: --Prg.time:
40.0s
Fati: 10 StTi: 30
Step: 06 Sce: 012
Step: 07 Sce: 013
Step: 08 Sce: 014
LStp: -- NLop: --LStp: -- NLop: --LStp: -- NLop: --Prg.time:
46.0s
Prg.time:
52.0s
Prg.time:
58.0s
Fati: 15 StTi: 60
Fati: 20 StTi: 60
Fati: 25 StTi: 60
I
Press <DEL> at step 6; the step sequences will change (the following step 7 will
become step 6):
Step: 05 Sce: 011
LStp: -- NLop: --Prg.time:
40.0s
Fati: 10 StTi: 60
Step: 06 Sce: 013
LStp: -- NLop: --Prg.time:
46.0s
Fati: 20 StTi: 60
Step: 07 Sce: 014
LStp: -- NLop: --Prg.time:
52.0s
Fati: 25 StTi: 60
Step: 08 Sce: 015
LStp: -- NLop: --Prg.time:
60.0s
Fati: 30 StTi: 80
Inserting the program step
1.Use <UP>,<DOWN>or TILT wheel until you reach the step prior to the one where you wish to insert the new
step.The inserted step will contain the same data as the current displayed step.
28
2.Press <INSERT/COPY>.The safety question appears:
Insert step ?
ESC/ENT
3.Press <ENTER> to insert the new program step or press <ESC> if you do not want to insert this step.
Example:You want to insert the step prior to the step No.4
Step: 02 Sce: 011
LStp: -- NLop: --Prg.time:
10.0s
Fati: 10 StTi: 60
Step: 03 Sce: 012
Step: 04 Sce: 013
Step: 05 Sce: 014
LStp: -- NLop: --LStp: -- NLop: --LStp: -- NLop: --Prg.time:
16.0s
Prg.time:
22.0s
Prg.time:
28.0s
Fati: 15 StTi: 60
Fati: 20 StTi: 60
Fati: 25 StTi: 60
I
Press <INSERT/COPY>,the step sequences will change (the following step 4
will become step 5:
Step: 02 Sce: 011
LStp: -- NLop: --Prg.time:
10.0s
Fati: 10 StTi: 60
Step: 03 Sce: 012
LStp: -- NLop: --Prg.time:
16.0s
Fati: 15 StTi: 60
Step: 04 Sce: 012
LStp: -- NLop: --Prg.time:
22.0s
Fati: 15 StTi: 60
Step: 05 Sce: 013
LStp: -- NLop: --Prg.time:
28.0s
Fati: 20 StTi: 60
12.5.Deleting a program
1.Press <ESC> several times until the display shows the initial screen.
2.Press <MENU> and use <UP>,<DOWN> to scroll to the "Make Program" menu and press <ENTER>.The
following message appears:
MAKE PROGRAM
Record: 001
USED
3.Use <UP>,<DOWN> or TILT wheel to select the program which you want to delete and press <DEL>.The
safety question appears:
Delete program ?
ESC/ENT
4.Press <ENTER> to confirm the program deleting.
12.6.Copying a program
1.Press <ESC> several times until the display shows the initial screen.
2.Press <MENU> and use <UP>,<DOWN> to scroll to the "Make Program" menu and press <ENTER>.The
following message appears:
MAKE PROGRAM
Program: 001
USED
3.Use <UP>,<DOWN> or TILT wheel to select the program (e.g.021) to which you want to copy another program
and press <INSERT/COPY>.The following screen appears:
COPY PROGRAM
From:021 To:021
4.Use <UP>,<DOWN> or TILT wheel to select the program which you want to copy to previously selected
program and press <ENTER>.The safety question appears:
29
SAVE CHANGES ?
ESC/ENT
5.Press <ENTER> to confirm the copying.
12.7.Creating a record
The record consists of conected programs
You can create up to 100 records with a maximum of 50 programs each.
Creating a record is simply a matter of assigning each step a previously recorded program number.
1.Press <ESC> several times until the display shows the initial screen.
2.Press <MENU> and use <UP>,<DOWN> to scroll to the "Make Record" menu and press <ENTER>.The
following messages appears:
MAKE RECORD
Record: 001
FREE
Record No.1
Record status: FREE......the record was not edited
USED......the record steps have assigned programes
3.Use <UP>,<DOWN> or Pan wheel to select desired free record .All LEDs of the PROJECTOR
SELECTbuttons,which have been assigned to the projectors, shine.
Now you have to determine the projectors, which will be used in the record - the mask.Press the PROJECTOR
SELECT buttons matched to the projectors ,which you don´t want to use in the record(their LEDs become off).
Only those projectors will be active in the record where the PROJECTOR SELECT button LEDs shine.
If you wish to create record for previously defined group of projectors,press <NEXT/GROUP>,select desired
group (1-20) by pressing the respective PROJECTOR SELECT button.If you select more than one group,the last
selected group will be active only.The selected group of projectors can be expanded/reduced by pressing the
respective PROJECTOR SELECT buttons.
Note:The record should be created with a maximum of active projectors (in run mode,you can simply reduce the
number of active projectors).
Press <ENTER> and the following screen appears:
Step: 01 Prog: 01
Start step: 01
Rec.tim:
50.00
Fati: 01 StTi: 01
Record step(1-50) and assigned program(1-50,End)
Step from which the assigned program will start running
Total record time (in seconds) from first step to current step (included)
Fati=Fade time multiplier (0.1-9.9 ) , StTi=Step time multiplier (0.1-9.9)
Note:01 means 0.1 ; 99 means 9.9
Note:The projectors used in this record should be used in the programs which you will assign:
Example:
Projectors mask
in the created record: Projector No.1
Projector No.2
Projector No.3
Projector No.10
Projectors mask
in the program No.1
Projector No.1
Projector No.2
Projectors mask
in the program No.2
Projector No.1
Projector No.2
Projector No.3
Projector No.10
These projectors will not be active
during record running:
Projector No.6
Projector No.15
4.Fill the items on the screen.
1.Use <UP>,<DOWN> to select the desired record step.
2.Press <RIGHT> and use <UP> , <DOWN> or TILT wheel to assign the program No. (1-50).
3.Press <RIGHT> and use <UP> , <DOWN> to select starting program step.
4.Press the <FADE TIME> (its LED shines) and adjust the fade time multiplier with FADE TIME slider(0.19.9).Press the <FADE TIME> again (its LED is off).
5.Press the <STEP TIME> and adjust the step time multiplier with the STEP TIME slider (0.1-9.9).Press
the <STEP TIME >again.
E.g.If you have adjusted fade time multiplier=5,the assigned program will have the fade time at all steps 5
times longer
If you have adjusted step time multiplier=3,the assigned program will have the step time at all steps 3
times longer.
6.Press <LEFT> and use <UP>,<DOWN> to select the next record step and repeat steps 1-6 in this point.
Note: By pressing <NEXT/GROUP> the current record step is copied to the next step.
30
The maximum viewable range of total record time "Rec. tim" is 99999.9s (1667 minutes) but in fact the
total record time can be longer.
6.In many cases,you may not wish to use all 50 steps. To end the record,choose the End in the field
"Prog".The number of steps in your record will be determined by the position in which you place the End.
Example:
You wish to end the record at step 30:
Step: 30 Prog.: 30
Start step: 01
Rec.tim:
650.00
Fati: 10 StTi: 20
Step: 31 Prog.: End
Start step:01
Rec.tim:
650.00
Fati: 10 StTi: 20
If you do not enter End to the field "Prog.",the steps No.31-No.50 will be executed.
If you want executed all 50 steps,do not enter End to the field "Prog." at last step No.50:
Step: 50 Prog.: 30
Start step: 01
Rec.tim:
820.00
Fati: 10 StTi: 20
5.To save the record which has been created,press <ENTER>,the safety question appears:
Save changes ?
ESC/ENT
6.Press <ENTER> to save the record or press <ESC> to leave the menu without changes.
Deleting the record step
1.Use <UP>,<DOWN> or TILT wheel to select the record step which you want to delete:
2.Press <DEL>.The safety question appears:
Delete step ?
ESC/ENT
3.Press <ENTER> to remove the record step or press <ESC> if you do not want to delete this step.
Example:You want to delete the step No.6.
Step: 05 Prog.: 011
Start step: 01
Rec.tim:
240.00
Fati: 10 StTi: 60
Step: 06 Prog.: 012
Step: 07 Prog.: 013
Start step: 01
Start step: 01
Rec.tim:
560.00
Rec.tim:
1320.00
Fati: 15 StTi: 20
Fati: 20 StTi: 30
I
Press <DEL>,the step sequences will change:
(the following step 7 will become step 6)
Step: 08 Prog.: 014
Start step: 05
Rec.tim:
1560.00
Fati: 20 StTi: 15
Step: 05 Prg.: 011
Start step: 01
Rec.tim:
240.00
Fati: 10 StTi: 60
Step: 06 Prg.: 013
Start step: 01
Rec.tim:
760.00
Fati: 20 StTi: 30
Step: 08 Prg.: 015
Start step: 02
Rec.tim:
1230.00
Fati: 10 StTi: 10
Step: 07 Prg.: 014
Start step: 05
Rec.tim:
1000.00
Fati: 20 StTi: 15
Inserting the record step
1.Use <UP>,<DOWN> or TILT wheel until you reach the step prior to the one where you wish to insert the new
step.Inserted step will contains the same data as a current displayed step.
2.Press <INSERT/COPY>.The safety question appears:
Insert step ?
ESC/ENT
31
3.Press <ENTER> to insert the new record step or press <ESC> if you do not want to insert this step.
Example:You want to insert the step prior to the step No.4.
Step: 02 Prg.: 011
Start step: 01
Rec.tim:
800.00
Fati: 10 StTi: 20
Step: 03 Prg.: 012
Step: 04 Prg.: 013
Step: 05 Prg.: 014
Start step: 01
Start step: 01
Start step: 01
Rec.tim:
1200.00
Rec.tim:
1800.00
Rec.tim:
3200.00
Fati: 15 StTi: 60
Fati: 20 StTi: 20
Fati: 25 StTi: 20
I
Press <INSERT/COPY>,the step sequences will change:
(the following step 4 will become step 5)
Step: 02 Prg.: 011
Start step: 01
Rec.tim:
800.00
Fati: 10 StTi: 20
Step: 03 Prg.: 012
Start step: 01
Rec.tim:
1200.00
Fati: 15 StTi: 60
Step: 04 Prg.: 012
Start step: 01
Rec.tim:
1600.00
Fati: 15 StTi: 60
Step: 05 Prg.: 013
Start step: 01
Rec.tim:
2200.00
Fati: 20 StTi: 20
12.8.Deleting a record
1.Press <ESC> several times until the display shows the initial screen.
2.Press <MENU> and use <UP>,<DOWN> to scroll to the "Make Record" menu and press <ENTER>.The
following message appears:
MAKE RECORD
Record: 001
USED
3.Use <UP>,<DOWN> or TILT wheel to select the record which you want to delete and press <DEL>.The safety
question appears:
Delete record ?
ESC/ENT
4.Press <ENTER> to confirm the record deleting.
12.9.Copying a record
1.Press <ESC> several times until the display shows the initial screen.
2.Press <MENU> and use <UP>,<DOWN> to scroll to the "Make Record" menu and press <ENTER>.The
following message appears:
MAKE RECORD
Record: 001
USED
3.Use <UP>,<DOWN> or TILT wheel to select the record (e.g.021) to which you want to copy another record and
press <INSERT/COPY>.The following screen appears:
COPY RECORD
From:021 To:021
4.Use <UP> ,<DOWN> or TILT wheel to select the record which you want to copy to the previously selected
record and press <ENTER>.The safety question appears:
SAVE CHANGES ?
ESC/ENT
5.Press <ENTER> to confirm the copying.
32
16.Runnig mode
The following instructions needed to recall and run previously created scanes, programs and records.You can run
2 scenes,programs or records at the same time (RUN A,RUN B buttons).The combinations scene-program,scenerecord or program-record are possible.
15.1.Running scenes
1.Press <ESC> several times until the display shows the initial screen.
2.press <SCENE>.The following screeen appears:
RUN SCENE
Select Scene
Scene num:001
USED
Current scene
FREE......scene was not edited (contains data from the scene No.000)
USED......scene was edited
3.Use <UP> , <DOWN> or TILT wheel to select the No. of the scene you wish to run.
4.Check the scene running mask (= projectors which will be used in the scene running) and press the PROJECTOR
SELECT buttons matched to the projectors ,which you don´t want to use in the scene running (their LEDs become
off).
Only those projectors will be active in the scene running where the PROJECTOR SELECT button LEDs shine.
If you wish to run the scene for previously defined group of projectors,press <NEXT/GROUP>,select desired
group (1-20) by pressing the respective PROJECTOR SELECT button.The selected group of projectors can be
expanded/reduced by pressing the respective PROJECTOR SELECT buttons.
5.Press <RUN A> (its LED shines) and the scene is prepared for running.
6.Press <RUN A> again (its LED flashes) and the scene starts running (light intensity can be adjusted with the
help of the slider INT A):
INTENSITY A
Rec.: --- Step:-Prog.:--- Step:-Scene: 001
Current running scene
7.Press <RUN A> to stop the scene running.
8.If you want to run 2 scenes at the same time,repeat the instructions 1-6 to start the scene running A .
9.Press <SCENE> to set the scene running B.Repeat the steps 2 -6 for slider INT B.The screen shows:
INT A Rec:--Prog.:--- Sce.:001
INT B
Rec: --Prog.:--- Sce.:002
Scene running A
Current scene in the scene running A
Scene running B
Current scene in the scene running B
Note :The scene running B "takes" the projectors assigned in the scene running A and vice-versa.
Example:
assigned projectors No.
active projectors in scene running
Scene running A
1,2,5,10,15
5,10
Scene running B
1,2,15,16,
1,2,15,16
For correct scene running,the scene running mask should be the same like the mask of the created scene.
10.To stop the scene running A or B, press <RUN A> or <RUN B>.
15.2.Running programs
1.Press <ESC> several times until the display shows the initial screen.
2.press <PROG>,the following screen appears:
RUN PROGRAM
Program num: 001
Start step:01
USED
Selected program No.1
Step from which the selected program will start running
Program status: FREE......the program was not edited
USED......the program steps have assigned scenes
3.Use <UP>,<DOWN> or TILT wheel to select No. of the program which you want to run.
33
4.Press <LEFT> and use <UP>,<DOWN> to select the starting step of the program.
5.Check the program running mask (= projectors which will be used in the program running) and press the
PROJECTOR SELECT buttons matched to the projectors ,which you don´t want to use in the program running
(their LEDs become off).
Only those projectors will be active in the program running where the PROJECTOR SELECT button LEDs shine.
If you wish to run the program for previously defined group of projectors,press <NEXT/GROUP>,select desired
group (1-20) by pressing the respective PROJECTOR SELECT button.The selected group of projectors can be
expanded/reduced by pressing the respective PROJECTOR SELECT buttons.
6.Press <RUN A> (LED shines) and the program is prepared for running(projectors wait at the first prog.step):
INTENSITY A
Rec.: --- Step:-Prog.:001 Step:01
Current running program and its current step
Scene: 002
Current running scene
7.Now you can adjust the program fade time multiplier and the program step time multiplier.To do so,press <FADE
TIME> (its LED shines) and adjust the program fade time multiplier with the FADE TIME slider (from 0.1 to 9.9).
Press <STEP TIME> (its LED shines) and adjust the program step time multiplier with the STEP TIME slider
(from 0.1 to 9.9).
Example:
If you have adjusted the program fade time multiplier=5, the selected program will have the fade times at all steps
5 times longer ).
If you have adjusted the program step time multiplier=3, the selected program will have the step times at all steps
3 times longer ).If the <STEP TIME> and <FADE TIME> are not active,than the program step time multiplier=1
and the program fade time multiplier =1.
fade time multiplier=5
Original program No.1
step time multiplier=3
Running Program No.1
step 1:
fade time =2s
step time =4s
step 1:
fade time =10s (5 x 2s)
step time =12s (3 x 4s)
step 2:
fade time =2.5s
step time =5s
step 2:
fade time =12.5s (5 x 2.5s)
step time =15s (3 x 5)
step 3:
fade time =3s
step time =6s
step 3:
fade time =15s (5 x 3s)
step time =18s (3 x 6s)
The screen shows:
INTENSITY A
Rec.: --- Step:-Prog.:001 Step:01
Fati:50 StTi:30
Fati=Program fade time multiplier (5) , StTi=Program step time multiplier (3)
Note: 01 means 0.1 ; 99 means 9.9
8.Press <RUN A> again (LED flashes) and the program starts its running (the slider INT A has to be in an upper
position of its track if Start Val=100 in "User setting") and by moving the slider INT A from a bottom possition to
an upper position of its track you can adjust the light intensity of projectors from minimum to maximum.
.If you want to pause the running program,adjust the slider to the bottom position of its track (shutters of fixtures
are closed).After ending the program running the initial screen appears on the display.
9.Long running program or program with endless loop can be stopped by pressing <RUN A>.
10.If you want to run 2 programs at the same time,repeat the instructions 1 - 8 to start the program running A.
11.Press <PROG> to set the program running B.Repeat the steps 2-8 for slider INT B.(If you adjust the step time
and fade time multipliers,these values are used for program running A as well ).The screen shows:
INT A
Prog.:001
INT B
Prog.:005
Rec:--Sce.:001
Rec: --Sce.:002
Program running A
Selected program and current running scene
Program running B
Selected program and current running scene
Note :The program running B "takes" the projectors assigned in the program running A and vice-versa.
34
Example:
assigned projectors No.
active projectors in program running
Program running A
1,2,5,10,15
5,10
Program running B
1,2,15,16,
1,2,15,16
After starting the program running B,projectors No.1 and No.2 go to the program step No.2 by reason of
synchronization with the projectors No.15 and No.16 which were prepared at step No.1 for the program running B.
The adjusted fade time and step time multiplier are used for both program running A and program running B.
For correct program running,the program running mask should be the same like the mask of the created program.
12.To stop the program running A or B, press <RUN A> or <RUN B>.
Note:By pressing the AUTO/AUDIO button (its LED flashes) the running program will folow the music´s beat.
By pressing the NEXT/+1STEP(its LED shine) button you can step the running program.
15.3.Running records
1.Press <ESC> several times until the display shows the initial screen.
2.press <RECORD>,the following screeen appears:
RUN RECORD
Record num: 001
Start step:01
USED
Selected record No.1
Step from which the selected record will start running
Program status: FREE......the record was not edited
USED......the record steps have the assigned programs
3.Use <UP>,<DOWN> or TILT wheel to select the No. of the record which you wish to run.
4.Press <LEFT> and use <UP>,<DOWN> to select the starting step of record.
5.Check the record running mask (= projectors which will be used in the record running) and press the PROJECTOR
SELECT buttons matched to the projectors ,which you don´t want to use in the program running (their LEDs
become off).
Only those projectors will be active in the record running where the PROJECTOR SELECT button LEDs shine.
If you wish to run the record for previously defined group of projectors,press <NEXT/GROUP>,select desired
group (1-20) by pressing the respective PROJECTOR SELECT button.The selected group of projectors can be
expanded/reduced by pressing the respective PROJECTOR SELECT buttons.
6.Press <RUN A> (its LED shines) and the record is prepared for running(projectors wait at the first prog.step):
INTENSITY A
Rec.: 001 Step:01
Prog.:001 Step:02
Scene: 002
Current running record and its current step
Matching program and its current step
Matching running program scene
7.Now you can adjust the record fade time multiplier and the record step time multiplier.To do so,press <FADE
TIME > (its LED shines) and adjust the record fade time multiplier (from 0.1 to 9.9) with FADE TIME slider.This
value will be used for record running insted of the fade time multiplier which was assigned during record creation.
Press the <STEP TIME> (its LED shines) and adjust the record step time multiplier (from 0.1 to 9.9) with the
STEP TIME slider.This value will be used for record running insted of the step time multiplier which was assigned
during record creation.
If the <STEP TIME> and <FADE TIME> are not active, the values, which were assigned during the record
creation, are used.
Example 1 (record with 1 step only):
record fade time multiplier=3
Original record 1
record step time multiplier=4
Running record 1
Step 1 - Program 1
step 1:fade time =12s(3 x 2s)
step time =16s (4 x 4s)
Values assigned
during record creation:
Fade time multiplier = 2
Step time multiplier = 3
Values assigned
during record creation:
Fade time multiplier = 2
Step time multiplier = 3
Step 1 - Program 1
step 1: fade time =2s
step time =4s
step 2:fade time =1.5s
step time = 3s
step 3:fade time =3s
step time =5s
35
step 2:fade time =9.0s(3 x1.5s)
step time =12s (4 x 3s)
step 3:fade time =18s (3 x 3s)
step time =20s (4 x 5s)
The screen shows:
INTENSITY A
Rec.: 001 Step:01
Prog.:001 Step:01
Fati:20 StTi:30
Fati=Record fade time multiplier (2) , StTi=Record step time multiplier (3)
Note:01 means 0.1 ; 99 means 9.9
Example 2 (record with 1 step only):
FADE TIME button is not active
STEP TIME button is not active
Original record 1
Step 1 - Program 1
step 1:fade time =4s (2 x 2s)
step time =12s (3 x 4s)
Values assigned
during record creation:
Fade time multiplier = 2
Step time multiplier = 3
Values assigned
during record creation:
Fade time multiplier = 2
Step time multiplier = 3
Step 1 - Program 1
step 1: fade time =2s
step time =4s
Running record 1
step 2:fade time =1.5s
step time = 3s
step 3:fade time =3s
step time =5s
step 2:fade time =3s (2 x 1.5s)
step time =9s (3 x 3s)
step 3:fade time =6s (2 x 3s)
step time =15s (3 x 5s)
8.Press <RUN A> again (LED flashes) and the record starts its running (the slider INT A has to be in an upper
position of its track if Start Val=100 in "User setting") and by moving the slider INT A from a bottom possition to
an upper position of its track you can adjust the light intensity of projectors from minimum to maximum.
.If you want to pause the running record,adjust the slider to the bottom position of its track (shutters of fixtures will
be closed).After ending the record running the initial screen appears on the display.
9.Long running records can be stopped by pressing <RUN A>.
10.If you want to run the 2 records at the time,repeat the instructions 1- 8 to start the program running A.
11.Press <RECORD> to select the record running B.Repeat the steps 2-8 for slider INT B.(If you adjust the step
time and fade time multipliers, these values are used for program running A as well ).The screen shows:
INT A
Prog.:001
INT B
Prog.:005
Rec:001Sce.:001
Rec: 002
Sce.:003
Record running A
Selected program and current running scene
Program running B
Selected program and current running scene
Note:The record running B "takes" the projectors assigned in the record running A and vice-versa.
Example:
assigned projectors No.
active projectors in record running
Record running A
1,2,5,10,15
5,10
Record running B
1,2,15,16,
1,2,15,16
After starting the record running B,projectors No.1 and No.2 go to the program step No.2 by reason of synchronization
with the projectors No.15 and No.16 which were prepared at program step No.1 for the record running B.
The adjusted fade time and step time multipliers are used for both record running A and record running B.
For correct record running,the record running mask should be the same like the mask of the created records.
12.To stop the record running A or B, press <RUN A> or <RUN B>.
Note:By pressing the AUTO/AUDIO button (its LED flashes) the running record will folow the music´s beat.
By pressing the NEXT/+1STEP(its LED shine) button you can step the running record.
36
16.Factory default setting
The DMX CONTROL 480 allows you to reset all memory contents to the factory seting.The operation described
below will permanently erase :all scenes,programs and records
user created projectors No.51-100 in the projector library
user created effect names No.128-255 in the projector library
groups of projector
assignment of projectors to the PROJECTOR SELECTbuttons
We recommend you to save memory contents to the memory card prior to effecting a factory setting!
The following items will be set to their default values:
contrast value for LCD display= 13
backlight value for LCD display= 04
items in "User settings" menu:"Start Val."=100
"S.Blackout"=YES
"S.Lock"=NO
password =<1>,<2>,<3>,<4>.
To restore a factory default setting:
1.Press <ESC> several times until the display shows the initial screen.
2.Press <MENU> and use <UP>,<DOWN> to scroll to the "Factory setting" line ("Setup" ==> <ENTER>==>
"Factory setting"==><ENTER>).The safety question appears:
Really load
factory setting ?
ESC/ENT
3.Press <ENTER> to start loading the factory default setting:
Loading factory
setting
Wait a minute !
After loading the factory default setting,the screen returns to the "Factory setting" line.
17. Updating the fixture library
The following are required in order to update the DMX CONTROL 480 library:
- the flashdev.exe file (for Windows 95 or higher) or flashdev (for Linux) ,available for download from ROBE web site
(http:// www.robe.cz)
- PC/AT-compatible computer
- serial interface cable
1.Make sure both the controller and the computer are turned off.
2.Connect one end of the serial interface cable to the computer serial port and the second end to the controller
serial input.
3.Turn on both the controller and the computer.
4.On the controller, press <MENU> and use <UP>,<DOWN> to scroll to the "PC connection" menu ("Setup"
==> <ENTER>==> "PC connection"==> <ENTER>).The following screen will appear:
PC CONNECTION
Rcvd. pkt:
Sent pkt:
Number of received pakets
Number of sent pakets
5.Run the flashdev.exe file on your computer,choose corresponding serial port and then click "Connect" button.
(Status line changes to "Connected").Click "Start uploading" button.After uploading the controller library, click
"OK" button.
Note:User defined library (positions 51-100) will not be overwritten.
37
18.Technical specifications
Number of control channels:
480
Maximum number of programs: 255 with up to 50 steps each
Maximum number of records:
100 with up to 50 steps each
Maximum number of scenes:
750
Maximum number of scenes within a program:50
Maximum number of programs within a record:50
Memory:
Memory Card:
512 kB
MultiMedia Card (32-128 MB max.)
Power supply:
Maximum power:
Fuse:
230V or 115 V AC,50-60 Hz
10 VA
T63mA@230V,T125mA@115V
Maximum number of channels on a projector: 24
Maximum number of independently controlled projectors:20
Maximum number of projectors in library:100
Audio signal input:
400 mV ( pick to pick)
Sound input connector:
¼" stereo jack
DMX 512 output connectors:
two 3-pin XLR female connectors
PC connection:
9-pin female connector for RS-232
3-pin XLR socket for service light (12V AC,3W)
Accessory in packing:
MultiMedia card 32 MB.............1piece
User manual.............................1piece
Ambient operation temperature: 5 - 35°C
Rack size:
19" 4U rack mountable
Weight:
3 kg
Dimensions (mm):
38
19.Cleaning and maintenance
DANGER !
Disconnect the device from the mains before starting any
maintenance work
There are no user-serviceable parts inside the device. Maintenance and servicing should be carried out by
authorized personnel only.
When cleaning the controller do not use cleaning solutions or aggressive detergents which may damage the
surface! Rather use a soft and damp cloth.
39
Appendix - Projector library
No.
1
2
3
4
5
6
7
8
9
10
11
12
13
14
15
16
17
18
19
20
21
22
23
24
25
26
27
28
29
30
31
32
33
34
34
35
36
37
38
39
40
41
42
43
44
45
46
47
48
49
49
Manufacturer
ROBE show lighting
ROBE show lighting
ROBE show lighting
ROBE show lighting
ROBE show lighting
ROBE show lighting
ROBE show lighting
ROBE show lighting
ROBE show lighting
ROBE show lighting
ROBE show lighting
ROBE show lighting
ROBE show lighting
ROBE show lighting
ROBE show lighting
ROBE show lighting
ROBE show lighting
ROBE show lighting
ROBE show lighting
ROBE show lighting
ROBE show lighting
ROBE show lighting
ROBE show lighting
ROBE show lighting
ROBE show lighting
ROBE show lighting
ROBE show lighting
ROBE show lighting
ROBE show lighting
ROBE show lighting
ROBE show lighting
ROBE show lighting
ROBE show lighting
ROBE show lighting
ROBE show lighting
ROBE show lighting
ROBE show lighting
ROBE show lighting
ROBE show lighting
ROBE show lighting
ROBE show lighting
ROBE show lighting
ROBE show lighting
ROBE show lighting
ROBE show lighting
ROBE show lighting
ROBE show lighting
ROBE show lighting
ROBE show lighting
ROBE show lighting
ROBE show lighting
Name
Spot
Spot
Spot
Spot
Name in the controller
150 XT/ClubSpot 150CT SPOT 150XT
160 XT/ClubSpot 160CT SPOT160XT
250 XT/ClubSpot 300 CT SPOT250XT
575 XT/ClubSpot 600CT SPOT575XT
MSZOOM 250 XT
DJ Scan 150 XT
DJ Scan 250 XT
Scan 250 XT
Scan 575 XT
Scan 1200 XT
MSZOOM 250XT
DJ SCAN 150XT
DJ SCAN 250XT
SCAN 250XT
SCAN 575XT
SCAN 1200XT
Beam 250 XT/FiberBeam 250AT BEAM 250XT
DJ Roller 150 XT
DJ ROLLER 150 XT
Wash 150 XT
WASH 150XT
Wash 250 XT/ClubWash 300CT WASH 250XT
Wash 575 XT/ClubWash 600CT WASH 575XT
Ecolor 250 XT
ECOLOR 250XT
ColorSpot 170 AT
COLORSPOT 170AT
ColorMix150 AT Wash
COLORMIX150 WASH
ColorMix150 AT Profile COLORMIX150 PROF
ColorMix 240 AT
COLORMIX 240AT
ColorMix 250 AT
COLORMIX 250AT
Recessed Wash 150
RECESSED WASH150
Recessed Spot 170
RECESSED SPOT170
ColorSpot 1200 AT(1200E) COLORSPOT 1200 AT
Dominator 1200 XT
DOMINATOR 1200XT
ColorSpot 250 AT
COLORSPOT 250AT
Colorspot 575 AT
COLORSPOT 575AT
ColorMix 550 AT
COLORMIX 550AT
ColorMix 575 AT
COLORMIX 575AT
ClubSpot 250 CT
CLUBSPOT 250CT
ClubWash 250 CT
CLUBWASH 250CT
ClubScan 150 CT
CLUBSCAN 150CT
ClubScan 250 CT
CLUBSCAN 250CT
Fusion
FUSION/FUNKY
Funky
FUSION/FUNKY
ColoWash 1200E AT
COLORWASH 1200AT
DJ Roller 250 XT
DJ ROLLER 250 XT
ClubRoller 150 CT
CLUBROLLER 150 CT
ClubRoller 250 CT
CLUBROLLER 250 CT
ColorWash 575 AT
COLORWASH 575AT
ColorWash 575 AT ZooomCOLORWASH 575ATZ
ColorWash 250 AT
COLORWASH 250AT
Hip-Hop
HIP-HOP
LED Blinder 148 LT
LED BLINDER 148LT
LED Blinder 196 LT
LED BLINDER 148LT
LED Wash 136 LT/ArcWash 136 LED WASH 136LT
ClubSpot 500 CT
CLUBSPOT 500CT
ClubWash 500 CT
CLUBWASH500CT
StageBanner 10/50 AT STAGEBANNER
Flare
FLARE
Euphoria
EUPHORIA
40
Mode
Channels
Mode 1
8
Mode 1
Mode 1
Mode 1
Mode 1
Mode 1
Mode 1
Mode 1
Mode 1
Mode 1
Mode 1
Mode 1
Mode 1
Mode 1
Mode 1
Mode 1
Mode 1
Mode 1
Mode 2
Mode 2
Mode 2
16bit
16bit
Mode 3
Mode 3
Mode 3
Mode 3
Mode 1
Mode 1
Mode 1
Mode 2
Mode 2
-
9
16
16
16
4
6
16
16
16
4
4
8
16
16
6
12
3
4
11
11
8
12
24
12
18
19
8
11
10
10
6
6
3
3
24
6
6
6
24
21
20
4
9
15
14
13
13
4
2
3
41