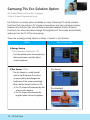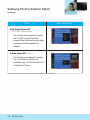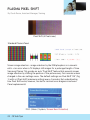
1
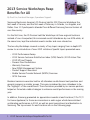
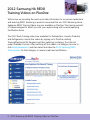
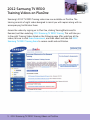
Inside this issue
March, 2013
1 2013 Service Workshops Reap Benefits for All
3 2012 Samsung HA REDO Training Videos on PlusOne
5 2012 Samsung TV REDO Training Videos on PlusOne
7 2013 RTC TV Training Schedule
9 2013 RTC HA Training Schedule
11 Parts Department Introduces New System for Returns
15 How to Look Up Bulletins on GSPN
17 CE Tech Tips
26 HA Tech Tips
2013 Service Workshops Reap
Benefits for All
By Paul Yun, Assistant Manager, Operations Support
Samsung Electronics America’s CS Division held its 2013 Service Workshops the
last week of January and the first week of February in Orlando, Los Angeles, and
Dallas. Over 113 participants attended from different Samsung Service Centers all
over the country.
For the first time, the CS Division held the Workshops at three regional locations
instead of one. As expected, this increased overall attendance by over 40% while, at
the same time, kept the individual events smaller and more interactive.
The two-day Workshops covered a variety of key topics ranging from in-depth KPI
review to an introduction of new 2013 initiatives. Specific topics presented were:
•
•
•
•
•
•
•
•
•
2012 Performance Recap
2012 Service Customer Satisfaction Index (SCSI) Results / 2013 Action Plan
2013 KPI and Targets
Process Flow Presentation
Warranty Overview
New FE/ME Management System
Product Support Innovation
Mobile Service Provider Network (MSPN) Overview
GPCA Overview
Breakout sessions were also held so all attendees could discuss best practices and
general concerns in smaller groups. This was considered by many attendees to be
the “highlight” of the overall event. The information provided by our service partners
helped us formulate viable strategies to enhance overall performance in the coming
year.
In addition, Samsung presented six appreciation awards at each location (3 for TV, 3
for Home Appliance) to those service centers in each region which demonstrated
outstanding performance in 2012, as well as great commitment and dedication to
Samsung. The top winners for each location are on the following page.
1 2013 Service Workshops Reap Benefits for All
2013 Service Workshops Reap
Benefits for All
continued
Workshop Location
TV
Home Appliance
Orlando
Computek
Home Service Network
Los Angeles
Canyon State Electronics
Jem Appliance
Dallas
Sterling Electronics
Gabes Electronics
Many Service Centers also found Samsung’s renewed focus on Quality of Service
(Customer Satisfaction) to be refreshing.
What’s more, the Workshops clearly enhanced the partnerships between Samsung
and our service network. Many of the attendees indicated that these Workshops
helped them connect with our goals. Most importantly, many attendees indicated
they le the Workshops with a renewed sense of pride in being part of the
Samsung Service team.
Samsung plans on holding another set of Service Workshops in the middle of this
year to review first half performance and 2nd half targets.
2 2013 Service Workshops Reap Benefits for All
2012 Samsung HA REDO
Training Videos on PlusOne
With an eye on providing the most up to date information to our service technicians
and reducing REDO, Samsung is proud to announce that our 2012 Samsung Home
Appliance REDO Training Videos are now available on PlusOne. The training consists
of videos designed to assist you with your repairs along with an accompanying
Certification Exam.
The 2012 Redo Training videos are available for Dishwashers, Laundry Products,
and Refrigerators. Access the videos by signing on to PlusOne, clicking
Training/Electronics/On Demand, and then selecting a category from the list
under Available Courses. Aer watching all the videos in a category, be sure to
click Exam/Assessment, and then select and take the 2012 Samsung REDO
Training Exam for that category to receive credit and certification.
3 2012 Samsung HA REDO Training Videos on PlusOne
2012 Samsung HA REDO
Training Videos on PlusOne
continued
Courses Available:
Samsung Dishwasher Training
2012 Laundry REDO Updates
2012 Dishwasher REDO Drain Errors Update (Video - Released 11.19.2012)
2012 Dishwasher REDO Extension Kit (Video - Released 11.19.2012)
2012 Dishwasher REDO Half Load Function Error Update (Video - Released
11.19.2012)
2012 Dishwasher REDO Heater Water Temp Errors Update (Video - Released
11.19.2012)
2012 Dishwasher REDO Leakage Errors Update (Video - Released 11.19.2012)
2012 Dishwasher REDO Service Mode Operation (Video - Released 11.19.2012)
2012 Dishwasher REDO Water Supply Errors Update (Video - Released 11.19.2012)
Samsung Laundry Training
2012 Laundry REDO Updates
2012 Dryer REDO Sounds & Vibrations (Video - Released 10.24.2012)
2012 Washer REDO Customer ED Not Enough Water (Video - Released 10.24.2012)
2012 Washer REDO Final Testing Updated (Video - Released 10.24.2012)
2012 Washer REDO Pre-Diagnostic Checklist (Video - Released 10.24.2012)
2012 Washer REDO Top Loader Water Errors (Video - Released 10.24.2012)
2012 Washer REDO Vibration & Spin Errors (Video - Released 10.24.2012)
2012 Washer REDO Weight Sensing Cycles (Video - Released 10.24.2012)
Samsung Refrigeration Training
2012 Refrigeration REDO Updates
2012 Refrigerator REDO Inverter Compressor Training (Video - Released 8.24.2012)
2012 Refrigerator REDO Heated Mold Training (Video - Released 8.24.2012)
2012 Refrigerator REDO Flex Tray Icemaker Training (Video - Released 8.24.2012)
2012 Refrigerator REDO Defrost Circuit Training (Video - Released 8.24.2012)
2012 Refrigerator REDO Customer Education Training (Video - Released 8.24.2012)
4 2012 Samsung HA REDO Training Videos on PlusOne
2012 Samsung TV REDO
Training Videos on PlusOne
Samsung's 2012 TV REDO Training videos are now available on PlusOne. The
training consists of eight videos designed to assist you with repairs along with an
accompanying Certification Exam.
Access the videos by signing on to Plus One, clicking Training/Electronics/On
Demand, and then selecting 2012 Samsung TV REDO Training. This will take you
to the eight Training Videos listed on the following page. Aer watching all the
videos, be sure to click Exam/Assessment, and then select and take the 2012
Samsung TV REDO Training Exam to receive credit and certification.
5 2012 Samsung TV REDO Training Videos on PlusOne
2012 Samsung TV REDO
Training Videos on PlusOne
continued
Courses Available:
2012 TV REDO 3D Troubleshooting (Video - Released 11.2.2012)
2012 TV REDO Bluetooth Troubleshooting (Video - Released 11.2.2012)
2012 TV REDO Testing the Function Board (Video - Released 11.2.2012)
2012 TV REDO Troubleshooting LED/LCD Video Noise (Video - Released 11.2.2012)
2012 TV REDO Network Testing and Troubleshooting (Video - Released 11.2.2012)
2012 TV REDO Troubleshooting Plasma Video Noise (Video - Released 11.2.2012)
2012 TV REDO Setting Option Bytes (Video - Released 11.2.2012)
2012 TV REDO Troubleshooting the D7000 LED TV (Video - Released 11.2.2012)
6 2012 Samsung TV REDO Training Videos on PlusOne
2013 RTC TV Training
Samsung Training 2013
For 2013, by popular demand, Samsung continues
to accommodate your demanding schedule with one
day update training. To be eligible to attend the one
day training session, you must have attended and
successfully completed 2012 TV product training in
one of our training centers, or at a live, on-site
training session.
Samsung will still hold 3 day Basic classes bi-annually. These classes are intended
for new techs who have never attended a Samsung training or for techs who need
extra help to improve their skills.
2012 product training will continue until the end of March. 2013 product training
will start in April.
Attend in-depth, hands-on 1 day Update or 3 day Basic training at one of our RTCs
in Little Ferry, NJ or Bensenville, IL! In addition, we will be holding limited on-site
trainings at various locations around the country. You can reserve your seat in
training by emailing us at [email protected].
You can always obtain the most up to date training list by sending an email to
[email protected].
Additionally, TV training is available on-demand 24/7 at
https://my.plus1solutions.net/clientPortals/samsung/
7 2013 RTC TV Training
2013 RTC TV Training
continued
Training Schedule:
Date
City
Comments
April 11, 2013
(Location TBD shortly)
Boston, MA
FE/ASC 1 day Update Training
April 12, 2013
Bensenville, IL
FE/ASC 1 day Update Training
April 18, 2013
(Location TBD shortly)
Dallas, TX
FE/ASC 1 day Update Training
April 19, 2013
Little Ferry, NJ
FE/ASC 1 day Update Training
April 23, 2013
Bensenville, IL
FE/ASC 1 day Update Training (Session 1)
April 24, 2013
Bensenville, IL
FE/ASC 1 day Update Training (Session 2)
April 25, 2013
Bensenville, IL
FE/ASC 1 day Update Training (Session 3)
April 26, 2013
Bensenville, IL
FE/ASC 1 day Update Training (Session 4)
April 25, 2013
(Location TBD shortly)
Atlanta, GA
FE/ASC 1 day Update Training
April 30, 2013
Little Ferry, NJ
FE/ASC 1 day Update Training (Session 1)
May 1, 2013
Little Ferry, NJ
FE/ASC 1 day Update Training (Session 2)
May 2, 2013
Little Ferry, NJ
FE/ASC 1 day Update Training (Session 3)
May 3 2013
Little Ferry, NJ
FE/ASC 1 day Update Training (Session 4)
May 3, 2013
(Location TBD shortly)
Los Angeles, CA
FE/ASC 1 day Update Training
8 2013 RTC TV Training
2013 RTC HA Training
Samsung HA Training 2013
For 2013, per popular demand, Samsung continues
to accommodate your demanding schedule with two
day update training. To be eligible to attend the two
day training session, techs must have attended and
successfully completed 2012 product training in one
of our training centers, or at a live, on-site training
session.
Samsung will still hold 3 day Basic classes bi-annually. These classes are intended
for new techs who have never attended a Samsung training or for techs who need
extra help to improve their skills.
2012 product training will continue until April, when training will commence on
2013 products.
Attend in-depth, hands-on 2 day Update or 3 day Basic training at one of our RTCs!
You can reserve your seat in training by emailing [email protected].
Additionally, Home Appliance training is available on-demand 24/7 at
https://my.plus1solutions.net/clientPortals/samsung/
9 2013 RTC HA Training
2013 RTC HA Training
continued
Date
City
Comments
March 19-20, 2013
Bensenville, IL
ME/ASC 2012 products 2 day
Update Training (Session 1)
March 21-22, 2013
Bensenville, IL
ME/ASC 2012 products 2 day
Update Training (Session 2)
March 26-27, 2013
Little Ferry, NJ
ME/ASC 2012 products 2 day
Update Training (Session 1)
March 28-29, 2013
Little Ferry, NJ
ME/ASC 2012 products 2 day
Update Training (Session 2)
April 30 – May 1
Bensenville, IL
ME/ASC 2012 products 2 day
Update Training (Session 1)
May 2 -3, 2013
Bensenville, IL
ME/ASC 2012 products 2 day
Update Training (Session 2)
10 2013 RTC HA Training
Parts Department Introduces
New System for Returns
David Caldwell, Senior Manager, Samsung GPCA
As part of our ongoing efforts to improve and simplify the Part Returns process,
GPCA is pleased to announce a new system for requesting Part Return Shipping
Labels and Pickup Requests for both Core and Normal Returns.
Previously, you were required to log into an outside website (UPS or KWI) to print
out Return Shipping Labels or schedule pickup requests for bulky items. With the
new process, you can now complete both from within GSPN, resulting in a faster,
easier, and more streamlined process. If you are not familiar with this new
system, please refer to the summary below for more details.
There is a new sub-category under “Service Parts
Return” called “Pickup Request Status.” Click it to
access the new Pickup Request Status Page.
11 Parts Department Introduces New System for Returns
Parts Department Introduces
New System for Returns
continued
On the Pickup Request Status page, you click the RA or Core that you would like to return
within the Date Ranges you selected. Aer you have clicked the RA or Core, you click
Submit.
0710781790
000010
11.16.2012
8153157998
3104939838 DC93-00101J
1
Open: Not Submitted
JOES(1234567)
On the pop-up screen that appears, verify the pickup address and input the correct phone
number and e-mail address.
The label or pickup arrangement information will be sent to the inputted e-mail address.
1234567890
[email protected]
12 Parts Department Introduces New System for Returns
Parts Department Introduces
New System for Returns
continued
Once the operation is complete, a “SUCCESS” notice appears.
SUCCESS
The status is changed to “Submitted” on the Pickup Request Status page. Nothing further
needs to be done.
Submitted
13 Parts Department Introduces New System for Returns
Parts Department Introduces
New System for Returns
continued
Within a few hours, you should receive an e-mail from [email protected].
An example is below:
14 Parts Department Introduces New System for Returns
How to Look Up Bulletins on GSPN
By Jorge Tavora, Technical Support Manager
Many technicians are calling Tech Support and asking where to find bulletins by
bulletin number. Here’s an article that shows you how, step-by-step.
Log in to GSPN.
Step 1. Click the Knowledge tab.
Step 2. Click the “Product Information” category on the le side.
Step 3. Click “Service Bulletin”.
15 How to Look Up Bulletins on GSPN
How to Look Up Bulletins on GSPN
continued
Step 4. Enter the “Service Bulletin number” in the Subject field, and then click
the Search button.
If nothing comes up when you search by Bulletin number, use the instructions below…
Step 5. Enter a model number in the “Model” field, and then click the magnifying glass
icon. If the system finds the model, it will auto populate it to the box below the Model
field.
Step 6. Click Search.
Step 7. Bulletins appear if there are any bulletins for that mode l.
16 How to Look Up Bulletins on GSPN
Quick Tip:
Wireless Audio Docks and Allshare
by Michael Vigliotti, Assistant Manager, Product Support
Samsung Wireless Audio Docks ((WADs) require a firmware update to work
correctly with the Galaxy S3 and Allshare. Without the soware update, there
will be a communication error between the Wireless Audio Dock’s Wi-Fi
module and the Galaxy S3. To fix the issue, you must update the Micom,
MPEG, and Wi-Fi Modules (in that order).
- You must update the firmware in order: A then B then C.
o If you do not update in the correct order, you WILL cause permanent
damage to the product and you will have to replace the Airplay Module.
o The DA-E651 does not require a Wi-Fi Module Update.
- Each update must be completed separately. You cannot store multiple updates
on the same USB.
Detailed Firmware Update Procedure
1. Download the latest firmware update from GSPN.
2. The firmware file will be compressed (.zip). Unzip the file to your PC.
3. The firmware package will have 2 to 3 files, each labeled as shown in the
above table.
4. Copy the “A” MICOM firmware (ending in .ssp) to the root folder of your USB.
5. Turn on the WAD, and then press the Function (F.) button repeatedly until the
USB Icon is lit.
6. Insert the USB into the USB port of the WAD. The update starts.
7. During the update, the USB icon will blink. When the update is complete, the
device will turn off.
8. Disconnect the USB from the WAD.
9. Repeat steps 4-8 with the “B” MPEG Firmware (ending in .ROM). It will take
about 2 minutes.
10. Repeat steps 4-8 with the “C” Wi-Fi Module Firmware (ending in .bcd),
except for the DA-E651. The whole process should take about 6 minutes.
17 CE Tech Tips
Quick Tip:
BD and HT Deck Adjustment
by Michael Vigliotti, Assistant Manager, Product Support
Note: This is a revised version of the article published in the January newsletter.
Aer you replace the Deck Assembly in a Blu-ray player or Home Theater, you
have to perform a deck adjustment to pair the new deck to the old main board. If
you do not perform this adjustment, then no disc will play, which will cause a redo
every time.
Follow the adjustment procedure below to pair the new deck to the Main board.
1. Turn on the Blu-ray or Home Theater.
2. Make sure the player is in No Disc Mode.
3. On the remote control, press 2-3-5-8-7-8 (or on a service remote, press
"TEST”, and then "21"). The image below is displayed on the TV.
4. Insert any Blu-ray disc into the player.
5. Play the disc for at least 15-20 seconds. Make sure it plays normally.
6. On the remote control, press 2-3-5-8-7-8 (or on a service remote, press
"TEST", and then "22"). The image below is displayed on the TV.
18 CE Tech Tips
Samsung TVs Eco Solution Option
By Khaled Abuali and Paul Kim, Managers,
Product Support Engineering Group
Eco Solution is a menu option available on many Samsung TVs which contains
functions that can reduce a TV’s power consumption and save customers money.
However, Eco Solution can also confuse customers because the Eco Solution
functions can, when activated, change the brightness of the screen automatically
and even turn the TV off to save energy.
There are 4 energy saving options in Menu > System > Eco Solution:
Option
Menu Screenshot
1) Energy Saving
(Off/Low/Medium/High/Picture Off)
- Can help reduce power consumption by
letting customers manually adjust
screen brightness.
2) Eco Sensor (Off/on)
[Eco Sensor]
- The Eco Sensor is usually located
next to the IR Receiver. It monitors
in-room lighting and changes the
brightness of the screen accordingly.
- When the Eco Sensor function is ON:
o The TV screen will automatically dim
when a room darkens.
o The TV screen will automatically
brighten when the room brightens.
19 CE Tech Tips
[Min. Backlight]
Samsung TVs Eco Solution Option
continued
Option
3) No Signal Power Off
(Off/15min/30min/60min)
- This function saves power by turning
the TV off if no signal has been
received from the current source aer
a customer set time period has
elapsed.
4) Auto Power Off (Off/on)
- This function saves power by turning
the TV off when no buttons are
pressed on the TV’s Remote or the TV’s
controller for 4 hours.
20 CE Tech Tips
Menu Screenshot
New Firmware Fixes the Sound Delay
(Lip Sync) Problem in UNxxEH6030
and UNxxEH6070 LED TVs
By Khaled Abuali and Paul Kim, Managers, Product Support Engineering Group
Symptom
A random/intermittent sound delay (lip sync) problem occurs when customers
watch TV for more than 2 hours.
▷ Connection Type: HDMI
▷ Affected Models: UNxxEH6030 and UNxxEH6070
Resolution
1) Update the customer’s TV FW to 1011.0
2) If the customer has a Cable/Satellite box and is still experiencing this issue aer
the FW upgrade:
- For customers with a Cable box, change the box’s Video Output Resolution to
fixed resolution.
- For customers with a Satellite box, do not change the box’s video resolution.
Leave the video resolution as it is.
21 CE Tech Tips
PLASMA PIXEL SHIFT
By Chuck Russo, Assistant Manager, Training
Pixel Shi (4 Pixels max)
Standard Plasma Panel
Screen image retention - image retention by the RGB phosphors in a screen’s
cells - can occur when a TV displays still images for a prolonged length of time.
Samsung Plasma TVs provide an auto “Pixel Shi” feature that prevents screen
image retention by shiing the position of the picture every four minutes unless
changed in the user settings menu. The default settings are Pixel Shi “ON” (Fig.
1) with a 4 Pixel shi (maximum setting) every 4 minutes. Not understanding
how Pixel Shi works, however, has led to incorrect error diagnosis and even
Panel replacements!
FIG 1 (Menu / System / Screen Burn Protection)
22 CE Tech Tips
PLASMA PIXEL SHIFT
continued
Most image retention is temporary, but retention can become permanent in
severe cases. Whether image retention becomes permanent depends on how
long the screen displays the still image on the screen along with the TV’s contrast level and cell drive settings. Dynamic Mode will speed up image retention
and should be avoided, particularly during the first approximately 100 hours of
a new TV’s operation. The phosphors on plasma TVs are more susceptible during
this time.
Pixel Shi shis the video image every 4 minutes one pixel at a time up to 4
pixels in distance (approx 3/8 inch total, depending on the screen size and panel
type). The shi first moves the video le to right on the screen, then top to
bottom, right to le, and finally bottom to top. It then repeats this cycle continuously. If either an input source or the TV power conditions are changed, the process resets to the beginning of the cycle.
Pixel Shi settings can be changed to meet customer preferences. (Figure 2)
• The Pixel Shi circuit can be turned “On / Off” (No Shi)
• The maximum amount of “Horizontal” shi can be changed: 1 pixel, 2 pixels, 3
pixels, 4 pixels.
• The maximum amount of “Vertical” shi can be changed: 1 pixel, 2 pixels, 3
pixels, 4 pixels.
• The “Time” each shi occurs can be changed: every 1 minute, 2 minutes, 3
minutes, 4 minutes.
FIG 2 (Menu / System / Screen Burn Protection / Pixel Shi)
23 CE Tech Tips
PLASMA PIXEL SHIFT
continued
Understanding Pixel shi operation and explaining this operation to a customer
will prevent related complaints or attempted false repairs. Pixel shi can simply
be turned off for customers who complain about the visual effect of the Pixel
Shi function on the screen (though we strongly recommend against doing this).
Other Screen Burn Protection Options
If you observe image retention, use the Scrolling option (Figures 3 and 4), also
found in the “Screen Burn Protection” menu, until the image has been removed.
(Figure 3)
(Figure 4)
Additional “Screen Burn Protection” Options:
“Auto ProtectionTime” (Settings: Off, 10 min (default), 20 min, 40 min, 1 Hr): If a
still image is detected for the set period of time, the Screen Saver will activate.
Side Gray ( Settings: Light (default setting)/Dark): The 4:3 Sidebars can be set to
Light or Dark Gray.
Please note that ALL the default settings in the Samsung Plasma TV’s “Screen Burn
Protection” menu are typically best for preventing image retention.
24 CE Tech Tips
TV Serial Numbers are Now
in the Main Board
By Scott Whitman, Senior Manager, CE Product Support
Starting in 2012, the serial number on Samsung TV’s can be found not only on
the rear cover, but also in the customer menu. As long as the TV has the original
main board, navigating to the Contact Samsung screen will now not only show
the TV model number and soware version, but also the serial number.
If the main board is replaced, however; this serial number will no longer be
available in the menu. It is not necessary to update the serial number on the
replacement board because, once service has been setup and completed; the
serial number will have been captured and stored in the service database.
Support
25 CE Tech Tips
Contact Samsung
2012 Top Load Washer:
Spin Basket Wobbles
By Tony Perkins, Regional Technical Trainer
An interesting failure is affecting a few of the new 2012 Front Load washers.
Customer complaints range from, “A loud noise coming from washer”, “Stops
washing in the middle of a cycle”, “Clothing still very wet aer wash complete”
to “Water leaking all over the place”. On site, Techs are discovering a lot of plastic scrapings and shavings in the bottom of the basket and scratches and deep
gouges in the tub top cover and VRT ring. Equally puzzling is the “wobble” the
spin basket exhibits when moved. If all this is leaving you scratching your head
over what needs to be done, not to worry. Here’s what we found while inspecting
one such unit (a WA400PJHDWR/AA) and how we solved this repair problem:
Aer some disassembly, it was clear the tub cover and VRT ring were badly
damaged. Also, a lot of plastic debris was found around the inside of the basket
(Pictures A, B, & C). The wash plate was then removed. Grabbing the top edge of
the basket/VRT assembly and tilting it forward and back revealed that a gap had
developed between the surface of the bottom of the spin basket and the bottom
of the large retaining nut.
A.
Tub cover with scraping
damage
26 HA Tech Tips
B.
C.
Damaged VRT Ring
Debris beneath the
pulsator (wash plate)
2012 Top Load Washer:
Spin Basket Wobbles
continued
At first, we thought the large 36MM reverse thread
nut holding the basket to the motor sha had come
loose allowing the basket to wobble. However, aer
several attempts to tighten the nut without any
change in the basket’s lateral movement, we saw it
was time to remove the nut and spin basket and
inspect further. The spin basket was removed and
severe tub damage was revealed (large circular
scrape marks so deep that there were holes right
through the side of the wash tub) (Pictures D, & E):
D.
It was clear further disassembly was required, so the unit was laid on its right
side (as per the recommended factory service procedure) and the motor and
complete clutch assemblies were removed (Pictures F & G).
E.
F.
G.
Looking closely at the original clutch assembly shows some unusual wear near the seal:
H.
Original Clutch Assy.
27 HA Tech Tips
I.
Close up view
- Original Clutch
Assy.
2012 Top Load Washer:
Spin Basket Wobbles
continued
Comparing these to a good clutch assy and the difference is very clear (Pictures. J & K):
J.
K.
Good Clutch Assy.
Close up view
- Good Clutch
Assy.
The problem is evident: The retaining plate and lower seal were completely worn away.
This allowed the spin basket to drop beneath the mount and created a gap which
allowed lateral movement that could not be fixed by tightening the locking nut.
If you encounter a case like this, to avoid the likelihood of a call back (ReDo) and affect
a complete repair, replace the wash tub, the VRT ring, the tub cover, AND the clutch
assembly.
The part number for the clutch assy. can be found stamped on its side (DC97-16984A):
28 HA Tech Tips
Kitchen Solutions – FE-R300 Series
Oven Delay Timer Setting
By Keith Robinson, Manager, HA Product Support
Recently, we became aware that customers are having trouble with the DELAY TIMER
feature on FE-R300 series ovens. The problem occurs when customers attempt to
set the DELAY TIMER in the morning to start the oven in the aernoon. The DELAY
TIMER feature, however, does not perform this way if the oven’s clock is set to the
12HR Display Mode. If the oven’s clock is set to the 12HR Mode, the DELAY TIMER
resets and turns off when the clock reaches 12:00. The clock does not have an
AM/PM setting and cannot distinguish between morning and aernoon, so at noon or
midnight, the oven resets the DELAY TIMER and shuts it off.
If a customer wants to use the oven in the manner describe above, then the
customer must set the oven’s clock to the 24HR Display Mode. The customer must
also set the time in the 24HR mode as well. Please do not change the MAIN Board if
you encounter this issue. The oven is operating as designed.
29 HA Tech Tips
Dryer Motor Does Not Run
By Steve Polzin, Samsung Technical Support Specialist
If you encounter this complaint, the first thing to do is make sure the belt has not
come off the drum. If the belt comes off the drum, the belt switch on the idler arm
is deactivated, leaving the motor circuit open. If the belt is broken, has come off,
or is shredded, you may need to replace the motor drive pulley and the belt. See
Bulletin ASC20100624001 for complete details and counter measures. Service
Bulletins can be found on the GSPN website.
If the belt is in place, proceed by removing the top cover and accessing the main
PCB located to the le of the drum. Next, identify the motor relay. The motor relay
will have a Black and Brown wire. The black wire is the L1 supply and provides
120VAC to the main PCB, as well as the motor relay and the heater relay. The
brown wire is the output to the motor circuit.
With the unit turned on and the door closed, check for 120VAC across the Black
and Brown on the motor relay. Next, press the start button.
30 HA Tech Tips
Dryer Motor Does Not Run
continued
• If the voltage drops to 0VAC, the relay is closing and the main PCB is good.
The problem will be in the motor circuit.
• If the reading remains at 120VAC, the relay is not closing. Complete the
repair by replacing the main PCB.
If further testing of the motor circuit is required, the drum assembly will have
to be removed. Aer removing the drum, you can test the belt switch, TH1
Thermostat, and the motor.
• The TH1 stat and the belt switch should both be closed. (Remember to
actuate the belt switch by liing the idler arm during testing.)
• To check the motor: Measure across the Brown and Yellow. A good start
winding will measure approximately 1.6 ohms.
If the TH1 thermostat is open, check the operating temperatures from the
exhaust. With the vent disconnected, the exhaust temp should be approximately
160°F in the high heat setting.
Note: The TH1 will open If the temperature in the vent housing reaches or
exceeds 185°F and the motor will no longer operate.
• If the exhaust temperature is around 160
°F the dryer is working within specification.
• If the temperature exceeds 170 °F, further
product diagnosis is needed to identify why
the unit is overheating. Overheating can be
caused by a faulty thermistor, shorted relay
on the main pcb, or shorted heating element.
(If the dryer also heats in the air only cycle,
suspect the main PCB or a shorted element.)
Note: The TH1 thermostat is in a load bearing circuit and could fail due to high
current draw caused by the motor circuit or continuous operation over extended
periods of time.
31 HA Tech Tips
Dryer Motor Does Not Run
continued
Thermistor Function: The thermistor is used to regulate the dryer operating
temperature.
Specification: The thermistor measures approximately 10K ohms at room
temperature. As the operating temperature rises, the resistance of the thermistor
will decrease (negative coefficient.) During operation in the high heat setting, the
normal operating exhaust temperatures should be approximately 160°F and the
temp inside of the drum should measure approximatly 185 to 200°F.
TH1 Thermostat Function: The TH1 Thermostat is wired in series with the
motor and functions as a thermal fuse.
Specification: If air temperature being exhausted from the dryer into the external vent reaches/exceeds 185°F during the dry cycle, the fuse opens and the
motor circuit is inoperative.
32 HA Tech Tips
HA GSPN Updates
By Jeff Brutman, Senior Staff, Publications
We encourage you to use our GSPN site to find the latest service bulletins to aid
you with your repairs:
http://gspn3.samsungcsportal.com/
HA Service Bulletins uploaded to GSPN February, 2013:
SUBJECT: Drain Pump Case Damage
ASC20130222001
SYMPTOMS:
• Drain pump case is damaged.
Washing Machines:
WA400, WA422, WA456
• Water leaks from the drain pump.
To access service bulletins on GSPN, first visit http://gspn3.samsungcsportal.com/
Login using your User ID and Password Click on “Knowledge” at the top, then
“Product Info” in the le column. The Product Information menu will appear Click
on “Service Bulletin (Local) to bring up the Service Bulletins (Local) screen. To
search for a bulletin, enter the bulletin number in the Subject field on the le side
of the screen, and then click the Search button on the far right. If for some reason
the bulletin does not appear, it can still be searched using the “Category”
drop-down menus, the Subject field, or the Model field. You can also try using the
Search field at the top of the screen.
33 HA Tech Tips
RF323 O/L Relay Check
Juan Morales, Regional Technical Trainer
The Over Load (O/L) Relay found on many Samsung
refrigerators protects the compressor by opening if
an excessive amount of current is detected.
Unfortunately, the line it opens will prevent L1 from
reaching the refrigerator’s Inverter Driver PCB.
Should you ever come across a completely “dead”
RF323, first verify the outlet is wired correctly and
that it is supplying 120V AC. If the outlet is ok,
check the O/L Relay and make sure it is not open.
You can do this by simply checking continuity
between the L1 post on the power connector and
the sky blue wire on CN102, located in the inverter
driver PCB. See the illustration below.
34 HA Tech Tips
Tips for Sealed System Repairs
By Nicholas Webert, Regional Technical Trainer
Sealed system repairs can be tricky, especially with the new dual evaporator units
and the addition of TDM valves. With that in mind, I have gathered together some
useful tips that can help make your sealed system repairs less tricky and more
consistently successful. If you need additional help aer reading through the tips,
take some time to log into Plus 1 and review our new “Sealed System” videos.
(http://my.plus1solutions.net/clientPortals/samsung)
Tip 1. No more sweep charges! To start, make sure you’re using a 1/4 or 1/3
horse vacuum pump. (Anything larger and you run the risk of collapsing some of
the copper lines.) Hook up to both the High side and the Low side, pull down to
about a 28 inch vacuum, and then let the pump run for 30 to 40 minutes. Once
that is complete, turn the pump off, and then monitor the gauges for 5 to 10 minutes to make sure there are no leaks. Any loss of pressure is a problem.
35 HA Tech Tips
Tips for Sealed System Repairs
continued
Tip 2. Make sure you are weighing your charge! It’s ok to slow charge or dump in
liquid, but you must know the amount that is going in while doing so.
A) If you like to slow fill the system, you should apply the charge from the low side.
In addition to watching your scale for the correct weight to exit the tank, you can
also watch your gauges and look for pressures around 105 psi on the high side
and 2 to 5 psi on the low side
B) If you prefer to dump your charge, it is best to do it on the high side. Running the
liquid through the filter drier will give you a higher success rate. Don’t forget to
keep your eye on your gauges for the pressures noted above.
Tip 3. Be Aware of the TDM Valve! TDM valves allow refrigerant to travel to both or
just one evaporator in the unit. If the TDM valve is clogged or stuck in one position,
the fresh food section could stop cooling. It could also cause both compartments not
to cool if the flow is stopped before it enters the valve. A quick and easy way to check
this valve is to use your temperature gun and shoot the two thinnest legs. Place a
piece of paper behind each leg to make sure you are reading the refrigeration line and
not the compressor compartment walls. If the refrigerant is running through both legs,
the temperature on the gun will read the same. If the temperatures read differently
on the gun, press the power cool button, wait for 3 minutes, and then repeat your
steps with the temperature gun.
36 HA Tech Tips
Samsung’s New Model Refrigerator
Has Sparkling Water
Wes Sirois, Manager, HA Product Support
Introducing the newest addition to Samsung’s refrigerator line-up, the RF31FMBSR.
The RF31FMBSR is the first refrigerator with a built-in Sparkling Water (SodaStream)
System.
More technical information will be available soon. Expected release date is
late March 2013.
Sparkling Water on Demand
37 HA Tech Tips
Samsung’s New Model Refrigerator
Has Sparkling Water
continued
Ultra High Capacity (31 Cubic Feet)
Le Side Door
38 HA Tech Tips
Counter Height FlexZone Drawer
CO2 Cartridge
Door Closed
CO2 Cartridge
Door Open
Samsung’s New Model Refrigerator
Has Sparkling Water
continued
Level Sensor
Sparkling
Storage Tank
39 HA Tech Tips
Complete Sparkling and
Fresh Water Assembly