1
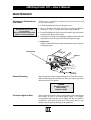
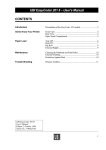
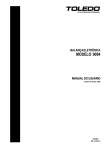
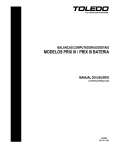
UBI EasyCoder 101 – User's Manual
CONTENTS
Introduction
Presentation of the EasyCoder 101 models .............................. 3
Get to Know Your Printer
Front View .............................................................................. 4
Rear View ............................................................................... 4
Paper Stock Compartment ....................................................... 5
Installation
Mains Connection ................................................................... 6
Computer Connection ............................................................. 6
Memory Card .......................................................................... 7
Paper Load
Tear-Off .................................................................................. 8
Peel-Off .................................................................................. 9
External Supply ..................................................................... 10
Maintenance
Cleaning the Printhead and Print Roller ................................. 11
External Cleaning .................................................................. 11
Protection Against Dust ......................................................... 11
Trouble Shooting
Printout Troubles ................................................................... 12
UBI EasyCoder 101
User's Manual
Edition 2, October 1994
Article No. 1-960321-01
1
UBI EasyCoder 101 – User's Manual
Information in this manual is subject to change without prior notice and does not represent a commitment
on the part of UBI Printer AB.
© Copyright UBI Printer AB, 1993. All rights reserved. Published in Sweden.
EasyCoder and LabelShop are trademarks of United Barcode Industries (UBI).
Macintosh is a registered trademark of Apple Computer Inc.
Microsoft is a registered trademark of Microsoft Corporation.
Windows is a trademark of Microsoft Corporation.
FCC Notice
United States of America
WARNING:
This equipment generates, uses, and can radiate radio frequency energy and if not installed and used in accordance with
the instructions manual, may cause interference to radio communications. It has been tested and found to comply with the
limits for a Class A computing device pursuant to Subpart J of Part 15 of FCC Rules, which are designed to provide
reasonable protection against such interference when operated in a commercial environment. Operation of this equipment
in a residential area is likely to cause interference in which case the user at his own expense will be required to take whatever
measures may be required to correct the interference.
DOC Notice
Canada
Canadian Dept. of Communication
REGULATIONS COMPLIANCE
(DOC-A)
This digital apparatus does not exceed the class A limits for radio noise emissions from a digital apparatus as set out in
the radio interference regulations of the Canadian Department of Communication.
✳✳✳
Ministère des Communications du Canada
CONFORMITE DE REGLEMENTS
(DOC-A)
Le présent appareil numérique n´émet pas de bruits radio-électriques dépassant les limites applicables aux appareils
numériques de classe A prescrites dans le règlement sur brouillage radioélectrique édicté par le Ministère des
Communications du Canada.
VDE Notice
Germany
ALLGEMEINE VORSCHRIFT:
Reparaturen oder sonstige Eingriffe, die sich nicht auf normale Bedienung der Maschine beziehen, dürfen ausschließlich
nur von einem ausgebildeten, zuständigen Fachmann vorgenommen werden.
2
UBI EasyCoder 101 – User's Manual
INTRODUCTION
EasyCoder 101
Power
EasyCoder 101 E
Ready
Error
Power
7
Ready
Error
F1
Pause
F2
Setup
F3
Feed
F4
Enter
F5
4
1
.
8
5
2
0
9
EasyCoder 101 SA
6
C
Power
7
Ready
Error
3
Ins
Pause
Del
Setup
Esc
Feed
4
1
Enter
.
8
5
2
0
9
6
3
C
PULL/TIREZ
PULL/TIREZ
PULL/TIREZ
UBI EasyCoder 101
UBI EasyCoder 101 E
UBI EasyCoder 101 SA
The UBI EasyCoder 101 is a series of medium duty
direct thermal printers. They come in three main
models intended for different types of applications:
• EasyCoder 101 is mainly intended to be controlled by a host computer using standard or custommade application software, e.g. the UBI LabelShop
label-design program for Microsoft Windows.
Being a low-cost alternative, it has fewer options
than the other members of the EasyCoder 101
printer family. Externally, the EasyCoder 101 is
distinguished by the absence of any built-in keyboard.
• EasyCoder 101 E (Enhanced) offers a built-in
keyboard and a larger number options in regard of
computer connection. It is recommended for
installations, where you want to switch between
different application programs, or create your
own programs in the built-in UBI Fingerprint
programming language. This printer model is
easily recognized by its 21-key membrane setup
keyboard (F1–F5).
• EasyCoder 101 SA is very similar to the
EasyCoder 101 E model, but is fitted with a
special “Stand-Alone” software and a special
keyboard, which allows the printer to be operated
independently, without any computer connection.
The EasyCoder 101 SA can easily be “docked” to
a personal computer and loaded with label texts
and formats created in the UBI LabelShop labelediting program running under Microsoft Windows.
Information on the different models and options
can be found in the Technical Manual, which also
describes installation and computer connection .
The following manuals may be of interest to the
operator or programmer:
• UBI Shell 3.1 Standard, Startup Manual
• UBI Shell 3.1 Enhanced, Startup Manual
• UBI EasyCoder 101, Technical Manual
• UBI Stand-Alone Concept, Operating Instructions
• UBI Fingerprint 5.0, Programmer's Manual
• UBI Fingerprint 5.1, Update Information
• UBI LabelShop, Operator's Manual
• UBI Windows Driver, Installation Instructions
• UBI Macintosh Driver, Installation Instructions
3
UBI EasyCoder 101 – User's Manual
GET TO KNOW YOUR PRINTER
Latch
LED Indicator Lamps
Display Window
EasyCoder 101 E
Keyboard (3 different types)
Power
7
Ready
Error
F1
Pause
F2
Setup
F3
Feed
F4
F5
Enter
4
1
.
8
5
2
0
9
6
3
C
Print Button
Print Output Slot
PULL/TIREZ
Memory Card Adapter
(optional)
Right-hand Door
Label Taken Sensor (optional)
Rails
CAUTION
SHOCK
ELECTRIC
RISK OF
OPEN
DO NOT
Intake for
External Paper Stock
Rails
N
ATTENTIO
CTRIQUE
CHOC ELE
RISQUE DE
RIR
NE PAS OUV
230 VAC
50 Hz
Intake for
External Paper Stock
Main Switch
Communication Port(s)
Voltage Sign
Mains Cord
Receptacle
Continued!
4
UBI EasyCoder 101 – User's Manual
GET TO KNOW YOUR PRINTER, cont'd.
The paper stock compartment becomes accessible when the righthand door is swung open. Although the printer is operable when this
door is left opened, you are strongly recommended to keep it closed
during normal operation, so as to prevent the printer mechanism
from being exposed to dust.
Printhead Lift Lever
EasyC
oder
Thermal
Printhead
101
Power
Ready
Error
UBI
PULL
TA
/TIRE
Z
Type
Art. No.
Ser. No.
115/230 V
Hz
2.6/1.3 A 50–60
SWEDEN
MADE IN
Rubber Roller
Dispenser
Shaft
Guide Rollers
Adjustable
Paper Guide
Backing Paper Take-Up
Idler Roll
Paper Supply Spool
External Paper Roll Holder (optional)
5
UBI EasyCoder 101 – User's Manual
PAPER LOAD
Tear-Off
EasyC
oder
101
Power
Ready
Error
UBI
PULL
TA
/TIRE
Z
Type
Art. No.
Ser. No.
115/230 V
Hz
2.6/1.3 A 50–60
SWEDEN
MADE IN
Remove the dispenser shaft
before permanently switching to
Tear-Off operation
Turn the printhead lift lever clockwise to vertical position.
2 Fit a new paper roll on the paper supply spool and push the roll
inwards as far as it will go.
1
3
Thread the paper above the take-up spool and underneath the
three guide shafts.
Thread the paper past the print roller.
5 Adjust the green paper guide so that the paper is guided with a
minimum of play.
4
6
Turn the printhead lift lever counter-clockwise to horizontal
position.
7
Feed out at least one label.
To tear off the paper, pull it upwards.
6
UBI EasyCoder 101 – User's Manual
PAPER LOAD, cont'd.
Peel-Off
EasyC
oder
101
Power
Ready
Error
UBI
PULL
TA
/TIRE
Z
Type
Art. No.
Ser. No.
115/230 V
Hz
2.6/1.3 A 50–60
SWEDEN
MADE IN
Note
The backing paper take-up can
accommodate the backing paper
from a full roll of labels.
Turn the printhead lift lever clockwise to vertical position.
2 Pull out the green plug on the backing paper take-up and dispose
of all wound-up backing paper.
1
3
Fit a new paper roll on the paper supply spool and push the roll
inwards as far as it will go.
4
Thread the paper above the take-up spool and underneath the
three guide shafts.
Thread the paper past the print roller.
6 Remove the labels from the first 25 cm (10") of the paper web.
Wrap the backing paper around the print roller and dispenser
edge. Then thread it back under the print mechanism and around
the idler shaft.
5
BACKING
PAPER
Affix the backing paper to the take-up
spool by means of the plug.
7
Affix the backing paper on the take-up spool by means of the
plug (see illustration).
8
Manually rotate the backing paper take-up and the paper roll so
the paper web becomes tight.
9
Turn the printhead lift lever counter-clockwise to horizontal
position.
10
Feed out at least one label.
7
UBI EasyCoder 101 – User's Manual
PAPER LOAD, cont'd.
External Supply
The EasyCoder 101 printers can use various types of external
supplies, e.g. boxes of fan-folded tickets or an external paper roll.
The optional External Paper Roll Holder can accommodate a paper
roll with a diameter of 180 mm (≈ 7"). It can be fitted either on top
on the printer or behind it, by means of the attachment rails.
EasyCo
der 10
1
Power
Ready
Error
UBI
PULL
TA
/TIRE
Z
Type
Art. No.
Ser. No.
115/230 V
Hz
2.6/1.3 A 50–60
SWEDEN
MADE IN
Note:
When using an external paper supply
in connection with peel-off operation,
regularly check the backing paper
take-up spool!
EasyC
oder
101
Power
Ready
Error
UBI
PULL
TA
/TIRE
Z
Type
Art. No.
Ser. No.
115/230 V
Hz
2.6/1.3 A 50–60
SWEDEN
MADE IN
8
UBI EasyCoder 101 – User's Manual
MAINTENANCE
Cleaning the Printhead and
Print Roller
Cleaning on a regular basis is important for life of the printer and
for the printout quality.
Lift the printhead and remove the paper web.
2 Insert a Printhead Cleaning Card into the print mechanism,
allowing 2–3 cm (1") to extend in front of the printhead.
1
WARNING!
The printhead and print roller
are very delicate.
Never use any tools to remove stuck
labels or to clean the printhead.
3
Lock the printhead in lowered position and slowly pull out the
cleaning card. Repeat if necessary.
4
Using a piece of cloth or blotting paper slightly moistened with
isopropanol, clean the print roller and the dispenser edge.
5
Important!
Allow a couple of minutes for the cleaned parts to get dry before
loading the paper.
EasyC
oder
Cleaning Card
101
Power
Ready
Error
Lift Lever
UBI
PULL
/TIRE
External Cleaning
Z
Wipe the outside surfaces using a damp piece of cloth. If necessary,
add a mild detergent. Be careful not to allow any water to penetrate
into the interior of the printer.
CAUTION!
Remove the power cord
before cleaning.
Dangerous voltage!
Protection Against Dust
Protect paper from dust by always keeping the stock compartment
door closed. In case of an external paper supply, it is strongly
recommended that both the actual supply and the web path be
protected by some kind of dust cover. Dirt, sand, grit etc. may
rapidly cause irreparable damage to the printhead.
9
UBI EasyCoder 101 – User's Manual
TROUBLE SHOOTING
Printout Troubles
Symptom
Overall weak printout
The list below is intended to help the operator to correct possible
printout troubles or flaws in printout quality, and to decide when
assistance from the Service dept. of the nearest UBI distributor is
required. Note that most problems are due to operating errors or
normal wear of the printhead.
Possible Cause
Wrong Paper type setup
Low Contrast setup
Worn printhead
Wrong printhead voltage
Printout weaker on one side
Uneven printhead pressure
Weak spots
Foreign particles on paper
Poor paper quality
Worn printhead
Worn pressing roller
Overall dark printout
Wrong Paper Type setup
Contrast setup too high
Wrong printhead voltage
Excessive bleeding
Wrong Paper Type setup
Contrast setup too high
Faulty energy control
Dark lines along paper web
Foreign objects on printhead
White lines along paper web
Printhead dirty
Missing dots on printhead
Large part of dot line missing
Wrong X-start or Width setup
Failing printhead
Failing strobe signal
Last part of label missing
Too small image buffer
Printout missing along inner edge Bad paper alignment
X-start setup too low
Remedy
Change
Increase value
Replace
Repair CPU
Adjust
Remove
Use other media
Replace
Replace
Change
Decrease
Repair CPU
Change
Decrease
Check CPU board
Clean
Clean
Replace
Change
Replace
Check CPU-board
Increase size
Adjust
Increase value
Refer to
Technical Manual
Technical Manual
TPH Install Instructions
☎ Call Service
☎ Call Service
n.a.
Technical Manual
TPH Install Instructions
☎ Call Service
Technical Manual
Technical Manual
☎ Call Service
Technical Manual
Technical Manual
☎ Call Service
User's Manual p. 9
User's Manual p. 9
TPH Install Instructions
Technical Manual
TPH Install Instructions
☎ Call Service
Technical Manual
User's Manual p. 6-8
Technical Manual
10