1
N
917,387000
OWNER'S MANUAL
° AssembUy
o Operation
oCustomer
Responsibinities
o Service
o Adjustments
o Repair Parts
Caution:
Read and Follow
all Safety Rules
and Instructions
Before Operating
This Equipment
156683
REV_2
06o12,97
VBLiKFSW
Printed in U.S,,Ao
IIII11
..........................................
SAFETY RULES
_k
Safe Operation
Practices for Walk-Behind
Mowers
IMPORTANT= THIS CUTTING MACHINE IS CAPABLE OF AMPUTATING HANDS AND FEET AND THROWING OBJECTS_
FAILURE TO OBSERVE THE FOLLOWING SAFETY INSTRUCTIONS COULD RESULT IN SERIOUS INJURY OR DEATH_
SAFETY STANDARDS REQUIRE OPERATOR PRESENCE CONTROLS TO MINIMIZE THE RISK OF INJURY. YOUR UNIT IS
EQUIPPED WITH SUCH CONTROLS.
DO NOT ATTEMPT TO DEFEAT THE FUNCTION OF THE OPERATOR PRESENCE
CONTROLS UNDER ANY CIRCUMSTANCES.
TRAINING:
•
Read this operator's manual carefuliyo Become familiar with
the controls and know how to operate your mower properly..
Learn how to quickly stop mower.
°
Do not continueto run your mower ifyou hit a foreign objecL
Follow the procedure outlined above, then repair any damage before restarting and operating you mower,
°
Do not allow children to use your mower. Never allow adults
to use mower without proper instructions.
°
Do not change the governor settings or overspeed the
engine. Engine damage or personal injury may result.
•
Keep the area of operation clear of all persons, especially
small children and pets..
•
Do not operate your mower if it vibrates abnormalfy_ Excessive vibration is an indication of damage; stop the engine,
safely check for the cause of vibration and repair as required.
=
Use mower only as the manufacturer intended and as described in this manual.
•
Do not run the engine indoors, Exhaust fumes are danger-
•
Do not operate mower if it tlas been dropped or damaged in
any manner.. Always have damage repaired before using
your moweL
Do not use accessory attachments that are not recommended
by the manufacturer. Use of such attachments may be
hazardous
•
Never cut grass by pulling the mower towards you. Mow
across the face of slopes, never up and down or you might
lose your footing_ Do not mow excessively steep slopes. Use
caution when operating the mower on uneven terrain orwhen
changing directions* maintain good footing,
°
Never operate your mower without proper guards, plates,
grass catcher or other safety devices in place.
•
•
OUS_
The blade turns when the engine is running°
MAINTENANCE
PREPARATION:
•
°
Always thoroughlycheck the area to be mowed and clear it of
all stones, sticks, wires, bones, and other foreign objects.
These objects will be thrown by the blade and can cause
severe injury_
°
Always wear safety glasses or eye shields when startingand
while using your mower
°
Dress properly, Do not operate mower when barefoot or
wearing open sandals_ Wear only solid shoes with good
traction when mowing
°
Check fuel tank before starting engine_ Do not fill gas tank
indoors,when the engine is runningor when the engine is hot.
Allow the engine to cool for severa! minutes before filling the
gas tank. Clean off any spilled gasoline before starting the
engine.
°
Always make wheel height adjustments before starting your'
mower. Never attempt to do this while the engine is running.
°
Mow only in daylight or good artificial light.
Check the blade and the engine mounting bolts often to be
sure they are tightened properly,.
Check all bolts, nuts and screws at frequent intervals for
proper tightness to be sure mower is in safe working condition.
°
°
°
Keep all safety devices in place and working°
To reduce fire hazard, keep the engine free of grass, leaves
or excessive grease and oil
•
Check grass catcher often for deterioration and wear and
replace wom bags. Use only replacement bags that are
recommended by and comply with specifications of the
manufacturer of your mower_
°
Always keep a sharp blade on your mower.
•
-
Al!ow engine to cool before storing in any enclosure..
Never' store mower with fuel in the tank inside a building
where fumes may reach an open flame or an ignition source
such as a hot water heater, space heater, clothes dryer, etc.
...........................................
OPERATION:
•
Keep your eyes and mind on your mower and the area being
cut. Do not let other' interests distract you..
•
Do not mow wet or slippery grass_ Never run while operating
your mower. Always be sure of your footing- keep a firm hold
on the handles and walk
°
Do not put hands or feet near or under rotating parts, Keep
clear of the discharge opening at all times.
•
Always stop the engine whenever you leave or are not using
your mower, or before crossing driveways, walks, roads, and
any gravel-covered areas..
•
Never direct discharge of material toward bystanders nor
allow anyone near the mower while you are operating it.
•
Before cleaning, inspecting, or repairing your mower, stop the
engine and make absolutely sure the blade and all moving
parts havestoppedo Then disconnect the sparkplug wire and
keep it away from the spark plug to prevent accidental
starting.
AND STORAGE:
i
,i
Look for this symbol
[L
it[
I
IIII
to point out im-
CAUTIONtt[
YOUR
portant safetyBECOMEALERTI!t
precautions,
It means
SAFETY IS INVOLVED.
, ...................
I
...................
ii i,i
CAUTION:
Always disconnect
spark
plug wire and place wire where it cannot contact spark plug in order to prevent accidental starting when setting
:,,,,_,,
i
iuJiL,u,,,i,
up, transporting,
adjusting, ,,,_ or making
_
.........
,
re,pairs.
""IIIIIIIL
"WARNING
The engine exhaust from this product contains ct_emicals known to the State of California to cause cancer,
reproductive harm.
...........
2
birth defects,
............
i
' IIJ!lJl]l
or other
III
PRODUCT SPECIFICATIONS
CONGRATULATIONS on your purchase of a Sears Lawn
Mower., It has been designed, engineered and manufactured to give you the best possible dependability and
performance°
HORSEPOWER:
3°5
DISPLACEMENT:
905 CU, IN.
Should you experience any problem you cannot easity
remedy, please contact your nearest Sears Authorized
Service Center/Department,
We have competent, welltrained technicians and the proper tools to service or repair
this lawn mower.
GASOLINECAPACITY
AND TYPE:
1.25 QUARTS
UNLEADED REGULAR
Piease read and retain this manual° The instructions will
enable you to assemble and maintain your lawn mower
properly, Always observe the "SAFETY RULES".
OiL CAPACITY:
20 OZSo
SPARK PLUG:
(GAP: _030")
CHAMPION J19LM, RJ19LM
STD361458
VALVE CLEARANCE:
INTAKE:
.008 IN,
EXHAUST: ,.008IN.
SERIAL
NUMBER
SOLID STATE IGNITION
AIR GAP:
..0125IN.
DATE OF PURCHASE
BLADEBOLT TORQUE:
35-40 FToLBS.
MODEL
NUMBER
OIL TYPE (API-SF/SG/SH): SAE 30 (ABOVE 32°F)
SAE 5W-30 (BELOW 32°F)
917..387000
THE MODELAND SERIAL NUMBERS WILL BE FOUND
ON A DECAL ATTACHED TO THE REAR OF THE
LAWN MOWER HOUSING
YOU SHOULD RECORD BOTH SERIAL NUMBER AND
DATE OF PURCHASE AND KEEP IN A SAFE PLACE
FOR FUTURE REFERENCE.
MAINTENANCE
AGREEMENT
A Sears Maintenance Agreement is available on this product,. Contact your nearest Sears store for details,
CUSTOMER
RESPONSIBILITIES
o
•
Read and observe the safety ruleso
Follow a regular schedule in maintaining, caring for and using your lawn mower,
°
Follow the instructionsunder "Customer Responsibilities" and "Storage" sections of this owner's manual°
LIMITED ONE YEAR WARRANTY ON CRAFTSMAN
POWER MOWER
For one year from date of purchase, when this Craftsman Lawn Mower is maintained, lubricated, and tuned up
according to the operating and maintenance instructionsin the owner's manual, Sears will repair free of charge any
defect in material or workmanship°
._
If this Craftsman Lawn Mower is used for commercial or rental purposes, this warranty applies for only 90 days from
the date of purchase,.
This Warranty does not cover:
o
Expendable items which become worn during normal use, such as rotary mower blades, blade adapters, belts,
air cleaners and spark plug,
•
Repairs necessary because of operator abuse or negligence, includingbent crankshafts and the failure to maintain
the equipment according to the instructions contained in the owner's manual
WARRANTY SERVICE IS AVAILABLE BY RETURNING THE CRAFTSMAN POWER MOWER TO THE NEAREST
SEARS SERVICE CENTER/DEPARTMENT IN THE UNITED STATES° THIS WARRANTY APPLIES ONLY WHILE
THIS PRODUCT IS IN USE IN THE UNITED STATES.
This Warranty gives you specific legal rights, and you may also have other rights which vary from state to state.
SEARS, ROEBUCK AND CO., D/817 WA, HOFFMAN ESTATES, ILLINOIS 60179
3
TABLE OF CONTENTS
PRODUCT SPECIFICATIONS
....................... 2
CUSTOMER RESPONSIBILITIES
........ 3, 9-11
WARRANTY ...................................................
2
SAFETY RULES .............................................
3
ASSEMBLY ....................................................
5
OPERATION ................................................
6-8
SERVICE AND ADJUSTMENTS .................. 12
STORAGE ....................................................
13
REPAIR PARTS-LAWN MOWER ........... 14-15
REPAI R PARTS-ENGI NE ....................... 16-18
TROUBLESHOOTING
..................................
19
PARTS ORDERING ......................................
20
INDEX
A
Adjustments:
Carburetor .................................. 12
Height of Cut ............................... 7
Air Filter:
Replacement .............................. 11
Assembly:
Handle .......................................... 5
B
Blade:
Sharpening ................................ 10
Replacement .............................. 10
C
Controls:
Engine Zone Control ................ 6,7
Customer Responsibilities ....... 3, 9-11
Air Filter ..................................... tl
Blade Care/Replacement .......... 10
Engine ........................................ 1t
Lubrication ............................. 9,11
Spark Plug ................................. 11
Mowing Tips ................................. 8
Cutting Levels .................................... 7
E
Engine:
Controls ....................................... 7
Oil Filler Plug ............................... 6
Oil Change ................................. 11
Oil Level .................................. 7,1t
Oil Type ........................................ 7
Starting ........................................ 8
Storage ....................................... 13
F
Fuel:
Type .............................................. 8
Storage ....................................... 13
H
Handle:
Assembly ..................................... 5
Height, Cutting ............................ 7
L
Lubrication:
Engine .......................................... 9
Wheel Adjusters .......................... 9
Discharge Guard Hinge Pin ....... 9
O
Oil:
Engine ...................................... 7,11
Storage ....................................... 13
Operation:
Operating Lawn Mower. ........... 6-8
Operator Presence Control .. 9,11
R
Repair/Replacement Parts .......... 14-18
Responsibilities, Customer ...... 3, 9-11
S
SafelPj Rules ........................................ 2
Service and Adjustments:
Carburetor ................................. 12
Spark Plug .......................................... 11
Specifications ..................................... 3
Speed Control:
Engine ............................................. 7
Starling the Engine ..................... 8
Starter Handle ............................. 8
Storage .............................................. 13
T
Trouble Shooting Chart ................... 19
W
Warranty ..............................................
4
3
LAWN
R ACCESSORmES
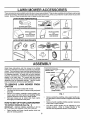
These accessories were available when this lawn mower was produced° They are also available at most Sears retail outlets
and service centers,, Most Sears stores can also order repair parts for you, when you provide the model number of your lawn
mower. Some of these accessories may not apply to your lawn mower_
LAWN MOWER
ii
PERFORMANCE
CLIPPING DEFLECTOR
FOR REAR DISCHARGE LAWN MOWERS
I.l==HH II
I .I
I
I ll= = II
I
|
STABILIZER
MULCHER KITS
=
GRASS CATCHERS
FOR
REAR DISCHARGE
LAWN MOWERS
A/
/'
lll
ll
GRASS CATCHERS
FOR
SiDE DISCHARGE
LAWN MOWERS
GAS CANS
LAWN MOWER
MAINTENANCE
MUFFLERS
AIR FILTERS
i
BELTS
BLADES
LI
I
II
BLADE ADAPTERS
SPARK PLUGS
I I.I.
HH...I
I,H.HH,.H,I"_ ...............................
WHEELS
ENGINE OIL
LY
Read these instructions and this manual in its entirety
before you attempt to assemble or operate your new lawn
mower. Your new lawn mower has been assembled at the
factory with the exception of those parts left unassembled
for shipping purposes,. Al! parts such as nuts, washers,
bolts, etc,, necessaryto complete the assembly have been
placed in the parts bag. To ensure safe and proper
operation of your lawn mower, all parts and hardware you
assemble must be tightened securely. Use the correct
tools as necessary to ensure proper tightness..
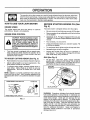
TO REMOVE
CARTON
=
°
o
-
LAWN MOWER
OPERATOR PRESENCE
CONTROLBAR
UPPER HANDLE
LIFT UP
FROM
MOWING POSITION
Remove loose parts included with mower°
Cut down two end corners of carton and lay end panel
down flato
Remove all packing materials except padding between upper and lower handle and padding holding
operator presence control bar to upper handle.
Roll lawn mower out of carton and check carton
thoroughly for additional loose parts.
LOWER HANDLE
FIG. 1
Remove protective padding, raise upper handle section into place on lower handle and tighten both handle
knobs.
HOW TO SET UP YOUR LAWN MOWER
°
Remove handle padding holding operator presence
control bar to upper handler
TO UNFOLD
•
Your lawn mower handle can be adjusted for your
mowing comfort° Refer to "Adjust Handle" in the
Service and Adjustments section of this manual.
HANDLE (See
Fig.
1)
IMPORTANT: UNFOLD HANDLE CAREFULLY SO AS
NOT TO PINCH OR DAMAGE CONTROL CABLES.
•
Raise handles until lower handle section locks into
place in mowing position,.
5
................
iii iiii
...................................
OPERATION
I
I
III
LIIIII
I IIIIII
lJlll
...................................
i
I IIIIII
I
I
I LI
I I I IIIIII
:
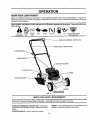
KNOW YOUR LAWN MOWER
READ THIS OWNER'S MANUAL AND SAFETY RULES BEFORE OPERATING YOUR LAWN MOWER, Compare the
illustrationswith your lawn mower to familiarize yourself with the location of various controls and adjustments. Save this
manual for future reference.
ij,
_ i _lJlUUUlJiiiNiiii
These symbols may appear on your lawn mower or in literature supplied with the product. Learn and understand
their meaning.
i\l
CAUTION
OR WARNING
ENGINE
ON
ENGINE
OFF
.............................................................
FAST
SLOW
CHOKE
..................................
FUEL
OIL
,, ,,.,,,,,,,,,,.....
DANGER, KEEP HANDS
AND FEET AWAy ........
OPERATOR PRESENCE
CONTROL, BAR
ENGINE ZONE CONTROL CABLE
STARTER HANDLE
HANDLE KNOBS
FILLER CAP
OIL FILLER PLUG
PRIMER
DtSCHARGE GUARD
HOUSING
WHEEL ADJUSTER
FIG, 2
.............................................................................
,, ,, , ,,,,,,,
(ONEACHWHEEL)
.................................................
MEETS CPSC SAFETY REQUIREMENTS
Sears rotary walk-behind power lawn mowers conform to the safety standards of the American National Standards institute
and the U.S. Consumer Product Safety Commission. The blade turns when the engine is running.
.....................................................
,,,,
,,,
,,,,,
.............................
,,,,,,,
,,,,,,,,,,,,,,,
PRIMER -.pumps additional fuel from the carburetor to the
cylinder for use when starting a cold engine.
OPERATOR PRESENCE CONTROL, BAR - must be held
down tothe handle to start the engine, Release to stop the
engine.
STARTER HANDLE - used for starting the engine.
6
OPERATmON
in,,ll,U
....
,Hlu,
i
_u
i
i
u ul 'M,H"II'""II'
I I
I I
I
The operation of any lawn mower can result in foreign objects thrown into the eyes, which can
result in severe eye damage. Always wear safety glasses or eye shields while operating your
lawn mower or performing any adjustments or repairs. We recommend a wide vision safety
mask over the spectacles or standard safety glasses,
1,1,1,11111,1
i,i ,
_
_1,,111,,,11
HOW TO USE YOUR LAWN MOWER
II
Hn
lu,nnlll,ll,,,,,,,,,,,lll,
BEFORE STARTING ENGINE OIL (See
Fig. 4)
ENGINE SPEED
The engine speed was set at the factory for optimum
performance. Speed is not adjustable.
Your lawn mower is shipped without oil in the engine.
•
Be sure mower islevel and area around oil fill is clean.
ENGINE ZONE CONTROL
°
Remove engine oil cap w/dipstick and fill to the full line
on the dipstick.
°
Use20oz& of oil. For type and grade of oil to use, see
"ENGINE" in Customer Responsibilities section of this
manual.
o
°
Pour oil slowly° Do not over fill,
Check oil level before each use_ Add oil if needed. Fill
to full line on dipstick.
o
o
To read proper level, tighten engine oil cap each time.
Reinstall engine oil cap and tighten,
°
Change the oil after every 25 hours of operation or
each season, You may need to change the oil more
often under dusty, dirty conditions°
&
CAUTION: Federal regulations require
an engine control to be installed on this
lawn mower in order to minimize the
risk of blade contact injury. Do not
under any circumstances attempt to
defeat the function of the operator control. The blade turns when the engine is
running.
_lllllIHHn I I I I
Your lawn mower is equipped with an operator presence control bar which requires the operator to be
positioned behind the lawn mower handle to start and
operate the lawn mower,
o
TO ADJUST
=
°
CUTTING
GAS (See Fig. 4)
HEIGHT (See Fig. 3)
°
Raise wheels for low cut and lower wheels for high cut,
Adjust cutting height to suit your requirements. Medium position is best for most tawns_
•
To change cutting height, squeeze adjuster lever toward wheel Move wheel up or down to suit your
requirements, Be sure all wheels are in the same
setting_
NOTE: Adjuster is properly positioned when plate tab
inserts into hole in lever_ Also, 9-position adjusters (if so
Fill fuel tank, Use fresh, clean, regular unleaded
gasoline with a minimum of 87 octane. Do not mix oil
with gasoline. Purchase fuel in quantities that can be
used within 30 days to assure fuel freshness_
GASOLINE
FILLER CAP
qbUsipped)allow lever to be positioned between the plate
LOWER WHEELS FOR HIGH CUT
PLATE TAB
OIL FILLER PLUG
FIG. 4
WARNING: Experience indicates that alcohol blended
fuels (called gasohol or using ethanol or methanol) can
attract moisture which leads to separation and formation of
acids during storage_ Acidic gas can damage the fuel
system of an engine while in storage. To avoid engine
problems, the fuel system should be emptied before storage of 30 days or longer, Drain the fuel tank, start the
engine and let it run until fuel lines and carburetor are
empty. Use fresh fuel next season. See Storage Instructions for additional information.
Never use engine or
carburetor cleaner products in fuel tank or permanent
damage may occur,
RAISE WHEELS FOR LOW CUT
FIG, 3
7
ATION
TO START ENGINE
MOWING TIPS
°
To start a cold engine, push primer five (5) timesbefore
trying to start. Use a firm push. This step isnot usually
necessary when starting an engine which has already
run for a few minutes.,
•
°
Hold operator presence control bar down to the handle
and pull starter handle quickly° Do not allow starter
rope to snap back.
•
°
To stop engine, release operator presence control bar.
NOTE: In cooler weather it may be necessary to repeat
priming steps, in warmer weather over priming may cause
flooding and engine will not start. If you do flood engine,
wait a few minutes before attempting to start and do not
repeat priming steps.
•
For better grass bagging and most cutting conditions,
the engine speed should be set in the fast (_) position°
•
For side discharge lawn mowers, cutting in a counter_
clockwise direction, starting at the outside of the area
to be cut, spreads grass clippings more evenly and
puts less load on the engine° To keep clippingsoff of
walkways, flower beds, etc., make the first cuts in a
clockwise direction_
o
Pores incloth grass catchers can become filtedwithdirt
and dust with use and catchers will collect less grass.,
Toprevent this, regularly hose catcher off with water
and let dry before using.
Keep top of engine around starter' clear and clean of
grass clippings and chaff. This will help engine air flow
and extend engine lifeo
°
8
Under certain conditions, such as very tall grass, itmay
be necessary to raise the height of cut to reduce
pushingeffort and to keep from overloading the engine
and leaving clumps of grass clippings.
For extremely heavy cutting, reduce the width ofcut by
overlapping previouslycut path and mow siowly.,
_"_O_,_'_._
Chec!_ :fO_o-o-se _asten e rs. ..........
clean/Inspect Grass Catcher
(If Equ.!pped) .................
M .Clean Lawn. Mower.
(Power-Propelled
_/V Clean
Under DriveMowers)
Cover
Checkdriv bei puiieys
.....
:
6/
tf
6/'
6/'
S ERVt O E DATES
........................
if
$f
II
(Power-Propelled Mowers)
II
Chec_ShaipenlRepiace
Blade .......................
"' i 0
Lubrication Chart
_ciean BatterylRechari e .......................
(Electric Start Mowers
.,,,
E Check Engine Oil Level
If
N Change Engine Oil
G .Clean Air Filter
! InsPect Muffler
Ni Clean or Replace Spark Plug
...........
E Replace Air Filter Paper Cartridge
I-
_p_'.._"
' '............
' ....
If
1_.3
If
.
..................
t_1.2
if
if
!_2
Change
more often when operating
under s heavy load or In high ambient
more often when operating
in dirty or dusty conditions,,
3- Replace blades more often when mowing tn sandy soil,,
4- Charge 48 hours at end of season
temperalures,
2- Service
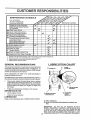
GENERAL RECOMMENDATIONS
LUBRICATION
The warranty on this lawn mower does not cover items that
have been subjected to operator abuse or negligence. To
receive full value from the warranty, operator must maintain
mower as instructed in this manual.
i_) ENGINE OIL
(_
CHART
WHEEL
ADJUSTER
Some adjustments will need to be made periodically to
properly maintain your uniL
All adjustments in the Service and Adjustments section of
this manual should be checked at least once each season°
=
Once a year, replace the spark plug, clean or replace
air filter element and check blade for wear, A newspark
plug and clean/new air filter element assures proper
air-fuel mixture and helps your engine run better and
last longer.
°
Follow the maintenance schedule in this manual°
BEFORE
EACH USE
BRAKE SPRING
BRACKET
/
°
Check engine oil level.
°
Check for loose fasteners.
LUBRICATION
(_ HANDLE BRACKET
MOUNTING PIN
(_) DISCHARGE
GUARD
HINGE PIN
Keep unit well lubricated (See "LUBRICATION CHART")
(_ SPRAY LUBRICANT
(_) REFERTO
TION.
9
CUSTOMER
RESPONSIBILITIES
ii
ENGINE
*!
SEC-
IMPORTANT
DO NOT OIL OR GREASE
PLASTIC
WHEEL
BEARINGS.
VISCOUS
LUBRICANTS
WILL
ATTRACT DUST AND DIRT THAT WILL SHORTEN THE
LIFE OF THE SELF LUBRICATING
BEARINGS,
IF YOU
FEEL THEY MUST BE LUBRICATED,
USE ONLY A DRY,
POWDERED GRAPHITE TYPE LUBRICANT SPARINGLY.
CUSTOMER
R
BILITIES
LAWN MOWER
KEY
TIRES
.
, CRANKSHAFT
KEYWAY
BLADE
ADAPTER ,..,
Always observe safety rules when performing any maintenance,
Keep tires free of gasoline, oil, orinsectcontrot chemicals which can harm rubber,
•
Avoid stumps, stones, deep ruts, sharp objects and
other' hazards that may cause tire damage.
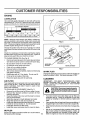
BLADE CARE
For best results, mowerblade must be kept sharp. Replace
bent or damaged blades.
TO REMOVE BLADE (See Fig. 5)
•
Disconnect spark plug wire from spark plug and place
wire where it cannot come in contact with spark plug_
•
Turn lawn mower on its side. Make sure air filter' and
carburetor are up.
•
Use a wood block between blade and mower' housing
to prevent blade from turning when removing blade
bolt.
°
Protect your hands with gloves and/or wrap blade with
heavy cloth°
°
CRANKSHAFT
BI
B(
HARDENED
WASHER
LOCK WASHER
TRA|LING
EDGE
BLADE ADAPTER
FIG. 5
to
SHARPEN BLADE
Care should be taken to keep the blade balanced. An
unbalanced blade will cause eventual damage to lawn
mower or engine.
Remove blade bolt by turning counter-clockwise,, Use
a 9/16" box or open-end wrench.
°
°
Remove blade and attaching hardware (bolt, lock
washer and hardened washer).
NOTE: Remove the btade adapter and check the key
inside hub of blade adapter. The key must be in good
condition to work properly. Replace adapter if damaged.
.
The blade can be sharpened with a file or on a grinding
wheel. Do not attempt to sharpen while on the mower,
To check blade balance, drive a naUinto a beam or wall.
Leave about one inch of the straight nail exposed.
Place center' hole of blade over the head of the nail. If
blade is balanced, it should remain in a horizontal
position. If either end of the blade moves downward,
sharpen the heavy end until the blade is balanced,
TO REPLACE BLADE (See Fig, 5)
o Position the blade adapter on the engine crankshaft.
Be sure key in adapter' and crankshaft keyway are
aligned.
GRASS CATCHER
°
Position blade on the blade adapter aligning the two (2)
holes in the blade with the raised lugs on the adapter°
•
The grass catcher may be hosed with water, but must
be dry when used.
Be sure the trailing edge of blade (opposite sharp
edge) is up toward the engine°
°
Installthe blade bolt with the Iockwasher and hardened
washer into btade adapter and crankshai't
°
Use block of wood between blade and lawn mower
housing and tighten the blade bolt, turning clockwise.
•
The recommended tighteningtorque is 35_40 ft. Ibso
IMPORTANT: BLADE BOLT IS GRADE 8 HEAT TREATED.
•
Check your grass catcher often for damage or deterioration, Through normal use it will wear. If catcher
needs replacing, replace only with a manufacturer
approved replacement catcher. Give the lawn mower
model number when ordering.
(If purchased as an accessory)
•
NOTE: We do not recommend sharpening blade - but ifyou
do, be sure the blade is balanced.
10
ENGINE
LUBRICATION
Use only high quality detergent oil rated with API service
classification SF, SG or SHo Select the oil's SAE viscosity
grade according to your expected operating temperature°
SAE VfSCOStTY GRADES
Bllml
mRlil
]
_F
-2o_
°c .3o,
0"
-20"
TEMPERATURE
30•
.1'oo
{
32" 4o=
o.
RANGE ANTiCiPATED
6o"
;o=
80"
_0:L
_0o_....
_0°
40"
BEFORE NEXT OIL CHANGE
OIL DRAIN
PLUG
NOTE; Although multi-viscosity oils (5W30, 10W30 etc.)
improve starting in cold weather, these multi-viscosity oils
witl result in increased oil consumption when used above
32°F. Check your engine oil level more frequently to avoid
possible engine damage from running low on oil
FIG. 6
AIR FILTER COVER
Change the oil after every 25 hours of operation or at least
once a year ifthe lawn mower is not used for 25 hours in one
year.
Check the crankcase oil level before starting the engine
and after each five (5) hours of continuous use. Tighten oil
plug securely each time you check the oil level
LIFT COVER
TO CHANGE ENGINE OIL (See Fig 6)
•
Disconnect spark plug wire from spark plug and place
wire where it cannot come in contact with spark plug.
•
Be sure lawn mower is on level surface
=
°
Oil will drain more freely when warm
Catch oil in a suitable container
•
=
Remove bottom oil drain plug.
After oil has drained completely, replace oil drain plug
and tighten securely.
Refill engine with oil. Pour slowly. Do not over fill.
Fill to top of slot inside of filler holeo
Reconnect spark plug wire to spark plug
°
°
=
AIR FILTER
Your engine will not run properly and may be damaged by
using a dirty air filter° Clean the element after every 25
hours of operation, more often if tractor is used in very
dusty, dirty conditions.
TO CLEAN AIR FILTER ELEMENT (See Fig. 7)_
o Remove the air filter cover by lifting on edge of cover
°
Remove filter element carefully to prevent dirt from
entering carburetor,
Clean the inside of the cover and the body to remove
any dirt accumulation.
° Wash filter element in liquid detergent and water
° Wrap filter element in cloth and squeeze dry.
.
Lightlycoat filterelementwithcleanengineoiL
Squeeze
in towel to remove excess oil. Do not saturate,
°
Install filter element into filter body°
o Install filter cover and press down to snap into place
MUFFLER
Inspect and replace corroded muffler as it could create a
11
fire hazard and!or damage°
AIR FILTER
ELEMENT
AIR RLTER BODY
FIG. 7
SPARK PLUG
Change the spark plug once a year to make the engine run
better and easier to start. Set spark plug gap at .030'L
CLEANING
IMPORTANT;
FOR BEST
PERFORMANCE,
KEEP
MOWER HOUSING
FREE OF BUILT-UP
GRASS AND
TRASH_ CLEAN THE UNDERSIDE
OF YOUR MOWER
AFTER EACH USE°
from spark plug and place wire where it
cannot come in contact with the spark
CAUTION:
Disconnect spark plug wire
plug.
',,._
.i
i
•
Turn lawn mower on its side. Make sure air filter and
carburetor are up. Clean the underside of your lawn
mower by scraping to remove build-up of grass and
trash°
°
Clean engine often to keep trash from accumulating. A
clogged engine runs hotter and shortens engine life.
•
Keep finished surfaces and wheels free of all gasoline,
oil,etc_
•
We do not recommend using a garden hose to clean
lawn mower unless the electrical system, muffler, air
filter and carburetor are covered to keep water out°
Water in engine can result in shortened engine life.
SERVICE AND ADJUSTMENTS
LAWN MOWER
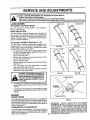
TO ADJUST CUTTING HEIGHT
MEDIUM LOW
MEDIUM HiGH
See "TO ADJUST CUTTING HEIGHT" in the Operation
section of this manual.
REAR DEFLECTOR
The rear deflector, attached between the rear wheels of
your mower, is provided to minimize the possibility that
objects will be thrown out of the rear of the mower intothe
operator mowing position., If the deflector becomes damaged, it should be replaced.
TO ADJUST
HANDLE
(See Figs. 8 - 10)
Your lawn mower handle can be raised or lowered for your
mowing comfort. Four (4) positions are available: high,
medium high, medium tow and low. Handles are shipped
mounted in the medium low position.
•
To change from medium low to medium high position,
the upper and lower handle sections will have to be
turned over (See Fig. 8B).
° Remove the cable clips°
= Remove the controls and operator presence control
bar from the upper handle_
°
Remove hairpin cotters.
° Disconnect the lower handle from the handle brackets
(See Fig. 10)_
o Turn the handle over and reassemble the hairpin
cotters that have been removed.
°
Reassemble the controls and the operator presence
control bar to the upper handle°
I ...........
A
......
_
•
•
CA'U'TI0'N: The operator presence con' ......
trol bar must pivot freelyto permit bladel
brake engagement when control bar is
released. Do not over tighten the fasteners holding the controls to the up-
FIG. 8A
FIG. 8B
LOW
FIG. 9B
FIG. 9A
LOWER HANDLE
per handle.
To change from medium low to high position only the
upper handle section will have to be turned over (See
Fig.,9A).
HANDLE BRACKET
SQUEEZE
TO REMOVE
To change from medium low to low position, only the
lower handle section wilt have to be turned over (See
Fig_9B)o
ENGINE
ENGINE SPEED
HAIRPIN COTTER
Your engine speed has been factory set. Do not attempt to
increase engine speed or it may result in personal injury.
If you believe that the engine is runningtoo fast ortoo slow,
take your lawn mower'to an authorized service center for
repair and adjustment,
CARBURETOR
ADJUSTMENTS
Your carburetor is not adjustable, tf your engine does not
operate properly due to suspected carburetor problems,
take your tawn mower to an authorized service center for
repair and/or adjustmenL
12
FIG. 10
IMPORTANT:
NEVER TAMPER
WITH THE ENGINE
GOVERNOR,
WHICH IS FACTORY SET FOR PROPER
ENGINE SPEED_ OVERSPEEDtNG
THE ENGINE ABOVE
THE
FACTORY
HIGH
SPEED
SETTING
CAN BE
DANGEROUS.. IF YOU THINK THE ENGINE-GOVERNED
HIGH SPEED NEEDS ADJUSTING, CONTACT YOUR
NEAREST AUTHORIZED SERVICE CENTER, WHICH HAS
PROPER EQUIPMENTAND EXPERIENCE TO MAKE ANY
NECESSARY ADJUSTMENTS.
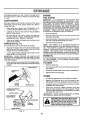
STORAGE
Immediately prepare your lawn mower for storage at the
end of the season or if the unit will not be used for 30 days
or more.
ENGINE
LAWN MOWER
IMPORTANT: IT IS IMPORTANT TO PREVENT GUM
DEPOSITS FROM FORMING IN ESSENTIAL FUEL
SYSTEM PARTS SUCH AS CARBURETOR, FUEL FILTER,
FUEL HOSE, OR TANK DURING STORAGE. ALSO,
EXPERIENCE INDICATES THAT ALCOHOL BLENDED
FUELS (CALLED GASOHOL OR USING ETHANOL OR
METHANOL) CAN ATTRACT MOISTURE WHICH LEADS
TO SEPARATION AND FORMATION OF ACIDS DURING
STORAGE. ACIDIC GAS CAN DAMAGE THE FUEL
SYSTEM OF AN ENGINE WHILE IN STORAGE..
•
Drain the fuel tank.
FUEL SYSTEM
When lawn mower is to be stored for a period of time, clean
it thoroughly, remove all dirt, grease, leaves, etc,. Store in
a clean, dry area.
•
.
o
•
Clean entire lawn mower (See "CLEANING" in the
Customer Responsibilities section of this manual)o
Lubricate as shown in the Customer Responsibilities
section of this manual
Be sure that all nuts, bolts, screws, and pins are
securely fastened° Inspect moving parts for damage,
breakage and wear° Replace if necessary.
Touch up all rusted or chipped paint surfaces; sand
lightly before painting.
Start the engine and let it run until the fuel Iines and
carburetor are empty.
=
Never use engine or carburetor cleaner products in the
fuel tank or permanent damage may occur°
Use fresh fuel next season,,
°
HANDLE (See Fig. 11)
NOTE: Fuel stabilizer is an acceptable alternative in
minimizing the formation of fuel gum deposits during storage. Add stabilizer to gasoline in fuel tank or storage
container. Always follow the mix ratio found on stabilizer
container. Run engine at least 10 minutes after adding
stabilizertoallowthestabilizerto
reach the carburetor. Do
not drain the gas tank and carburetor if using fuel stabilizer.
You can fold your lawn mower handle for storage,
°
Squeeze the bottom ends of the lower handle toward
each other until the lower handle clears the handle
bracket, then move handle forward.
o
Loosen upper handle mounting bolts enough to allow
upper handle to be folded back.
IMPORTANT:
WHEN FOLDING THE HANDLE FOR
STORAGE OR TRANSPORTATION, BE SURE TO FOLD
THE HANDLE AS SHOWN OR YOU MAY DAMAGE THE
CONTROL CABLES,
o
°
ENGINE OIL
Drain oil (with engine warm) and replace with clean engine
oil (See "ENGINE" in the Customer Responsibilities
section of this manual)°
When setting up your handle from the storage position,
the lower handle will automatically lock intothe mowing
position°
CYLINDER
SQUEEZE TO
FOLD
°
Remove spark plug.
°
Pour one ounce (29 ml) of oil through spark plug hole
into cy}indero
°
Pull starter handle slowly a few times to distribute oil
=
Repface with new spark plug_
OTHER
HAIRPIN
COTTER
o
Do not store gasoline from one season to another.
°
Replace your gasoline can if your can starts to rust°
Rust and/or dirt in your gasoline will cause problems°
If possible, store your unit indoors and cover it to give
protection from dust and dirt.
°
MOUNTING PIN
°
Cover your unit with a suitable protective cover that
does not retain moisture_ Do not use plastic. Plastic
cannot breathe which allows condensation to form and
will cause your unit to rust°
IMPORTANT: NEVER COVER MOWER WHILE ENGINE
AND EXHAUST AREAS ARE STILL WARM,.
OPERATOR PRESENCE
with gasoline in the tank inside a building where fumes may reach an open
flameorspark.
AIIowtheenginetocool
CAUTION: Never
store the lawn mower
before storing in any enclosure.
D_BACKWARD
!_
MOWING
POSITION
,
LOWER HANDLE
FIG. 11
13
!,!,::
,:
,:,
,:
,,:,,:,:,,:,,,:,,,
,,
.,:,L,I,H
I
I
|I
I
0
0
m
Z
0
i
W
Z
.J
ee
W
14
i
x
x
_o
E
60
0
m
v
E
x
_
o _
,-,
_
0
_o
"_ O_ ,,u
"0
Z
0
0
bcO
9
i-
a.
0
T-
UJ
o
o
in
Z
.J
ILl
Q
_0_0_0_0_000
,.d
_z
0
|
111
Z
.J
z
9
I--.
o
W
Q
0_
l-
<d
i-
_z
XX
0
0_
0
0
o
X
oo_
X_XX
o
X
o
X
o_o_mg*NN_om_mo.gmo_mo__m
>.
,,,d
_z
15
m
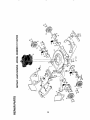
CRAFTSMAN
I
4.-CYCLE ENGINE
H_"""""%11'111111
............................
: I I :I ! i I :l i
MODEL
L I!1'!';_ii
....................
I ' II
NUMBER
143.973500
IIv'"''"IL
I"'1'1'"
.......
_==,_j 370K
.390
301
3OO
26
900
t_..,. 292
1
282/_
40O
110,
_1,.,292
t35
130
126
120
119
125
2"75
46
16
'1
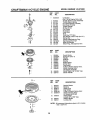
CRAFTSMAN
REF PART
NO. NO.
1
36470A
2
6
7
12A
t4
15
16
17
18
19
20
30
40
40
40
41
41
26727
33734
36557
36558
28277
30589
31383A
31335
651018
31361
32600
34460A
34514
34515
34516
32538B
32548B
41
32549B
42
42
42
43
45
46
48
50
52
69
70
28986
28987
28988
20381
30963B
32610A
27241
35990
29914
35261
30571C
72
75
80
81
82
83
86
89
90
92
93
t00
t03
110
119
120
125
125
126
126
130
36083
26208
30574A
30590A
30591
30588A
650488
61t004
6! t 112
650815
650816
34443A
651007
34961
364.37
36474
36471
36472
29314B
29315C
6021A
4-.CYCLE ENGINE
MODELNUMBER
143.973500
REF
NO.
DESCRIPTION
Cylinder (Incl.
2,7,20,125,169,172,174)
Dowel Pin
Breather Element
Breather Ass'y_ (IncL 6 & 12A)
Breather Cover & Tube
Washer
Governor Rod (Incio 14)
Governor Lever
Governor Lever Clamp
Screw, TorxT-15, 8-32 x 19/64"
Extension Spring
Oil Seal
Crankshaft
Piston, Pin & Ring Set (Std.)
Piston, Pin & Ring Set (.010" OS)
Piston, Pin & Ring Set(.020 OS)
Piston & Pin Ass'y. (Std.) (Inclo 43)
Piston & Pin Ass'y.
(.010" OS) (lncL 43)
Piston & Pin Ass'y.
(.020 OS) (Incl. 43)
Ring Set (Std.)
Ring Set (_010"OS)
Ring Set (.020" OS)
Piston Pin Retaining Ring
Connecting Rod Ass'y. (lncL 46)
Connecting Rod Bolt
Valve Lifter
Camshaft (BCR)
Oil PumpAss'y.
* Mounting Flange Gasket
Mounting Flange
(incl.72 thru 83,311)
Oil Drain Plug
Oil Seal
Governor Shaft
Washer
Governor Gear Ass'yo (IncL 8t)
Governor Spool
Screw, 1/4-20 x 1-t/4"
Flywheel Key
Flywheel
BelleviIte Washer
Flywheel Nut
Solid State Ignition
Screw, Torx T-15, 10-24 x 15/16"
Ground Wire
* Cylinder Head Gasket
Cylinder Head
Exhaust Valve (Std.) (Incl. 151)
Exhaust Valve (1/32" OS) (tnclo151
Intake Valve (Std.) (Inclo 151)
Intake Valve (1/32" OS) (Incl. 151)
Screw, 5/16-18 x 1-1/2"
PART
NO.
135 35395
150 35991
t51 31673
169 27234A
172 32755
174 30200
178 29752
182 6201
184 26756
185 31384A
186 32653
189 650839
191 36559
195 610973
207 34336
2t6 33086
223 650451
224 34690A
238 650806
239 34338
240 34858
245 34340
250 34341B
260 35491
261 30200
262 650831
275 35708
277 650795
285 35000A
287 650926
290 34357
292 26460
300 35586
301 36246
311 27625
313 34080
370A 36261
370C 36861
370K 36695
380 632046A
390 590694
400 36475
900 -900 --
DESCRIPTION
Resistor Spark Plug (RJ19LM)
Valve Spring
Valve Spring Cap
* Valve Cover Gasket
Valve Cover
Screw, 10-24x 9/16"
Nut & Lock Washer, 1/4-28
Screw, 1/4-28 x 7/8"
* Carburetor To Intake Pipe Gasket
Intake Pipe (Incl. 224)
Governor Link
Screw, 1/4-20 x 3/8"
SoEoBrake Bracket (lncL 195)
Terminal
Throttle Link
R.P.M. Adjusting Lever
Screw, 1/4-20 x 1"
* Intake Pipe Gasket
Screw, 10_32 x 5/8"
* Air Cleaner Gasket
Air Cleaner Body
Air Cleaner Filter
Air Cleaner Cover
Blower Housing
Screw, 10-24 x 9/16"
Screw, 1/4-20 x 1/2"
Muffler (Incl. 277)
Screw, 1/4-20 x 2-1/4"
Starter Cup
Screw, 8-32 x 21/64"
Fuel Line
Fuel Line Clamp
Fuel Tank (lncL 292 & 301)
Fuel Cap
Oil Fill Plug
Spacer
Lubrication Decal
Pdmer Decal
Starter Decal
Carburetor (IncL 184)
Rewind Starter
RPM High 2900 to 3200
Gasket Set
(Incl. Items Marked * in Notes)
Replacement Engine NONE
Replacement S!B 760699A,
order from 71-999
(NOTE: This engine could have been built with 590737
starter. Refer to the design of the rope pulley strength
ribs for part identification.Individual starter parts do not
interchange.)
NOTE: All component dimensions given in U.S. inches
1 inch = 25°4 mm
17
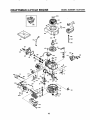
CRAFTSMAN
MODEL
4-CYCLE ENGINE
,,,
.m i
Ililk'P!l_mlllll
I II ii
NUMBER
143.973500
i.............................
REF
NO.
PART
NO.
632046A
1
2
4
5
6
7
!6
25
27
28
29
30
31
35
40
44
48
°< )
1=o
40"1
631615
631767
631184
631183
631616
650506
631775
631700
631024
632019
631028
631021
631022
632047
631937A
631334
631027
REF
NO.
PART
NO.
t
2
3
4
5
6
7
8
11
590694
590599A
590600
590696
590601
590697
590698
590699
590700
590695
12
13
590535
590701
, mm,ii Im IVlll
REF
NO.
V_4
DESCRIPTION
Carburetor
(incl. 184 of Engine Parts List)
Throttle Shaft & Lever Assembly
Throttle Return Spring
Dust Seat Washer (Throttle)
Dust Seal (Throttle)
Throttle Shutter
Shutter Screw
Fuel Fitting
Float Bowl
Float Shaft
Float
Float Bowl "O" Ring
Inlet Needle, Seat & Clip (lncL 31)
Spring Clip
Primer Bulb/Retaining Ring
High Speed Bowl Nut
Bowl Nut Washer
Welch Plug, Atmospheric Vent
DESCRIPTION
Recoil Starter
Spring Pin (IncL 4)
Washer
Retainer
Washer
Brake Spring
Starter Dog
Dog Spring
Pulley & Rewind Spring Ass'y,
Starter Housing Ass'y.
(40 degree grommet)
Starter Rope ( 98" X 9/64" diao)
Starter Handle
..................
PART
NO.
3
6
7
8
11
590737
590740
590616
590617
590618A
590687A
12
590535
13
14
590701
590741
i mmLiHmm
Ilml
DESCRIPTION
Rewind Starter
Retainer
Starter Dog
Dog Spring
Pulley & Rewind Spring Ass'y
Starter' Housing Ass'y
(40 degree grommet)
Starter Rope
(Length 98" x 9/64" dia.)
Starter Handle
Locking Tab
NOTE: All component dimensions given in U.S, inches
1 inch = 25_4 mm
18
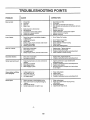
TROUBLESHOO
NG POINTS
PROBLEM
CAUSE
CORRECTION
Does not start
1.
2.
3
4_
Dirty air filter.
Out of fuel
Stale fuel.
Water in fuet
I.
2.
3
4.
Ciearv'replace air filter..
Fill fuel tank..
Drain tank and refil{ with fresh clean fuel..
Drain fdei tank and carburetor and refill tank with fresh
5.
6.
7.
8.
9.
Spark plug wire is disconnected..
Bad spark piug..
Loose blade or broken blade adapter.
Control barin released position
Control bar defeclive
5.
6.
7.
8.
9
gasoline..
Connect wire to plug..
Replace spark plug
Tighten blade bolt or replace blade adapter
Depress control bar to handle.
Replace control bar.
1
Set in "Higher Cut" position.
2.
3
4.
5.
6.
Rear of lawn mower housing/blade dragging
in heavy grass.
Cutting too much grass..
Dirty air filterr
Buildup of grass, leaves and trash under mower.
Too much oil in engine.
Walking speed too fast.
2.
3.
4..
5.
6
Set tn "Higher Cut" position..
Clean/replace air filter.,
Clean underside of mower housing.
Check oit level
Cut at slower walking speed.
Pooreut-uneven
1.
2
3.
4.
Worn, bent or loose blade.
Wheel heights uneven.
Low engine speed.
Buildup of grass, leaves, and trash under mower
1. Replace blade. Tighten blade bolt.
2_ Set all wheels at same hetght_
3. Contact an authorized service eenter/department_
4. Clean underside of mower housing..
Excessive vibration
1.
2.
Worn, bent or]oose blade..
Bent engine crankshaft..
1.
2.
Starter rope hard to pull
1.
1.
2.
3.
4.
Engine flywheel brake is on when controf bar is
reteased_
Bent engine crankshaft
Blade adapter broken..
Blade dragging in grass.
Grass catcher not filling
(if so equipped)
1..
2.
3.
4.,
Cutting height too low.
Lilt on blade worn off.
Catcher not venting air.
Low engine speed.
1.
2.
3.
4.
Hard to push
1.
2.
Grass is too high or wheel hetght ts too low,
Rear of lawn mower housing/blade dragging
in grass,
Grass catcher too full.
Handle height position not right for you
1..
2.
,lll,=i
1.
Loss of power
Replace blade. Tighten blade bolt.
Contact an authorized service center/department..
...............................
i
lu
,1111,ill
2o
3,,
4.
Depress control bar to upper handle before
pulling starter rope..
Contact an authorized service center/department.
Replace blade adapter.
Move lawn mower to cut grass or to hard surface
to start engine.
ii,i
3,
4.
19
Raise cutting height.
Replace blade.
Clean grass catcher.
Contact an authorized service centertdepartment..
Raise cuffing height.
Raise rear of tawn mower housing one (1)
setting higher_
3.. Empty grass catcher..
4. Adjust handle height to suit
H"H
CRAFTIMnN
o
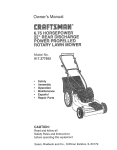
OWNER'S
MANUAL
3.5 HORSEPOWER
20" SIDE DISCHARGE
ROTARY LAWN MOWER
Each lawn mower has its own model number.
gine has its own model number°
MODEL NO.
917.387000
Each en-
The model number for your lawn mower will be found on a
decal attached to the rear of the lawn mower housing.
The model number for your engine will be found on the
blower housing of the engine°
All parts listed herein may be ordered from any Sears,
Roebuck and Co. Service Center/Department and most
Retail Stores_
IFYOU NEED
REPAIR SERVICE
OR PARTS:
WHEN ORDERING REPAIR PARTS, ALWAYS GIVE THE
FOLLOWING INFORMATION:
• PRODUCT- LAWN MOWER
• MODEL NUMBER - 917.387000
FOR REPAIR SERVICE, CALL
THIS TOLL FREE NUMBER:
1-800-4-REPAIR
(1-800-473-7247)
FOR REPLACEMENT PARTS
INFORMATION AND
ORDERING, CALL THIS
TOLL FREE NUMBER:
1-800-FON-PART
= ENGINE - CRAFTSMAN - MODEL NO. 143.973500
° PART NUMBER
° PART DESCRIPTION
Your' Sears merchandise has added value when you
consider Sears has service units nationwide staffed with
Sears trained technicians
professional technicians
specifically trained to insure that we meet our pledge to
you, we service what we sell
....
(1-800-366-7278)
2O
MODELO NOo 917,387000
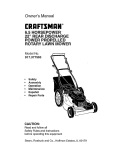
MANUAL
DEL DUEllO
o iVlontaje
OperacBbn
Responsabilidades
del Ciiente
- Servicio
- Ajustes
o Partes de Repuesto
Precaucibn:
Lea y siga todas
las reglas e
intrucciones de
seguridad antes de
operar este equipo.
156683
REV,, 2
06.12_97
VBL/KFSW
IMPRESO
EN LOS ESTADOS
UNIDOS
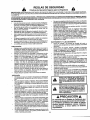
REGLAS DE SEGURIDAD
Pr_cticas de Operaci6n
Seguras para las Segadoras
IMPORTANTE: ESTA MAQUINA CORTADORA ES CAPAZ DE AMPUTAR LAS MANES Y LOS PIES Y DE LANZAR OBJETOS,
SI NO SE OBSERVAN LAS INSTRUCCIONES DE SEGURIDAD StGUIENTES SE PUEDEN PRODUCtR LESIONES GRAVES O
LA MUERTE.
LOSESTANDARESDE SEGURIDADEX{GENLA PRESENClADEL OPERADOREN LOSCONTROLESPARAREDUCIRA UN MINIMOELRIESGO
DE LESIONARSE.SU UNIDAD VIENE EQUlPADACON DtCHOSCONTROLES_PeR NINGUNMOTIVOTRATEDE EUMINAR LA FUNC[6N DE LOS
CONTROLES;
QUE EXIGEN
LA PRESENCIA
DEL
OPERADOR,.
ENTRENAMIENTO:
•
Lea este manual del operador cuidadosamente. Faml_iarfcese conlos controles y aprenda a operarsu segadora en forrna
adecuada, Aprenda a parar su segadora rdpidamente.
•
No perrnita que los ni_os user=su segadora. Nunca permita
que los adultos operen la segadora sin contar con las
instrucciones adecuadas_
•
Mantenga el drea de operaci6n despejada de gents, especialmente de niSos psque_,.osy de animales domdstIcoso
•
Use la segadora solamente para los fines propuestos per el
fabricante y seg_n las explicaciones descritas on ests ma*
nual.
•
No opere la segadora si se ha cards o daSado en cualqulera
forma. Siempre repare los dar3os antes de usarta.
°
No use accesorios que no hayan sido recomendados por el
fabricante. El uso de dichos accesorios pueds ser peltgroso.
•
La cuchifla gira cuando el motor est& funcionando,.
•
•
°
°
MANTENIMIENTO Y ALMACENAMIENTO:
=
Revise la cuchtlla y los pemos de montaje del motor a
menudo, para asegurarse que est&n aprstados en la forma
adecuada,
•
Revise todos los pernos, tuercas y tomillos a intervatos
frecuentes, para verificar si estdn apretados en forma ads*
cuada, y asegurarse que la segadora se encuentra en
condicionesde funcionamiento seguroo
•
Mantenga redes los dispositivosde seguridad en su lugar y
listos para funcionar.
°
Para reducir el peligro de incendio, mantenga el motor sin
cdsped, hojas y grasa o aceite on exceso_
•
Revise el recogedor de c6sped a menudo para vedficar si hay
deterioro y desgaste y cambie las bolsas desgastadas. Use
solamente las bolsas de repuesto recomsndadas per el
fabdcante de su segadora o que cumplsn con las especificaclones de dste.
•
Siempre mantenga una cuchilla afUada en su segadora_
•
Siempre permita que el motor se enfrfe antes de guardarla on
cualquier recinto cerrado.,
•
Nunca guarde la segadora con combustible en et estanque
dentro de un edificio en donde osgases pueden alcanzar
una llama expuesta o una fuente de ignici6n, tal come el
calentador de agua, la estufa de calefacci6n, la secadora de
ropa, etc_
PREPARACION:
•
Siempre revise cuidadosamente el &rea que se va a segar y
despdjsia de todas las piedras, paios, alambres, huesos y
otms objetos extra_os. Estos objetos serdn lanzados con la
cuchilla y pueden producir lesiones graves,
•
Siempre use anteojos de seguridad o protectores de ojos
cuando arranque y durante el tiempo que use la segadera_
•
Vfstase en forma adecuada. No opere la segadora sin
zapatos o con sandalias abiertas. Use sotamente zapatos
sdlidos con buena tracciSn cuando siegue.
•
Revise el estanque de combustible antes de hacsr arrancar
el motor._ No llene el estanque do gasotina en recintos
cerrados, ni cuando el motor estd funcionando o cuando est,_
caliente. Permita que el motor se enfr[e per varies minutes
antes ds Ilsnar el estanque de gasolina_ Limpie toda la
gasolina dsrramada antes de hacer arrancar el motor..
•
Siempre haga los ajustes de altura de las ruedas antes de
hacer arrancar su segadora. Nunca trate de hacer _sto
mientras que el motor est& funcionando_
•
Siegue siempre durante el dfa o con buena luz artificial
OPERACION;
•
Mantenga sus sissy su mente en la segadoray en el _rea qus
se est& cortando. No permita que otros intereses Is distraigan.
•
No corte c_spsd msjado o resbaloso. Nunca corra mientras
est_ operando su segadora,, Siempre asegt_rese de mantenet' el equifibrio - mantenga el mango agarrado firmemente
y camlne.
•
No ponga las manes o los pies cerca o debajo de las partes
rotatorias. Mant_ngase alejado de la abertura de descarga
en rods momento_
•
Siempre pare e! motor cuando se vaya o cuando no est6
usando su segadora, o antes de atravesar las entradas para
autos, los senderos, caminos y ,_reascubisrtas de ripio.
•
Nunca dirija la descarga del material hacia los espectadores
ni permita a nadie cerca de la segadora mientras la est6
operando.
•
Antes de limpiar, inspeccionar o de reparar la segadora, pare
el motor y est6 completamente seguro de que la cuch{Uay
que todas las partes que se mueven se hayan detenido.
Luego, desconecte el alambre de la buj{a y mantdngalo
alejado de dsta para evitar el arranque per accidents°
•
No continue haclendo funcionar su segado[a si le pega a un
objeto extraSo. Siga el procedimiento descrito anteriormenre, luego repare cualqu_erdafio antes de volver a arrancar y
de operar su segadora.
°
No cambis losajustes del regulador o haga que el motor ands
a una velocidad excesiva.. Se pueden producirdaSos en el
motor y lesiones personales.
No opere su segadorasivibra fuera deto normaL La vibraci6n
excesiva es una lnd cactOn de dafio; pare el motor, revise en
forma segura la causa de lavibraciSn y haga tas reparaciones
seg_n sea necesado.
No haga funcionar el motor en rectntos cerrados_Los gases
de escape son peligrosos.
•
Nunca corte el c_sped tirando la segadora hacla usted.
Siegue a travSs de la cara do las penaientes, nunca hacia
arriba o hacia abajo pues puede perder el equilibrio. No
siegue pendientes demasiado empinadas. Tenga cuidado
cuando opere la segadora en terreno dlspareio o cuando
cambie de direcct6n- mantenga un buen equthbrio_
Nunca opere la segadora sin [as protecclones adecuadas,
las planchas, el recogedor de cdsped y sires dispositivosde
seguridad en su lugar_
I
•
A
"'":'"_
cauclones de segurida.d de impor-tancla,
Quieredecir- [i|ATENCIONII! i[iESTEALER"
'Busque este s{mb'o'l'oque seSala ias p're*
T IDA. ' ...................
................
To!.suSEOURIDAD
ESTA
COMPROMEiI
i
...............
:
ii
,i,ll
, 'Hill
III
,11
PRECAUCi6N: Siempre desconectee! alambre de ia bujt'a y p6nga!o deride no pueda
entrar en contacts con la bujfa, para evitar et
arranque per accidente, durante la preparacidn, el transporte, el ajuste o cuanao se
hacen reparaciones.
............
............
.......
..........
&
r
,,,,,, ,.,
ij k
'HH_
.........................
i ! I..,,_,/t"_u
v
Iv
= '_
&
Es conocido por el Estado de California
que
los gases de escape del motor de este productor contienen qmmicos los cuales a ciertos
niveles, pueden ocasionar, cdncer, defectos
de nacimiento,
y otros da_os al sistema
reproductive.
..........
2
I
I
i, u iu
i_
.........
IH
ESPECIFICACIONES
FELIClTACtONESporlacompradesusegadoraSears
Craftsman..
Ha side diseSada, planificada y fabdcada para dafle la major
confiabilidad y el major rendimiento posibles_
En el case de que se encuentre con cuatquier problema que no
pueda solucionar f_cilmente, haga el favor de ponerse en contacto con su Centro/Departamento de Servicio Sears m&s cercano..
Sears cuenta con t_cnicos bien capacitados y competentes y con
las herramientas adecuadas para darle servicio o para reparar su
unidad.
Haga el favor do leer y do guardar eete manual,, EstaB in_=ttucciones le permitir_n montar y mantener su segadora en forma
adecuada. Siempre observe las "REGLAS DE SEGURIDAD,.
NUMERO DE
MODELO
917..387000
DEL PRODUCTO
CABALLOS DE FUERZA:
345
DESPLAZAMIENTO:
9.05 cue ino
CAPACIDAD Y TIPO
DE GASOLfNA:
1.25 Cuartos
REGULAR SIN PLOMO
TIPO DE ACEITE:
(API-81=/SC_SH)
SAE 30 (sobre 32°F)
SAE 5W-30 (debajo 32_F)
CAPACIDAD DE ACEITE:
20 oz. de capacidad
BUJJA:
(ABERTURA:
CHAMPION J19LM, RJ19LM
STD361458
_030")
TOLERANCIA DE
VALVULA:
ADMISION:
_008"
DESCARGA: ,008"
FECHA DE
COMPRA
ENCENDIDO DE
ESTADO SOLIDO
ABERTURA DE A1RE:
o0125 in..
EL NOMERO DEL MODELO Y EL DE SERIE SE ENCUENTRAN EN LA CALCOMANIA ADJUNTA A LA PARTE TRASERA DE LA CAJA DE LA SEGADORA,
TORS!ON DEL PERNO
DE LA CUCHtLLA:
NUMERO DE
SERIE
35-40 FT_LBS_ (PIES LIBRA)
DEBE REGISTRAR TANTO EL NUMERO DE SERIE COMe
LA FECHA DE COMPRA Y MANTENGALOS EN UN LUGAR SEGURO PARA REFERENCIA EN EL FUTUROo
ACUERDO
DE MANTENIMIENTO
Este productoincluye un Acuerdo de Mantenimiento Sears_P6ngase en contactoconsu tienda Sears m_s cercana para informarse sobre
los detalles.
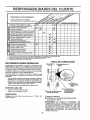
RESPONSABILIDADES
=
=
•
DEL CLIENTE
Lea y observe las reglas de seguridado
Siga un programa regular de mantenimiento, cuidado y use de su segadora..
Siga las instrucciones descritas en las secciones "Responsabiiidades del Cliente" y "AImacenamiento" de este Manual del Due_,oo
GARANTfA
LIMITADA DE UN ANO PARA LA SEGADORA
A MOTOR CRAFTSMAN
Per un (1) ale, a partir de ta fecha de compra, cuando esta Segadora Craftsman se mantenga, lubrique y aline segun fas
instrucciones para la operaci6n y el mantenimiento en el manual del dueSo, Sears reparar_, gratis todo defecto en el material y la
mane de obra..
Si fa Segadora Craftsman se usa para fines comerciales o de arriendo, esta garantfa s61ose aplica per noventa (90) dias a partir
de la fecha de compra.
Esta Garantfa no cubre:
•
Arliculos qua se desgastan durante el use normal tales come las cuchillas segadoras rolatorias, los adapladores de la cuchilla,
las correas, los filtros de aire y las bujtas.
•
Reparaciones necesarias debido al abuse o a ta negligencia del operador, incluy_ndose a los cigOefales doblados y a la falta
de mantenimiento del equipo seg_n las instrucciones qua se incluyen en el manual del due5o.
EL SERV1CIO DE GARANT_A ESTA DISPONIBLE AL DEVOLVER LA SEGADORA A MOTOR CRAFTSMAN, AL CENTRe!
DEPARTAMENTO DE SERVtCIO SEARS MAS CERCANO EN LOS ESTADOS UNIDOS ESTA GARANTIA SE APLICA
SOLAMENTE MIENTRAS EL PRODUCTO ESTE EN use EN LOS ESTADOS UNIDOS,.
Esta Garantfa le otorga detaches legales especlficos, y puede qua tambi_n tenga otros derechos que vafian de estado a estado,
SEARS,
ROEBUCK
''
AND CO.,, D/817 WA, HOFFMAN
i
II
Hill'
3
iiii
II
iiiiiiii
ESTATES,
ii
I
ILLINOIS
I
60179
.....
_'"'
'"_'""
"_'"_ ........
TABLA DE M
..........................
REGLAS
DE
SEGUR_DAD
............................................
illl
llllllllul
ii
i
PROGRAMA DE MANTENIMIENTO .......................... 10
SERVICIO Y AJUSTES ............................................... 13
ALMACENAMIENTO ................................................... 14
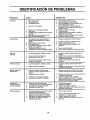
IDENTIFICACI6N DE PROBLEMAS .......................... 15
PARTES DE REPUESTO .................. VEA EL MANU_L
INGLF.S DEL DUENO
ORDEN DE PARTESISERVICIO ................................ 16
2
ESPECIFICACIONES
DEL PRODUCTO
......................
3
RESPONSABILIDADES
DEL CL1ENTE ............ 3, 10-12
GARANTiA ....................................................................
3
MONTAJEI .....................................................................
5
OPERACION
..............................................................
6-9
|NDICE
A
E
O
Aceite:
Opciones:
Especificaciones ...............................................
3
Almacenamiento ...........................................
14
Accesorios ..................................................
5
Motor ..................................................................
12
Operacidn:
Acuerdo de mantenimiento .......................3
F
Barra de control que exige la
Ajustes:
presencia del operador ................... 6
Filtro de Aire:
AItura de code ..............................................
7
Recogedor de c_sped ....................11
Cambio ...............................................................
12
Altura del mango ..........................................
13
Servicio .....................................................
12
Carburador ............................................
13
Velocidad del motor .............................
13
P
Almacenamiento .............................................
14
G
Parada del motor ............................................
8
Arranque del motor ........................................
8
Garantfa ..............................................................
3
Programa de mantenimiento ...................
10
B
L
R
Bujia ................................................................
12
LubricaciSn:
Motor .........................................................
12
Segadora ..............................................
10
Reglas de seguddad
2
Responsabilidades del Cliente... 3, 10-12
Buji'a.........................................................
12
Cuidado de la cuchilla]cambio .......11
Filtro de aire .......................................
12
Lubricacidn.......................................t0
Motor ...................................................
12
C
..........
..........................
Combustible:
Almacenamiento .....................................
14
M
Capacidad ....................................................
8
Mango:
Tipo ......................................................................
8
Ajustes ............................................................
13
Control de la velocidad:
S
Montaje .................................................................
5
Motor ........................................................................
7
Servicio y Ajustes:
Motor:
Controles:
Carburador ...............................................
13
Almacenamiento .................................
I4
Barra de control que exige la
Mango ...................................................
13
Arranque ....................................................
8
presencia del operador. ...........................
6
Desviador trasero .................................
13
Cambio de aceite .....................................
12
Control de la velocidad del motor .o7
Velocidad del motor _...........................
13
Filtro de aire ..........................................
12
Consejos para segar .......................................
9
Nivel de aceite .....................................
12
T
Cuchilla:
Parada ............................................................
8
Afilamfento ...................................... 1t
Tipo de aceite .....................................
12
Tabla para la identificaci6n de
Cambio ....................................................
11
problemas ......................................................
15
4
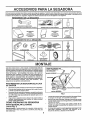
PARA LA
EGADORA
Estos accesorios estaban disponibles cuando se produjo la segadora. Tambi_n est_n disponibles en la mayorfa de las tiendas de Sears
yen los centros de servicio,. La mayorfa de las tiendas Sears tambi_n pueden ordenar partes de repuesto para usted, si les proporciona
el n_mero del modelo de su segadora., Algunos de estos accesorios tal vez no se apllquen a su segadorao
RENDIMIENTO
DE LA SEGADORA
DESVIADOR
DE RECORTES
PARA SEGADORAS
CON DESCARGA TRASERA
JUEGOS
PARA LA ACOLCHADORA
ESTAB|LIZADORES
RECOREDOR
PARA
SEGADORAS
CON DESCARGA
LATERAL
SEGADORAS
CON
DESCARGA
RECOREDORpARA
TRASERA
ENVASES
DE GASOLINA
,.,,,..
MANTENIMIENTO
DE LA SEGADORA
,,,,,,,,.,,,
..................
_ ............................
FILTROS
S1LENCIADORES
CORREAS
ADAPTADORES
DE CUCHiLLA
CUCHILLAS
BUJfAS
DE AIRE
ACEITE
DEL MOTOR
RUEDAS
,i
i
i mii1_11_111111
MONTAJE
Lea estas instrucciones y este manual completamente antes de
tratar de montar u operar su segadora nueva. Su segadora nueva
ha sido montada en la f,_brica con la excepci6n de aquetlas parles
que se dejaron sin montar por razones de envfo,. Todas las partes
como las tuercas,
las arandelas, ios pemos, etc.., qua son
necesarias para completar el montaje ban sido colocadas en la
boisa de partes. Para asegurarse que su segadora funcione en
forma segura y adecuada, todas las partes y los artfculos de
ferreterfa que se monten tienen que ser apretados seguramenteo
Use las herramientas correctas, como sea necesario,
para
asegurar que se apdeten adecuadamente_
PARA REMOVER
DE CART6N
•
•
•
•
LA SEGADORA
BARRA DE CONTROLQUE
EXIGE LA PRESENCIA
DELOPERADOR
MANGO SUPERIOR
LEVANTAR
DE LA CAJA
Remueva las partes sueltas que se incluyen con la segadora.
Corte las dos esquinas de los extremos de la caja de cart6n
y tienda el panel del extremo plano_
Remueva todo el material de empaque, excepto la cuSa entre
el mango superior y 61inferior, y la curia que sujeta labarra de
los control que exige la presencia del operador junto con el
mango supenor..
Haga rodar la segadora hacia afuera de la caja de cart6n y
revfsela cuidadosamente para verificar si todavfa quedan
partes sueltas adicionaleso
COMO PREPARAR
PARA
DESDOBLAR
POSICI6N
PARA SEGAR
MANGOINFERIOR
FIG. 1
•
•
SU SEGADORA
•
EL MANGO
(Vea la Fig. '1)
°
IMPORTANTE:
DESPLIEGUE
EL MANGO CON MUCHO
CUIDADO PARA NO PELLIZCAR O DAI_AR LOS CABLES
DE CONTROL..
5
Levante los mangos hasta que la secci6n del mango inferior
se asegure en su lugar, en la posici6n para segar.
Remueva la cuSa protectora, levante la secci6n del mango
superior hasta su lugar en el mango inferior, y apriete ambas
manillas del mango°
Rernueva la cuSa del mango que sujeta la barra de los
control que exige la presencia del operador junto con el
mango supenoro
El mango de la segadora puede ajustarse segun le acomode
para segar_ Refi6rase a "AJUSTE DEL MANGO' en la
Secci6n de Servicio y Ajustes de este manual
111111
I
IIIIIIIIIIIIIIIIIIIIIIIIIIIIIIIMIII
I'
II
I
I'll
'1'1111'
IIII
IIIJl
:
!!"!!!!''"'111111111
I'
III
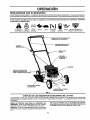
OPERACION
FAMILIARICESE
CON SU SEGADORA
LEA ESTE MANUAL DEL DU EI_IOY LAS REGLAS DE SEGURIDAD ANTES DE OPARAR SU SEGADORA. Compare las ilustraciones
con su segadora para famtltadzarse con la ubicaciSn de los diversos controles y ajustes.. Guarde este manual para referenc!a en el futuro.
Estos sfmboloe pueden apareser
comprenda sus significados.
ATTENCIONO
ADVERTENCIA
MOTOR
sobr'e su segadora
MOTOR
R_PIDO
APAGADO
ENCENDIDO
o en la literatura
LENTO
,11 ii
ESTRANGU
LACION
IIIIIIIIIIIIIIIIIIIII
proporcionada
con el I=roducto.
Aprenda
y
COMACEITE PELIGRO,GUARDELAS
BUSTIBLE
MANOSY LOSPIESLEJOS
I
I
I
I
IIII
I
III
IIIII
IIIU
IIII
BARRA DE CONTROL QUE EXIGE LA
PRESENCIA DEL OPERADOR
CABLE DECONTROLDELA
VELOCIDAD
DEL MOTOR
CORD6N
ARRANCADOR_
MAN]LLADEL
MANGO
DEL
DEPOSITO DE
GASOLINA
CEBADOR
TAPA DEL DEPOSITO DE
ACEITE DEL MOTOR CON
VARILLA INDICADORA DE NIVEL
PROTECCI6N CONTRA
LA DESCARGA
CAJA
AJUSTADORDELARUEDA
(ENCADARUEDA)
FIG. 2
IIIL
I
II
III
IIIII
III
II
_
.................
CUMPLE CON LOS REQUISITOS
DE SEGURIDAD
DE LA CPSC
Las segadoras a moter, que se conducen desde la parte de atrds, rotaterias, Sears, cumplen con los estdndares de seguridad del
American Natienal Standards Institute y de ta U_S. Consumer Product Safety Commission. La cuchilla gira cuando el motor estd
functonando.
....................
,,,,,
, ,, ,,,,
BARRA DE CONTROL QUE EXIGE LA PRESENCIA DEL
OPERADOR - tiene que sujetarse abajo, junto con el mango,
para hacer arrancar el meter_ Su_tela para parar el motor_
CEBADOR _bombea combustible adicional desde el carburador
al cilindro para use cuando se necesita hacer arrancar un motor
fr/o._
,,
I,u,,IHl,,,,,,
PALANCA DE CONTROl,, DE LA VELOCIADA DEL MOTORse usa para hacer arrancar el motor y le permite selecci0nar las
velocidades del motor ya sea r,_pida (_) o lenta (,=b)_
6
f
OPERACION
La operaci6n de cualquier segadora puede hacer que salten objetos extrafios dentro de sus ojos, Io
que puede producir dafios graves en _stOSo Siempre use anteojos de seguridad o proteccidn para los
ojos mientras operesu segadora o cuando haga ajustes o reparaciones. Recomendamos una masc_ara
de seguridad de visi6n amplia, para uso espejuelos o anteojos de seguridad estandarte.
COMO USAR SU SEGADORA
CONTROL
DE LA VELOCIDAD
ANTES DE HACER
MOTOR
DEL MOTOR
La velocidad del motor se estableci6 en la f_brica para un
rendimiento 6ptimoo La vetocidad no se puede ajustar,
CONTROL
=
Su segadora fue enviada sin aceite en el motor.
•
Aseg_rese que la segadora est6 nivelada y que el &rea
alrededor del dep6sito de aceite est6 limpia.,
•
Remueva la tapa del dep6sito de aceite del motor con la
varilta indicadora de nivel y rellene hasta la IJ'neade lleno en
_sta.
I'llIHl'll
PRECAUCtON: Las regulaciones federales
exigen que se instale un control para el
mfnimo
riesgo
de lesionarse
debtdo
al
motor enelesta
segadora
para reducir
a un
contacto con la cuchilla. Por ning6n motivo
trate de eliminar la funci6n del control del
operador. La cuchilla gira cuando el motor
est_ funcionando.
•
°
°
•
Su segadora viene equipada con una barra de control que
exige/a presencia del operador, Io que requiere que el
operador estd detrds del mango de la segadora para hacerla
arrancar y operarlao
PARA AJUSTAR
Fig. 3)
LA ALTURA
DE CORTE
Revise el nivel del aceite antes de cada uso. Agregue aceite
si es necesario, Llene hasta la I_nea de ileno en la varilla
indicadora de niveL
•
Para leer el nivel adecuado, apdete la tapa del dep6sito de
aceite del motor cada vez.
Vuelva a tnstalar la tapa del dep6sito del aceite y apri_telao
Cambie el aceite despu_s de 25 horas de operaci6n o una
vez pot temporadao Puede necesitar cambiar el aceite m&s
a menudo cuando las condiciones son polvorosas o sucias.
•
•
(Vea la
Use 20 oz, de aceite. Para el tipo y la calidad vea "MOTOR"
en la secci6n de las Responsabilidades del Cliente en este
manual.
Vact'e el aceite lentamente. No 1ollene demasfadoo
°
Levante las ruedas para el corte bajo y baje las ruedas para
el corte alto.
GASOLINA
•
Ajuste la altura de corte para que se acomode a sus requisitos. La posici6n del medio es la mejor para la mayorfa de los
cdspedes.,
°
Para cambiar la altura de come, empuje la palanca del
ajustador hacla la rueda, Mueva la rueda hacia ardba o hacia
abajo de modo que se acomode a sus requisitos.Aseg_rese
que todas las ruedas queden igualmente ajustadas.
ATENCION; El ajustador esta correctamente colocado cuando
las orejas de la jolaca est&n insertadas en el agujero del
mango. Tambien, los ajustes de 9 posiciones (si equipado)
permiten que el mango pueda ser movido entre las orejas de la
)lacao
PARA UN CORTE
ALTO= BAJE LAS
RUEDAS
EL
ACEITE (Vea la Fig. 4)
DE ZONA DEL MOTOR
,=,ll=,=,
,=l,im L H_
ARRANCAR
.
(Vea la Fig. 4)
Llene el estanque de combustible° Use gasolina regular, sin
plomo, nueva 7.limpia con el mi'nimo de 87 octanos, No
mezcle el acewte con la gasolina,, Para asegurar que la
TAPA DEL
RELLENADOR
GASOLINA
DE
OREJAS DE
LA PLACA
TAPA DEL DEPOSITO DE,ACEITE CON
VARILLA INDICADORA DE NIVEL
MANGO
FIG. 4
PARA UN CORTE
BAJO, LEVANTELAS
RUEDAS
FIG. 3
7
gasolina utilizada sea fresca compre estanques los cuales
puedan ser utilizados durante los pfimeros 30 dfas.
ADMERTENOIA: La experiencia ha indicado que los combustibles mezclados con alcohol (conocidos como gasohol, o el uso de
etano! o metanol) pueden atraer la humedad, la que conduce a la
separact6n y formaci6n de &cidos durante et almacenamientoo La
gasolina acidica puede dafiar el sistema del combustible de un
motor durante et almacenamiento. Para evitar los problemas con
el motor, se debe vaciar el sistema del combustible antes de
guardarlo por un perfodo de 30 dfas o m&s_Vacie el estanque del
combustible, haga arrancar el motor yh&galo luncionar hasta que
las Ifneas del combustible y el carburador queden vacioso La
pr6xima temporada use combustible nuevo, Vea las lnstrucciones Para E1Almacenamiento para m_s informaci6n. Nunca use
productos de ltmpieza para el motor o para el carburador en el
estanque del combustible pues se pueden producir dafios
permanentes,
N
PARA HACER
ARRANCAR
CONSEJOS
EL MOTOR
•
Para hacer arrancar un motor frfo, empuje el cebador cinco
(5) veces antes de tratarlo. Empuje firmemente. Este paso
normalmente no es necesario cuando se hace arrancar un
motor que ya ha estado functonando per unos cuantos
minutes,
•
Sujete !a barra de controles que exigen lapresencia del
operador abajo en et mango y tire el mango del arrancador
r_pidamente. No permita que el cordSn arrancador se devuelva abruptamente.
•
Para parar el motor, sueite la barra de controles que exigen
la presencia del operador,
AVISO: En ctimas m&s fr/os puede que sea necesado repetir los
pasos del cebado., En ctimas m_s calurosos el cebar demasiado
puede producir el ahogo y el motor no va a arrancar. Si se ahoga
el motor espere unos cuantos minutes antes de tratar de hacerlo
arrancar y no repita los pasos del cebado_
•
•
•
•
,,
•
8
PARA SEGAR
Bajo ciertas condiciones, tal come c_sped muy alto, puede
ser necesado el elevar la altura del corte para reducir el
esfuerzo necesario para empujar la segadora y para evitar
sobrecargar el motor, dejando montones de rocorto_ de
c_sped.
Para un corte muy pesado, reduzca el ancho del corte
pasando parcialmente per encima del lugar anteriormente
cortado y s[egue lentamenteo
Para un mejor ensacado del cdsped y para la mayoHa de las
condiciones de code, ta velocidad del motor debe ajustarse
a la posiciSn de rdpido (_)_
Si las segadoras de descarga latera! co[tan en una direcct6n
contraria alas manil_as del reloj, si se em-pieza en la parte
de afuera del drea que se va a cortar, se repadir&n los
recortes del c_sped en forma rods pareja y el motor se
cargard, menos. Para evitar que los recortes catgan en los
senderos, en las flores, etc., haga los primeros codes en la
direcci6n de las manillas del reloj.
Los pores en !os recogedores de cdsped de tela pueden
|lenarse con mugre y polvo con el use y los recogedores
recaudardn menos cesped. Para evitar dsto, roc[eel recogedot con la manguera de agua, regularmente, y ddjelo secarse antes de usarlo_
Mantenga la parte superior del motor', alrededor del
arrancador, despejada ys_nrecortes de cdsped y paja. Esto
ayudard el flujo del aire del motor y extender_ la duraci6n
_ste.
jjlljlljl jl U
.....................
:
::::
:
l'llnlll
RESPONSABmLIDADE
i
i
....................
S
E
G
D
...........................
:
Limpiariinspeccfonar
el recogedor
.......
c_sPed (siviene equipado)
_
i
....
J
! 6_
..........
mlsi6n (se!
Limpiar
de actoras
ajo de la
con
cubterta
poder de
propulsor)
la transReviser las €orreas y iaspoieas impuisadas (segadoras
con poder propulsor)
Revlsar o/afilar/cambiar ia Cuchiiia
Tabla de iubricaci6n
q
Limplar le baierfa/recargar ........................
(segadoras con arranque el_ctdco)
M
Reviser el hive! del aceite
Camblar el aceito del rn'oio'r
Limp}at el filtro de afre
insPeccio'nar el Silenctador
e,,'
_1_3
_J1'1,2
,
Limptar oicambiar la buj[a
Cambtar
de aire el cartucho de pape! del ftltro
,
,
_ .....
,
.
_2
Cambiar
rods a menudo
cuando se opere bajo carga pesada o en amb_entes con aftas temperaturas
Dar servtcto mds a menudo
cuando se opere en condlclones
suctas o pofvorosas_
Camb_e las cuchftlas m_s a menudo cuando stegue en terreno arenoso,
Cargar por 48 horas al fin de la temporada.
RECOMENDACIONES
TABLA DE LUBRICACION
GENERALES
(_
La garantfa de esta segadora no cubre los artrculos que hen
estado sujetos al abuso o ala negtigencia del operador. Para
recibtrtodo el valor de la garant[a, el operador tiene que mantener
la segadora segt',n las instrucciones descritas en este manual
Hay atgunos ajustes que se tienen que hacer en forma ped6dica
para poder mantener su unidad adecuadamenteo
Todos los ajustes en la secci6n de Servicio y Ajustes de este
manual tienen que ser revisados per lo menos un vez pot cada
temporada.
°
Una vez al aSo, cambie la bujia, ltmpie o cambie el elemento
del filtro de aire y revise si la cuchilla est& desgastada. Una
bujfa nueva y un elemento del fi[tro de aire limpiolnuevo
aseguran la mezcla de aire-combustible adecuada y ayudan
a que su motor funcione mejor y que dure mds.
•
Siga el programa de mantenfmtento en este manual.
ANTES DE CADA
•
°
ENTE
...........i, ,111 ....
de
j_
12 3 4 -
I_L
DEL C
:: ......
......
Ltmpiar la segadora
III
ACEITE DEE
MOTOR
(_
AJUSTADOR
RUEDA
DIE LA
(_ PUNTAL DE
RESORTE DEL
FRENO
USO
('_1 CLAVIJA DE LA
,,,:., ARTICULAC]6N DE
LA PROTECCION
(_ CLAVIJADE MONTAJEDEL
PUNTALDEL MANGO
DE DESCARGE
Revise el nivel del aceite del motor.
Revise si hay sujetadores sueltos.
LUBRIOAClON
Mantenga I_ unidad
LUBRICACION").
bien
lubricada
(vea
la "TABLA
DE
(_ ROCtEELLUBRICANTE
(_) REFIERASE A LA SECC|6N DE RESPONSABILIDADES
DISL CLIENTE EN "MOTOR"
IMPORTANTE:
NO ACEITE
O ENGRASE
LOS
RODAMIENTOS
DE LA RUEDA DE PLASTICO.
LOS
LUBRICANTES VISCOSOS ATRAERAN POLVO Y MUGRE,
LO QUE
ACORTARA
LA
DURACION
DE LOS
RODAMiENTOS
AUTOLUBRICANTES,.
SI CREE QUE
TIENEN QUE LUBRICARSE,
USE SOLAMENTE
UN
LUBRICANTE TIPO GRAFITO,
DE POLVO SECO, EN
FORMA MODERADA.
9
illl ii iilll
i i
J Jii
i i i i
R
IIIIHIIIIIIII
IIIIIIJJllJl
II I1 I IJ II
III
III
IIIIIIIIIIII IIIIIIII IIIII
Jll/l/IJll/l/
II//ll_HIIIII
DEL
LILII
SEGADORA
J J J JJllJllllll
ADAPTADOR
CUCHILLA
Siempre observe las reglas de seguridad cuando haga el mantenimiento..
DE LA
CHAVETERO
DI=L CIGUEI_IAL
RANURA
LLANTAS
•
I
SABILIDADES
IlJlll
•
II
CUCHILLA
Mantenga las Ilantas sin gasolina, aceite o substancias
qufmicas paracontrolde inseetos que pueden daSarla goma.,
Evite los tocones, las piedras, las gdetas profundas, los
objetos afilados y otros peltgros que pueden da_ar a las
ilantas
PERNO
DE LA
UCHILLA
CUIDADO
DE LA CUCHILLA
Para obtener los mejores resultados, la cuchilla de la segadora
tiene qua mantenerse afilada. Cambie la cuchiila doblada o
daSada.
ClGUE_AL
PARA REMOVER LA CUCHILLA (Vea la Fig_5)
•
Desconecte el alambre de la bujia y p6ngalo en donde no
pueda entrar en contacto con dsta_
•
Haga descansar la segadora en su iado. Asegtlrese qua et
fiitro de aire y qua el carburador queden mtrando hacia arriba,
°
Use un bloque de madera entre ta cuchiHa y la caja de la
segadora para evitar que [a cuchiUa gire cuando sele quite el
pemo.
•
Proteja sus manos con guantes y/o envuelva la cuchilla con
una tela gruesa,.
•
Remueva el perno de la cuchilla girdndolo en el sentido
contrario en qua giran las manitlas del reloj_
Remueva la cuchilla y los artfculos de ferreteria adjuntadores
(el pemo, la arandela de seguridad y la arandela endurecida).
AVISO: Remueva el adaptador de la cuchiUa y revise el cubo
interior de la ranura del adaptador de la cuchilla. La ranura tiene
qua estar en buenas condiciones para que funcione en forma
adecuada_ Cambte el adaptador si est_ dafiado.
ARANDELA DE
SEGLIRIDAD
,, ,,, ,,,,,,,
\
BORDE DE
SAL|DA
ADAPTADOR
LA CUCHILLA
DE
FIG, 5
AVISO: No recomendamos el afilar la cuchilfa - pero si Io hace,
aseg_lrese de qua quede balanceada_
PARA AFILAR LA CUCHtLLA
Se tiene qua tenet cuidado de mantenerla balanceada. Una
cuchilla qua no est_ balanceada va a producir eventualmente
da5o en la segadora o en el motor.
•
La cuchilta puede afilarse con una lima o en una rueda
rectificadora.No trate de afilada mientras se encuentra en la
segadora.
°
Para revisar el balance de la cuchilla, clave un ctavo en una
vtga o en la pared, Deje alrededor de una pulgada de un clavo
recto expuesto. Ponga el agujero central dela cuchilla sobre
la cabeza del ctavo. Si la cuchilla estd balanceada debe
permanecer en la postcidn horizontal. Si cualquiera de los
extremos de la cuchiila se mueva hacia abajo, afile el
extremo pesado hasta qua dsta quede balanceada.
PARA CAMBIAR LA CUCHILLA (Vea la Fig_5)
°
Ponga el adaptador de la cuchiila en el cigueSal del motor.
Asegdrese qua la ranura del adaptador y que el chavetero del
ciguefial estdn alineados,
•
Ponga ta cuchilla en el adaptador de _sta atineando los dos
(2) agujeros en la cuchilla con las salientes elevadas en el
adaptador,,
•
Aseg5rese de que el borde de saUda de [a cuch[lla (opuesto
al borde afifado) estd hacia ardba hacia el motor,,
=
instale el pemo de la cuchiHa con la arandeta de seguridad y
la arandela endurecida en el adaptador de {a cuchi[la y el
ctgueSal.
•
Use un bloque de madera entre la cuchtlla y la caja de la
segadora y apriete el perno de la cuchilla girdndolo en el
sentido en que giran tas manillas del reloj.
°
La torstdn para apretar recomendada es de 35 - 40 pies
libras,
IMPORTANTE: EL PERNO DE LA CUCHILLA
TRATADO A CALOR,
,
ARANDELA
ENDURECIDA
RECOGEDOR
DE ClaSPED
(Si comprado como un accesodo)
°
El recogedo{ de cdsped puede set rociado con el agua de la
manguera pero tiene que estar seco cuando se vaya a usaro
°
Revise su recogedor de cdsped a menudo para verificar si
estd da,Sado o deteriorado. Se va a desgastar con et uso
normal. Si se necesita cambtar el recogedor, cdmbielo solamente por uno que sea aprobado por el fabricante. D_ el
nemero del modelo de la segadora cuando Io ordeneo
ES CLASE 8
10
,II'I,'IIH"I'I,I'II'II'"I'"I"I
"Ill'II'l'"l
'"l"l'"l '"'"'l '"_'" '_
I I
....
I'
I
II
ESPONSABILHDADES
I'll ' _
................II"'lll'','
DEL CLmE TE
MOTOR
LUBRICACION
Use solamente aceite de detergente de alta calidad clasificado
con la clasificaci6n SF, SG o SH de servicio API, Selecctone la
caliclad de viscosldad SAE segL_n su temperatura de operaci6n
esperada.
CALIDADES
4m
;F
DE VISCOSIDAD
DE SAE
ELTAP_N
DRENAJE
DEP6SITO
DEACEEE
lmn
:20"
°c -3o"
0_
.2'0.
GAMA DE TEMPERATURA
30°
,,i_=
ANTICIPADA
_-" 4_;"
_=
ANTES
SO"
;o.
SO
o
_0°
DEL PROXIMO
_00
°"....
_o
FIG. 6
40"
CAMBIO DE ACEITE
CUBtERTA DEL
FILTRO DE A|RE
AVISO: A pesar de qua los aceites de multiviscosidad (5W30,
10W30, etco) mejoran el arranque en clima frl'o, estos aceites de
multiviscosidad van ha aumentar el consumo de aceite cuando se
usan en temperaturas sobre 32 ° F,.Revise ei nivet del aceite del
motor m_s a menudo, para evitar un posible dafio en el motor,
debido a que no tiene suficiente aceite,,
Cambie el aceite despu_s de 25 horas de operaci6n o pot io
menos una vez al a5o si la segadora se utiliza menos 25 horas
el afio.
Revise el nivel del aceite del c_rter antes de arrancar el motor y
despu_s de cada cinco (5) horas de uso continuado, Apriete el
tapo'n del aceite en forma segura cada vez qua revise el nivel del
aceite.
PARA CAMBIAR EL ACEITE DEL MOTOR(Vea ta Fig, 6)
.
Desconecte el alambre de la buifa y p6ngalo de modo qua no
pueda entrar en contacto con esta,
°
AsegOrese qua la segadora est_ en una superficie nivelada.,
El aceite se drenar_ m_s f_cilmente si est& caliente
°
Recoja el aceite en un envase adecuado.
°
Remueva el tap6n de drenaje del dep6sito de aceite de la
parte inferior.
=
Despu6s de qua el aceite se haya drenado completamente,
vuelva a poner el tap6n de dren&je de! dep6sito de aceite en
su lugar y apri_telo en forma segura,
°
Rellene et motor con aceite,, Udnelo lentamente,,NO LO
LLENE DEMASIADO.
°
Llene hasta la cima de la ranura en el agujero del re!lenador,
°
Vue[va a conectar el alambre de ts bujia a 8sta.
FILTRO
FILTRO
.
o
•
DEL
DE AIRE
LEVANTE LA
CUBIERTA
"_
CUERPO DEL
FILTRO DE AIRE
FIG. 7
SILENCIADOR
lnspeccioney camble el silenciador si est_ corrofdo pues producir
un peligm de incendio y/o dafio.
BUJfA
Cambie su buji'acada aSo para hacer que su motor arranque m_.s
f_,cflmente y funcione mejor, Ajuste la abertura de la bujfa en 0_030
pulgada.
LIMPIEZA
IMPORTANTE: PARA OBTENER EL MEJOR RENDIMIENTO,
MANTENGA
LA CAJA
DE LA SEGADORA
SIN
ACUMULACI_N DIECESPED Y BASURA. LIMPIE LA PARTE
DE ABAJO DE SU SEGADORA DESPUES DE CADA USO_
DE AIRE
Su motor no funcionard en forma adecuada y puede sufrir daSos
si se usa un fiitro de aire sucio,, Limpie el elemento cada 25 horas
de oparaci6n, y rods a menudo si et tractor se usa en condiciones
muy poIvorosas o sucias,
PARA CAMBIAR EL ACEITE DEL MOTOR(Vea la Fig, 7)
Desconecte el alambre de la buifa y p6ngalo de modo que no
pueda entrar en contacto con esta_
°
Asegerese que la segadora est_ en una supefficie niveiada.
•
El aceite se drenard rods fdcilmente si estd caliente.
•
•
°
DE
DEL
I
°
Recoja el aceite en un envase adecuado,
Remueva de la parte inferior.
Despuds de que el aceite se haya drenado completamente,
vuelva a poner el tap6n de drenaje del dep6sito de aceite en
su lugar y apridteto en forma segura
Rellene el motor con aceiteo Ll_nelo lentamenteoNO LO
LLENE DEMASIADO.
•
•
•
L{ene hasta la cima de ta ranura en el agujero del rellenador,,
Vuelva a conectar el alambre de la buji'a a _sta,
1'1
_
buj{a y p6ngalo en donde no pueda entrar
PRECAUG|ON_
el alambre
d_
|a
en contacto conDesk°nacre
_sta,
I
I
I
Haga descansar la segadora en su lado. Aseg_irese que el
filtro de aire y qua el carburador queden mirando hacia arribao
Limpte la parte inferior de su segadora rasp_ndola para
remover la acumulaci6n de c_spedy basura.
Limpie el motor a menudo para evitar qua se acumule la
basura,, Un motor tapado funciona m_s caltente y se acorta
su duraci6n,,
Mantenga las superficies acabadas y las ruedas sin gasolina,
aceite, etc_
No recomendamos el uso de una manguera de jardfn para
limpiar la segadora a menos que el sistema ei_ctrico, el
silenciador, el filtro de aire y el carburador est_.ntapados para
evitarqua losentre el aguaoEl agua en el motor puede acortar
la duraci6n de _ste,
SERVIClO Y AJUSTE
HUH
I
'
iI
,
,
i1,11
SEGADORA
I1"1'"111''
II1'111//1!11/[![111'1111[111[1!1'111
Postc, .DEE.v,o
MEDIANAALTA
MEDIANA BAJA
PARA AJUSTAR LA ALTURA DE CORTE
Yea "PARAAJUSTAR LA ALTURA DE CORTE" on la secci6n
de Operaci6n de este manual
DESVIADOR
II
TRASERO
Se proporciona un desviador trasero, adjunto entre las ruedas
traseras de su segadora, para reducir a un mfnimo la posibilidad
que objetos sean lanzados hacia afuera de la parte trasera de la
segadora, en la posici6n en donde se encuentra el operador: Si
se daSa el desviador debe cambiarse.
PROTECClON
CONTRA
LA DESCARGA
Se proporciona una protecci6n contra la descarga, adjunta a la
abertura de descarga de su segadora, para evitar la posibiIidad
que objetos sean lanzados hacia afuera de la abertura de
descarga, en la posici6n en donde se encuentra el operador. Si
se dafia la protecci6n contra la descarga debe cambiarse_
PARA AJUSTAR
EL MANGO
FIG. 8A
FIG. 8B
(Vea las Figs. 8-10)
Se puede levantar o bajar e! mango de su se_adora segLin le
quede c6modo. Hay cuatro (4) posiciones dJsponibles: alta,
mediana atta, mediana baja, baja. Los mangos se envfan montados en la posici6n mediana bajao
•
Para cambiar de la posiciSn mediana baja a mediana alta,
la secci6n superior yla inferior del mango tendr_n que darse
vuelta (Vea la Fig XB).
•
Remueva las abrazaderas del cable.
•
Remueva los controIes y la barra de controles que exigen la
presencia del operador del mango superior.,
•
Remueva las clavijas de horquilla.
•
Desconecte el mango inferior de los puntales del mango
(Vea la Fig_ X).
=
De vuelta el mango y vuelva a montar las clavJjas de
horquilla que se hab{an removido_
•
Vuelva a montar los controles y la barra de controles que
exigen la presencia del operador en et mango superior.
PRECAUCl6N:
BAJA
FIG. 9A
La barra de controles que
pivotear flbremente para permitir e! enganche
de la cuchilla!freno cuando so suelta la barra
exigen la presencia del operador tiene que
de control_ No apriete demasiado
los
sujetadores que sujetan a los controles al
mango supenor..
•
FIG. 9B
MANGOtNFER|OR
Para cambiar de {a posici6n de mediana baja a alta solamente se tendr& que dar vuelta la secci6n del mango
superior (Vea la Fig. 9A)_
Para cambiar de la posici6n mediana baja a baja, solamente
se tendr_ que dar vuelta la secci6n del mango inferior (Yea
la Fig..9B).
APRIETE
PARA
REMOVER
MOTOR
CARBURADOR
ABRAZADERA
HORQUILLA
Su carburador tiene un chorro principal fijo no ajustabie para
controlar la mezcla. Si su motor no est_ funcionando on forma
adecuada debido a problemas que se sospecha vienen del
carburador, Ileve su segadora a un centro/departamento de
servic{o autodzado para repararla y/o ajustafla..
DE
PUNTAL
DEL MANGO
FIG. 10
VELOCIDAD
DEL MOTOR
La vetocidaddel motor ha sido ajustada on la fdbrica. No trate de
aumentar la velocidad del motor pues se pueden producir lesiones personales. Si cree que el motor estd funcionando demasiado
rdpiao o aemaslado lento, lleve su segadora a un centro de
servicio autorizado para repararla o ajustarla.
12
ALMACENAMIENTO
,,i,,,i,,i,, ,ill,l i,
, itl,
lnmediatamente prepare su segadora para el almacenamiento al
final de carla temporada o si la unidad no se va a usar por 30 di'as
o m_s..
MOTOR
SEGADORA
IMPORTANTE: ES IMPORTANTE EVITAR QUE SE FORMEN
DEPOSITOS DE GOMA EN PARTES FUNDAMENTALES
DEL SISTEMA DE COMBUSTIBLE
TALES COMO EL
CARBURADOR,
EL FILTRO DEL COMBUSTIBLE,
LA
MANGUERA DEL COMBUSTIBLE O EN EL ESTANQUE
DURANTE EL ALMACENAMIENTO.
LA EXPERIENCIA
TAMBIEN INDICA QUE LOS COMBUSTIBLES MEZCLADOS
CON ALCOHOL (CONOClDO COMO GASOHOL O QUE
TIENEN
ETANOL
O METANOL)
PUEDEN
_ATRAER
HUMEDAD, LO QUE CONDUCE A LA SEPARAC1ON Y A LA
FORMACION
DE
_CIDOS
D URANTE
EL
ALMACENAMIENTO
LA GASOLINA ACIDICA PUEDE
DAI_IAR EL SISTEMA DE COMBUSTIBLE DE UN MOTOR
DURANTE EL PERIODO DE ALMACENAMIENTOo
SISTEMA
Cuando se va a guardar la segadora pot cierto peri'odode tiempo,
i/mpiela cuidadosamente, remueva toda la mugre, la grasa, las
hojas, etc_ Gu_rdela en un &rea limpia y seca.
,,
Limpie toda la segadora (Vea "LIMPIEZA" en la secci6n de
Responsabilidades del Cliente de este manual).
,'
Lubr{quela segun se muestra en ta secci6n de Responsabilidades del Cliente de este manual.
,,
=
Aseg_rese de que todas tas tuercas y clavijas y todos los
pernos y tornillos est_n apretados en foma segura lnspeccione las partes que se mueven para verificar si estdn
daSadas, quebradas o desgastadas. C_mbielas si es necesano.
Retoque todas las superficies que est_n oxidadas o con la
pintura picada; use una lija antes de pintar_
MANGO
,
°
Drene el estanque de combustible..
Haga arrancar el motor y ddjelo funcionar hasta que tas
lfneas del combustible y el carburador est_n vacfos,
•
Nunca use losproductos para limpieza del carburador o del
motor en el estanque de combustible pues se pueden
producirdaSos permanentes.
•
Use combustible nuevo la pr6xima temporadao
AVISO: El estabi{izador de combustible es una alternativa aceptable para reducir a unmfnlmo la formaciSn de dep6sitos de goma
en el combustible durante el perl'odode almacenamtento,.Agregue estabitizador a la gasolina en el estanque de combustible o
en el envase para el almacenamiento., Siempre siga laproporci6n
de mezcla que se encuentra en el envase del estabiiizador.,Haga
funcionar el motorper Io menos 10 minutos despu8s de agregar
el estabitizador, para permitir que este Ilegue a/carburador_ No
drene la gasoltna del estanque de gasolina y el carburador si se
est& usando estabilizador de combustible.
(Vea la Fig. 'I 1)
Puede doblar el mango de su segadora para almacenarla..
=
Apriete los extremos inferiores del mango inferior entre sf
hasta que el mango inferior quede separado del puntal del
mango, luego muevalo hacia adelante,.
,,
Suelte los pernos de montaje del mango superior Io suficiem
te como para permttirque elmango superior se pueda doblar
hacia atr_s.
IMPORTANTE:
CUANDO DOBLE EL MANGO PARA EL
ALMACENAMIENTO
O EL TRANSPORTE,
ASEGURESE
QUE LO DOBLE SEGUN SE MUESTRA O PUEDE DANAR
LOS CABLES DE CONTROL.
•
Cuando prepare sus mangos a partir de ]a posici6n de
almacenamiento,
el mango inferior autom&ttcamente se
asegurar& en la posici6n para segar..
MANGO
DE COMBUSTIBLE
ACEITE DEL MOTOR
Drene el aceite (con el motor caliente) y cdmbielo con aceite de
motor Ifmpio,(Vea"MOTOR" en lasecci6n de Responsabilidades
del Ciiente de este manuaL)
INFERIOR
ClLINDRO
APRIETE
DOBLAR
PARA
DE
o
•
MONTAJE
•
,,
CLAVIJA
ii
BARRA
i
OTROS
DE HORQUILLA
........................
ill
ii
Remueva la bujt'a.
Vaefe una onza (29 ml) de aceite a trav_s del agujero de Ja
bujt'a en el cilindroo
Tire la maniUa de arranque lentamente unas cuantas veces
para distdbuir el aceiteo
Vuelva a montar la nueva bujfa..
°
•
No guarde la gasolina de una temporada a la otrao
Cambie el envase de la gasolina si se empleza a oxidar..La
oxidaci6ny/o la mugre en su gasotina producirdnproblemaso
•
Si es posible, guarde su unidad en un recinto cerrado y
ct_bralapara pmtegerla contra el potvo y la mugreo
°
Cubra su unidad con un forro protector adecuado que no
retenga la humedad. No use pldstico. El pt&stico no puede
respirar,lo que permite ta formaci6n decondensaci6n, Io que
producirdla oxidaci6n de su unidad.
IMPORTANTE: NUNCA CUBRA LA SEGADORA MIENTRAS
EL MOTOR Y LAS AREAS DE ESCAPE TODAVIA ESTAN
CAL1ENTESo
i i
DE CONTROL
._,,-;
'__'_-,.",,,_
"/
:"
//
"_J?/"_"_
II DOBLAR
.J .ACIA
"_
ATRAS
POSICI6N
PARA
SEGAR
MANGO
INFERIOR
I&
FIG. 11
13
ra con gasolina en el estanque dentro de un
edifieio en donde los gases pueden alcanzar una llama expuesta o una chispa. PerPRECAUCI6N:
Nunca almaeene
segadomita
que se enfr{e
el motor iaantes
de
almacenarla en alglin recint 0 cerrado,
I
I
I
Ii
I
IIIILIII
iJlllllllllll
illllll
i
k IIIIlll
II" II
f
IDENTIFICAClON
DE PROBLEMAS
PROBLEMA
CAUSA
CORRECCION
No arranca
1.
2o
3.
Flltro de aire sucIo°
Sin combustible.
Combustible rancio,.
1,
2.
3.
4_
Agua en el combustible,
Falta de fuerza
5o Atambre de la bujfa desconectado.
Bujfa mala.
Cuchtlla suelta o adaptador de la cuchilla
quebrado.
8_ Barta de control en la posici_n suelta_
9. Barra de control defectuosa.
Limpte/camble el filtro de aire,
Llene el estanque de combustible.
Drene el estanque y vuelva a llenado con
combustible limpio y nuevo.
4_ Drene el estanque de combustible y el
carburador y vuelva a llenar el estanque con
gasolina nueva.
5. Conecte el alambre a la bujla,
6o Cambie la bujfa_
7. Apriete el pemo de ta cuchilla o cambie et
adaptador de la cuchitla,
8. Presione la barra de control hacia el mango.
9. Cambie la barra de control.
1o
t,
Ajuste a la posici_n de "Corte m_s alto."
2_
4.
Ajuste
a la posici6n
dedo
"Corte
L=mpie/cambie
el filtro
aire_m_s alto."
Umpte la parte inferior de la caja de la
segadorao
5.
6
Revise el nivel del aceite_
Corte a una velocidad de recorrido rods lenta.
2.
3.
4.
5_
6o
Mal cortedisparejo
Parte trasera de la caja/cuchitla de la
segadora arrastrdndose en el c_sped
pesado.
Estd cortando mucho cdsped.
Filtro de aire sucio.
Acumulaci6n de crisped, hojas y basura
debajo de la se_adora.
Demasiado acede en el motor.
Velocidad de recorddo demasiado r_pida.
Cuchitla desgastada, doblada o suelta
2,
3,
Altura de las ruedas dispareja.
Velocidad del motor lenta_
4,
Acumulaci6n de c_sped, hojas o basura
debajo de la segadora,,
1.
Cambie la cuchtlla, Apriete el pemo de la
cuchilla.
Ajuste todas las ruedas a la misma aftura.
P6ngase en contacto con su centre de sen;,icio
autorizado m&s cercano.
4_ Limpie la parle inferior de la caja de la
segadora.
'
Vibraci6n excestva
1.
1,,
CigueSal de¿motor doblado.
2_
El freno del volante del motor est&
aplicado cuando se suelta la barra de
control.
CigueSal del motor doblado.
2.
3o
4_
Adaptador de la cuchilIa quebrado.
La cuchtlla se arrastra en el cdsped
3_
4_
2_
3_
Altura de corte demasiado baja,,
Levantamiento de la cuchilla desgastado_
Reco_ledor sin venttlaci6n de atre.
Veloc=dad del motor lenta,.
2.
3.
4,,
Dlf/cll de empuJar
ii i ii iiii
2_
Cord6n arrancador
dif_ci! de tirar
Recogedor de
c6sped no se tlena
(sl vlene equipado)
i
1.
2,
3.
4.
2.
El cdsped estd demasiado alto o la altura
de la rueda demasiado baja.
Pade trasera de la caja/cuchiHa de la
segadora arrastrdndose en el cdsped
Reco_]edor de c_sped demasiado Ueno.
Posic=6nde la altura del mango no
adecuada para usted°
14
ii iiilu
................
'
' '"
'" '
Camble la cuchtlla. Apriete el pemo de la
cuchilla.
P6ngase en contacto con su centre de servicio
autorizado mds cercano.
Presione la barra de control hacia el mango
superior antes de tirar el corddn arrancador.
P6ngase en contacto con su centre de servicio
autorizado mds cercano,,
Cambie el adaptador de la cuchilla.
Mueva ta segadora a un lugar en donde el
cdsped ha side cortado o a una superficie
firme para hacer arrancar el motor.
Eleve la altura de code,,
Cambie las cuchiltas.
Limple el recogedor de c_sped.
.
P6ngase en contacto con su centre de servicio
autorizado m_s cercano,
1.
EIevela altura de code,
2.
Eleve la parte trasera de la caja de la
segadora (1) un lugar mds alto.
Vact'e el recogedor de c_sped.
Ajuste la altura del mango de mode que le
acomode
3,,
4.
NOTAS
15
£RRFTSMI:IN®
MANUAL
DEL DUENO
3.5 CABALLOS DE FUERZA
DESCARGA LATERAL 20"
SEGADORA ROTATORIA
Cada segadora cuenta con su propio n_mero del modeloo
Cada motor cuenta con su propio nemero del modelo.
MODELO NO.
917.387000
El n8mero del mode[o de su segadora se encuentra en la
plancha adjunta a la parte trasera de la caja de la segadora_
El ntlmero del modelo de su motor'se encuentra en la caja del
ventilador del motor.
Partes de repuesto se pueden ordenara travds de cuaiquiera
de los Centros/Departamentos
de Servicio de Sears,
Roebuck and Coo, yen la mayorl'a de sus tiendaso
SI NECESITA
SERVICIO O PARTES
DE REPUESTO:
PARA SERVIClO, LLAME ESTE
NUMERO DE TELEFONO SIN
COBRO:
CUANDO ORDENE PARTES DE REPUESTO, SIEMPRE
DE LA INFORMACION SIGUIENTE:
° PRODUCTO-
SEGADORA
• NOMERO DEL MODELO - 917.387000
,, MODELO NO. DEL MOTOR - 143.973500
° NOMERO DE LA PARTE
° DESCRIPCION DE LA PARTE
1-800-686-5811
(LA OPERADORA
HABLA ESPANOL)
PARA PARTES DE REPUESTO,
INFORMACI6N Y PARA
ORDENAR, LLAME ESTE
NOMERO DE TELEFONO SIN
COBRO:
Su mercaderfa Sears vale rn_s cuando se toma en
considerar}ci6n que Sears cuenta con unidades de servicio
en todo el pals, con t_cnicos entrenados en los Productos de
Sears_.tenemos a t_cnicos profesionales, especialmente
entrenados para garantizarle que cumplimos con nuestra
promesa, servimos Io que vendemos.
1-800-FON-PART
(1-800-366-7278)
16