1
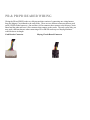
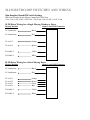
SMART VEND PR & PR/PD & SLIM
TROUBLESHOOTING GUIDE
MAYTAG CIRCUIT BOARD
The Maytag Circuit Board Interface
The Maytag CompuTrac Circuit Board was designed to work with advanced payment type of
systems along with coin drops and coin slides. By creating this interface, Maytag has provided a
way to connect readers without the need to modify existing machine wiring. The interface Maytag
has provided on their CompuTrac Circuit Board allows for two forms of communication with
external devices. The first being through Enables and Availables and the second provided through a
serial connection.
Connection through Enables and Availables:
When connecting card reader equipment using the Enables and Availables the reader monitors if the
machine is in use through a set of contacts providing a short circuit on the Avail1 and Avail2
connections. The reader starts the machine though the Enable 1 and Enable 2 circuit by providing a
5 volt 30 milli second pulse to the Enable 1 circuit in reference to the Enable 2 ground circuit. The
Maytag board can be configured to work off of one pulse or multiple pulses. Depending on if the
machine is going to be connected with card and coin support at the same time will determine the
number of pulses the reader needs to be setup with. If the machine is programmed to take three
quarters to start, then the reader will need to provide 3 pulses to start the machine. If the machine is
not going to be connected to coin then it is suggested to program the Maytag board so that 1 pulse
equals to the total vend price, also setting up the card reader with one pulse.
Connection through a PR or PR/PD interface:
When connecting a PR or PR/PD reader to a Maytag Circuit Board, upon power up the board
immediately locks itself in Enhanced Debit mode, locking out all other forms of card reader
communication. This board is now dedicated as a PR or PR/PD reader ready circuit board and
cannot communicate with coin slides, drops or retro-fit readers.
PR & PR/PD READERS DESCRIPTION
Smart Vend PR & PR/PD Readers
The Smart Vend PR Reader is a smart card reader that has been developed to work directly with
Maytag PR machines. PR readers are the substitute for coin drops and/or coin slides at the
washer or dryer. The PR reader communicates serially with the Maytag Circuit Board making
it difficult to cheat or bypass the reader due to the complex communication which takes place
between the reader and Maytag Board. The PR/PD reader is also a PR reader and operates
identical to the PR reader. The only difference between the PR and PR/PD reader is the
physical attributes. The PR/PD Reader was designed as a direct replacement for the SLIM
Retro Fit Reader to cut costs and make installation of a retro-fit style reader much easier. The
only limitations for the installation of a PR/PD reader is that the Maytag Circuit Board must
have a DRS label on the main CPU indicating support for a PR style reader, also the Maytag
Circuit Board must have a 6-Pin Molex connector for connection of the reader. Some older
stacked dryers have support on the processor but do not provide a Molex connection. On these
older machine Smart Vend recommends using a SLIM Retro reader.
Smart Vend SLIM DC and AC Retro Readers
Smart Vend provides two styles of Retro-Fit Readers, the SLIM-AC and the SLIM-DC. These
two readers have been designed to operate on all types of machines. The Maytag Machines use
only the SLIM-DC model of reader. The difference between the two models are the SLIM-AC
readers control and monitor AC voltages within the machine, and the SLIM-DC model controls
and monitors DC voltages within the machine. Smart Vend has also provided on both the
SLIM-AC and SLIM-DC readers DIP Switches that are used to configure the reader specifically
to each machine.
READER PROGRAMMING
Keys to Successful Programming
Programming a PR, PR/PD or SLIM Retro reader successfully relies on having a known good,
complete set of setup cards. Never mix cards from one location with another. Also keep the setup
cards together so if ever needed, all of the cards will be ready to use.
When removing keys from a PR & PR/PD reader, four dashes across the Maytag Circuit Board
Display indicate the keys have been removed from the reader.
Make sure to wait until the Maytag Circuit Board indicates to PULL the card before removing the
card from the reader.
Any special reader programming need to be requested through Smart Vend.
THE PROGRAMMING CARDS
Key Card: Card # 1
The Key Card is always the first card inserted into the reader, PR, PR/PD and SLIM Retro.
This card loads the keys “secret passwords” into the reader so that competitors’ equipment
won’t interfere with another. The keys can also be removed from a reader by reinserting the
Key Card back into a reader that already has the keys installed. In order to remove the keys
from a reader the Key Card must contain the exact same keys that were previously loaded into
the reader.
PR Site Code Card: Card # 2
This is the second card that is loaded into the reader, PR, PR/PD and SLIM Retro. This card
loads a number into the reader that will always be verified for before allowing the card to be
accepted. Similar to the key card, the site code card is the second level in protection keeping
competitors cards out of each others equipment.
PR Price Card / SLIM-Retro Price Card: Card # 3
This is the third card that is loaded into the reader. This PR Price Card sets the maximum card
value accepted in a reader to $50. This card can also setup special pricing within the reader.
PR Service Mode Card: Card #4
This is the fourth card that is used to setup a PR or PR/PD reader in a Maytag Machine. This
card allows access to the Maytag Circuit Board programming. When the card is first inserted
into the reader the firmware revision will be displayed and next the Maytag Circuit Board
Programming Codes.
SLIM Retro Laundry Machine Definition Card : Card #4 for SLIM
Retro
ONLY FOR THE SLIM RETRO This is the fourth card that is used to setup a SLIM Retro
Reader in a Maytag Machine. This card transfers the Cycle Price, Topoff Price and Start Pulses
to a SLIM Retro Reader.
User Card:
This is the card that a resident uses to start the washers and dryers. The maximum suggested
value on a user card at any one time is $50. The user card can be used over and over again
indefinitely.
PR & PR/PD READER SETUP PROCEDURE
Smart Vend PR & PR/PD Readers
The PR & PR/PD Readers can be setup with the same setup card sets. Only a retro-fit reader will
need a special set of setup cards to be setup. The key to successfully setting up a PR or PR/PD
Reader is to insert each card #1 - #4 in sequential order waiting for each card for the “Pull Card”
message on the Maytag Board Display. If a reader displays an error code when attempting to set it
up then revert back to the #1 Key Card and try again from the beginning. Sometimes the reader can
already have keys installed into the device and by inserting the Key Card the reader may have lost its
system keys.
Both the PR and PR/PD readers are setup exactly the same and operate identical.
1. Connect the Smart Vend PR or PR/PD reader to a Maytag Circuit Board.
2. Plug in the machine.
3. Attempt to test the reader with a user card to see if the reader is pre-programmed. If the
user card is accepted your reader is ready for operation. If the user card is not accepted
then proceed to the next step in programming the reader.
4. Insert the Key Card. “Card # 1” and wait until the display indicates to remove the card.
5. Insert the Site Code Card “Card #2” and wait until the display indicates to remove the
card.
6. Insert the Price Card “Card #3” ” and wait until the display indicates to remove the card.
7. Insert the Service Mode Card “Card #4” ” and wait until the display indicates to remove
the card.
8. Insert the User Card “Card #5” and verify the reader is reading the value card indicating
the card value on the display.
9. Turn off the power and the reader is complete. If the reader cannot read the value repeat
steps 1through 8 and try again. If the reader still does not read cards please contact Smart
Vend.
SLIM RETRO READER SETUP PROCEDURE
Smart Vend SLIM Retro Readers
The SLIM Retro-fit reader needs a special set of setup cards to be setup. Following is a list of
procedures to setup a SLIM Retro-Reader.
1. Install the SLIM Retro reader into the machine
2. Plug in the machine
3. Insert the System Key Card and wait until it indicates that it is complete
4. Insert a Site Code card and wait until it indicates that it is complete.
5. Insert the SLIM-Retro fit Prices card and wait until it indicates that it is complete
6. Insert the Laundry Machine Definition card until the reader indicates that it is complete.
7. Now you are ready to test the reader. Insert a user card and make sure the reader removed the
correct value, starts the machine and indicates that the machine is in use.
PR & PR/PD READER WIRING
Wiring the PR and PR/PD reader to a Maytag machine consists of connecting one wiring harness
from the Maytag Circuit Board to the card reader. There are two different connectors that are used
on PR, PR/PD reader harnesses. One end has a 6-Pin connector that connects to the Maytag Circuit
Board and the other end has a 8-Pin connector that connects to the reader. The only reason why you
may need a different harness when connecting a PR or PR/PD reader up to a Maytag Machines
would be due to its length.
Card Reader Connector
Maytag Circuit Board Connector
SLIM RETRO DIP SWITCHES AND WIRING
Slim Daughter Board DIP Switch Settings
DIP-Switch settings for the Maytag CompuTrac2 (PD) Units
1-On, 2-On, 3-On, 4-Off, 5-Off, 6-On, 7-On, 8-On, 9-On, 10-Off, 11-Off, 12-On
SLIM Retro Wiring for a Single Maytag Washer or Dryer
Maytag Machine
Smart Vend SLIM Connector
To Transformer
Black
To Transformer
Red
To Avail 1
Orange
To Avail 2
Brown
To Enable 1
Yellow
To Enable 2
White
SLIM Retro Wiring for a Stack Maytag Dryer
Maytag Machine
Smart Vend SLIM Connector
To Transformer
Black
To Transformer
Red
To Avail 1
To Avail 2
To Avail 3
To Avail 4
Orange
Brown
Green
Blue
To Enable 1
Yellow
To Enable 2
White
BASIC TROUBLESHOOTING
PR & PR/PD Reader
1. Check for a Fault Code Displayed on the Maytag Board
2. Test with a User Card
3. Attempt to Reprogram the Reader
• When reprogramming the reader, the keys are toggled on and off each time the
Key Card is inserted
4. Change the Reader with a Brand New Reader
5. If needed use a machine next to the bad machine to help diagnose the problem, follow
where the problem goes when swapping components
SLIM Retro Reader
1. Check for a Fault Code Displayed on the Reader and the Maytag Board
2. Test with a User Card
3. Attempt to Reprogram the Reader
• When reprogramming the reader, the keys are toggled on and off each time the
Key Card is inserted
4. Check wiring and connections
5. Change the Reader with a Brand New Reader, check DIP Switch Settings on the new
Reader
6. If needed use a machine next to the bad machine to help diagnose the problem, follow
where the problem goes when swapping components
ERROR MESSAGES
CARD ERROR 01
1. Bad site code or site code is not loaded into the reader. Either load the site code into the
reader for the user card or replace the user card with a user card with the correct site code.
CARD ERROR 02
1. Invalid purse data. The card balance is lost. A new card must be reissued.
CARD ERROR 03
1. Bad read. A new card must be reissued
CARD ERROR 04
1. Invalid card type. A new card must be reissued.
CARD ERROR 05
1. Bad write. A new card must be reissued.
CARD ERROR 15
1. CSC1 Failed. An error has occurred while reading the card. A new card must be reissued.
CARD ERROR 34
1. Balance too high. The card balance is higher then allowed. A new card must be reissued.
CARD ERROR 43
1. Key Mismatch. The system key card inserted does not match what is loaded into the reader.
Verify proper key card is being used.
CARD ERROR 47
1. Internal failure. Contact Smart Vend for repairs or replacement.
CARD ERROR 48
1. Invalid application ID. Card is invalid. Replace card.
CARD ERROR 49
1. Card has expired. Check internal clock or replace card.
CARD ERROR 50
1. Card soft lock. Only one more attempt may be available. Try again or replace card if failed.
CARD ERROR 51
1. Card authentication failed. Try reading card again or replace card.
CARD ERROR 53
1. Invalid issuer code. Card does not match issuer. Attempt to reprogram card or replace card.
CARD ERROR 54
1. Invalid card checksum. Bad card, replace card.
CARD ERROR 55
1. Invalid card status. Try again and if it does not work replace admin card.
CARD ERROR 56
1. Invalid admin card. Replace admin card, card is bad.
CARD ERROR 64
1. Hot card. The card ID was found in the readers hotlist. Replace card
SYSTEM ERROR 60
1. Program data has not been loaded. Get admin programming card.
SYSTEM ERROR 62
1. System Keys have not been loaded. Load System Keys Card.
SYSTEM ERROR 63
1. Site Codes have not been loaded. Load Site Code Card.
SYSTEM ERROR 64
1. Machine data has not been loaded. Load Prices Card