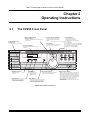
1
Model CP650 Digital Cinema Processor User’s Manual Issue 3 Part Number 91570 Dolby® CP650 Digital Cinema Processor User’s Manual Dolby Laboratories, Inc. Corporate Headquarters Dolby Laboratories, Inc. 100 Potrero Avenue San Francisco, CA 94103-4813 USA Telephone 415-558-0200 Fax 415-863-1373 www.dolby.com European Headquarters Dolby Laboratories, Inc. Wootton Bassett Wiltshire SN4 8QJ England Telephone (44) 1793-842100 Fax (44) 1793-842101 DISCLAIMER OF WARRANTIES: EQUIPMENT MANUFACTURED BY DOLBY LABORATORIES IS WARRANTED AGAINST DEFECTS IN MATERIALS AND WORKMANSHIP FOR A PERIOD OF ONE YEAR FROM THE DATE OF PURCHASE. THERE ARE NO OTHER EXPRESS OR IMPLIED WARRANTIES AND NO WARRANTY OF MERCHANTABILITY OR FITNESS FOR A PARTICULAR PURPOSE, OR OF NONINFRINGEMENT OF THIRD-PARTY RIGHTS (INCLUDING, BUT NOT LIMITED TO, COPYRIGHT AND PATENT RIGHTS). LIMITATION OF LIABILITY: IT IS UNDERSTOOD AND AGREED THAT DOLBY LABORATORIES’ LIABILITY, WHETHER IN CONTRACT, IN TORT, UNDER ANY WARRANTY, IN NEGLIGENCE, OR OTHERWISE, SHALL NOT EXCEED THE COST OF REPAIR OR REPLACEMENT OF THE DEFECTIVE COMPONENTS OR ACCUSED INFRINGING DEVICES, AND UNDER NO CIRCUMSTANCES SHALL DOLBY LABORATORIES BE LIABLE FOR INCIDENTAL, SPECIAL, DIRECT, INDIRECT, OR CONSEQUENTIAL DAMAGES (INCLUDING, BUT NOT LIMITED TO, DAMAGE TO SOFTWARE OR RECORDED AUDIO OR VISUAL MATERIAL), COST OF DEFENSE, OR LOSS OF USE, REVENUE, OR PROFIT, EVEN IF DOLBY LABORATORIES OR ITS AGENTS HAVE BEEN ADVISED, ORALLY OR IN WRITING, OF THE POSSIBILITY OF SUCH DAMAGES. WARNING: To avoid the risk of electrical shock or fire, do not attempt to service the CP650 or remove the front panel. Do not remove the power supply housing located on the rear of some digital soundheads. Refer all service and repairs to qualified technicians. Dolby, Pro Logic, and the double-D symbol are registered trademarks of Dolby Laboratories. Auditorium Assist and Surround EX are trademarks of Dolby Laboratories. All other trademarks remain the property of their respective owners. 2006 Dolby Laboratories, Inc. All rights reserved. Part Number 91570 Issue 3 S06/14395/17501 Software Version 2.3.4.4 Dolby® CP650 Digital Cinema Processor User’s Manual Table of Contents Chapter 1 Introduction Chapter 2 Operating Instructions 2.1 The CP650 Front Panel............................................................................ 2-1 2.1.1 Front-Panel Display.................................................................... 2-2 2.1.2 Level Display ............................................................................. 2-4 2.1.3 Main Fader Knob ....................................................................... 2-4 2.1.4 Projector Signal Indicators ......................................................... 2-4 2.1.5 Bypass Power Supply Failure Indicator ..................................... 2-4 2.1.6 Bypass Power Button ................................................................. 2-4 2.1.7 Format Buttons........................................................................... 2-4 2.1.8 Setup Control Panel Access Door .............................................. 2-5 2.1.9 Mute Button................................................................................ 2-5 2.1.10 Menu Control Buttons................................................................ 2-5 2.2 Normal Operation .................................................................................... 2-6 2.2.1 Power On.................................................................................... 2-6 2.2.2 Main Fader ................................................................................. 2-7 2.2.3 Auditorium Fader ....................................................................... 2-8 2.2.4 Assigning Preset Fader Levels ................................................... 2-8 2.2.5 Automatic Selection of the Dolby Digital Format ..................... 2-9 2.2.6 Setting the Auto Dolby Digital Target ..................................... 2-10 2.2.7 Quick Sound Check—Rotating Pink Noise ............................. 2-10 2.2.8 Assigning Front-Panel Buttons to Formats .............................. 2-11 2.2.9 The Mute Function ................................................................... 2-11 2.2.10 Selecting the Power-On Format ............................................... 2-12 2.2.11 Setting the Front-Panel Display Contrast................................. 2-12 2.2.12 Operation with an Automation System .................................... 2-12 2.3 Bypass Operation................................................................................... 2-13 ii Dolby® CP650 Digital Cinema Processor User’s Manual Chapter 3 Maintenance and Calibration 3.1 Soundhead Maintenance...........................................................................3-1 3.1.1 Analog Sound System.................................................................3-1 3.1.2 Digital Sound System..................................................................3-1 3.1.3 Replacing the Cat. No. 700 Exciter Lamp ..................................3-1 3.2 Dolby Level Calibration ...........................................................................3-2 3.2.1 Automatic Calibration.................................................................3-3 3.2.2 Manual Calibration .....................................................................3-3 3.3 Film Print Cleanliness ..............................................................................3-4 Chapter 4 Troubleshooting 4.1 Troubleshooting Chart..............................................................................4-3 Appendix A Advanced Operations A.1 Using Auditorium Assist .........................................................................A-1 A.2 Displaying the Event Log ........................................................................A-2 A.3 Display Information About This CP650 Unit .........................................A-3 A.4 Format 80/81 PCM Options ....................................................................A-4 A.5 Remote Address.......................................................................................A-4 Appendix B The Evolution of Dolby Film Sound Appendix C Reference Information C.1 How to Identify Soundtracks on Prints ...................................................C-1 C.2 About Dolby Digital Surround EX..........................................................C-2 C.3 Test and Demonstration Films.................................................................C-4 C.4 List of Cat. Numbers Used ......................................................................C-5 Appendix D CP650 Menu Listing iii Dolby® CP650 Digital Cinema Processor User’s Manual List of Figures Figure 2-1 CP650 Front Panel ..................................................................................................... 2-1 Figure 2-2 Front-Panel Display Showing All Possible Channels Active .................................... 2-2 Figure 2-3 Front-Panel Display Showing Dolby Digital Film Playing ....................................... 2-3 Figure 2-4 Front-Panel Display Showing Dolby Digital Surround EX Film Playing ................. 2-3 Figure 2-5 Front-Panel Display when Running Earlier Software................................................ 2-3 Figure 2-6 CP650 Setup Menu Control Buttons.......................................................................... 2-5 Figure 3-1 Digital/Analog Track Wear........................................................................................ 3-5 Figure C-1 Film Sound Track Layout..........................................................................................C-1 Figure C-2 Identifying Types of Film Sound Tracks ..................................................................C-2 Figure C-3 Surround Speaker/Amplifier Switching for 5.1-Channel..........................................C-3 Figure C-4 Surround Speaker/Amplifier Switching for Dolby Digital Surround EX .................C-3 Figure C-5 Cat. No. 69T Dolby Tone Test Film .........................................................................C-4 iv Virtual Dolby Technologies Test DVD Track List iv Dolby® CP650 Digital Cinema Processor User’s Manual Chapter 1 Introduction The Dolby® CP650 Digital Cinema Processor is the heart of your theatre sound system. All sound sources are connected to the CP650, which processes the signals appropriately and feeds them to the power amplifiers. Entirely self contained, the CP650 provides both Dolby Digital and Dolby analog processing. An easy-to-read front-panel screen and uncomplicated front-panel buttons make it simple to operate. Software that can be readily programmed controls all existing film sound formats. Calibration settings for a given theatre can be stored on a PC and, if necessary, transferred directly to another CP650, reducing or eliminating the need for recalibration after repairs. As improvements to the CP650’s digital control and processing software are developed, the latest revisions can be downloaded from a PC to the CP650 hardware. Moreover, updates to the audio coding used for Dolby Digital soundtracks, which are included from time to time right on Dolby Digital release prints, download automatically into the CP650 the first time such a print is played in the cinema. The CP650 was installed and adjusted initially by a trained engineer so that your theatre would have the same standard playback characteristics as the dubbing theatres in which all Dolby films are mixed. This results in the most accurate sound reproduction possible. Do not attempt to adjust any controls within the CP650 except those specified in this manual. Adjusting internal controls requires special test equipment. Tampering with these controls can have an adverse effect on the sound in your theatre and will require a service call to restore proper operation. The first thing to do when you have a problem is to read Chapter 4. In addition, do not adjust any of the preset controls on the other audio equipment in your theatre sound system. Misadjusting the power amplifier gain controls, for example, can cause channel imbalance and too much power amplifier noise. Those controls have been set by the installer for correct channel balance. The play level should be correct in the theatre with the front-panel fader reading 7.0. 1-1 Dolby® CP650 Digital Cinema Processor User’s Manual 1.1 Introduction About This Manual This user’s manual has been prepared specifically to help projectionists get the most from the CP650 and the theatre sound system once it has been installed and aligned. (Installation and alignment instructions are supplied to the local distributor or installation company.) We suggest that you keep this manual readily available. Following this introductory chapter, the manual is organized as follows: • • • • Chapter 2 covers the basic control functions and operation of the CP650. Chapter 3 contains tips for maintaining the CP650 and the theatre sound system. Chapter 4 will help you track down problems in the sound system without test equipment. It consists of a troubleshooting chart and procedures to follow during a show, between shows, and after closing. The appendices contain important additional information to help you get the most out of the CP650 and your theatre sound system. 1-2 Dolby® CP650 Digital Cinema Processor User’s Manual Chapter 2 Operating Instructions 2.1 The CP650 Front Panel Projector Signal Indicators Bypass Power Supply Failure Indicator P1 and P2 show which projector's output is being processed by the CP650. Indicates a problem detected in the bypass power supply. Setup Control Panel Access Door Level Display For use by the service engineer. Displays fader setting. Ranges from 0.0 to 10. Normally set to 7.0. Front Panel Display Displays current format and processor condition. Format Buttons Used to select the format: 01 Mono (user-definable) 04 Dolby A-Type (user-definable) 05 Dolby SR 10 Dolby Digital 11 External 6 channel in (user-definable) U1 Nonsync 1 Pro Logic (user-definable) U2 User-definable during setup NS Nonsync 1 (user-definable) Format 10 Dolby Digital L M1 0 mute menu Next Menu Button Steps through the menu list. Select Button Selects a menu parameter to change. Make the change by rotating the main fader knob. P1 P2 Main Fader Knob OK Button Stores the setting displayed in the CP650 memory. Controls sound level and is used for menu operations during setup. Mute Button Fades down and fades up the signal to all channels without disturbing the current main fader setting. Flashes red when activated to fade down. Figure 2-1 CP650 Front Panel 2-1 Bypass Power Button When this button is illuminated red, the unit is in bypass mode, either because bypass mode has been manually selected (by using the button) or because the main power supply has developed a fault. In bypass mode, the unit is powered by the built-in bypass power supply. While the main power supply is in use, this button is not illuminated, and the screen and other indicators operate normally. Dolby® CP650 Digital Cinema Processor User’s Manual 2.1.1 Operating Instructions Front-Panel Display Day-to-day operation of the CP650 is performed through interaction with the display in Figure 2-2. L Le C Re R Rs Bsr Bsl Ls SW Figure 2-2 Front-Panel Display Showing All Possible Channels Active Figure 2-2 shows the display that is active when the CP650 is processing and playing a digital signal connected to the CP650 input with all channels active. The top two lines display the current format, which in this case is Dolby® Digital Surround EXTM with five screen channels active. The bottom left area contains an active bar graph display of the sound signals present on each channel. The bars move, confirming that audio is passing through the CP650. The bars are displayed starting with the Left screen channel, and moving clockwise around the auditorium: Left screen, Left Extra screen, Center screen, Right Extra screen, Right screen, Right Surround, Back Surround Right, Back Surround Left, Left Surround, Subwoofer. The L on the display indicates that fader control is set to Local, meaning that the fader knob on the front panel of the CP650 (and any Dolby remote-box fader knob) controls the sound level in the auditorium. If the display shows an A, an external auditorium fader knob (not manufactured by Dolby) controls the sound level. An M1 on the display indicates that, in two-projector installations, the projector 1 motor contact is closed. In single-projector installations the front-panel display will always show as M1. The motor start signal is used during projector changeovers on Dolby Digital films in two-projector installations. The 0 shown on the bottom right is the Dolby Digital film error rate. The first indication of satisfactory digital soundtrack playback is the detection of a low error rate. The error rate is a number between 0 and 8. With a correctly aligned digital film reader, most films will play at an error rate of 6 or lower. If the digital error rate exceeds 8, or if the display shows F (data not readable) or “–”(no digital soundtrack), the CP650 automatically switches to playing the film’s analog soundtrack until usable data appears. 2-2 Dolby® CP650 Digital Cinema Processor User’s Manual Operating Instructions Other Possible Front-Panel Sound Format Displays L C R Rs Ls SW Figure 2-3 Front-Panel Display Showing Dolby Digital Film Playing Figure 2-3 shows the display when the CP650 is playing a Dolby Digital soundtrack with no Dolby Digital Surround EX decoder board installed. Since there are no Le, Re, Bsr, or Bsl channels present in this configuration, no signal bars are indicated for those channels. L C R Rs Bsr Bsl Ls SW Figure 2-4 Front-Panel Display Showing Dolby Digital Surround EX Film Playing Figure 2-4 shows the display when the CP650 is equipped with a Dolby Digital Surround EX decoder board, and playing a Dolby Digital Surround EX soundtrack. The additional Back Surround Left and Back Surround Right channels are present in this configuration. The digital sound data from current films produced with the Dolby Digital Surround EX process contains auto-switching bits, or “Surround EX flags.” A CP650 equipped with the Cat. No. 790 Surround EX board detects these bits and switches the additional back surround channels on as shown. If the flags indicate that the film is not a Surround EX film, or if the flag bits are not present, Auto Surround EX mode is switched off, and the display will show equal levels for the Rs/Bsr and Bsl/Ls channels. Front-Panel Sound Format Display on Units with Earlier Software The bar graph display on CP650s running software earlier than version 2.1 is slightly different. See Figure 2-5. Dolby Digital Surround EX board installed: Not installed: L C R Ls Rs SW Bsl Bsr L C R Ls Rs SW Figure 2-5 Front-Panel Display when Running Earlier Software 2-3 Dolby® CP650 Digital Cinema Processor User’s Manual 2.1.2 Operating Instructions Level Display The main fader level is displayed as a two-digit number. Starting at 0.0, the level increases as the fader knob is rotated clockwise. As with previous generations of Dolby cinema processors, a fader setting of 7.0 is the correct operating level. This setting matches the level used during production of the film. 2.1.3 Main Fader Knob Use the main fader knob to adjust the sound level. As the main fader is turned, the numbers on the display move from 0.0 to 10. A fader reading of 7.0 is the correct operating level. The main fader knob rotates continuously with no end stops. The knob is also used to choose various menu items during setup operations. 2.1.4 Projector Signal Indicators P1 and P2 show which projector analog optical sound input has been selected by the CP650. 2.1.5 Bypass Power Supply Failure Indicator The bypass power supply failure indicator turns on if a problem is detected in the bypass power supply circuitry. 2.1.6 Bypass Power Button The bypass power button operates the main power supply for the CP650. In the ON position, the CP650 is powered by the main supply. As with other Dolby cinema processors, the CP650 has a separate backup (bypass) power supply. In the OFF position, the unit is powered by the built-in bypass power supply, and the power button glows red. It also glows red if a fault is detected during normal operation (power button in the ON position), indicating that the unit has automatically switched to bypass operation. 2.1.7 Format Buttons The following format buttons are used to select the desired film sound format: • 01—Mono. • 04—Dolby A-type. • 05—Dolby SR. • 10—Dolby Digital. • 11—External six-channel input signal. • U1, U2—Set by the user. • NS—Nonsync, for intermission music CD, tape, and so on. It is usually set as format 60, but it can be set to other formats. Any available format can be assigned to the 01, 04, 11, U1, U2, or NS buttons. See Section 2.2.8. 2-4 Dolby® CP650 Digital Cinema Processor User’s Manual 2.1.8 Operating Instructions Setup Control-Panel Access Door The setup control-panel access door is for use only by the service or installation engineer. 2.1.9 Mute Button Press the mute button to fade down the sound on all channels without disturbing the current fader setting. The speed of fade-in/fade-out is adjustable from 0.2 to 5 seconds. The button flashes red when mute is activated. 2.1.10 Menu Control Buttons Use the menu control buttons to navigate through the various menus displayed on the front-panel screen, select various menu options, and store setup data. menu OK Figure 2-6 CP650 Setup Menu Control Buttons Use the left-hand button to step through the menu list. Press and release the button once to change the display to the next menu item. Press and hold the button while rotating the main fader knob to step the display through all menu items. Press and release the center button to choose a parameter to adjust when there are multiple items available on the display. Rotate the main fader knob to change or adjust the chosen parameter. Use the right-hand button to accept the setting displayed on the front-panel screen and store it in CP650 memory. Any changes to settings occur immediately but are not saved until this button is pressed. Leaving the current menu before pressing the OK button discards the change. Note: For convenience, pressing the illuminated format button once, or any other format button twice, causes the CP650 to immediately return to the menu toplevel screen display. This feature is handy for making a quick change, then returning to normal operation. 2-5 Dolby® CP650 Digital Cinema Processor User’s Manual 2.2 Operating Instructions Normal Operation This section describes the normal operation of the CP650. Section 2.3 describes operation when the CP650 has switched to emergency bypass. 2.2.1 Power On Each time the CP650 is connected to power, it automatically sets itself to the selected wake-up state. During the CP650 installation, the power-on state of the unit was configured from the following choices: • Projector 1 or 2 (selected by the installation technician). • The last fader setting before shutdown. (If the front-panel fader was active, the system will start up at the last fader setting before power was turned off. If the auditorium fader was active, the system will read the setting of the auditorium fader knob.) • Either the film sound format that was active when power was turned off or the film sound format previously stored as the power-on format. (The format options can be set using the procedure described Section 2.2.10.) If power has been removed for longer than approximately three weeks, the CP650 wake-up state is: • Front-panel main fader activated and set to 7.0 • • Format 10 (Dolby Digital) Power-on format set to the last format used before power was turned off When power is first applied, the first screen shows that the software is loading into the CP650 memory, and displays the software version number. Next, a brief self-test of various internal circuitry is automatically performed. Finally, the normal operating screen appears. Details on the items displayed are described earlier in this chapter. This is the only screen you will need to see for ordinary operation. 2-6 System V.2.x.x.x Loading......... ........ Running self test Checking video level Checking 6 ch. input Checking opt in:P1 Dolby® CP650 Digital Cinema Processor User’s Manual Operating Instructions Format Selection Select the desired film soundtrack format or your nonsync source by pressing the appropriate front-panel button. The button illuminates and the format number appears on the screen to confirm that the format was selected. Common formats are: • 01 Mono—For all optical prints of any vintage with conventional mono optical (Academy) soundtracks. • 04 Dolby A-type—For Dolby releases, except those marked SR or Digital. • 05 Dolby SR—For releases marked as having a Dolby SR (Spectral Recording) soundtrack or for Dolby Digital prints if your CP650 is not equipped with digital playback capability. • 10 Dolby Digital—For Dolby Digital film releases. The digital data is clearly visible between the film perforations next to the analog soundtrack. (Your CP650 must be equipped with a Cat. No. 773 board.) • 11 External 6ch—For selecting an external six-channel analog sound source. • 13 Dolby Digital Surround EX. • NS nonsync—Usually format 60. For playing an intermission music tape or CD. The film-soundtrack format numbers used on the CP650 buttons (and also on models CP45, CP65, and CP500) often appear on the film can and leader. If these numbers are not supplied and you are not sure if a print is mono, stereo optical, or digital, see Appendix C, which explains how to identify the various types of soundtracks. 2.2.2 Main Fader The main front-panel fader knob on the CP650 controls the volume level in the theatre. It works in both normal and bypass operation. When the CP650 has been correctly installed, setting the fader to 7.0 plays the film at the level at which it was mixed. This is the proper level for any film encoded with Dolby technologies. Although a minor adjustment in playback level might be required under unusual circumstances, avoid significant deviations from the correct level (7.0) established by the installer. If the playback level is set too low, dialogue may be hard to understand; too high a level may cause complaints from the audience, and under extreme circumstances, can damage the theatre’s sound system. 2-7 Dolby® CP650 Digital Cinema Processor User’s Manual 2.2.3 Operating Instructions Auditorium Fader If an analog auditorium fader pot (not a Dolby Cat. No. 779 Digital Remote Unit or Cat. No. 771 Remote Fader) has been installed, it is activated by performing the following menu steps: Fader Setting Main Fader 1. Press multiple times, or press and hold the button while rotating the front-panel knob to move to the Fader Setting screen. 2. Rotate the fader knob to select Auditorium. 3. Press OK to save the change. 4. Press the illuminated format button to return to normal operation. Fader Setting Auditorium To return control to the main fader or digital remote faders, repeat steps 1–4 and select Local on the fader setting menu. 2.2.4 Assigning Preset Fader Levels Preset levels can be assigned to each front-panel format button. 1. Press to move to the Preset Fader Levels menu, then rotate the front-panel knob to select the front-panel button you wish to preset (01, 04, 05, 10, 11, U1, U2, or NS). Preset Fader Levels >Format xx Fader: xx.x 2. Press to move the selection to Fader, then rotate the front-panel knob to the desired level setting for this button (1–10). Preset Fader Levels Format xx >Fader: xx.x 3. Press OK to save the preset for this button. 4. Repeat the steps above to set the preset fader levels desired for other buttons and save the changes. 5. Press the illuminated format button to return to normal CP650 operation. 2-8 Dolby® CP650 Digital Cinema Processor User’s Manual 2.2.5 Operating Instructions Automatic Selection of the Dolby Digital Format CP650 units equipped to play Dolby Digital films can be set up to sense the presence of Dolby Digital data on the film and automatically switch the CP650 to the Dolby Digital format from any other film format. In other words, if the CP650 is operating in format 01, 04, 05, or 11, it will automatically switch to format 10 when a Dolby Digital film is detected. CP650s are shipped from the factory with this feature enabled. Auto Dolby Digital can only be sensed from an analog film source format. The format 10 button location can be thought of as the target for Auto Dolby Digital. Note: There may be more than one format 10 button location. In addition to button 10, format 10 may also be assigned to any of the six user-assignable buttons—01, 04, 11, U1, U2, NS. Buttons 05 (Dolby SR) and 10 (Dolby Digital) are not user assignable. More than one button can be assigned as format 10 in order to use the fader preset feature available for each button. Some users assign one button as format 10 for trailers and another format 10 button for the feature film, with each button preset to the desired fader level. If an analog soundtrack film is playing on a button that is assigned to either format 01 (Mono), format 04 (Dolby A-type), or format 05 (Dolby SR) and a Dolby Digital soundtrack is sensed, the CP650 will switch to the format 10 (Dolby Digital) target button. The format 10 target button is assigned in one of the menus. The Auto Dolby Digital feature is disabled whenever a front-panel button is pressed or an automation cue is received after Auto Dolby Digital has operated. This action is useful, for example, if you wish to quickly select an analog film format during the show. The NS button reenables the Auto Dolby Digital feature. We recommend that the NS button be assigned to your intermission format (typically format 60, 75, or 80), because at the end of the film, when the NS format button is typically used, the Auto Dolby Digital feature is then reenabled. To disable (or reenable) the Auto Dolby Digital feature, follow these steps: multiple times, or press and hold the button while 1. Press rotating the front-panel knob to move to the Auto Dolby Digital screen. 2. Rotate the fader knob to select Disabled. Auto Dolby Digital >Enabled Auto Dolby Digital >Disabled 3. Press OK to save the change. 4. Press the illuminated format button to return to normal operation. 2-9 Dolby® CP650 Digital Cinema Processor User’s Manual 2.2.6 Operating Instructions Setting the Auto Dolby Digital Target This menu item allows you to select which format button will activate when a Dolby Digital film is detected automatically. If you have assigned the Dolby Digital format to multiple buttons, choose the button you wish to use. 1. Press multiple times, or press and hold the button while rotating the front-panel knob to move to the Auto Digital Target screen. Auto Digital Target 2. Rotate the fader knob to select among the format buttons that have Dolby Digital assigned to them. Auto Digital Target >Format 10 Dolby Digital 3. Press OK to save the change. 4. Press the illuminated format button to return to normal operation. 2.2.7 Quick Sound Check—Rotating Pink Noise Use the rotating pink noise function as a fast method to check the overall sound quality in your theatre. 1. Press multiple times, or press and hold the button while rotating the front-panel knob to move to the Rotating Noise screen. 2. A warning message appears. Press OK to start the pink noise. Rotating Noise Press OK to Start or Stop CAUTION Pressing OK will play pink noise in the auditorium Pink noise is sent to each channel in turn, holding for five seconds at each channel. The channel currently running pink noise is shown on the bottom right-hand side of the display. Rotating Noise Press OK to Start or Stop Running Pressing OK stops the pink noise from moving to the next channel. Pressing OK again resumes pink-noise rotation. 3. Go to the auditorium and sit two-thirds of the distance from the front speakers to the rear, and at the center from side to side. All channels should sound equally loud and have a similar sound as the noise rotates. Call your service engineer if you hear a problem. 4. Press the illuminated format button to return to normal operation. 2-10 L Dolby® CP650 Digital Cinema Processor User’s Manual 2.2.8 Operating Instructions Assigning Front-Panel Buttons to Formats Any available format can be assigned to the front-panel 01, 04, 11, U1, U2, or NS buttons. When the button is pressed, that format will be selected. steps through the button selections, 01, 04, 1. Pressing 11, U1, U2, and NS. 2. Rotate the fader knob to select one of the many format choices available. This example shows Format 80 assigned to Button 01. Button 01 Format > Format xx format name Button 01 Format >Format 80 Master Digital In 3. Press OK to save the assignment to this button. to step to the other button choices, then rotate the 4. Press fader knob again to select the desired format. Button U2 Format >Format 65 Public Address LsRs 5. Press OK to save the assignment to this button, and so on. 6. Press the illuminated format button to return to normal CP650 operation. 2.2.9 The Mute Function Use the mute function between intermission music and starting the projector to prevent the audience from hearing annoying thumps and leader crackle at the beginning of the show. This function is also useful if the film breaks or runs out while the projector is active, since it suppresses the very loud signal that occurs when leaders or tails pass through the projector. When you press mute, the volume automatically fades all the way down on all channels. The button will flash, indicating that the CP650 outputs are muted. When you press the button again, or select a new format, the volume automatically rises to the level set by the fader. The fade-out and fade-in time can be set to work from 0.2 to 5 seconds by following this procedure: , or press and hold the button while rotating the 1. Press front-panel knob to move to the Mute Fade-in Time menu. Mute Fade-in Time >x.x Seconds 2. Set the desired fade-in time using the front-panel knob. 3. Press OK to save your setting. 4. Press to set the Mute Fade-out Time using the same procedure. 5. Press the illuminated format button to return to normal operation. 2-11 Dolby® CP650 Digital Cinema Processor User’s Manual 2.2.10 Operating Instructions Selecting the Power-On Format Each time the CP650 is connected to power, it automatically sets itself to the selected power-on format. Use this menu item to store a specific power-on format or to select the format that was active when power was turned off. 1. Press to move to the Power On Format Select menu, then rotate the front-panel knob to select which format button will be active at power-on. Power On Format 2. Press OK to save your changes. 3. Press the illuminated format button to return to normal CP650 operation. 2.2.11 Setting the Front-Panel Display Contrast The liquid crystal display (LCD) contrast can be adjusted to give the clearest possible readability. 1. Press to move to the Contrast Adjustment menu, then rotate the front-panel knob while watching the display. Adjust for the most pleasing appearance. This example shows the contrast set to 10. Contrast Adjustment > 10 2. Press OK to save your changes. 3. Press the illuminated format button to return to normal CP650 operation. 2.2.12 Operation with an Automation System When the CP650 in your theatre is connected to automation equipment, the format selection is duplicated elsewhere. Usually, the front-panel buttons of the CP650 can be used to override commands from the automation system; however, as automation equipment differs from installation to installation, check with your system installer if you have any questions about overriding the automation commands. 2-12 Dolby® CP650 Digital Cinema Processor User’s Manual 2.3 Operating Instructions Bypass Operation The CP650 has an independent power supply for emergency operation. If the main power supply or processor circuitry fails, the unit automatically switches to bypass operation, allowing the show to continue with limited sound processing functions. The front-panel bypass power button glows red when the unit is operating in bypass. In the case of other problems, such as distortion or the loss of a channel, Bypass mode can be selected manually by pressing the bypass power button. Other components in the theatre sound system could also fail. Refer to Chapter 4 any time there is a problem. When the CP650 is operating in Bypass mode: • • • • The bypass button glows red. Only the front-panel main fader operates; no other remote fader works. All other front-panel buttons do not work. The optical preamp circuit of the selected projector remains operational and is fed to the CP650 Left, Center, and Right channel outputs. • Even when a stereo print is playing, a mono signal is fed to all screen speakers. Thus, you can switch to Bypass mode to keep the show going if one of the power amplifiers fails. • All Dolby processors, speaker equalizers, and subwoofer circuits are switched out of the signal path. Be sure to follow the troubleshooting procedures and, if necessary, call your service engineer as soon as possible. If the front-panel bypass power supply failure indicator (located directly above the main fader knob) is on, the CP650 will not operate in Bypass mode. Note: The CP650 will not operate, even in Bypass mode, if there is a fault in any of the following areas: • • • The AC mains power to the CP650 The bypass power supply fuse or bypass power supply circuit The optical preamplifier circuitry or bypass circuitry on the Cat. No. 772B board We strongly recommend that a spare Cat. No. 772B board be kept on hand for substitution in emergencies. 2-13 Virtual Dolby Technologies Test DVD Track List iv Dolby® CP650 Digital Cinema Processor User’s Manual Chapter 3 Maintenance and Calibration Having the very best equipment in your installation does not in itself guarantee that you will always achieve the best results. A number of routine maintenance and adjustment procedures, requiring no special test equipment or technical knowledge, are necessary to realize the full potential of the sound system on a day-to-day basis. These procedures can also prevent costly show cancellations and service calls. A Dolby® Cat. No. 69T test film is required for proper maintenance of your sound system. We also recommend that you keep on hand the Dolby Cat. No. 251 Jiffy test film, and run it regularly to check the theatre sound system thoroughly (see Appendix C). 3.1 Soundhead Maintenance No single maintenance procedure is more vital to good sound in the theatre than regular cleaning of the projector soundhead optics. A clean soundhead keeps your theatre sounding its best. 3.1.1 Analog Sound System Use lint-free cotton swabs and window or glass cleaner to clean the optical barrel lens surfaces. If your system uses a solar cell, it can be cleaned by gently using a dry cotton swab. The solar cell and its adjustments are extremely delicate. Alternatively, careful use of compressed air can blow dirt and debris away from the cell. Be very careful that the nozzle or tube end never touches the cell. The spray can crack it. 3.1.2 Digital Sound System The digital soundhead, like the analog soundhead, should be kept clean for best performance. Wiping the external surfaces with a clean cloth on a regular basis will keep the soundhead looking new. The optical path should be inspected regularly and kept dust free with a photographer’s lens-cleaning kit (available from most camera stores). Take care not to scratch the lens. The film path (rollers and drum) should be cleaned regularly, as you would on the projector. Acetone, carbon tetrachloride, and other dangerous cleaners should not be used. 3.1.3 Replacing the Cat. No. 700 Digital Soundhead Exciter Lamp If your system uses the earlier Cat. No. 700 Digital Soundhead, the exciter lamp needs occasional replacement. It is designed for long life and should provide more than 8,000 hours of reliable use under normal circumstances. Routine replacement 3-1 Dolby® CP650 Digital Cinema Processor User’s Manual Maintenance and Calibration will depend on your theatre’s hours of operation. Use only a General Electric EPT, reflector-type, 42 watt lamp (Dolby Part Number 34010). To replace the exciter lamp: 1. Disconnect AC mains power, then carefully remove the six screws holding the rear cover/power supply assembly. 2. Allow the lamp to cool, if necessary. With the rear cover removed, the lamp will be visible but still attached to the rear cover assembly by its two supply wires. Slide the lamp out of its mounting bracket, then remove the lamp from the socket. 3. Using gloves or a clean, lint-free cloth, carefully remove a new lamp from its protective box. Place the new lamp in the socket. Be careful not to touch the bulb or inner surface of the reflector in the lamp. If either is accidentally touched, carefully clean the area with isopropyl alcohol when the bulb is cool. Allow time to dry. 4. Slide the lamp back into its bracket in the soundhead, replace the rear cover assembly, and tighten the six screws. 3.2 Dolby Level Calibration Proper decoding of soundtracks encoded with Dolby processing requires careful level matching of each channel. When the CP650 was first installed, the technician made this adjustment. We recommend that you routinely perform these steps to compensate for the normal aging of the optical soundtrack light source. It is always necessary to adjust Dolby level whenever an exciter lamp is replaced. (See Appendix C.3 for a description of why Dolby level is important.) The CP650 has an automatic level adjustment facility for easy calibration. A loop of Dolby Cat. No. 69T test film is required for this adjustment. The test film is available from your theatre equipment supplier. 1. On projector 1, clean the optics as described earlier. 2. Thread and play the Cat. No. 69T Dolby tone test film. Ensure that the arrow is going in the correct direction. The film emulsion should face away from the screen. 3. Switch the booth monitor to Center channel. 4. Listen to the tone on the booth monitor to identify any problems with distortion or speed variations. Call your service technician if you hear problems. 3-2 Dolby® CP650 Digital Cinema Processor User’s Manual Maintenance and Calibration 5. Press mute. 3.2.1 Automatic Calibration 1. Press multiple times, or press and hold the button while rotating the front-panel knob to move to the Automatic Optical Level Adjust, Projector 1 menu. 2. Press OK to begin the automatic level calibration for projector 1. With the Dolby tone test film running, the CP650 automatically calibrates the Left and Right channels to the Dolby tone playing on the film. The four vertical circles display the left channel signal level. 3. The CP650 displays this screen when the calibration has finished. Press OK to save the settings. 4. In two-projector installations, press once to move to the Automatic Optical Level Adjust, Projector 2 menu, and repeat steps 2 and 3 to automatically adjust the projector 2 Dolby level. Automatic Optical Level Adjust Projector 1 Press OK When Ready. Please Wait. L O ..O O O O R O O O Automatic Optical Level Adjust done. Press OK to save the Current settings. Automatic Optical Level Adjust Projector 2 Press OK When Ready. 5. Press the illuminated format button to return to normal operation, which also cancels muting. 6. If there is a problem with automatic calibration, perform manual adjustment by pressing OK. See Section 3.2.2. 3.2.2 Unable to complete Level adjustment. Press OK to continue Manual Calibration 1. To set Dolby level manually, press OK to return to the Automatic Optical Level Adjust screen, then press move to Manual Optical Level Adjust for projector 1. twice to Manual Optical Level Adjust Projector 1 Press OK When Ready. 2. Press OK to begin manual adjustment. 3. The number displayed on the bottom line (xx in the screenshot) Manual Level represents the level setting for the Left channel. The left four P1 vertical circles display the Left channel signal level, similar to an LED meter. Rotate the front-panel knob until the two center circles fill black. The adjustment range is 0–63 dB, in 0.3 dB steps. 3-3 L O ● ● XX O O R O O O Dolby® CP650 Digital Cinema Processor User’s Manual Maintenance and Calibration 4. Press to select the Right channel, and adjust in the same manner. The number displayed on the bottom line will move to the Right-channel column. Manual Level P1 L O 5. Press OK to save your level settings for projector 1. Saving Changes..... ... ● ● O O R O O O XX 6. Stop the projector, and load and run Cat. No. 69T film loop on projector 2, if so equipped. 7. Press to move the menu to Manual Optical Level Adjust for projector 2, and repeat the above procedure for the Left and Right channels. 8. Press OK to save your level settings for projector 2. 9. Press the illuminated format button to return to normal operation, which also cancels muting. 3.3 Film Print Cleanliness A high-quality theatre system outfitted with Dolby equipment is like a high-quality home stereo system: it can sound only as good as the program material playing through it. Just as a good home stereo clearly reproduces the annoying pops and clicks on poorly received radio signals, a good theatre system reproduces pops, crackles, and other noises from worn and dirty film prints. If you receive a poor print from your distributor, there is little you can do except, if possible, arrange a replacement. While a print is in your theatre, however, you should always treat it with respect and care to be sure your audiences receive the best in both sound and picture. The print should be kept as clean as possible when it is played, when it is stored between shows, and when a platter reel is prepared. In particular, when individual reels are unwound to make up a platter reel, do not let the film touch the floor or come in contact with other sources of dust and dirt. The Dolby Digital print format has robust error-correction information encoded along with the audio data, and the CP650 uses a powerful digital error-correction technique, allowing the data to be decoded perfectly even if scratches and dirt are present. However, best performance will be obtained if the print is kept clean. Standard film cleaners provide good results. 3-4 Dolby® CP650 Digital Cinema Processor User’s Manual Maintenance and Calibration The sound quality of the digital track degrades differently than the analog track. With any analog track, print wear reduces the quality more or less gradually; the more wear, the lower the quality of the sound. With a digital soundtrack, wear has no audible effect until the print is degraded beyond usability (by which time the picture quality is usually unacceptable, as well). At this point, wear may also exceed the error correction capabilities of the CP650, and the processor will automatically switch to playing the analog Dolby SR track. Figure 3-1 Digital/Analog Track Wear 3-5 Virtual Dolby Technologies Test DVD Track List iv Dolby® CP650 Digital Cinema Processor User’s Manual Chapter 4 Troubleshooting Your theatre sound system consists of a number of critical audio components in addition to the Dolby® CP650. Thus, the first step when something goes wrong with the sound is to determine which component is causing the problem. If you are unable to solve the problem using the information that follows, call your local authorized service engineer. Appendix C.4 contains a list of circuit boards available. The troubleshooting Table 4–1, located at the end of this chapter, may also be helpful. If Film Sound Is Lost If film sound is lost, take the following steps: 1. Check that the correct format button is glowing on the CP650 front panel, and that the correct projector (P1 or P2) is selected. 2. Verify that the lamp or LED is on in both the analog and digital (if present) film readers. 3. Confirm that the mute button is not flashing, and that the fader display is 4.0 or above. If your installation uses a remote auditorium fader, check its setting. 4. Switch the CP650 to Bypass mode by pressing the front-panel bypass power button. If sound is restored it will play in mono, but you can continue the show while you try to find the source of the trouble. 5. If these steps do not restore film sound, press the front-panel bypass power button again. When the CP650 self-test is finished, press the NS front-panel button and play your source of intermission music. If the system operates properly in this format, there is no problem with the equipment following the CP650 (such as power amplifiers and loudspeakers). The problem may be in the projectors. Double-check both projectors, and if possible, continue the show using the other projector. 4-1 Dolby® CP650 Digital Cinema Processor User’s Manual Troubleshooting If One Channel Fails or Is Distorted If one channel in your theatre system fails or sounds distorted, take the following steps: 1. Switch the CP650 to Bypass mode by pressing the front-panel bypass power switch. A mono signal is fed to all three screen channels. If the problem in one channel persists, the power amplifier or speaker for that channel is probably at fault. If the problem is not in the Center channel, switch the faulty amplifier off (be sure that the amplifier is not shared with the Center channel) and finish the show in Bypass mode. 2. If you are showing a mono film and the Center channel has failed or is distorted, switch the CP650 to Bypass mode so that the mono signal is fed to the stillfunctioning Left and Right channels. Turn off the power amplifier for the Center channel. If Switching to Bypass Mode Does Not Restore Sound 1. Check the film reader LEDs or exciter lamps, the fader setting, and the mute button. Make certain that all components—including power amplifiers—are receiving AC mains power. 2. If the bypass power appears to work (front-panel bypass power button glows red), open the front control-panel access door and check if the signal present lights are flashing. If they are, and sound is still not available, check for AC power to the power amplifiers. 3. If the signal present lights are not flashing, the Cat. No. 772B circuit board may be faulty. Call your service engineer. If You Hear Extraneous Noises when Playing a Digital Film 1. Press the format 05 front-panel button to play the film in analog Dolby SR format. 2. If the noises persist, switch the CP650 to Bypass mode by pressing the front-panel bypass power button. 3. If the noises still persist, check the power amplifiers, as it is unlikely that both the digital and analog parts of the system have failed. Excessive or Inappropriate Sound from Surround Speakers As an emergency measure to continue the show, switch off the surround channel power amplifiers. Contact your service engineer to determine if the problem is related to the film itself or to the theatre sound system. 4.1 Troubleshooting Chart Table 4–1 may be helpful in finding sound problems with your system. 4-2 Dolby® CP650 Digital Cinema Processor User’s Manual Troubleshooting Table 4-1 Troubleshooting Chart Symptom Possible Cause Recommended Action NO SOUND AT ALL No sound, front-panel lights look normal. No sound, front panel is dark, bypass power button is not glowing red. No power to CP650. No sound, and switching to Bypass mode doesn’t restore sound. Film sound reader on the projector. Verify that the selected format, mute status, and fader setting are correct. If no formats produce sound, there may be a CP650 internal problem. Call your local service engineer. See if the AC mains panel circuit breaker feeding the CP650 is tripped. Verify that all power connectors are fully inserted into their sockets. Press the front-panel bypass power button. If the CP650 still does not come on, call your service engineer. Check that the film sound reader LED or exciter lamp is on. If not, fade up background music and transfer the reel to the alternative projector and continue the show until the LED/lamp or its power supply can be replaced. Call your service engineer. or No sound, front panel is dark, bypass power button is illuminated, and system is already in Bypass mode. Check that the signal-present LEDs inside the setup control-panel access door are flashing while the film is running. If not, call your service engineer. Power amplifiers switched off. Check the power feed to the power amplifiers for a tripped circuit breaker or fuse or an accidental disconnection. 4-3 Dolby® CP650 Digital Cinema Processor User’s Manual Symptom Possible Cause Troubleshooting Recommended Action NO SOUND IN SOME FORMATS No Dolby Digital sound (format 10). Front panel looks normal, analog film format (05) plays OK. No Dolby Digital data available. Not a Dolby Digital print. Projector not running. Digital data on the film badly damaged. Digital film reader not working. Film not threaded correctly in digital reader. Verify that the LED (or exciter lamp) in the digital film reader is on and that the print you are playing includes Dolby Digital information and is correctly threaded through the digital reader. Bypass power button is illuminated, System is in Bypass mode. Switch the CP650 out of Bypass mode by pressing the front-panel bypass power button. Call your service engineer if the system is still not operating correctly. Front-panel fader knob has no effect. External analog remote fader selected. Select the front-panel (local) fader by pressing the left menu button to show the Fader Setting menu, then turning the front-panel knob to display Local. Press OK. This will restore volume control to the main front-panel fader and any digital remotes that are connected. Fader level display changes when no change is made to the CP650 frontpanel fader. A remote digital fader is being operated. A format with a different fader setting was selected. Analog remote fader is selected and being changed. but the front panel is dark. There is sound. FADER PROBLEMS 4-4 Dolby® CP650 Digital Cinema Processor User’s Manual Symptom Possible Cause Troubleshooting Recommended Action CONTROL PROBLEMS CP650 won’t accept a format button selection, and gives “Format Unavailable” message. When the digital format 10 is selected, front-panel display reads “Reverted!” and “Optical Dolby SR.” CP650 doesn’t have the optional modules needed for that format, or that part of the system is not working. No Dolby Digital data available. Not a Dolby Digital print. Projector not running. Digital data on the film badly damaged. Digital film reader not working. Film not threaded correctly in digital reader. 4-5 Format 10 requires the Dolby Digital Cat. No. 773 board. Formats 13, 80, or 81 require the Cat. No. 790 Dolby Digital Surround EXTM board. Verify that the LED (or exciter lamp) in the digital film reader is on and that the print you are playing includes Dolby Digital information and is correctly threaded through the digital reader. Virtual Dolby Technologies Test DVD Track List iv Dolby® CP650 Digital Cinema Processor User’s Manual Appendix A Advanced Operations A.1 Using Auditorium Assist The Dolby® Auditorium AssistTM feature provides an indication of the stability and characteristics of your theatre’s speakers, crossovers, amplifiers, and auditorium acoustics. Use of this feature requires a Dolby Cat. No. 735 microphone mounted along the rear wall of the auditorium. After installation of the microphone, the installation engineer performed the initial reference calibration. The frequency response and sound level of each speaker were checked and stored in the CP650 memory. Whenever Auditorium Assist is subsequently selected, all channels are measured and compared to these reference settings. Auditorium Assist also checks and compares the level of the ambient noise floor in the auditorium to the reference level originally stored. Operation The Auditorium Assist sound-check function can be performed at any time. Set up the following conditions before activating the Auditorium Assist measurement function: • • • • Curtains and masking fully open Auditorium unoccupied Doors closed Heating and air conditioning system switched to a known and repeatable condition The Auditorium Assist sound-check function can be performed at any time. 1. To move the display to the Auditorium Assist menu, press press and hold the button while rotating the front-panel knob. 2. Use to choose Check Auditorium, then press OK to begin the process. multiple times, or Auditorium Assist >Check Auditorium .Set Reference Note: The display shows Invalid Reference if the CP650 room equalization settings were changed after reference measurements were stored, or No Reference if auditorium measurements were not previously stored. Contact your service engineer. A-1 Dolby® CP650 Digital Cinema Processor User’s Manual 3. Auditorium Assist automatically begins the measurement sequence, beginning with an auditorium noise floor measurement, then cycling through all channels. The channel being measured is displayed. The CP650 outputs pink noise at 85 dBC for the Left, Center, and Right channels; 82 dBC for each of the surround channels; and +10 dBr for the subwoofer. Advanced Operations Auditorium Assist Checking Auditorium: Left Press OK to cancel Note: The CP650 outputs pink noise to the auditorium speakers during the test. 4. Upon completion, channels are listed with OK for pass, or X for fail. Any X (failure) indication is logged into the event log. (See Section A.2.) Auditorium Assist L:OK C:OK R:OK Ls: X SW:OK Rs:OK Bsl:OK Amb:OK Bsr:OK 5. Press the illuminated format button to return to normal operation. A.2 Displaying the Event Log The event log provides useful information when explaining any problems to your service engineer. The event log stores entries on the operation of the CP650. It can be useful in troubleshooting or tracking subtle system failures. Also, Auditorium Assist fail parameters are stored in the event log. Normally, a single log entry occurs every time the CP650 powers on. When viewing the event log display, the newest entries appear at the top. 1. Press multiple times, or press and hold the button while rotating the front-panel knob to move to the event log. Event Log 00:00:00 10:20:36 36:09:03 (newest) Startup Startup Startup 2. Scroll through the event log using the front-panel knob. Note: If film is running during CP650 power up, you may see erroneous information entered into the event log. The power-up self-test software applies test signals to the optical input circuits. If film is playing, the test signals are mixed with film sound, producing unpredictable test results. 3. Press the illuminated format button to return to normal operation. A-2 Dolby® CP650 Digital Cinema Processor User’s Manual A.3 Advanced Operations Display Information About This CP650 Unit The last menu items provide information about the hardware and software installed in your CP650 unit. This information is useful for discussions with your service engineer. multiple times, or press and hold the button while rotating the front-panel 1. Press knob to move to the About this CP650 screen. This menu is made up of four menu screens. 2. The first information screen displays the version number of the installed system control software, and lists any optional circuit boards installed in your unit. About this CP650: System v.a.b.c.d Cat.No.xyz installed Cat.No.xyz installed 3. Pressing cycles the menu display between the four screens. The second information screen displays the headroom configuration setting. Headroom Config Typical 4. The third information screen displays the version numbers of the various software modules running in your unit. This screen is useful to call up when discussing CP650 operational issues with Dolby engineers. About this CP650: Module Version 050304000100002020401 020201010101 5. The fourth screen displays the network MAC address, unique to this CP650. The bottom line displays the version number of each circuit board installed in your unit. The version numbers are listed for each board in the following order: About this CP650: Hardware Information Network:xxxxxxx Boards:a3842 Cat. No. 772B, Cat. No. 773, Cat. No. 774A, Cat. No. 777, Cat. No. 778, or Cat. No. 790 (or earlier Cat. No. 794) If an X is displayed, the corresponding board is not installed. In the example shown, the following board versions are installed: Board Cat. No. 772B Cat. No. 773 Cat. No. 774A Cat. No. 777 (front-panel board) Cat. No. 778, or 790, or 794 Version A 3 8 4 2 6. Press the illuminated format button, or press CP650 to normal operation. A-3 at the fourth screen to return the Dolby® CP650 Digital Cinema Processor User’s Manual A.4 Advanced Operations Format 80/81 PCM Options Use this menu to change the settings for processing a PCM digital input to the CP650. Dolby Pro Logic® decoding can be applied to the signal if desired. Auto mute causes the CP650 outputs to mute automatically if a Dolby Digital bitstream input is not present. When a PCM input bitstream is detected, the CP650 outputs will mute. Use this option with caution. , or press and hold the button while rotating the 1. Press front-panel knob to move to the Format 80/81 PCM Options menu. Format 80/81 PCM Options >Auto Mute: Disabled Decode: L/R Stereo 2. Press to choose between setting PCM Options to Auto Mute (Disabled or Enabled) and PCM Dolby Pro Logic Decode (L/R Stereo or Pro Logic). Note: Be aware that enabling PCM auto mute will not allow the CP650 to play back any PCM content. 3. Rotate the front-panel knob to make the selections. 4. Press OK to save the settings. A.5 Remote Address You can confirm that Dolby remote units are connected to and communicating with the CP650 by selecting the Remote Addresses menu on the CP650. , or press and hold the button while rotating the front-panel knob to move to 1. Press the Remote Addresses menu. 2. The single-digit address of each connected remote unit is displayed. Up to three remote units may be connected to the CP650. A-4 Dolby® CP650 Digital Cinema Processor User’s Manual Appendix B The Evolution of Dolby Film Sound Going to the movies today is more exciting and involving than ever before, thanks in large part to a continuing effort to improve film sound undertaken by Dolby Laboratories in the early 1970s. Indeed, the history of cinema sound over the past three decades closely mirrors the history of Dolby® film sound technologies. Optical Soundtracks The photographic (optical) soundtrack was the first method of putting sound on film. Today it remains the standard, in both analog and digital forms. The classic analog optical soundtrack consists of an opaque area adjacent to the picture containing narrow, clear tracks that vary in width according to variations in the sound. As the film is played, a beam of light from an exciter lamp or LED in the projector’s soundhead shines through the moving tracks. Variations in the width of the clear tracks cause a varying amount of light to fall on a solar cell, which converts the light to a similarly varying electrical signal. That signal is amplified and ultimately converted to sound by loudspeakers in the auditorium. Economy, simplicity, and durability are among the advantages that have contributed to optical sound’s universal acceptance. The soundtrack is printed photographically on the film at the same time as the picture and can last just as long, which—with care—can be a long time indeed. The optical soundhead within the projector is also economical and easily maintained. Success Gets in the Way of Progress Motion pictures with sound were first shown to significant numbers of moviegoers in the late 1920s. Within a few years, many thousands of theatres were equipped to show “talking pictures” with optical soundtracks. This phenomenally rapid acceptance of a sophisticated new technology was not without drawbacks, however. Equipment was installed in cinemas so rapidly that there was no time to take advantage of the improvements that occurred almost daily. A good example is loudspeaker design. The first cinema loudspeakers had very poor high-frequency response. Speakers with superior response became available within just a few years, but there was no time to retrofit the original systems with new units. Engineers were too busy equipping other cinemas with their first sound installations. This caused a dilemma for soundtrack recordists. Should the tracks be recorded to take advantage of the improved speakers, or should they be prepared to sound best on the many older installations already in place? Given that it was impractical to release two versions of a given title, the only alternative was to tailor soundtracks to the older B-1 Dolby® CP650 Digital Cinema Processor User’s Manual The Evolution of Dolby Film Sound speakers. The result was to ignore the improved high-frequency response of the newer, better units. To forestall compatibility problems, in the late 1930s a de facto standardization set in, the cinema playback response that today is called the Academy characteristic. Cinema owners knew what to expect from the films, and therefore what equipment to install. Directors and sound recordists knew what to expect from cinema sound systems, and thus what kind of soundtracks to prepare. The result was a system of sound recording and playback that made it possible for just about any film to sound acceptable in any cinema in the world. The problem now was that the system lacked the flexibility to incorporate improvements beyond the limitations that existed in the 1930s. Magnetic Striping and Multichannel Sound In the early 1950s, as the film industry sought to woo viewers away from their fascinating new television sets, a new method of putting sound on film was introduced. After the picture was printed, narrow stripes of iron oxide material (similar to the coating on magnetic recording tape) were applied to the release print. The sound was then recorded on the magnetic stripes in real time. In the cinema, magnetic prints would be played back on projectors equipped with magnetic heads similar to those on a tape recorder, mounted in a special soundhead assembly called a penthouse. Magnetic sound was a significant step forward, and at its best provided muchimproved fidelity over the conventional optical soundtrack. It also enabled the first multichannel sound reproduction, dubbed “stereophonic sound,” ever heard by the public. The voice of an actor appearing to the left, center, or right of the picture could be heard coming from speakers located at the left, center, or right of the new wide screens also being introduced at this time. Music took on a new dimension of realism, and special sound effects could emanate from the rear or sides of the cinema. The two main magnetic systems adopted were the four-track 35 mm CinemaScope system, introduced with The Robe, and the six-track 70 mm Todd-AO system, first used for Oklahoma! Magnetic Falls into Disuse Magnetic sound was widely adopted in the 1950s. By the 1970s, however, when the film industry experienced an overall decline, the expense of magnetic release prints, their comparatively short life compared to optical prints, and the high cost of maintaining the playback equipment led to a massive reduction in the number of magnetic releases and cinemas capable of playing them. Magnetic sound came to be reserved for only a handful of first-run engagements of major releases each year. By the mid-1970s, then, moviegoers were again hearing low-fidelity, mono optical releases most of the time, with only an occasional multitrack stereo magnetic release. Ironically, just as the industry was reverting to mono optical, more and more moviegoers were enjoying better sound at home over superior hi-fi stereo systems. B-2 Dolby® CP650 Digital Cinema Processor User’s Manual The Evolution of Dolby Film Sound Dolby Gets Involved By the late 1980s, the situation that prevailed in the mid-1970s had completely changed. Thanks to new technology and a turnaround in the financial decline of the industry, almost all major titles by that time were being released with wide-range multichannel stereo soundtracks, as is the case today. The breakthrough was the development by Dolby Laboratories of a highly practical 35 mm stereo optical release print format originally identified as Dolby Stereo. In the space allotted to the conventional mono optical soundtrack are two soundtracks that not only carry left and right information as in home stereo sound, but are also encoded with a third center-screen channel and—most notably—a fourth surround channel for ambient sound and special effects. This format not only enabled stereo sound from optical soundtracks, but higherquality sound as well. Various techniques were applied to the soundtrack during both recording and playback to improve fidelity. Foremost among these was Dolby noise reduction to lower the hissing and popping associated with optical soundtracks, and loudspeaker equalization to adjust the cinema sound system to a standard response curve. As a result, with the installation of cinema processors manufactured by Dolby, stereo optical prints could be reproduced with far wider frequency response and much lower distortion than conventional soundtracks. In fact, the Dolby optical format led to a new worldwide playback standard (ISO 2969) for wide-range stereo prints. An important advantage of the Dolby optical format was that the soundtracks were printed simultaneously with the picture, just like mono prints. Thus four-channel stereo optical release prints cost no more to make than mono prints, and far less than magnetic prints. In addition, conversion to stereo optical proved relatively simple, and once the equipment was installed, very little maintenance was required. The result was multichannel capability equaling that of four-track magnetic 35 mm (which soon became obsolete), with consistently higher fidelity, greater reliability, and far lower costs. The Next Step—Dolby SR In 1986, Dolby Laboratories introduced a new professional recording process called Dolby SR (Spectral Recording). Like Dolby noise reduction, it was a mirror-image, encode-decode system used during both recording and playback. It provided more than twice the noise reduction of Dolby A-type, and, moreover, permitted loud sounds with wider frequency response and lower distortion. The 35 mm optical soundtracks treated with Dolby SR instead of Dolby A-type not only sounded superb in cinemas equipped with new Dolby SR processors, but also played back satisfactorily in all cinemas. This led to the situation today, where the analog soundtracks on virtually all prints are Dolby SR tracks. B-3 Dolby® CP650 Digital Cinema Processor User’s Manual The Evolution of Dolby Film Sound The Digital Age Begins The next film sound development from Dolby Laboratories was Dolby Digital, introduced in 1992. Dolby Digital puts a six-channel digital optical soundtrack in addition to a four-channel SR analog track on 35 mm prints. This format is yet another significant step forward in film sound, providing independent Left, Center, Right, Left Surround, and Right Surround channels, plus a sixth Low-Frequency Effects channel for bass effects. In addition to its six-channel capability, Dolby Digital provides extraordinary dynamic capability, wide frequency range, low distortion, and relative immunity to wear. Its combination of high quality, reliability, and practicality has been proved in cinemas around the world, and today it is the most popular digital format, with the most equipped cinemas worldwide and the most releases. As with previous Dolby developments, Dolby Digital did not obsolete existing cinema installations. Prints can play conventionally in any cinema, while the digital track can be reproduced in cinemas with Dolby Digital soundtrack readers and decoders. Dolby Digital Surround EX Dolby Digital Surround EXTM was introduced in 1999, and adds a third surround channel to the Dolby Digital format. Enabling improved realism, more precise sound placement, and exciting special effects, the third channel is reproduced by rear-wall surround speakers, while the Left Surround and Right Surround channels are reproduced by speakers on the side walls. As with all Dolby soundtrack improvements, Dolby Digital Surround EX is backward compatible, with prints playable in all Dolby Digital cinemas, whether or not equipped to decode the additional surround track. The New World of Digital Cinema Today digital cinema is poised to change the way people see movies. By replacing traditional film prints with a digital bitstream, digital cinema offers a more consistent and more involving experience. Digital movies are free of scratches, picture movement, and screen dust. They play back exactly as the director intended, every single time. Audiences feel a greater sense of realism, particularly in the 3-D format. The 3-D format is far more practical with digital technology than with film-based systems. Dolby offers a comprehensive, reliable digital cinema solution, designed and built specifically for today’s cinemas. We also provide mastering and encoding systems and services studios, as well as playback equipment for cinemas. Making Films Sound Better Release prints that use one or more Dolby formats, and the equipment for playing them, are only part of the chain that extends from the original postproduction location, to the dubbing theatre and processing laboratory, and finally into the cinema. Developments like Dolby SR and Dolby Digital ensure that the soundtrack itself remains one of the strongest links. But the extreme fidelity of the latest Dolby formats can reveal the quality of each step in the recording, mixing, and dubbing B-4 Dolby® CP650 Digital Cinema Processor User’s Manual The Evolution of Dolby Film Sound processes, and this has necessitated new approaches to soundtrack production. Admittedly, the results can vary—the final reproduced soundtrack can be no better than the elements it comprises—but Dolby film sound at its best means not only better quality sound, but sound in the theatre that consistently realizes the director’s original intentions. While Dolby’s involvement with film sound first achieved wide recognition with the spectacular audio effects of such films as Star Wars, it has long since come to mean more than just special or dramatic effects. The objective is high-quality sound reproduction overall—from the dialogue and the score to the sound design and effects. Dolby technology is a means, not an end. It can be likened to an artist’s palette that provides the director with a full range of colors, where before there were but a few. Above all, Dolby formats have been developed to enhance that very special experience of going to the movies. B-5 Virtual Dolby Technologies Test DVD Track List iv Dolby® CP650 Digital Cinema Processor User’s Manual Appendix C Reference Information C.1 How to Identify Soundtracks on Prints Edge of film Dolby Digital soundtrack Analog soundtrack Picture area Figure C-1 Film Sound Track Layout A Dolby® Digital film print, a stereo analog optical print (A-type or SR), or a mono analog optical print should be identified as such on both the film can and leader. However, with handling, the identification may be lost. If you are not sure if you have a stereo analog print, play a reel and find a section with music or effects only. (On dialogue or narration, stereo soundtracks look much the same as mono soundtracks.) Examine the soundtracks closely. On music and effects, the two soundtracks will appear to be different on a stereo print. On a mono print they are identical. If you received the wrong print, be sure to check with your local exchange or the film distributor. C-1 Dolby® CP650 Digital Cinema Processor User’s Manual Dolby Digital or Dolby Digital Surround EX Print The digital data blocks are clearly visible between perforations next to the analog track. The analog track is Dolby SR encoded. Analog Stereo Print Clear differences between channels will be seen in some places along the track. Reference Information Mono Print Both tracks are the same. Figure C-2 Identifying Types of Film Sound Tracks There is no way to tell by visual inspection if a stereo print is Dolby A-type or Dolby SR encoded. The majority of stereo prints are Dolby SR encoded. If you are in doubt, listen to the track and compare playback quality in formats 04 and 05. If you are unable to do this before the show, play the film in format 04, Dolby A-type. C.2 About Dolby Digital Surround EX CP650 operating system software versions 1.1.3.0 and higher (2.1 and higher if your system is equipped with a Cat. No. 790 card) add Dolby Digital Surround EXTM film soundtrack playback capability, along with support for decoding AES/EBU input signal bitstreams. To take advantage of these new features, the CP650 must contain a Cat. No. 790 (or earlier Cat. No. 794) card. If your CP650 does not have this card installed, an upgrade kit, the UEX/650, is available. Contact your dealer for installation information. Note: Your CP650 must be capable of decoding Dolby Digital film soundtracks to play films with Dolby Digital Surround EX soundtracks. If your cinema processor is a Model CP650SR, a Cat. No. 773 Dolby Digital decoder board must be installed. The UD/650 upgrade kit is available for this purpose. Contact your dealer for information. Dolby Digital Surround EX, format 13, can be assigned to a front-panel button. Dolby Digital Surround EX adds a third surround channel to digital film sound, a concept first envisioned by sound designers at Lucasfilm’s Skywalker Sound postproduction facility. It gives sound mixers a new level of creative freedom. Dolby Digital Surround EX is fully compatible with all current 5.1 digital sound formats and theatre systems. Prints that use it play normally with current systems, and provide the extra surround channel when played using a CP650 cinema processor equipped with a Cat. No. 790 or 794 board. C-2 Dolby® CP650 Digital Cinema Processor User’s Manual Reference Information A Center screen channel is necessary to ensure the precise localization of front sounds for all viewers, including those seated off to the sides. Dolby Digital Surround EX brings similar benefits to the surround sound field. With Surround EX, a Back Surround channel is reproduced by the speaker array at the back of the theatre, while Left Surround and Right Surround channels are reproduced by the side arrays. This means that sounds can now be positioned behind the audience, allowing for exciting new effects, such as true 360-degree pans. The Back Surround channel also makes front-to-back and back-to-front transitions more realistic. Flyovers really seem to pass overhead, rather than down the sides of the theatre. Even ambient sound reproduction is improved, being less affected by the width of the theatre. Equally important, the new Back Surround channel ensures that even viewers seated close to the left or right of the theatre experience the total surround ambience intended by the filmmaker. The UEX/650 kit upgrades the CP650D 5.1-channel processor to include three surround channels that can play digital prints prepared with the Dolby Digital Surround EX process. The installation requires wiring the surround speakers into left, and right groups. Two power amplifier channels are required for powering the two groups of Back Surround channel speakers. rro un d Bsl su Ls ft Surround amplifiers Le Dolby CP650 Bsr Ls Rs d un ro ur ts gh Ri 10 Back surround left Back surround right Rs Ls Bsl Bsr Rs Dolby Digital 5.1 mode Figure C-3 Surround Speaker/Amplifier Switching for 5.1-Channel Operation Bsr Bs Rs Ls Bsl Bsr Rs t su rro un d Bsl Le f Surround amplifiers Ls Ls d un ro ur ts gh Ri U1 Dolby CP650 Back surround left Back surround right Rs Dolby Digital Surround EX mode Figure C-4 Surround Speaker/Amplifier Switching for Dolby Digital Surround EX Operation C-3 Dolby® CP650 Digital Cinema Processor User’s Manual C.3 Reference Information Test and Demonstration Films Several test and demonstration films produced by Dolby Laboratories are available from your equipment supplier. For proper system maintenance, the Cat. No. 69T test film is required, and the Cat. No. 251 Jiffy test film is strongly recommended. The Cat. No. 69T test film should be formed into loops for ease of use. Other test films are for use by your service engineer with special test equipment. Cat. No. 69T—Dolby Tone Figure C-5 Cat. No. 69T Dolby Tone Test Film The Cat. No. 69T is required to maintain your theatre system. The Dolby tone recorded on the film is used during automatic calibration of the operating level in the CP650. This simple procedure must be performed whenever an exciter lamp or soundhead LED is replaced, and should also be performed regularly to compensate for normal aging (and resultant lower sound output on analog soundtracks). Why is adjusting Dolby level important? The accurate reproduction of analog Dolby soundtracks requires that the decoders in the theatre act as precise mirror images of the encoders used when the tracks were recorded. This precision is ensured in two ways. First, the circuits are manufactured to very close tolerances. Second, a reference Dolby level has been established so that any Dolby encoded film can be accurately decoded by any Dolby cinema processor. Cat. No. 251—Jiffy Test Film We strongly recommend that you obtain the Cat. No. 251 eight-minute test film to help keep your system sounding its best. No special equipment is required; the tests have been specifically designed to permit subjective judgment by ear. Each test is described by a male or female voice, and is supplemented by captions on the screen that help identify the causes of sound system problems. Visual checks are also included to assist in identifying some picture projection problems. Tests provided on the Cat. No. 251 include level set, channel identification, channel level, loudspeaker equalization, loudspeaker and amplifier condition, projector wow and flutter, overall system performance, visual checks, and a noise and interference test. C-4 Dolby® CP650 Digital Cinema Processor User’s Manual Reference Information Jiffy Test Film Specifications: • • • Duration: Eight minutes Picture format: 35 mm color, can be screened either 1.85:1 widescreen or 2.39:1 anamorphic Sound formats: Dolby Digital and Dolby SR Cat. No. 69P, 97, 151B, and 566 Test Films The Cat. No. 69P, 97, 151B, and 566 test films are specialized analog test films for use only by trained engineers with special test equipment, and need not be kept on hand at the theatre. The Cat. No. 97 is used for aligning stereo solar cells in projector soundheads, while the Cat. No. 151B is used to set the level of the surround speakers relative to the screen speakers. The Cat. No. 566 is used to measure the uniformity of light along the slit of the sound lens assembly in the projector. Cat. No. 1010, 1011, and 1012 Test Films The Cat. No. 1010, 1011, and 1012 test films are specialized digital test films for use only by trained engineers with special test equipment, and need not be kept on hand at the theatre. They are used to set up the Dolby Digital portions of the CP650. C.4 List of Cat. Numbers Used • • • • • • • • • • • Cat. No. 735 Cat. No. 771 Cat. No. 772B Cat. No. 773 Cat. No. 774A Cat. No. 775 Cat. No. 776 Cat. No. 777 Cat. No. 778 Cat. No. 779 Cat. No. 790 • • • Cat. No. 791 Cat. No. 792 Cat. No. 794 • Cat. No. 797 Auditorium AssistTM Microphone Remote Fader Analog I/O and Bypass Circuit Board Dolby Digital Film Decoder Circuit Board System Controller Circuit Board Backplane Board Power Supply Assembly Front-Panel Circuit Board Digital I/O Board Remote Control Unit Dolby Digital Surround EX Decoder, with four digital inputs (this board replaces the earlier Cat. No. 794) Crossover Board (Cat. Nos. 773, 790, 772B, and 774A required) Bypass Power Regulator Circuit Board Dolby Digital Surround EX Decoder with Digital AES3 Input (used in earlier CP650s; replaced by Cat. No. 790) Flash Memory Module (part of the Cat. No. 774A board) C-5 Virtual Dolby Technologies Test DVD Track List iv Dolby® CP650 Digital Cinema Processor User’s Manual Appendix D CP650 Menu Listing The options shown in bold are the default settings when the unit was shipped from the factory. menu menu OK OK Notes This is the top-level menu display. Format and CP650 Status Display 1 Fader Setting Local/Auditorium Local/Auditorium 2 Preset Fader Levels Format: Fader level set: 01, 04, 05, 10, 11, U1, U2, NS 0–10 or None 3 Auto Dolby Digital Enabled/Disabled Enabled/Disabled 4 Auto Digital Target 5 Rotating Pink Noise 6 Auditorium AssistTM 7 Automatic Optical Level Adjust Projector 1 8 10 Automatic Optical Level Adjust Projector 2 Manual Optical Level Adjust Projector 1 Manual Optical Level Adjust Projector 2 11 Button 01 Format Select 12 Button 04 Format Select 13 Button 11 Format Select 14 Button Format Select 15 Button Format Select 16 Button NS Format Select 9 Select Target Format: Format 10 or Format 13 Check Auditorium or No Reference Set level Set level Select Format to assign to the 01 button. Select Format to assign to the 04 button. Select Format to assign to the 11 button. Select Format to assign to the U1 button. Select Format to assign to the U2 button. Select Format to assign to the NS button. (Continued on next page) D-1 Press OK to start/stop movement. "No Reference" is displayed when no room measurements have been stored. Run Cat. No. 69T test film. Press OK to start. Press OK to save. Press OK to start. Press OK to save. Press OK to start. Press OK to save. Press OK to start. Press OK to save. Default is format 75. Default is format 65. Default is format 60. Dolby® CP650 Digital Cinema Processor User’s Manual CP650 Menu Listing CP650 User Menu, Continued menu menu OK OK Notes 17 Auto Mute: Disabled/Enabled Decode: L/R Stereo/Pro Logic Format 80/81 PCM Options 18 Mute Fade-In Time 0.2–5 seconds 19 Mute Fade-Out Time 0.2–5 seconds 20 Power-On Format Select 21 Contrast Adjustment Set the display contrast. 22 Event Log Scroll up and down the event listing. 23 24 25 Select from Format list or select Last Format used. About this CP650—Screen 1 • Control software version number • Optional boards installed About this CP650—Screen 2 • Headroom Configuration setting About this CP650—Screen 3 • CP650 software modules version numbers Mutes CP650 if not detecting Dolby Digital input bitstreams. Select from Format list or select Last Format used. Useful for telephone discussions. The version numbers are listed for each board in the following order: About this CP650—Screen 4 • CP650 network MAC address • Board version numbers Cat. No. 772B, Cat. No. 773, Cat. No. 774A, Cat. No. 777, Cat. No. 778, or 790 or 794 x = Board not installed 26 Remote Addresses 27 Return to the Top-Level Menu Display Displays the single-digit address of each attached remote unit (three remotes maximum). D-2