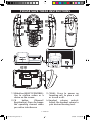
1
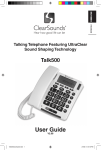
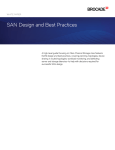
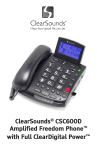
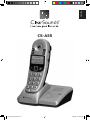
English CS-A55 1 – ENGLISH cS-a55-TriLingual.indd 1 5/28/08 9:10:27 aM Congratulations on your purchase of the CS-A55 Phone from ClearSounds Communications™. Please read this User Guide carefully in order to get the very best results from your telephone. Keep the manual near the telephone for easy reference. Please visit our website at www.clearsounds.com to: Register your product, download additional manuals, and review trouble shooting tips. Due to the nature of VOIP/Broadband technology results may vary when used with VOIP/Broadband service. Important Safety Instructions Read and understand the Installation Guide & User Manual. When using your telephone equipment, basic safety precautions should always be followed to reduce the risk of fire, electric shock and injury to person. WARNING: Follow all warnings and instructions marked on the telephone. WARNING: The ClearSounds A55 is capable of amplifying sounds to a loud volume. It is important to instruct all potential users of its proper operation. It is advised to adjust the volume control to the minimum level (Low) when not in use and alert other users that hearing damage can potentially result from misuse. WARNING: To avoid the possibility of electrical shock, do not use this product near water while in the bathtub or shower or when you are wet. For example, near a bathtub, wash basin, kitchen sink or laundry tub, in a wet basement or near a swimming pool. If the phone becomes submerged in water, do not attempt to retrieve it until after you have unplugged the line cord from the modular wall jack. Do not plug the phone back in until it has dried completely. WARNING: Avoid using the telephone during electrical storms. There may be a remote risk of electric shock from lightning. If the electrical storm is present in your immediate area, possibility of electrical shock exists. WARNING: Do not use the phone if you suspect a gas leak in the area. The phone’s electrical contacts could create a spark, which could ignite any heavy concentration of leaking gas. WARNING: Unplug this telephone from wall outlet before cleaning. Do not use liquid cleaners or aerosol cleaners on the telephone. Use a damp cloth for cleaning. WARNING: No telephone should ever be placed near an open radiator or heating register. 2 – ENGLISH cS-a55-TriLingual.indd 2 5/28/08 9:10:28 aM WARNING: Occasionally a power surge can occur on electrical lines without warning. With any electrical device that you plug into an outlet, it is suggested you use a surge protector. A surge protector will prevent power surges from damaging your telephone. Surge protectors are simple devices available at your local hardware store. WARNING: Do not overload wall outlet or extension cords, as this can increase the risk of fire or electrical shock. WARNING: Never push any objects through the slots in the phone. They can touch dangerous voltage points or short out parts that could result in a risk of fire or electrical shock. WARNING: Put this unit securely on a stable surface. Serious damage may result from dropping or the unit falling. WARNING: Do not cover slots and openings on the unit, they are needed for ventilation and protection against overheating. Never place the unit near hot places where proper ventilation is not provided WARNING: Unplug this unit from the wall outlet and refer servicing to qualified service personnel under the following conditions: A When the power supply cord or plug is damaged BIf liquid has been spilled over the unit CIf the unit has been exposed to rain or water DIf the unit does not work normally upon following the instructions. Adjust only controls covered by the operating instructions, to avoid expensive repairs by qualified technicians. EIf the unit has been dropped or damaged FIf the unit exhibits a distinct change in performance 3 – ENGLISH cS-a55-TriLingual.indd 3 5/28/08 9:10:28 aM PLEASE SAVE THESE INSTRUCTIONS 1SEL button (SELECT/CONFIRM): Use to confirm action or a choice on the screen. 3 (TALK): Press to answer an incoming call, to place a call or to end a call. 2CH button (Channel/ Registration): Press to change the operating channel when you notice interference 4Handset volume control: Adjust the handset volume to your desired hearing level. 4 – ENGLISH cS-a55-TriLingual.indd 4 5/28/08 9:10:30 aM 5Handset tone control: Adjust the incoming voice tone level on your handset so you can clearly understand every word. 6 2.5mm headset jack: To connect your hands-free headset. 7 F button (FLASH/DELETE): Press to answer an incoming call if you have Call Waiting or “F” button to be used to cancel an action/entry or clear a stored Caller ID call 8 MEMO button (PROGRAM): Press to store numbers in memory or to call a number you’ve previously stored. 9LCD display: The screen shows the activity and programming of your handset. The Caller ID feature is optional 10Arrow UP/DOWN button: Use to highlight or scroll through the menu 11R/P button (REDIAL/PAUSE): Both the last number redial and the pause feature. Press to redial the last number you’ve dialed. To insert a pause while dialing 12Lighted keypad: The keypad stays lit up for 15 seconds after removing the handset from the base. To reactivate the feature while in standby, press the or the “MEMO” button. To activate while the phone is in use, press any key. 13Amplify button: Use to turn ON/OFF the additional handset amplification. 14Shake mode switch: Turns the handset shaker ON/OFF when the telephone rings 15Belt clip: Use to handset to the waist attach 16Page icon button (PAGE): Press to page the handset. The handset will ring for about 25 seconds then end the paging automatically. 17Charger indicator LED: Lights up when handset is placed on the base for charging. (RED) 18Charging terminals / contacts: To charge the batteries inside the handset. For best performance, clean periodically with a damp cloth only. 19Telephone line connection jack: To connect to the telephone line jack. 20Ringer volume switch: Set the base ringer HI/MED/LO/OFF. 21Shaker plug: To connect to an optional vibrating shaker. 22Adapter plug-in connection: To connect the AC Adapter to the base. Auto Amplified Switch (inside the battery compartment on the lower right side, not shown) 5 – ENGLISH cS-a55-TriLingual.indd 5 5/28/08 9:10:30 aM Telephone Base Installation Choose a location for the base near an electrical outlet and a telephone jack. Handset batteries MUST be connected before beginning initial charging! 1Plug in the AC Adapter to the base at the AC plug-in connection. 2Plug the telephone line cord into the telephone jack on the base 3Remove battery compartment cover by sliding it downwards. 4Insert the 3 AAA batteries into the battery compartment – be sure to observe the correct polarity of the batteries. Note: Before placing the batteries in the compartment you may want to activate the auto-amplification mode. 5Replace the battery compartment cover by sliding upward until it clicks into place. 6Remove the Caller ID protection film before using the phone for the first time. Handset Battery Charging 1 Place the handset into the base. The charge indicator LED on the base will light RED. 2IMPORTANT: The batteries in the handset must be fully charged for 24 hours before using the telephone for the first time. 3After the batteries are fully charged, check for dial tone by pressing the TALK BUTTON button on the handset. 4 When you place the handset on the base, the battery indicator LED on the right side of the base will blink, it will check the battery voltage to determine if the batteries are fully charged. If the batteries are fully charged the LED will turn off after 2 minutes, otherwise it will continue blinking until the batteries are fully charged and return to standby (the LED will turn off at this time). Low Batteries When the handset batteries get low during a call, there will be a warning tone (3 beeps) and the low battery icon will appear on the Caller ID display. End your call by pressing the button to return to standby mode, and then place on the base to recharge. Make sure the contact points are touching and the charge indicator LED is lit RED. The battery level can also be monitored via the battery charge icon. This icon appears while the phone is in standby mode and indicates the condition of the batteries. When the handset batteries get low, 6 – ENGLISH cS-a55-TriLingual.indd 6 5/28/08 9:10:30 aM when not in use and off the base, the low battery icon will appear on the Caller ID display. Place on the base to recharge. If not, after 4 hours the phone will be dead and you will need to recharge for 24 hours before using. Important Information…Please Read Battery Life Fully charged batteries provided an average talk time of about 4 hours, or standby time of about 8 days. Talk time & standby time may vary depending on operating conditions. Belt Clip Installation You may choose to use the optional belt clip provided with your handset 1 To attach, slide the belt clip down onto the grooves. Press the tabs on the belt clip into the slots to attach. 2 To remove, lift one side of the belt clip with your thumbnail and push back. A55 Handset Registration You will need to wait 24 hours after initial charging before setting up any features listed below. Handset Registration The Handset is already pre-set and coded to communicate with the base. Should you need to re-register or and additional handsets please follow this procedure. 1 Make sure the base unit is connected into the AC outlet and phone jack. 2Remove the handset from the charging base and place it near the main base. If you have more than one handset, or are adding additional handsets, place the extra handsets near the main base. 3Press and hold the /PAGE button on the base unit. After 3 seconds, press the “CH” button on the handset, and the unit will give a confirmation beep, which means that the code has been set and the handset will show HS-1 (Handset 1) on the LCD. 4If you have more than one handset, press the “CH” button on the handset until you get a beep and the display reads HS-2. Continue the same procedure if you have a third handset. If not, release the /PAGE button from the base. NOTE: The /PAGE button on the base unit should be kept pressed during the whole procedure. 7 – ENGLISH cS-a55-TriLingual.indd 7 5/28/08 9:10:31 aM Setting your Phone In standby mode, press the SEL button once, then the LCD will show PROGRAM to indicate you have entered the setting mode. LCD CONTRAST SETTING [SEL 2] Press the SEL button, then the 2 key, the current level CONTRAST or button to ADJ X[X=1,2,3,4] will show on the LCD. Press the get the desired level and press the SEL button once more to confirm and exit. SETTING THE RINGER [SEL 3] Press the SEL button, then the 3 key, the current mode RING ON/OFF or button to activate/deactivate will show on the LCD. Press the the ringer function. Press the SEL button once more to confirm and exit. You should hear a confirmation beep. SETTING THE DATE AND TIME [SEL 4] Press the SEL button, then the 4 key, the SET TIME will show on the or button to get the LCD and the month with flash. Press the desired month then press the SEL button to confirm and enter the next item (the sequence is MONTH-DAY-HOUR-MINUTE). After the setting the correct date and time, press SEL button to confirm. You should hear a confirmation beep. SETTING THE KEYPAD TONE ON OR OFF [SEL 5] Press the SEL button, then the 5 key. Press the or On or Beep Off then press the SEL button to confirm. to select Beep AUTO AMPLIFY SETTING Auto Amplify ON To set handset amplifier so that it will AUTOMATICALLY return to your previous volume setting every time you use the handset without having to press the “AMPLIFY” button. Simply turn the “AUTO AMPLIFY” switch in the battery compartment to the ON (up) position using the tip of a pencil. When the “AUTO AMPLIFY” switch is in the ON position, you do not need to press the “AMPLIFY” button on the side of the handset. On any call, you can temporarily turn OFF and turn back ON the AUTO AMPLIFY feature by pressing the “AMPLIFY” button. When the LED indicator light is on the AMPLIFY feature is engaged. 8 – ENGLISH cS-a55-TriLingual.indd 8 5/28/08 9:10:31 aM Auto Amplify OFF To set your handset in the standard mode so that it will reset to normal sound levels when you hang up. This allows people who do not require the level of amplification offered on the phone to use it. Turn the “AUTO AMPLIFY” switch in the battery compartment to the OFF (down) position. The amplify feature is automatically deactivated each time you use the phone. You will manually need to activate the function temporarily by pressing the “AMPLIFY” button. Caution: When the “AUTO AMPLIFY” switch is set to ON, the handset volume will be set to loud. To protect people who do not experience a hearing loss, we suggest setting the switch to OFF. You may turn the extra amplification feature back ON by pressing the “AMPLIFY” button. Handset Vibration Setting The vibration call alert feature notifies you of incoming calls by making the handset vibrate. When an incoming call is received, you can turn the vibrate/shake mode to ON (up) position, and the handset will vibrate/shake. To turn OFF this function, just turn the switch to OFF (down) position. FLASH (F) Function Press to answer an incoming call if you have Call Waiting (if you subscribe to the service from your local phone company). To Make A Call BASIC FUNCTION Press the TALK button and wait for a dial tone. Dial the telephone number Note: During the call you can press the F button to switch over to another call while using call waiting. To Receive a Call To receive a call simply pick up the handset and press the TALK button. To End a Call Simply press the TALK button. Using the Pre-Dialing Function In standby mode, dial your desired number, You can press F to delete any numbers entered in error. If the phone number is correct, press TALK button to dial the number. 9 – ENGLISH cS-a55-TriLingual.indd 9 5/28/08 9:10:31 aM Last Number Redial Press the TALK button, then press R/P button to redial the last number dialed. CH Button During the conversation, the phone will scan the clear channel automatically. If you still hear noise or static, press the CH button to find a clearer channel. NOTE: It takes approximately 2 seconds for the unit to scan a channel. Pause Function This function allows you to insert a temporary pause during a dialing sequence. For example, when using a calling card, some telephone company systems will not register the entire number without inserting a pause between the card number and the telephone number. To insert a pause use the R/P button. 1-800-123-4567 R/P 1-800-965-9043. This allows adequate time for the telephone company’s system to register the numbers and complete the call. Battery Low warning and shut down protection Once the battery voltage is low, the low battery icon will turn on. The low battery warning tone will also be generated if the handset is in talk mode. You can press TALK button to return to standby mode, then place the phone on the base to recharge. Out of Range Warning In talk mode, if the handset is too far away from the base unit, an out of range warning tone will be heard. You should move closer to the base unit. It not, the handset will automatically return to standby mode after about 20 seconds. When the handset makes a noise, press the button to return to standby mode. 10 – ENGLISH cS-a55-TriLingual.indd 10 5/28/08 9:10:31 aM Paging Press the PAGE button to page the handset Press the PAGE button once more to cancel the paging operation. If you do not press PAGE button again, the handset will ring for about 25 seconds then end the paging automatically. PHONE BOOK Storing names and numbers in the phone book You can store up to 60 names and numbers in the memory. Adding Names and Numbers to the Phone 1In standby mode, input the number you want to store by using the keypad 2Press the MEMO button and then the LCD will show NAME 3 Enter the name using the keypad. If the next character is on the same button as previous one, ie. K,L, you will need to wait for about 2 seconds before entering the next character. You can press the F button to delete any letters entered in error. Press “1” to enter a space. 4Press the MEMO button to confirm; you should hear a confirmation beep Copying Caller ID numbers to phone book: 1 In standby mode press the or button repeatedly to find out the Caller ID number you want to add. 2 If the number has the caller’s name, press MEMO button to store. If the number does not have the caller’s name, press MEMO button, then enter the name. After that, press the MEMO button again to store. Reviewing names and numbers in the phone book. In standby mode, press the MEMO button, the LCD shows the total number of records. There are 3 ways to review the records. 1 Press the or button to review the records 2 Enter the caller’s name, then press the MEMO button to review the matching record 3 Enter the first character of the caller’s name, then press the MEMO button. The LCD shows the matching records, press the or button to get your desired record. 11 – ENGLISH cS-a55-TriLingual.indd 11 5/28/08 9:10:31 aM Modifying names and numbers in the phone book 1 Find the record you want to modify. Please see “Reviewing names and numbers in phone book” for details. 2Press the SEL button to enter the modifying mode, the last digit of the number flashes. 3 Enter the new number by keypad. If necessary, press F button to delete the error digits. 4Press the MEMO button to confirm and enter the name modification. 5 Enter the new name by keypad. If necessary, press F button to delete the error characters. Press “1” to enter a space. 6Press the MEMO button to confirm; you will hear a confirmation tone. Dialing a number from the Phone Book 1 Find the number you want to dial. Please see “Reviewing names and numbers in the phone book” for details. 2 Press the TALK button to dial out. Deleting all records from the phone book 1In standby mode, press the MEMO button, then the LCD shows the total number of records. 2Press the F button twice, then all the records will be deleted Deleting a single record from the phone book 1 In standby mode, press the MEMO button, then the LCD shows the total number of records. 2 Press the to delete. or button to select the name and number you want 3 Press the F button twice, then the selected record will be deleted CALLER ID OPERATION Reviewing the Caller ID List 1 Press the or button, the LCD shows the total number of Caller ID numbers and new numbers. (ALL XX NEW XX) 2 Press the or button to review the other caller’s numbers. Dialing the CALLER ID numbers During the review process, press the button to dial the number shown on the LCD. Press the or button to review the other caller’s numbers 12 – ENGLISH cS-a55-TriLingual.indd 12 5/28/08 9:10:31 aM If the Caller ID number exceeds 7 digits, you can dial the number in different ways. Press the 1 key to dial the number shown with the 1. Press the 7 key to dial the last 7 digits. For Use outside the United States 1Press the 0 key to dial the number shown with the 0. 2Press the 8 key to dial the last 8 digits. Deleting all CALLER ID numbers 1Press the or button, the LCD shows the total number of Caller ID numbers and new numbers (ALL XX NEW XX) 2Press the F button twice, then all the numbers will be deleted. Caller ID Call Waiting If you have subscribed to Call Waiting service from your local telephone company, this telephone will indicate the name and number of the second caller while you are having a conversation with the first caller. You can press the F button to answer the 2nd caller. After the call, you can press this button once more to continue with your original conversation. Background Information Hearing Aid Compatibility Your ClearSounds A55 can be used with hearing aids and Cochlear Processors equipped with a telecoil (T-coil). Adjust your hearing aid “T-switch” to the “T” position. Make sure to hold the handset close to your hearing aid. 13 – ENGLISH cS-a55-TriLingual.indd 13 5/28/08 9:10:32 aM The 900 MHz frequency technology allows cordless telephones to: 1Provide better range of operation 2Provide better obstacle penetration 3Provide better power efficiency 4Provide better battery life 5Provide better overall sound quality 6 Be less prone to interference Operating Range This cordless telephone operates within the maximum power allowed by the Federal Communication Commission (FCC). Even so, this handset & base can communicate over only a certain distance – which can vary with the location of the base and handset, the weather, and the construction of your home or office. If possible locate the base in a high and central location and stay away from obstructions such as walls. It is also recommended that the base is kept away from electrical appliances such as TVs, PCs or other cordless phones. Using The Headset Feature You can use this telephone hands-free when you connect a 2.5mm headset (purchased separately). To connect, plug the headset into the HEADSET JACK on the left side of the handset. While in the Headset Mode, the volume of the headset is controlled by the telephone and the handset’s earpiece and microphone are disconnected. Follow the procedures discussed in ANSWERING A CALL and PLACING A CALL when you receive and place a call. NOTE: When you plug the headset into the HEADSET JACK, it automatically mutes the microphone and speaker of the cordless handset. Unplug the headset to return the handset to normal use. Ordering a Headset or Neckloop: Headsets are available at most retail outlets that sell telephone equipment or contact ClearSounds Communications at 800-965-9043 or visit www.clearsounds.com. We recommend using the ClearSounds Amplified Powered Neckloop or one of our ClearLink Products. Your ClearSounds A55 uses a digital coding security system to prevent unauthorized use of your telephone line by another nearby cordless 14 – ENGLISH cS-a55-TriLingual.indd 14 5/28/08 9:10:32 aM telephone. The system has its own identifying signal created by microcomputers in both the base unit and handset(s). Noise Electrical pulse noise is present in most homes at one time or another. This noise is most intense during electrical storms. Certain kinds of electrical equipment such as light dimmers, fluorescent bulbs, motors and fans also generate noise pulses. Because radio frequencies are susceptible to these noise pulses, you may occasionally hear them in your handset. Generally they are a minor annoyance and should not be interpreted as a defect in the system. Range Because frequency is used, the location of the base unit can affect the operating range. Try several locations in your home or office and pick the one that gives you the clearest signal to the handset. Interference Electronic circuits activate a relay to connect the cordless telephone to your telephone line. These electronic circuits operate in the radio frequency spectrum. While several protection circuits are used to prevent unwanted signals, there may be periods when these unwanted signals enter the base. You may hear clicks or hear the relay activate while you are not using the handset. If the interference occurs frequently, it can be minimized or eliminated by relocating the base. NOTICE: This cordless telephone uses radio communication between the handset and the base unit and may not ensure privacy of communication. Other devices, including other cordless telephones, may interfere with the operation of this cordless telephone or cause noise during operation. Units not containing coded access may be accessed by other radio communication systems. Cordless telephones must not cause interference to any licensed radio service. General Cautionary Instructions 1Avoid dropping or knocking the unit. 2 Dust the unit regularly. Unplug your phone and wipe with a soft, slightly damp cloth to remove any dirt. To avoid damage, NEVER use an abrasive or strong solvent to clean any part of the phone. 3 Keep the phone out of direct sunlight. 4Avoid placing the phone in extremely humid conditions. 5Avoid electric shock by keeping the phone away from water (i.e. bathroom, kitchen sink, pools, etc.) If you experience trouble with your ClearSounds A55, please try the suggestions below before calling for help. For Customer service call 15 – ENGLISH cS-a55-TriLingual.indd 15 5/28/08 9:10:32 aM 1-800-965-9043 V or 1-888-814-5359 TTY. Please retain your receipt as your proof of purchase 1. If the phone doesn’t work at all, check these items first: • Adjust the volume controls. • Make sure the AC adapter is plugged into an outlet not controlled by a wall switch. • Make sure the AC adapter is securely plugged into the base and AC outlet. • Make sure the telephone modular line cord is plugged firmly into the base and the modular jack. • If the handset does not beep when you press the, battery might need charging. • Make sure the batteries are installed correctly. • Make sure the battery was charged 24 hours prior to the first use. • Make sure you have touch tone service. • Make sure you are in the usable range of the base. • Make sure the handset is off-hook. • Reset the security code by placing the handset in the base for 5-10 seconds. If the above suggestions don’t solve the problem, try re-initializing the Handset and Base: 1 Disconnect the power to the base 2Remove the handset batteries 3 Wait a few minutes 4Connect the power to the base 5Insert the handset batteries 6Put the handset in the base to re-initialize 2. If you hear a two-beep signal when you try to use the Handset: • You might be out of range. Move closer to the base and try again. • If moving closer to the base doesn’t help, try following the direction above for re-initializing the handset and base. 3. If the phone does not ring when you receive a call: • Make sure the handset ringer is ON. • Make sure the telephone modular line cord is connected firmly to the base and the telephone jack. 16 – ENGLISH cS-a55-TriLingual.indd 16 5/28/08 9:10:32 aM • Make sure the AC adapter is plugged firmly into an outlet not controlled by a wall switch. • You might be too far from the base; move closer. • You might have too many extension phones on your telephone line to allow all of them to ring. Try unplugging some of them. 4. If you hear noise or interference when using the phone: • You may be out range. Move closer to the base. • Press and release the “CH” button to change to another of the channels available. • Household appliances plugged into the same circuit as the base can sometimes cause interference. Try moving the appliance or the base to another outlet. • Using the handset near household appliances (microwaves, computers, televisions, stereos, games and fax machines) can sometimes cause interference. Move away from appliances while using the handset. • Try moving the base to another location. • If the buttons don’t work, try placing the handset in the base for at least 15 seconds. • Make sure the handset battery is fully charged. 5. Phone will not hold a charge: • Make sure the charging contacts on the handset and base are free of dust and dirt. • Clean the contacts with a soft cloth. • If necessary, replace the handset battery. 6. If you hear other calls while using your phone: • Press the “CH” button to change to another channel. • Disconnect the base from the modular jack and plug in a corded telephone. If you still hear other calls, the problem is probably in your wiring or local services. Call your local telephone service company. 7. If you lose a call after changing channels: • You were probably almost out of range. Move closer to the base before changing channels. Before placing another call, set the handset in the base for at least 15 seconds. 8. If the LOW BATTERY indicator is on display: · The battery needs recharging. 17 – ENGLISH cS-a55-TriLingual.indd 17 5/28/08 9:10:32 aM FCC WANTS YOU TO KNOW Your new product has been registered with the Federal Communication Commission (FCC). This product complies with standards in Part 68 of the FCC Rules. The FCC requires us to provide you with the following information: Connection and Use with the Nationwide Telephone Network The FCC requires that you connect your product to the nationwide telephone network through a modular telephone outlet or jack. The modular telephone outlet or jack to which the telephone must be connected is a USOC RJ-11C or RJ-11W. This equipment may not be used with Party Line Service or with Coin Telephone Lines. Notification to the Telephone Company The FCC requires that upon request of your local telephone company, you provide the following information: a) The “line” to which you will connect the telephone equipment (that is, your phone number), and b) The telephone equipment’s FCC registration number and ringer equivalence number (REN). These numbers are on the back or bottom of your telephone equipment. The REN is used to determine how many devices you may connect to your telephone line and still have them ring when your telephone line is called. In most, but not all areas, the sum of all REN’s should be 5 or less. You may want to contact your local telephone company. Repair Instructions If it is determined that your telephone equipment is malfunctioning, the FCC requires that it not be used and that it be unplugged from the modular outlet until the problem has been corrected. Repairs to the telephone equipment can only be made by the manufacturer or its authorized agents or by others who may be authorized by the FCC. For repair procedures, follow instruction outlined under the “Limited Warranty”. Rights of the Telephone Company If your product is causing harm to the telephone network, the telephone company may temporarily discontinue your telephone service. If possible, they’ll notify you before they interrupt service. If advance notice isn’t practical, you’ll be given the opportunity to correct the problem, and you will be informed of your right to file a complaint with the FCC notified as soon as possible. Your telephone company may make changes in its facilities, equipment, operations, or procedures that could affect the proper functioning of your product. If such changes are planned, you will be notified. Interference Information: Part 15 of FCC Rules Some telephone equipment generates, uses, and can radiate radio-frequency energy and, if not installed and used properly, may cause interference to radio and television reception. Your product has been tested and found to meet the standards for a Class B digital device, as specified in Part 15 of the FCC Rules. These specifications are designed to provide reasonable protection 18 – ENGLISH cS-a55-TriLingual.indd 18 5/28/08 9:10:32 aM against such interference in a residential installation. However, there is no guarantee that interference will not occur in a particular installation. If your product causes interference to radio or television reception when it is in use, you might correct the interference with any one or all of these measures: (a) where it can be done safely, reorient the receiving television or radio antenna. (b) To the extent possible, relocate the television, radio or other receiver with respect to the telephone equipment. (c) If your telephone product runs on AC power, plug your product into an AC outlet that is not on the same circuit as the one used by your radio or television. INDUSTRY CANADA CS03 STATEMENT This product meets the applicable Industry Canada technical specifications. This is confirmed by the registration number. The abbreviation, IC before the registration number signifies that registration was performed based on a Declaration of Conformity indicating that Industry Canada technical specifications were met. It does not imply that Industry Canada approved the equipment. Before installing this equipment, users should ensure that it is permissible to be connected to the facilities of the local telecommunications company. The equipment must also be installed using an acceptable method of connections. The customer should be aware that compliance with the above conditions may not prevent degradation of service in some situations. Repairs to certified equipment should be made by an authorized Canadian maintenance facility designated by the supplier. Any repairs or alterations made by the user of this equipment, or equipment malfunctions, may give the telecommunications company cause to request the user to disconnect the equipment. WARNING! Users should not attempt to make such connections themselves, but should contact the appropriate electric inspection authority, or an electrician, as appropriate. CAUTION: The Ringer Equivalence Number (REN) assigned to each terminal device provides an indication of the maximum number of terminals allowed to be connected to a telephone interface. The termination on an interface may consist of any combination of devices subject only to the requirement that the sum of the Ringer Equivalence Numbers of all the devices does not exceed 5. An alternative indication of the REN is the Load Number (LN); this number should be divided by 20 to approximate the equivalent REN. The REN Number of this unit is indicated on the bottom of your answering machine. If your home has specially wired alarm equipment connected to the telephone line, ensure the installation of TALK500 does not disable your alarm equipment. If you have questions about what will disable alarm equipment, consult your telephone company or a qualified installer. 19 – ENGLISH cS-a55-TriLingual.indd 19 5/28/08 9:10:32 aM This Class B digital apparatus complies with Canadian ICES-003. Limited One-year Warranty The product is warranted by ClearSounds against manufacturing defect in material and workmanship under normal use for one (1) year from the date of purchase. Should you experience a problem, contact our customer service department or visit our website at www.clearsounds.com. Be sure to save your sales receipt as proof of purchase date should you need warranty service. Within a period of one year from purchase date, ClearSounds Communications™ will repair or replace (our discretion) your phone if a defect in materials or workmanship is found. If we elect to replace your phone, we may replace it with a new or reconditioned product of the same or similar design. Repair or replacement will be warranted for a period of 90 days or the remainder of the warranty period (from original purchase date), whichever is longer. The warranty does not cover accidents, negligence or breakage to any parts. This includes shipping damage, failure to follow instructions, misuse, fire, floods, use of incompatible accessories, Acts of God or failure in your phone service carrier’s line service. The product must not be tampered with or taken apart by anyone who is not an authorized ClearSounds Communications™ representative. Tampering with the phone will void any written or implied warranties. ClearSounds Communications™ shall not be responsible for loss of time, inconvenience, loss of use of your CS-A55, property damage by the CS-A55 or any consequential damages. 20 – ENGLISH cS-a55-TriLingual.indd 20 5/28/08 9:10:32 aM Shipping cost must be prepaid and the product must be packaged appropriately for shipping. IMPORTANT: YOUR RECEIPT IS PART OF YOUR WARRANTY AND MUST BE RETAINED AND PRODUCED IN THE EVENT OF A WARRANTY CLAIM. Service in United StatesSCANA ClearSounds CommunicationsC Attention: Repair CenterA 1743 Quincy Avenue, suite 155 Naperville, IL 60540 USACANA 800-965-9043 Check our website www.clearsounds.com for additional information and to download additional manuals and information. 21 – ENGLISH cS-a55-TriLingual.indd 21 5/28/08 9:10:32 aM