1
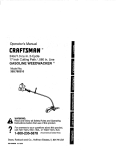
Operator's Manual
®
CRRFTSMRN
24cc/1.46 cu. in. 2-Cycle
17 Inch Cutting Path
GASOLINE WEEDWACKER
®
Model No.
358.795320
&
WARNING:
Read and follow all Safety Rules and Operating
Instructions before first use of this product.
For answers to your questions about this product:
Carl 7 am-7 pm, Mon-Sat; Sun, 10 am-7 pm
1-800-235-5878
Sears, Roebuck
530-084661 03/16/97
and Co., Hoffman Estates, IL 60179 USA
//
I
I
WarrantyStatement
SafetyRules
Assembly
Operation
Maintenance
Service& Adjustments
2
2
4
5
8
9
Storage
TroubleshootingChart
Repair PartsList
Spanish
Partsand Ordering
10
1!
12
16
BackCover
FULL ONE YEAR WARRANTY ON CRAFTSMAN GAS POWERED
WEEDWACKER ® LINE TRIMMER
For one year from the date of pumhase, when this Craftsman Gas Powered
Weedwacker_ Line Trimmer is maintained, lubricated, and tuned up according to
the operating and maintenance instructions in the Operator's Manual, Sears will
repair, free of charge, any defect in materials or workmanship.
This warranty excludes nylon line, spark plug, and air filter, which are expendable
parts and become worn during normal use.
if th_sWeedwacker® Line Trimmer is used for commercial purposes, this warranty applies for only 90 days from the date of pumhase. If this Weedwacker_ Line
Trimmer is used for rental purposes, this warranty applies for only 30 days from
the date of purchase. This warranty applies only while this product is in use in the
United States.
WARRANTYSERVICE IS AVAILABLEBY RETURNING THE WEEDWACKER® LINE
TRIMMER TO THE NEARESTSEARS SERVICE CENTER IN THE UNITED STATES.
This warranty gives you specific legal rights, and you may also have other rights
which vary from state to state.
Sears, Roebuck and Co., D/817 WA Heffman Estates, IL 60179
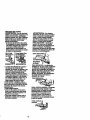
DANGER: Never usebladesor flailWARNING: When usinggardening
appliances,basicsafetyprecautions
ingdevices.This unitis designedfor
mustalwaysbe followedto reducethe
line trimmeruse only.Use of anyother
riskof fire and seriousinjury.Read and accessoriesor attachments willin.
follow all instructions.
creasethe riskof injury.
This power unitcan be dangerous!
Operatoris responsibleforfollowing
instructions
and warningson unitand
in manual.Read entireOperator's
WARNING: Trimmerlinethrows obManualbeforeusingunit!Bethorough- jectsviolently.You and otherscan be
lyfamiliar withthe controlsand the
blinded/injured.Wear eye and leg
properuse ofthe unit.Restrictthe use
protection.Keep bodypartsclear of
ofthis unitto personswho haveread,
rotatingline. Keep children,bystandunderstand,andwillfollow the instrucers, and animals 50 feet (15 m) away.
tionsand warningson the unitand in
If approached,stopunitimmediately.
the manual. Neverallowchildrento
_Prote_on
operatethisunit.
Safetyinformation
on the unit
2
• tf situationsoccurwhichare notcov- • Move at least 10 feet (3 meters)
ered in this manual, use care and
away fromfuelingsit=
engine.
good judgement.If you need assistance, contactSears Service or call • Stop engine and allowtocoolbefore
the 1-800 numberlistedon thefront of
removingfuel cap.
this manual.
CUTTING SAFETY
• Use onlyfor trimming,mowing,
OPERATOR SAFETY
ing, and sweeping.Do notusefor
• Alwayswearsafetyeye protection.
pruningor hedgetrimming.
• Always,wearlongpants,long
• Inspectthearea beforeeach use.
sleeves,boots,and gloves.Wearing
Removeobjects(rocks,broken
safetyleg guardsis recommended.
glass,nails,wire,etc.)whichcan be
Do notgo barefootor wear sandals.
thrownby or becomeentangledin
Stay clearof spinningline.
line. Hardobjectscan damagethe
• Securehairaboveshoulderlength.
trimmerbead and be throwncausing
Secureor remove looseclothingor
seriousinjury.
clothingwithlooselyhangingties,
• Keep firmfoolingand balance.Do
straps,tassels,etc.They can be
not overreach.
caughtin movingparts.
• Keepall partsof yourbodyaway
• Do notoperatewhenyou are tired,
from muffler and spinningline. Keep
ill,or underthe influenceof alcohol,
enginebelowwaistlevel A hotmufdrugs,or medication.
fler cancauseseriousbums.
• Wear hearingprotectionif you use
• Cuttingon leftside oftheshieldwill
unitfor morethan 1-1/2 hours per
throwdebrisawayfrom the operator.
day.
TRANSPORTING AND
• Never startor runinsidea closed
STORAGE
roomor building.Breathingexhaust
fumescan kilt.
• Allowengineto cool;secureunitbefore storingor transportingin vehicle.
• Keep handlesfreeof oiland fuel.
• Emptythefueltank beforestoring or
UNIT / MAINTENANCE SAFETY
transportingthe unit. Useup fuel left
• Disconnectthe sparkplugbefore
in the carburetorby startingtheenperformingmaintenanceexceptcargineand
letting it run untilitstops.
buretoradjustments.
• Storeunitand fuel in area wherefuel
• Lookfor and replacedamagedor
vapors cannot reach sparksor open
leose partsbeforeeach use. Look
flames from water heaters,electric
for and repairfuelleaksbefore use.
motorsor switches, furnaces, etc.
Keep in goodworkingcondition.
• Store unitso linelimiter cannotacci• Replacetrimmerhead partsthatare
dentally causeinjury. The unit can be
chipped,cracked,broken,or damhung by the tube.
aged in any otherway beforeusing
• Store unitout of reach of children.
the unit.
• Makesure unitis assembled correct- • If situations occur which are not covered in this manual, use care and
lyas shownin thismanual.
good judgment. If you need assis• Make carburetoradjustmentswith
tance, call 1-800-235-5878.
lower end suppertedto preventline
SPECIAL NOTICE: This unitis not
from contactinganyobject.
• Keep othersaway when making carequippedwitha temperaturelimiting
buretoradjustments.
muffler and sparkarrestingscreen
• UseonlyrecommendedCraftsman
whichmeetsthe requirementsof CaliforniaCodes4442 and 4443. AllU.S.
accessoriesand replacementparts.
forest landand the statesof California,
FUEL SAFETY
Idaho,Maine, Minnesota,New Jersey,
° Mix and pourfuel outdoors.
Oregon,and Washingtonrequireby
° Keep away from sparksor flames.
law that manyinternalcombustionen• Usea containerapprovedfor fuel.
gines be equippedwitha sparkarres• Do notsmokeor allowsmokingnear
fuel or the unit.
tor screen.If youoperatein a locale
where suchregulationsexist,you are
' Wipe up all fuel spills.
3
legally responsible for installing and
maintaining the operating condition of
these parts. Failure to do so is a viola-
CARTON CONTENTS
Check carton contents against the followinglist.
Model 358,795320
• Trimmer
• Shield with wing nut
• Assist Handle with'bolt and wing nut
• Container of Oil
• Spool with 20 ft. of line
Examine parts for damage, Do not use
damaged parts.
NOTE: it you need assistance or find
pads missing or damaged, call
1-800-235-5878.
It is normal for the fuel filter to rattle in
the empty fuel tank,
Finding fuel or oil residue on muffler is
normal due to carburetor adjustments
and testing done by the manufacturer.
ASSEMBLY
WARNING: If receivedassembled,
repeatall stepsto ensureyourunitis
pmpedyassembledand all fasteners
are secure.
Be suretoassemblethe handleto the
unitbeforeyou assemblethe shield.
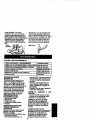
ATTACHING THE HANDLE
(some units are already assembled)
WARNING: Make sure unit is propedy
assembled and all fasteners are secure.
tion of the law, Contact your Sears
Service Center for the correct parts.
• Assembiehandletotheunitasshown;
make sure bottom of handle is seated
in the groove in the trigger housing.
NOTE: Wing nut must be assembled
on the right hand side of the unit as
shown in the above illustration.
• Make sure the bolt is seated into the
hex shapped hole in the handle.
• Pivot handle to a comfortable position.
• Tighten handle securely.
ATTACHING SHIELD
WARNING: The shield must be properly installed.The shield providespartial
protectionfrom the risk of thrown objects
to the operator and othersand is
equipped with a line llm_terwhich cuts
excess lineto the proper length. The line
limtter(on undersideof shield) is sharp
and can cut you. For proper orientation,
see illustrationin Operation section.
• Remove wing nut from shield.
- Insert bracket into slot as shown.
• Pivot shield until bolt passes through
hole in bracket.
• Securely tighten wing nut onto bolt.
_-_
"_,__
Slot
Bracket
Wing
nut
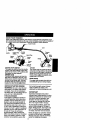
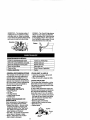
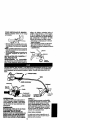
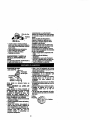
KNOWYOURTRIMMER
READTHiSOPERATOR'SMANUALAND SAFETY RULES BEFOREOPERATINGYOUR
UNIT. Compare the illustrations with your unit b familiarize yourself with the !ocationof
e various controlsand adjustments. Save this manual for future mferenca.
AssistHandle
Tube
Muffler
EngineStop
Switch
Starter
Rope
Throttle
Trigger
Tdrr_rner
Head
Choke
Lever
Shield
Primer
Bulb
FuelMix
FillCap
ENGINE
STOP SWITCH
The engine
stopswitchis usedto stopthe
engine.Pushand holdthe enginestop
swltcnin the STOPor OFFpositionuntil
the enginehas fully stopped.
PRIMER BULB
The primerbulb removesair from the
fuel linesandfillsthem withfuel. This
allowsyou to startthe enginewithfewer pullson thestarterrope, Activate
theprimerbulbby pressingit and allowingitto return to itsoriginalform.
CHOKE
\
Line
Limiter
B!ade
The chokehelps tosupplyfuel to the
carburetorduring starting.This allows
you to starta coldengine.Activatethe
chokeby movingchokelever to Full
Choke.After enginehas started,move
chokeleverto Off Choke.
EDGE GUIDE
The edQeguide protectsthe unitfrom
contactingthe groundduringedging,
BEFORE STARTING ENGINE
thefuel isthoroughlymixed,Always
WARNING: Be sureto readthe fuel
read and follow the safetyrules
relatingtofuel beforefueling yourunit.
informationin thesafety rulesbefore
you begin.If you do notunderstand
IMPORTANT
the safelyrules,do not attemptto luel
Experience indicates that alcohol
yourunit.Call 1-800-235-5878,
blended fuels (called gasehol or using
FUELING ENGINE
ethanol or methanol) can attract moisThisengineis certifiedto operateon
lure which leads to separation and
unleadedgasoline.Before operalion,
formation of acids during storage.
gasoiinemust be mixedwitha good
Acidic gas can damage the fuel sysquality2-cycleair-cooledengineoil,
tem of an engine while in storage.
We recommendCraftsmanbrandoil.
To avoid engine problems,empty fuel
Mix gasoline and oilat a ratioof 40:1
system before storage for 30 days or
(A 40:1 ratioisobtainedby mixing3.2
ouncesof oilwith _ gallonof unFeaded longer. Drain gas tank, start engine and
let it mn until fuel line,s and carburetor
gaseline),DONOT USEautomotive oil
are empty. Use freshfuel next season.
or boatoil. These oilswillcause
enginedamage.When mixingfuel,
Never use engine or carburetor cleaner
follow inslructionspdntedon container. productsin the fuel tank or permanent
Onceoil isaddedto gasoline,shake
damage may occur. See the STORAGE
containermomentarily to assurethat
section for additional information.
5
HOW TO STOP YOUR UNIT
Push and hold the engine stop switch
in the STOP or OFF position until the
unit has fully stopped.
STARTING YOUR ENGINE
Engine
Stop
Switch_
could require pullingthe starter handle
many times depending on how badly
the unit is flooded.
If the unit still doesn't start, refer to
TROUBLESHOOTINGchart or call
1-800-235-5878.
ChokeLever
-__
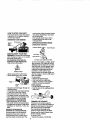
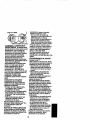
OPERATING INSTRUCTIONS
OPERATING POSITION
ALWAYS WEAR:
HOW TO START YOUR UNIT
WARNING: The tdmmer head will turn
while starting the engine. A hot muffler
can cause serious burns.
COLD ENGINE STARTING OR
STARTING AFTER REFUELING
• Set unit on a flat surface.
Starting Position
• Slowlypressprimerbulb6 limes.
• Move chokelever to FULLchoke.
Trigger
Bulb
• Squeeze and hold trigger through all
remaining steps.
° Pullstarter handleuntilengine attempts
to start, but no more than 5 pulls.
• Move choke lever to HALFchoke.
• Pull starter handle until engine runs.
Allow engine to run 10 seconds, then
move choke lever to OFF choke.
RESTARTING A WARM ENGINE
• Move choke lever to OFF choke.
• Pull starter handle until engine starts.
° If engine does notstart in 5 pulis,follow
ir_truclions in STARTINGA COLDENGINE.
DIFFICULT STARTING OR
STARTING A FLOODED ENGINE
_
Cut from your dghtI
Eye Protection
left.
Do not run the engine at a higher speed
than necessa_,. The cutting line w_ cut
efficiently when the engine is run at less
than full throttle.At lower speeds, there
is less engine noise and vlbralion.The
cuttingline will last longer and will be
less likely to "weld" ontothe spool.
Always release the throttle trigger and
allow the engine to return to idle speed
when notcutting.
To stop engine:
• Release the throttle trigger.
• Push and hold the engine stop
switch in the STOP or OFF position
until the unit has fully stopped.
TWIST-N-EDGE
• Pull the tab toward the engine.
• Twist the tube to the edging position.;
release tab.
TRIMMER UNE ADVANCE
Trimmer line will advance approximately 2 in. (5 cm) each time bottom of
tdmmer head is tapped on the ground
with engine running at full throttle.
The most efficientline length is the
maximum length allowedby line limiter.
Always keep the shield in place when
the tool is being operated;
To Advance Line:
° Operate the engine at full throttle.
Flooded engines can be started by
placing the choke lever in the Off
Choke position; then, pull the rope to
clear the engine of excess fue!. This
6
• Holdthe trimmerhead parallelto and
abovethe grassyarea.
• Tapthe bottomof the trimmerhead
lightlyon the groundone time.Approximately2 in. (5 cm) of linewillbe
advancedwitheachtap.
Toadvance line,tap bottomoftrimmer
headon groundonetime.
Always tap the trimmer head on a
grassy area. Tapping on surfaces such
as concrete or asphalt can cause excessive wear to the trimmer head.
If line is worn down to 2 in. (5 cm) or
less, more than one tap will be required
to obtain the most officiantline length.
WARNING" Use only .080" (2 ram)
diameter line. Other sizes o! line will
not advance properly and can cause
serious injury. Do not use other materials such as wire, String, rope, etc. Wire
can break off during cutting and become a dangerous missile that can
cause serious injury.
CUTTING METHODS
WARNING:
Use minimum speed and
do not crowd the line when cutting
around hard objects (rock, gravel, fence
posts, etc.), which can damage the trimmer head, become entan_ed in the line,
or be thrown causing a serious hazard,
* The tip of the line does the curing.
You will achieve the best performance
and minimum line wear by notcrowding the line into cuttingarea. The right
and wrong ways are shown below.
Tip ofthe Une
LineCrowdedInto
DoesTheCutting
WorkArea
Right
* The line will easily remove grass and
weeds from around walls, fences,
trees and flower beds, but it also can
cut the tender bark of trees or shrubs
and scar fences. To help avoid damage especially to delicate vegetation
or trees with tender bark, shorten line
to 4-5 in. (10-13 cm) and use at less
than full throttle.
• For trimming or scalping, use less
than full throttle to increase line life
and decrease head wear, especially:
• During light duty cutting,
• Near objects around which the line
can wrap such as small posts,
trees or fence wire.
° For mowing or sweeping, use full
throttle for a good clean job.
WARNING:
Always wear eye protection. Never teen over the trimmer head.
Rocks or debris can ricochet or be
thrown into eyes and face and cause
blindness or other serious injury.
TRIMMING - Hold the bottom of the
trimmer head about 3 in. (8
the ground and at an
the tip of the line to make contact.
not fome trimmer line into work area.
Trimming
:3in. (8 cm)
AboveGround
SCALPING - The scalping technique
removes unwanted vegetation. Hold
the bottom of the trimmer head about 3
in. (8 cm) above the ground and at an
angle. Allow the tip of the line to strike
the ground around trees, posts, monuments, etc. This technique increases
line wear.
Scelpi_o...
.
MOWING - Your trimmer is ideal for
mowing in places conventional lawn
mowers cannot reach. In the mowing
position, keep the line parallel to the
ground, Avoid pressing the head into
the ground as this can scalp the
ground and damage the tool.
Mowing
Ii
SWEEPING- The fanningactionof
rotatinglinecanbe usedfor a quick
and easy cleanup. Keep lineparallel
to and abovethe surfacesbeingswept
and movethetoolfromside to side.
EDGING - The Twist-N-Edgefeature
allows for easy edgingof sidewalks,
patios,driveways,etc.Adjust trimmer
to the edging position.Allow onlythe
tip of the line to make contact. Do not
force trimmerline intoworkarea.
Edging
_',_1
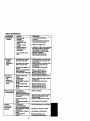
MAINTENANCESCHEDULE
CARE & MAINTENANCETASK
Checkfor Loosefastenersand parts
Checkfor damagedor wornparts
Cleanunit and tabels
Cleanair filter
Replace sparkplug
WHEN TO PERFORM
Beforeeach use
Beforeeachuse
Aftere_h use..........
.........
Every5 hoursof operation
Yearly
GENERALRECOMMENDATIONS
CLEAN UNIT & LABELS
The warrantyon this unitdoes not cov- • Cleanthe unitusing a damp cloth
er itemsthathavebeen subjected to
witha milddetergent.
operatorabuse or negligence.To re• Wipe off unitwitha clean drycloth.
ceivefull valuefrom thewarranty,the
operatormustmaintainunitas instruct- CLEAN AIR RLTER
ed in thismanual Variousadjustments Do notclean filterin gasolineor other
flammablesolventto avoidcreatinga
willneed to be madeperiodicallyto
fire hazard or producingharmfulevapproperlymaintainyourunit.
orativeemissions.
CHECK FOR LOOSE
A dirtyair filter decreasesengineperFASTENERS AND PARTS
formanoe and increasesfuel consump• SparkPlugBoot
tion
and harmfulemissions.Always
• Air Filter
clean afterevery5 hoursof operation.
, HousingScrews
• Clean the coverand the area around
• Assist HandleScrews
it to keepdirt and debrisfrom failing
• Shield Screw
intothe carburetorchamberwhen
CHECK FOR DAMAGED OR
the cover is removed.
WORN PARTS
• Remove parts as illustrated.
Refer replacementof damaged/worn
• Wash the filterin soapand water.
partsto yourSearsService Center.
• Allowfilterto dry.
• EngineStopSwitch- Ensureswitch
• Replaceparts.
functions propedyby pressingand
holdingthe switchin the "Stop" posiFdter
S
.
tion. Makesure enginestops;then
restartengineand continue.
• FuetTank- Do notuseunitit fueltank
showssignsof damageor leaks.
• Shield- Discontinueuse ofunit if
Cover
debrisshieldis damaged.
REPLACE SPARK PLUG
Replacethe spark plugeach year to
ensuretheenginestarts easier and
runsbetter. Set sparkplug gap at
,025 in. ignitiontimingisfixed and
nonadjustable.
• Twist,then pu!loffsparkplug boot.
ADVANCING THE CU'R'ING LINE
Advancelinebytappingbottomof cutringheed tightlyon the groundwhile
engineis runningat fullspeed.A metal
bladeattachedto the shieldwillcutthe
line to theproperlength.
REPLACING THE LINE
• Removethe spoolbyfirmlypu!ling
on thetap button.
• Cleanentiresurfaceof huband
spool.
• Replacewitha pre-woundspool,or
cuta lengthof20 feet of .080" _2
ram)diameterCraftsman®ProTrimmerline. Neveruse wire,rope,
string,etc,, whichcan break offand
becomea dangerousmissile.
• insertabout1/2 inch(1 cm) of one
end o!the lineintothe small holeinsidethe spool.
Smati
Hole__'
._'-.P"_
_,..__Spool
• Windthe lineevenlyand tightlyonto
thespool.Wind in the directionof the
arrowfoundon the spool.
• Push the lineintothe notch,leaving
3 to5 inches(7 - 12 cm) unwound.
• Insertthe line intothe e_dthole in the
hubas shownin the illustration.
• Alignthe notchwith the line exithole.
• Pushthespoolintothe hubuntilit
snapsinto place.
• Pullthe lineextendingoutsidethe
hub to releaseit from the notch.
• Removesparkplugfromcylinder
and discard.
• Replacewith ChampionRCJ-SY
sparkplugand tightenwitha 3/4 in.
socketwrench(10-12 ft.-Jbs).
° Reinstallthe sparkplugboot.
CARBURETOR ADJUSTMENT
WARNING: The trimmerhead willbe
spinningduringmost of thisprocedure.
Wear yourprotectiveequipmentand
observeall safetyprecautions.After
makingmixtureadjustments,recheck
idtespeed.
Carburetoradjustmentiscriticaland if
doneimproperlycan permanently
damagethe engineas well as the carburetor.If yourequ|refurtherassistanceor are unsureaboutperforming
thisprocedure,call 1.800-235-5878.
Old fuel, a dirtyair filter,a dirtyfuel Illter, or floodingmay givethe impressionof an improperlyadjustedcarburetor.Checktheseconditionsbefore
adjustingthe carburetor.
The carburetorhasbeen carefullySet
at the factory.Adjustmentsmay be
necessaryifyou noticeany ofthe followingconditions;
° Enginewillnot idle.
underadjusting procedure.
• Enginediesor hesitatesinsteadof
accelerating.See =Acceleration
Check"underadjustingprocedure.
• Lossof cuttingpower.See "Mixture
Adjustment"
underadjusting
procedure.
There are twoadjustmentscrewson
the carburetor.They are locatedin the
area justabove the primerbulb.
MixtureScrew(with
LirniterCap)
Idle
Speed
Screw
Air F{Iter
Cover
Line exit hole
CARBURETOR PRESETS
No further adjustmentsare necessary
Whenmakingcarburetorpresetadjust- if performanceissatisfactory.
ments,do not force plasticlimitercaps Mixture Adjustment "H"
beyondstopsor damagewilloccur.
DONOToperateengineat full throttle
Ifcarburetorpresetsare notneeded,
for prolongedperiodswhilemakingadproceedto =AdjustingProcedure,Idle
justments.Damage to theenginecan
Speed."
occur.Extend lineto the lengtha!To adjustpresets:
lowedby the linetimiterand cutsome
• Turn mixture screwcounterclockwise
grass.Based on performancewhile
untilit stops.
cutting,turn the mixture adjustmentin
• Turnthe idlespeed screwclockwise 1/16-turnincrementsas follows:
untilit stops.Now turn counterclock• Clockwiseuntil the enginehasgood
wise4-1/2 turns.
powerwhilecuttingwithno hesita=Startengine,cutgrass for 3 minutes,
tion.
and proceedtothe adjustment
Do not adjust by soundor speed,but
section.If enginedoes notstart,
judge by how well the engineperreferto troubleshooting
chartor call
forms whilecutting.
the 1-800 numberlistedon the front
• Counterclockwise
if theenginehas
of thismanual.
speed but dies or lackspowerwhile
* If engineperformanceis acceptable
cutting.
at the presetpositions,nofurther
After completingadjustments,check
adjustmentis necessary.
for acceleration.Resetif necessary.
ADJUSTING PROCEDURE
Acceleration Check
Idle Speed
Allowengineto idle.Adjustspeed until
enginerunswithoutstalling.
• Turnclockwiseto increaseengine
speed if enginestallsor dies.
oTurncounterclockwise
to decrease
speed.
Prepare unitfor storageat end ofseason or if itwilt not be used for 30 days
or more.
WARNING:
• Allowengineto cool,and secure the
unitbeforestoringor transporting.
* Store unitand fuel in a well ventilatedarea where fuel vaporscannot
reachsparksor open flamesfrom
waterheaters,electricmotorsor
switches,furnaces, etc.
* Store unitwith all guardsin place.
Positionunitso that anysharpobject
cannotaccidentallycause injury.
• Storeunitand fuel well outof the
reachof children.
EXTERNAL SURFACES
If your unitis to be storedfor a period
oftime, clean itthoroughlybeforestorage. Storein a clean dry area.
. Ughtiy oil extemal metalsurfaces.
If enginedies or hesitatesinsteadof
accelerating,turn mixtureadjustment
counterclockwise
until you have
smoothacceleration.Recheckand adjust as necessaryfor acceptableperformance.
FUEL SYSTEM
Under Fueling Engine in the Operating
Section of this manual, see message
labeled IMPORTANT regarding the use
of gasohol in your engine.
Fuel stabilizer is an acceptable alternative in minimizing the formation of
fuel gum deposits during storage. Add
stabilizer to the gasoline in the fuel
tank or fuel storage container. Follow
the mix instructions found on stabilizer
container. Run engine at least 5 minutss after adding stabilizer.
CRAFTSMAN40:1, 2-cycle engine oil
(air cooled) is already blended with
fuel stabilizer. If you do not use this
Sears oil, you can add a fuel stabilizer
to your fuel tank.
10
ENGINE
• Removesparkplugand pour1 teaspoon of 40:1, 2-cycleengineoil (air
cooled)throughthe sparkplug opening. Slowlypullthestarterrope8 to
10 timesto distributeoil
• Replacesparkplugwithnew one of
recommended typeand heat range.
• Clean air filter.
• Checkentireunitfor loosescrews,
TROUBLESHOOTING
nuts,and bolts.Replaceanydam*
aged,broken,or wom parts.
• At the beginningof the nextseason;
use onlyfresh fuel havingthe proper
gasolineto oilratio.
OTHER
• Do not storegasolinefrom one seasonte another.
• Replacegasotinecanif itstartsto rust.
CHART
REMEOY
TROUBLE
Engine will no
ICAUSE
- Engine flooded.
start.
plugempty.
not firing.
! Spark
Fuel tank
Fuel not reaching
carburetor.
See "S_artingInstructions."
-=Filltankwith correctfuel mixture.
Installnew sparkplug.
: Checkfor dirtyfuel filter;replace.
Checkfor kinkedor splitfuel line
repairor replace.
* ContactSearsService.
• Compression low.
idleEngineproperly.Will
not • Idle speed set too low.
- Idle speed set too high.
Engine will not
accelerate,
lacks power,
or dies under
a lead.
• Carburetor requires
adjustment.
• Crankshaft seals worn. • ContactSearsService.
• ContactSears Service,
• Compression low.
Air filter dirty.
Cleanor replaceair filter.
_° Spark plug fouled.
: Cleanor replacesparkplug
• Carburetor requires
adjustment.
• Carbon bui_ up.
• Compression low.
Enginesmokes Choke partially on.
: J'-uelmixture incorrect.
excessively.
* Air filterdirty.
• Carburetorrequires
adjustment,
Enginerunshot I ' Fuelmixture
incorrect.
Sparkplugincorrect.
Carburetorrequires
adjustment
• Carbonbuildup.
i
clockwiseto increasespeed.
Adjustidlespeed screwcounteri clockwise
Adjustidlespeed
screw
to reducespeed.
See "CarburetorAdjustments."
J
11
and re-gap.
• See "CarburetorAdjustments."
• ContactSearsService.
• ContactSears Service.
• Adjustchoke.
• Emptyfuel tankand refillwith
correctfuel mixture.
• Clean or replaceair filter.
• See =Carburetor
Adjustments.
_
• See "FuelingYourUnit."
• Replace withcorrectsparkplug.
• See =CarburetorAdjustments."
• Contact SearsService.
= =
,
=
,
=== == =
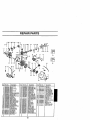
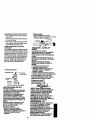
REPAIR PARTS
L
i
i
=
=
SEARS MODEL 358.795320
&
WA_NG
21 25
AE rep_lr_ adjustrnont_ and
ma]nton_on not described
In the Opemtor's Mmmat
must be pedo_
by quailfled se'tvfcepersonnel
2_ P"
3
_
_-_ _
_
108
9
22
6
20
23
17
15 --
18
_
ROt.
Part No.
"L
530094551
•.
4.
56.
7.
9_
10.
11.
_2_
13.
14.
530016179
530049107
5_0478_3
530047924
530047910
530015820
530_0B4
53004792_
530016193
.5,30049065
53_86
530015814
530069930
15.
530095500
16.
17,
18.
530095380
530401958
530401957
26
ROt.
DesCr]p.0n
DriveShaft
Screu_ThrottreHsg.
Trigger
]hrottie Hsg• (Right}
lhrot_e H_. (Left)
AssistHandle
BoJt-Shield
Sp_ng-CompreSsien
Aclut_tor
Washer
DdveSh_t Hsg_A_'y
Uno Umiter
Screw,4,ineLimitor
ShieldKit Ass'y.
(;ncl.12 & 13)
CuffingHead Ass'y.
(Incl. 16-19)
HubAss'y
Sp_r_
Clip-Retainer-Head .
19.
20.
21.
22.
23.
24.
25.
2_
27,
28.
Port No.
7185932
5_0479t2
5300479€1
5300_6173
530018152
530094543
530015810
53004,9844
530O49845
530015966
oon_peo.
Spoolw_L_e
Locator-dght
Locator-_eft
Bo_-Han_ie
Wingnut
Dust Cup
Screw
Edga Guard
Clamp-Mount_g
Screw
Not Shown
530084661
530047467
530049"f22
530049102
530O475OO
12
Operator'sMonua_
ShaftWarningDecal
ShieldDecal
Slad_Tng
Instruction
StopDecal
.
iiiiiiii
i
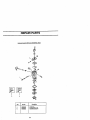
REPAIR PARTS
28
8
6
735369
38
4
14
11
12
57
32
56
50
52
53
3
64
1, 530016164
2. 530015_2
3. 530016168
4. 530015880
I_-sedpflo.
23.
24.
25.
26.
27,
! Ref.
Part
28. ;
29, i 530049489
Rett_r-Pufley
Screw
Statt_r Handk_
_ctaw
30.
31.
32.
33.
530036579
530016197
530049377
530019181
34,
35.
36,
53C069757
_58
53C015849
iSpark Plug (RCJ-SY)
49
67
1
Muffler Cove_
Muf_er B_fife-Exit
MufflerBaffle-First
MufflerSpdng
Rear Shroud
GasP.et--C'case
cy_er _e
530019194 Gasket.K:_rb.
530015945 Retainer Ring-C'case
37.
530319223
530049390 Lead Wire
38.
5300_75,€
530049389 Ground Wlro
530069886 FIp_heef Ass'y.
39. 530015162
530039163 tgnili_ Mod_
40. 530047914
5&q036145 Spacet4gn_t. Module
41. 530015557
530015954 Scmw-lgnit, Module
42+_530047916
530O15826 1Washer-Thrust
43. _1525_
53_7953
D_ Cou_ng
44. 530015852
53O014532 CrankshaftAss'y.
4_, 530049089
_15
3or_ectJngRodASSy. 46. 5300479_
47. 5,._)049079
=iston Ring
530014861 3tank_sa Assy,
48. 530015966
(Incf+l0 & 23-26}
49. 530049066
530032125
IrmerBear[ng
50. 53004,9"299
530032124
Ou_erB_aring
51. 530015953
530019179
C'caseSeal
52. 530036793
530015941
Rat. Ring/C'shaft
53. 530069247
530036578
62
Descd_on
No,
_rter
Spring
Screw
6. 5_015810
7. 530019233 IGasket-CylindertCarb.
9.
10.
11.
12.
13,
14.
15.
16.
17,
18.i
1_
20
21,
22,
16
63
23
Rid'. Part No.
6!
Ref
Part
No,
54.
530069_70
55.
56.
53001434"/"
! 530014,36_
57,
_16
! 58.
530014729
53.
60.
61.
62,
530038114
530049469
_32
5300_400
ChokeLever
65.
Wave Washer
66.
Choke Spacer
A_f_ox
67.
Air F_terFoam
AirF_er Cover
_
Box
"rhmttlaC_ble Assy
Fue_TankAss'y.
Screw-CyUnder
ShroudIsolator
Fuel Line-Cad0/Tank
530036792
53006_756
Carb. Adaptor t_t
Screw-Carb AdioS.
Gas'_4-.Cy_nder
Carburetor Assy K_
(Incl. I.,imller Cap)
Piston Pin Rak_iner
_t_oke Plate
Screw
Muffler Body
13
53006_380
Meffler Kit
(Inc[ 27--31)
Fuel Cap Assy.
Fue_ Pickup Assy
Engine Gasket KIt
(Ind. 7.9,33, 37)
C'ease/C's_
Assy.
(Incl. _0,19,P,2-2S)
ONOff Switch
F_'_ Hou_eg Ass,a,.
Rope
S_ter F_lfe¥ Kit
(Incl.
64)
Fuel L_e-Ca_L_Tank
Screw
Isolator-C'case
PLston K3t
(_'ncL21,68 & Pin)
Spad< Anes_or Kil
._cD.l_r _o r A_emblv
I_t Number
#r_006_._4
-WA226
1
÷
ReL
.
3.
Part No.
530038404
5_00_B42
530069844
Descrip_on
Ltmiter
Ca_retor CapRepair
J_t
Gasket/DisphragmKit
I
14
15
Declarac_
deGaran6a
Reglas
deSeguridad
16
16
Montaje
Uso
Mantenimiento
1B
19
23
Sewicio
yAjuste
Almacenamiento
24
26
Tabla Diagnd_stica
27
Repuestos.yEncargos Contratapa
GARANTIA DE UN AN PARA LA CORTADORA DE HIERBAS A GASOUNA
CRAFTSMAN WEEDWACI__R ®
Por unafio desdela fechade cornpracuandoesta unidada gaso_naCraftsman
Weedw_ker_, es mantemda,lubncaday puestaa puntode acuerdocon las
mstruc_
de opemcidny mantenimientoen el manualdel operado,Sears
reparara_bre decosto cuaJquier
defectode materialo de rnanode obra.
Estagarar_'aexcluyela cuerdade nylon,bujfay filtmde aim, las cualesson
partesdescartabfesque se desgastanduranteel uso normal.
S! este Weedwa.cker@se usa para finescomercieles,esta garantfase aplicadurante9u a/as solamentea partirde la fechade compra.Sieste Weedwacker@se
.usapara.Tines
de alquile_r,
esta gara..ntfa
se ap/icadumnte30 d_assolamentea partir
oe p mcnaoe corn.
pra. bstagaranuase aplma_1o mlentraseste productose use
en los Estaaosuniaos.
ELSERVICIODEGARANTtAESTADISPONIBLE
DEVOLV1ENDO
ELWEEDWACKER®
ALCENTRO0 DEPARTAMENTO
DESERVICIODESEARSMASCERCANOENLOS
ESTADOS
UNIDOS°
Estagar'_ntia!e otorga derechoslegaJesespecl'fl_ y ustedpuedetambidntener ozrosoerecnosque vadan oe _-stadoa Estado.
Sears, Roebuck and Co. Dept. D/817WA lloffman Estates,IL 60179
aD_Cl_
AI usar_
Infozmaci6n
de _
N
PEMGRO:
_ns
en
el aparato
oe ruemapu_e serpe/i_!
Nurma use cucidl_s nl
deseguridad
quese
en elapamto yen ez
_iLeael
Manual de] UsuaHoen
_" tota,r_lad antesde hacer uso de!
paraserusado€omo€_,tadoragnea. B
ES_..
to=_wntafamzT_,tzado_n_
€_cor_
incmn_nta_
el I_r_o
de
y e_ u_o coaecto de_
L,Jm_ ef u_o de e_e a]_zato
_le_do
_ones
en el aparato yen el
_l=r;caual
Y que las vay_ a cumpli_
pern_ que los n_s usen
y
AD_ClA:
La_n_ de <_
9b_etos
vio_camente,
_do
esteapar_.
os se_
16
y proteccidnde pien_tas.
17
• $1se cor'_con la Ifr_a de! lado
izquierdodel protector,los
escombrosvolardnen sentido
opuestoel usuado.
TRANSPORTE Y
ALMACENAMIENTO
- Espereque el motorse enfrfe y fije
_ien el apartoantesde guardarloo
oe'_sportar]o en un vehfculo.
• Vac_'eel tanquede combustible
antesde guardarelapamto o de
_'_-'por_do. Consuma todo el
com_'Me
re_nte en el
_bumdor poniendoel motor en
marchay dejdndeloen marcha
hastaque el motorse pare solo.
• Guardeel apar_ y el combustible
en un lu_r dondelos vaporesdel
Maine, Mi_nr_sota, Nue_ra Jersey,
umgony washington,reqtaerenporley
que muchos motoms de cornbusti(_
interna est_n equ__
con re_la
anti_dspa. Si u_ed UbT_ael aparato
donde e0dsten taJes _lamenteos,
usted _ne la responsabir_iad
juddica
de instalary mantenerestas pmzasen
correctoestado de funcionamiento.
De
1ocontrado,estan_,en infraccidnde la
tey. Entreen contactocon suCentrode
8ewicioAutorizado para informaci6n
sobre las piezas correctas.
CpmDU_l_Dle rio pued,_l
.cnispasni llamaspmvenientesde
los termotanques,los motoms o
intenuPtores_,
los
celefactores_,
etc.
• Guardeel aparatode mocloque el
!imitador de Ifnea no pueoa causar
ne.rkfas9ccidentales.Se puede
co,garel aparatoporel tubo.
• _uarde el aparatofuem del aicance
de los n'_os.
Si acontece elguna situad6n no
pmv_. en este manuel,tenga cuidado
y use Duenc_.
Si necesita ayuda,
Ilameel 1-800-235-5878
AVlSO ESPECIAL: Este aparato no
.._ene equipado con silenciador
_or
de temperatum.ni con rejil_
que cumplalos requisitosde
_ C6dlgosde California4442 y 4443.
las tienas forestadasfederales,
rndslos estados de Cai_mia, Idaho,
CONTENIDO DE LA CAJA
Verifiqueque _
induidas todas las
piezasque figuranen la lista a
conlinuact6n.
Modelo 356.795320
* Cortadora
° Protectory tuerca mariposa
. MangoAuxifiarytomilloy tuercamadposa
, Recipinetede aceite
* Bobinacon 6 m (20 pies)de Ifnea
ExanW _s piezasparava_x_rque no
est_ndar,adas.No usepiezasdar,adas.
s_neoes_ayud__
piezas
0 hay
pieza.s
da_
llameal 1-800-235..5878.
AVISO:Ex nom_ escuchar
quego_ee
e_fi"_ode_
end tanquevado.
Esnorm_encc_mrresiducsde combustibleo aceiteen el slendadordebidoa
losajustesal _
y a taspruebas
efectuad_porel fabdcar_.
MONTAJE
ADVERTENCIA: s_reci_ d aparato
ya montado,mpitatodoslospasospara
aswgu_rqueestdcortectamente
armado
y quetodoslos_dores est_ ffjosy segums.
18
COMOINSTARLAR
EL MANGO
(Algur_s
unidadesvienenconel mango
ya instaJado)
• Monted .m_:jo en el aq_0-atocomo se _s-
0-a;_
quelaprateinfenor
de_
rrmngo
se a't:u_We en fa _
en la oJbiertade{
: La perit_de ajuste deberaserarmada
_o
de__no.
• Qimeln-_._go
_
cordodable. _
peligrode objetos anohadoshada el
usuadoo hada temerosy vieneequipado de un r_nitadorde lineaqusco_a el
excesode h'neaparaquequededellargo
q_ co_.
FI B'nitador
de llnea
(dd_o del prot_r) es liloso y corI_L
. Introduzcata mensulapor la ranura
comose ilustra.
• Gire el protectorhasta que el pemo
pase porel odficioen la mensula.
, Enrosquela tuerca manposaa! pemo
y ajdstelabien.
or
_g_r a _ _si_n rr_s
%
Ranura
de ajust_ bien el
mango.
INSTALAClON DEL CABEZAL Y
DEL PROTECTOR
AO_
Es _presc_Z_
q_ el proteotoreste_e
instalado.Proveeprotecci6n
parcialcoNraet
LEA ESTE MANUAL DEL USUARIO Y LAS FEGLAS DE SERGLIRADAD ANTES DE PONER
TapadelTanque
deCombus_'bts
I_i'B_OPTOR
Se uUlizael intermptorpara pararel
motor.Empuiey sujeteel intenuptor
en la posiciOnde STOP o OFF hasta
quela unidadse hayadetenidocompletamente.
BOMBEAOOR
El bombeadorret_raa_e _e iasI_neas
de €omboslff:de
y las Ifena de
Esto perrr q e
pongae_motoren tu_
€oo
men_ _
a _ soga _ a_anqu_
Gufa_ra
de
bordes
PERILLA
[] pedlla ayoda a proveer
al carburadordu_
el arranque.Esto
le _
al usoado por_r on motor
fn'oen funciormmiento.Accione el cebadorcotocandola palan_ en la posiSTART.Despudsde que el motor
se hayapuestoen marcha,coloqueel
cebadoren la posici_nRUN.
GUIA PARABORDES
La gufapara bordes impedird que el
aparatotoqueelsueloduranteel prooe_nao que mmme su forma originaL cedimientode borde_r.
19
N_rEs DE PONER EL MOTOR
EN MARCHA
ADVERT_CI_u Aseg0msede
PAPA-PARA_
haler lefdo la infomlac_n sobm el
combm_le en msm_as de _
seguddadantes de cornered. ,Sino
_,T_.
EL MOTOR
-
Presione y sostengael interruptorpara
detenerel motoren fa posici6nSTOPo
en la positf6nOFFhastaque el motor
se hayadetenido por completo.
PARA ARRANCAR EL MOTOR
IJame
Interruptor
para Detener
el Motor
ABASTECLMI_RO DEL MOTOR
E_e motorest_ habBado pare
.flj_c_mr con _
sin piomo.
Antes de usar, se debe_ mez¢_ la
_
con un acei_ de buerm
pare motoresde 2 _'dempos
enfdados aa_
a_be mama _
ga.._
_
et
la
Me;_e
COMO ARRANCAR
EL MOTOR
DE SU APARATO
AVERTENCIA:
El cabezal de corte girard mientras se est_ intentando porter
en marcha el motor. Un silenciador caliente podria provocar quemaduras de
gravedad st se toca.
.
ARRANQUE DE MOTOR FRIO O
ARRANQUE DESPUES DE HABER
ABASTECICO EL MOTOR
. Coloque el aparato en una superflcie
tlana.
con e_ace_ en la propor_n
aceee con cada gain de gasck_ sin
_):
NOUSEace_ePare
aUtomOvg_ ni pam bar¢o_ Estos
ace_es da_rdn d motor. N mezdar
_6as
e. el _
que hayaa_b
U.avez
el aceite a la
gaso_ a_e _ referee
rim=rob._a_y_
reds de_
vet €on eJ _
_
q.e_enenque
antes de
at_a=ec_e_aparao.
Posid6n deArranque
IMPORTANTE
• Lentamente, oprima el bombeador 6
V_CP-_S.
(los_mados gap=_! o losque
• Mueva la,palanca del cebador a laposici6n FULL.
con_._ e_k:_ometan_pueden
Gat_llo
dma_
et _
_que de_
._
, Apriete y sostenga el gatillo durante
todos los pasos skjuientes.
• Tire del mango de arranque basra que
el motor intente arra,ncar,perono rnds
de 5 timnes.
• Mueva la palanca de! cebador a la posici6n HALF.
° Tire del mango de arranque hasta clue
el motor se ponga en marcha.
• Deje el motor en marcha pot 10 segundos, fuego, mueva la palanca del
cebador a la posoci6n OFF. -..
porea
re_a q.e ias I_eas de
_a_o_ Guando vaya a u_ar el a_umo
nuevameme,
use_
Vea_s bsmedo.es de
fmco.
N.MACENAMIENTO pa_ obta_r
rodsir/mmaciones.
Nun¢_ use productos de _
de
motor o ca,'burador en el tanque de
p.rov_araanos pe_
2O
ARRANQUE
DEMOTOR
CALIENTE
° Mueva la palanca del cebador a la posici6n OFF.
° Tire de( mango de arranque hasta que
el motor arranque,
• Si el motor no arranca despu_s de 5 titones, siga las instmccionesbajo el t[tu1oARRANQEUDE MOTORFRIO.
: Hale ta leng0ela hacta el motor.
Tuerza e( lubo en la pos(d(_n de corte;
entonces, suelte la lengQe_-'_
)
COMO ARRANCAR UN MOTOR
AHOGADO
Los motores ahogados pueden ponerse
en marcha moviendo la palanca del cebador a laposici6n OFF; luego, tire de la
cuerda para aclarar el exceso de combustible. Esto podrd requerir que se tire
de la cuerda muchas veces dependiendo cuan ahogade se encuentm el metot. Si el apamto sigue sin ponerse en
marcha, yea la TABLADIGNOSTICA o
Ilame al ndmero 1-800-235-5878.
POSICION DE USO
para los Ojos
S!EMPREUS_._---
ProtecciSn
Pantalones
Largos "'-_.. _'_,.
Zapatos _
TWIST-N-EDGE
AVANCE DE LA LINEA DE
CORTE
La I(nea de code avanza
ap.mximadamente
5 cm (2 pulgadas)
caoa vez que se tocael _bez_l
¢ontrael sLmIocon el motoraceletado
a fondo,
E! largorods eficientede l(nea es el
largo mdxJmopermifidopor el limitador
de It'nea.
Siempremantenga el protector
debidamenteinstaladoal ub'Ezarel
aparato.
* Para hacer avancarla li'nas:
* Acolareel motora fondo.
- Soet_
el cabezaJencima de un
espa.ciode tierra,con c_d
y
parauelo
al misrno.
, Toqueel cabezallevemente unavez
contrael suelo.La lfnea avanzard unos
crn.(2putgadas)con cada toque.
ara nacoravanzar la t(nea, toqueel
cabezal€ontrael suelo una vez.
El re'n,'_ador
de Ifnea\\
€odaJaJ(neaaJk_'go\1
_ tl JJ _\
que €orresponde,-.,J_
Code de derechaa izquierda
INSTRUCCIONES DE USO
No haga marchar
el motor a velocidadesmds altasque
la rrecesada.La Ifnea de corte€orta
efictentementeconel motor
marchando a una velocidadmenor
que la mdxima, ptoduciendoas/
memosruidoy wl_raci6n.La Iinea de
colts durampot rods ttempo,y tendrd
menos probabilidadde "tunoirse"a la
bobina.
Siempresuetteel acolemdory deje
que el motor bajea marcha]enta
€_,Jando
no ostdcod_.
Para parar et motor:,
* Suelte el gatilloacelerador.
- Aprete y mantengaapretadoel
interruptormomentdneo hasta que el
motorse haya detenkJopot
=
AVBO: Toq_ _ cabeza] siempre
cemtmel sueJooonde hay'ace_pecLB
cemtaoto
conba las supeff_as tales
comoel cemento o asfaito causard
desga..,_e
excesh,
o del cabezaL
AViSO: 8i no que_ rodsqUe des o
.trespulgadasde hnea, habr_ que
naserm(Lsde un toque para obtenered
largode Iinea rndseficienta.
ADVERTENCIA: Use
excludva_ente ifnea con didmetrode
2 rnm(.080"de pulgada)._ Ifneas
m
con cualquierotrodidmetro no
avanz_'dndeOi_nte y podrdn
¢ausargraves heddas. No use ning(m
otton-,a_rial,como alambre, _l_
sog_ etc. El _re
se puede
qu_mr _
el €orte,
convir'd
.6r_oseen proyec_ pe!h_'oso m
que pueaecaasar graves he_
completo.
21
ADV_ffI_ICIA:
Use.sk_m
_6n
de ojo_ Nunca se inc_e
Sobreelcabez_ B _
puede
arrojar.ohacerrebot_r_edmsy
escorr_ros que pueden d_"en los
ojosy la tara del usuado y causar
ceguerau otras _'aves heddas.
PARARECORTAR - Sostengael
aparatode modo que el cabd_
q.uedea unos S cm (3 pU}gadas)de]
sue_oyen dngub. Perrnit_,q_
lmicamerdetd,puntade la Uneahaga
contaclo.No meta ia lfnea dentrodel
4ma que se e_ trabajar_.
Por Encima
del Sue]o
PAPA ESCALPAR - La t_ca
de
escalparse usaparequear,#_c_
_ deseada.So_
el cabe_ a
uncs i_cm (3 pulga.'_) del suetoy en
4nguio.Deje que P.'.'punta dela h_nea
e_sue_oalmdedorde los
am_e_ los .pcs_s, los mcnmnentos,
et_. Esta _,_a
_nmlen_ _
desga_e de la Enea,
PAPA ESC,N..PAR
PAPA CORTAR CESPED-B .a,oarato
es ideal pavacoe_arcdspeden _os
cortarcdsped,mag_tengafa I_nea
pasalelael sueio. Eviteapre_ el
cabez_ €ontraelsuelo,ya que lal
p.mceo_m_ento
puedees_par el suelo
y aa_ar el aparato.
PARACORTAR _|
cespeo
22
.
PARABARRER- La acci6n
vent,adorade la Ifneaen rot,_ci6n
p.uedeser utiffzadapara haceruna
timpiezar_.ida.y f_'L Mantengala
ffneaparaJelaaJsueloy encimade las
superfi¢i.esque se quierabartery
mueva eJaparatorepetidamente
pdmem hacia un lade y despudsal
otro
PAPA
_
i_J" "_,
RIBETEAR- Las caracterfsticasdel
Twist-N-Edgepermitenfacilitar el Ira*
bajodel dbeteoalredederde aceras,
patios,caminosde entrade,etc. Ajuste
la podadorapara la posici6nde ribeteo. Permitaque s61ola punta de la
,nea haga el contacto.No fuerce la
Ifnea de podaren el drea de trabajo.
RIBETEAR
t
3:
PLANILLA DE MANTENIMIENTO
TAREA DE CUIDADO Y MANTENIMIENTO
CUANDO HACER
Vedficarque no haya_adems flo_osni piezassuaitas Antesde cada uso
Verificarque.no.hayapiezasdafiadaso gastadas
Antesde cada uso
Umpiarel aparaioy las placas
Despudsde cada uso
Cada 5 horasde uso
Umpiarel fill_ de aim
..
Inspeccionar y limpiarta re_llaantidlispas
Cada 2.5horasde uso
Anuaimente
Cambiar la bujfa
.......
RECOMENDACIONES
GENEFIALES
La garanffade esteaparatono se
aplicaa losartfculossomel_losal
abucoo a la negligenciadel usuado.
Parareciblrel valorcorr_pleto
de la
garantfa,el usuariodebr4mantenerel
aparatoseg0n lasinstrucciones
en
este manual.Set4 necesadohacer
vadosajustesped6dicarnentepara
mantenere! apamtodebidamente.
VERIFIQUE QUE NO HAYA
PIEZAS SUELTAS NI
F JA.O..FLOJOS
: Tommos
delacaja
Tomillosde la ManijaAu_iar
• Protector
VERIRQUE QUE NO HAYA
PIEZAS DAI_DAS N!
GAETADAS
El Centrode Sewido Seas deberd
efeotuartodocamblode piezas
daSadaso gastadas.
• InterruptorOn/Stop-Asegumseque
el intermptorfunciona
correctamentemovi_ndo[o
a la
posici6nSTOR Vea que el motorsehaya detenido;aotoseguidoponga
el motoren marchanuevamentey
contimle.
• Tanquede Combustible-Parede
usarel aparatosi hay indiciosde
da_.0so ..p_lidas en el tanquede
combustible.
- Protector-Parede usarel aparatosi
el protectorest4 dafiedo.
LIMPIE EL APARATO Y LAS
PLACAS
• Urnpieel aparatousandoun trape
homedocon undetergen_ suave.
• Sdquelocon untrapolimpio.
LIMPIE EL RLTRO DE AIRE
N_31impie
el filtrocon gasoEnani
un ottosolventei_
._le, y.a
que nacenop_e crear peligroae
ince_o y emisionesevaporativas
nocivas.
Lim_eza del filVo de aim:
Los_
de aim Suciosoisminuyenel
renairmentodet motore incmmentan
el co_sumode combustible y la
producoi6nde emisionesnocivas.
Limpieaiempm el filtrode aim
despudsde cada5 horasde uso.
23
,ios
cadxmizando.La €_rboniza_n
deberd ser re_rada para ev_,r _
de incen¢_ o ba_ de re_nto
del
motor.
Re, re la _'i_ de!dlendador y
hmpiela.Cambie la re_'llaporuna
numtasi se producealguna rolura_
CAMB|E LA BUJIA
P_.ambie
la buj_ todoslos_
par9
.as_ar que el motorap'an.quemas
re
• l.:,mpie
_ tapay eh_rea_,'r_ua
para.evitarque ca,icjatien'ay asem'n
en la cdmeradel carburadorcuando
abra la.tapa.,
Laveel flareen agu=y jalx_
! De_eque
let_ lasp'._as
el t_lrose
_ seque.
se ausa'an.
GE'ey luego r_m _ €_puc_ _ b
Reponga_s pk=as.
bujra_
.
* relJmlabuj=adeidEndro y
II_PECCIONE Y MMPIE LA
REJILLA ANTICHISPAS (Si
. Cdmbielaporunabujra_
RCJ_Yy _
con una _.._.de
8/4 de pu_g_ (10-12 _/pie;.
- Yuelva a i#_;ta_ la cai:u:ha.
"t_.e) ......
A!ir usanoo= apera_, el sEenciadory
la rej_ ant_pas sevan
POSICION DE USO
USE $1EMPRE
. Meta _ =,n(I/2 pU_gada)
de _apur_
de lalmea porel odf_iopeque_oenel
interiorde I_ bobina.
• Enrosquela li'neaen la bobir_,
f_ne y
pare".._pe__e en la _recci6n clue
• F_ la Eneaen I= megaen la bobina,
_jan_
unos 7 a 12 cm (3 a 5
t_nea colgando sin
_)de
• Meta la puntade la Ifnea porel or_=_o
de s_da en el c_o comoseve en m
Corte desde su dere_ hada su
izqmerda.
PAPA AVANZAR LA UNEA DE
tORTE
• Armeelamell=¢_n el odficiode salida.
• Co[¢<tue la bob_na en el cubo y
er_u_,le_. basra que se fije en
Haga avamar la Ifnea tocando el
c_:i¢_l leven_nte en la _ra mieneas
el ¢abezal estd gim_o
• "rimla Ii'ne_que sobre_le del cubo
a toda
ve_
E! r_,_tad_r de l[nea, una
cucP_ de metal instalada en el
protec_x,_rta laIfneaal largocormcto.
PAPA CAMBIAR LA LINEAR
• Retire la bobina Erando firmemente
• del bot6nde toque.
• lnstale una bobin= pre,_rga_
o
cor_ un largo de unos 6 mem_ de
I/nee.rnan_ Sea._ con cEdmetro
de
2mm (.080 de _).
Nunca use
alambre, soga, htlo, e_, que se
pueden rcm_ r y converlime en
proyectilespeligrosos.
24
precalibraci6n,pase a la secci6n
=Ajustesa la MarchaLenta'.
• Gire el tomillode mezclaa la
izquierda(an contradel sentJdode!
reloj)hastequa se detenga.
• Gim el tom!riode marcha lentaa la
derecha(en el sent!dodel mloj)
hastaque se detenga.Ahoragfrelo
Odficiode sar_lade la Ifne_
hacialaizquierda4 vueltasy media.
Pongael
motor en rnamhay code
AJUSTES AL CARBURADOR
pastopot 3 minutos, luego prcoedaa
ADVERTENCIA: Elcabezal estard
la secci6nde ajustes.Si el motor no
gimndodumntela mayorpartede este arranos,,tea la tabia diagn_-ticao
proce_miento.Use su equip(>de
llamaal 1-800-235-5878.
protecel6ny cumplacon todaslas
$i el funcionam|entode!motores
precaucionesde seguddad.Despuds
aceptable conlas posicionesde
de hacerlos ajustesa la mezP.Je,
precalibraci6n,no hardfalta hacerrods
.welva a verificarla marcha lenta.
ajustes.
El ajuote de! carburador es de
PROCEDIMIENTO DE AJUSTE
pdmomial importancia. Si se Io haos
Maroha Lenta "T"
inaotmctamente, puede da_ar tanto el
Deje el motoren mamhalenta.Ajuste
motorcomo el cmburader
lasrevolucioneshastaque el motor se
permanentemente.Si necesitarods
mantenga en marchasin ahogarse.
_yuda o no estdsegurode cSmo
• Gire el tomilloa la derecha(en el
acer el procedimiento,Ilamea
sentidedel relo_pare aumentarlas
nuestrotel6fonode ayudael
.
revolucionessi el motorse ahogao
consumider,a! 1-800-235-5878.
se pare.
Elcombuslible vencido,el fi_o de aim
• Gim el tomilloa la izquierda(an
suoioo el motorahogadopuedendar
contra del sentidodet reloj)pare
ra impresk_de carburaci6n
bajarlas revoiuciones.
desajustade.Verifiqueestas
No
hacefeltaningt_nottoajuste si el
condiciones antes de hacercualquier
rendimientoes _actodo.
ajuste.
Ajuste de Mezcia "H"
El ostburador ha side ajustade
NO HAGA MARCHAREL MOTOR
cuidadosamenteen laf_Lbdca.
con el acelemdora fondoportiempo
Posiblementese hagennecosarios
prolongademientras hate losajustes.
_ljustessise note cuatquierade las
E! motorpuedequedarde,ado.
iguientescondiciones:
Extiendala [inea al largo permitidopor
• E1motor no anda a marcha lenta.
el
limitadorde Ifnea y cortealgode
Vea "MamhaLentaT" bajoel
pasto.De acuerdoal mndimiento de!
procedknientode ajuste.
motoral cortar,gireet tomi,o de ajuste
• El motor se pare o se ahogacuando de
mezcla en incrementosde 1/16 de
dabs aoslerar.Vea "Ajustede la
vuelta
del tomillo, comose detallaa
Aceleraci6n"bajo el procedimiento
continuad6n:
de ajuste.
• A la derecha (en el sentidodel relo_
• Fablede potenciapare corlar. Vea
hastaque e! motortengabuena
"AjL_'te
de la Mazda H" bajoel
potenciapare cortar sin ahogarse.
proced'n'niento
de ajuste.
No hega losajustesporsonideni
Hay dostom_tosde ajustaen el
por revoludones,sinopor el
carburader.F_.eldn
marcadoscon =H"y
rendimientode! motoral cotter.
"T'. Est_ ubicadosarribade!
•
A
la izquierda(en €ontmde!sentido
bombeador.
de!reloj)si el motortienevelocidad
PUNTOS DE PRECALIBRAClON
de revolucionesperose parao le
A!hacerajustesne fuerce lastapes
falta potenciaal cortar.
limitadorasde ptds_corndselld de los
Despudsde completarestosajustes,
retentoreso puede haberda_os.Si no verifiquela aoslemci6n.Ajuste
se necesitanlos puntosde
nuevarnentesies necesario.
Lineaen ia Mella
25
Vedfic_ac_6n
delaA¢_m_6n
Sielmotorsepamohesitaen vezde
(cdn 1
ac_emr, gim el t0m_ de aius_ede la
ade
March=
senfidodel reloj)hastaconseguiruna
aosleraci6nparej_ Vedfique
nuevamentey haga losajustes
necesadospara con.s_, ir un
tuncionamientoaGep_.me:
Prepareel apara._ para.el
almacenarn_nto al finalde la
teml_rada o elva a est_ sin usarpot
m_ _e 30 dfas.
ADVERTENCIA:
de transpottado.
vaporesdecom_
nopued_.
entraren ¢ontactocon.chisp_ n._
llamasablertasproven_entes
ae ,os
termotanques,_ motores o
intermptoresel(_tdpos, lOS
c_efa_'_oresosn_,
ez_
• G_rde ela_rato contodd.los _
protecto.rysen sur_gar,y €?_lue e_
aparato€lemode ClUelas
no puedanc_usarheridaspot
accidente.
• Guardeel a_aratoy el combust_le
bienfuera_1 elcanos de los niEos.
SUPERFICIES EXT_RNAS
$i va a _uard_ el a_..0 durante .
mucho tiempo,nmp=e_o
ngurosam.,
eme
pfirnero.Gudrdetoen un _gar limpio y
fieoo,
met_s.
SISTEMA DE COMBUSTIBLE
BajoAb.apte_mi'entodel Motor,en la_
sebcionoe Uso en este manu=, yea e[
mm,., o_r r=do' O AFm'
acerc_del usoa¢ ¢ombuSt_leS
mezcladoscon elcohol en el motorde
su apa_to.
Los _d_T_zadores de combustible
de goma duranteel almacenamiento.
_de|
A_ad=estabiliz_dora la g_ina en e!
tamlue de con_usttbloo en p__
redpientede =ma._.enp.mientq oe
combustible._iga ms mstruo=ones ae
mezcla que se e.nc._n_ane.nlop_,
envasesde osta_._r,
k'ong__
motor en mand_ay ck_jeloon
por Io menos5 minutosoespue_
ponedeestabl_izador.
El aosite CRAFTSMAN40:1 pare
motoros de 2 lL=mpos(enfdado__.
a .
elre)vtenemezdado=onest=_zapo,
r
de (_mbu_'ble. Sino usa estea_:e_
de _m;, ententes puedeaifadirun
estabi]izadoral tanque_e
comb_.
INTERIOR DEI. MOTOR
• Reg.'rela bujia la bujfay viertaur=a
cucnaradadelas de t6 de acelte
40:1 _
mo*p_esde 2 ti_
_ra la =>_ta._=mneejenmmen==
la soga _ mTaJ:KlUe.U
a 10 veces
pare ff_douir el ace_e.
• Reer_
ia buifacon ot_ del tipo
y de _agarnade ¢elor
reosrnenclaOos,
• Umpieel fiftmde aim.
• F.xaminetodoel apamto Ep'a
verlficarclueno h_yatpmilLosj'-ie
_ercas ntpemossuel_)s._;.arnu
todas las piezasdafladas,
quebradeso _stad_.
• _ principle
delapr<_ma_m_._r'a_
use exc_usivameme
con-,ous=o_
nuevocon la propo_dn correctade
gaso_n_s _eite.
OTRO
• No guardpg.a:soltnadeuna
temp0ra_ a la siguiente.
• Cambieel recipie,_ede gasolinas_
se empiezaa Oxidar.
26
TABLA DIAGNOSTICA
PROeLeMA
El motorno
arrano_,
SOLUCION
Vea las Instruccionesde
Arranque.
• Lien• el tanque con la mezda
con-ectade combu_ble.
• B motore_
ahogado.
• Eltanquede
combustible
estd
vacfo.
' • La bujfano hace
ch_pa.
• El €ombuslJble
no
estdIlegandoal
carburador.
I,
• _que
s! el firm de combustibl_
sucio, Ifmpielo. Vedfique si
hay dobleces en _at_ea de
combustible o si astd pardda;
rep_'ela o cdmbie_a.
° Entre en contaoto con et
Concesionario de Servicio.
• La compresidne._H'd
baja.
El motorno
anda en
mamha
lenta como
debe,
Instal• una buj_ nueva.
• I_1ajustede la maria
lent=estdmuy bajo.
• E! ajus_ de la mamha
lent=estdmuy afro.
, El cad_urador
requiem
aide.
* Ajusteel tomiUode mamha lent=
ala derecha pare aumentar las
revolution•s,
- Ajustee! tomillo de marcha lent=
ala izquierda pare bajar las
revoludones.
• Vea "Ajustesal Carburador.
ie
Entreen contactoconel
[. Lasjuntasde_cig0e_J _
Concesionado
de 8en/ioio.
estdn gastadas.
• La compresi6nestdbaje • Entreencontactoconel
Concesionario
deServicio.
El motor no
• El flirt0 deair• estd
•
Umpieo cabmiee! filtrode aire.
acelem, le
sue!o.
falta
• La bujfaestd
* Umpieo cambfela bujfay calibre]
notenciao
carbonizada.
la sel_d6n.
J
_-".._ k_=. , El carburadorrequiem - Vea "Ajustes
al Carbumdor.
j
_Js_e.
I
(:alga.
* El filtrode ade est_
" Entreenconta_'to
con e!
$UC_O.
Concesionado
de Servicio.
J
• Elcarburadorrequiem * Entreencontactooon el
Concesionario
de Sewic_o.
I
El motor humea * La mezci=
*
I
excesivamen_ combus_e se ha
! Ajusteelcebador.
hechoincorrectarnente,
1
]
I" Se ha instaladola bujfa * Vade el tanquede Combustible-y
inco_.
ff_nelode €ombus'albe
con ta
|
mezclacorre_:la.
|
• El filtrode air• estd
Umpieo ceJnbieel fiitrode aim. I
sucio.
|
• "Et carburadorrequiem • Vea "Ajustes
as Carburador'.
I
..... ; La
a J=e.
mezclade
El motor
marchacon
temperature
_i_'_-'-'-'-_
•
|
Vea "Abastecimiento
del Apamto'.
combustiblese ha
'
"
l_
hechoincorrect=mente.i
• Se ha instaladola bujfa • Cdmbiela
pot labuj_acorrecta. III
inoorrecta.
• B carburadorrequiem I • vea "Ajustesal Carburador
_.
t|
ajuste.
!
• Acumu_i6n de
• Entreencontactocon el
Ill
carb6n.
Concesionario
de Servicio.
ill
27
For the repair or replacement parts you need
delivered directly to your home
Call 7 am - 7 pm, 7 days a week
1-800-366-PART
(1-800-366-7278)
Para ordenar piezas con entrega a
domicilio - 1-800-659-7084
For in-house major brand repair service
Call 24 hours a day, 7 days a week
1-800-4-REPAIR
(1-800-473-7247)
Para pedir servicio de reparaci6n
domicilio1-800-676=-5811
a
For the location of a Sears Parts and
Repair Center in your area
Call 24 hours a day, 7 days a week
1-800-488-1222
For information on purchasing a Sears
Maintenance Agreement or to inquire
about an existing Agreement
Call 9 am - 5 pro, Monday-Saturday
1-800-827-6655
When requesting service or ordering
parts, always provide the following
information:
• Product Type
• Part Number
• Model Number
° Part Description
America's Repair Specialists