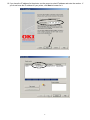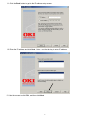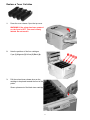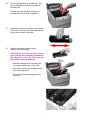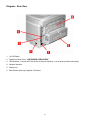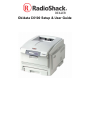
1
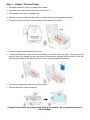
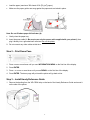
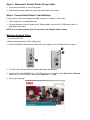
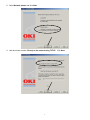
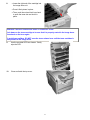
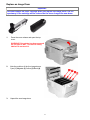
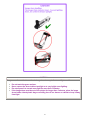
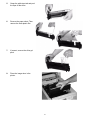
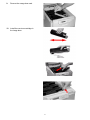
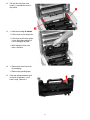
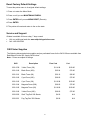
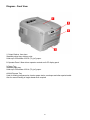
Okidata C6100 Setup & User Guide
Table of Contents STEP 1- UNPACK/PREPARE PRINTER………………………………………………………………………………………2
STEP 2 – PRINT DEMO PAGE.………..……………….…..............................................................................................4
STEP 3 - INSTALL HANDY REFERENCE GUIDE ...................................................................................................4
STEP 4 - DISCONNECT CURRENT PRINTER ………………….................................................................................5
STEP 5 - CONNECT NEW PRINTER/LOAD SOFTWARE.........................................................................................5
WINDOWS NETWORK SETUP..…………..………………..............................................................................................5
PRINT IN BLACK AND WHITE……………………………………………………………………………………..10
CHECK TONER LIFE...…………………………………............................................................................................10
REPLACE TONER CARTRIDGE..……… …...…………..….........................................................................................11
REPLACE DRUM.………………………………………....................................................................................................14
REPLACE FUSER.…………………..……………………………...................................................................................18
CHECK CURRENT PRINTER SETTINGS ……………...............................................................................................20
RESET FACTORY DEFAULTS..………………………………………………………………………………………..………21
SERVICE AND SUPPORT...………….…………...........................................................................................................21
ORDER SUPPLIES.........……………………………… ....................................................................................................21
DIAGRAM - FRONT VIEW…..…………………. …………………..................................................................................22
DIAGRAM - REAR VIEW...............................................................................................................................................23
1
Step 1 – Unpack / Prepare Printer
1. Designate an area for your new printer to be installed.
2. Ask someone to assist in lifting the printer out of the box.
3. Lift the printer out of the box (straight up).
4. Remove all pieces of tape from the printer. (11 sheets with tape) (6 single pieces of tape)
5. Follow the instructions below to remove tape from the inside of the printer:
•
Press the release button and lift the top cover.
•
On the right-hand side of each drum/toner cartridge, you will see a blue lock lever. The lock lever will
keep the toner from leaking out when you remove the drum/toner cartridge from the printer. Push the
lever toward the back of the printer as far as it will go (for each drum/toner cartridge).
•
Lift the black image drum/toner unit out of the printer.
•
Remove the pieces of tape and sheets.
Caution! Do not touch the image drum's shiny green surface. Do not expose the drum to
direct sunlight.
2
•
Reinstall the black drum/toner unit.
•
Repeat these steps for all remaining drum/toner units.
Important! If TONER SENSOR ERROR appears when you turn on the printer, the lever for
the toner cartridge color indicated is not pushed all the way back.
6. Follow the steps below to prepare the fuser:
remove orange piece
•
Press firmly on the blue lock (1) to release the orange transport restraint (2). Pull the restraint out by
moving it left and then pulling up. This piece looks as though it is a permanent part of the printer, but is
not.
•
After the orange restraint piece has been removed, take out the orange band and close the top cover.
•
All orange pieces should be thrown away.
•
Lock the fuser into place by pushing the lever toward the back of the printer.
7. Follow the instructions below to load the paper tray:
•
Pull out the paper tray (A).
•
Carefully pull the shipping restraint down, and out (B).
Important! Be sure you remove the entire piece, including both arms.
•
Use both hands to pull the front cover down and flip the paper tray out. Remove the pieces of tape and
sheet.
3
•
Load the paper (maximum 300 sheets 20-lb [75 g/m2] paper).
•
Make sure the paper guides are snug against the paper and are locked in place.
Note: Do not fill above paper full indicator (A).
•
Gently close the paper tray.
8. Insert the power cable (1: Be sure to use only the power cable supplied with your printer!), then
plug it directly into a grounded wall outlet and turn on the printer.
9. Do not connect any other cables at this time.
Step 2 – Print Demo Page
1. Press + one or more times until you see: INFORMATION MENU on the first line of the display.
2. Press ENTER.
3. Press – or + one or more times until you see DEMO1 on the first line of the display.
4. Press ENTER. The demo page will print and the printer will go back online.
Step 3 – Install Handy Reference Guide
1. Remove the backing from the VELCRO® strip on the back of the Handy Reference Guide and mount it
on the side of the printer.
4
Step 4 – Disconnect Current Printer (If one exists)
1. Press the power button to turn off the printer.
2. Disconnect the power cable from the power outlet and from the printer.
Step 5 - Connect New Printer / Load Software
For this portion, refer to the diagram provided on page 20. (Diagram – Rear View)
•
Place the printer in its designated area.
•
Connect the power cord to a power outlet. When possible, connect the (C6100) power cord to a
dedicated power outlet.
NOTE: It is recommended that you use the power cord shipped with the printer.
Windows Network Setup
1. Turn the printer OFF.
2. Remove the plastic cap from the LAN port (1).
3. Connect the Ethernet cable between the printer and a spare port on the Ethernet hub or router.
3. Turn the Printer ON and wait for the status light (2) to stop blinking.
4. Insert the CD in the CD-ROM drive. The CD will auto-run. If it doesn't, click Start > Run > Browse.
Browse to your CD-ROM drive, double-click Setup.exe. Click OK.
5. Select your language:
5
6. Next, if you agree, accept the License Agreement:
The Installer screen will appear:
7. Click Install Driver.
6
8. Select Network printer and click Next:
9. Use the mouse to select ‘Directly to the network using TCP/IP’. Click Next.
7
10. If you know the IP address for the printer, use the mouse to select IP address and enter the number. If
you do not know the IP address for your printer, click Next to browse for it.
8
11. Click the Back button to get to the IP address entry screen:
12. Enter the IP address and click Next. Note – use the tab key to enter IP address.
13. Use the mouse to click PCL, and then click Next.
9
Drivers will be installed and you will see the following:
14. Use the mouse to click Finish, and exit out of any open Okidata screens.
15. To make sure the printer driver was installed correctly, print a page from any program. Reinstall the
driver if the installation failed.
Print Only in Black and White:
•
Click Start > Settings > Printers and Faxes.
•
Left click on Laser to highlight.
•
Click File > Printing Preferences.
•
Click on the Color tab.
•
Click on the circle by Grayscale to move the bullet to that selection.
•
Click Apply and OK.
Check Toner Life
The Okidata C6100 Printer has the ability to display the remaining life of each toner cartridge.
•
Press the <+> button until you see USAGE MENU.
•
Press the ENTER button.
•
Press the <+> button until you see the toner cartridge:
~
~
~
~
•
K
C
M
Y
toner remaining - xx% (Black)
toner remaining - xx% (Cyan)
toner remaining - xx% (Magenta)
toner remaining - xx% (Yellow)
After you have checked the life percentage, press the BACK button until <ONLINE> is displayed.
10
Replace a Toner Cartridge
1.
Press the cover release. Open the top cover.
WARNING! If the printer has been powered
on, the fuser is HOT. This area is clearly
labeled. Do not touch it.
2.
Note the positions of the four cartridges:
Cyan (1) Magenta (2) Yellow (3) Black (4).
3.
Pull the colored toner release lever on the
cartridge to be placed towards the front of the
printer.
Shown: placement of the black toner cartridge
11
4.
Lift the right-hand end of the cartridge. Then,
pull the cartridge to the right to release the
left-hand end.
Remove the toner cartridge. Discard it in
accordance with your local regulations.
5.
Unpack the new toner cartridge. Gently shake
it from side to side to loosen and distribute the
toner evenly inside the cartridge.
6.
Remove the adhesive tape from the
underside of the cartridge.
CAUTION! Do not touch the toner release
lever until the toner cartridge is installed in
the image drum. If you do, it will open the
toner release slot and spill toner.
• Hold the cartridge by its top center with
the colored release lever to the right.
• Insert the left end of the cartridge into the
top of the image drum.
• Push it firmly against the spring on the
drum unit.
12
8.
• Lower the right end of the cartridge into
the image drum unit.
• Press it firmly down in place.
• Then, push the colored lock lever back
to open the toner slot and lock it in
place.
Important! The lever should move easily. If it does not, STOP!
Push down on the toner cartridge to be sure that it is properly seated in the image drum.
Press back on the lever again.
To avoid toner spillage, DO NOT open the toner release lever until the toner cartridge is
firmly seated in the image drum.
Use the provided LED lens cleaner. Gently
9.
wipe the LED.
10.
Close and latch the top cover.
13
Replace an Image Drum
Important!
You must replace the toner cartridge when you replace the image drum. The life
expectancy of the cartridge will be reduced as the toner charges the new drum.
1.
Press the cover release and open the top
cover.
WARNING! If the printer has been powered
on, the fuser is HOT. This area is clearly
labeled. Do not touch it.
2.
Note the positions of the four image drums:
Cyan (1) Magenta (2) Yellow (3) Black (4).
3.
Unpack the new image drum.
14
CAUTION!
The green surface at the base of each image drum is very delicate and light sensitive.
•
•
•
•
Do not touch the green surface.
Never expose the drum to direct sunlight or to very bright room lighting.
Do not expose it to normal room light for more than 5 minutes.
If the image drum must be out of the printer for longer than 5 minutes, place the image
drum inside a black plastic bag or carefully place it in a drawer or cabinet to keep it away
from light.
15
5.
Grasp the white tape tab and peel
the tape off the drum.
6.
Remove the paper sheet. Then,
remove the clear plastic film.
7.
If present, remove the silica gel
pack.
8.
Place the image drum in the
printer.
16
9.
Remove the orange drum seal.
10.
Install the new toner cartridge in
the image drum.
17
11.
Use the provided LED lens
cleaner. Gently wipe the LED.
12.
Close and latch the top cover.
Replace the Fuser
WARNING!
If the printer has been powered on, the fuser is HOT. This area is clearly labeled. Do not
touch it. Handle the fuser with extreme care. Hold it only by its handle, which is only mildly
warm to the touch.
If in doubt, switch the printer off. Wait at least 10 minutes for the fuser to cool before
opening the printer cover.
1. Press the cover release and
open the top cover.
18
2.
3.
Pull the two blue fuser lock
levers (1) towards the front of
the printer.
• Hold the fuser by its handle.
• Lift the fuser out of the printer.
• If the fuser is still warm, place
it on a flat surface which will
not be damaged by heat.
• After letting the fuser cool
down, discard it.
4.
• Remove the new fuser from
its packaging.
• Remove any packing tape.
5.
Push the orange transport lock
to the left to release it. You'll
hear it snap. Remove it.
19
6.
Hold the new fuser by the
handle. The fuser pressure
release lever (1) should be on
the right. Lower the fuser into
the printer.
7.
Push the two blue retaining
levers (1) toward the rear of the
printer to lock the fuser in place.
8.
Close and latch the top cover.
Check Current Printer Settings
To print a list of the current settings1. Press + until you see INFORMATION MENU.
2. Press ENTER until you see PRINT MENU MAP (Execute).
3. Press ENTER.
4. The Menu Map will print. The printer will go back on line.
20
Reset Factory Default Settings
To reset the printer menu to its original default settings:
1. Press + to enter the Menu Mode.
2. Press + until you see MAINTENANCE MENU.
3. Press ENTER until you see MENU RESET (Execute)
4. Press ENTER.
5. The printer will reset and return to the on-line state.
Service and Support
Okidata is available 24 hours a day, 7 days a week
•
•
Visit our multilingual web site: www.okiprintingsolutions.com
Call 1-800-654-3282
OKI Printer Supplies
The following discounted printer supplies and pre-perforated forms for the OKI 6100n are available from
RadioShack via the 050- supply SKUs below.
Note – Prices are subject to change.
SKU
Description
Fran Cost
List
050-1539
Yellow Toner (5K)
$114.98
$139.00
050-1540
Black Drum (20K)
$65.04
$70.00
050-1541
Black Toner (6K)
$56.10
$90.00
050-1542
Cyan Drum (20K)
$69.60
$75.00
050-1543
Cyan Toner (5K)
$119.98
$139.00
050-1544
Magenta Drum (20K)
$69.60
$75.00
050-1545
Magenta Toner (5K)
$118.80
$139.00
050-1546
Yellow Drum (20K)
$69.60
$75.00
050-2050
Shelf Tag-Perf 200 Sheets
$4.50
N/A
050-2051
Peg Tag-Perf 200 Sheets
$6.90
N/A
21
Diagram – Front View
1. Output Stacker, face down
Standard printed copy delivery point.
Holds up to 250 sheets of 20-lb. (75 g/m²) paper.
2. Operator Panel - Menu driven operator controls and LCD display panel
3. Paper Tray
Standard paper tray.
Holds up to 300 sheets of 20-lb. (75 g/m²) paper.
4. Multi-Purpose Tray
Used for feeding transparencies, heavier paper stocks, envelopes and other special media.
Also for manual feeding of single sheets when required
22
Diagram – Rear View
1.
On/Off Switch
2. Socket for Power Cord – USE POWER CORD IN BOX
3. USB Interface –Connect HP Print Server to this port (optional – not covered by these instructions)
4. Network Interface
5. Duplex Unit
6. Rear Stacker (face up) Capacity 100 sheets
23