1
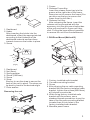
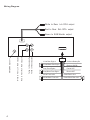
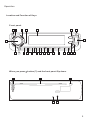
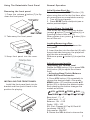
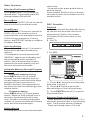
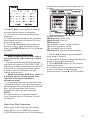
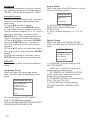
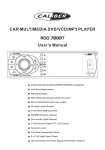
PLD179U
Instruction Manual
WWW.PYLEAUDIO.COM
CAR VIDEO SYSTEM
DVD/MPEG4 PLAYER
AM/FM 2 Band Radio
Anti-Shock Mechanism
PLL Synthesizer Tuner
PAL/NTSC Color System
Flip Down Detachable Front Panel
A/V Output & A/V Input
Sub-woofer Function
CONTENTS
Safety Information
1
Installation
Wiring Diagram
2
4
Operation
5
Location and Function of Keys
5
Preparing The Remote Control
6
Using The Detachable Front Panel
7
General Operation
7
Radio Operation
9
DISC Operation
9
Unique DISC Operation
11
Data Disc Play Operation
13
Memory Card Play Operation
14
USB Play Operation
14
AV In Operation
14
Setup
15
System Setup
15
Language Setup
16
Audio Setup
16
Digital Setup
16
Specification
17
Troubleshooting
17
Safety Information
CAUTION:
Mobile DVD player is a class 1 laser
product. However this mobile DVD player
uses a visible/invisible laser beam which
could cause hazardous radiation
exposure if directed. Be sure to operate
the mobile DVD player correctly as
instructed.
Use of controls or adjustments or
performance of procedures other than
those specified herein may result in
hazardous radiation exposure.
Do not open covers and do not repair
yourself. Refer servicing to qualified
personnel.
WARNING:
- To reduce the risk of fire or electric
shock, do not expose this equipment to
rain or moisture.
- To reduce the risk of fire or electric
shock, and annoying interference, use
only the recommended accessories.
- This device is intended for continuous
operation.
This product incorporates copyright
protection technology that is protected
by method claims of certain U.S. patents
and other intellectual property rights
owned by macro vision Corporation and
other rights owners. Use of this
copyright protection technology must be
authorized by Macro vision Corporation,
and is intended for home and other
limited viewing uses only unless
otherwise authorized by Macro vision
Corporation. Reverse engineering or
disassembly is prohibited.
Discs you can play
You can playback the following discs12CM on the receiver:
DVD VIDEO/DVD AUDIO
VIDEO CD/AUDIO CD
MP3/WMA/JPEG/MPEG4
Handling and Cleaning
- Dirt, dust, scratches and warping discs
will cause disoperation.
- Do not place stickers or make scratches
on discs.
- Do not warp discs.
- A disc should always be kept in its case
when not in use to prevent from damage.
- Do not place discs in the following
places:
1. Direct sunlight.
2. Dirty, dusty and damp areas.
3.Near car heaters.
4.On the seats or dashboard.
Disc Cleaning
Use a dry soft cloth to wipe the surface.
If the disc is quite dirty, Use a soft cloth
slightly moistures with isopropyl
(rubbing) alcohol. Never use solvents
such as benzene, thinner or conventional
record cleaners as they may mar the
surface of the disc.
Note:
A disc may become somewhat
scratched (although not enough to make
it unusable) depending on the way it is
handled and conditions in the usage
environment. Note these scratches are
not an indication of any problem with the
player.
Region Management Information
Region Management Information: This
Mobile DVD Player is designed and
manufactured to respond to the Region
Management Information that is
recorded on a DVD disc. If the Region
number described on the DVD disc does
not correspond to the Region number of
this Mobile DVD Player, this Mobile DVD
Player cannot play this disc.
1
Installation
Label side up
Do not touch
the underside
of the disc
Do not bend
Wipe the disc from center
toward the outside edge
Preparing New Discs with Rough
Spots
A new disc may have rough edges on its
inside and outside edges. If a disc with
rough edges is used, the proper setting
will not be performed and the player will
not play the disc. Therefore, remove the
rough edges in advance by using a
ballpoint pen or pencil as shown on the
right. To remove the rough edges, press
the side of the pen or pencil against the
inside and outside edges of the disc.
Rough spots on
outside edge
Ball point pen
or pencil
Notes:
- Choose the mounting location where the unit
will not interfere with the normal driving
function of the driver.
- Before finally installing the unit, connect the
wiring temporarily and make sure it is all
connected up properly and the unit and the
system work properly.
- Use only the parts included with the unit to
ensure proper installation. The use of
unauthorized parts can cause malfunctions.
- Consult with your nearest dealer if
installation requires the drilling of holes or
other modifications of the vehicle.
- Install the unit where it does not get in the
driver's way and cannot injure the passenger if
there is a sudden stop, like an emergency
stop.
- If installation angel exceeds 30°from
horizontal, the unit might not give its optimum
performance
- Avoid installing the unit where it would
be subject to high temperature, such as
from direct sunlight, or from hot air, from
the heater, or where it would be subject to
dust, dirt or excessive vibration.
Din Front/Rear-Mount
This unit can be properly installed
either from 'Front' (conventional DIN
Front-mount) or 'Rear' (DIN Rear-mount
installation, utilizing threaded screw
holes at the sides of the unit chassis). For
details, refer to the following illustrated
installation methods.
Take Out Screw Before Installation
Before install the unit, please remove
the two screws.
Take out screws
before installation
Rough spots on
inside edge
1. DIN Front-Mount(Method A)
Installing the unit
2
1
2
182
53
3
(Fig.1)
1. Dashboard
2. Hoder
After inserting the holder into the
dashboard, select the appropriate tab
according to the thickness of the
dashboard material and ben them
inwards to secure the holder in place.
3. Screw
1. Frame
2. Release Frame Key
Insert the release frame key into the
groove at the right side of the frame,
then prize out to remove the frame (You
can also use the key to remove the
frame from the left side.)
3. Release Unit Key
After releasing the frame, insert the
release unit keys supplied with the
accessory into the grooves at both sides
of the unit as shown in figure until they
click. Pulling the keys makes it possible
to remove the unit from the dashboard.
1. DIN Rear-Mount(Method B)
3
1
2
1
6
2
4
5
3
7
4
(Fig.2)
6
1. Dashboard
2. Nut (5mm)
3. Spring washer
4. Screw (5X25mm)
5. Screw
6. Strap
Be sure to use the strap to secure the
back of the unit in place. The strap can
be bent by hand to the desired angle.
7. Plain washer
Removing the unit
1
2
3
5
Tab
1. Factory-installed radio bracket
2. Car radio mounting bracket
3. Screw
4. After aligning the car radio mounting
bracket with the factory-installed radio
bracket, tighten the screws (M5X4mm)
at 2 places on each side.
5. When fixing factory-installed radio
bracket with the screws, use a
standard-tipped screwdriver to pry the
tabs of the car radio mounting bracket
to make them fit into holes in the
factory-installed radio bracket.
6. Movable panel frame.
3
Wiring Diagram
White to Rear Lch RCA output
Red to Rear Rch RCA output
4
Yellow to Video output 1
Yellow to Video output 2
Red to Front Rch RCA output
White to Front Lch RCA output
ANTENNA Socket
Green to SUB-Woofer output
Violet Rear Right +
Yellow to Battery B+
Violet/Black Rear Right -
Black to GND B-
Grey Front Right +
Red to ACC
Grey/Black Front Right -
Blue to ANT
White Front Left +
Green Rear Left +
White/Black Front Left -
Green/Black Rear Left -
Operation
Location and Function of Keys
Front panel :
9
19
15
11
8
7
16
27
10
13
18
6
When you press
42
20
21
22
14
23
24
25
3
2
1
17
43
button (7) and the front panel flip down:
5
4
26
12
5
Remote control:
- Do not put in a trouser pocket.
- Keep away from food, moisture and
dirt.
- Do not place in direct sunshine.
9
15
6
28
41
22
40
29
19
39
30
31
38
Battery replacement
Battery type: a button cell lithium battery
(CR2025 3V)
1. Opening the battery case
Slide out the battery cover while firmly
pressing in the direction of the arrow.
32
37
16
36
17
35
33
25
20
24
34
14
23
13
2. Replacing the battery
Put the battery in the case with the (+)
indication upward as shown in the
illustration.
Preparing The Remote Control
When using the Remote Control
* Before you using the remote control,
please take the transparent insulator
slice off the bottom of remote control.
* Point the remote control at the remote
sensor (11) within 2 meters.
* It may not be possible to operate the
remote control if the remote control
sensor is exposed to direct sunlight.
* Operation angle: about ±30°in each the
direction of the front of the remote
sensor.
* The remote control is a small,
lightweight precision device. To avoid
damage, short battery life, operational
errors and poor response, observe the
following.
- Do not subject the remote control to
excessive shock.
6
3. Closing the cover
Slide the cover as illustrated until a click
is head.
Using The Detachable Front Panel
General Operation
Removing the front panel
Initial System Start-Up
Be sure to press the RESET button (12)
when using the unit for the first time, after
all connections are completed correctly.
1. Turn off the unit power.
2. Press RESET with a ballpoint pen or
similar pointed object.
1 . Press the release
down the front panel.
button (7) to flip
2 . Take away the front panel .
3 . Keep front panel into the case .
INSTALLING THE FRONT PANEL
Install the front panel back into its
bracket and then push it back to the
position for playing.
Turning Power On And Off
Turn on the unit by pressing any button
(except
button (7) and button (4)) or
inserting a disc to disc slot (5).
When system is on, press
button (9) to
turn off the unit.
Loading/Removing a Disc
1. Press
button (7) to flip down the
front panel.
2. Insert the disc into the disc slot (5) with
the printed side facing up; the player will
play the disc automatically.
Whenever press
button (4) to eject the
disc.
Adjusting sound quality
- Adjusting the volume level
Rota te the VOL button (10) or press VOL
(+/-) button (38) to adjust the volume
level.
- Adjusting Bass /Treble /Balance
/Fader/EQ/Loud/Subwoofer
1. Press VOL button (10) repeatedly to
choose the desired mode. Alos press
MENU button (37) and then press ▲/▼
button (30) to choose the desired mode.
Each pressing the button changes the
modes as follows:
BASS
VOL
TREB
EQ
SUBW
LOUD
BAL
FAD
Bass level: -7 ~ +7
Treble level: -7 ~ +7
Balance: 15L ~ 15R
Fader: 15R ~ 15F
EQ: Flat, Classes M, Pop M, Rock M
Loudness: ON/OFF
Sub-woofer: ON/OFF
2. Rotate the VOL button to choose the
7
desired item. Also press ◄/► button (30)
to choose the desired item.
Display/Adjust Time
1. Displaying time:
Press DISP button (15) to show current
information and time on the LCD . Return
to original status after 5 seconds.
2. Adjusting time:
1). Press and hold DISP button (15) until
the clock begins blinking.
2). Press 9 / : or ◄/► button to move to
between hour area and minute area.
3). Rotate VOL button (10) or ▲/▼ to
adjust hour or minute.
LCD Display
Exhibit current information and activated
functions on the LCD display (8).
Flashing LED
The LED (26) will flash if the front cover is
not inserted into the main unit.
ESP function
If the unit has the electronic shockproof
function, it can be shockproof about
several seconds:
CD, VCD: 18 seconds.
MP3: 160 seconds.
DVD: 6 seconds.
MPEG4: 20 seconds.
Turning Loudness on/off
Loudness introduces a special low- and
high-frequency emphasis at low listening
levels. This compensates for the ear's
decreased sensitivity to bass and treble
sound. Press LOUD button (2) to switch
loudness on/off.
Equalization
Press EQ button (3) repeatedly to cycle
though the following equalization mode:
FLAT→CLASSICS→ POP M → ROCK M
→ DSP OFF
8
Mute Function
Press MUTE button (19) to mute down the
sound instantly, press it again to recover
previous volume level.
Mode Function
Press MODE (6) to switch between the
DVD, AV and TUNER.
Last Position Memory
- During disc playback, if you press
button (9) to turn off the unit and then
press the button again to turn on the unit,
the DVD unit will resume playing from the
point that it was interrupted.
- During disc playback, if you press
MODE button (6) to switch to other mode,
and then return to DVD mode again, the
unit will resume playing from the point
that it was interrupted.
Sub-Woofer Function
This unit is equipped with a sub-woofer
output jack. When a sub-woofer is
connects to this unit. Press VOL button
(10) repeatedly to select SUBW and then
rotate VOL button to turn sub-woofer
output on/off.
Reset Function
RESET button on the housing must be
activated with either a ballpoint pen or
thin metal object. The RESET button (12)
is to be activated for the following
reasons:
- Initial installation of the unit when all
wiring is completed.
- All the function buttons do not
operate.
- Error symbol on the display.
Note:
If press RESET button(12), the unit can't
work yet, please use a cotton swab
soaked in isopropyl alcohol to clean the
disc socket.
Radio Operation
Selecting The Frequency Band
Press BAND button (13) to select the
desired band. The reception band will
change between FM and AM .
seek mode.
- In manual mode, press : / 9 button to
select a station .
Press preset 1-6 button (14) for several
seconds to store current station into the
number button.
Stereo/Mono
Press ST (1) or MO/ST (23) on the remote
control to select mono/stereo mode.
DISC Operation
Local/Distant
Press ST/LOC (1) for several seconds or
LO/DX (34) on the remote control to
select between local and distant stations.
LOCAL setting is reception of strong
station, and DISTANT setting is reception
of weaker stations.
Selecting Station
- Press preset 1-6 button (14) to select a
station which had been stored in the
memory.
- Press : / 9 for several seconds until
“MANUAL” appears on the display, and
then press : / 9 button to select a
station. If both buttons have not been
pressed for several seconds, they will
return to automatic seek mode .
Automatic Memory Storing & Program
Scanning
- Automatic memory storing
Press AMS button (18) for several
seconds, the radio searches from the
current frequency and checks the signal
strength until one cycle search is
finished. And then 6 strongest stations
are stored into the corresponding preset
number button.
- Program scanning
Press AMS button (18) to scan preset
station. When the field strength level is
more than the threshold level of stop
level, the radio is holding at that preset
number for several seconds with release
mute, and then searches again.
Playback
1. Insert a disc with the label side facing
up; the disc will be pulled into the unit
automatically. Display the console
information of the current disc on the
screen.
2. For CD:
3 . For MP3 :
1). Press ◄ /► button to move between
work area A, B and C.
2). Press ▲/▼ button to select the
desired folder or file of this work area.
3). Press ENTER button (31) to confirm
the selected item.
Selecting Tracks In Single Step
- Press 9 button (16) or : button (17) to
skip to the previous track or the following
track. Track number shows on display.
- Press and hold 9 button (16) or :
Station Storing
- Press : / 9 button to activate automatic
9
button (17) to fast reverse or fast
forward. It return to normal mode when
you release the button.
Pause Playback
Press
button (20) to pause playback.
Press it again to resume playback.
Stopping playback
- Briefly press the < button ( 24 ) to stop
the unit playback . W hen the < button is
pressed and then press
button ( 20),
resume to the normal playback.
- Press < button (24) twice and then
press
button to stop the playback and
go back to initial track.
Fast-Forward / Fast-Reverse
1. Fast-Forward
Press
button (36) during playback.
Each time the button is pressed, the
speed of fast-forward changes according
to the disc as follows :
FORWARD 2X Æ 4X Æ 8X Æ 20X
In fast-forward state, press button (20)
to recover normal playback.
2. Fast-Reverse
Press
button (35) during playback.
Each time the button is pressed, the
speed of fast-reverse changes according
to the disc as follows:
BACKWARD 2X Æ 4X Æ 8X Æ 20X
In fast-reverse state, press
button (20)
to recover normal playback.
Repeat Play/ Paragraph Repeat Play
- Repeat play:
When you want to repeat play whole disc,
a track or a directory in the disc.
1) Press RPT button (22) repeatedly to
select different repeat modes.
2) For different kinds of discs, pressing
RPT button ( 22 ) has different effects.
For CD/VCD/SVCD:
REP 1→REP ALL → REP OFF
For MP3:
REP 1 →REP DIR→REP ALL→ REP OFF
For DVD:
REP CHAPTER →REP TITLE→REP OFF
10
NOTES:
REP 1: Only a track (file) is repeatedly
playback.
REP DIR: Only tracks (files) in a folder
are repeatedly playback .
REP CHAPTER: The chapter is repeatedly playback.
REP TITLE: The title is repeatedly playback.
REP ALL: A disc is repeatedly playback .
REP OFF: The mode returns to normal
playback.
* Repeat feature does not support VCD
2.0 (PBC is on).
- Paragraph Repeat Play:
When you want to repeat play a desired
paragraph. A-B repeat allows a passage
to be repeated continuously.
Press A-B button (28) first at the start of
the required passage.
REPEAT APress A-B button (28) secondly at the
end of the passage.
REPEAT A-B
Then the unit will repeat playing the
passage you just set from A to B.
To revert to normal playback, press A-B
button again.
REPEAT CANCEL
Playing In Random Sequence
Press RDM button (23) to switch the
random mode on/off. If the random mode
is on, tracks (files) on the disc will be play
in random sequence.
Previewing All Tracks
Press INT button (21) to play first several
seconds of each track on the current
disc. Press the button again to stop intro
scan and return to normal mode .
Unique DISC Operation
DISC Menu Operation
Menu-driven playback is possible while
playing back a DVD with menu-driven
feature or VCD with the PBC (PlayBack
Control).
1). Press TITLE/PBC (33) button, the title
list or disc menu will appear on the
monitor.
2). Use the cursor buttons (▲/▼/◄/►)
(30) and ENTER button (31) to select
item you want on the menu.
* On some discs, you can select the
items by the numeric key (33).
Multi-subtitle Language Function
Some DVD has multiple subtitle
language, the subtitle language can be
switched during playback, or subtitles
can be hidden.
Press SUB-T button (40) repeatedly to
switch between multiple languages
recorded on the disc. EX:
Notes:
- Not all discs will allow changing the
subtitle during playback. In these cases,
select subtitle from the DVD's menu.
- There may be a delay before the
selected subtitle appears.
- For some discs, the subtitles will be
displayed even when this is set to off.
- The language number is different
according to the disc.
- Some discs only contain one subtitle
language.
Multi-audio Language Function
For DVD :
Y ou can select the language to listen to if
the disc has multiple audio language.
Press AUDIO (41) repeatedly to switch
between multiple audio languages
recorded on the disc. EX:
:
:
Notes:
- The language number is different
according to the disc.
- Some discs only contain one
soundtrack language.
- Not all discs will allow changing the
subtitle during playback. In these cases,
select subtitle from the DVD's menu.
For VCD/SVCD:
For some VCD/SVCD discs with multiple
audio channel. You can select the audio
channel to play.
Press AUDIO button (41) repeatedly to
switch between the audio channel
recorded on the disc.
STEREO: To listen to normal stereo (left/
right) playback.
MONO L: To listen to the left audio
channel.
MONO R: To listen to the right audio
channel.
Notes:
- Some discs only contain one soundtrack language.
Multi-angle Function
You can view the same screen at different
angles if the disc has multi-angle views.
Press ANGLE button (39) during playback. The following information will be
shown on the screen.
EX: When the disc has 3 options
The angle switches between the angles
recorded on the disc each time the button
is pressed.
Notes:
- Some time may be required for the
angle to change.
- Depending on the disc, the angle may
switch in one of two ways.
1 . Seamless: The angle switches
smoothly.
2 . Non-seamless: When the angle is
switched, a still picture is displayed
first, after which the angle switches.
- The angle number is different
according to the disc.
11
- The function only works for discs
having scenes recorded at different
angles.
On Screen Display Function
Press the SUB-T button (40) for several
seconds during playback to display the
console information of the current disc on
the screen.
Press SUB-T button (40) for several
seconds continually , you will see the
information as following :
FOR DVD:
Use the number keys (14) to input the
desired Title, Chapter or Time, and then
press ENTER button (31) to confirm.
FOR VCD:
PBC
Use the number keys (14) to input the
Track and Time then press ENTER button
(31) to confirm.
ZOOM Function
Press ZOOM button (29) to enlarge or
reduce the size of image according to the
disc as follows :
ZOOM 2
For VCD:
1)TT
Display the current title number and total
title number.
2)CH
Display the current chapter number and
total chapter number.
3)
Display the played times of the whole
disc.
4)C-:
Display the remaining times of the
current chapter.
5)T:
Display the played times of the current
title.
6)T-:
Display the remaining times of the
current title.
7)C:
Display the played times of the current
chapter.
8)
Display the current disc language, audio
type, subtitle language and play angle.
For VCD:
GOTO Function
Press GOTO button (25), the screen will
display the following message:
FOR DVD:
12
ZOOM 3
ZOOM 1/3
ZOOM 4
ZOOM 1/2
ZOOM 1/4 ZOOM OFF
In zoom in state, press ▲/▼/◄/►
buttons (30) to move pictures up / down,
left / right direction in order to find the
picture that you want to zoom in.
Program Play Function
- In VCD/CD playback mode, press
PROG button (34) can activate program
edit interface as follow :
Use ▲/▼/◄/► cursor button to select the
item that you want to program .
1). The item you selected will become
highlight .
2). Input the track number that you want
to program by numeric buttons (0-9) on
the remote control .
3). Press ▲/▼/◄/► cursor buttons to
move to " PLAY " operation button and
then press ENTER button ( 31 ) to
program playback .
- In DVD/MP3 playback mode, press
PROG button (34) to activate program
edit interface as follow :
media play window will be shown on the
screen:
Use ▲/▼/◄/► cursor button to select
the item that you want to program .
1). The item you selected will become
highlight .
2). Input the track number that you want
to program by numeric buttons (0-9) on
the remote control .
3). Press ▲/▼/◄/► cursor buttons to
move to "PLAY" operation button and
then press ENTER button (31) to program
playback .
Frequently Asked Questions
- When inserting a DVD disc, why it
can't be played, just showing “region
error”?
It is because that the DVD player and
the discs all have the “REGION CODE”. If
the region number described on the DVD
disc does not correspond to the region
number of this DVD player, the unit
cannot play the disc.
- When inserting a DVD disc, there is
a window shown on the screen that
requires entering 4 characters
password, why?
It is because that the current disc has
“Parental Control” level, and the player's
parental level is set below the level of the
disc, you should enter the correct
password to play the disc normally.
NOTE:
For how to set the “Parental Control”
level, please refer to “Parental Control”
on page 18.
Explain as follows:
Work area A: folders list
Work area B: files list
Work area C:
(1): playback audio mode (default)
(2): viewing picture mode
(3): playback movie mode
Work area D: file information display
1. Press ◄/► button to move between
work area A, B and C.
2. Press ▲/▼ button to select the desired
folder or file of this work area.
3. Press ENTER button (31) to confirm
the selected item.
4. In viewing picture or playback movie
mode, if you want to return to the
previous menu, press < (STOP) button.
Data Disc Play Operation
When you insert a data disc including
audio (MP3), movie (MPEG4), picture
(JPG) files into the disc slot, the following
13
Memory Card Play Operation
This disc player offers you a memory card
slot (42).
Using the SD/MMC card:
When you insert a SD/MMC card into the
memory card slot (42), the DVD player
will read the SD / MMC card automatically.
The unit gives first priority to the latter. If
insert a disc into the disc slot ( 5 ) while
read the SD/MMC card, the unit will play
the disc. Press < (24) button to enter into
PRE-STOP mode, then press GOTO
button (25) to switch to the reading card
mode.
Note:
When reading the memory card, please
don't touch or take out the card.
If following the instruction above, the unit
can't read the card, please check if the
card is in good condition, or tack out the
card then insert it into the card slot once
more.
can't read the device, please check if the
device is in good condition, or tack out
the device then insert it into the USB slot
(27) once more.
The main unit can only support the
standard USB-memory disc which is
approved by Microsoft.
USB MP3 player is not a standard
which means different brand name or
different models have their own standard.
So our product cannot support every MP3
player.
When connecting an MP3 player and
there has normal battery in the player
(non rechargeable battery), you should
remove the battery from the MP3 player
then connect it to the USB slot.
Otherwise, it may cause battery burst.
When in USB play mode, be sure not to
remove the USB driver from the USB slot.
AV In Operation
USB Play Operation
This disc player offers you a USB slot
(27). A USB driver can be connected
through this slot.
Using the USB driver:
When you insert a USB driver into the
USB slot (27), the DVD player will read
the USB automatically.
The unit gives priority to the latter. If
insert a disc into the disc slot (5) while
read the USB driver, the unit will play the
disc. Press < (24) button to enter into
PRE-STOP mode, then press GOTO
button (25) to switch to the reading USB
mode.
Note:
When reading the USB device, please
don't touch or take out the device.
If following the instruction above, the unit
14
This disc player offers you the option of
using the auxiliary A/V input jack (43) to
connect a video game, digital camera /
camcorder or other units you wish to use
in your mobile audio / video system.
1 ) . To connect with a mobile audio/video
system by AV IN cable .
2 ) . Press the MODE button (6) to switch
to the AV IN mode on or off.
Setup
and AUTO. The default setting is NTSC
format.
In DVD mode, when the disc is playing or
in stop mode, press SETUP button (32) to
enter setup menu.
1. When the cursor is on the topside, use
◄/► buttons to move between the
different pages.
2. Press ▼ button to move the cursor to
the setup page below and then you can
use ▲/▼ buttons to move between the
different setup options.
3. Press ► or ENTER button to move to
the choice list of each setup option , and
then use ▲/▼ buttons and ENTER button
to change your selection.
4. When the setting is complete, press
SETUP button (32) to return to normal
mode.
* When settings are changed, old settings
are overwritten. Make a note of the
current settings before making changes.
If the vehicles battery is disconnected,
the settings will be cleared and will return
to the factory settings.
System Setup
When you open the setup menu, you will
see the system setup page at first, see
below:
SYSTEM SETUP
TV SYSTEM
SCREEN SAVER
TV TYPE
PASSWORD
RATING
DEFAULT
SCREEN SAVER
Change the SCREEN SAVER on or off.
SETTING the TV TYPE
Use the procedure described below to set
the output screen according to the type of
TV monitor being used.
Setting contents: 4:3PS /4:3LB /16:9.
For some discs, the picture may not be
set to the selected screen size. (For
details, refer to the explanation on the
disc's jacket.)
4:3 PS (PAN SCAN)
Select this when connected to a
conventional 4:3size monitor. The picture
will fill the entire TV screen. However,
due to the mismatch in aspect ratio, parts
of the movie at the extreme left and right
sides will not be visible (when playing a
16:9 size movie).
This is selected upon shipment from the
factory.
4:3 (LETTER BOX)
Select this when connected to a
conventional 4:3 size (normal TV aspect
ratio) monitor. There may be black bands
visible at the top and bottom of the
screen (when playing a 16:9 size movie).
The width of these stripes will depend
upon the original aspect ratio of the
theatre release of the movie.
EXIT SETUP
TV SYSTEM
TV SYSTEM is used to select the TV
output mode. This player can play discs
recorded in either PAL or NTSC formats.
Select NTSC format, when the unit is
connected to NTSC TV.
Select PAL format, when the unit is
connected to PAL TV.
Select AUTO format, the player TV output
Change the TV mode among NTSC, PAL
16:9
Select this when connected to a wide
screen TV.
15
Password
Change the password locking or unlocking . I nputting numbers are dispalyed as
"XXXX". T he default password is “0000”.
Parental Control
Use this function to restrict the viewing of
movies to children of appropriate age
levels only.
1) Press ▲/▼ button to select
“ PASSWORD ” then press ENTER button.
2) The password input mode is activate.
Use the numeric keypad “0” to “9” to input
the 4-digit password, and then press
ENTER button. The default password is
“0000” upon shipment from the factory.
3) Press ▲/▼ button to select “ RATING ”
then press ENTER button. The restriction level (parental level) input display
appears .
4) Press ▲/▼ button to select the restriction level (1 to 8), and then press ENTER
button.
5) When the setting is complete, press
SETUP button to return to normal mode.
Audio Setup
When you open the AUDIO menu, you will
see the following picture:
AUDIO SETUP
AUDIO OUT
KEY
EXIT SETUP
1) AUDIO OUT: Change among
SPDIF/OFF, SPDIF/RAW and
SPDIF/PCM.
2) KEY: Change among b,-4, -2, 0, +2,
+4, #.
Digital Setup
When you open the DIGITAL SETUP
menu, you will see the DIGITAL SETUP
page:
DIGITAL SETUP
OP MODE
DYNAMIC RANGE
DUAL MONO
EXIT SETUP
DEFAULT
Restore the system setup to the default
setup.
Language Setup
When you open the language setup
menu, you will see the language setup
page:
LANGUAGE SETUP
OSD LANGUAGE
AUDIO LANG
SUBTITLE LANG
MENU LANG
DIVX [R] VOD
EXIT
You can change the OSD/ AUDIO/
SUBTITLE/ MENU language:
ENGLISH/GERMAN/SPANISH/FRENCH/PORTU
GUESE/ITALIAN/RUSSIAN/POLISH
16
1). OP MODE: Change among LINE
OUT/RF REMOD.
- LINE OUT: LINE OUT mode, with
digital dialog normalization.
- RF REMOD: RF REMODULATION
mode, with heavy compression and
digital dialog normalization.
2). DYNAMIC RANGE: Change among
FULL, 6/8, 4/8, 2/8, OFF.
3). DUAL MONO: Change among
STEREO, MONO L, MONO R, MIX
MONO.
Specification
Troubleshooting
1. GENERAL
Power Supply Requirements
DC 12 Volts, Negative Ground
Chassis Dimensions
178(W)x160(D)x 50(H)
Tone Controls
- Bass (at 100 Hz)
- Treble (at 10 kHz)
±10 dB
±10 dB
Maximum Output Power
4x60 watts
Current Drain
15 Ampere (max.)
2. DVD PLAYER
Signal to Noise Ratio
> 55 dB
Channel Separation
> 40 dB
Frequency Response
20Hz - 20 KHz
3. RADIO
FM
Frequency Coverage
FM: 87.5 - 107.9 MHz
IF
If it appears that your DVD unit is faulty,
first consult this checklist. It may be that
something simple has been overlooked.
Under no circumstances should you try to
repair the player yourself, as this will
invalidate the warranty. Only qualified
service personnel can remove the cover
or service this player.
No Power
< If the power supply is connected to the
car accessory circuits, but the engine is
not moving, switch the ignition key to
“ACC”.
< Check if the fuse is blown. Then
replace the new fuse.
< Check if the on/off button on the front
of the player is set to on.
No Picture
< Check if the monitor or TV is switched
on.
< Check if select proper mode, such as
Disc Play mode and AV mode.
< Check the video connection.
Distorted Picture
< Check the disc for fingerprints and
clean with soft cloth, wiping from centre
to edge.
< Sometimes a small amount of picture
distortion may appear. This is not a
malfunction.
10.7 MHz
Sensitivity (S/N=30dB)
4μV
Stereo Separation
>25dB
AM
Frequency Coverage
530 - 1710 KHz
IF
450 KHz
Completely Distorted Picture
< The disc format is not according to the
TV-set used (PAL/NTSC).
No Color in Picture
< The disc format is not according to the
TV-set used (PAL/NTSC).
Disc Does Not Play
< Ensure the disc label is upwards.
< Clean the disc.
< Check if the disc is defective by trying
another disc.
17
No Sound
< Check audio connections.
< If using a HIFI amplifier, try another
sound source.
Distorted Sound from HIFI Amplifier
< Check to make sure that no audio
connections are made to the amplifier
phono input.
The Player Does Not Respond To the
Remote Control
< Aim the remote control directly at the
sensor on the front of the player.
< Avoid all obstacles which may interfere
with the signal path.
< Inspect or replace the remote control
battery.
Distorted or B/W Picture
< The disc format is not according to the
TV-set used (PAL/NTSC).
No Audio at Digital Output
< Check the digital connections
< Check the Digital Audio menu to make
sure that the digital output is correctly
set.
< Check if the audio format of the
selected audio language matches your
receiver's capabilities.
Buttons Do Not Work
< Press Reset button on the housing of
the DVD unit.
The Radio Does Not Work
< Check if the antenna cable is
connected firmly.
The Radio Station Automatic Selection
Does Not Work
< If the signals are too weak, select a
station manually.
18