1
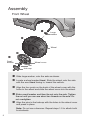
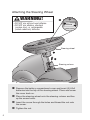
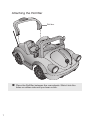
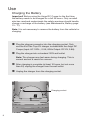
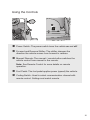
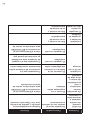
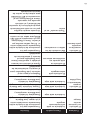
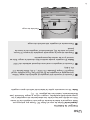
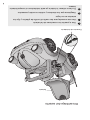
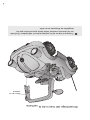
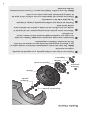
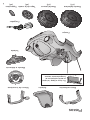
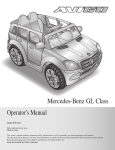
RC Coupe
Model Number: KT1075TR
Owner’s Manual
The Owner’s manual contains assembly, use and maintenance
instructions. The Avigo RC Coupe must be assembled by an
adult who has read and understands the instructions in this
manual. Keep the packaging away from children and dispose all
packaging before use. Keep instructions for future reference.
©2008 Pacific Cycle Inc.
4902 Hammersley Rd.
Madison, WI 53711
United States of America
Phone: (877) 741-6154
www.kidtraxtoys.com
Styles and Colors may vary
Made in China
Thank You
Thank you for purchasing the Avigo RC Coupe.
With the Avigo RC Coupe your child will have fun and
enjoyment for years to come. Some of the features
on the Avigo RC Coupe include: manual operation,
4-direction remote control (with parental password
control), a forward and reverse shifter, and a steering
wheel with music and sound.
Please call us at Kid Trax Toys Consumer Relations at
877-741-6154 with comments or questions.
Contents
Safety . . . . . . . . . . . . . . . . . . . . . . . . . . . . . . . . . . . 1
Parts . . . . . . . . . . . . . . . . . . . . . . . . . . . . . . . . . . . . 2
Assembly . . . . . . . . . . . . . . . . . . . . . . . . . . . . . . . . . 3
Front Wheel . . . . . . . . . . . . . . . . . . . . . . . . . . . . . . . . . 3
Rear Wheel . . . . . . . . . . . . . . . . . . . . . . . . . . . . . . . . . 4
Attaching the Steering Wheel . . . . . . . . . . . . . . . . . . . 5
Attaching the Window Frame . . . . . . . . . . . . . . . . . . . . 6
Attaching the Roll Bar . . . . . . . . . . . . . . . . . . . . . . . . . 7
Attaching the Seat . . . . . . . . . . . . . . . . . . . . . . . . . . . . 8
Use . . . . . . . . . . . . . . . . . . . . . . . . . . . . . . . . . . . . . 9
Charging the Battery . . . . . . . . . . . . . . . . . . . . . . . . . . 9
Using the Controls . . . . . . . . . . . . . . . . . . . . . . . . . . . . 10
User Requirements . . . . . . . . . . . . . . . . . . . . . . . . . . . 11
Operating the Vehicle . . . . . . . . . . . . . . . . . . . . . . . . . . 11
Manual Operation . . . . . . . . . . . . . . . . . . . . . . . . . . . . . . . . 11
Remote Operation . . . . . . . . . . . . . . . . . . . . . . . . . . . . . . . 12
Maintenance . . . . . . . . . . . . . . . . . . . . . . . . . . . . . . 13
General . . . . . . . . . . . . . . . . . . . . . . . . . . . . . . . . . . . . . 13
Battery . . . . . . . . . . . . . . . . . . . . . . . . . . . . . . . . . . . . . 13
Re-Charge Interval and Time . . . . . . . . . . . . . . . . . . . . . . . 15
Battery Storage . . . . . . . . . . . . . . . . . . . . . . . . . . . . . . . . . 15
Battery Replacement and Disposal . . . . . . . . . . . . . . . . . . 16
Battery Fuse . . . . . . . . . . . . . . . . . . . . . . . . . . . . . . . . . . . . 17
Reset the Remote Password . . . . . . . . . . . . . . . . . . . . . . . 17
Troubleshooting Guide . . . . . . . . . . . . . . . . . . . . . 18
Services, Repairs and Parts . . . . . . . . . . . . . . . . . 21
FCC Information . . . . . . . . . . . . . . . . . . . . . . . . . . 22
Safety
WARNING!
The following safety hazards may result in serious injury or death
to the user of the Avigo RC Coupe:
• This product contains small parts that are for adult assembly
only. Keep small children away when assembling. Remove
and dispose of all protective material and poly bags before
assembly. Be sure to remove all packaging materials and
parts from underneath the car body.
• Riding the vehicle without a helmet. Riders must always wear a fitted helmet that complies with U.S. Consumer Product
Safety Commission (CPSC) Standard CFR 1203.
• Body parts such as hands, legs, hair and clothing can get
caught in moving parts. Never place a body part near a
moving part or wear loose clothing while using the vehicle.
Always wear shoes when using the vehicle.
• Using the vehicle near streets, motor vehicles, drop-offs such
as: steps, water (swimming pools) or other bodies of water,
sloped surfaces, hills, wet areas, flammable vapors, in alleys,
at night or in the dark could result in an unexpected accident.
Always use the vehicle in a safe, secure environment with
continuous adult supervision.
• Using the vehicle in unsafe conditions such as snow, rain,
loose dirt, mud, sand or fine gravel may result in unexpected
action such as tip over and skidding.
• Using the vehicle in an unsafe manner. Examples include but
are not limited to:
a. Pulling the vehicle with another vehicle or similar device
b. Allowing more than one rider
c. Pushing the user from the back
d. Traveling at an unsafe speed
Always use common sense and safe practices when using the
vehicle.
1
Parts
Seat
Roll Bar
Window frame
Please note: Battery is
already installed in sealed
rear compartment.
Battery
Steering wheel
Remote Controller
Body
Charger
Front wheel
(x2)
Rear wheel
(x2)
Wheel cover
(x4)
Hub caps
(x4)
2
Assembly
Front Wheel
1
Large
washer
2
Wheel
3
4
Small
washer
Wheel cover
Nut
5
Hub cap
1 Slide large washer, onto the axle as shown.
2 Locate a wheel marked front. Slide the wheel onto the axle with the word front facing in, toward the vehicle.
3
Align the four posts on the back of the wheel cover with the
holes in the wheel and slide the wheel cover into the wheel.
4 Slide a small washer and then the nut onto the axle. Tighten
the nut until you can see about two threads on the axle. Do
not overtighten.
5 Align the pins in the hubcap with the holes in the wheel cover
and press in place
3
Note: Do not use a hammer. Repeat steps 1-5 to attach both
front wheels.
Rear Wheel
Large spacer
2
1
Large
washer
3
Wheel
4
Small
washer
5
Nut
Hub cap
Wheel cover
1 Slide a large washer and large spacer onto the axle as shown.
Note: On the motor side simply slide the wheel onto the axle
and align the gear so it fits into the pocket. No washer or
spacer is needed.
2 Locate a wheel marked rear. Slide the wheel onto the axle with the word rear facing in, toward the vehicle.
3
Align the four posts on the back of the wheel cover with the
holes in the wheel and slide the wheel cover into the wheel.
4 Slide a small washer and then the nut onto the axle. Tighten
the nut until you can see about two threads on the axle. Do
not overtighten.
5Align the pins in the hubcap with the holes in the wheel cover
and press in place
Note: Do not use a hammer. Repeat steps 1-5 to attach both
rear wheels.
4
Attaching the Steering Wheel
WARNING!
1
• DO NOT mix old and new batteries.
• DO NOT mix alkaline, standard
(carbon-zinc), or rechargeable
(nickel-cadmium) batteries.
Steering wheel
Steering column
1 Remove the battery compartment cover and insert (2) AAA
batteries into the top of the steering wheel. Place and screw
the cover back on.
2 Place the steering wheel onto the steering column and line
up the screw holes.
3 Insert the screw through the holes and thread the nut onto
the screw.
3 Tighten the nut.
5
Attaching the Window Frame
Window
frame
1 Place the window frame over the dashboard. Slide it into the
slots on both sides until you hear the tabs lock into place.
6
Attaching the Roll Bar
Roll bar
1 Place the Roll Bar between the rear wheels. Slide it into the
holes on either side until you hear a click.
7
Attaching the Seat
Seat
Battery connector
1
Snap battery connector together.
2
Use a coin and turn the plastic screw to lock the seats in place.
3
4
Please note: Battery is already installed in sealed rear compartment.
8
Use
Charging the Battery
Important! Before using the Avigo RC Coupe for the first time
the battery needs to be charged for a full 24 hours. Only an adult
who has read and understands the safety warnings should handle,
charge or recharge of the battery (see Maintenance, Battery page
13 - 17).
Note: It is not necessary to remove the battery from the vehicle for
charging.
1 Plug the charger connector into the charging socket. Only
use the Kid Trax Toys 6V charger included with the Avigo RC
Coupe (Input: AC 120V–, 0.5A, 60Hz Output: DC 6V, 0.8A).
2 Plug the charger into a standard 120V wall outlet.
Note: The charger may feel warm during charging. This is
normal and not a cause for concern.
3 After charging is complete (at least 16 hours, but not more
than 30) unplug the charger from the wall outlet.
4 Unplug the charger from the charging socket.
1
Charging socket
9
Using the Controls
3
5
1
2
4
1 Power Switch: The power switch turns the vehicle on and off.
2 Forward and Reverse Shifter: The shifter changes the
direction the vehicle moves from forward to reverse.
3 Manual/ Remote: The manual / remote button switches the
vehicle control from manual to the remote.
Note: See Remote Control for more details on remote
operation.
4 Foot Pedal: The foot pedal applies power (speed) the vehicle.
5 Coding Switch: Used to select communication channel with
remote control. Setting must match remote.
10
User Requirements
The suitable age range for a child using the Avigo RC Coupe is
between 2 and max. 6 years old. The maximum weight of the child is
60 lbs (27kg).
Before using the Avigo RC Coupe the child should understand the
vehicle controls and safety issues. They must also demonstrate the
capability to handle the vehicle and operate its controls. It is the
responsibility of the adult to educate the child and supervise the
vehicles use.
Here are basic safe riding rules you should read aloud to your child
and playmates:
• Only use the vehicle when an adult is present to watch (supervise)
• Always sit in the seat when using the vehicle
• Keep your hands, hair and clothes away from moving parts
• Only one rider is allowed at a time
• Friends under 2 years old cannot use the vehicle
• Only drive on level ground. Don’t go near water, drop-offs or up and
down steep slopes.
• Don’t drive the vehicle into loose dirt, mud, sand or fine gravel.
• Do not drive the vehicle on streets or near cars.
Operating the Vehicle
Manual Operation
1 Child must be seated securely.
2 Turn the power switch On.
3 Set the forward/reverse shifter to the desired direction.
Important! The vehicle must be completely stopped when
shifting from forward to reverse or visa-versa. Failure to do so
may damage the gears and motor.
4 Press on the foot pedal to apply power (speed) to the vehicle
11
Important! Removing foot from foot pedal will stop the vehicle.
Note: To save battery life the vehicle has an auto shut off feature
after one minute on the remote control and 10 minutes on the car.
Remote Operation
Remote Control should only be used by an adult who
has read and understands the instructions of this manual.
1
On the vehicle, switch the manual/remote switch to remote.
2
Turn the vehicle power switch On.
Remote Control Buttons
A
B
C
E
3
4
5
D
A
B
C
D
E
F
Forward/Reverse
Left/Right
Emergency stop
Enter key (E)
Password keys (1-4)
On/Off switch
F
Turn the remote power switch on (the Power LED should be red)
Move the vehicle coding switch (located in the battery
compartment) the so it matches the coding switch on the remote
control.
Enter the password for the remote (default password is 1234).
The Setting LED should light up according to each press of the
numeric keys.
Note: to reset the password, see Maintenance: Reset the
Remote Password See page 17.
6
Press the Enter (E) key to confirm the password. The Setting
LED will stay green if the password is entered correctly,
otherwise it will be flashing red. Repeat steps 5 & 6 if necessary.
Remote will power Off after 1 minute of idle use. Turn the remote
Off and On again to format.
7
Test the connection from the remote to the vehicle, see
Troubleshooting for problem resolution.
8
9
Operate the vehicle.
If necessary, press “C” button to activate the emergency stop.
Then turn the remote Off and On again to operate. The 4 digit
code must be re-entered.
12
Maintenance
General
The vehicle should be checked for damage, missing or badly worn
parts before each use.
• Check the tightness of the fasteners before each use.
• Check the tightness of the screw nuts. Use a flat head screwdriver
to gently pry off the hubcap.
Note: If the screw nuts are not tight, the wheels will not engage the forward gears and the vehicle will not run.
• Ensure the battery bracket is securely in place before use
• Occasionally use lightweight oil to lubricate moving parts such
as wheels and steering linkage. Do not use oil on plastic or nylon
parts. No lubrication is required.
• Store the vehicle indoors or cover it with a tarp to protect it from
the wet weather. Keep it away from sources of heat, such as
stoves and heaters.
• Clean the vehicle with a soft, dry cloth. To restore shine to
plastic parts, use a non-wax furniture polish. Do not use car wax,
abrasive cleaners or wash the vehicle with soap and water. Water
will damage the motor, electrical system and battery.
• Kid Trax Toys recommends that you take the vehicle to an
authorized service center for periodic maintenance and service.
Call Kid Trax Toys Consumer Relations at 877-741-6154 for an
authorized service center.
Battery
Only an adult who has read and understands the safety warnings
should handle, charge or recharge of the battery. Failure to comply
with the following safety warnings may result in serious injury or
death.
WARNING!
• DO NOT mix old and new batteries.
• DO NOT mix alkaline, standard
(carbon-zinc), or rechargeable
(nickel-cadmium) batteries.
13
WARNING!
The following safety hazards may result in serious injury or
death to the user of the Avigo RC Coupe:
• Use of a battery or charger other than the supplied Kid
Trax Toys 6V rechargeable battery and charger may cause
a fire or explosion. Only use the supplied Kid Trax Toys 6V
rechargeable battery and charger with the vehicle.
• Using the Kid Trax Toys 6V rechargeable battery and
charger for any other product may result in overheating, fire
or explosion. Never use the Kid Trax Toys 6V rechargeable
battery and charger with another product.
• Explosive gases are created during charging. Charge the
battery in a well ventilated area. Do not charge the battery
near heat or flammable materials.
• Contact between the positive and negative terminals may
result in fire or explosion. Avoid direct contact between the
terminals. Picking up the battery by the wires or charger can
cause damage to the battery and may result in a fire. Always
pick up the battery by it’s case or handles.
• Liquids on the battery may cause fire or electric shock.
Always keep all liquids away from the battery and keep the
battery dry.
• Contact or exposure to battery leakage (lead acid) may cause
serious injury. If contact or exposure occurs immediately call
your physician. If the chemical is on the skin or in the eyes,
flush with cool water for 15 minutes. If the chemical was
swallowed, immediately give the person water or milk. Do not
give water or milk if the patient is vomiting or has a decreased
level of alertness. Do not induce vomiting.
14
WARNING! (cont’d)
The following safety hazards may result in serious injury or death
to the user of the Avigo RC Coupe:
• Battery posts, terminals and related accessories contain lead
and lead compounds (acid), chemicals known to the State of
California to cause cancer, reproductive harm and are toxic
and corrosive. Never open the battery.
• Tampering or modifying the electric circuit system may cause
a shock, fire or explosion and permanently damage the
system. Exposed wiring, circuitry in the charger may cause
electric shock. Always keep the charger housing closed.
Re-Charge Interval and Time
Important!
• Damage to the battery may occur if it is allowed to drain
completely. Do not allow the battery to drain completely.
• Check the battery and charger (supply chord, connector) for wear
and damage before charging. Do not charge the battery if damage
has occurred. Only replace with a Kid Trax Toys 6V rechargeable
battery and charger.
The battery should be charged after each use, or if not used
regularly, once a month at a minimum. Charge the battery for a full
16 hours. Do not charge the battery for more than 30 hours. Failure
to charge the battery as directed would cause permanent damage to
the battery and void the warranty.
Battery Storage
Do not leave the battery connected in the vehicle for long period of
times while not being used. This may drain the battery completely
and cause permanent damage. Disconnect the battery connectors
from the battery when the vehicle is not going to be used for a long
period of time.
It is best to leave the battery in the battery compartment when the
vehicle is being stored for long periods. Follow these guidelines if the
battery is removed:
15
• Store the battery where temperatures are between -10° F (-24° C
and 75° F (24° C).
• Store the battery on a wood surface. Do not place the battery
on cement floors for extended periods. This will result in battery
discharge.
• Wipe the battery clean with a dry cloth prior to storage.
• Charge the battery once every month for 16 hours.
Battery Replacement and Disposal
The Kids Trax Toys 6V battery will eventually lose the ability to hold
a charge. Depending on the amount of use, and varying conditions,
the battery should operate for one to three years.
Follow these steps to replace and dispose the battery:
1
2Remove screws at bottom of the rear cover. Remove cover.
3Disconnect the battery connectors.
4Remove the battery bracket.
5Carefully lift the battery.
• Depending on the condition of the battery (i.e.: leakage) you
may want to wear protective gloves before removal.
• Do not lift the battery by its connectors or cables.
6Place the dead battery in a plastic bag.
Important! Recycle the dead battery responsibly. The battery contains lead acid (electrolyte) and must be disposed of properly and legally. It is illegal in most areas to incinerate lead acid batteries or dispose of them in landfills. Take it to a federal or state-approved lead acid battery recycler, such as a Kid Trax Toys authorized service center or your local automotive battery retailer. Do not throw the battery away with your regular household trash!
7Replace the battery with a Kid Trax Toys 6V battery and reconnect
the connectors.
8Replace the metal battery bracket.
9Replace the rear cover.
bkReplace the seat.
16
Battery Fuse
The Kid Trax Toys 6V battery features a thermal fuse with a reset
fuse on the circuit board that will automatically trip and cut all power
to the vehicle if the motor, electric system or battery is overloaded.
The fuse will reset and power will be restored after the unit is
turned Off and turned On again. If the thermal fuse trips repeatedly
during normal use, the vehicle may need repair. Call Kid Trax Toys
Consumer Relations at 877-741-6154 for an authorized service
center.
To avoid losing power, follow these guidelines:
• Do not overload the vehicle.
• Do not tow anything behind the vehicle.
• Do not drive up steep slopes.
• Do not drive into fixed objects, which may cause the wheels to
spin, causing the motor to overheat.
• Do not drive in very hot weather; components may overheat.
• Do not allow water or other liquids to come in contact with the
battery or other electric components.
• Do not tamper with the electric system. Doing so may create a
short, causing the fuse to trip.
Reset the Remote Password
Follow these steps if you need to change reset the password:
1Open the battery compartment in the remote. Turn the remote On
position.
2Press and hold the reset button for 3 seconds (the Setting LED
will flash green).
3Press the Enter key (the Setting LED will be constant green for 3
seconds, then flash).
4Press the numeric keypads to enter the new password. The green
light must flash to confirm the number pushed.
5Press the Enter key to confirm.
6Password should be reset and the Setting LED should be
constant green. The assigned password will not be affected when
changing batteries.
17
Troubleshooting Guide
The following are examples of potential problems. Completely read
through this manual and the troubleshooting guide table before
calling Kid Trax Toys Consumer Relations. If you still need help
resolving the problem please call 877-741-6154.
Kid Trax Toys recommends that you take the vehicle to an
authorized service center for periodic maintenance and service.
Call the number listed above for the closest center to you.
Problem
Possible Cause
Vehicle does not run Battery low on
power
Thermal fuse has
tripped
Snap pins are loose
Remedy
Recharge battery (see
Battery: Recharge
Interval and Time)
Reset fuse (see
Maintenance: General)
Tighten snap pins (see
Maintenance: General)
Battery connector or Check that the battery
wires are loose
connectors are firmly
plugged into each other.
If wires are loose around
the motor call Consumer
Relations at 877-7416154 for an authorized
service center
Battery is dead
Electrical system is
damaged
Motor is damaged
Replace battery (see
Battery: Replacement
and Disposal)
Call Consumer Relations
at 877-741-6154 for an
authorized service center
Call Consumer Relations
at 877-741-6154 for an
authorized service center
18
Problem
Vehicle does not
run very long
Possible Cause
Battery is under
charged
Battery is old
Vehicle runs
sluggishly or
beeping occurs
Battery low on
power
Battery is old
Vehicle is
overloaded
Vehicle is being
used in harsh
conditions
Vehicle needs a
push to go forward
Poor contact of
wires or connectors
“Dead Spot” on
motor
19
Remedy
Check that the battery
connectors are firmly
plugged into each other
when recharging (see
Battery: Recharge Interval
and Time)
Replace battery (see
Battery: Replacement and
Disposal)
Recharge battery (see
Battery: Recharge Interval
and Time)
Replace battery (see
Battery: Replacement and
Disposal
Reduce weight on vehicle
(see User Requirements
and Safety Warnings)
Operate the vehicle level
ground and firm surfaces
(see User Requirements
and Safety Warnings)
Check that battery
connectors are firmly
plugged into each other.
If wires are loose around
the motor call Consumer
Relations at 877-7416154 for an authorized
service center
A dead spot means
the electric power is not
being delivered to the
terminal connection and
the vehicle needs repair.
Call Consumer Relations
at 877-741-6154 for an
authorized service center
Problem
Possible Cause
Remedy
Difficult shifting
from forward to
reverse or visaversa
Attempting to shift
while the vehicle is
in motion
Completely stop the
vehicle and shift (see Use:
Manual Operation)
Motor or gears are
damaged
Call Consumer Relations
at 877-741-6154 for an
authorized service center
6V Battery will not
recharge
Battery connector or Check that battery
adapter connector is connectors are firmly
loose
plugged into each other
Loud grinding or
clicking noises
coming from motor
or gear box
Charger not
plugged in
Charger is not
working
Battery bubbles
or gurgles when
charging
Charger feels warm
when recharging
This is normal and
not a cause for
concern
Check that battery
charger is plugged into a
working wall outlet
Call Consumer Relations
at 877-741-6154 for an
authorized service center
This is normal and
not a cause for
concern
20
Services, Repairs and Parts
Do not return this product to the place of purchase. If your Avigo RC
Coupe needs service, repairs or replacement parts, call:
Kid Trax Toys Consumer Relations
Hours: 8:00am – 5:00pm (CST) Monday - Friday
Phone: 877-741-6154
Email: [email protected]
Web: www.kidtraxtoys.com
For service and repairs you will be directed to an authorized service
center. To order parts have the model and serial number, found
underneath the vehicle body and a brief description of the part.
The following is a list of available replacement parts:
• Front wheel
• Rear wheel
• Wheel cover
• Hub caps
• Hardware bag for wheel assembly
• Hardware bag for dash and steering column
• Seat
• 6-volt battery
• Charger
• Mirrors
• Steering Wheel
• Remote Control
21
FCC Information
This device complies with part 15 of the FCC Rules. Operation
is subject to the following two conditions (1) this device may not
cause harmful interference, and (2) this device must accept any
interference received, including interference that may cause
undesired operation.
This equipment has been tested and found to comply with the limits
for a Class B digital device, pursuant to Part 15 of the FCC rules.
These limits are designed to provide reasonable protection against
harmful interference in a residential installation.
This equipment generates, uses and can radiate radio
frequency energy and, if not installed and used in accordance
with the instructions, may cause harmful interference to radio
communications. However, there is no guarantee that interference
will not occur in a particular installation. If this equipment does
cause harmful interference to radio or television reception, which
can be determined by turning the equipment off and on, the user is
encouraged to try to correct the interference by one or more of the
following measures:
• Reorient or relocate the receiving antenna.
• Increase the distance between the equipment and the receiver.
• Consult dealer or an experienced radio/TV technician for help.
Caution: Changes or modifications not expressly approved by the
party responsible for compliance could void the user's authority to
operate the equipment.
22
Warranty
One-Year Limited Warranty
Six-Month Limited Warranty on Battery
Pacific Cycle, Inc. (PC) warrants this product to the original retail
purchaser as follows:
The vehicle (except for the 6-volt battery) is warranted against
defective materials or workmanship for one year from the date of
original purchase. The 6-volt battery is warranted against defective
materials or workmanship for six months from the date of original
purchase. An original receipt is required to validate your warranty.
PC will, at its option, provide replacement parts or replace this
product. PC reserves the right to substitute if the part or model has
been discontinued.
To make a claim under this warranty you may contact us at www.
kidtraxtoys.com; fax us at 1-800-858-2800 , 24 hours a day; write to
Kid Trax Consumer Relations Department, Kid Trax Toys, P.O. Box
344 Olney, IL 62450 or call 1-877-741-6154 from 8 a.m. to 5 p.m.,
Monday through Friday, CST. Proof of purchase is required, and
shipping charges are the responsibility of the consumer.
Warranty Limitations
This warranty does not include damages which arise from accident,
misuse, abuse, neglect or other causes not arising out of defects in
materials or workmanship, nor does it cover damages arising out of
service by other than an authorized PC service center. For personal
use only. Not for commercial use. The original owner shall pay all
labor charges connected with the repair or replacement of all parts.
Under no circumstances does this limited warranty include the cost
of shipment or transportation to or from an authorized Kid Trax repair
center or Kid Trax retailer.
Limitation of Damages:
The warranty and remedies as set forth are exclusive and in lieu of
all others, oral or written, expressed or implied. In no event will PC
or the dealer selling this product be liable to you for any damages,
including incidental or consequential damages, arising out of the use
or inability to use this product. Some states do not allow limitations
as the exclusion or limitation of incidental or consequential damages,
so the above limitation may not apply to you.
23
Limitation of Warranties and Warranty Terms
Any implied warranties, including implied warranties of the
merchantability and fitness for a particular purpose, shall be limited
to the duration and terms of the express written warranty. Some
states do not allow limitations as the exclusion or limitation of
incidental or consequential damages, so the above limitation may
not apply to you. This warranty gives you specific legal rights, and
you may have other rights, which vary from state to state. Neither PC
nor the dealer selling this product authorized any person to create
for it any other warranty, obligation or liability in connection with this
product.
24
Contact Information
If you have any questions or comments please contact us at:
In U.S.A.
Pacific-Cycle Inc.
4902 Hammersly Rd.
Madison, WI 53711
Customer Service:
877-741-6154
[email protected]
www.kidtraxtoys.com
Distributed by Toys”R”US. Inc.
©2008 Geoffrey, Inc.
Distributed by Toys “R” US. Inc. Wayne, NJ 07470
Made in China
25
Información de contacto
Si tiene cualquier pregunta o comentario, comuníquese con
nosotros en:
En los EE.UU.
Pacific-Cycle Inc.
4902 Hammersly Rd.
Madison, WI 53711
Servicio al cliente:
877-741-6154
[email protected]
www.kidtraxtoys.com
Distribuido por Toys”R”US. Inc.
©2008 Geoffrey, Inc.
Distribuido por Toys ”R” US. Inc. Wayne, NJ 07470
Hecho en China
25
Limitación de daños y perjuicios
La garantía y remedios que se establecen son exclusivos y en
lugar de cualquier otro, verbal o por escrito, explícito o implícito. En
ningún caso PC o el distribuidor que venda este producto tendrán
responsabilidad legal por cualesquiera daños y perjuicios, incluidos
los incidentales o consecuenciales, que se desprendan del uso o
incapacidad de uso de este producto. Algunos estados no permiten
las limitaciones como la exclusión o la limitación de los daños y
perjuicios incidentales o consecuenciales, de modo que es posible
que la limitación antes señalada no se le aplique a usted.
Limitación de garantías y términos de la garantía
Cualquier garantía implícita, incluidas las garantías implícitas de
comerciabilidad y adaptabilidad para un propósito en particular, se
limitarán a la duración y términos de la garantía escrita explícita.
Algunos estados no permiten las limitaciones como la exclusión o
limitación de los daños y perjuicios incidentales o consecuenciales,
de modo que es posible que la limitación antes señalada no se le
aplique a usted. Esta garantía le otorga derechos legales concretos,
y es posible que tenga también otros derechos que varían según el
estado. Ni PC ni el distribuidor que vende este producto autorizan a
ninguna persona a crear para él ninguna otra garantía, obligación o
responsabilidad legal relacionadas con este producto.
24
Garantía
Garantía limitada de un año
Garantía limitada de seis meses por la batería
Pacific Cycle, Inc. (PC) garantiza este producto al comprador
original al menudeo de la siguiente manera:
El vehículo (excepto la batería de 6 voltios) está garantizado contra
materiales o mano de obra defectuosos durante un año desde la
fecha de la compra original. La batería de 6 voltios está garantizada
contra materiales o mano de obra defectuosos durante seis meses
desde la fecha de la compra original. Se requiere un recibo original
para validar su garantía.
A su discreción, PC proporcionará piezas de recambio o
reemplazará este producto. PC se reserva el derecho de hacer una
sustitución si se han descontinuado la pieza o el modelo.
Para presentar una reclamación de conformidad con esta garantía,
puede comunicarse con nosotros a www.kidtraxtoys.com; envíenos
un fax al 1-800-858-2800, 24 horas al día; escriba a Departamento
de relaciones con el consumidor de Kid Trax, Kid Trax Toys, P.O.
Box 344 Olney, IL 62450 o llame al 1-877-741-6154 de 8 a.m. a
5:00 p.m., de lunes a viernes, CST. Se requiere prueba de la
compra y los cargos de transportación son responsabilidad del
consumidor.
Limitaciones a la garantía
Esta garantía no incluye daños y perjuicios que se deriven de un
accidente, mal uso, maltrato, negligencia u otras causas que no se
desprendan de defectos de los materiales o la mano de obra, ni
cubre los daños y perjuicios que resulten de servicio proporcionado
por alguien que no sea un centro de servicio de PC autorizado.
Sólo para uso personal. No para uso comercial. El propietario
original pagará todos los cargos de mano de obra relacionados
con la reparación o reemplazo de cualquier pieza. Esta garantía
limitada no incluye, bajo ninguna circunstancia, el costo del envío o
transporte hacia o desde un centro de reparaciones autorizado de
Kid Trax o un detallista de Kid Trax.
23
Información de la FCC
Este dispositivo cumple con el Artículo 15 de las reglas de la FCC.
El funcionamiento está sujeto a las dos condiciones siguientes: (1)
este dispositivo no puede causar interferencia dañina, y (2) este
dispositivo debe aceptar cualquier interferencia que reciba, incluida
la interferencia que pueda ocasionar un funcionamiento no deseado.
Este equipo se ha probado y se ha determinado que cumple con los
límites de un dispositivo digital de Clase B, de conformidad con el
Artículo 15 de las reglas de la FCC. Estos límites están diseñados
para proporcionar una protección razonable contra la interferencia
dañina en una instalación residencial.
Este equipo genera, usa y puede emitir energía de radiofrecuencia
y, si no se instala y utiliza de acuerdo con las instrucciones,
puede causar interferencia dañina a las radiocomunicaciones. No
obstante, no hay garantía de que no ocurra interferencia en una
instalación determinada. Si este equipo causa interferencia dañina
a la recepción de radio o televisión, lo cual puede determinarse
encendiendo y apagando el equipo, se recomienda al usuario que
intente corregir la interferencia con una o más de las medidas
siguientes:
• Reorientar o reubicar la antena receptora.
• Aumentar la distancia entre el equipo y el receptor.
• Consulte con el distribuidor o con un técnico con experiencia en
radio y televisión para obtener asistencia.
Precaución: cambios o modificaciones que no sea expresamente
aprobados por la parte responsable de conformidad podrían anular
la autoridad del usuario para operar el equipo.
22
Servicios, reparaciones y piezas
No devuelva este producto al lugar de compra. Si su Avigo RC
Coupe necesita servicio, reparaciones o piezas de reemplazo,
llame a:
Relaciones con el consumidor de Kid Trax Toys
Horario: de 8:00 a.m. a 5:00 p.m. (CST), de lunes a viernes
Teléfono: 877-741-6154
Correo electrónico: [email protected]
Web: www.kidtraxtoys.com
Para obtener servicio y reparaciones, se le dirigirá a un centro de
servicio autorizado. Para ordenar piezas, tenga a mano el modelo y
número de serie, que se encuentran debajo del cuerpo del vehículo,
y una breve descripción de la pieza. La siguiente es una lista de las
piezas de recambio disponibles:
• Rueda delantera
• Rueda trasera
• Tapa de la rueda
• Tapacubos
• Bolsa de accesorios para el ensamblaje de las ruedas
• Bolsa de accesorios para el salpicadero y columna de la dirección
• Asiento
• Batería de 6 voltios
• Cargador
• Espejos
• Volante de dirección
• Mando a distancia
21
Problema
Causa posible
Solución
Es difícil
Se intentó hacer el
Detenga completamente el
cambiar
cambio con el vehículo vehículo y cambie de marcha
de marcha
en movimiento
(vea Uso: Operación manual)
adelante a
marcha atrás
o viceversa
El conector de la
batería o el conector
del adaptador están
sueltos
La batería
de 6V no se
recarga
El motor o los
engranajes están
dañados
Se escuchan
fuertes
rechinidos
o clics
provenientes
del motor o
de la caja de
cambios
El cargador no está
enchufado
El cargador no está
funcionando
La batería
burbujea o
gorgotea al
cargarse
Esto es normal y
no es causa de
preocupación
Llame a Relaciones con el
consumidor al 877-741-6154
para saber de un centro de
servicio autorizado
Compruebe que los
conectores de la batería estén
firmemente conectados entre
sí
Compruebe que el cargador
de la batería esté enchufado
en una toma de pared que
funcione
Llame a Relaciones con el
consumidor al 877-741-6154
para saber de un centro de
servicio autorizado
El cargador
Esto es normal y
se siente
no es causa de
tibio al cargar preocupación
20
La batería no está
suficientemente
cargada
El vehículo
no funciona
mucho
tiempo
Causa posible
Problema
El vehículo
avanza
lentamente o
hay pitidos
El vehículo
necesita un
empujón
para avanzar
Solución
Compruebe que los
conectores de la batería estén
firmemente conectados entre
sí al cargar (vea Batería:
Intervalo y tiempo de recarga)
Reemplace la batería
(vea Batería: reemplazo y
disposición)
La batería está vieja
Reemplace la batería
(vea Batería: reemplazo y
disposición)
La batería está vieja
La batería está baja
de potencia
Cargue la batería (vea Batería:
Intervalo y tiempo de recarga)
Compruebe que los
conectores de la batería estén
firmemente conectados entre
sí. Si hay cables sueltos por
el motor, llame a Relaciones
con el consumidor al 877-7416154 para saber de un centro
de servicio autorizado
Mal contacto de los
cables o conectores
Opere el vehículo en terreno
nivelado y superficies firmes
(vea Requisitos para el
usuario y advertencias de
seguridad)
El vehículo se
está usando en
condiciones adversas
Reduzca el peso en el
vehículo (vea Requisitos para
el usuario y advertencias de
seguridad)
El vehículo está
sobrecargado
“Punto muerto” en el
motor
Un punto muerto significa
que no se está suministrando
energía eléctrica a la conexión
del terminal y el vehículo
necesita ser reparado.
Llame a Relaciones con el
consumidor al 877-741-6154
para saber de un centro de
servicio autorizado
19
Guía de identificación y solución
de problemas
Los siguientes son ejemplos de posibles problemas. Lea por completo
este manual y la tabla de guía de identificación y resolución de
problemas antes de llamar a Relaciones con el consumidor de Kid Trax
Toys. Si aún necesita ayuda para resolver el problema, llame al
877-741-6154.
Kid Trax Toys recomienda que lleve el vehículo a un centro de servicio
autorizado para que le den mantenimiento y servicio periódicos. Llame
al número arriba indicado para conocer el centro más cercano a usted.
Problema
El vehículo
no funciona
Causa posible
La batería está baja
de potencia
Se ha disparado el
fusible térmico
Los pasadores de
presión están sueltos
El conector de la
batería o los cables
están sueltos
Solución
Reemplace la batería (vea
Batería: intervalo y tiempo de
recarga)
Restaurar el fusible (vea
Mantenimiento: General)
Apriete los pasadores de
presión (vea Mantenimiento:
General)
Compruebe que los conectores
de la batería estén firmemente
conectados entre sí.
Si hay cables sueltos por el
motor, llame a Relaciones con
el consumidor al 877-741-6154
para saber de un centro de
servicio autorizado
La batería está muerta Reemplace la batería
(vea Batería: reemplazo y
disposición)
El sistema eléctrico
está dañado
El motor está dañado
Llame a Relaciones con el
consumidor al 877-741-6154
para saber de un centro de
servicio autorizado
Llame a Relaciones con el
consumidor al 877-741-6154
para saber de un centro de
servicio autorizado
18
Fusible de la batería
La batería de 6V de Kid Trax Toys incluye un fusible térmico con
un fusible de restauración en la placa de circuitos que se disparará
automáticamente y cortará toda la alimentación al vehículo si se
sobrecargan el motor, el sistema eléctrico o la batería. El fusible se
restaurará y se reanudará la alimentación después de que la unidad
se apague y se vuelva a encender. Si el fusible térmico se dispara
repetidamente durante el uso normal, es posible que el vehículo necesite
reparaciones. Llame a Relaciones con el consumidor de Kid Trax Toys al
877-741-6154 para saber de un centro de servicio autorizado.
Para evitar perder potencia, siga estos lineamientos:
• No sobrecargue el vehículo
• No remolque nada detrás del vehículo
• No conduzca subiendo pendientes empinadas
• No conduzca hacia objetos fijos, lo que puede hacer que las ruedas
patinen y ocasionar que se sobrecaliente el motor.
• No conduzca en clima demasiado cálido; los componentes se pueden
sobrecalentar.
• No permita que el agua u otros líquidos entren en contacto con la
batería u otros componentes eléctricos.
• No altere el sistema eléctrico. Hacerlo puede crear un cortocircuito,
haciendo que se dispare el fusible.
Restaurar la contraseña del mando a distancia
Siga estos pasos si necesita cambiar o restaurar la contraseña:
1Abra el compartimiento de la batería en el mando a distancia.
Encienda el interruptor de alimentación poniéndolo en On.
2 Mantenga pulsado el botón de restauración durante 3 segundos
(la luz LED de ajuste destellará en verde)
3 Pulse la tecla Enter (la luz LED de ajuste se mantendrá constante
durante 3 segundos y luego destellará)
4 Pulse las teclas numéricas para introducir la nueva contraseña. La luz
verde debe destellar para confirmar el número pulsado.
5 Pulse la tecla Enter para confirmar
6 Debe restaurarse la contraseña y la luz LED de ajuste debe estar
encendida de modo constante en verde. La contraseña asignada no
se verá afectada al cambiar las baterías.
17
• Almacene la batería donde las temperaturas estén entre -10° F (-24° C) y
75° F (24° C)
• Almacene la batería sobre una superficie de madera. No coloque la batería
en suelos de cemento durante períodos prolongados. Esto descargará la
batería.
• Limpie la batería con un paño seco antes de guardarla.
• Cargue la batería una vez al mes durante 16 horas.
Reemplazo y disposición de la batería
La batería de 6V de Kids Trax Toys con el tiempo perderá la capacidad de
retener una carga. En función de la cantidad de uso y condiciones variables,
la batería debe funcionar entre uno y tres años.
Siga estos pasos para reemplazar la batería y deshacerse de ella:
1Utilice una moneda para aflojar los 2 tornillos de plástico de los asientos.
Levante los asientos y póngalos a un lado.
2 Desatornille los tornillos de la parte inferior de la tapa. Quite la cubierta
trasera.
3 Desconecte los conectores de la batería.
4 Quite la abrazadera de la batería
5 Levante la batería cuidadosamente
• No levante la batería por sus conectores o cables
• En función de las condiciones de la batería (es decir, si hay escurrimientos), es recomendable usar guantes protectores antes de quitarla
6 Coloque la batería agotada en una bolsa de plástico.
¡Importante! Recicle la batería agotada con responsabilidad. La batería
contiene plomo-ácido (electrolito) y debe disponerse de ella de modo
adecuado y legal. Es ilegal en la mayoría de las zonas incinerar baterías
de plomo ácido, o deshacerse de ellas en vertederos. Llévela a un
reciclador de baterías de plomo ácido con aprobación federal o estatal,
como un centro de servicio autorizado de Kid Trax Toys o su distribuidor
local de baterías de automóvil. ¡No tire la batería con su basura doméstica
común!
7 Reemplace la batería con una batería de 6V de Kid Trax Toys y vuelva a
conectar los conectores.
8 Reemplace la abrazadera metálica de la batería
9 Reemplace la cubierta trasera
bk Reemplace el asiento
16
¡ADVERTENCIA! (cont.)
Los siguientes riesgos de seguridad pueden dar como resultado graves
lesiones o la muerte al usuario del Avigo RC Coupe:
• Los postes de la batería, los terminales y los accesorios relacionados
con ellos contienen plomo y compuestos de plomo (ácido), sustancias
químicas que según el Estado de California causan cáncer, daños
reproductivos y son tóxicas y corrosivas. Nunca abra la batería.
• Forzar o modificar el sistema del circuito eléctrico puede ocasionar
una descarga eléctrica, un incendio o una explosión y dañar
permanentemente el sistema. Los cables pelados y los circuitos del
cargador pueden ocasionar descargas eléctricas. Mantenga siempre
cerrado el contenedor del cargador.electric shock. Always keep the
charger housing closed.
Intervalo y tiempo de recarga
¡Importante!
• Puede dañarse la batería si se le permite descargarse por completo. No
permita que la batería se descargue por completo.
• Antes de cargar, compruebe la batería y el cargador (cable de
alimentación, conector) para ver que no tenga desgaste o daños. No
cargue la batería si hay daños. Reemplácela únicamente con una batería
recargable de 6V y cargador de Kid Trax Toys.
La batería debe cargarse después de cada uso o, si no se usa regularmente,
una vez al mes como mínimo. Cargue la batería durante 16 horas completas.
No cargue la batería durante más de 30 horas. No cargar la batería según se
indica le provocará daños permanentes a la batería y anulará la garantía.
Almacenamiento de la batería
No deje la batería conectada en el vehículo durante largos períodos de tiempo
si no se usa. Esto puede descargar la batería completamente y ocasionar
daños permanentes. Desconecte los conectores de la batería cuando el
vehículo no vaya a utilizarse durante mucho tiempo.
Es mejor dejar la batería en el compartimiento cuando el vehículo se vaya a
guardar durante mucho tiempo. Siga estos lineamientos si extrae la batería:
15
¡ADVERTENCIA!
Los siguientes riesgos de seguridad pueden dar como resultado
graves lesiones o la muerte al usuario del Avigo RC Coupe:
• El uso de una batería o cargador distintos de la batería recargable
de 6V y el cargador suministrados por Kid Trax Toys puede
ocasionar un incendio o una explosión. Use únicamente la batería
recargable de 6V y el cargador suministrados por Kid Trax Toys en
el vehículo.
• El uso de la batería recargable de 6V y el cargador suministrados
por Kid Trax Toys en cualquier otro producto puede ocasionar
sobrecalentamiento, un incendio o una explosión. Nunca utilice la
batería recargable de 6V y el cargador de Kid Trax Toys en otro
producto.
• Durante la carga se crean gases explosivos. Cargue la batería
en un área bien ventilada. No cargue la batería cerca del calor o
materiales inflamables.
• El contacto entre los terminales positivo y negativo puede dar
como resultado un incendio o una explosión. Evite el contacto
directo entre los terminales. Levantar la batería por los cables o el
cargador puede ocasionarle daños a aquélla y dar como resultado
un incendio. Siempre levante la batería por su armazón o asas.
• Los líquidos sobre la batería pueden ocasionar un incendio o
descargas eléctricas. Siempre mantenga todos los líquidos lejos
de la batería y manténgala seca.
• El contacto con los derrames de la batería (plomo-ácido) o la
exposición a ellos puede ocasionar lesiones graves. Si hay contacto
o exposición, llame de inmediato a su médico. Si la sustancia
química está en la piel o en los ojos, enjuague con agua fresca
durante 15 minutos. Si se ingirió la sustancia, adminístrele de
inmediato a la persona agua o leche. No administre agua o leche si
el paciente está vomitando o tiene un nivel de alerta disminuido. No
induzca el vómito.
14
Mantenimiento
General
Antes de cada uso, debe revisarse que el vehículo no tenga daños
ni piezas faltantes o muy desgastadas.
• Antes de cada uso, compruebe que las sujeciones estén firmes.
• Compruebe que estén firmes los tuercas. Use un destornillador
de cabeza plana para quitar suavemente el tapacubos.
• Nota: Si los tuercas no están firmes, las ruedas no conectarán
con los engranajes delanteros y el vehículo no funcionará.
• Antes de usarlo, asegúrese de que la abrazadera de la batería
esté firmemente en su sitio.
• Ocasionalmente, use un aceite de peso ligero para lubricar las
piezas móviles, como las ruedas y el ensamblaje de la dirección.
No use aceite en las piezas de plástico o nailon. No necesitan
lubricación.
• Guarde el vehículo bajo techo o cúbralo con una lona para
protegerlo del clima húmedo. Manténgalo apartado de fuentes de
calor, como estufas y calentadores.
• Limpie el vehículo con un paño suave y seco. Para devolver el
brillo a las piezas de plástico, use un pulidor de muebles que no
contenga cera. No use cera para autos, ni limpiadores abrasivos,
ni lave el vehículo con jabón y agua. El agua dañará el motor, el
sistema eléctrico y la batería.
• Kid Trax Toys recomienda que lleve el vehículo a un centro de
servicio autorizado para que le den mantenimiento y servicio
periódicos. Llame a Relaciones con el consumidor de Kid
Trax Toys al 877-741-6154 para saber de un centro de servicio
autorizado.
Batería
Sólo un adulto que haya leído las advertencias de seguridad y las
comprenda debe manipular, cargar o volver a cargar la batería. No
cumplir las siguientes advertencias de seguridad puede dar como
resultado lesiones graves o la muerte.
13
Operación del mando a distancia
1 En el vehículo, cambie el interruptor manual/remoto a remoto.
2 Encienda el interruptor de alimentación del vehículo poniéndolo en On.
Botones del mando a distancia
AMarcha adelante/
A
CD
E
B
F
Marcha atrás
BIzquierda/Derecha
CParada de emergencia
DTecla Intro (E)
ETeclas de contraseña (1-4)
FInterruptor de encendido
y apagado (On-Off)
3 Encienda el interruptor de alimentación poniéndolo en on (la luz LED de
encendido debe ponerse roja)
4 Mueva el interruptor de codificación del vehículo (situado en el
compartimiento de la batería) de modo que coincida con el interruptor de
codificación del mando a distancia.
5 Introduzca la contraseña del mando a distancia (la contraseña
predeterminada es 1234).
Nota: Para restaurar la contraseña, vea Mantenimiento: Restaurar la
contraseña del mando a distancia
La luz LED de ajuste debe iluminarse con cada pulsación de las teclas
numéricas.
6 Pulse la tecla Enter (E) para confirmar la contraseña. La luz LED de ajuste
se mantendrá verde si la contraseña se introduce correctamente; en caso
contrario, destellará en rojo. Repita los pasos 5 y 6, de ser necesario. El
mando a distancia se apagará después de 1 minuto sin utilizarse. Apague
y encienda nuevamente el mando a distancia para formatear.
7 Pruebe la conexión del mando a distancia al vehículo. Vea Identificación y
resolución de problemas para resolver cualquier problema.
8 Opere el vehículo.
9 De ser necesario, pulse el botón “C” para activar la parada de emergencia.
Luego apague y encienda nuevamente el mando a distancia para operar.
El código de 4 cifras debe volver a introducirse.
12
Requisitos para el usuario
El intervalo de edad adecuado para que un niño utilice el Avigo RC Coupe se
encuentra entre 2 y, máximo, 6 años. El peso máximo del niño debe ser de
60 lb (27 kg).
Antes de usar el Avigo RC Coupe, el niño debe entender los controles
del vehículo y los temas de seguridad. También debe demostrar la
capacidad necesaria para manejar el vehículo y operar sus controles. Es
responsabilidad del adulto educar al niño y supervisar el uso del vehículo.
Aquí hay unas reglas básicas de seguridad durante la conducción que debe
leerles en voz alta a su hijo y a sus compañeros de juegos:
• Sólo pueden utilizar el vehículo cuando haya un adulto presente para
observar (supervisar)
• Siempre deben sentarse en el asiento al usar el vehículo
• Conserve las manos, cabello y ropa apartados de las piezas en
movimiento.
• Sólo se permite un pasajero a la vez.
• Los amigos de menos de 2 años de edad no pueden usar el vehículo
• Sólo conduzca en terreno nivelado. No debe acercarse al agua, caídas o
pendientes empinadas hacia arriba o hacia abajo.
• No debe conducirse el vehículo en tierra suelta, barro, arena o grava fina.
• No debe conducirse el vehículo en calles o cerca de los coches.
Operación del vehículo
Operación manual
1 El niño debe estar sentado con seguridad.
2 Encienda el interruptor de encendido poniéndolo en On.
3 Ponga la palanca de cambio de marcha adelante/atrás en la dirección
deseada.
Nota: Para ahorrar vida de la batería, el vehículo tiene una función de
apagado automático después de un minuto en el mando a distancia y 10
minutos en el auto
¡Importante! Quitar el pie del pedal detendrá el vehículo.
¡Importante! El vehículo debe estar totalmente detenido al cambiar de
marcha adelante a marcha atrás o viceversa. No hacerlo puede dañar los
engranajes y el motor.
4 Presione el pedal para aplicarle potencia (velocidad) al vehículo.
11
Uso de los controles
3
5
1
2
4
1 Interruptor de alimentación: El interruptor de alimentación
enciende y apaga el vehículo.
2 Palanca de cambio de marcha hacia delante y hacia atrás:
La palanca de cambio de marcha cambia la dirección en que
se mueve el vehículo de adelante hacia atrás.
3 Manual/Remoto: El botón manual / remoto alterna el control
del vehículo de manual a remoto.
Nota: Vea Mando a distancia para obtener más detalles
sobre la operación remota.
4 Pedal: El pedal aplica potencia (velocidad) al vehículo.
5 Interruptor de codificación: Se utiliza para seleccionar un
canal de comunicación con el mando a distancia. La
configuración debe coincidir con el mando a distancia.
10
Uso
Cargar la batería
¡Importante! Antes de usar el Avigo RC Coupe por primera vez,
debe cargarse la batería durante un período completo de 24 horas.
Sólo un adulto que haya leído las advertencias de seguridad y las
comprenda debe manipular, cargar o volver a cargar la batería (vea
Mantenimiento, batería en las páginas 13 - 17).
Nota: No es necesario quitar la batería del vehículo para cargarla.
1 Conecte el conector del cargador al enchufe de carga. Utilice
únicamente el cargador de 6V de Kid Trax Toys incluido con el
Avigo RC Coupe (Entrada: CA 120V–, 0.5A, 60Hz Salida: CC
6V, 0.8A).
2 Conecte el cargador a una toma de pared estándar de 120V.
Nota: El cargador puede sentirse tibio durante la carga. Esto es
normal y no es causa de preocupación.
3 Después de que la carga esté completa (al menos 16 horas,
pero no más de 30), desenchufe el cargador de la toma de
pared.
4 Desconecte el cargador del enchufe de carga.
1
Enchufe de carga
9
Ensamblaje del asiento
Asiento
Conector de la batería
1
2
Una a presión los conectores de la batería.
Use una moneda para dar vuelta al tornillo de plástico y fijar los
asientos en su lugar.
Por favor nótese: la batería ya está instalada en el compartimiento
trasero.
4
Asegúrese que los alambres y cables no estén prensados.
3
8
Ensamblaje de la barra antivuelco
Barra antivuelco
1 Coloque la barra antivuelco entre las ruedas traseras.
Deslícela en los orificios de ambos lados hasta que escuche
un clic.
7
Ensamblaje del marco de la ventana
Marco de la
ventana
1 Coloque el marco de la ventana sobre el salpicadero. Deslícelo
en las ranuras a ambos lados hasta que escuche que las
lengüetas se bloquean en su sitio.
6
Ensamblaje del volante de dirección
¡ADVERTENCIA!
• NO combine baterías nuevas y viejas.
• NO combine baterías alcalinas,
estándar (carbón-zinc), o recargables
(níquel-cadmio).
1
Volante de dirección
Columna de dirección
1 Quite la tapa del compartimiento de la batería e inserte (2)
baterías AAA en la parte superior del volante. Coloque la
tapa de nuevo y atorníllela.
2 Coloque el volante en la columna de dirección y alinee los
orificios del tornillo.
3 Inserte el tornillo por los orificios y coloque la tuerca en el
tornillo.
4 Apriete la tuerca.
5
Rueda trasera
Espaciador grande
1
2
Roldana
grande
3
Rueda
4
Roldana
pequeña
Tapa de la rueda
Tuercas
Tapacubos
5
1 Deslice en el eje una roldana grande y un espaciador grande,
según se muestra.
Nota: Del lado del motor simplemente deslice la rueda sobre el
eje y alinee el engranaje de modo que se ajuste en la bolsa.
No se necesitan roldana ni espaciador.
2 Encuentre una rueda marcada como rear. Deslice la rueda
en el eje con la palabra rear mirando hacia dentro, hacia
el vehículo.
3
Alinee los cinco postes de la parte posterior de la tapa de la
rueda con los orificios de la rueda y deslice la cubierta de la
rueda hacia ésta.
4 Deslice en el eje una roldana pequeña y luego el tuercas.
No apriete más de lo necesario.
5Alinee los pernos del tapacubos con los orificios de la tapa de
la rueda y presiónelo para que entre en su sitio.
Nota: No use martillo. Repita los pasos 1-5 para montar ambas
ruedas traseras.
4
Montaje
Rueda delantera
1
2
Roldana
grande
Rueda
3
4
Roldana
pequeña
Tapa de la rueda
Tuercas
Tapacubos
5
1 Deslice en el eje roldana grande, según se muestra.
2 Encuentre una rueda marcada como front. Deslice la rueda en
el eje con la palabra front mirando hacia dentro, hacia el
vehículo.
3
Alinee los cuatro postes de la parte posterior de la tapa de la
rueda con los orificios de la rueda y deslice la cubierta de la
rueda hacia ésta.
4 Deslice en el eje una roldana pequeña y luego el tuercas.
No apriete más de lo necesario.
5Alinee los pernos del tapacubos con los orificios de la tapa de
la rueda y presiónelo para que entre en su sitio.
Nota: No use martillo. Repita los pasos 1-5 para montar
ambas ruedas delanteras.
3
Piezas
Barra antivuelco
Asiento
Marco de la ventana
Por favor nótese: la batería
ya está instalada en el
compartimiento trasero.
Batería
Mando a distancia
Volante
Cuerpo
Cargador
Rueda delantera
(x2)
Rueda trasera
(x2)
Tapa de la rueda Tapacubos
(x4)
(x4)
2
Seguridad
¡ADVERTENCIA!
Los siguientes riesgos de seguridad pueden dar como resultado
graves lesiones o la muerte al usuario del Avigo RC Coupe:
• Este producto contiene piezas pequeñas, de modo que el montaje
es sólo para ser llevado a cabo por un adulto. Mantenga apartados
a los niños pequeños mientras esté montando el vehículo. Quite y
descarte todo el material de protección y las bolsas de polietileno
antes del montaje. Cuide de eliminar todos los materiales de
empaquetado y las piezas de la parte inferior del cuerpo del auto.
• Viajar en el vehículo sin casco. Los viajeros deben llevar siempre un
casco ajustado que cumpla con la Norma CFR 1203 de la Comisión
de Seguridad de los Productos para el Consumidor de los EE.UU.
(CPSC).
• Las partes del cuerpo, como manos, piernas, cabello y ropa se
pueden ver atrapadas en partes móviles. Nunca ponga una parte
del cuerpo cerca de una pieza en movimiento ni lleve ropa suelta
cuando use el vehículo. Siempre debe llevar zapatos cuando use
el vehículo.
• Puede producirse un accidente inesperado por el uso del vehículo
cerca de calles, vehículos de motor, desniveles como son los
escalones, agua (piscinas) u otros cuerpos de agua, superficies con
declive, colinas, áreas mojadas, vapores inflamables, en callejones,
de noche o en la oscuridad. Siempre utilice el vehículo en un
entorno seguro y salvo, con supervisión continua de los adultos.
• El uso del vehículo en condiciones inseguras, como las de nieve,
lluvia, tierra suelta, barro, arena o grava fina puede dar como
resultado acciones inesperadas, como volcaduras y derrapes.
• Usar el vehículo de modo poco seguro. Como ejemplos tenemos,
entre otros:
d. Viajar a una velocidad poco segura
c. Empujar al usuario por la espalda
b. Permitir más de una persona a bordo
a. Tirar del vehículo con otro vehículo o dispositivo similar
Siempre use el sentido común y prácticas seguras al utilizar
el vehículo.
1
Contenido
Seguridad . . . . . . . . . . . . . . . . . . . . . . . . . . . . . . . . . . . . 1
Piezas . . . . . . . . . . . . . . . . . . . . . . . . . . . . . . . . . . . . . . . 2
Montaje . . . . . . . . . . . . . . . . . . . . . . . . . . . . . . . . . . . . . . 3
Rueda delantera . . . . . . . . . . . . . . . . . . . . . . . . . . . . . . . . . . .3
Rueda trasera . . . . . . . . . . . . . . . . . . . . . . . . . . . . . . . . . . . . .4
Ensamblaje del volante de dirección . . . . . . . . . . . . . . . . . . . 5
Ensamblaje del marco de la ventana . . . . . . . . . . . . . . . . . . .6
Ensamblaje de la barra antivuelco . . . . . . . . . . . . . . . . . . . . .7
Ensamblaje del asiento . . . . . . . . . . . . . . . . . . . . . . . . . . . . . 8
Uso . . . . . . . . . . . . . . . . . . . . . . . . . . . . . . . . . . . . . . . . . 9
Carga de la batería . . . . . . . . . . . . . . . . . . . . . . . . . . . . . . . . .9
Uso de los controles . . . . . . . . . . . . . . . . . . . . . . . . . . . . . . .10
Requisitos para el usuario . . . . . . . . . . . . . . . . . . . . . . . . . . 11
Operación del vehículo . . . . . . . . . . . . . . . . . . . . . . . . . . . . 11
Operación manual . . . . . . . . . . . . . . . . . . . . . . . . . . . . . . . . . . . . 11
Operación remota . . . . . . . . . . . . . . . . . . . . . . . . . . . . . . . . . . . . 12
Mantenimiento . . . . . . . . . . . . . . . . . . . . . . . . . . . . . . . 13
General . . . . . . . . . . . . . . . . . . . . . . . . . . . . . . . . . . . . . . . . . 13
Batería . . . . . . . . . . . . . . . . . . . . . . . . . . . . . . . . . . . . . . . . . 13
Intervalo y tiempo de recarga . . . . . . . . . . . . . . . . . . . . . . . . . . . 15
Almacenamiento de la batería . . . . . . . . . . . . . . . . . . . . . . . . . . . 15
Reemplazo y disposición de la batería . . . . . . . . . . . . . . . . . . . . 16
Fusible de la batería . . . . . . . . . . . . . . . . . . . . . . . . . . . . . . . . . . . 17
Restaurar la contraseña del mando a distancia . . . . . . . . . . . . . 17
Guía de identificación y solución de problemas . . . 18
Servicios, reparaciones y piezas . . . . . . . . . . . . . . . 21
Información de la FCC . . . . . . . . . . . . . . . . . . . . . . . . 22
Gracias
Gracias por adquirir el Avigo RC Coupe de Kid Trax.
Con el Avigo RC Coupe, su hijo se divertirá y disfrutará
durante muchos años. Algunas de las características del
Avigo RC Coupe incluyen: operación manual, mando a
distancia de 4 direcciones (con control de contraseña
paterna), una palanca de cambio de marcha hacia
delante y hacia atrás, y un volante de dirección con
música y sonidos.
Llámenos a Relaciones con el Consumidor de Kid Trax
Toys al 877-741-6154 si tiene comentarios o preguntas.
Avigo RC Coupe
Número de modelo: KT1075TR
Manual del propietario
El manual del propietario contiene instrucciones para el montaje,
uso y mantenimiento. El Avigo RC Coupe debe ser ensamblado
por un adulto que haya leído las instrucciones de este manual
y las haya comprendido. Conserve el empaquetamiento lejos
de los niños y deshágase de todo el material de empaquetado
antes de usarlo. Conserve las instrucciones para consultarlas
más adelante.
©2008 Pacific Cycle Inc.
4902 Hammersley Rd.
Madison, WI 53711
Estados Unidos de América
Teléfono: (877) 741-6154
www.kidtraxtoys.com
Los estilos y colores pueden variar
Hecho en China