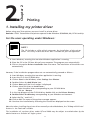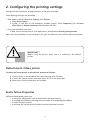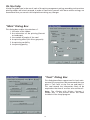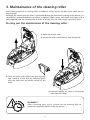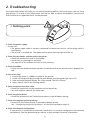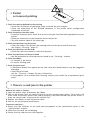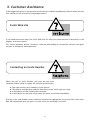
1
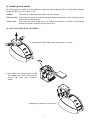
Tattoo Card Printer
User’s Guide
Tattoo User’s Guide Part Number : A5205
© December 2002 Evolis Card Printer
Rev. 1.1
Trademarks
Evolis Tattoo is a registered trademark of Evolis Card Printer.
Microsoft is a U.S. registered trademark of Microsoft Corporation.
Windows is a trademark of Microsoft Corporation.
Copyright Information
© 2002 Evolis Card Printer
All rights reserved.
Notice of Royalty
The user is obliged to observe the regulations relative to royalties applicable in his country. No part
of this manual may be photocopied, translated, reproduced or transmitted for whatever purpose
or by any means, electronic or mechanical, without the express and written permission of the Evolis
Card Printer Company.
All information contained in this document is subject to changes without prior notification.
Evolis Card Printer cannot be held responsible for possible errors contained in this manual, nor incidental or consequential damage connected with the supply or use of this manual.
2
DECLARATION OF CONFORMITY
FOR SAFETY AND EMC
Manufacturer’s name :
EVOLIS
Manufacturer’s address :
29, rue de la Fontaine
Z.I. Angers Beaucouzé
49070 BEAUCOUZE – France
Product’s name :
TATTOO Printer
I, the undersigned,
Serge Olivier, Technical Manager
Declare to have obtained the presumption of the material referred to here above, used and
installed according to the manual, and according to the requirements expressed in the
Directives 73/23/CEE and 86/336/CEE, and modified by 92/31/CEE et 93/68/CEE through the
application of the following norms:
EN 60950 : January 1993 + A1 / A2 / A3 / A4
EN
EN
EN
EN
55022 : 1998 Class B
55024 : 1998
61000-3-2 : 1995
61000-3-3 : 1995
Beaucouzé, October 10th, 2002
Supplementary Information:
This equipment has been tested and found to comply with the limits for a Class B digital device, pursuant to
Part 15 of the FCC Rules. These limits are designed to provide reasonable protection against harmful
interference when the equipment is operated in a commercial environment. This equipment generates, uses,
and can radiate radio frequency energy and, if not installed and used in accordance with the instruction
manual, may cause harmful interference in which case the user will be required to correct the interference at
his own expense.
3
Table of contents
Chapter I – Setting Up
Page 5
Introduction
Page 5
1. Unpacking my printer
2. Description of the printer and its functions
3. Installing my printer
a. Installation of the interface and the supply cable
b. Installation of the ribbon
c. Loading the cards
Chapter II – Printing
Page
Page
Page
Page
Page
Page
5
6
7
7
8
9
Page 11
1. Installing my printer driver
2. Configuring the printing settings
3. My first cards
Page 11
Page 13
Page 15
Chapter III – Cleaning
Page 18
1. Cleaning of the inside of the printer
2. Cleaning of the print head
3. Maintenance of the cleaning roller
Page 18
Page 20
Page 21
Chapter IV – Assistance
Page 22
1. Printer Control Panel
2. Troubleshooting
3. Customer Assistance
Page 22
Page 23
Page 26
Chapter V – Specifications
Page 27
Chapter VI – Evolis Warranty
Page 28
1. Extent of the warranty
2. After sales service in the warranty period
3. After sales service outside the warranty period
Page 28
Page 29
Page 29
Chapter VII – Supplies
Page 30
Appendix A – Magnetic Encoding
Page 31
4
Chapter 1
1.
Setting up
Introduction
We congratulate you on having made the Tattoo printer your choice !
The Tattoo printer is the ideal solution for all your printing of plastic cards in fields as extensive and
varied as management of visitors, business cards, loyalty cards, time attendance, members, etc.
This product, comes with a wide range of assistance services, from the Evolis company and its
partners, specially selected to help you in an efficient and professional manner.
1. Unpacking my printer
Verify whether the following parts have been supplied with your printer :
Power supply and power supply cable
Printer interface cable
Operator’s Service Book
CD with Drivers & Documentation
Cleaning Case
IMPORTANT !
The printer must be placed on a level surface, in a dust free
environment. It is essential to be able to access the printer from all
sides for its installation.
5
2. Description of the printer and its functions
Description of the printer :
Functions
A
B
C
D
E
F
G
H
I
Thermal Transfer Print Head
Media
Control Panel
Push Button
Cleaning Roller
Cover Lever
Card Feeder
Electrical connector
USB Port (optional)
J
Parallel Port
K Serial Port (optional)
For printing cards.
Thermal Transfer Monochrome Ribbon.
Shows the printer activity.
Shows the printer activity (power ON/OFF)
Removes any dust before printing the cards.
Allows the printer cover to be opened.
Holds the cards to be printed.
For connecting the printer to the power supply.
Enables data to be received and sent from and to the
computer.
Enables data to be received and sent from and to the
computer.
Enables data to be received and sent from and to the
computer.
Printer control Panel
There is a Control Panel on the front part of the printer.
Four warning lights are associated with symbols showing the activity during printing.
These lights show :
Push
button
Ribbon No
end card
Magnetic Cleaning
encoding signal
alert
6
3. Installing my printer
a) Installation of the interface and supply cables:
1. Connect the supplied interface cable to your printer as shown while slightly lifting this side of
the printer up to get a better reach.
2. Connect the other end of the cable to the appropriate port of your computer.
3. Connect the power cable to the supply then plug in the power cable connector to the printer.
Then connect the end of the power cable to an earthed mains power point.
IMPORTANT !
To disconnect this product, pull the plug out of the socket, which
should remain easily accessible.
This product must be connected to an electrical installation correctly protected and equipped with a protective earth.
Only use the printer power supply provided by Evolis.
7
b) Installation of the ribbon
1. Open the printer cover by pressing on the
opening lever, then pivoting it.
2. Install the ribbon in the printer as shown.
3. Close the printer cover.
WARNING
The ribbon must be correctly installed for the printer to function.
Only use Evolis printer ribbons. Evolis accepts no responsibility if the
printer is damaged following the use of an unapproved ribbon.
8
c) Loading the cards
The Tattoo printer works in three different modes for card loading which are selectable through
the printer driver in the « Main » tab :
• Feeder
The cards are taken automatically from the feeder.
• Manual feed
The cards are manually inserted one by one by the operator in the feeding mouth
at the front of the printer.
• Auto select
The cards are taken either from the feeder or manually inserted in the feeding
mouth whichever card the printer senses first.
TO LOAD THE CARDS FROM THE FEEDER :
1. Remove the Card Feeder from the printer as shown.
2. Press down the spring system inside
the feeder and insert 100 cards as
shown (100 cards max. 0.76mm 30mil).
3. Replace the feeder in the printer.
9
TO LOAD A CARD MANUALLY FROM THE FEEDING MOUTH :
1. Insert a card in the feeding mouth. The card will be automatically
taken out.
IMPORTANT !
Advice about selecting cards :
• Only use the types of card appearing in the Specifications page of
this manual
• Do not touch the printable surface of the cards ; the print quality
depends upon this
• Do not use damaged or folded cards or ones with an embossed
texture.
• Always store the blank cards in a clean, dust free location
Card thickness :
• The Evolis printer accepts cards from 0.25mm (10mil) to 0.76mm
(30mil) thick without any adjustment.
10
Chapter 2
2.
Printing
1. Installing my printer driver
Before using your Tatto printer, you must install its printer driver.
Reminder : Evolis Tattoo driver and printers operate under Windows 95/98/2000, Me, NT 4.0 and Xp.
For the users operating under Windows :
NOTE !
The CD includes a utility which automates the installation of the printer
driver. This utility installs the driver that is suitable for your configuration.
1. Start Windows, ensuring that no other Windows application is running.
2. Place the CD in the CD Rom drive of your computer. The program runs automatically.
3. Click on the option Drivers Installation from the menu. The installation of the driver runs
automatically.
However, if the installation program does not run automatically, proceed as follows :
1.
2.
3.
4.
5.
6.
Start Windows, ensuring that no other application is running.
Insert the CD in the CD ROM drive
Click on Start in the Windows, select Settings then Printers.
Double-click on the Add Printer icon.
Click on Next until the list of makers is displayed.
Click on Have Disk then on Install from…
Select the drive letter corresponding to your CD ROM drive
Click on Browse.
7. In the tree diagram of the CD ROM drive, double-click on the Drivers directory
8. Double-click on the directory corresponding to your Windows environment.
9. Select the file “ evolis.inf ”.
10. Click on OK. The name of the printer manager appears.
11. Continue the installation by following the instructions displayed on the screen.
Note that when installing the printer driver manually as described above, the "Dialog with Printer"
feature in the Tools tab is disable.
The installation of a printer driver under NT and 2000 may be subject to authorisation by the
administrator as a function of "login system"
11
IMPORTANT !
If your printer will be connected via a parallel interface cable, the
driver installation is finished.
If your printer will be connected via a USB interface cable, refer to
the next section « For the users operating under Windows with a
USB interface » for the instructions to be followed.
For the users operating under Windows with a USB interface :
1. Install the printer driver by following the instructions given in the previous section « For the
users operating under Windows ».
2. Install the USB driver :
– Check that the Tattoo printer is powered ON.
– Connect the USB interface cable to your computer then to the appropriate printer port.
– The « Add New Hardware Wizard » window is displayed. Then click on the « Next »
button.
– Click on the option which invites you to search the best driver for your peripheral and
then click on the « Next » button.
– Select the « CD-ROM Drive » option and click on the « Next » button.
– Click on the « Next » button. The USB driver is now installed.
– Follow the instructions displayed on the screen.
3. Set the printer port of your computer :
– After having reboot your computer, click on « Start » and in « Parameters » select
« Printers ».
– In the « Printers » window, select the « Evolis Tattoo » icon.
– In the « File » menu, select « Properties ».
– Click on the « Details » tab and select USB printer port in the list.
– Click on OK to close this window. The configuration is now finished.
12
2. Configuring the printing settings
Your printer has numerous setting functions in the print manager.
These printing settings are accessible :
• from Start in the Windows bar, Settings then Printers
1. Select Evolis Tattoo
2. In File, in the bar of the Windows window menus, select Properties (for Windows
95/98/2000) or Default Document (for Windows NT 4.0).
• From your Windows software.
In File, from the menu bar of your application, select Print or Printing Configuration.
Note that the procedures vary according to the type of software used and the Operating System.
IMPORTANT !
Before using the printer, check that it is selected as the default
printer.
Default Evolis Tattoo printer
To select the Tattoo printer as the default, proceed as follows :
1. Click on Start, in the Windows bar, select Settings then Printers.
2. Click on the Tattoo Printer icon then point to File in the menu bar.
3. Select Set as Default and close the window.
Evolis Tattoo Properties
Different dialog boxes allow you :
• to carry out adjustments such as orientation and print quality.
• to manage the different printing and use modes of the appropriate ribbons.
• to select the printer port.
• to activate the various printer control and maintenance functions.
13
On line help
A help file guides you in the use of each of the print management settings according to the various
printing modes and criteria entered. In order to familiarize yourself with these various settings, we
recommend that you consult this help before making any changes.
"Main" Dialog Box
This dialog box enables the selection of :
1. the color of the ribbon
2. the orientation of the printing (Portrait
or Landscape)
3. the number of copies of the card
4. the printing effect (B & W or grayscale)
5. the printing sensibility
6. the printing quality
"Tools" Dialog Box
This dialog box allows support and 1st level maintenance for your printer. We recommend that you
print a "Test Card" at the first use and keep it.
This card records the information likely to be
required at the time of an after sales service call.
Note : The « Dialog with Printer » feature is
enable only if the printer driver has been
installed via the Setup program.
14
"General" Dialog Box
This dialog box is a Windows information window. It enables a test page to be printed for the sole
purpose of checking the communication between the computer and the printer.
"Details" Dialog Box
This dialog box is a Windows control window enabling the printer port to be selected and to check
the use of the appropriate printer driver. The displayed settings must only be changed by an experienced person.
"Color Management" Dialog Box
This dialog box enables the printing to be associated with a defined colour management profile.
3. My first cards
A large number of Windows applications allow document printing (Word – Access – Excel, for
example). In order to familiarize you with the page setup of a card and the printer settings for it,
we offer you the following example.
Under Microsoft ® Word
After having previously registered the Tattoo
printer as the default
1. Run Word and in File click on Page Setup.
2. The dialog box offers :
• "Paper Format " select Card
• "Orientation" select Landscape
15
3. The "Margins" dialog box offers
"printing margins" • Select 0 cm
Your Word window should now appear like this :
You are ready to personalize your card by introducing the various composition elements :
• Logo and Illustration
• Identity photo
• Permanent texts and Variables (Identity)
• Etc..
Example :
Note that this example does not claim to
introduce the operator to the Word
application. Its only objective is to establish a
relationship between the graphics of a card
and the Tattoo Printer management settings
necessary for printing it.
16
Tattoo Card Printer Driver Settings
To access the settings from the
Word window :
1. In the menu bar point to
File and select "Print"
2. The dialog box shows you
that the Evolis printer is
selected. Then click on
Properties.
3. The dialog box of the
Evolis Tattoo driver opens.
Do not forget to refer to
the help for each dialogue
box
The print settings for this graphic example are :
1. "Main" Dialog Box select :
• Monochrome Black ribbon
• Treatment : Grayscale
• Landscape orientation
• Copy (number)
2. Click on Apply, if you change a setting, then on OK to successively close each dialog box.
3. On returning to the main window click on OK to start printing.
17
Chapter 3
3.
Cleaning
Protect the validity of your Guarantee!
Not observing the cleaning procedures contained in this chapter can invalidate your printer and for
print head guarantees. The Evolis company accepts no responsibility if the printer is used in an
unauthorised cleaning condition.
The following cleaning articles are available from Evolis :
❖ Pre-saturated cleaning cards with 99% isopropyl alcohol for cleaning the inside of the printer
❖ Cleaning swabs with 99% isopropyl alcohol base for cleaning the print head
❖ Pre-saturated cleaning cloths for cleaning the cleaning roller
1. Cleaning of the inside of the printer
The Tattoo printer is fitted with cleaning alert which is
activated every 500 cards that has been inserted.
The warning light switches on as follows :
Status after 500 inserted cards
If you do not clean the printer when the light has
switched ON, is starts flashing when another 100 cards
have been inserted as follows :
When the light starts flashing, the warranty of the print
head will be void, unless cleaning has been done before.
Status after 600 inserted cards
This simple cleaning system requires the use of specially pre-saturated cleaning cards specially
designed for the printer. A cleaning kit with samples of these cards is delivered with your package.
Repeatedly running the card through inside the printer cleans the card transport rollers, the dust
removing roller and the print head.
IMPORTANT !
The printer will continue to function even though the automatic
cleaning alarm is activated.
18
To carry out cleaning of the inside of the printer :
1. Remove the ribbon from the printer. Then close cover.
2. Press the Push Button
from the printer
Control Panel.
3. Open pouch and remove the
cleaning card. Insert Cleaning
Card in the printer Card
Feeder as shown. The
cleaning starts.
WARNING !
After a cleaning cycle, wait 2 minutes for the cleaning fluid to
evaporate completely before using the printer.
NOTE !
It is also possible to start an automatic cleaning sequence without
waiting for the printer light signal. This is done by pressing on the
Control Panel push button for a few seconds. In this case, first repeat
operations 1, 2 and 3 quoted above.
19
2. Cleaning of the print head
WARNING !
The print head is a fragile component of your printer. To avoid
damaging it, never put the print head in contact with pointed
and/or metal objects. Also avoid touching the print head surface
with the fingers. Changed print quality or even permanent
degradation of the print head could result.
The print head is cleaned during the automatic cleaning of your printer (see previous section).
However, in order to preserve the original print quality and to reduce problems caused by an excess
of ink on the print head surface, it is recommended that you clean it regularly (about every
500 cards) using the swab supplied with your printer.
To carry out print head cleaning :
1. Open the printer cover and locate the print head.
2. Take the swab from the Cleaning Case supplied with your printer.
3. Gently rub the swab from left to right on the
print head for a few seconds.
WARNING !
After a cleaning cycle, wait 2 minutes for the cleaning fluid to
evaporate completely before using the printer.
20
3. Maintainance of the cleaning roller
Your Tattoo printer has a cleaning roller. Its adhesive surface retains the dust when cards are running through.
Although the cleaning of this roller is carried out during the automatic cleaning of the printer, it is
nevertheless recommended that you clean it regularly (about every 100 cards) and simply with a
cloth supplied with the cleaning case in order to ensure that the card surface is perfectly clean.
To carry out the maintenance of the cleaning roller :
1. Open the printer cover.
2. Locate the roller and remove it from the printer
3. Clean the roller with a cloth from your cleaning
case. Remove all the dust by rubbing lightly
with the cloth over the whole surface of the
roller.
4. Once dry replace the roller in the printer
then close the cover.
WARNING !
After a cleaning cycle, wait 2 minutes for the cleaning fluid to
evaporate completely before using the printer.
21
Chapter 4
4.
Assistance
For the best possible satisfaction of customer requirements, Evolis provides a complete range of
technical assistance services.
(See section 3 – Customer Assistance)
1. Printer Control Panel
Refer to the following conditions to determine the status or the current activity of your printer.
The control panel warning lights are shown in one of the following conditions:
SWITCHED ON
SWITCHED OFF
FLASHING
PRINTER READY
PROCESSING
END OF RIBBON
NO CARD
PRINTER-CLEANING ALERT
PRINTER-CLEANING ALERT
(after 500 inserted cards)
(after 600 inserted cards)
INTERNAL PRINTER
PROBLEM
MECHANICAL
PROBLEM
CARD INSERTION
SIGNAL
CARD TO BE
TAKEN OUT
COOL DOWN
MODE
PRINTER COVER
OPENED
The push button returns the control panel to its original status after processing the
following situations: – MECHANICAL PROBLEM
– MAGNETIC ENCODING ALERT
– CARD EJECT
It also enables:
– The printing of a test card
– The running of a cleaning process
– The switching off of the printer
22
2. Troubleshooting
The information below will help you to resolve possible problems that occur when you are using
your printer. If, in spite of this information, you are not able to resolve the problem, contact your
Evolis retailer or an approved Evolis service provider.
❍ Nothing prints
1. Check the power supply
Ensure that:
• The power supply cable is correctly connected to the printer and to a mains plug which is
functioning.
• The printer is switched on. The green control panel warning light must be on.
2. Check the card feeder and the card in the printer
• Check the presence of cards in the feeder.
• Check that no jamming has occurred.
• See page 25 of this chapter for how to cure jamming.
3. Check the ribbon
• Check that the ribbon has been correctly installed and that the printer cover is properly closed.
4. Print
1.
2.
3.
4.
a test card
Ensure that there is a ribbon installed in the printer.
Switch off the printer by pressing the push button until the green ligh turns OFF.
Push and hold the push button for a few second. The LED’s flashes.
Insert a blank card in the feeding mouth.
5. Check the printer interface cable
• Check the connection to the computer and to the printer.
• Test with another cable of the same type.
6. Check the printer driver
• Check the presence of the Tattoo Printer driver in the Windows settings
7. Check the computer printing settings
• Ensure that the Tattoo printer is selected as default printer.
• See “ Configuring the printing settings ” of the Printing chapter page 13.
8. Check the network configuration
If your printer is connected to a network, check that it is correctly configured in the network
environment. See the documentation relative to your network for more information.
23
❍ A blank card is ejected
from the printer
1. Check the ribbon
• Check that the ribbon has not run out or cut. Replace or reinstall the ribbon, if necessary.
2. Check the cleanliness of the printer
• Clean the cleaning roller.
• See chapter «Cleaning » page 18.
3. Check the printer interface cable
• Check the connection to the computer and to the printer.
• Test with another cable of the same type.
4. Elements of the print head may be damaged.
• Print a test card (See previous page)
If the test card does not print, contact your retailer for a replacement print head.
❍ The print quality
is not satisfactory
1. Check the cleanliness of the printer
• Clean the print head.
• See chapter «Cleaning » page 18.
2. The contrast settings must be modified
• Lack of contrast; increase the contrast settings in the printer driver configuration (see
“Main” tab).
3. The type of card used may be inappropriate
• Check if the type of card used corresponds to the required specifications See chapter
“ Specifications ” page 27 for more information.
• The texture of the card is rough or not perfectly flat.
• Print test with another type of card.
24
❍ Partial
or incorrect printing
1. Check the settings defined for the printing
• Check that no element of your page setup is outside the print margins
• Check the orientation of the selected document in the printer driver configuration
(Landscape or Portrait)
2. Check the printer interface cable
• If unusual characters print, check that you are using the interface cable appropriate to your
printer.
• Check the connection to the computer and to the printer.
• Test with another cable of the same type.
3. Check the cleanliness of the printer
• Clean the inside of the printer, the cleaning roller and the print head if necessary.
• See chapter “Cleaning ” page 16.
4. Check the cleanliness of the cards
• Check that these are stored in a dust-free location.
5. Check the cleanliness of the print head
• See the procedure for cleaning the print head in the “ Cleaning ” chapter.
6. Check the ribbon
• Its location in the printer
• Its correct winding path
7. Check the print head
• If horizontal (blank) lines appear on the card, some print head elements may be clogged or
damaged.
• Clean the print head
• See the “ Cleaning ” chapter for more information.
• If the problem is not resolved after cleaning, contact your retailer for a replacement print
head.
❍ There is a card jam in the printer
Remove the cards as follows :
1. Open the printer cover and remove the ribbon.
2. Push on the button from the Control Panel to run the transportation rollers. If the card is still
stuck inside the printer, remove the card by pushing it by hand towards the printer outlet. If
there are several cards, always push the top one first.
3. Replace the ribbon, re-close the printer cover.
4. Press on the control panel push button.
To prevent card jams :
1. Ensure that the thickness of the card used corresponds to the specifications given in the
“Specifications” chapter.
2. Check that the cards are not bulging.
3. Ensure that the cards are not stuck together.
25
3. Customer Assistance
If the suggestions given in the previous section do not enable the problem(s) to be resolved, contact
your retailer or one of the Evolis help departments.
Evolis Web site
If you need some more help, the Evolis Web Site will offer you some technical information in the
Support & Services section.
This section proposes drivers, firmware, software dowloading or instruction manuals and gives
answers to frequently asked questions.
Contacting an Evolis Reseller
When you call an Evolis Reseller, you must be near your
computer and be ready to supply the following information:
➤ The type and the serial number of your printer
➤ The type of configuration and the operating system which you are using
➤ A description of the incident that occurred
➤ A description of the steps which you have taken to resolve the problem
Printing a test card enables certain technical information appropriate to your printer to be recorded. We recommend that you print it at the initial use and keep it to hand.
26
Chapter 5
5.
Specifications
Printing Mode
Monochrome Thermal Transfer
Printing Speed
500 cards/hour
Resolution
300 DPI
Windows™ Drivers
For Windows™ 95 / 98 / Me / NT 4.0 / 2000 and Xp
Warranty
Printer: 1 year
Print head: 1 year, unlimited number of prints 1
Ribbon Type
Mono Color Ribbons : 600 cards/roll
Colors : black, blue, red, green, white, gold, silver and scratch off
Other printer models
Tattoo MAG
Printer with HICO / LOCO Magnetic Stripe Encoder– ISO 7811
(3 tracks)
Tattoo Stand-Alone
Printer connected to a keyboard
Card Types
All PVC and Composite PCV cards
Card Format
ISO CR-80 – ISO 7810 (53.98mm x 85.60mm)
Card Thickness
From 0.25mm (10mil) to 0.76mm (30mil)
Card Feeder Capacity
100 cards (0.76mm-30mil)
300 cards (0.25mm-10mil)
Printer Size
Height: 166mm (6.53’’)
Width: 290mm (11.42’’)
Depth: 187mm (7.36’’-
Printer Weight
2.5kg (5.5lbs)
Communication Interface
Centronics Parallel (supplied cable)
Optional USB port (supplied cable)
Optional Serial port (supplied cable)
Electrical
110~230 Volts CA, 60~50 Hertz
Environmental
Min / Max operating temperatures: 15°C / 30°C
Humidity: 20% to 70% non-condensing
Min / Max storage temperatures: -5°C / +70°C
Storage humidity: 20% to 70% non-condensing
Operating ventilation: free air
1 – Clause governing the use of Evolis consumables
27
Chapter 6
6.
Evolis warranty
1. Extent of the warranty
1. Evolis warranties the Tattoo printer, to the end customer, against all manufacturing defects for a
limited period of one year starting from the date of purchase by the customer. The customer
must be able to supply proof of the purchase or the registration of the product.
2. Evolis warranties the print head for a period of one year only on condition of the use of Evolis
ribbons, standardized cards and of adequate maintenance and cleaning cycles.
3. The Evolis limited warranty only covers problems occurring during normal use of the product and
does not apply in the following cases :
a. Poor maintenance of the printer
b. Unauthorised technical modification of the printer
c. Use of interfaces not supplied by Evolis
d. Use of non authorized materials
e. Use outside the specified conditions.
4. Concerning the software products, this warranty only applies to the medium on which the product has been recorded. Evolis does not warranty that these products will work continuously or
fault-free.
5. If a breakdown or damage occur, caused by the use of ribbons with a trademark other than
Evolis, Evolis will invoice the customer for the repair of the breakdown or damage at the standard price list of the labour and of the replacement parts.
6. If, during the warranty period, Evolis is notified of a plastic card or ribbon manufacturing defect,
Evolis will replace the defective product. If, during the warranty period, Evolis is notified of a
hardware fault, Evolis will repair or replace the product in question, at its discretion.
7. If, depending on the circumstances, Evolis is unable to repair or replace the defective product
covered by the warranty, Evolis will reimburse its purchase price within a reasonable time, on
rapid return of the product.
8. Evolis is not under any obligation to repair, replace or reimburse if the customer has not returned the defective product.
9. The replacement product can be new or second-hand, if its functionality is at least the equivalent of the original product that it replaces.
28
2. After Sales Service in the warranty period
In the event of hardware breakdown, and after agreement, Evolis offers the following assistance
options:
➤ Evolis authorized Reseller : send the printer to an Evolis authorized Reseller.
➤ Evolis authorized service provider: send the printer to an Evolis authorized after sales
service.
Do not forget to enclose proof of purchase with each dispatch.
IMPORTANT !
The customer is responsible for all damage sustained due to
inadequate packaging when returning goods. As far as possible, reuse the original packaging.
3. After Sales Service outside the warranty period
In the event of breakdown outside the warranty period, contact your Evolis authorized reseller or
an Evolis authorized service provider.
29
Chapter 7
7.
Supplies
Evolis has a choice of ribbons and various accessories. You will find below the list of supplies available from your authorized Evolis retailer.
Mono Color Ribbons
Black Monochrome Ribbon
600 cards/ribbon
Ref. R2211
Blue Monochrome Ribbon
600 cards/ribbon
Ref. R2212
Red Monochrome Ribbon
600 cards/ribbon
Ref. R2213
Green Monochrome Ribbon
600 cards/ribbon
Ref. R2214
White Monochrome Ribbon
600 cards/ribbon
Ref. R2215
Gold Monochrome Ribbon
600 cards/ribbon
Ref. R2216
Silver Monochrome Ribbon
600 cards/ribbon
Ref. R2217
Scratch Off Monochrome Ribbon
600 cards/ribbon
Ref. R2218
Accessories
UltraClean Cleaning Kit
5 Pre-Saturated Cleaning Cards, 5 Swabs,
1 box of 40 Pre-Saturated Cleaning Cloths
P/N. A5011
Additional Card Feeder Kit
Feeder with a capacity of 100 cards (0.76mm - 30mil)
P/N. S2204
30
Appendix A
A.
Magnetic Encoding
Introduction
Tattoo printers equipped with a magnetic stripe encoder are known as Tattoo MAG printers. The
way that a Tattoo MAG printer works is identical to that of a Tattoo printer.
The magnetic encoder encodes ISO strips 1, 2 and 3 in a single movement before carrying out data
verification.
Tattoo MAG printer encoders can be set for high coercivity (HICO) or for low coercivity (LOCO)
simply by clicking on the Windows driver, but they leave the factory set by default for high
coercivity (HICO), unless specifically requested otherwise when ordering.
1. Position of the magnetic encoder
The magnetic encoder is a unit fitted in Tattoo MAG printers
in the factory. The read/write head is positioned below the
path taken by the cards and after the print head.
NOTE: the encoding sequence of a card is always performed
before a print session.
2. Position of cards
The magnetic strip cards must be installed in the feeder
as shown:
31
IMPORTANT !
Use only magnetic strip cards that comply with ISO Standards 7810
and 7811.
In order to function correctly, the magnetic strip must be moulded
to the card.
Never use a card with a glued magnetic strip.
3. Setting Windows Driver
During the first installation of the Windows Driver, it is essential to define the functions of the
magnetic encoder.
"Encoder Settings" Button
The magnetic encoder functions are accessible via
the “Tools” dialogue box of the Windows driver
by clicking on the “Encoder Settings” button.
“Magnetic Encoder” dialogue box
The “Magnetic Encoder” dialogue
box is opened by selecting the
“Encoder Settings” button.
Track Settings allows the ISO Standard
desired for each strip to be selected.
ISO1 accepts up to 76 alphanumeric
characters, from A to Z and from 0 to
9 as well as the ASCII characters between 20 and 95.
ISO2 accepts up to 37 numeric characters from 0 to 9 as well as the ASCII
characters between 48 and 62.
32
ISO3 accepts up to 104 numeric characters from 0 to 9 as well as the ASCII characters between 48
and 62.
Coercivity defines the magnetic encoder at high or low coercivity. An encoded magnetic stripe at
high coercivity is more resistant to exterior disturbances than an encoded magnetic stripe at low
coercivity.
Direct Encoding allows the magnetic stripes to be directly encoded using this window.
Enable Macro processing allows magnetic stripe cards to be encoded from Windows applications.
A text field delimited by the characters “ |” and “|” (or other characters may be defined by the user)
will be interpreted as an encoding command by the driver.
4. Cleaning of magnetic encoder
The head of the magnetic encoder requires regular maintenance in order to ensure the integrity of
the encoded data on the cards.
The cleaning of the magnetic encoder is carried out by running an auto – cleaning sequence with
the pre-saturated cleaning cards (see Chapter 3 of this manual for more detailed information).
The repeated passage of the cleaning card within the printer cleans the card transport rollers, the
cleaning roller and the print head as well as the read/write head of the magnetic encoder.
If, between two printer cleaning sessions (all of the 500 cards inserted), the read/write process has
failed with more than one card, it is recommended to launch a printer cleaning sequence manually
(see Chapter 3 of this manual for the relevant procedure).
33