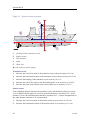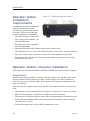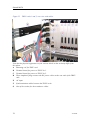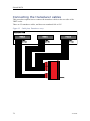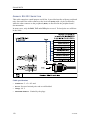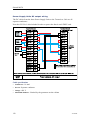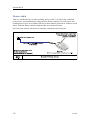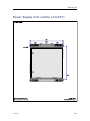
1
Installation manual
Simrad MS70
Scientific multibeam sonar
(CD016018B)
www.simrad.com
TECHNOLOGY
FOR
SUSTAINABLE
FISHERIES
Simrad MS70
Installation manual
This manual provides you with the basic information
required to install the Simrad MS70. For more detailed
information about the practical use of the product, refer to
the Simrad MS70 Operator manual.
This manual has been prepared for Generic delivery.
System configuration
This manual is configured for the following hardware items:
• System: Simrad MS70 Scientific multibeam sonar
• Ethernet switch: HP Procurve 2910
• Number of Ethernet switches: 1
• TRC Beamforming computers: Dell PowerEdge R610
– The TRC0 computer is fitted with an Intel PRO1000PT
4–port Ethernet adapter.
• Transceiver Unit: Single cabinet
• OS Computer: Simrad APC12
• Power supplies: External Power Supply Units
331549/B
24.03.2011
©
Kongsberg Maritime AS
Revision status
Simrad doc.no.: 331549 / Vessel: Generic / Current revision: B.
Rev.A
04.03.2011
First version
Rev.B
24.03.2011
Two chapters added. For details, see the record of changes in About this
manual on page 9.
Copyright
©2011 Kongsberg Maritime AS
The information contained in this document remains the sole property of Kongsberg Maritime AS. No part
of this document may be copied or reproduced in any form or by any means, and the information contained
within it is not to be communicated to a third party, without the prior written consent of Kongsberg
Maritime AS. The document, or any part of it, may not be translated to any other language without the
written approval from Kongsberg Maritime AS.
Disclaimer
Kongsberg Maritime AS endeavours to ensure that all information in this document is correct and fairly
stated, but does not accept liability for any errors or omissions.
Warning
The equipment to which this manual applies must only be used for the purpose for which it was
designed. Improper use or maintenance may cause damage to the equipment and/or injury to
personnel. The user must be familiar with the contents of the appropriate manuals before attempting
to install, operate or work on the equipment.
Kongsberg Maritime AS disclaims any responsibility for damage or injury caused by improper
installation, use or maintenance of the equipment.
Support information
If you require maintenance or repair, contact your local dealer. You can also contact us using the
following address: [email protected]. If you need information about our other products, visit
http://www.simrad.com. On this website you will also find a list of our dealers and distributors.
Kongsberg Maritime AS
www.kongsberg.com
Installation manual
Table of contents
ABOUT THIS MANUAL ....................................................... 9
SIMRAD MS70................................................................. 11
Functional description ............................................................................................ 11
System description .................................................................................................13
System diagram ......................................................................................................13
System units ...........................................................................................................14
Multibeam Operator Station ........................................................................ 14
Transceiver Unit ......................................................................................... 14
Power Supply Unit...................................................................................... 15
Transducer ................................................................................................. 15
Uninterrupted Power Supply (UPS).............................................................. 15
General safety rules ................................................................................................16
General supply conditions ......................................................................................17
General installation requirements...........................................................................18
Approval by classification society ................................................................ 18
Supply power ............................................................................................. 18
Compass deviation...................................................................................... 18
Noise sources ............................................................................................. 18
Dry docking ............................................................................................... 18
Wiring........................................................................................................ 19
Support information ...............................................................................................19
INSTALLATION PLANNING.............................................. 21
About installation drawings....................................................................................21
Where to mount the transducer ..............................................................................22
Mount the transducer deep........................................................................... 22
Mount the transducer midway...................................................................... 22
Avoid protruding objects ............................................................................. 22
Avoid the boundary water layer ................................................................... 23
Avoid all propellers..................................................................................... 24
Avoid all bow thrusters................................................................................ 24
Summary and general recommendations....................................................... 24
Sonar room requirements .......................................................................................25
Cabling requirements .............................................................................................26
TRANSDUCER INSTALLATION ......................................... 28
Transducer description ...........................................................................................29
Transducer unpacking ............................................................................................29
Handling rules ............................................................................................ 30
How to lift the transducer out of its transport crate ........................................ 30
331549/B
3
Simrad MS70
Transducer installation procedure ..........................................................................31
Installation principles .................................................................................. 31
Preparations ............................................................................................... 32
Mounting the array ..................................................................................... 33
Cables........................................................................................................ 34
Transducer cables and conduit ...............................................................................35
Transducer alignment .............................................................................................36
Measurements ............................................................................................ 36
Vessel coordinate system ............................................................................. 37
Sensor locations.......................................................................................... 38
Measurement accuracy ................................................................................ 39
Transducer orientation................................................................................. 41
Heading sensor calibration .......................................................................... 43
Alignment summary.................................................................................... 43
Transducer handling and maintenance ...................................................................44
Rules for transducer handling ...................................................................... 44
Rules for transducer maintenance................................................................. 45
Approved anti-fouling paints for transducers ................................................ 45
TRANSCEIVER UNIT INSTALLATION ............................... 47
About the Transceiver Unit ....................................................................................47
Transceiver Unit preparations ................................................................................49
Transceiver Unit installation procedure .................................................................50
Transceiver Unit parts identification ......................................................................50
Forward view ............................................................................................. 51
Rear view................................................................................................... 52
POWER SUPPLY UNIT INSTALLATION ............................. 53
About the Power Supply Unit ................................................................................54
Power Supply Unit preparations.............................................................................54
Steel conduits for power cables..............................................................................56
Power Supply Unit installation procedure..............................................................57
Power Supply Unit population ...............................................................................57
MULTIBEAM OPERATOR STATION INSTALLATION........... 59
About the Multibeam Operator Station ..................................................................59
Operator station installation requirements .............................................................60
Operator station computer installation ...................................................................60
Preparations ............................................................................................... 60
Installation procedure.................................................................................. 61
Operator station display monitor installation .........................................................62
UPS INSTALLATION ........................................................ 63
TRANSCEIVER UNIT ASSEMBLY ...................................... 64
4
331549/B
Installation manual
About the Transceiver Unit ....................................................................................65
Transceiver Unit purpose............................................................................. 65
Transceiver Unit parts identification............................................................. 65
Mounting the TRXU racks .....................................................................................68
Mounting the Ethernet switch ................................................................................73
Mounting the TRC Beamforming computers.........................................................74
Connecting the power cables from the Power Supply Units..................................76
Connecting the transducer cables ...........................................................................78
CABLE LAYOUT AND INTERCONNECTIONS ...................... 80
Read this first! ........................................................................................................81
Cable plans .............................................................................................................82
Ethernet switch connectors .......................................................................... 83
System interconnection cables ..................................................................... 84
Ethernet cables; TRC computers .................................................................. 85
Ethernet cables; TRXU transceiver racks...................................................... 86
Ethernet cables; Operator Station and Power Supply Units ............................ 87
Power cables; Transceiver Unit.................................................................... 88
Power cables; Power Supply Units............................................................... 89
Transducer cables ....................................................................................... 90
Interface cables; TRXU synchronization ...................................................... 91
Interface cables; Motion Reference Unit....................................................... 92
Interface cables; GPS, sound velocity and gyro............................................. 93
Interface cables; external trigger .................................................................. 94
Multibeam Operator Station cables .............................................................. 95
Detailed list of cables .............................................................................................96
[A] Ethernet cables to Power Supply Units ................................................... 97
[B] Ethernet cables to TRC Beamforming computers .................................... 98
[C] Ethernet cables to TRXU transceiver racks ........................................... 100
[D] Ethernet cables to external cabinets...................................................... 101
[F] Internal TRXU synchronisation ............................................................ 102
[G] Motion Reference Unit interface .......................................................... 103
[H] GPS, Sound Velocity and Gyro interface .............................................. 104
[K] External trigger................................................................................... 105
[P] Power cables to TRC Beamforming computers...................................... 106
[Q] Power cables to TRXU transceiver racks .............................................. 107
[R] Power cables to ship’s 230 Vac mains supply ........................................ 108
[S] Power cables from the four circuit breakers........................................... 109
[T] AC mains supply to Power Supply Units................................................110
[U] Power cables from Power Supply Units to Transceiver Unit....................111
[W] Operator Station cables........................................................................113
Transducer cables overview........................................................................115
Transducer cables ................................................................................................. 115
331549/B
5
Simrad MS70
Transducer cable pairs................................................................................115
Element organisation..................................................................................116
Channel and element identification tables ....................................................117
Moxa CP134U-I Serial adapter setup...................................................................125
Serial line support ..................................................................................... 125
Jumper and DIP switch settings ................................................................. 126
Adapter cable ........................................................................................... 127
Cable specifications ..............................................................................................129
Generic RS-232 Serial line ........................................................................ 130
RS-232 as external trigger ........................................................................ 131
RS-232 cable applied as external trigger (1:1)............................................. 132
Coax to RS-232 cable and adapter.............................................................. 133
Generic RS-422 Serial line ........................................................................ 134
Moxa CP134U-I Serial line adapter............................................................ 135
Power Supply Unit wiring ......................................................................... 137
Transceiver Unit wiring............................................................................. 143
AC mains (IEC 60320).............................................................................. 145
Circuit breaker.......................................................................................... 146
RJ45 Ethernet, straight .............................................................................. 147
RJ45 Ethernet, crossover ........................................................................... 149
VGA/SVGA Display................................................................................. 150
Keyboard cable......................................................................................... 151
Mouse cable ............................................................................................. 152
DVI–I Display .......................................................................................... 153
Serial line adapter ..................................................................................... 154
Serial line to USB adapter ......................................................................... 155
Transducer cables ..................................................................................... 156
SETTING TO WORK ....................................................... 161
Initial power-on ....................................................................................................161
Performance testing ..............................................................................................161
TECHNICAL SPECIFICATIONS ....................................... 162
System components ..............................................................................................163
Operation and performance ..................................................................................164
Configuration settings ............................................................................... 165
Operational performance ........................................................................... 167
Performance, Multibeam Operator Station .................................................. 168
Performance, Transceiver Unit................................................................... 168
Performance, Power Supply Unit ............................................................... 168
Performance, Transducer array .................................................................. 168
Interface specifications .........................................................................................169
Weights and outline dimensions...........................................................................171
Power requirements ..............................................................................................173
6
331549/B
Installation manual
Environmental requirements ................................................................................174
DRAWING FILE ............................................................. 175
Multibeam Operator Station (341305) .................................................................176
Transceiver Unit outline (281020) .......................................................................177
Power Supply Unit outline (311237)....................................................................181
Power Supply Unit mounting frame (308337) .....................................................183
Transducer Array outline (208463) ......................................................................184
Clamping ring (208465) .......................................................................................186
Mounting ring (208461) .......................................................................................188
A
EQUIPMENT HANDLING ................................................ 190
Transportation.......................................................................................................190
Lifting ...................................................................................................................191
Storage prior to installation or use .......................................................................191
Inspection .............................................................................................................192
Unpacking ............................................................................................................192
General unpacking procedure .................................................................... 192
Unpacking electronic and electromechanical units ...................................... 193
Unpacking mechanical units ...................................................................... 194
Unpacking transducers .............................................................................. 194
Storage after unpacking........................................................................................194
Storage after use ...................................................................................................195
Cleaning cabinets...................................................................................... 195
Mechanical units....................................................................................... 195
Cables...................................................................................................... 196
Internal batteries ....................................................................................... 196
Dehumidifier ............................................................................................ 196
Coatings................................................................................................... 196
Re-packaging........................................................................................................196
Temperature protection.........................................................................................197
Circuit board handling and packaging..................................................................197
Electro-Static Discharge (ESD)............................................................................198
Disposal ................................................................................................................199
B
BASIC CABLE REQUIREMENTS ...................................... 200
Cable trays ............................................................................................................200
Radio Frequency interference ..............................................................................201
Physical protection ...............................................................................................201
Grounding.............................................................................................................202
Cable connections.................................................................................................202
Cable terminations................................................................................................202
Cable identification...............................................................................................203
331549/B
7
Simrad MS70
8
331549/B
About this manual
About this manual
Purpose
The purpose of this manual is to provide the information and basic drawings required for
installation of the Simrad MS70.
For more detailed information about the practical use of the product, refer to the Simrad
MS70 Operator manual.
About the technical descriptions and the target audience
This manual describes the installation of the Simrad MS70.
The manual is intended for technical personnel; qualified maintenance engineers and
technicians. It is assumed that the personnel is conversant with the general principles of
maritime electronic equipment, in particular sonar, echo sounder and catch monitoring
systems. The personnel must also be familiar with computer hardware, signal processing,
interface technology and traditional troubleshooting on electronic and mechanical
products.
The instructions must be followed carefully to ensure optimal performance. As a guide,
installation procedures are presented in the order they are to be performed. Successful
completion of each procedure is to be confirmed by checking off the corresponding box.
Note
The installation instructions given in this document must be adhered to. Failure to do so
may render the guarantee void.
Kongsberg Maritime AS will accept no responsibility for any damage or injury to the
system, vessel or personnel caused by equipment that has been incorrectly installed or
maintained, or by drawings, instructions or procedures that have not been prepared by us.
The equipment described in this manual includes the complete system with associated
cabinets, but not system units provided locally by the customer, installation shipyard
or local dealer. The manual also defines the equipment responsibility, and provides
instructions for unpacking and storage.
After installation, this document must be stored on board the vessel for later reference
when updating or servicing the equipment.
331549/B
9
Simrad MS70
Installation drawings
Detailed vessel specific mechanical drawings for the installation must be provided by the
customer, or any shipyard contracted to perform the installation.
Kongsberg Maritime AS may, on special order, provide assistance to these drawings.
Drawings must be approved by the appropriate vessel certification authority prior to
installation of the system.
Applicable outline dimension and productions drawings are provided in the Drawing
file chapter. Drawings may also be downloaded in PDF and/or DWG formats from
http://www.simrad.com.
System configuration
This manual is configured for the following hardware items:
• System: Simrad MS70 Scientific multibeam sonar
• Ethernet switch: HP Procurve 2910
• Number of Ethernet switches: 1
• TRC Beamforming computers: Dell PowerEdge R610
– The TRC0 computer is fitted with an Intel PRO1000PT 4–port Ethernet adapter.
• Transceiver Unit: Single cabinet
• OS Computer: Simrad APC12
• Power supplies: External Power Supply Units
Record of changes
A
04.03.2011: First release
B
24.03.2011
a
TRC Beamforming computers changed from Dell 1950 to Dell R610.
b
Added two new chapters:
→ Transceiver Unit assembly on page 64
→ Setting to work on page 161
10
331549/B
Simrad MS70
Simrad MS70
Study this chapter to familiarize yourself with the Simrad MS70.
Topics
• Functional description on page 11
• System description on page 13
• System diagram on page 13
• System units on page 14
• General safety rules on page 16
• General supply conditions on page 17
• General installation requirements on page 18
• Support information on page 19
Related topics
• Equipment handling on page 190
• Basic cable requirements on page 200
Functional description
The Simrad MS70 is a Scientific multibeam sonar system. It is designed for fishery
research applications, and incorporates the following primary features:
• Transceiver operation control
• Sensor input control
• Information display
• Data output and record control
• Replay of previously recorded data
• Remote control and data subscription
• Calibration utility
331549/B
11
Simrad MS70
Figure 1
Operational principle
The Simrad MS70 Scientific multibeam sonar transducer is designed to be mounted on
a drop keel. From this position, it will look horizontally athwartship, and provide a
matrix of beams. This configuration allows for characterization and volume estimation
of a school of fish using a single transmission. Schools of fish can be tracked, followed
and studied using multiple transmissions. The MS70 also enables detection and
characterization of schools close to surface.
The MS70 provides an acoustic matrix of 500 beams (25 horizontal and 20 vertical).
This enables the MS70 to provide instantaneous 3D volume data. Where other systems
need multiple pings to provide 3D volume data, the MS70 can provide this using a single
ping. This allows the MS70 to provide more accurate data. For example, a school of fish
can change its structure several times during the time other systems need to cover the
school. Multiple consecutive pings enable the MS70 to provide true 4D data, where time
is the fourth dimension. This allows for improved characterization of school structures
that are changing over time.
12
331549/B
Simrad MS70
System description
The Simrad MS70 is the world’s first quantitative multibeam sonar for fishery research
applications The MS70 transducer array provides a matrix of acoustic beams. The array
is normally mounted on a drop keel, which allows it to look horizontally. The MS70
allows you to perform characterization and volume estimation of a school of fish using a
single transmission. Schools of fish can be tracked, followed and studied during multiple
transmissions. The system also enables detection and characterization of schools close
to surface.
The Simrad MS70 comprises the following units:
• Colour display
• Multibeam Operator Station
• Transceiver Unit
• Power Supply Units (3 ea)
• Transducer
System diagram
A basic MS70 system diagram is provided.
Hardware items
A Multibeam Operator
Station
B Transceiver Unit
• TRXU = three
transceiver racks
• ES = Ethernet
switch
• TRC = six
beamforming
computers
C Power Supply Units
D Transducer Array
Figure 2
Simplified system diagram
Interfaces
1 Ethernet cable between the transceiver and the operator station
2 Ethernet cable between the operator station and ship’s local area network
3 Ethernet cable to external data logger (optional)
4 Serial line communication with a motion reference sensor
5 Serial line communication with external sensors (Global positioning system, Course
gyro and Sound velocity sensor)
331549/B
13
Simrad MS70
The 25 cables from the transducer (D) are connected to the three transceiver shelves
(TRXU) in the transceiver (B). An Ethernet switch controlling two local area networks
within the transceiver distribute the processing tasks between the six beamforming
computers (TRC). The operator station is connected to these networks by means of an
Ethernet cable (1).
System units
The Simrad MS70 comprises the following units:
• Colour display
• Multibeam Operator Station
• Transceiver Unit
• Power Supply Units (3 ea)
• Transducer
Multibeam Operator Station
The MS70 Multibeam Operator Station is a high performance computer.
The computer software is based on the commercial Microsoft® Windows® XP® operating
system.
The Multibeam Operator Station communicates with the Ethernet switch in the
Transceiver Unit by means of an Ethernet cable.
The software on the operator station provides you with the following main functionality:
• Operational control of the Simrad MS70
• Communication with peripheral sensors and optional post-processing system(s)
• Sonar presentation
• Menu system
• Context sensitive on-line help
Transceiver Unit
The transceiver performs the signal processing and digital beamforming of the
transmitter and receiver channels.
The MS70 Transceiver Unit is housed in a 19” instrument rack.
In order to reduce the loss in the transducer cables, the transceiver is physically located
as close as possible to the transducer array.
14
331549/B
Simrad MS70
The main components in the transceiver are:
• 3 ea TRXU Transceiver subracks
• 6 ea TRC Beamforming computers
• 1 ea Ethernet switch
• Cabinet fan unit
Power Supply Unit
The Simrad MS70 comprises three Power Supply Units. Each unit provides AC and DC
power to one of the three transceiver racks in the transceiver. External analogue power
supplies have been chosen to ensure minimum electric noise.
In order to reduce the voltage drop in the power cables between each Power Supply Unit
and the Transceiver Unit, these cables must be kept as short as possible. The cables must
also be run in steel conduits to minimize electric noise.
The main active components in each Power Supply Unit are:
• One Internet Power Switch
• One power supply, 6 Vdc
• One power supply, 12 Vdc
• One power supply, 75 Vdc
Transducer
The MS70 Transducer is plane, and consists of a
ceramic-polymer composite matrix.
Figure 3 The Simrad MS70
transducer
The matching transformer for each transducer
element is located in the transducer, this allows a low
impedance connection to the Transceiver Unit. The
array is connected to the rear side of the three TRXU
Transceiver subracks using 25 cables.
Uninterrupted Power Supply (UPS)
In order to ensure continuous operation of the Simrad
MS70 independent of varying quality of the vessel’s
mains supply, the use of uninterrupted power supplies
(UPS) is important.
A UPS system must be fitted to supply to the TRC computers in the Transceiver Unit.
A UPS system is strongly recommended to power the Multibeam Operator Station and
the Power Supply Units.
Normally, two UPS units are used:
• One is used to power the Multibeam Operator Station and other relevant units.
331549/B
15
Simrad MS70
• One is used to power the Power Supply Units, and thus the Transceiver Unit.
Uninterrupted power supply (UPS) units are not included in the standard MS70 delivery.
Several commercial types are available. To choose the best UPS for the MS70
installation, consider environmental conditions, space available, the availability and
duration of the batteries, and the power requirements of the MS70 units.
The minimum specifications for the Uninterrupted Power Supply (UPS) are:
• Input voltage: Must fit vessel supply voltage
• Output voltage: 230 Vac, 50 Hz
• Output power:
The output power must correspond the power requirements of the MS70. If you
wish to connect other computers and/or systems to the UPS, adjust the power rating
accordingly.
• Output requirement: The AC output voltage must be a sine wave
Related topics
• Power requirements on page 173
General safety rules
WARNING
The Simrad MS70 operates on 230 Vac 50/60 Hz. This voltage is
lethal!
The following safety precautions must be followed at all times during installation
and maintenance work
• Always switch off all power before installation or maintenance.
Use the main circuit breaker, and label the breaker with a warning sign that informs
others that maintenance or installation work is being carried out on the system.
• Do not open the rack or cabinet doors while in rough seas. It may swing open
suddenly and cause damage or injury.
• For safety reasons during troubleshooting on the equipment with power ON, two
persons must always be present.
• Read and understand the applicable first aid instructions for electric shock.
• Whenever maintenance is carried out, it is essential that a first aid kit is available,
and that the maintenance personnel are familiar with the first aid instructions for
electrical shock.
• The various parts of the system may be heavy. Make sure that the appropriate tools
and certified lifting equipment are available, and that the personnel are trained in
installation and maintenance work.
16
331549/B
Simrad MS70
General supply conditions
The following supply conditions are applicable to this Simrad MS70 delivery.
Equipment responsibility
The shipyard performing the installation and/or equipment dealer becomes fully
responsible for the equipment upon receipt unless otherwise stated in the contract.
The duration of responsibility includes:
• The period of time the equipment is stored locally before installation.
• During the entire installation process.
• While commissioning the equipment.
• The period of time between commissioning and the final acceptance of the equipment
by the end user (normally the owner of the vessel which the equipment has been
installed).
Unless other arrangements have been made in the contract, the Simrad MS70 guarantee
period (as specified in the contract) begins when the acceptance documents have been
signed
Receipt, unpacking and storage
Upon accepting shipment of the equipment, the shipyard and/or the dealer should ensure
that the delivery is complete and inspect each shipping container for evidence of physical
damage. If this inspection reveals any indication of crushing, dropping, immersion in
water or any other form of damage, the recipient should request that a representative
from the company used to transport the equipment be present during unpacking.
All equipment should be inspected for physical damage, i.e. broken controls and
indicators, dents, scratches etc. during unpacking. If any damage to the equipment is
discovered, the recipient should notify both the transportation company and Kongsberg
Maritime so that Kongsberg Maritime can arrange for replacement or repair of the
damaged equipment.
Once unpacked, the equipment must be stored in a controlled environment with an
atmosphere free of corrosive agents, excessive humidity or temperature extremes. The
equipment must be covered to protect it from dust and other forms of contamination
when stored.
For more information, see the appendix related to equipment handling.
→ Equipment handling on page 190
331549/B
17
Simrad MS70
General installation requirements
The following installation requirements are applicable to this Kongsberg Maritime
delivery.
Approval by classification society
The Simrad MS70 transducer installation must be approved by Det Norske Veritas
(DNV) or another classification society.
The shipowner and shipyard performing the installation are responsible for obtaining
the installation approval.
Supply power
The supply voltage to the equipment is to be kept within ±10% of the installation’s
nominal voltage. Maximum transient voltage variations on the main switchboard’s
bus-bars are not to exceed -15% to +20% of the nominal voltage (except under fault
conditions).
Kongsberg Maritime recommends that the Simrad MS70 is powered using an
Uninterrupted Power Supply (UPS) with sine wave output.
The UPS must have the capacity to independently maintain power to the system for a
minimum of 10 minutes. This ensures that the system can be switched off in a controlled
manner in the event of a power failure.
Compass deviation
Once the installation is complete, the vessel must be swung with the system in both
the operative and inoperative modes. The shipowner and captain are responsible for
updating the deviation table accordingly with regard to the vessel’s national registry and
corresponding maritime authority.
Noise sources
The vessel’s hull, rudder(s) and propeller(s) should be thoroughly inspected in dry dock
prior to installation.
Roughness below the water-line deformities in the shell plating and protruding obstacles
can create underwater noise. These sources of turbulence must be smoothed or removed
as best as possible. It is especially important that the propeller(s) is not pitted or damaged.
Dry docking
Make sure that ample clearance under the transducer and/or protection blister is provided
when dry docking the vessel.
Avoid locating supporting blocks or structures in the vicinity of this equipment.
18
331549/B
Simrad MS70
Note
The location of the transducer and/or protection blister must be noted on the vessel’s
docking plan for future reference.
Prior to dry docking, power down all hydroacoustic systems, and label each system
accordingly to prevent accidental power on.
Remove circuit breakers if necessary.
Wiring
All cables running between system cabinets located in different rooms and/or on different
decks must be supported and protected along their entire lengths using conduits and/or
cable trays. Note that the cables must not be installed in the vicinity of high-power
supplies and cables, antenna cables or other possible sources of interference.
For more detailed information about cables and wiring, refer to the basic cable
requirements.
→ Basic cable requirements on page 200
Support information
If you need additional technical support for your Simrad MS70 you must contact your
local dealer, or one of our support departments. A list of all our dealers is provided on
http://www.simrad.com.
Norway (Main office)
• Address: Strandpromenaden 50, 3190 Horten, Norway
• Telephone: +47 33 03 40 00
• Telefax: +47 33 04 29 87
• E-mail address: [email protected]
• Website: http://www.simrad.no
Spain
• Address: Poligono Partida Torres 38, 03570 Villajoyosa, Spain
• Telephone: +34 966 810 149
• Telefax: +34 966 852 304
• E-mail address: [email protected]
• Website: http://www.simrad.es
331549/B
19
Simrad MS70
USA
• Address: 19210 33rd Ave W, Lynnwood, WA 98036, USA
• Telephone: +1 425 712 1136
• Telefax: +1 425 712 1193
• E-mail address: [email protected]
• Website: http://www.simrad.com
20
331549/B
Installation planning
Installation planning
This chapter provides the marine engineers responsible for the installation the
information necessary to plan the installation the Simrad MS70 according to Kongsberg
Maritime’s requirements.
Correct installation of the MS70 transducer is vital to the system’s performance.
Several variables must be taken into consideration, the most important of which is the
vessel’s construction. This guide can be used to select the best location for the transducer,
and includes a brief description of areas to be avoided.
Topics
• About installation drawings on page 21
• Where to mount the transducer on page 22
• Sonar room requirements on page 25
• Cabling requirements on page 26
About installation drawings
All installation drawings must be supplied by the shipyard performing the installation.
Note
The installation must be approved by the vessel’s national registry and corresponding
maritime authority and/or classification society. The shipowner and shipyard performing
the installation are responsible for obtaining and paying for installation approval.
Kongsberg Maritime offers free advice for installation planning. Proposed arrangements
may be sent for commentary or suggestions supplied by Kongsberg Maritime. The
following drawings should be submitted should assistance be requested:
• General arrangement
• Body plan and drawings of relevant bottom tanks and cofferdams
• Lines plan
331549/B
21
Simrad MS70
Where to mount the transducer
A single answer to the question where to locate the transducer cannot be given. It
depends very much on the vessel’s construction, how the hull is shaped and how the
water runs along the hull. There are however a number of important guide lines, and
some of these are even conflicting.
Mount the transducer deep
Mount the transducer at a deep position on the hull. Consider the situations when the
vessel is unloaded, and when it is pitching in heavy seas.
There are several reasons for this.
1
The upper water layers of the sea contain a myriad of small air bubbles created by the
breaking waves. In heavy seas the upper 5 to 10 metres may be filled with air, and
the highest concentrations will be near the surface. Air bubbles absorb and reflect the
sound energy, and they may in worst cases block the sound transmission altogether.
2
Another reason to go deep is the cavitation in front of high power transducers.
Cavitation is the formation of small bubbles in the water due to the resulting local
pressure becoming negative during parts of the acoustic pressure cycles. The
cavitation threshold increases with the hydrostatic pressure.
3
The transducer must never be lifted free of the water surface. Transmitting into
open air may damage the transducer beyond repair. Mounting the transducer at a
deep position on the hull prevents this.
4
If the transducer is lifted up from the water during heavy seas, it may be damaged
when the hull strikes back at the sea surface. This is especially important for low
frequency transducers with large faces.
Mount the transducer midway
Mount the transducer midway between the bow and the stern to avoid heave effects
Heave is the vertical movement of the vessel. It disturbs the echo traces in the echogram,
making a flat bottom appear as a wave. A transducer location in the middle of the vessel
minimises the influence of the vessel’s roll and pitch.
Avoid protruding objects
Mount the transducer well away from protruding objects on the hull.
Objects protruding from the hull, such as zinc anodes, sonar transducers or even the
vessel’s keel, generate turbulence and flow noise. Holes and pipe outlets are also
important noise sources. They may act as resonant cavities amplifying the flow noise at
certain frequencies.
Do not place an echo sounder transducer in the vicinity of such objects, and especially
not close behind them.
22
331549/B
Installation planning
For the same reason, it is very important that the hull area around the transducer face is as
smooth and level as possible. Even traces of sealing compound, sharp edges, protruding
bolts or bolt holes without filling compound will create noise.
Avoid the boundary water layer
Mount the transducer at the forward part of the hull to minimise the effects from the
boundary water layer.
When the vessel forces its way through the sea, the friction between the hull and the
water creates a boundary layer. The thickness of the boundary layer depends upon vessel
speed and the roughness of the hull. Objects protruding from the hull, and dents in the
hull, disturb the flow and increase the thickness of the boundary layer.
The flow in this boundary layer may be laminar or turbulent. A laminar flow is a nicely
ordered, parallel movement of the water. A turbulent flow has a disorderly pattern, full of
eddies. The boundary layer increases in thickness when the flow goes from laminar to
turbulent. The figure below illustrates the boundary layer of a vessel moving through
the water.
Figure 4
Boundary water layer
A
Turbulent flow
B
Laminar flow
C
Air bubbles in the water
Furthermore, air bubbles in the sea water are pressed down below the hull and mixed
into the boundary layer. The boundary layer is thin underneath the forward part of the
vessel, and increases in thickness as it moves towards aft. If the sides of the hull are
steep, some of the air bubbles in the boundary layer may escape to the sea surface along
the vessel sides. It is our experience that a wide and flat bottom, with a rising angle less
than around 13 degrees, is prone to giving air problems for the transducer. In any case a
transducer location in the forward part of the hull is preferred in order to minimise the
influence of the boundary layer.
331549/B
23
Simrad MS70
Avoid all propellers
Mount the transducer far away from the propellers.
The propulsion propeller is the dominant noise source on most fishing vessels, research
vessels, merchant vessels and pleasure crafts. The noise is transmitted through the sea
water. For this reason, the transducer should be placed far away from the propeller,
which means on the fore part of the hull. Positions outside the direct line of sight from
the propeller are favourable.
On small vessels with short distances it is advised to mount the transducer on that side of
the keel where the propeller blades move upwards, because the propeller cavitation is
strongest on the other side. The cavitation starts most easily when the water flows in
the same direction as the propeller blade, and that is to some degree the case at that side
of the keel where the propeller blades move downwards.
Avoid all bow thrusters
Mount the transducer far away from the bow thrusters.
Bow thruster propellers are extremely noisy. When in operation, the noise and cavitation
bubbles created by the thruster make the echo sounder useless, almost no matter where
the transducer is installed. And when not in operation, the tunnel creates turbulence, and
if the vessel is pitching, the tunnel may be filled with air or aerated water in the upper
position and release this in the lower position.
In general, all transducers must be therefore placed well away from the bow thruster.
However, this is not an invariable rule. Certain thruster designs combined with its
physical location on the hull may still offer suitable transducer locations near the thruster.
If you are in doubt, consult a naval architect.
Summary and general recommendations
Some of the above guide lines are conflicting, and each case has to be treated individually
in order to find the best compromise. Generally the propeller noise is the dominant factor,
and a recommended transducer location is in the fore part of the hull, with maximum
distance from the bow equal to one third of the total length of the hull at the water line.
Figure 5
24
General recommendation for transducer location
A
Transducer
B
Inclination angle
C
Hull length at
water line
D
Maximum 1/3 of
the hull length at
water line (C)
331549/B
Installation planning
If the vessel hull has a bulbous bow, this may well be a good transducer location, but
also here must be taken into consideration the flow pattern of the aerated water. Often
the foremost part of the bulb is preferable.
Figure 6 Recommended location of the transducer
on a bulbous hull
A
Thruster
B
Transducer location
Sonar room requirements
The “sonar room” is the compartment in which the Transceiver Unit and the Power
Supply Units are installed.
Observe these minimum requirements to obtain suitable working conditions for MS70
installation, use and maintenance.
Size and access
A well designed sonar room reduces the risk of corrosion and simplifies maintenance
increasing system reliability.
• The sonar room must be dimensioned to house all the relevant cabinets that comprise
the Simrad MS70.
• The physical distance between the transmitters and the transducer is limited due
to the length of the transducer cables.
• The sonar room must not be unnecessarily obstructed by girders, pipes etc. which
might cause installation problems or impede maintenance.
• The sonar room must be accessible under all conditions at sea or at a berth.
• All doors or hatches must be designed so that the equipment can be removed without
being disassembled.
Heating
The sonar room must be equipped with heater, dimensioned to maintain the equipment
within its environmental tolerances (at least 1000 W), installed close to the deck. Heating
is also an effective method for reducing humidity.
331549/B
25
Simrad MS70
Insulation
Bulkheads must be insulated and provided with an interior wall to the deck. The
insulation should be the minimum equivalent of 50 mm of rock-wool. In addition, piping
passing through the space prone to condensation must be insulated.
Ventilation
The sonar room must be connected to the vessel’s ventilation system. If this is not
possible, two 3” vents must be provided from the sonar room to the main deck. In the
room, the air inlet must whenever possible be located close to the deck and the outlet as
high as possible. A funnel shaped drip-collector must be mounted below the vent pipes
to divert moisture to the bilge. On the main deck, the best ventilation is provided when
the outlet pipe is at least four meters higher than the inlet pipe. To keep out sea water,
rain and spray, the ventilation pipes should be fitted with goosenecks or the equivalent. If
the vessel is likely to operate in tropical conditions, a suitable air conditioning system
must be installed. This system must be able to provide an ambient temperature not
exceeding the maximum operating temperatures for the cabinets installed in the room.
Cable protection
If the cables between the sonar room equipment and other system units located in
different compartments on the vessel pass through hatches or areas where they may be
damaged, they must be run through conduits (minimum 2” conduit is recommended).
Electrical installations and lights
The sonar room must be equipped with suitable lighting to simplify the installation and
to aid future maintenance. A minimum number of electrical outlets must be provided
for the system units and other equipment.
Bilge pump and decking
If the sonar room is located below the water line, it must be connected to the vessel’s
bilge pump system. If this is not possible, a separate bilge pump for the sonar room must
be installed. Once the installation has been completed, the sonar room must be suitably
decked without restricting access to the equipment and the cables.
Cabling requirements
A detailed cable plan is provided for the installation of the Simrad MS70.
→ Cable plans on page 82
The cables fall into the following categories:
• Internal cables within the Transceiver Unit rack
• Ethernet cables between the Transceiver Unit rack and the Operator Station, and
between the MS70 system and external network(s).
• Interface cables to external sensors
26
331549/B
Installation planning
• Transducer cables
The power cables from the three Power Supply Unit cabinets must be run in steel
conduits.
→ Steel conduits for power cables on page 56
The majority of the cables are provided by Kongsberg Maritime, but certain cables (in
particular the cables to the external sensors) must be provided by the installation shipyard.
Note
All electronic installations and corresponding wiring must be in accordance with the
vessel’s national registry and corresponding maritime authority and/or classification
society. If no such guidelines exist, we recommend that Det Norske Veritas (DNV) Report
No. 80-P008 «Guidelines for Installation and Proposal for Test of Equipment» is used as
a guide. Observe Basic cable requirements on page 200.
For more information about the cabling, see the Cable layout chapter and the basic
cable requirements.
→ Cable layout and interconnections on page 80
→ Basic cable requirements on page 200
331549/B
27
Simrad MS70
Transducer installation
The purpose of this chapter is to provide generic descriptions and illustrations allowing
the reader to understand the basic principles for echo sounder transducer installation.
This information must be regarded as general guidelines and recommendations only.
The installation shipyard must design and manufacture installation hardware to fit each
individual transducer and vessel. Whenever required, the installation shipyard must also
have the installation approved by the applicable maritime authorities.
Topics
• Transducer description on page 29
• Transducer unpacking on page 29
• Transducer installation procedure on page 31
• Transducer cables and conduit on page 35
• Transducer alignment on page 36
• Transducer handling and maintenance on page 44
Related topics
• Performance, Transducer array on page 168
• Transducer Array outline (208463) on page 184
Note
Do not expose the transducer to direct sunlight!
Do not expose the transducer to excessive heat!
Do not use high pressure water, sand blasting or metal tools to clean the transducer face!
Do not use strong solvents to clean the transducer face!
28
331549/B
Transducer installation
Transducer description
The Simrad MS70 transducer is a short cylindrical
container with the transducer array located at the
bottom. The transducer cables penetrate the top of the
cylinder.
Figure 7 The Simrad MS70
transducer
The transducer is mounted with twelve -12- bolts with
M12 thread.
A mounting ring must be welded to the blister plate.
A clamping ring is then inserted sideways towards the
mounting ring.
The twelve screws penetrate the clamping ring, and are
fastened in the mounting ring. Both rings are supplied
by Simrad.
The transducer must be mounted so that it has a clear view within its coverage sector. It
is also important that the transducer is mounted so that the water around it is not aerated.
Note
An accurate measurement of the final position and angular orientation of the transducer
is always required after installation.
The risk of galvanic corrosion must be taken into account in the design of the mounting
structure. Periodic inspection of the mounting screws and use of sacrificial anodes is
required.
The transducer is provided with three sacrificial zinc anodes mounted to its top surface
(lid). These anodes must be replaced when 1/3 of their bodies have been spent. If it is
difficult to access the zinc anodes after the transducer has been installed, additional
anodes must be mounted inside the blister. These additional anodes must be in electrical
contact with the transducer, but not with the blister and/or hull.
Note
The transducer - with the cables - is a delicate item. Great care must be shown during
all handling.
Even minor damages to the transducer cable may cause water to penetrate both the
cable and the transducer body. Further, a blow to the transducer face may easily
damage one or more elements.
Transducer unpacking
The Simrad MS70 transducer is large and heavy. It is also a delicate precision instrument,
and it must be handled with care during unpacking and installation. The following basic
rules for transducer handling MUST be followed.
331549/B
29
Simrad MS70
Handling rules
Note
Do not expose the transducer to direct sunlight!
Do not expose the transducer to excessive heat!
Do not use high pressure water, sand blasting or metal tools to clean the transducer face!
Do not use strong solvents to clean the transducer face!
Related topics
• Rules for transducer handling on page 44
How to lift the transducer out of its transport crate
The Simrad MS70 transducer is shipped in a large wooden crate. The crate has two
“rooms”, one to house the transducer, and one to house the cables. The transducer is
placed with its “face” downwards. It rests on a protective cushion shaped to fit the
transducer. Across the top of the transducer body, a wooden beam secures that it stays
in place during transportation.
A
The three M10 lifting eye
bolts are inserted into these
threaded holes.
Figure 8
The top side of the transducer array
Preparations
In order to lift the transducer out
from its transportation crate, you
will need a suitable crane. The
crane must be able to carry the
total weight of the transducer
array and the cables. You will
also need the necessary ropes
and tackles, as well as three
M10 lifting eye bolts. In order
to protect the transducer face
while handling the array, you
will also need a circular wooden
plate with diameter 522 mm.
The weight of the transducer
array is provided in the
Technical specifications chapter.
B
A
C
(CD016012B)
Procedure
1
30
Open the crate. Do not use heavy tools, and make sure that you do not damage the
transducer or any of the cables inside the crate.
331549/B
Transducer installation
2
Remove the transport beam across the top of the transducer body.
3
Mount the three 10 mm lifting eye bolts.
4
Lift the transducer straight up and out of the crate. Support the cables during the
lift to keep the transducer body from tilting sideways.
5
Place the protective wooden plate under the transducer body to protect its face.
Transducer installation procedure
Observe the following procedures to install the Simrad MS70 transducer array.
Installation principles
The Simrad MS70 transducer array is installed vertically in a retractable keel lowered
below the vessel’s hull. A mounting ring (B) is welded to the side wall of the retractable
keel (C). The transducer is pushed in sideways, and fits into the mounting ring with the
transducer face (E) facing towards port. A clamping ring (B) is mounted sideways, and
holds the transducer in place by means of 12 bolts (D).
The lifting eyes on the transducer must be removed prior to final installation.
331549/B
31
Simrad MS70
Figure 9
Transducer installation principle
A
Mounting ring (welded to the retractable
keel’s side wall)
B
Clamping ring
C
Side wall of retractable keel
D
Bolts (12 x 12M)
E
Transducer face
(CD016003A)
The transducer is provided with three sacrificial
zinc anodes mounted to its top surface (lid).
These anodes must be replaced when 1/3 of their
bodies have been spent. If it is difficult to access
the zinc anodes after the transducer has been
installed, additional anodes must be mounted
inside the blister. These additional anodes must
be in electrical contact with the transducer, but
not with the blister and/or hull.
E
Preparations
1
2
Using available literature, experience
and the ship drawings, decide the physical
location of the transducer.
Prepare the retractable keel to accept the
transducer array.
D
A
B
C
• A suitable hole for the array must be
provided, and you must ensure that
enough space is available to accept the transducer and all the cables.
• Also, suitable cable ducts must be prepared.
• Refer to the mounting and clamping ring drawings.
32
331549/B
Transducer installation
Figure 10
Mounting and clamping rings
A
D
G
C
E
F
B
(CD016004A)
A
Mounting ring (to be welded to the retractable keel)
B
Clamping ring
C
Guidance notch in the mounting ring. This notch must be pointing UP!
D
M6 guidance bolt on the mounting ring.
E
M6 guidance hole on the clamping ring, will ensure that the clamping ring
fits correctly on the mounting ring.
F
Hole for one of the 12 mounting bolts.
G
Self-locking thread to accept the mounting bolt.
Mounting the array
1
Weld the mounting ring to the retractable keel. Ensure that the notch on the
mounting ring points UP.
• Special care must be taken to ensure that the mounting ring is welded correctly
in place.
• Check and verify that the mounting ring is vertical.
• Check and verify that the ring is not twisted out of shape as a result of the welding.
2
Lift the transducer, and place it into the mounting ring. Ensure that the arrow on
the transducer rim points UP.
3
Fit the clamping ring, and mount the 12 bolts.
• Bolt type: M12 x 55 Stainless steel A4 Class 80
• Washer: Flat, Stainless steel A4 Class 80
• Torque: 76 Nm
• Apply Locktite 243
331549/B
33
Simrad MS70
Cables
Place the cables in the cable ducts, and pull them through the applicable seals to
the sonar room.
2 Check and verify that cables are installed in such a way that they are protected from
sharp edges, shock and vibration, as well as occasional work on the vessel.
→ Transducer cables and conduit on page 35
1
34
331549/B
Transducer installation
Transducer cables and conduit
25 cables arranged in three groups are used to connect the MS70 transducer array to
the 19” rack with the transceiver circuitry.
A
Steel conduit
B
Watertight seal
C
Allow the transducer cables to move freely up and
down
D
Secure the cables here
E
Steel conduit
Figure 11 Designing the
cable conduit
By default, each cable is 25 meters long. The cables are
cut to fit each individual installation.
The cable must be properly supported both inside and
outside the retractable keel.
On the inside, design a steel cable duct from the top of
the keel to just above the transducer (A). On the top of the
ducts, place a watertight seal (B) which also supports the
total weight of the cables, both inside and outside the keel.
Outside the retractable keel, allow the cable to run
smoothly up and down (C) when the keel is lowered
and hoisted. The top of the external cable run must
be properly and permanently secured (D), and the seal
must be able to take the entire weight of the cables. It
is also important to ensure that the cable run can move
undisturbed up and down outside the keel. There must be
no obstructions to prevent the cables from moving freely!
(CD016005A)
A second steel conduit (E) is used between the external
cable support and the electronic equipment in the sonar
room.
0
0
Min. 800 mm
Design of cable conduit
The cable conduit must be designed to fit each individual ship and retractable keel. The
quality of the materials used, as well as the quality of the workmanship must be defined
by the vessel owner and the installation shipyard.
If a watertight sealing is used, the design and quality of this sealing must be approved by
the vessel’s classification society.
331549/B
35
Simrad MS70
Transducer alignment
The Simrad MS70 is a precision instrument for scientific use. In order to produce data
that are both detailed and correct, it is necessary to calibrate the survey vessel more
accurately than what may have been a standard practice earlier. The results, with all
measurements taken in a common vessel coordinate system must be entered as MS70
operational parameters.
The calibration tasks include:
• measurement of where sensors are located
• measurement of how sensors are oriented
• measurement of the water line vertical location
• alignment of angular measurement sensors
• determination of any offsets in sensor data
• determination of any time delays in sensor data
Topics
• Measurements on page 36
• Vessel coordinate system on page 37
• Sensor locations on page 38
• Measurement accuracy on page 39
• Transducer orientation on page 41
• Heading sensor calibration on page 43
• Alignment summary on page 43
Note
Calibration must be taken seriously. It is recommended that this task and the continued
control of the soundings’ consistency is assigned to one motivated and qualified person
in the organization. To achieve the best results, the calibration must be planned
carefully, and monitored throughout the installation and the first sea trials. It is also
recommended to repeat the calibration procedures with regular checks throughout the
operation of the vessel.
Measurements
Observe this general introduction to the alignment task.
Objectives
The following measurements must be made after installation:
• the horizontal and vertical positions of the transducer array.
• the angular orientation of the transducer array
• the horizontal and vertical positions of the motion sensor
• the horizontal and vertical positions of the positioning system (radio or GPS antenna)
36
331549/B
Transducer installation
It is easiest to perform these measurements with the vessel in dry dock, the others may
be done with the vessel berthed. It is however recommended to perform these when in
dry dock
During the sea trials (SAT), calibration surveys are required as described in the MS70
Reference Manual. Based on the calibration parameters determined from these surveys,
proper values are entered into the MS70 as operational parameters.
In order to check and verify the performance of the MS70 system, we strongly
recommend that calibration surveys are performed at regular intervals, or prior to any
large survey. If existing sensors have been replaced, or new sensors have been installed,
a new calibration is always required.
Alignment of motion and heading sensors
The alignment of the motion sensor and the heading sensor must be adjusted so that they
provide zero values for pitch, roll and heading with the vessel lying still with normal
trim and a true North heading. It is recommended that this takes place in the dry dock.
Alternatively, the offsets from zero must be determined. This is easiest to do with the
vessel berthed. Follow the procedures in the applicable sensor manuals.
Time delays
Any time delays of the motion sensor and positioning data from their time of validity to
the time when they are available at the interface ports of the MS70 must be determined.
The information may be available from the sensor manufacturer.
Water line
Finally, the vertical position of the water line must be measured with the vessel in normal
trim. This should preferably be done at normal survey speed, and must of course be
repeated as the loading and hence the draft of the vessel changes.
Vessel coordinate system
A Cartesian coordinate system must be defined for the vessel. The following definition
must be adhered to:
• X = forwards
• Y = to starboard
• Z = pointing downwards
There are no restrictions to where the coordinate system’s origo is located in the X and Y
directions. In the Z direction however, the origo must be located on the water line.
Note
The sea surface with the vessel in normal trim defines the horizontal (X-Y) plane. The
water line must therefore be marked on the hull with the vessel in normal trim before
any dry docking.
331549/B
37
Simrad MS70
Figure 12
Vessel coordinate system with the reference point on the water line
A
Downward (Z-axis)
B
Starboard (Y-azis)
C
D
A
B
C
-Z
Forward (X-axis)
Reference point (origo)
-Y
-X
D
+X
+Y
(CD017013D)
+Z
Reference points must be established on the vessel at selected positions. These are
needed during measurements of the sensor positions. Visual markings at these positions
should be prepared and noted on the vessel drawings with X, Y and Z coordinates in the
vessel coordinate system.
Sensor locations
The MS70 transducer array must be located according to the guidelines given elsewhere
in this manual. With regard to the location of other sensors the following guidelines
should be followed, but otherwise should be chosen according to the manufacturer’s
documentation.
Motion sensor
The system motion sensor should normally be mounted on the centre line of the vessel,
either close to the MS70 transducer array, or close to the vessel’s centre of gravity.
The latter point is recommended if the sensor is used for other purposes than just with
the MS70, or if its accuracy is sensitive to horizontal accelerations.
If there is any point in the fore-aft direction which does not change height with respect
to the water line with changes in vessel speed, then this is the ideal location for the
motion sensor. This will eliminate any errors from squat induced height changes which
is not measured by current motion sensors.
Note
If the fore-and-aft distance between the transducer array and the motion sensor is larger
than 20 m, the system accuracy may be degraded.
The motion sensor must be aligned with the vessel centre line.
38
331549/B
Transducer installation
Heading sensor
The alignment of the motion sensor and the heading sensor must be adjusted so that they
provide zero values for pitch, roll and heading with the vessel lying still with normal
trim and a true North heading. It is recommended that this takes place in the dry dock.
Alternatively, the offsets from zero must be determined. This is easiest to do with the
vessel berthed. Follow the procedures in the applicable sensor manuals.
Note
The heading sensor must be aligned with the vessel centre line.
Measurement accuracy
The required measurement accuracies given below have been determined from
considerations on how they contribute to total system accuracy. Any errors in these
measurements shall not significantly contribute to depth or position errors in the
soundings.
The motion sensor must be aligned (set up). The indicated roll and pitch angles from the
sensor when the vessel has a normal trim (i.e. the coordinate system’s horizontal plane is
horizontal) must be less than ±0.055° for both roll and pitch.
Note
The given accuracies are maximum values, and if easily achievable, better accuracies
should be obtained.
331549/B
39
Simrad MS70
Figure 13
Typical location of sensors
-Z
3
5
2
4
-X
+X
R
1
(CD017013B)
+Z
1
Location of the transducer array
2
Motion sensor
3
GPS Antenna
4
Draft
5
Water line
R is the reference point (origo)
Transducer array
1
Measure the vertical location of the transducer array with an accuracy of ±2 cm.
2
Measure the horizontal location of the transducer array with an accuracy of ±5 cm.
3
Measure the heading of the transducer to an accuracy of ±0.1°.
4
Measure the roll (with respect to the horizontal plane) to an accuracy of ±0.025°.
5
Measure the pitch (with respect to the vertical plane) to an accuracy of ±0.1°.
Motion sensor
If the alongship distance between the transducer array and the Motion Sensor exceeds
5 m, its indicated pitch angle for vessel in normal trim must be less than 0.25°. If the
distance is 20 m, the indicated pitch should be less than 0.05°. A linear interpolation for
the other distance alternatives is recommended.
1
Measure the vertical location of the motion sensor to an accuracy of ±10 cm.
2
Measure the horizontal location of the motion sensor to an accuracy of ±5 cm.
40
331549/B
Transducer installation
Note
If the Motion Sensor performs lever arm correction to give heave data valid for
another location than where it is actually mounted, it is this location which must
be measured.
3
Set up the forward axis on the motion sensor with the X-axis of the vessel’s
coordinate system to an accuracy of ±0.1°.
4
Set up the motion sensor such that the indicated roll and pitch angles from the
sensor when the vessel has a normal trim (the coordinate system’s horizontal plane
is horizontal) are less than ±0.05° for both roll and pitch.
Heading sensor
The heading sensor must be aligned with the X-axis of the vessel’s coordinate system
to an accuracy of +0.255. If this is not possible, the resulting offset must be known to
the same accuracy.
Positioning system
1
Measure the vertical location of the positioning system antenna with an accuracy
of ±2 cm.
This is only required if the positioning system measures position in the vertical
axis. This will be usually only be the case for real-time kinematic GPS systems
and some optical positioning systems.
2
Measure the horizontal location of the positioning system antenna’s with an
accuracy of ±5 cm or 20% of the positioning system’s accuracy.
Water line
Note
With the vessel in normal trim, that is with an indicated pitch angle of zero from the
motion sensor, the distance to the water line may be measured anywhere on the vessel,
but otherwise it must be measured at the alongship physical location of the motion
sensor. The measurement should be taken on both sides of the vessel and averaged to
remove any roll effects. Simultaneous measurements are required if the vessel is moving.
1
Measure the vertical distance to the water line with an accuracy of ±2 cm.
Transducer orientation
The MS70 transducer array is equipped with index marks to be used for measuring
its orientation. A ruler oriented with the face index marks can be used to give the
heading and pitch of the array. By making the ruler as a right-angle cross the roll may
be measured.
331549/B
41
Simrad MS70
Coordinate systems
The heading of the transducer array is measured as the heading of the projection of a line
through the face index marks into the horizontal plane of the vessel coordinate system. If
the array is mounted in such a way that the X-axis is vertical, the heading angle must be
measured as the heading of the Y-axis with 90° subtracted. See the definition below.
The measurement of roll and pitch is done in a coordinate system which is the
vessel coordinate system rotated about the Z-axis so that its X-axis is pointing in the
transducer’s heading direction.
• The pitch of the transducer array is measured as the angle in the vertical plane between
the horizontal plane and the line through the index mark.
The pitch installation angle is measured between the X axis and the horizontal plane.
The angle is positive if the axis points upwards, and negative if it points down. The
range is between -90° and +90°.
• The roll of the transducer array is measured as the angle in the vertical plane between
the horizontal plane and a line on the face at right angle to the line through the index
mark.
The roll installation angle is measured between the Y axis and the horizontal plane.
The angle is positive if the axis points downwards, and negative if it points up. The
range is between -180° and +180°.
To determine if the roll installation angle is larger than +90° or smaller than -90°,
consider how much roll was required to bring the transducer array into its final position.
Use the standard definition for roll direction.
The MS70 software converts the measured roll angle to a rotation angle. This is made
with an arc sine calculation, and erroneous measurements or data entry may make this
impossible. However, if the measurements are done accurately, this will never be a
problem.
Making the measurements
The actual measurement of the installation angles may be done by two different methods:
1
The most accurate method is to use land surveying techniques, establish a horizontal
plane, and do distance measurements to and in this plane.
2
The second method is to use an inclinometer to measure roll and pitch angles
combined with distance measurements in the horizontal plane for heading. This
method is easier, but it requires a sufficiently accurate inclinometer.
Which method is to be used must be determined by the facilities available. The use of
land surveying techniques is the recommended method, and is especially appropriate on
a new vessel where all sensor locations must be measured. The two other methods may
be appropriate when installing an MS70 on a survey vessel where other sensor positions
and orientations are already established. A prerequisite for using an inclinometer is of
course that it is accurate enough.
42
331549/B
Transducer installation
Heading sensor calibration
It may not be possible to calibrate the heading sensor accurately enough through sea
trials, so the calibration is normally done with the vessel berthed.
On the quay the geographical coordinates of two points must be known or measured so
that the heading of a line on the quay can be established to an accuracy of better than
±0.1°. The distance from two points on the centre line of the vessel (fore and aft) are
then measured so that the vessel’s heading can be calculated. The heading sensor is then
aligned to this heading or its measured offset determined.
The vessel must be turned 180° as many times as necessary with the alignment or offset
checked until the mean error is within the specifications of the heading sensor.
Alignment summary
The table below give a summary of the requirements to the accuracy of the measurements.
Table 1
Alignment summary
Sensor
Measurement
Accuracy
Transducer array
Position (x,y) [m]
±0.05
Transducer array
Position (z) [m]
±0.02
Transducer array
Pitch [deg]
±0.10
Transducer array
Roll [deg]
±0.025
Transducer array
Heading [deg]
±0.50
Motion sensor
Position (x,y) [m]
±0.05
Motion sensor
Position (z) [m]
±0.10
Motion sensor
Pitch [deg]
±0.05
Motion sensor
Roll [deg]
±0.05
Motion sensor
Heading [deg]
±0.10
Heading sensor
Heading [deg]
±0.10
Positioning system (antenna)
Position (x,y) [m]
±0.05
Positioning system (antenna)
Position (z) [m]
±0.02
Water line
Position (z) [m]
±0.02
331549/B
43
Simrad MS70
Transducer handling and maintenance
You MUST observe the following rules for handling, cleaning, maintenance and painting.
Topics
• Rules for transducer handling on page 44
• Rules for transducer maintenance on page 45
• Approved anti-fouling paints for transducers on page 45
Rules for transducer handling
Note
Do not expose the transducer to direct sunlight!
Do not expose the transducer to excessive heat!
Do not use high pressure water, sand blasting or metal tools to clean the transducer face!
Do not use strong solvents to clean the transducer face!
Transport protection
Some transducers are delivered with a cover plate on the face for protection during
transport. Let this plate stay on as long as possible, but do not forget to remove it before
the vessel goes into the sea.
Painting the transducer face
An anti-fouling paint may be applied to the transducer face. Because some paint types
may be aggressive to the polyurethane in the transducer face, consult Simrad’s list of
approved paints.
→ Approved anti-fouling paints for transducers on page 45
Cleaning the transducer face
Whenever opportunity arise, for example when the vessel is dry docked, the transducer
face may be cleaned for shells and other marine fouling.
Be careful not to make cuts in the transducer face.
Use a piece of soft wood or a very fine grade emery paper.
Do not use high pressure water or sand blasting.
Special rules for acoustic windows
Arctic tanks have acoustic windows made of polycarbonate.
These must neither be painted nor cleaned with chemicals.
Acoustic windows must not be exposed to direct sunlight.
44
331549/B
Transducer installation
Rules for transducer maintenance
Once installed, the transducer is maintenance free. However, when the vessel is docked,
it is highly recommended to clean the transducer face to remove marine growth.
1
Perform a thorough visual check of the transducer.
2
If necessary, clean the transducer
• To clean the transducer, use normal synthetic soap and water.
• To remove marine growth, use fine-grade sandpaper or emery paper.
Note
Do not expose the transducer to direct sunlight!
Do not expose the transducer to excessive heat!
Do not use high pressure water, sand blasting or metal tools to clean the transducer
face!
Do not use strong solvents to clean the transducer face!
3
If necessary, apply a new layer of anti-fouling paint to the transducer face.
Because some paint types may be aggressive to the polyurethane in the transducer
face, please consult Simrad’s list of approved paints.
→ Approved anti-fouling paints for transducers on page 45
Approved anti-fouling paints for transducers
This is Simrad’s list of approved antifouling paints on polyurethane transducer housing.
Please note that the products offered from these manufacturers are changed. Old products
are removed, and new are offered. Consult the manufacturer’s websites for up-to-date
information. In case of doubt, contact Simrad for advice.
Refer to the manufacturer’s documentation and data sheets for a complete product
information and applicable procedures.
Jotun
Head office address: P.O.Box 2021, N-3248 Sandefjord, Norway
Website: www.jotun.com.
1
Racing
2
Non-stop
3
Safeguard Universal primer (125 micron) with Antifouling SeaQuantum Ultra (125
micron)
4
Antifouling Seaguardian
331549/B
45
Simrad MS70
International Marine Coatings
Address: World-wide offices
Website: www.international-marine.com.
1
Intersleek tie coat + 425 FCS
• BXA386/BXA390/BXA391 Grey
• HKA563/HKA570/HKA571 Yellow
• Mix BXA386, BXA390 and BXA391 first, then apply. When dry, mix HKA563,
HKA570 and HKA571, apply.
2
Intersmooth 360 Ecoloflex SPC
3
Micron Extra
Hempel IFA Coatings
Head office address: Hempel A/S, Lundtoftevej 150, Kgs. Lyngby, DK-2800
Copenhagen, Denmark
Website: www.hempel.com.
1
46
Hempel A/F Classic 76550
331549/B
Transceiver Unit installation
Transceiver Unit installation
This chapter explains how to install the Simrad MS70 Transceiver Unit.
The Transceiver is normally positioned in a dedicated room in the vicinity of the
transducer. The physical length of the cables limit the physical distance between the
transducer and the transceiver.
Topics
• About the Transceiver Unit on page 47
• Transceiver Unit preparations on page 49
• Transceiver Unit installation procedure on page 50
• Transceiver Unit parts identification on page 65
Related topics
• Sonar room requirements on page 25
• Performance, Transceiver Unit on page 168
• Power requirements on page 173
• Environmental requirements on page 174
• Transceiver Unit outline (281020) on page 177
About the Transceiver Unit
The transceiver performs the signal processing and digital beamforming of the
transmitter and receiver channels.
The MS70 Transceiver Unit is housed in a 19” instrument rack.
In order to reduce the loss in the transducer cables, the transceiver is physically located
as close as possible to the transducer array.
The main components in the transceiver are:
• 3 ea TRXU Transceiver subracks
• 6 ea TRC Beamforming computers
• 1 ea Ethernet switch
• Cabinet fan unit
331549/B
47
Simrad MS70
Note
The Transceiver Unit is shipped as a “wired rack”.
This means that the 19” instrument rack is empty.
The TRXU subracks, Ethernet switch and TRC computers are not mounted. However, all
internal mounting material and wiring have been prepared to accept these units.
The physical installation of the electronic units, the internal wiring and the
setting-to-work procedures are done by personnel from Kongsberg Maritime AS.
48
331549/B
Transceiver Unit installation
Transceiver Unit preparations
The instrument rack housing the
Transceiver Unit is equipped with shock
absorbers at the bottom of the cabinet and
at the left hand side. This means that the
cabinet is designed to be installed alongside
a bulkhead.
A
U-shaped steel profiles, must provide
minimum 10 cm height
B
Cable tray
C
Grounding
Figure 14 Transceiver Unit positioning
and grounding
This procedure outlines the necessary tasks
to prepare the transceiver for installation.
1
Use U-shaped steel profiles (A) to
add extra height for the cabinet. This
allows room below the cabinet for
transducer and interconnection cables.
2
Use the space below the cabinet
to install a cable tray (B) for the
transducer cables.
All cables enter the cabinet through
an opening in the bottom frame.
3
Ensure that the Transceiver Unit can
be properly grounded (C).
4
Observe the outline dimensions
drawing and the details regarding the
cabinet’s footprint.
→ Transceiver Unit outline (281020)
on page 177
5
Check and ensure that ample space
is provided around the cabinet to
allow for cables, maintenance and
replacement of modules.
• Minimum space requirement, front:
100 cm
• Minimum space requirement, rear:
60 cm
• Minimum space requirement, below: Minimum 10 cm below the shock absorbers
6
Check that the environmental requirements (temperature and humidity) for the
sonar are met.
→ Environmental requirements on page 174
331549/B
49
Simrad MS70
7
Check that the sonar room requirements are met.
→ Sonar room requirements on page 25
Transceiver Unit installation procedure
This procedure explains how to install the Transceiver Unit.
The Transceiver Unit is housed in a 19 inch commercial instrument rack.
The chosen method for mounting the cabinet must be determined by the installation
shipyard and the customer. The cabinet may be welded to the deck and bulkhead
brackets, or mounted using suitable bolts.
1
Position the U-shaped profiles below the Transceiver Unit to provide the
recommended height.
2
Arrange the necessary brackets on the bulkhead to fit the shock absorbers.
Note that the outline dimension drawing shows the initial size of the shock
absorbers. When the cabinet is complete with all electronics, the weight will
compress the bottom shock absorbers slightly. You must take this into consideration
when you arrange the mounting of the absorbers at the top of the cabinet.
3
Mount the bulkhead brackets for the shock absorbers.
4
Place the cabinet in its correct position, and mount it properly.
Transceiver Unit parts identification
This section provides a generic overview of the Transceiver Unit.
Easy access to the front and rear part of the Transceiver Unit is essential, as this allows
for easy replacement of parts.
Line replaceable units
The following units have been defined as line replaceable units in the Transceiver Unit.
• TRX32 Receiver boards
• SMS Driver boards
• TRX RIO boards
• Capacitor module
• Ethernet switch
• TRC Beamforming computer
• Cabinet fan unit
50
331549/B
Transceiver Unit installation
Forward view
Figure 15
Transceiver Unit, front view
A
Transceiver rack TRXU0
A
(CD016006-019)
Eight TRX32 boards are used.
B
Transceiver rack TRXU1
Eight TRX32 boards are used.
C
Transceiver rack TRXU2
Nine TRX32 boards are used.
D
Ethernet switch
E
TRC0–5 Beamforming computers
TRC0 (top) is the master.
B
F
Fan unit
C
D
E
F
331549/B
51
Simrad MS70
Rear view
Figure 16
A
B
Transceiver Unit, rear view
D
C
E
A
Power distributor PD2
B
Power distributor PD1
C
Power distributor PD1
D
Rear side of Transceiver rack TRXU0
E
Rear side of Transceiver rack TRXU1
F
Rear side of Transceiver rack TRXU2
G
Rear side of Ethernet switch
H
Rear side of TRC Beamforming
computers
I
Circuit breakers (from left) CB0, CB1,
CB2, CB3
F
(CD016006-020)
G
H
I
52
331549/B
Power Supply Unit installation
Power Supply Unit
installation
This chapter explains how to do the physical installation of the Power Supply Units.
The three units are installed in the sonar room within reasonable distance from the
Transceiver Unit. The physical length of the power cables limit the physical distance
between each Power Supply Unit and the Transceiver Unit.
Topics
• About the Power Supply Unit on page 54
• Power Supply Unit preparations on page 54
• Steel conduits for power cables on page 56
• Power Supply Unit installation procedure on page 57
• Power Supply Unit population on page 57
Related topics
• Sonar room requirements on page 25
• Performance, Power Supply Unit on page 168
• Power requirements on page 173
• Environmental requirements on page 174
• Power Supply Unit outline (311237) on page 181
• Power Supply Unit mounting frame (308337) on page 183
331549/B
53
Simrad MS70
About the Power Supply Unit
The Simrad MS70 comprises three Power Supply Units. Each unit provides AC and DC
power to one of the three transceiver racks in the transceiver. External analogue power
supplies have been chosen to ensure minimum electric noise.
In order to reduce the voltage drop in the power cables between each Power Supply Unit
and the Transceiver Unit, these cables must be kept as short as possible. The cables must
also be run in steel conduits to minimize electric noise.
The main active components in each Power Supply Unit are:
• One Internet Power Switch
• One power supply, 6 Vdc
• One power supply, 12 Vdc
• One power supply, 75 Vdc
Power Supply Unit preparations
Before the Power Supply Units are mounted, observe the following procedure.
Installation methods
• Each cabinet can be installed
“stand-alone”, side by side or on top of
each other. Make sure that enough space
is provided between the cabinets to
allow for ventilation, maintenance and
parts replacements.
Figure 17 Power supply Unit
ventilation; air flow
• The three cabinets can be installed
together on a dedicated frame. This is an
option, and the frame must be ordered
separately. The frame is mounted
vertically on the bulkhead by means of
shock absorbers.
Procedure
1
Observe the outline dimensions
drawing and the details regarding the Power Supply Unit’s footprint.
→ Power Supply Unit outline (311237) on page 181
→ Power Supply Unit mounting frame (308337) on page 183
2
54
Decide which of the two installation methods that will be used.
331549/B
Power Supply Unit installation
3
4
5
Provide ample space around the cabinet to allow for ventilation, inspection,
maintenance and parts replacement. Make sure that the cabinet door can be fully
dismounted for unobstructed access to its internal parts.
• Minimum space requirement, front: 80 cm
• Minimum space requirement, rear: 0 cm
• Minimum space requirement, below: 0 cm (provided that the four feet are
mounted)
Check that the environmental requirements (temperature and humidity) for the
sonar are met.
→ Environmental requirements on page 174
Check that the sonar room requirements are met.
→ Sonar room requirements on page 25
331549/B
55
Simrad MS70
Steel conduits for power cables
Note
Due to the voltages and currents provided by the power supplies, steel conduits are
imperative.
Figure 18
Steel conduits principle
The power cables from the
three Power Supply Unit
cabinets to the Transceiver
Unit must be run in steel
conduits. These conduits
serve the following purposes:
Power
Supply
Unit
• Noise and interference
protection
Max 1 m
• Physical protection
Power
Supply
Unit
Transceiver
Unit
The maximum length of
unprotected cable is 1 meter
in each end of the conduit.
For this reason, separate
conduits for each Power
Supply Unit is required.
Max 1 m
Power
Supply
Unit
Max 1 m
The minimum internal
diameter of the steel conduits
is 5 cm.
Max 1 m
If it is necessary to bend the steel conduits, make sure that the bending radius do not
prevent the cable from being pulled through the conduit.
56
331549/B
Power Supply Unit installation
Power Supply Unit installation procedure
Depending on the installation method provided, two procedures are provided.
Cabinets mounted side by side, or above each other
1
Observe the eight 8.5 mm mounting holes through the rear side of the two shock
absorbers.
2
Arrange the necessary brackets on the bulkhead to fit the cabinets.
3
Prepare the brackets to accept the eight bolts.
4
If necessary, mount a temporary shelf under the cabinet to support its weight.
5
Place the cabinet in its correct position (on the support shelf), and mount it properly
using eight suitable bolts.
Cabinets installed on the mounting frame
1
Observe the mounting holes on the mounting frame.
2
Arrange the necessary brackets on the bulkhead to fit shock absorbers.
3
Mount the bulkhead brackets for the shock absorbers.
4
Place the frame in its correct position, and mount it properly.
5
For each cabinet, place it on the support shelf on the frame, and mount it properly
to the frame using four suitable bolts.
Power Supply Unit population
WARNING
This cabinet contains high voltages. You must disconnect the AC
power connections before opening the cabinet.
The following items are installed in the Power Supply Unit.
• Mounted on shelves on the back wall:
– +75 Vdc power supply
– +12 Vdc power supply
– +6 Vdc power supply
– Fuse bracket
• An Internet power switch is mounted at the bottom of the cabinet.
• A terminal block and a fan are mounted on the left side wall.
All cables in and out of the cabinet are fed through holes in the bottom.
331549/B
57
Simrad MS70
Figure 19
Power Supply Unit overview
A
Power supply +6 Vdc
B
Power supply +12 Vdc
C
Power supply +75 Vdc
D
Internet Power Switch
E
Fuse panel
F
Fan
G
Terminal board for all interface and power cables
58
331549/B
Multibeam Operator Station installation
Multibeam Operator Station
installation
This chapter describes the installation of the Simrad MS70 Multibeam Operator Station.
Topics
• Operator station installation requirements on page 60
• Operator station computer installation on page 60
• Operator station display monitor installation on page 62
Related topics
• Performance, Multibeam Operator Station on page 168
• Power requirements on page 173
• Environmental requirements on page 174
• Multibeam Operator Station (341305) on page 176
About the Multibeam Operator Station
The MS70 Multibeam Operator Station comprises a Simrad APC12 Processor Unit
manufactured by Kongsberg Maritime AS.
The necessary information required to install this computer is provided in this chapter.
331549/B
59
Simrad MS70
Operator station
installation
requirements
Figure 20
Multibeam Operator Station
Installation of the MS70 Multibeam
Operator Station units must be
performed by qualified and trained
personnel. Observe the following
general guidelines for installation.
• The safe navigation of the vessel.
• The “Compass safe distance” for
each individual unit.
• Ergonomically correct operating
and viewing heights.
• Maximum allowable cable distances between the various units.
• The installation areas are dry, well ventilated and free of excessive dust and vibration.
• Easy access to the cable connections on the back of the equipment is provided.
• Enough extra cable is allowed to facilitate maintenance and service by not having
to disconnect the cables.
Operator station computer installation
This section describes the installation of the MS70 Multibeam Operator Station computer.
Preparations
Provide ample space around the computer. This is necessary to reach and use the front
and rear mounted USB connectors, and the CD/DVD player. It is also important to
allow for easy access to all the cables, and to provide for inspection, maintenance and
parts replacement.
Make sure that the computer can be fully opened for unobstructed access to its internal
parts.
• The computer can be installed inside a console, in a cabinet or 19” rack, or on a desk.
• Make sure that adequate ventilation is available to avoid overheating.
• The compass safe distance must be allowed for when planning the location of the unit.
• Ensure that the installation allows for the physical movements and forces normally
experienced on a vessel.
• Ensure that enough space is provided for maintenance work.
60
331549/B
Multibeam Operator Station installation
Installation procedure
1
Prepare the mounting location.
→ Multibeam Operator Station (341305) on page 176
2
Disassemble the base rails from the Processor Unit by removing the two front
base rail screws.
3
Attach the base rails as shown in the figure.
Note
Note that the four rubber bushings must be mounted on top of the base rails. These
are required to provide vibration and shock absorption between the base rails, and
the rails mounted on the Processor Unit.
Figure 21
Installation of the Processor Unit
315.3
(CD031082-004)
ø6.5
297.5
Rubber foot inside rail
5)
3.
(36.7)
3
(4
4
Mount the Processor Unit onto the base rails.
a
Hook the unit onto the rails at the rear end.
b
Press it down.
c
Secure the Processor Unit with the two front base rail screws
331549/B
61
Simrad MS70
Operator station display monitor installation
This section describes the installation of the MS70 Operator Station display. The
make and model of the this display is determined by the customer. For this reason,
the information provided here is only for guidance. For a detailed specific installation
procedure, refer to the applicable documentation provided with the display.
• The display must be located so that it is best protected from glare which reduces
readability.
• The display may be mounted in a panel, on the desktop or bulkhead, or overhead.
• Make sure that adequate ventilation is available to avoid overheating.
• The compass safe distance must be allowed for when planning the unit’s location.
• Make sure that the installation allows for the physical movements and forces normally
experienced on a vessel.
• Make sure that enough space is provided for maintenance work.
62
331549/B
UPS installation
UPS installation
In order to ensure continuous operation of the Simrad MS70 independent of varying
quality of the vessel’s mains supply, the use of uninterrupted power supplies (UPS) is
important.
A UPS system must be fitted to supply to the TRC computers in the Transceiver Unit.
A UPS system is strongly recommended to power the Multibeam Operator Station and
the Power Supply Units.
Normally, two UPS units are used:
• One is used to power the Multibeam Operator Station and other relevant units.
• One is used to power the Power Supply Units, and thus the Transceiver Unit.
Uninterrupted power supply (UPS) units are not included in the standard MS70 delivery.
The installation of these units must be performed as described in the applicable
documentation provided by the manufacturer. Ensure that you install the UPS unit in
such a way that maintenance is easily carried out.
The minimum performance specifications for the UPS units are listed in chapter Simrad
MS70.
Related topics
• Uninterrupted Power Supply (UPS) on page 15
331549/B
63
Simrad MS70
Transceiver Unit assembly
When delivered, the MS70 Transceiver Unit is provided as a wired cabinet. This means
that the cabinet is empty. None of the main modules are mounted. These are packed
separately, and must thus be installed before the system can be set to work.
This chapter provides the necessary procedures to install the transceiver modules and
cables.
Important
Do not connect any AC or DC power to the MS70 Transceiver or Power Supply Units
until explicitly instructed to do so in the relevant procedure.
Topics
• About the Transceiver Unit on page 65
• Mounting the TRXU racks on page 68
• Mounting the Ethernet switch on page 73
• Mounting the TRC Beamforming computers on page 74
• Connecting the power cables from the Power Supply Units on page 76
• Connecting the transducer cables on page 78
64
331549/B
Transceiver Unit assembly
About the Transceiver Unit
This section provides a general description of the Transceiver Unit.
Topics
• Transceiver Unit purpose on page 65
• Transceiver Unit parts identification on page 65
Transceiver Unit purpose
The transceiver performs the signal processing and digital beamforming of the
transmitter and receiver channels.
The MS70 Transceiver Unit is housed in a 19” instrument rack.
In order to reduce the loss in the transducer cables, the transceiver is physically located
as close as possible to the transducer array.
The main components in the transceiver are:
• 3 ea TRXU Transceiver subracks
• 6 ea TRC Beamforming computers
• 1 ea Ethernet switch
• Cabinet fan unit
The purpose of the Simrad MS70 Transceiver Unit is to:
• Transmission parameter distribution
• Transmission triggering
• Audio transmission
• Audio reception
• Analogue to digital conversion
• Beamforming
• Transmission and reception stabilizing
Transceiver Unit parts identification
This section provides a generic overview of the Transceiver Unit.
Easy access to the front and rear part of the Transceiver Unit is essential, as this allows
for easy replacement of parts.
Line replaceable units
The following units have been defined as line replaceable units in the Transceiver Unit.
• TRX32 Receiver boards
• SMS Driver boards
• TRX RIO boards
• Capacitor module
• Ethernet switch
331549/B
65
Simrad MS70
• TRC Beamforming computer
• Cabinet fan unit
Forward view
Figure 22
Transceiver Unit, front view
A
Transceiver rack TRXU0
A
(CD016006-019)
Eight TRX32 boards are used.
B
Transceiver rack TRXU1
Eight TRX32 boards are used.
C
Transceiver rack TRXU2
Nine TRX32 boards are used.
D
Ethernet switch
E
TRC0–5 Beamforming computers
TRC0 (top) is the master.
B
F
Fan unit
C
D
E
F
66
331549/B
Transceiver Unit assembly
Rear view
Figure 23
A
B
Transceiver Unit, rear view
D
C
E
A
Power distributor PD2
B
Power distributor PD1
C
Power distributor PD1
D
Rear side of Transceiver rack TRXU0
E
Rear side of Transceiver rack TRXU1
F
Rear side of Transceiver rack TRXU2
G
Rear side of Ethernet switch
H
Rear side of TRC Beamforming
computers
I
Circuit breakers (from left) CB0, CB1,
CB2, CB3
F
(CD016006-020)
G
H
I
331549/B
67
Simrad MS70
Mounting the TRXU racks
This procedure explains how to install the three TRXU racks into the empty wired frame
of the transceiver cabinet.
Note
Due to the physical weight of the racks, minimum two persons must be allocated to do
this task.
Standard workshop tools are required, as well as a torque wrench for Allen bolts.
Important
Each of the three TRXU racks are provided complete with all circuit boards and modules
readily mounted. They are positioned at the top of the transceiver rack, one above each
of the three air ducts.
The racks must be installed in the following order:
1
TRXU No.0 must be installed in the top position. There are eight TRX32 circuit
boards in this rack, and they are identified with numbers 24 to 17.
2
TRXU No.1 must be installed in the middle position. There are eight TRX32 circuit
boards in this rack, and they are identified with numbers 16 to 9.
3
TRXU No.2 must be installed in the bottom position. There are nine TRX32 circuit
boards in this rack, and they are identified with numbers 8 to 0.
Each rack is mounted on a dedicated set of rails, and then secured with four front
mounted racks bolts on each side of each TRXU rack.
The rails are already installed in the wired transceiver rack, and the bolts to be used are
already placed in their holes. Each rail consists of two parts; one is mounted to the rack
framework, and one is mounted to the side of the TRXU rack. During shipping, these
side rails are however mounted inside the framework rails.
The bottom bolt on the right side of TRXU No.0 secures an earth strap to the top bolt
on the right hand side of TRXU No.1. Similar, the bottom bolt on the right side of
TRXU No.1 secures an earth strap to the top bolt on the right hand side of TRXU No.2.
The bottom earth strap on TRXU No.2 is connected to the frame of the transceiver
cabinet. These earth straps are all mounted on the empty transceiver cabinet frame
during shipping.
68
331549/B
Transceiver Unit assembly
Figure 24
TRXU rack, front view
Note that the physical appearance of the TRX32 circuit boards and the various labels on
the rack may differ from this photo.
A
Ethernet cable, one is connected to each TRX32 circuit after the rack has been
secured.
B
Eight bolts are used to secure the rack. Two of these bolts also holds the earth straps.
C
Earth straps
D
Air duct. This air duct is mounted in the empty transceiver cabinet during shipping.
331549/B
69
Simrad MS70
Figure 25
TRXU racks 1 and 2, rear view with cables
Note that the physical appearance of the various labels on the rack may differ from
this photo.
A
Mounting rail for TRSU rack
B
Terminal board for power to TRXU No.1.
C
Terminal board for power to TRXU No.2.
D
Three Amphenol plugs connect the DC power cables to the rear side of the TRXU
rack.
E
AC input
F
Synchronisation cables between the TRXU racks
G
One of the sockets for the transducer cables.
70
331549/B
Transceiver Unit assembly
Procedure
1 Remove the two earth straps on the right hand side of the transceiver cabinet.
2 Remove all the remaining 20 bolts that are temporarily mounted into their front
holes.
3 On each of the six rails (three on each side), dismount the side rail that shall be
mounted onto the TRXU racks.
Figure 26
4
5
Remove the side rail (A) by unlocking it (B)
Remove the rail bolts from the two side panels on each TRXU rack.
Use the same bolts to mount the two side rails.
Note
Figure 27
Mount each side rails with three bolts (A)
Do not use excessive
force when you tighten
the bolts for the side rails.
Maximum torque is 130
Ncm. These bolts are
inserted into nuts on the
inside of the subracks, and
if you tighten too hard, you
may damage the threads.
6
Push the rails mounted on
the side of each rack into the rails on the cabinet, and push the rack carefully in.
You may find it useful to loosen the bolts on the fan drawers over and/or under the
TRXU rack.
Note
Make sure that you do not damage any of the Ethernet cables!
7
8
Secure the subrack with the front bolts, four on each side.
Mount the two earth straps.
Note that the bolts used to mount the earths traps are slightly longer than the others.
331549/B
71
Simrad MS70
9
Connect the Ethernet cables to the corresponding sockets at the top of each TRX32
transceiver board.
The Ethernet cables are pre-installed, and the length of each cable is adjusted to
reach the individual TRX32 transceiver boards.
10 On the rear side of each TRXU rack, connect the four power plugs.
→ Power Supply Units DC output wiring on page 138
→ TRXU racks DC input wiring on page 139
→ Power Connector Panel on page 140
→ +6 and +12 Vdc to the TRXU backplane on page 141
→ +75 Vdc to the TRXU backplane on page 142
11 On the rear side of the TRXU racks, connect the two synchronisation Ethernet
cables.
→ Transceiver Unit TRXU synchronization cable on page 144
72
331549/B
Transceiver Unit assembly
Mounting the Ethernet switch
This procedure explains how to install the Ethernet switch into the empty wired frame of
the transceiver cabinet.
Only standard workshop tools are required.
The Ethernet switch rests on a set of angular shelves on each side of the rack. It is
secured in position using four bolts.
1
Push the Ethernet switch in place on the shelves provided.
2
Secure the switch in position using the four bolts, two on each side.
3
Connect the front mounted Ethernet cables.
Observe the colour codes used on the cables.
→ Ethernet cables; TRC computers on page 85
→ Ethernet cables; TRXU transceiver racks on page 86
Figure 28
Ethernet switch with all cables connected
Note that the Ethernet cables to the Power Supply Units and Multibeam Operator Station
are not connected on this picture.
Note that the physical appearance of the various labels on the rack may differ from
this photo.
4
Connect the AC power cables to the rear side of the switch.
Note
Do not apply power!
331549/B
73
Simrad MS70
Mounting the TRC Beamforming computers
This procedure explains how to install the six TRC Beamforming computers into the
empty wired frame of the transceiver cabinet.
Note
Due to the physical weight and the size of the computers, minimum two persons must be
allocated to do this task.
No tools are required.
Important
Each of the six TRC Beamforming computers are provided complete with all additional
circuit boards and modules readily mounted. The software has been installed on all the
computers. They are positioned at the bottom of the transceiver rack.
The TRC0 Beamforming computer must be mounted at the top. This computer is
recognized by label, and the additional Ethernet interface boards that are mounted.
The order of the computers are:
1
TRC0 (on top)
2
TRC1
3
TRC2
4
TRC3
5
TRC4
6
TRC5 (at the bottom)
Each computer is identified with a name label.
Each computer is mounted on a dedicated set of rails. The rails are already installed in
the wired transceiver rack.
74
331549/B
Transceiver Unit assembly
Figure 29
TRC Beamformer computer installation
A
The two bolts on each side of the computer cabinet fit into these slots in the rail
B
Press here (on each side) to push the computer into the rack.
C
Locking device to release the computer from the rails
Procedure
1
Pull out the rails.
2
Lift the computer carefully, align the two bolts on each side so that they will fall
into the corresponding slots on the rails.
3
When the computer is properly aligned to the slots, release it.
4
Push the computer into the transceiver rack.
It will lock in the withdrawn position.
5
Connect the Ethernet cables to the rear side of the computer.
→ Ethernet cables; TRC computers on page 85
→ [B] Ethernet cables to TRC Beamforming computers on page 98
→ RJ45 Ethernet, straight on page 147
6
Connect the AC power cables to the rear side of the computers.
Note
Do not apply power!
7
Connect the interface cable to the rear side of the TRC0 Beamforming computer.
→ Interface cables; Motion Reference Unit on page 92
→ [G] Motion Reference Unit interface on page 103
→ Generic RS-232 Serial line on page 130
331549/B
75
Simrad MS70
Connecting the power cables from the Power
Supply Units
This procedure explains how to connect the power cables from the three Power Supply
Units.
The following cables must be connected:
a
230 Vac to TRXU fans
b
+6 Vdc (one red and one blue cable)
c
+6 Vdc (one red and one blue cable)
d
+12 Vdc (one red and one blue cable)
e
+75 Vdc (one red and one blue cable)
Important
Do not connect any AC or DC power to the MS70 Transceiver or Power Supply Units
until explicitly instructed to do so in the relevant procedure.
Figure 30
Block diagram, AC and DC distribution from Power Supply Units
POWER CABINET 0
TRXU 0
POWER CABINET 1
TRXU 1
POWER
SUPPL Y
+12 Vdc
+75 Vdc
230 Vac
TERMINAL BOARD
POWER
SUPPL Y
+6 Vdc
TERMINAL BOARD
POWER
SUPPL Y
TRXU
BACKPLANE
POWER CABINET 2
POWER
CONNECT OR P ANEL
TRXU 2
TRXU
FANS
230 Vac
SWITCH
ETHERNET
SWITCH
Ethernet
(CD016022-003)
76
331549/B
Transceiver Unit assembly
1
Connect each of the power
cables to the three terminal
boards in the Transceiver Unit.
Figure 31 Power cables connected to the
terminal board (example)
• The top terminal board is
used to accept the power
cables from Power Supply
Unit no.0. The power is then
connected to TRXU no.0.
• The bottom rear terminal
board is used to accept the
power cables from Power
Supply Unit no.1. The power
is then connected to TRXU
no.1.
• The bottom forward terminal
board is used to accept the
power cables from Power
Supply Unit no.2. The power
is then connected to TRXU
no.2.
→ Power Supply Units DC
output wiring on page 138
2
These cables are connected for test purposes
when the side wall of the transceiver cabinet
has been removed.
Secure the cables to the frame in the cabinet using wire wraps.
331549/B
77
Simrad MS70
Connecting the transducer cables
This procedure explains how to connect the transducer cables to the rear side of the
TRXU racks.
There are 25 transducer cables, and these are numbered 001 to 025.
Figure 32
Cable plan, Transducer array
Transceiver Unit
TRXU0
Cables
001 - 008
TRXU1
TRXU2
Cables
009 - 016
Cables
017 - 025
(CD016008C)
78
331549/B
Transceiver Unit assembly
1
For each transducer cable, locate
the identification number.
2
Connect the plug to the correct
socket on the correct TRXU, and
tighten the bolts.
Figure 33 Transducer cables connected to
the rear side of the TRXU rack
Observe the connection
drawings provided.
→ Transducer cables on
page 156
3
Collect the transducer cables in
bundles, and secure these to the
wired frame in the transceiver
cabinet with wire wraps.
331549/B
79
Simrad MS70
Cable layout and
interconnections
This chapter provides the cable plan and cable installation requirements for the Simrad
MS70.
Topics
• Read this first! on page 81
• Cable plans on page 82
• Detailed list of cables on page 96
• Transducer cables on page 115
• Moxa CP134U-I Serial adapter setup on page 125
• Cable specifications on page 129
80
331549/B
Cable layout and interconnections
Read this first!
Detailed information about cable specifications, termination and connectors are provided.
All cables are provided by Simrad unless otherwise specified. In order to provide for
maintenance and to allow for vibration, make sure that some slack is provided for all
cables.
A detailed drawing for each cable is provided. Each drawing provides additional
specifications, and may, when applicable, include:
• Required minimum specifications
• Connections at each end (including reference to the corresponding: system unit,
terminal board identification and plug/socket to be used)
• Corresponding terminations
• Number of cores
Cables fall into two categories.
• System cables: These cables are supplied by Kongsberg Maritime.
• Shipyard cables: These cables must be provided by the shipyard performing the
installation, or the shipowner. It is very important that the cables used meet the
minimum specifications provided in this manual.
Kongsberg Maritime accepts no responsibility for damage to the system or reduced
operational performance caused by improper wiring.
For more information, see the generic cable requirements.
→ Basic cable requirements on page 200
Note
Before you perform the MS70 cabling, ensure that the mains circuit breaker for the
system is switched off.
Note
All electronic installations and corresponding wiring must be in accordance with the
vessel’s national registry and corresponding maritime authority and/or classification
society. If no such guidelines exist, we recommend that Det Norske Veritas (DNV) Report
No. 80-P008 «Guidelines for Installation and Proposal for Test of Equipment» is used as
a guide. Observe Basic cable requirements on page 200.
331549/B
81
Simrad MS70
Cable plans
A detailed cable plan is provided. Due to the large number of cables, they are organized
in groups, each with different leading characters. The cable plan is organized with the
following cable groups (indicated by [N]) and drawings:
1
Interconnection cables: Overview of those cables that are used between the physical
system units
2
Ethernet cables: Cables [A], [B], [C] and [D]
3
Power cables: Cables [B], [Q] and [R]
4
Power Supply Unit cables: Cables [A] and [Q]
5
Transducer cables: Cables 001 through 025
6
Interface cables: Cables [F]
7
Multibeam Operator Station cables: Cables [W]
Topics
• Ethernet switch connectors on page 83
• System interconnection cables on page 84
• Ethernet cables; TRC computers on page 85
• Ethernet cables; TRXU transceiver racks on page 86
• Ethernet cables; Operator Station and Power Supply Units on page 87
• Power cables; Transceiver Unit on page 88
• Power cables; Power Supply Units on page 89
• Transducer cables on page 90
• Interface cables; TRXU synchronization on page 91
• Interface cables; Motion Reference Unit on page 92
• Interface cables; GPS, sound velocity and gyro on page 93
• Interface cables; external trigger on page 94
• Multibeam Operator Station cables on page 95
82
331549/B
Cable layout and interconnections
Ethernet switch connectors
The HP ProCurve 2910 Ethernet switch holds 48 front mounted connectors. The
connectors are numbered 1 to 48 as shown in the illustration.
Figure 34
HP ProCurve 2910 Ethernet switch connectors
Note
Although the Ethernet connectors on the switch appear identical, they are organized
in two different logical groups. The Ethernet switch thus operates as a “dual” unit
providing two separate networks. For this reason, the connections between the switch
and the peripheral devices are not random. Observe the ports that are identified on the
cable plan, and use these.
The two logical groups comprise the following ports:
• TRU LAN: Ports 1 through 32
• OS LAN: Ports 33 through 48
331549/B
83
Simrad MS70
System interconnection cables
Figure 35
T1 230 Vac
T2 230 Vac
T3 230 Vac
Cable plan, interconnection cables
Power
Supply
Unit 0
U1
Display
A1
Power
Supply
Unit 1
U2
Power
Supply
Unit 2
U3
Transceiver
Unit
D1
Operator
Station
230 Vac W4
230 Vac W5
Trigger K1
GPS
SV
Gyro
Spare
A2
H1
H2
H3
H4
Ethernet W6
A3
Ethernet D2
Ethernet D3
MRU G1
230 Vac R1
Power cables provided by Simrad
001 to 025
230 Vac R2
Ethernet cables provided by Simrad
230 Vac R3
Power cables provided by shipyard
Serial cables provided by shipyard
230 Vac R4
CAT6 Ethernet cables provided
by shipyard
(CD016008F)
84
331549/B
Cable layout and interconnections
Ethernet cables; TRC computers
Figure 36
Cable plan, Ethernet cables; TRC computers
B2
19
B4
21
B6
23
B8
25
B10
B12
29
27
B3
B1
B5
35
33
36
39
38
B7
B9
41
40
B14
B13
B5
B7
37
B15
B9
B11
43
42
44
B16
B17
B11
TRC0
TRC1
TRC2
TRC3
TRC4
TRC5
1
1
1
1
1
1
2
2
2
2
2
2
3
3
3
3
3
3
4
4
4
4
4
B13
B14
B15
B16
B17
4
B3
B12
5
6
B4
B6
B8
B10
7
B2
8
9
10
B1
(CD016029-014)
Related topics
• [B] Ethernet cables to TRC Beamforming computers on page 98
• RJ45 Ethernet, straight on page 147
331549/B
85
Simrad MS70
Ethernet cables; TRXU transceiver racks
Figure 37
Cable plan, TRXU Ethernet
Related topics
• [C] Ethernet cables to TRXU transceiver racks on page 100
• RJ45 Ethernet, straight on page 147
86
331549/B
Cable layout and interconnections
Ethernet cables; Operator Station and Power Supply Units
Figure 38
Cable plan, Power and Multibeam Operator Station Ethernet
Related topics
• [A] Ethernet cables to Power Supply Units on page 97
• [D] Ethernet cables to external cabinets on page 101
• RJ45 Ethernet, straight on page 147
331549/B
87
Simrad MS70
Power cables; Transceiver Unit
Figure 39
Cable plan, AC mains, Transceiver Unit
TRXU0
TRC0
(Top)
FAN
UNIT
TRC3
(Top)
TRXU1
TRC1
TRC4
TRXU2
TRC2
TRC5
(Bottom)
(Bottom)
ETH.SW.
Q1 Q2 Q3
0
1
2
P1
3
4
5
0
P3
P2
1
PD0
2
P4
3
4
5
0
PD1
(Bottom)
1
2
P7
3
4
PD2
(Middle)
S1
P6
P5
5
Power
distributors
(Top)
S2
S3
S4
CIRCUIT
BREAKER
CIRCUIT
BREAKER
CIRCUIT
BREAKER
CIRCUIT
BREAKER
CB0
CB1
CB2
CB3
(Left)
(Right)
R1
R2
(CD016008B)
R3
R4
Ship 's 230 V ac mains supply
Related topics
• [P] Power cables to TRC Beamforming computers on page 106
• [Q] Power cables to TRXU transceiver racks on page 107
• [R] Power cables to ship’s 230 Vac mains supply on page 108
• [S] Power cables from the four circuit breakers on page 109
• AC mains (IEC 60320) on page 145
• Circuit breaker on page 146
• Transceiver Unit Fan module wiring on page 143
88
331549/B
Cable layout and interconnections
Power cables; Power Supply Units
Figure 40
Cable plan, Power Supply Units and DC supply power
Transceiver Unit
TRXU0
U4A
U4B
U4C
TRXU1
U4D
U5A
TB0
U5B
U5C
TRXU2
U5D
U6A
TB1
U6B
U6C
U6D
TB2
+ 6 Vdc
+ 6 Vdc
+ 12 Vdc
+ 75 Vdc
+ 230 V ac
U1
POWER
SUPPLY UNIT 0
T1
U2
POWER
SUPPLY UNIT
U3
1
T2
POWER
SUPPLY UNIT
2
T3
Ship 's 230 V ac mains supply
(CD016008-003)
Related topics
• [T] AC mains supply to Power Supply Units on page 110
• [U] Power cables from Power Supply Units to Transceiver Unit on page 111
• Power Supply Units AC mains wiring on page 137
• Power Supply Units DC output wiring on page 138
• TRXU racks DC input wiring on page 139
331549/B
89
Simrad MS70
Transducer cables
Figure 41
Cable plan, Transducer array
Transceiver Unit
TRXU0
Cables
001 - 008
TRXU1
TRXU2
Cables
009 - 016
Cables
017 - 025
(CD016008C)
Related topics
• Transducer cables overview on page 115
• Transducer cables on page 156
• Terminations to TRXU0 (Top subrack) on page 158
• Terminations to TRXU1 (Middle subrack) on page 159
• Terminations to TRXU2 (Bottom subrack) on page 160
• Transducer cables on page 115
90
331549/B
Cable layout and interconnections
Interface cables; TRXU synchronization
Figure 42
Cable plan, TRXU synchronization
Related topics
• [F] Internal TRXU synchronisation on page 102
• Transceiver Unit TRXU synchronization cable on page 144
331549/B
91
Simrad MS70
Interface cables; Motion Reference Unit
Figure 43
Cable plan, Motion Reference Unit interface
Transceiver Unit
TRC0
TRC1
TRC2
TRC3
TRC4
TRC5
Serial
G1
(CD016008D)
Motion Reference Unit
Related topics
• [G] Motion Reference Unit interface on page 103
• Generic RS-232 Serial line on page 130
92
331549/B
Cable layout and interconnections
Interface cables; GPS, sound velocity and gyro
Figure 44
Cable plan, GPS, Sound velocity and Gyro interfaces
(CD016008D)
Operator Station
Power supply
AC Mains
Alternative 1:
USB
adapter
Computer
providing USB interfaces
USB x 1
Alternative 2:
Cable
adapter
Computer
with serial interface board
RS-232 x 4
H4
Alternative 3:
H3
Computer
RS-232 x 4
providing sufficient interfaces
H2
H1
Spare
Course gyro
Sound V elocity sensor
Global Positioning System
Related topics
• [H] GPS, Sound Velocity and Gyro interface on page 104
• Generic RS-232 Serial line on page 130
331549/B
93
Simrad MS70
Interface cables; external trigger
Figure 45
Cable plan, External trigger
Operator Station
Computer
RS-232
K1
External trigger
(CD016008D)
Related topics
• [K] External trigger on page 105
• RS-232 cable applied as external trigger (1:1) on page 132
94
331549/B
Cable layout and interconnections
Multibeam Operator Station cables
Figure 46
Cable plan, Multibeam Operator Station
Display
W11-15
Other interfaces
W4 230 Vac
W7-10
Serial lines
W1
Display
W6
Ship 's Ethernet
Computer
W5 230 Vac
D1
Ethernet communication
with Transceiver Unit
(CD016008-005)
W3
Keyboard
W2
Mouse
Related topics
• [D] Ethernet cables to external cabinets on page 101
• [W] Operator Station cables on page 113
• Generic RS-232 Serial line on page 130
• Generic RS-422 Serial line on page 134
• VGA/SVGA Display on page 150
• Mouse cable on page 152
• Keyboard cable on page 151
• AC mains (IEC 60320) on page 145
• RJ45 Ethernet, straight on page 147
331549/B
95
Simrad MS70
Detailed list of cables
The list below specifies each cable used by the Simrad MS70. References are made to
the detailed cable drawings with applicable specifications.
Topics
• [A] Ethernet cables to Power Supply Units on page 97
• [B] Ethernet cables to TRC Beamforming computers on page 98
• [C] Ethernet cables to TRXU transceiver racks on page 100
• [D] Ethernet cables to external cabinets on page 101
• [F] Internal TRXU synchronisation on page 102
• [G] Motion Reference Unit interface on page 103
• [H] GPS, Sound Velocity and Gyro interface on page 104
• [K] External trigger on page 105
• [P] Power cables to TRC Beamforming computers on page 106
• [Q] Power cables to TRXU transceiver racks on page 107
• [R] Power cables to ship’s 230 Vac mains supply on page 108
• [S] Power cables from the four circuit breakers on page 109
• [T] AC mains supply to Power Supply Units on page 110
• [U] Power cables from Power Supply Units to Transceiver Unit on page 111
• [W] Operator Station cables on page 113
• Transducer cables overview on page 115
96
331549/B
Cable layout and interconnections
[A] Ethernet cables to Power Supply Units
Cat.5 Ethernet cables are used, the default colour is grey. All are wired “straight“ (no
crossovers).
The length of the cables are defined by the physical distance between the Transceiver
Unit and the Power Supply Units. All cables are provided by Kongsberg Maritime.
Table 2
Ethernet to Power Supply Units
Cable
From
To
A1
Power Supply Unit 0
Ethernet Switch [45]
A2
Power Supply Unit 1
Ethernet Switch [46]
A3
Power Supply Unit 2
Ethernet Switch [47]
Related topics
• Ethernet cables; Operator Station and Power Supply Units on page 87
• RJ45 Ethernet, straight on page 147
331549/B
97
Simrad MS70
[B] Ethernet cables to TRC Beamforming computers
Cat.6 Ethernet cables are used. Neither of the Ethernet cables are screened, and all are
wired “straight“ (no crossovers). Even numbered cables are normally green, and connect
to port “1” on all the TRC Beamforming computers. Odd numbered cables are normally
red, and connect to port “2” on the TRC Beamforming computers. Additional Ethernet
cables are connected to the TRC0 Beamforming computer. All cables are 2 meters long.
Figure 47
Ethernet connectors on the rear side of the TRC0 Beamforming computer
Figure 48
Ethernet connectors on the rear side of the TRC1–5 computers
Table 3
Ethernet TRC Beamforming computers
Cable
From
To
B1
TRC0 port 1
Ethernet Switch (OS LAN)
B2
TRC0 port 2
Ethernet Switch (TRU LAN)
B3
TRC1 port 1
Ethernet Switch (OS LAN)
B4
TRC1 port 2
Ethernet Switch (TRU LAN)
B5
TRC2 port 1
Ethernet Switch (OS LAN)
98
331549/B
Cable layout and interconnections
Table 3
Ethernet TRC Beamforming computers (cont’d.)
Cable
From
To
B6
TRC2 port 2
Ethernet Switch (TRU LAN)
B7
TRC3 port 1
Ethernet Switch (OS LAN)
B8
TRC3 port 2
Ethernet Switch (TRU LAN)
B9
TRC4 port 1
Ethernet Switch (OS LAN)
B10
TRC4 port 2
Ethernet Switch (TRU LAN)
B11
TRC5 port 1
Ethernet Switch (OS LAN)
B12
TRC5 port 2
Ethernet Switch (TRU LAN)
B13–17
TRC0 ports 4 to 8
Ethernet Switch (OS LAN)
All cables are provided by Kongsberg Maritime.
Related topics
• Ethernet cables; TRC computers on page 85
• RJ45 Ethernet, straight on page 147
331549/B
99
Simrad MS70
[C] Ethernet cables to TRXU transceiver racks
Cat.6 Ethernet cables are used. Neither of the Ethernet cables are screened, and all
are wired “straight“ (no crossovers). By default, all cables are blue. Those connected
to TRXU0 are 2 meters long, the others are 1.5 meters long. All cables are provided
by Kongsberg Maritime.
Table 4
Ethernet to TRXU subracks
Cable
From
To
C1–8
TRXU0
Ethernet Switch (TRU)
C9–16
TRXU1
Ethernet Switch (TRU)
C17–25
TRXU2
Ethernet Switch (TRU)
Related topics
• Ethernet cables; TRXU transceiver racks on page 86
• RJ45 Ethernet, straight on page 147
100
331549/B
Cable layout and interconnections
[D] Ethernet cables to external cabinets
D1 is a standard Cat 6 Ethernet cable used to connect the Ethernet Switch in the
Transceiver Unit to the Multibeam Operator Station. The cable colour is grey. The cable
is wired “straight“ (no crossovers). The length of the cable is defined by the physical
distance between the Transceiver Unit and the Multibeam Operator Station. The cable
must be provided by the installation shipyard. In order to handle the bandwidth of the
Ethernet communication, a Cat 6 Ethernet cable must be used.
Optional cables D2 and D3 may be used for external work stations (data loggers,
post-processing stations etc.). If these cables are required, they must be provided by the
installation shipyard. If an optional workstation is used for specific requirements, this is
also connected to the Ethernet Switch in the Transceiver Unit. In order to handle the
bandwidth of the Ethernet communication, Cat 6 Ethernet cables must be used.
Table 5
Ethernet cables for Multibeam Operator Station
Cable
From
To
D1
Multibeam Operator Station
Ethernet Switch (OS)
D2
Not used
D3
Not used
Related topics
• Ethernet cables; Operator Station and Power Supply Units on page 87
• Multibeam Operator Station cables on page 95
• RJ45 Ethernet, straight on page 147
331549/B
101
Simrad MS70
[F] Internal TRXU synchronisation
Two special cables are used to synchronise the transmission in the Transceiver Unit.
The two cables are connected from the TRXU2 rack (bottom) to TRXU1, and from
TRXU1 to TRXU2 (top).
Both cables are provided by Kongsberg Maritime.
Related topics
• Interface cables; TRXU synchronization on page 91
102
331549/B
Cable layout and interconnections
[G] Motion Reference Unit interface
A single serial line cable is connected to the RS-232 port on the rear side of the TRC0
Beamforming computer.
Figure 49
RS-232 connector on the rear side of the TRC0 Beamforming computer
The cable must be provided by the installation shipyard.
Related topics
• Interface cables; Motion Reference Unit on page 92
• Generic RS-232 Serial line on page 130
331549/B
103
Simrad MS70
[H] GPS, Sound Velocity and Gyro interface
Commercial RS-232 serial line cables are used to connect these inputs to the Multibeam
Operator Station computer.
Several computers may not offer the required amount of serial lines. In order to provide
the necessary serial interfaces, additional serial line adapters may be added to the
computer. As an alternative, RS-232 to USB adapters can be used. In order to ensure
that the necessary power is available, such adapters must - whenever possible - be used
with dedicated external power supplies.
The Multibeam Operator Station computer must also facilitate interface for external
trigger. Since the trigger only uses the CTS and DTS signals on a serial line (pins 5, 7
an8), it can be connected to a serial port otherwise used with an other peripheral device.
See [K] External trigger on page 105.
These cables must be provided by the installation shipyard.
Related topics
• Interface cables; GPS, sound velocity and gyro on page 93
• [K] External trigger on page 105
• Generic RS-232 Serial line on page 130
• Serial line to USB adapter on page 155
104
331549/B
Cable layout and interconnections
[K] External trigger
Various trigger signals are required for the MS70. Some of these trigger signals are
connected to or from external devices, while others are connected internally.
The following trigger signals are in use:
• External trigger: In order to allow for external triggering to or from other acoustic
systems on the ship, a serial line on the Multibeam Operator Station computer is used.
Whenever possible, a standard serial line interface should be used. If an RS-232 to
USB adapter is used on the computer to facilitate the serial lines, one of these can also
be used, provided that the CTS and RTS signals are available. This trigger cable must
be provided by the installation shipyard.
Related topics
• [W] Operator Station cables on page 113
• Interface cables; external trigger on page 94
• RS-232 as external trigger on page 131
331549/B
105
Simrad MS70
[P] Power cables to TRC Beamforming computers
Standard commercial 230 Vac power cables are used on all TRC Beamforming
computers. The AC power distribution inside the rack is provided by four circuit
breakers at the bottom of the cabinet, and three distribution rails at the top.
Figure 50
AC distribution rail
The units are powered from the three distribution rails as specified in the table.
Table 6
Power cables to TRC Beamforming computers
Cable
From
To
P1
Power Distribution 1
TRC Beamforming computer 0
P2
Power Distribution 1
TRC Beamforming computer 1
P3
Power Distribution 1
TRC Beamforming computer 2
P4
Power Distribution 2
TRC Beamforming computer 3
P5
Power Distribution 2
TRC Beamforming computer 4
P6
Power Distribution 2
TRC Beamforming computer 5
Table 7
Power cable to Ethernet switch
Cable
From
To
P7
Power Distribution 2
Ethernet Switch 2
All cables are provided by Kongsberg Maritime.
Related topics
• Power cables; Transceiver Unit on page 88
• AC mains (IEC 60320) on page 145
106
331549/B
Cable layout and interconnections
[Q] Power cables to TRXU transceiver racks
When the Power Supply Units are used, all DC and AC voltages required by the TRXU
racks are provided by these external supplies. Distributor 0 and Circuit Breaker 0 are then
not in use. These devices are however installed for test purposes, and to provide power
for potential future power modifications.
331549/B
107
Simrad MS70
[R] Power cables to ship’s 230 Vac mains supply
The power cables provided to supply the Transceiver Unit with 230 Vac mains are
connected to the four circuit breakers in the bottom of the rack.
Circuit breakers
• Circuit Breaker 0 (left): Feeds Distributor 0 (bottom), for future expansions
• Circuit Breaker 1: Feeds Distributor 1 (middle), powers TRC beamforming computers
0, 1 and 2
• Circuit Breaker 2: Feeds Distributor 2 (top), powers TRC beamforming computers 3, 4
and 5 and the Ethernet Switch
• Circuit Breaker 3 (right): Feeds the main fan unit at the bottom of the rack
The other end of the mains cables are fitted with a standard mains plug.
Table 8
Power cables to ship’s mains
Cable
From
To
R1
Ship’s mains supply
Circuit breaker 0
R2
Ship’s mains supply
Circuit breaker 1
R3
Ship’s mains supply
Circuit breaker 2
R4
Ship’s mains supply
Circuit breaker 3
All cables are provided by Kongsberg Maritime.
Related topics
• Power cables; Transceiver Unit on page 88
• Circuit breaker on page 146
108
331549/B
Cable layout and interconnections
[S] Power cables from the four circuit breakers
Circuit breakers 0, 1 and 2 feed the three power distributors at the top of the rack, and
cables S1, S2 and S3 are fitted to these distributor devices.
Cable S4 powers the main fan at the bottom of the rack.
Table 9
Power cables to ship’s mains
Cable
From
To
S1
Circuit breaker 0
Power Distribution 0
S2
Circuit breaker 1
Power Distribution 1
S3
Circuit breaker 2
Power Distribution 2
S4
Circuit breaker 3
Fan unit
All cables are provided by Kongsberg Maritime.
Related topics
• Power cables; Transceiver Unit on page 88
• AC mains (IEC 60320) on page 145
• Transceiver Unit Fan module wiring on page 143
331549/B
109
Simrad MS70
[T] AC mains supply to Power Supply Units
The three external Power Supply Units are powered by from a 230 Vac 16A mains
outlet. The DC output is fed to the three TRXU transceiver subracks by means of three
cable bundles.
Table 10
AC mains to Power Supply Units
Cable
From
To
T1
Ship’s mains supply
Power Supply Unit 0
T2
Ship’s mains supply
Power Supply Unit 1
T3
Ship’s mains supply
Power Supply Unit 2
All cables are provided by Kongsberg Maritime.
Supply requirements
Each of the two AC outlets for the instrument rack must provide minimum 10A. The AC
outlet for the external power supply must provide 16A.
Related topics
• Power cables; Power Supply Units on page 89
• AC mains (IEC 60320) on page 145
• Power Supply Units AC mains wiring on page 137
110
331549/B
Cable layout and interconnections
[U] Power cables from Power Supply Units to Transceiver Unit
The DC power from the three Power Supply Units are connected to the Transceiver Unit
using bundled cables. Each bundle holds the following cables:
a 230 Vac to TRXU fans
b +6 Vdc (one red and one blue cable)
c +6 Vdc (one red and one blue cable)
d +12 Vdc (one red and one blue cable)
e +75 Vdc (one red and one blue cable)
Observe the block diagram.
In addition to the three DC voltages, the bundled cables also provide 230 Vac power to
the fan drawers in the TRXU racks.
Note
The power cables must be installed in steel conduits to reduce noise.
Figure 51
Block diagram, AC and DC distribution from Power Supply Units
POWER CABINET 0
TRXU 0
POWER CABINET 1
TRXU 1
TERMINAL BOARD
POWER
SUPPL Y
POWER
SUPPL Y
TERMINAL BOARD
+6 Vdc
POWER
SUPPL Y
+12 Vdc
+75 Vdc
230 Vac
TRXU
BACKPLANE
POWER CABINET 2
POWER
CONNECT OR P ANEL
TRXU 2
TRXU
FANS
230 Vac
SWITCH
ETHERNET
SWITCH
Ethernet
(CD016022-003)
Table 11
AC mains to Power Supply Units
Cable
From
To
U1
Power Supply Unit 0
TB0 on rear side of TRXU0
U2
Power Supply Unit 1
TB1 on rear side of TRXU1
U3
Power Supply Unit 2
TB2 on rear side of TRXU2
All cables are provided by Kongsberg Maritime.
331549/B
111
Simrad MS70
Related topics
• Power cables; Power Supply Units on page 89
• Power Supply Units DC output wiring on page 138
• TRXU racks DC input wiring on page 139
• Power Connector Panel on page 140
• +6 and +12 Vdc to the TRXU backplane on page 141
• +75 Vdc to the TRXU backplane on page 142
112
331549/B
Cable layout and interconnections
[W] Operator Station cables
These cables are used on the Operator Station.
• W1 / Display: This is a commercial display cable. It provides the connection between
the computer and the colour monitor. The type of cable used will depend on the video
format required by the display (VGA/SVGA/DVI).
• W2 / Mouse: This is a commercial cable, and in most cases, it is fixed to the mouse.
Ensure that the plug on the mouse cable is compatible with the computer (USB/PS2).
• W3 / Keyboard: This is a commercial cable, and in most cases, it is fixed to the
keyboard. Ensure that the plug on the keyboard cable is compatible with the computer
(USB/PS2).
• W4 / AC mains to display: This is a commercial power cable, and in most cases, it is
provided with the display.
• W5 / AC mains to computer: This is a commercial power cable, and in most cases, it
is provided with the computer.
• W6 / Ship’s ethernet: A standard Ethernet cable with RJ45 connectors is used to
connect the Operator Station to the ship’s network. This cable must be provided
by the installation shipyard. In order to handle the bandwidth of the Ethernet
communication, we strongly recommend that a Cat 6 Ethernet cable is used. This
cable must be provided by the customer or the installation shipyard.
• W7–10 / Serial line interfaces: Standard serial line interfaces (RS232/RS422) may be
used as required. One may be used as K1 External trigger
• W11–15 / Serial line interfaces: Other interfaces (USB, Firewire etc) may be used as
required.
Note
Additional Dx Ethernet cable(s) are used to connect the Multibeam Operator Station
to the Transceiver Unit. For these specifications. see [D] Ethernet cables to external
cabinets on page 101.
The Operator Station is equipped with a serial port adapter to provide multiple interfaces.
→ Moxa CP134U-I Serial adapter setup on page 125
→ Moxa CP134U-I Serial line adapter on page 135
Table 12
Multibeam Operator Station
Cable
From
To
W1
Operator Station computer
Colour display
W2
Operator Station computer
Mouse
W3
Operator Station computer
Keyboard
W4
Display
Ship’s mains supply
W5
Operator Station computer
Ship’s mains supply
W6
Operator Station computer
Ship’s local area network
331549/B
113
Simrad MS70
Table 12
Multibeam Operator Station (cont’d.)
Cable
From
To
W7–10
Operator Station computer
External equipment and/or peripherals (sensors)
W11–15
Operator Station computer
External equipment
Related topics
• [D] Ethernet cables to external cabinets on page 101
• [K] External trigger on page 105
• Multibeam Operator Station cables on page 95
• Moxa CP134U-I Serial line adapter on page 135
• VGA/SVGA Display on page 150
• Mouse cable on page 152
• Keyboard cable on page 151
• AC mains (IEC 60320) on page 145
• AC mains (IEC 60320) on page 145
• RJ45 Ethernet, straight on page 147
114
331549/B
Cable layout and interconnections
Transducer cables overview
A total of 25 transducer cables are brought up from the transducer array. Each cable is
terminated in a large connector, and each connector plugs into its dedicated socket on
the rear side of the TRXU transceiver subracks. The transducer cables are identified
with numbers 001 through 025
All transducer cables are provided by Kongsberg Maritime.
Related topics
• Transducer cables on page 156
• Terminations to TRXU0 (Top subrack) on page 158
• Terminations to TRXU1 (Middle subrack) on page 159
• Terminations to TRXU2 (Bottom subrack) on page 160
• Transducer cables on page 115
Transducer cables
The MS70 transducer array is organised as follows:
• The array contains 25 quadrants
• Each quadrant contains 32 individual elements
• Each quadrant is connected by means of a separate cable to a dedicated TRX32 circuit
board handling the 32 channels
Transducer cable pairs
There are 36 cable pairs in each transducer cable.
32 of these cable pairs are used for the elements in the module.
Cable pair 33 connects to a thermistor on the transformer circuit board in the transducer.
The last two cables pairs are not used, and these are cut.
331549/B
115
Simrad MS70
Element organisation
Figure 52
Transducer element organisation
0 1 2 3 4 5 6 7
D
E
8 9 10 11 12 13 14 15
16 17 18 19 20 21 22 23
24 25 26 27 28 29 30 31
B
011
TRX-02
C
A
001
TRX-04
002
TRX-09
003
TRX-14
004
TRX-19
005
TRX-24
006
TRX-03
007
TRX-08
008
TRX-13
009
TRX-18
010
TRX-23
011
TRX-02
012
TRX-07
013
TRX-12
014
TRX-17
015
TRX-22
016
TRX-01
017
TRX-06
018
TRX-11
019
TRX-16
020
TRX-21
021
TRX-00
022
TRX-05
023
TRX-10
024
TRX-15
025
TRX-20
(CD016010A)
The transducer array is seen from behind.
A
The transducer array contains 25 quadrants.
B
Each quadrant is identified with the number of the transducer cable used for that
specific quadrant.
C
Each quadrant is identified with the TRX32 circuit board used for that specific
quadrant.
D
Each quadrant contains 32 elements, four rows with eight elements in each row. The
number provided for each element specifies which TRX32 channel on the specific
circuit board that is used for the specific element.
E
The arrow indicates direction UP.
116
331549/B
Cable layout and interconnections
Channel and element identification tables
The tables below defines the relationship between the elements and the individual
channels. They also define which cable that is used, and to which TRX32 circuit board
the element is physically connected.
Figure 53
19
Transducer channel organisation
39
779 799
18
17
16
15
14
13
12
11
10
9
8
7
6
5
4
3
2
1
21
0
20
40
740 760 780
(CD016010B)
The transducer array is seen from behind. It contains a total of 800 channels organized
as shown.
Table 13
Quadrant 001 element identification
Cha
Elmnt
Cha
Elmnt
Cha
Elmnt
Cha
Elmnt
0
19
8
18
16
17
24
16
1
39
9
38
17
37
25
36
2
59
10
58
18
57
26
56
3
79
11
78
19
77
27
76
4
99
12
98
20
97
28
96
5
119
13
118
21
117
29
116
6
139
14
138
22
137
30
136
331549/B
117
Simrad MS70
Table 13
Quadrant 001 element identification (cont’d.)
Cha
Elmnt
Cha
Elmnt
Cha
Elmnt
Cha
Elmnt
7
159
15
158
23
157
31
156
TRX32 circuit board: 4
Cable: 001
Table 14
Quadrant 002 element identification
Cha
Elmnt
Cha
Elmnt
Cha
Elmnt
Cha
Elmnt
0
179
8
178
16
177
24
176
1
199
9
198
17
197
25
196
2
219
10
218
18
217
26
216
3
239
11
238
19
237
27
236
4
259
12
258
20
257
28
256
5
279
13
278
21
277
29
276
6
299
14
298
22
297
30
296
7
319
15
318
23
317
31
316
TRX32 circuit board: 9
Cable: 002
Table 15
Quadrant 003 element identification
Cha
Elmnt
Cha
Elmnt
Cha
Elmnt
Cha
Elmnt
0
339
8
338
16
337
24
336
1
359
9
358
17
357
25
356
2
379
10
378
18
377
26
376
3
399
11
398
19
397
27
396
4
419
12
418
20
417
28
416
5
439
13
438
21
437
29
436
6
459
14
458
22
457
30
456
7
479
15
478
23
477
31
476
TRX32 circuit board: 14
Cable: 003
Table 16
Quadrant 004 element identification
Cha
Elmnt
Cha
Elmnt
Cha
Elmnt
Cha
Elmnt
0
499
8
498
16
497
24
496
1
519
9
518
17
517
25
516
2
539
10
538
18
537
26
536
3
559
11
558
19
557
27
556
4
579
12
578
20
577
28
576
5
599
13
598
21
597
29
596
6
619
14
618
22
617
30
616
7
639
15
638
23
637
31
636
Cable: 004
118
TRX32 circuit board: 19
331549/B
Cable layout and interconnections
Table 17
Quadrant 005 element identification
Cha
Elmnt
Cha
Elmnt
Cha
Elmnt
Cha
Elmnt
0
659
8
658
16
657
24
656
1
679
9
678
17
677
25
676
2
699
10
698
18
697
26
696
3
719
11
718
19
717
27
716
4
739
12
738
20
737
28
736
5
759
13
758
21
757
29
756
6
779
14
778
22
777
30
776
7
799
15
798
23
797
31
796
TRX32 circuit board: 24
Cable: 005
Table 18
Quadrant 006 element identification
Cha
Elmnt
Cha
Elmnt
Cha
Elmnt
Cha
Elmnt
0
15
8
14
16
13
24
12
1
35
9
34
17
33
25
32
2
55
10
54
18
53
26
52
3
75
11
74
19
73
27
72
4
95
12
94
20
93
28
92
5
115
13
114
21
113
29
112
6
135
14
134
22
133
30
132
7
155
15
154
23
153
31
152
TRX32 circuit board: 3
Cable: 006
Table 19
Quadrant 007 element identification
Cha
Elmnt
Cha
Elmnt
Cha
Elmnt
Cha
Elmnt
0
175
8
174
16
173
24
172
1
195
9
194
17
193
25
192
2
215
10
214
18
213
26
212
3
235
11
234
19
233
27
232
4
255
12
254
20
253
28
252
5
275
13
274
21
273
29
272
6
295
14
294
22
293
30
292
7
315
15
314
23
313
31
312
TRX32 circuit board: 8
Cable: 007
Table 20
Quadrant 008 element identification
Cha
Elmnt
Cha
Elmnt
Cha
Elmnt
Cha
Elmnt
0
335
8
334
16
333
24
332
1
355
9
354
17
353
25
352
331549/B
119
Simrad MS70
Table 20
Quadrant 008 element identification (cont’d.)
Cha
Elmnt
Cha
Elmnt
Cha
Elmnt
Cha
Elmnt
2
375
10
374
18
373
26
372
3
395
11
394
19
393
27
392
4
415
12
414
20
413
28
412
5
435
13
434
21
433
29
432
6
455
14
454
22
453
30
452
7
475
15
474
23
473
31
472
TRX32 circuit board: 13
Cable: 008
Table 21
Quadrant 009 element identification
Cha
Elmnt
Cha
Elmnt
Cha
Elmnt
Cha
Elmnt
0
495
8
494
16
493
24
492
1
515
9
514
17
513
25
512
2
535
10
534
18
533
26
532
3
555
11
554
19
553
27
552
4
575
12
574
20
573
28
572
5
595
13
594
21
593
29
592
6
615
14
614
22
613
30
612
7
635
15
634
23
633
31
632
TRX32 circuit board: 18
Cable: 009
Table 22
Quadrant 010 element identification
Cha
Elmnt
Cha
Elmnt
Cha
Elmnt
Cha
Elmnt
0
655
8
654
16
653
24
652
1
675
9
674
17
673
25
672
2
695
10
694
18
693
26
692
3
715
11
714
19
713
27
712
4
735
12
734
20
733
28
732
5
755
13
754
21
753
29
752
6
775
14
774
22
773
30
772
7
795
15
794
23
793
31
792
TRX32 circuit board: 23
Cable: 010
Table 23
Quadrant 011 element identification
Cha
Elmnt
Cha
Elmnt
Cha
Elmnt
Cha
Elmnt
0
11
8
10
16
9
24
8
1
31
9
30
17
29
25
28
2
51
10
50
18
49
26
48
3
71
11
70
19
69
27
68
120
331549/B
Cable layout and interconnections
Table 23
Quadrant 011 element identification (cont’d.)
Cha
Elmnt
Cha
Elmnt
Cha
Elmnt
Cha
Elmnt
4
91
12
90
20
89
28
88
5
111
13
110
21
109
29
108
6
131
14
130
22
129
30
128
7
151
15
150
23
149
31
148
TRX32 circuit board: 2
Cable: 011
Table 24
Quadrant 012 element identification
Cha
Elmnt
Cha
Elmnt
Cha
Elmnt
Cha
Elmnt
0
171
8
170
16
169
24
168
1
191
9
190
17
189
25
188
2
211
10
210
18
209
26
208
3
231
11
230
19
229
27
228
4
251
12
250
20
249
28
248
5
271
13
270
21
269
29
268
6
291
14
290
22
289
30
288
7
311
15
310
23
309
31
308
TRX32 circuit board: 7
Cable: 012
Table 25
Quadrant 013 element identification
Cha
Elmnt
Cha
Elmnt
Cha
Elmnt
Cha
Elmnt
0
331
8
330
16
329
24
328
1
351
9
350
17
349
25
348
2
371
10
370
18
369
26
368
3
391
11
390
19
389
27
388
4
411
12
410
20
409
28
408
5
431
13
430
21
429
29
428
6
451
14
450
22
449
30
448
7
471
15
470
23
469
31
468
TRX32 circuit board: 12
Cable: 013
Table 26
Quadrant 014 element identification
Cha
Elmnt
Cha
Elmnt
Cha
Elmnt
Cha
Elmnt
0
491
8
490
16
489
24
488
1
511
9
510
17
509
25
508
2
531
10
530
18
529
26
528
3
551
11
550
19
549
27
548
4
571
12
570
20
569
28
568
5
591
13
590
21
589
29
588
331549/B
121
Simrad MS70
Table 26
Quadrant 014 element identification (cont’d.)
Cha
Elmnt
Cha
Elmnt
Cha
Elmnt
Cha
Elmnt
6
611
14
610
22
609
30
608
7
631
15
630
23
629
31
628
TRX32 circuit board: 17
Cable: 014
Table 27
Quadrant 015 element identification
Cha
Elmnt
Cha
Elmnt
Cha
Elmnt
Cha
Elmnt
0
651
8
650
16
649
24
648
1
671
9
670
17
669
25
668
2
691
10
690
18
689
26
688
3
711
11
710
19
709
27
708
4
731
12
730
20
729
28
828
5
751
13
750
21
749
29
748
6
771
14
770
22
769
30
768
7
791
15
790
23
789
31
788
Cha
Elmnt
TRX32 circuit board: 22
Cable: 015
Table 28
Quadrant 016 element identification
Cha
Elmnt
0
7
8
6
16
5
24
4
1
27
9
26
17
25
25
24
2
47
10
46
18
45
26
44
3
67
11
66
19
65
27
64
4
87
12
86
20
85
28
84
5
107
13
106
21
105
29
104
6
127
14
126
22
125
30
124
7
147
15
146
23
145
31
144
Cha
Elmnt
Elmnt
TRX32 circuit board: 1
Cable: 016
Table 29
Cha
Quadrant 017 element identification
Cha
Elmnt
Cha
Elmnt
Cha
Elmnt
Cha
Elmnt
0
167
8
166
16
165
24
164
1
187
9
186
17
185
25
184
2
207
10
206
18
205
26
204
3
227
11
226
19
225
27
224
4
247
12
246
20
245
28
244
5
267
13
266
21
265
29
264
6
287
14
286
22
285
30
284
122
331549/B
Cable layout and interconnections
Table 29
Quadrant 017 element identification (cont’d.)
Cha
Elmnt
Cha
Elmnt
Cha
Elmnt
Cha
Elmnt
7
307
15
306
23
305
31
304
TRX32 circuit board: 6
Cable: 017
Table 30
Quadrant 018 element identification
Cha
Elmnt
Cha
Elmnt
Cha
Elmnt
Cha
Elmnt
0
327
8
326
16
325
24
324
1
347
9
346
17
345
25
344
2
367
10
366
18
365
26
364
3
387
11
386
19
385
27
384
4
407
12
406
20
405
28
404
5
427
13
426
21
425
29
424
6
447
14
446
22
445
30
444
7
467
15
466
23
465
31
464
TRX32 circuit board: 11
Cable: 018
Table 31
Quadrant 019 element identification
Cha
Elmnt
Cha
Elmnt
Cha
Elmnt
Cha
Elmnt
0
487
8
486
16
485
24
484
1
507
9
506
17
505
25
504
2
527
10
526
18
525
26
524
3
547
11
546
19
545
27
544
4
567
12
566
20
565
28
564
5
587
13
586
21
585
29
584
6
607
14
606
22
605
30
604
7
627
15
626
23
625
31
624
TRX32 circuit board: 16
Cable: 019
Table 32
Quadrant 020 element identification
Cha
Elmnt
Cha
Elmnt
Cha
Elmnt
Cha
Elmnt
0
647
8
646
16
645
24
644
1
667
9
666
17
665
25
664
2
687
10
686
18
685
26
684
3
707
11
706
19
705
27
704
4
727
12
726
20
725
28
724
5
747
13
746
21
745
29
744
6
767
14
766
22
765
30
764
7
787
15
786
23
785
31
784
Cable: 020
331549/B
TRX32 circuit board: 21
123
Simrad MS70
Table 33
Quadrant 021 element identification
Cha
Elmnt
Cha
Elmnt
Cha
Elmnt
Cha
Elmnt
0
3
8
2
16
1
24
0
1
23
9
22
17
21
25
20
2
43
10
42
18
41
26
40
3
63
11
62
19
61
27
60
4
83
12
82
20
81
28
80
5
103
13
102
21
101
29
100
6
123
14
122
22
121
30
120
7
143
15
142
23
141
31
140
TRX32 circuit board: 0
Cable: 021
Table 34
Quadrant 022 element identification
Cha
Elmnt
Cha
Elmnt
Cha
Elmnt
Cha
Elmnt
0
163
8
162
16
161
24
160
1
183
9
182
17
181
25
180
2
203
10
202
18
201
26
200
3
223
11
222
19
221
27
220
4
243
12
242
20
241
28
240
5
263
13
262
21
261
29
260
6
283
14
282
22
281
30
280
7
303
15
302
23
301
31
300
TRX32 circuit board: 5
Cable: 022
Table 35
Quadrant 023 element identification
Cha
Elmnt
Cha
Elmnt
Cha
Elmnt
Cha
Elmnt
0
323
8
322
16
321
24
320
1
343
9
342
17
341
25
340
2
363
10
362
18
361
26
360
3
383
11
382
19
381
27
380
4
403
12
402
20
401
28
400
5
423
13
422
21
421
29
420
6
443
14
442
22
441
30
440
7
463
15
462
23
461
31
460
TRX32 circuit board: 10
Cable: 023
Table 36
Quadrant 024 element identification
Cha
Elmnt
Cha
Elmnt
Cha
Elmnt
Cha
Elmnt
0
483
8
482
16
481
24
480
1
503
9
502
17
501
25
500
124
331549/B
Cable layout and interconnections
Table 36
Quadrant 024 element identification (cont’d.)
Cha
Elmnt
Cha
Elmnt
Cha
Elmnt
Cha
Elmnt
2
523
10
522
18
521
26
520
3
543
11
542
19
541
27
540
4
563
12
562
20
561
28
560
5
583
13
582
21
581
29
580
6
603
14
602
22
601
30
600
7
623
15
622
23
621
31
620
TRX32 circuit board: 15
Cable: 024
Table 37
Quadrant 025 element identification
Cha
Elmnt
Cha
Elmnt
Cha
Elmnt
Cha
Elmnt
0
643
8
642
16
641
24
640
1
663
9
662
17
661
25
660
2
683
10
682
18
681
26
680
3
703
11
702
19
701
27
700
4
723
12
722
20
721
28
720
5
743
13
742
21
741
29
740
6
763
14
762
22
761
30
760
7
783
15
782
23
781
31
780
Cable: 025
TRX32 circuit board: 20
Moxa CP134U-I Serial adapter setup
This section describes the Moxa CP134U-I 4–port optical isolated serial interface board.
This board is used on the Multibeam Operator Station to provide multiple serial line
connections.
Serial line support
The 4-port serial board supports the following serial line interface formats:
• Port 1: RS-232/422/485
• Port 2: RS-232/422/485
• Port 3: RS-422/485
• Port 4: RS-422/485
By manufacturer default, all these serial connections are set to RS-422 format. In order to
change this to RS-232 or RS-485 format, dedicated jumpers or DIP switches must be
changed.
331549/B
125
Simrad MS70
Note
Note that only ports 1 and 2 support RS-232 format.
Jumper and DIP switch settings
Use the 10-pin jumper arrays and the two DIP switches to set ports 1 and 2 to RS-232,
RS-422, or RS-485. Use the two DIP switches to set ports 3 and 4 to RS-422 or RS-485.
• RS–232: In order to use Port 1 (COM2) or Port 2 (COM3) as RS-232 interfaces, the
relevant jumper arrays for Port 1 or Port 2 must be moved. Note that ports 3 and 4
do not support RS-232 format.
• RS-422: All four ports can be set to RS-422 using the two jumpers and the right-hand
DIP switch S2.
• RS-485: All four ports can be set to RS-485 using the two jumpers and the right-hand
DIP switch S2. Additionally, each port can be selected for a 2-wire or 4-wire
connection type using the left-hand DIP switch S1.
Figure 54
Location of the jumpers and DIP switches
A
Jumper for Port 1 interface setup
B
Jumper for Port 2 interface setup
C
DIP-switch S1 for 2–wire or 4–wire setup (all
ports)
D
DIP-switch S2 for RS-422 or RS-485 selection
(all ports)
Table 38
Serial lines jumper and DIP switch settings
Port
Interface
Jumper
Port 1
RS-232
Port 1 to right
RS-422
Port 1 to left
2–wire RS-485
Port 1 to left
1 to ON
1 to ON
4–wire RS-485
Port 1 to left
1 to OFF
1 to ON
RS-232
Port 2 to right
RS-422
Port 2 to left
2–wire RS-485
Port 2 to left
2 to ON
2 to ON
4–wire RS-485
Port 2 to left
2 to OFF
2 to ON
Port 2
126
S1
S2
1 to OFF
2 to OFF
331549/B
Cable layout and interconnections
Table 38
Serial lines jumper and DIP switch settings (cont’d.)
Port
Interface
Port 3
RS-422
Port 4
Jumper
S1
S2
3 to OFF
2–wire RS-485
3 to ON
3 to ON
4–wire RS-485
3 to OFF
3 to ON
RS-422
4 to OFF
2–wire RS-485
4 to ON
4 to ON
4–wire RS-485
4 to OFF
4 to ON
Note: [Blank] = Not active or not used. Ports 3 and 4 do not support RS-232.
Table 39
Serial lines DIP switch settings, examples
DIP switch
Setting
Port 1 set for RS-422 transmission.
Port 1 set for 2-wire RS-485 transmission.
Port 1 set for 4-wire RS-485 transmission.
Adapter cable
An adapter cable is included in the delivery. This allows for connection of four individual
9-pin D-sub connectors to the serial interface board.
331549/B
127
Simrad MS70
Table 40
Moxa CP134U-I 9–pin D-connector converter
Pin
RS-232
RS-422
RS485 (4–wire)
RS485 (2–wire)
1
DCD
TXD-(A)
TXD-(A)
—
2
RxD
TXD+(B)
TXD+(B)
—
3
TxD
RXD+(B)
RXD+(B)
Data-(B)
4
DTR
RXD-(A)
RXD-(A)
Data-(A)
5
GND
GND
GND
GND
6
DSR
—
—
—
7
RTS
—
—
—
8
CTS
—
—
—
9
—
—
—
—
128
331549/B
Cable layout and interconnections
Cable specifications
The drawings provided in this section specify in detail each cable used by the MS70
Scientific multibeam sonar.
Topics
• Generic RS-232 Serial line on page 130
• RS-232 as external trigger on page 131
• RS-232 cable applied as external trigger (1:1) on page 132
• Coax to RS-232 cable and adapter on page 133
• Generic RS-422 Serial line on page 134
• Moxa CP134U-I Serial line adapter on page 135
• Power Supply Units AC mains wiring on page 137
• Power Supply Units DC output wiring on page 138
• TRXU racks DC input wiring on page 139
• Power Connector Panel on page 140
• +6 and +12 Vdc to the TRXU backplane on page 141
• +75 Vdc to the TRXU backplane on page 142
• Transceiver Unit Fan module wiring on page 143
• Transceiver Unit TRXU synchronization cable on page 144
• AC mains (IEC 60320) on page 145
• Circuit breaker on page 146
• RJ45 Ethernet, straight on page 147
• RJ45 Ethernet, crossover on page 149
• VGA/SVGA Display on page 150
• Keyboard cable on page 151
• Mouse cable on page 152
• Serial line adapter on page 154
• Serial line to USB adapter on page 155
• Transducer cables on page 156
• Terminations to TRXU0 (Top subrack) on page 158
• Terminations to TRXU1 (Middle subrack) on page 159
• Terminations to TRXU2 (Bottom subrack) on page 160
331549/B
129
Simrad MS70
Generic RS-232 Serial line
This cable comprises a multi purpose serial line. It provides interface with any peripheral
unit. One end of the cable connects to the local unit (DTE) with a 9-pin D-connector,
while the other connects to the peripheral (DCE) as described in the peripheral unit’s
documentation.
In many cases, only the RxD, TxT and GND pins are used. Twisted pairs are sufficient
in the cable.
Cable specifications
• Conductors: 5 x 2 x 0.5 mm²
• Screen: Screened twisted pairs and overall braided
• Voltage: 60 V
• Maximum diameter: Limited by the plugs
130
331549/B
Cable layout and interconnections
RS-232 as external trigger
This cable comprises an RS-232 serial line applied as an external trigger. It provides
interface with any peripheral unit that requires transmit/receive synchronization. One
end of the cable connects to the local unit with a 9-pin D-connector, while the other
connects to the peripheral system as described in the peripheral unit documentation.
Remote "Master"
9-pin 'D' connector
Local
9-pin ‘D’ connector
5
7
Ground
Ground
5
RTS
RTS
7
8
CTS
CTS
8
5
1
Female 9-pin
D-pin connector
9
6
5
1
View
Male 9-pin
D-pin connector
6
W126
Rev.C
9
RS-232 serial line applied as external trigger
Cable specifications
• Conductors: 9 x 2 x 0.5 mm²
• Screen: Screened twisted pairs and overall braided
• Voltage: 60 V
• Maximum diameter: Limited by the plugs
331549/B
131
Simrad MS70
RS-232 cable applied as external trigger (1:1)
This cable comprises an RS-232 serial line applied as an external trigger. It provides
interface with any peripheral unit that requires transmit/receive synchronization. One
end of the cable connects to the local unit with a 9-pin D-sub connector, while the other
connects to the peripheral system as described in the peripheral unit documentation.
Remote "Master"
9-pin 'D' connector
Local
9-pin ‘D’ connector
5
7
Ground
Ground
5
RTS
RTS
7
8
CTS
CTS
8
5
1
Female 9-pin
D-pin connector
9
6
5
1
View
Male 9-pin
D-pin connector
6
W128
Rev.A
9
RS-232 serial line applied as external trigger
• Conductors: 9 x 2 x 0.5 mm²
• Screen: Screened twisted pairs and overall braided
• Voltage: 60 V
• Maximum diameter: Limited by the plugs
132
331549/B
Cable layout and interconnections
Coax to RS-232 cable and adapter
This cable with adapter is used to connect a coax connector to an RS-232 serial line.
Remote Coax connector
Live
Gnd
Adapter available from
Quality Positioning Services BV
(www.qps.nl)
Ground
Female 9-pin
D-connector socket
W129
Rev.A
331549/B
Live
Coax to RS-232 using QPS adapter
133
Simrad MS70
Generic RS-422 Serial line
This cable holds a multi purpose RS-422 balanced serial line. It provides interface with
any peripheral unit. One end of the cable connects to the local unit (DTE) with a 9-pin
D-connector, while the other connects to the peripheral (DCE) as described in the
peripheral unit’s documentation.
9-pin ‘D’ connector
1
2
3
4
5
Peripheral device
RXD+
TXD+
TXDRXDGND
1
5
6
5
9
1
Female 9-pin
D-pin connector
View
Male 9-pin
D-pin connector
9
6
W132 / Rev .A
Generic RS-422 serial line
More information
• http://en.wikipedia.org/wiki/Rs422
Cable specifications
• Conductors: 5 x 2 x 0.5 mm²
• Screen: Screened twisted pairs and overall braided
• Voltage: 60 V
• Maximum diameter: Limited by the plugs
134
331549/B
Cable layout and interconnections
Moxa CP134U-I Serial line adapter
The Multibeam Operator Station is equipped with a Moxa CP-134U-I serial interface
board.
By default, each board provides four RS-422 serial lines. The connections to the board
are made using four 9–pin D-connectors, and short converter cables with terminal boards
are provided with the system.
Cable specifications
• Conductors: 5 x 2 x 0.5 mm²
• Screen: Screened twisted pairs and overall braided
• Voltage: 60 V
• Maximum diameter: Limited by the plugs
331549/B
135
Simrad MS70
Pin assignments
This board supports RS-422 and RS-485 (both 2 and 4-wire). Ports 1 and 2 also support
RS-232. The board is provided with a four way connector cable to offer four 9–pin
male D-connectors.
Table 41
Moxa CP134U-I 9–pin D-connector converter
Pin
RS-232
RS-422
RS485 (4–wire)
RS485 (2–wire)
1
DCD
TXD-(A)
TXD-(A)
—
2
RxD
TXD+(B)
TXD+(B)
—
3
TxD
RXD+(B)
RXD+(B)
Data-(B)
4
DTR
RXD-(A)
RXD-(A)
Data-(A)
5
GND
GND
GND
GND
6
DSR
—
—
—
7
RTS
—
—
—
8
CTS
—
—
—
9
—
—
—
—
136
331549/B
Cable layout and interconnections
Power Supply Unit wiring
Three Power Supply Units are used, one for each TRXU transceiver rack. The cables are
terminated at terminal blocks; one inside each Power Supply Unit, and one of the rear
side of each TRXU rack. From the terminal block on the rear side of each TRXU, three
DC cable bundles are fed up to the rear side of the rack and terminated with plugs on
the Power Connector Panel. The AC power provided by the Power Supply Units is also
terminated on the Power Connector Panel, and it is only used to power the TRXU fans.
All power cables (AC and DC) are provided with the Power Supply Units. Maximum
cable length between each Power Supply Unit and the Transceiver Unit is 10 meters.
Power Supply Units AC mains wiring
The AC mains cables for the three Power Supply Units are connected to Terminal Board
1 inside each cabinet.
Terminal board
in Power Cabinet
230 Vac
input
230 Vac
9
230 Vac
10
Ground
11
The Power Cabinets is provided with an
W246A
Rev A
AC mains cable readily connected to the terminal board.
Power cabinets,
AC input
Cable specifications
• Conductors: 2.5 mm²
• Screen: Separate conductor
• Voltage: 600 V
• Maximum diameter: Limited by the grommets on the cabinet
331549/B
137
Simrad MS70
Power Supply Units DC output wiring
The DC cables from the three Power Supply Units to the Transceiver Unit are all
separate conductors.
Note that 230 Vac is also included in order to power the fans in each TRXU rack.
Terminal board
in Power Cabinet
12 Vdc
power
supply
6 Vdc
power
supply
75 Vdc
power
supply
230 Vac
input
Terminal board
in Transceiver Unit
+12 Vdc
1
Ground
-12 Vdc
2
230 Vac
+6 Vdc
3
230 Vac
+6 Vdc
4
+6 Vdc
-6 Vdc
5
+6 Vdc
-6 Vdc
6
-6 Vdc
+75 Vdc
7
-6 Vdc
-75 Vdc
8
+12 Vdc
230 Vac
9
+12 Vdc
230 Vac
10
-12 Vdc
Ground
11
-12 Vdc
Ground
12
+75 Vdc
Ground
13
-75 Vdc
Ground
14
230 Vac
15
230 Vac
16
This symbol means that the terminals
are connected with a conductive rail.
There are three Power Cabinets, and three terminal boards in the
W246B
Rev B
To Power
Connector
Panel
Transceiver Unit: One set for each
TRXU rack.
Power cabinets, DC output
Cable specifications
• Conductors: 16 mm²
• Screen: Separate conductor
• Voltage: 600 V
• Maximum diameter: Limited by the grommets on the cabinet
138
331549/B
Cable layout and interconnections
TRXU racks DC input wiring
These are the DC cables from the DC terminal boards at the rear of the three TRXU
racks. Three Amphenol plugs connect these cables to the Power Connector Panel
at rear side of the rack.
-75V
F
E
+75V
-12V
D
C
-12V
B
+12V
+12V
-6V
-6V
+6V
Live
+6V
I
H
G
Ground
A
Amphenol 6-pin female connector
J
Neutral
Female mains connector
F
E
D
C
B
A
Amphenol 10-pin male connector
A
B
C
D
E
F
G
H
I
J
Amphenol 10-pin female connector
W246C
Rev A
Power cabinets, DC supply to
TRXU
Cable specifications
• Conductors: 1.5 mm²
• Screen: Separate conductor
• Voltage: 600 V
• Maximum diameter: Limited by the mounting pins on the Amphenol connectors.
331549/B
139
Simrad MS70
Power Connector Panel
The DC and AC voltages are connected to the TRXU backplane and the fans through the
Power Connector Panel.
75 Vdc input
W246D
Rev A
140
6 Vdc input
12 Vdc input
Power connector panel for
230 Vac input
TRXU subracks
331549/B
Cable layout and interconnections
+6 and +12 Vdc to the TRXU backplane
The +6 Vdc and the +12 Vdc voltages are connected to the TRXU backplane as shown
below. The +75 Vdc cables are brought out to the front side of the backplane, while the
230 Vac voltage is connected to the fans at the bottom of the TRXU rack.
+6 BLUE
75 Vdc
input
+6 RED
+12 RED
6 Vdc
input
+12 BLUE
12 Vdc
input
230 Vac
input
TO FANS
W246E
Rev A
331549/B
Power cabinets, Power connector panel connects to
TRXU backplane
141
Simrad MS70
+75 Vdc to the TRXU backplane
The +75 Vdc cables are brought out to the front side of the backplane, and connects as
shown below. Use a cable strip to secure the rectangular plug into the socket.
75 Vdc
input
6 Vdc
input
BLUE
12 Vdc
input
230 Vac
input
RED
Backplane seen from
the front of the TRXU rack
W246F
Rev A
142
Power cabinets, 75 Vdc connects to
TRXU backplane
331549/B
Cable layout and interconnections
Transceiver Unit wiring
Transceiver Unit Fan module wiring
The Transceiver Unit fan module is located at the bottom of the Transceiver Unit rack.
Its mains cable is connected to Circuit Breaker 3.
A standard AC mains cable is used. One end is open, the other is fitted with a standard
mains plug.
331549/B
143
Simrad MS70
Transceiver Unit TRXU synchronization cable
Two special cables are used to provide TRXU synchronization. These are connected to
the rear side of the TRXU racks.
144
331549/B
Cable layout and interconnections
AC mains (IEC 60320)
This is a commercial 230 Vac power cable for mains power. One end is fitted with
an IEC plug, the other with a standard European mains plug. This is a standard cable
type supplied in different lengths.
Cable specifications
• Conductors: 2 x 1.5 mm² + GND
• Screen: None
• Voltage: 750 V
• Maximum diameter: Set by the plugs
More information
• http://en.wikipedia.org/wiki/IEC_320
331549/B
145
Simrad MS70
Circuit breaker
This is a commercial circuit breaker providing overload protection. All cables used for
the wiring are minimum 1.5 mm2.
AC Ground (Y ellow/Green)
AC Neutral (Brown)
AC Live (Blue)
(Blue)
(Black)
4
2
2
GND
1
OFF
3
W322
Rev.A
146
1
Circuit breaker
331549/B
Cable layout and interconnections
RJ45 Ethernet, straight
This cable is used to provide standard Ethernet connections. Note that various categories
exists. Normally, CAT-5E and CAT-6 cables are used in local area networks with
bandwidth exceeding 100 Mbit. Ethernet cables are available commercially in different
lengths, colours and categories.
On the MS70, most of the local area networks cabling is for 1 Gbit bandwidth. We
strongly recommend that CAT-6 or CAT-7 Ethernet cables are used.
10Base-T Low-speed Ethernet connections
Cable specifications
• Not applicable. This is a commercial cable.
331549/B
147
Simrad MS70
1000Base-T High-speed Ethernet connections (CAT5E and faster)
Cable specifications
• Not applicable. This is a commercial cable.
More information
• http://en.wikipedia.org/wiki/TIA/EIA-568-B
• http://en.wikipedia.org/wiki/Category_5_cable
148
331549/B
Cable layout and interconnections
RJ45 Ethernet, crossover
This cable is used to provide standard ethernet connections. Note that various categories
exists. Normally, Cat.5 and Cat.6 cables are used in local area networks with bandwidth
exceeding 100 Mbit
On the MS70 Scientific multibeam sonar however, most of the local area networks
cabling is for 1 Gbit bandwidth, and we strongly recommend use of Cat.6 or Cat.7 cables.
Ethernet cables are available commercially in different lengths, colours and categories.
Pin 8
Pin 1
End view
of RJ45 plug
Pin 8
View
Pin 1
RJ45 plug
Tx Data+
Tx DataRx Data+
(White/Orange)
1
(Orange)
2
(White/Green)
3
(Blue)
4
(White/Blue)
5
Rx Data-
(Green)
6
(White/Brown)
7
8
W405
Rev.A
(Brown)
Pairs
Ethernet 10Base-T
RJ45 plug
1
Tx Data+
2
Tx Data-
3
Rx Data+
4
5
6
Rx Data-
7
8
“Crossover ”
In order to prevent noise and crosstalk, you are strongly advised to use the cable pairs
indicated in the drawing.
Cable specifications
• Not applicable. This is a commercial cable.
More information
• http://en.wikipedia.org
331549/B
149
Simrad MS70
VGA/SVGA Display
This is a standard VGA and SVGA video cable. One end is normally connected to the
display, while the other end is terminated in a standard D-connector.
Cable specifications
• Not applicable. This is a commercial cable.
150
331549/B
Cable layout and interconnections
Keyboard cable
This is a standard keyboard cable. In most cases, the cable is physically connected to the
keyboard. It is terminated in a plug suited to fit the computer.
Several keyboard types are available for different languages and hardware platforms.
Both the keyboard and the attached cable are commercial items.
331549/B
151
Simrad MS70
Mouse cable
This is a standard mouse (or other pointing device) cable. It is physically connected
to the mouse, and terminated in a plug suited to fit the computer. Several mouse and
pointing device types are available with two or three buttons, and with or without a scroll
wheel. Both the mouse and the attached cable are commercial items.
On Unix work stations, the mouse is normally connected to the keyboard.
152
331549/B
Cable layout and interconnections
DVI–I Display
This cable is a standard DVI-I cable. It is normally provided with the colour display.
For more information about the DVI signals, see http://en.wikipedia.org.
Pin-out viewed from the socket
1
2
3
4
5
6
7
8
9
10
11 12
13
14
15
16
17
18
19
21 22
23
24
20
W508
Rev.C
C1
C2
C5
C3
C4
Standard DVI-I cable
Pin
Signal
Pin
Signal
1
TMDS Data 2- (Digital red - (Link 1))
15
Ground (Return for pin 14 and analog sync)
2
TMDS Data 2+ (Digital red + (Link 1))
16
Hot plug detect
3
TMDS Data 2/4 shield
17
TMDS data 0- (Digital blue - (Link 1) and
digital sync)
4
TMDS Data 4- (Digital green - (Link 2))
18
TMDS data 0+ (Digital blue + (Link 1) and
digital sync)
5
TMDS Data 4+ (Digital green + (Link 2))
19
TMDS data 0/5 shield
6
DDC clock
20
TMDS data 5- (Digital red - (Link 2))
7
DDC data
21
TMDS data 5+ (Digital red + (Link 2))
8
Analog vertical sync
22
TMDS clock shield
9
TMDS Data 1- (Digital green - (Link 1))
23
TMDS clock+ (Digital clock + (Links 1 &
2))
10
TMDS Data 1+ (Digital green + (Link 1))
24
TMDS clock- (Digital clock - (Links 1 &
2))
11
TMDS Data 1/3 shield
C1
Analog red
12
TMDS Data 3- (Digital blue - (Link 2))
C2
Analog green
13
TMDS Data 3+ (Digital blue + (Link 2))
C3
Analog blue
14
+5 Vdc (Power for monitor when in
standby)
C4
Analog horizontal sync
TMDS = Transition Minimized Differential
Signaling
C5
Analog ground (Return for R, G and B
signals)
331549/B
153
Simrad MS70
Serial line adapter
This is a commercial adapter. It allows you to connect four RS-232 serial lines to a
common socket on the computer.
Female 9-pin
D-connectors
identified as "A"
through "D"
To socket
on computer
W510
Rev.A
Serial line adapter
Cable specifications
• Not applicable
154
331549/B
Cable layout and interconnections
Serial line to USB adapter
Commercial adapters providing conversion from RS-232 serial line to USB are available.
Four serial lines to external devices
USB cable to computer ("A" plug)
SUNIX ComHUB 4-port adapter shown as an example
W512A
Rev. A
Serial line to USB adapter
For information about cables and connections, observe the documentation provided
with the adapter.
331549/B
155
Simrad MS70
Transducer cables
This is the termination of the transducer cable from the MS70 transducer array to the
sockets on the rear side of the transceiver shelves. The other end of each cable is
permanently fixed to the transducer array.
Transducer connector
The drawing and table below show how the each transducer connector is wired.
002
Pin 1
Cable
number
W808A
Rev.B
Transducer cable termination
• Minimum bending radius during installation: 95 mm
• Minimum bending radius, dynamic: 243 mm
• Tensile strength: 3000 N
156
331549/B
Cable layout and interconnections
The connections made inside the D-connector are specified in the table below. Each pair
in the cable contains the signal for the corresponding channel with the offset of 1 (pair
1 for channel 0 etc). Pair 33 is for the built-in thermistor. The cable contains three
additional pairs, but these are cut.
Table 42
Connections made inside the D-connector
Pair
Pin numbers
1
1
21
White
Brown
2
40
60
Green
Yellow
3
2
22
Grey
Pink
4
41
61
Blue
Red
5
3
23
Black
Violet
6
42
62
Grey/Pink
Red/Blue
Cable colour code
7
4
24
White/Green
Brown/Green
8
43
63
White/Yellow
Yellow/Brown
9
5
25
White/Grey
Grey/Brown
10
44
64
White/Pink
Pink/Brown
11
6
26
White/Blue
Brown/Blue
12
45
65
White/Red
Brown/Red
13
7
27
White/Black
Brown/Black
14
46
66
Grey/Green
Yellow/Green
15
8
28
Pink/Green
Yellow/Pink
16
47
67
Green/Blue
Yellow/Blue
17
9
29
Green/Red
Yellow/Red
18
48
68
Green/Black
Yellow/Black
19
10
30
Grey/Blue
Pink/Blue
20
49
69
Grey/Red
Pink/Red
21
11
31
Grey/Black
Pink/Black
22
50
70
Blue/Black
Red/Black
23
12
32
White
Brown
24
51
71
Green
Yellow
25
13
33
Grey
Pink
26
52
72
Blue
Red
27
14
34
Black
Violet
28
53
73
Grey/Pink
Red/Blue
29
15
35
White/Green
Brown/Green
30
54
74
White/Yellow
Yellow/Brown
31
16
36
White/Grey
Grey/Brown
32
55
75
White/Pink
Pink/Brown
33
17
37
White/Blue
Brown/Blue
331549/B
157
Simrad MS70
Terminations to TRXU0 (Top subrack)
The drawing below shows which transducer cables that are connected to the eight
connectors on the rear side of the TRXU0 transceiver subrack.
W808D
Rev.A
158
Transducer cable terminations -
005
010
015
020
025
004
009
014
17 18 19 20 21 22 23 24
TRXU0 (Top)
331549/B
Cable layout and interconnections
Terminations to TRXU1 (Middle subrack)
The drawing below shows which transducer cables that are connected to the eight
connectors on the rear side of the TRXU1 transceiver subrack.
W808C
Rev.A
331549/B
Transducer cable terminations -
019
024
003
008
013
018
10 11 12 13 14 15 16
023
002
9
TRXU1 (Middle)
159
Simrad MS70
Terminations to TRXU2 (Bottom subrack)
W808B
Rev.A
160
011
006
5
6
7
8
007
016
Transducer cable terminations -
4
012
3
017
2
022
1
001
0
021
The drawing below shows which transducer cables that are connected to the nine
connectors on the rear side of the TRXU2 transceiver subrack.
TRXU2 (Bottom)
331549/B
Setting to work
Setting to work
The procedures in this chapter shall be carried out once all the MS70 hardware units have
been installed, and the cabling is finished.
When you carry out these procedures, make sure that you only perform those tasks
described, and in the given order.
Topics
• Initial power-on on page 161
• Performance testing on page 161
Initial power-on
The initial power-on procedure is done by personnel from Kongsberg Maritime AS.
Performance testing
The performance tests are described in the Harbour Acceptance Test and Sea Acceptance
Test procedures.
331549/B
161
Simrad MS70
Technical specifications
This chapter provides the technical specifications and requirements related to the Simrad
MS70.
In Kongsberg Maritime, we are continuously working to improve the quality and
performance of our products. Technical specifications may therefore be changed without
prior notice.
Topics
• System components on page 163
• Operation and performance on page 164
• Interface specifications on page 169
• Weights and outline dimensions on page 171
• Power requirements on page 173
• Environmental requirements on page 174
162
331549/B
Technical specifications
System components
The Simrad MS70 comprises the following units.
Basic system
• One Multibeam Operator Station
• One Transceiver Unit, including
– Six beamforming computers
– Three customised transceiver racks
– One Ethernet switch
• Three Power Supply Units
• One Transducer Array
Optional systems
• Element Data Logger
– Element Data Logger Operator Station
– One Ethernet switch (if required)
331549/B
163
Simrad MS70
Operation and performance
This section provides the performance specifications for the Simrad MS70.
The Simrad MS70 is a flexible instrument allowing for a variety of different
configurations optimized for different survey objectives. As many of the system
parameters are mutually dependent the performance specification numbers will depend
on the specific operation configuration. Please note that it will not be possible to obtain
the limits for all performance parameters simultaneously as they are mutually dependent.
Topics
• Configuration settings on page 165
• Operational performance on page 167
• Performance, Multibeam Operator Station on page 168
• Performance, Transceiver Unit on page 168
• Performance, Power Supply Unit on page 168
• Performance, Transducer array on page 168
164
331549/B
Technical specifications
Configuration settings
Frequency band
• Upper frequency: 75 to 112 kHz
• Lower frequency: 75 to 112 kHz
• Pulse duration: 1024 to 10240 µsec
• Pulse forms: CW and LFM (Linear FM)
• Number of sectors transmitted simultaneously: 1 to 4
331549/B
165
Simrad MS70
Sectors
• Number of sectors: 1 to 20
166
331549/B
Technical specifications
Operational performance
Coverage
• Horizontal plane: ±30 degrees
• Vertical plane: 0 to 45 degrees
Figure 55
Frequency/Sector plot
Motion compensation
• Roll compensation: ≤ ±10º
Sidelobe level
• -35 dB horizontal (alongship)
• -25 dB vertical
Transmit and receive
• Source level: ≤ 225 dB
• Receiver dynamic range: 150 dB (instantaneous)
• Individual transmitter channels: 800
• Individual receiver channels: 800
• Ping rate: ≤ 2 Hz
Sample rates
• Output sample rate: 62,5 kHz complex sampling (before decimation)
• Output sample length: Minimum 1,2 cm
331549/B
167
Simrad MS70
Performance, Multibeam Operator Station
Hardware
• Processor: Pentium IV or later
• Processor speed: Minimum 3 GHz
• Memory capacity: Minimum 2 Gb
• Hard-disk capacity: Minimum 20 Gb
• Type: Simrad APC12 Processor Unit
Software
• Operating system: Microsoft® Windows XP®
• Scientific multibeam sonar application: Custom Simrad software
Performance, Transceiver Unit
• TRC Beamforming computers: Dell PowerEdge R610
• TRXU Transceivers: Custom MS70
• Ethernet switch: HP Procurve 2910
Performance, Power Supply Unit
• Output voltages:
– +6 Vdc, 20 A
– +12 Vdc, 10 A
– +75 Vdc, 4 A
• Nominal power delivered to TRXU load: 270 W
• Ethernet cable:
– Length: 10 m
– Type: CAT 5
• DC voltage cables:
– Maximum length: 10 m
– Total weight, all power cables: 14 kg
Performance, Transducer array
• Technology: Ceramic polymer composite
• Number of individual elements: 800
• Frequency range: 70 to 120 kHz
• Maximum transducer depth: 15 m
168
331549/B
Technical specifications
Interface specifications
This section provides the interface specifications for the Simrad MS70.
All serial lines are provided with adjustable baud rate, data bits, parity, and talker ID.
All Ethernet interfaces are provided with adjustable IP address and port number. The
Ethernet interface may also be used to connect to the ship network to access file data.
Serial lines
• Inputs:
– Position: NMEA 0183 (GGA, GLL, or RMC)
– Speed: NMEA 0183 (VBW, VTG, or RMC)
– Heading: NMEA 0183 (HDM, HDT, HDG, or VHW)
– Distance: NMEA 0183 (VLW) or 1/200 nmi contact pulses
– Sound speed at transducer face: AML Smart Sensor Format
– Trawl: Simrad ITI, Simrad PI, or Ifremer (Pacha and Scanmar)
– Motion: Kongsberg EM Attitude
– Synchronization (Slave): CTS and RTS
• Outputs:
– Depth: NMEA 0183 (DBS, DBT, DPT, Simrad, and Atlas)
– Synchronization (Master): CTS and RTS
Ethernet
• Inputs:
– Position: NMEA 0183 (GGA, GLL, or RMC)
– Speed: NMEA 0183 (VBW, VTG, or RMC)
– Heading: NMEA 0183 (HDM, HDT, HDG, or VHW)
– Distance: NMEA 0183 (VLW)
– Trawl: Simrad ITI, Simrad PI, or Ifremer (Pacha and Scanmar)
– Remote control: MS70 Remote control commands (proprietary)
– Data subscription: MS70 Data subscription commands (proprietary)
• Outputs:
– Depth: NMEA 0183 (DBS, DBT, DPT, Simrad, and Atlas)
– Remote control: MS70 Remote control responds (proprietary)
– Data subscription: A wide variety of MS70 output data
331549/B
169
Simrad MS70
File
• Inputs:
– Beam mode configuration parameters
– Calibration data
– User settings
– Sound speed profile for the water column
– Previously recorded data for replay
• Outputs:
– Beam mode configuration parameters
– Calibration data
– User settings
– Raw data for replay
Other interfaces
Depending on the choice of Multibeam Operator Station model various interfaces are
available such as Firewire, USB 2.0, and CD/DVD recorder.
170
331549/B
Technical specifications
Weights and outline dimensions
This section provides the technical specifications and requirements related to weight
and outline dimensions. For more detailed information about the dimensions, refer to
Drawing file on page 175.
Note
All weights are approximate.
Display Unit
• Not applicable. Refer to the documentation provided by the manufacturer.
Multibeam Operator Station
• Weight: 20 kg
• Width: 445 mm
• Height: 185 mm
• Depth: 365 mm
• Outline dimensions:
– Multibeam Operator Station (341305) on page 176
Transceiver Unit
• Weight: 380 kg
• Width: 600 mm
• Depth: 900 mm
• Height: 1921 mm (excluding air outlet)
• Outline dimensions:
– Transceiver Unit outline (281020) on page 177
Power Supply Unit
• Weight: 82 kg
• Width: 600 mm
• Depth: 418 mm
• Height: 812 mm
• Outline dimensions:
– Power Supply Unit outline (311237) on page 181
331549/B
171
Simrad MS70
Transducer array
• Overall diameter: 677 mm
• Height, main body: 313 mm
• Maximum length of transducer cables: 30 m
• Weights:
– Weight without cables: 250 kg
– Weight of transducer cables: 8,75 kg per meter
– Weight of transducer cables with protective hose: 12,5 kg per meter
– Weight of transducer array with 15 m cables: 382 kg
• Minimum space required behind transducer: 500 mm
• Outline dimensions:
– Transducer Array outline (208463) on page 184
– Clamping ring (208465) on page 186
– Mounting ring (208461) on page 188
Transducer cable
• Minimum bending radius, static: 95 mm
• Minimum bending radius, dynamic: 243 mm
• Tensile strength: 3000 N
• Outer sheet: Polyurethane
172
331549/B
Technical specifications
Power requirements
This section provides the technical specifications and requirements related to the AC
mains supply.
Display Unit
• Not applicable. Refer to the documentation provided by the manufacturer.
APC12 Processor Unit
• Voltage requirement: 115/230 Vac / 47–63 Hz / single phase, selectable (nominal)
• Deviation: 15%
• Transient: 20% of nominal voltage, recovery time 3 s
• Power consumption: Approximately 150 VA
• Recommended circuit breaker: 10 A, slow
Transceiver Unit
• Voltage requirement: 230 Vac / 50–60 Hz / single phase (nominal)
• Deviation: 15%
• Transient: 20% of nominal voltage, recovery time 3 s
• Power consumption:
– TRC Computers: 6 x 400 W = 2.400 W
– Ethernet switch: 100 W
– Fan unit: 100 W
• Recommended circuit breaker: 2 x 10 A, slow
Power Supply Unit
• Voltage requirement: 230 Vac / 50–60 Hz / single phase (nominal)
• Deviation: 15%
• Transient: 20% of nominal voltage, recovery time 3 s
• Power consumption: Approximately 800 W (each cabinet)
• Recommended circuit breaker: 10 A, slow (each cabinet)
331549/B
173
Simrad MS70
Environmental requirements
This section provides the technical specifications and requirements related to the
environmental conditions.
Display Unit
• Not applicable. Refer to the documentation provided by the manufacturer.
Multibeam Operator Station
• Operational temperature: 0 → +50°C
• Storage temperature: –40 → +70°C
• Maximum ambient relative humidity, no condensation, operation: 8 → 85%
• Maximum ambient relative humidity, no condensation, storage: 8 → 95%
Transceiver Unit
• Operational temperature: 10 → +30°C with a maximum temperature gradation of
10°C per hour
• Storage temperature: –40 → +65°C
• Maximum ambient relative humidity, no condensation, operation: 20 → 80% with
maximum humidity gradation of 10% per hour
• Maximum ambient relative humidity, no condensation, storage: 8 → 95%
Power Supply Unit
• Operational temperature: 0 → +30°C
• Storage temperature: –40 → +65°C
• Maximum ambient relative humidity, no condensation, operation: 8 → 85%
• Maximum ambient relative humidity, no condensation, storage: 8 → 95%
174
331549/B
Drawing file
Drawing file
This chapter contains relevant drawings related to the installation and maintenance of
the Simrad MS70.
Note
The mechanical drawings are for information and guidance only. They are not in scale.
All dimensions are in mm unless otherwise is noted. The original installation drawings
are available on PDF and/or AutoCad’s DWG format.
Topics
• Multibeam Operator Station (341305) on page 176
• Transceiver Unit outline (281020) on page 177
• Power Supply Unit outline (311237) on page 181
• Power Supply Unit mounting frame (308337) on page 183
• Transducer Array outline (208463) on page 184
• Clamping ring (208465) on page 186
• Mounting ring (208461) on page 188
331549/B
175
Simrad MS70
Multibeam Operator Station (341305)
185
445
160
365
All measurements in mm.
The drawing is not in scale
176
341305 Rev .B
CD031082-005 Page 1 of 1
331549/B
Drawing file
Transceiver Unit outline (281020)
Front and
rear view
1960 1907
1780
475
All measurements in mm.
The drawing is not in scale.
331549/B
600
[281020] Rev .A
CD01601 1-001
177
Simrad MS70
Side view
Rear
Front
900
990
All measurements in mm.
The drawing is not in scale.
178
[281020] Rev .A
CD01601 1-002
331549/B
Drawing file
Top view
800
±0,10
155.6
755.5 ±0,10
±0,10
111.1 ±0,10
±0,10
688.8
644.4 ±0,10
44.4 ±0,10
0
718
1000 mm
service
area
600 mm
service
area
Front
All measurements in mm.
The drawing is not in scale.
331549/B
Rear
[281020] Rev .A
CD01601 1-003
179
Simrad MS70
Bottom view
676
±0,10
155.6
631.5
±0,10
564.8 ±0,10
520.4 ±0,10
±0,10
111.1
±0,10
44.4 ±0,10
0
475
ø9
All measurements in mm.
The drawing is not in scale.
180
[281020] Rev .A
CD01601 1-004
331549/B
Drawing file
Power Supply Unit outline (311237)
Front view
202
630
614
210
202
ø8.5 (x8)
663
All measurements in mm.
The drawing is not in scale
331549/B
311237 Rev .A
CD016022-006 Page 1
181
Simrad MS70
Side view
408
744
All measurements in mm.
The drawing is not in scale
182
311237 Rev .A
CD016022-006 Page 2
331549/B
Drawing file
Power Supply Unit mounting frame (308337)
0
38
92.5
174.5
229.5
229.5
174.5
92.5
38
0
A
30
Mounting
holes for
shock
absorbers
Mounting
holes for
Power
Cabinets
1985
Note:
All measurements are in mm.
The drawing is not in scale.
331549/B
600
CD016025B Page 1 of 1
308337 Rev .A
183
Simrad MS70
Transducer Array outline (208463)
ø22
ø16 Cable
130
62
Cable
strain
relief
Side view
313
70
ø677
FOR WARD
ø171
3 x M10 holes
One is used for electric
connection to the
external sacrificial anode.
156
78
Top view
135
All measurements in mm.
The drawing is not in scale
184
135
208463 Rev .C
CD016012-001 Page 1
331549/B
Drawing file
Optional
sacrificial anode
inside the blister
Electrical
connection
400
ø536
ø520
ø574
ø522
12 ea M12x55 bolts, stainless steel,
A4 class 80 (Order no.302477)
12 ea flat washer , stainless steel (Order no.572-019363)
Torque: 76 NM
Use Loctite 243
Clamping ring
Mounting ring
Side view
(Cross section of mounting and clamping rings)
Orientation bolt M6x10 Stainless steel
All measurements in mm.
The drawing is not in scale
331549/B
Bottom view
A4
208463 Rev .C
CD016012-001 Page 2
185
Simrad MS70
Clamping ring (208465)
Bottom view
30°
Depth: 0.8 mm
7.5±1
7±0.5
19±0.5
15°
R1
7,5°
ø11
Material:
Carbon steel St52
or equivalent
ø597
6.3
Note:
All measurements are in mm.
The drawing is not in scale.
186
NO SHARP EDGES
CD016013A Page 1 of 2 / 871-208465 Rev
.B
331549/B
Drawing file
Side view
34.5
ø0.2
15
±0.1
±0.2
12 holes,
equal spacing
ø25
ø13
635
+0.2/-0
523
575
+0.5/-0
-0.2/-0.4
+0.5/-0
10.5
R5
R10
R0.5
Note:
All measurements are in mm.
The drawing is not in scale.
331549/B
CD016013A Page 2 of 2 / 871-208465 Rev
.B
187
Simrad MS70
Mounting ring (208461)
ø677
±1
ø637
12
35°
45°
16
70
Self-locking threads must be tapped from this side
7.5°
15°
R6
R1
M6
±1
±1
Self-locking threads
Equal spacing
Bore diameter 10.7 mm
M12
ø0.2
272 ±0.5
ø537
±0.2
ø597
6.3
NO SHARP EDGES
Note:
All measurements are in mm.
The drawing is not in scale.
188
CD016014A Page 1 of 2
871-208461 Rev .D
331549/B
Drawing file
34.5 ±0.1
Material:
Carbon steel St52
or equivalent
+0.5-0
-0.1-0.4
ø575
ø637 +1-0
17.5
R0.5
R1
R10
R1
Note:
All measurements are in mm.
The drawing is not in scale.
331549/B
CD016104A Page 2 of 2
871-208461 Rev .D
189
Simrad MS70
Appendix A
Equipment handling
This section provides the basic rules for transportation, storage and handling of units. In
this context, a unit may be any large or small part of the system. It can be supplied as
part of the initial delivery, or as a spare part.
Topics
Transportation
Unless otherwise stated in the accompanying documentation, electronic,
electro-mechanical and mechanical units supplied by Kongsberg Maritime can be
transported using all methods approved for delicate equipment; (by road, rail, air or sea).
The units are to be transported in accordance with general or specific instructions for the
appropriate unit(s), using pallets, transport cases, or carton boxes as appropriate.
Note
Special local restrictions concerning air transportation may be applied to units
containing certain types of batteries. These units must be checked properly, and the
regulations must be investigated by the packer/shipper before the unit is dispatched.
All local transportation must be carried out according to the same specifications as for
the initial delivery. In general, all units must be handled with care.
The carton or case containing the unit must be kept dry at all times, and must be sheltered
from the weather. It must not be subjected to shocks, excessive vibration or other rough
handling. The carton or case will normally be marked with text or symbols indicating
which way it is to be placed. Follow any instructions given, and ensure the case is always
placed with its “top” uppermost.
The carton or case must not be used for any purpose for which it was not intended (step,
table, etc.), and in the absence of other information, no other cartons or cases must
be stacked on top of it.
190
331549/B
Appendix A Equipment handling
Lifting
A heavy crate will normally be marked with its weight, and the weights of other cartons
or crates will normally be entered on the packing list.
• You must always check the weight of a crate before you attempt to lift it.
• You must always use lifting apparatus that is approved and certified for the load.
Heavy units may be equipped with lifting lugs for transportation by crane within the
workshop or installation area. Before you use a crane:
• You must check the applicable weight certificate for the crane.
• You must check the security of the lifting lugs.
Ensure that all available lifting lugs are used. Ensure the unit remains under control
during the operation to avoid damage to the unit, equipment or personnel.
Heavy units may be transported using a forklift truck. Special attention must then be
paid to the position of the unit’s centre of gravity. The units must be properly secured to
the truck.
Storage prior to installation or use
When a system, a unit or a spare part has been delivered to the customer, it may be
subject to long time storage prior to installation and use. During this storage period,
certain specifications must be met. The equipment must be preserved and stored in such
a way that it does not constitute any danger to health, environment or personal injury.
1 The equipment must be stored in its original transportation crate.
2 Ensure that the units are clearly separated in the shelves and that each unit is easily
identifiable.
3 The crate must not be used for any purpose for which it was not intended (eg. work
platform etc.).
4 The crates must not be placed on top of each other, unless specific markings permit
this.
5 The crates must not be placed directly on a dirt-floor.
6 Do not open the crate for inspection unless special circumstances permit so.
• “Special circumstances” may be suspected damage to the crate and its content, or
inspections by civil authorities.
• If any units are damaged, prepare an inspection report stating the condition of the
unit and actions taken. Describe the damage and collect photographic evidence if
possible. Re-preserve the equipment.
• If the units are not damaged, check the humidity absorbing material. If required,
dry or replace the bags, then re-pack the unit(s) according to the packing
instructions.
7 If the crate has been opened, make sure that is it closed and sealed after the
inspection. Use the original packing material as far as possible.
331549/B
191
Simrad MS70
8
The storage room/area must be dry, with a non-condensing atmosphere. It must
be free from corrosive agents.
9
The storage area’s mean temperature must not be lower than -30° C, and not warmer
than +70° C. If other limitations apply, the crates will be marked accordingly.
10 The crate must not be exposed to moisture from fluid leakages.
11 The crate must not be exposed to direct sunlight or excessive warmth from heaters.
12 The crate must not be subjected to excessive shock and vibration.
13 If the unit contains normal batteries, these may have been disconnected/isolated
before the unit was packed. These must only be reconnected before the installation
starts. Units containing batteries are marked.
Caution
Units containing lithium or alkaline batteries must be handled separately
and with care. Such units are marked accordingly. Do not attempt to
recharge such batteries, open them or dispose of them by incineration.
Refer to the applicable product data sheets.
Inspection
An inspection must be carried out immediately after the unit(s) have arrived at their
destination.
1
Check all wooden or cardboard boxes, plastic bags and pallets for physical damage.
Look for signs of dropping, immersion in water or other mishandling.
2
If damage is detected externally, you will have to open the packaging to check the
contents. Request a representative of the carrier to be present while the carton is
opened, so any transportation damage can be identified.
3
If any units are damaged, prepare an inspection report stating the condition of the
unit and actions taken. Describe the damage and collect photographic evidence if
possible. Send the inspection report to Kongsberg Maritime as soon as possible.
4
If the units are not damaged, check the humidity absorbing material. If required, dry
or replace the bags, then re-pack the unit(s) according to the packing instructions.
Unpacking
General unpacking procedure
Normal precautions for the handling, transportation and storage of fragile electronic
equipment must be undertaken.
192
331549/B
Appendix A Equipment handling
Note
If the unit is not to be prepared for immediate use, you may consider storing it unopened
in its original packing material. However, it may be useful to open the case to check its
contents for damage and retrieve any accompanying documentation.
Do not use a knife to open cardboard cartons - the contents may lie close to the surface,
and may be damaged by the blade.
1
Check the carton before opening it to ensure it shows no signs of dropping,
immersion in water or other mishandling. If the carton shows signs of such damage,
refer to the paragraph covering Inspection on receipt.
2
Place the carton on a stable work bench or on the floor with the top of the carton
uppermost.
3
In the absence of other instructions, always open the top of the carton first. The
contents will normally have been lowered into the carton from above, so this will
usually be the easiest route to follow. Care must be used when opening the carton to
ensure the contents are not damaged. Do not use a knife to open cardboard cartons
4
If the carton has been closed using staples, remove the staples from the carton as
you open it. This will reduce the possibilities of scratch injury to yourself and
damage to the contents.
5
If a wooden crate has been closed using screws, always remove them using a
screwdriver. Do not attempt to prise the lid off with a crowbar or similar.
6
Once the carton is open, carefully remove all loose packing and insulation material.
Check for manuals and other documents that may have been added to the carton
during packing, and put these to one side. Check also for special tools, door keys etc.
Unpacking electronic and electromechanical units
Electronic and electromechanical units will normally be wrapped in a clear plastic
bag. Lift the unit, in its bag, out of the carton and place it in a stable position on the
floor/work bench.
Inspect the unit for damage before opening the plastic bag.
Note
Beware of the dangers of Electro-Static Discharge (ESD) both to yourself and to the
equipment, when handling electronic units and components.
Cables must never be used as carrying handles or lifting points.
Do not break the seal to open a circuit board package before the board is to be used. If
the board package is returned to the manufacturer with the seal broken, the contents will
be assumed to have been used and the customer will be billed accordingly.
Assuming all is well, open the bag and remove the unit.
Open the unit and check inside. Remove any packing and desiccant material that may
be inside.
331549/B
193
Simrad MS70
Unpacking mechanical units
Mechanical units may be heavy. Using a suitably certified lifting apparatus, lift the unit
out of the crate and place it in a stable position on the floor/work bench.
Inspect the unit for damage and remove any packing material that may be inside the unit.
Unpacking transducers
Transducers may be supplied mounted to a hull unit (if any), or packed separately. Crates
are normally identified by the order number and the serial number.
The transducer face must be protected by a rigid, padded cover (e.g. a wooden box lined
with foam rubber) all the time it is exposed to the risk of physical damage.
Caution
Once transducer is unpacked, great care must be taken to ensure that
transducer body and cabling is not exposed to any mechanical stress.
Storage after unpacking
The unit must whenever possible be stored in its original transportation crate until ready
for installation. The crate must not be used for any purpose for which it was not intended
(eg. work platform etc.).
Once unpacked, the equipment must be kept in a dry, non condensing atmosphere, free
from corrosive agents and isolated from sources of vibration.
Note
Do not break the seal to open a circuit board package before the board is to be used. If
the board package is returned to the manufacturers with the seal broken, the contents
will be assumed to have been used and the customer will be billed accordingly.
The unit must be installed in its intended operating position as soon as possible
after unpacking. If the unit contains normal batteries, these may have been
disconnected/isolated before the unit was packed. These must then be reconnected
during the installation procedure. Units containing batteries are marked.
Note
Units containing lithium or alkaline batteries must be handled separately and with care.
Such units are marked accordingly. Do not attempt to recharge such batteries, open them
or dispose of them by incineration. Refer to the applicable product data sheets.
194
331549/B
Appendix A Equipment handling
Storage after use
If a unit is removed from its operating location and placed into storage, it must be
properly cleaned and prepared before packing.
Cleaning cabinets
If a cabinet has been exposed to salt atmosphere while it was in use, it must be thoroughly
cleaned both internally and externally to prevent corrosion.
1
Wipe the cabinet externally using a damp cloth and a little detergent. Do not use
excessive amounts of water as the unit may not be water tight. On completion,
dry the unit thoroughly.
2
All surfaces must be inspected for signs of corrosion, flaking/bubbling paint, stains
etc. Damaged or suspect areas must be cleaned, prepared and preserved using the
correct preservation mediums for the unit. The mediums to be used will usually be
defined in the units’ maintenance manual.
3
Open the unit, and using a vacuum cleaner, remove all dust etc. from the unit.
Great care must be taken to ensure the circuit boards and modules are not damaged
in the process.
Mechanical units
If a mechanical unit may has been exposed to a salt atmosphere while it was in use, it
must be thoroughly cleaned both internally and externally to prevent corrosion.
1
If the construction materials and type of unit permits, wash the unit using a
high-pressure hose and copious amounts of fresh water. Examples are the lower
parts of hull units (outside the hull) or subsea units
2
Ensure that all traces of mud and marine growth are removed. Use a wooden or
plastic scraper to remove persistent growth, barnacles etc. On completion, dry
the unit thoroughly.
Caution
Do not use a high pressure hose in the vicinity of cables or transducers.
Do not use sharp or metal tools on a transducer face.
3
If the materials or type of unit prevents the use of a high-pressure hose, wipe the
unit using a cloth dampened with water containing a little detergent. Examples are
the upper parts of hull units (inside the hull) and hydraulic systems
4
Do not use excessive amounts of water as some components on the unit may not be
water tight. Wipe off the detergent with a damp cloth, then dry the unit thoroughly.
5
All surfaces must be inspected for signs of corrosion, flaking/bubbling paint, stains
etc. Damaged or suspect areas must be cleaned, prepared and preserved using the
correct preservation mediums. The mediums to be used will normally be defined in
the unit’s maintenance manual.
331549/B
195
Simrad MS70
Cables
Wipe clean all exposed cables, and check for damage. If a cable shows signs of wear or
ageing, contact Kongsberg Maritime for advice.
Internal batteries
If the unit contains batteries, these may discharge slowly during storage. If the unit is to
be stored for an extended period, disconnect or remove all internal batteries.
A suitable piece of insulating material can be placed between the battery and the
electrical contacts to prevent electrical discharge. The battery can then remain in the unit,
reducing the risk of it being misplaced during the storage period.
Caution
Units containing lithium or alkaline batteries must be handled separately and
with care. Such units are marked accordingly. Do not attempt to recharge
such batteries, open them or dispose of them by incineration. Refer to the
applicable product data sheets.
Dehumidifier
Place a suitably sized bag of desiccant material (silica gel or similar) into the unit to keep
the electronic components as dry as possible.
Coatings
Spray the unit externally with a corrosion inhibitor (e.g. a light oil) before packing.
Re-packaging
Whenever possible, the unit must be stored and transported in its original packing
material and/or crate. In the event that this material is not available, proceed as follows:
• Small units must be protected from damp by being placed within a plastic bag at least
0.15 mm thick. An appropriate quantity of desiccant material should be placed inside
this bag, and the bag sealed. The sealed unit must then be placed in an appropriate
carton or crate, and supported in the container by appropriate shock-absorbing
insulation (polystyrene foam chips etc.).
• Large units must be placed in a suitable cardboard box or wooden crate. The unit
must be protected against physical damage by means of shock-absorbing insulation
mats. The box must be clearly marked with its contents, and must be stored in a
dry and dust-free area.
196
331549/B
Appendix A Equipment handling
Temperature protection
If the unit must be protected against extremes of temperature, the carton/crate must be
lined on all walls, base and lid with 5 cm thick polyurethane or polystyrene foam. These
units will be identified as delicate in the applicable documentation.
The package must then be clearly marked:
Must not be transported or stored in temperatures below -5 degrees Celsius.
Other units can normally be stored in temperatures between -30° C and +70° C, refer to
the system’s technical specifications for details.
Note
Unless otherwise specified, transducers must not be stored in temperatures below -20° C
and above +55° C.
Circuit board handling and packaging
Circuit boards are delicate items. They may work year after year in an advanced product,
but then fail due to a small spark of static electricity. For this reason, it is very important
that they are properly handled and protected during shipping.
Beware of ESD!
When you handle electronic circuit boards, you must beware of the dangers of
electrostatic discharge (ESD), both to yourself and to the equipment. In order to ensure
safe transport and storage, circuit boards and other electronic units will always be
wrapped in a clear plastic protective bag, and the bag will be sealed. See also section
Electro-Static Discharge (ESD) on page 198.
Unpacking and handling circuit boards
Observe the following steps to unpack a circuit board.
1 Wherever possible, prepare a suitable workbench. It must have an approved
conductive service mat, and it must be connected directly to a reliable earth point
via its earthing cord. You must wear a wristband in direct contact with the skin, and
the wristband must be connected to the service mat.
2 Lift the circuit board, in its protective bag, out of the carton and place it in a stable
position on the a floor/work bench.
3 Inspect the unit for damage before you open the plastic bag.
4 Do not break the seal to open a circuit board package before the board shall to be
used. If the board package is returned with the seal broken, we will assume that the
content has been used, and we will bill you accordingly.
5 Assuming all is well, open the bag and remove the unit.
6 Take out and keep the documentation. You will need it if the circuit board shall be
returned to us. Also, remove any packing and desiccant material that may be inside.
331549/B
197
Simrad MS70
7
Keep the protective plastic bag for future use.
Unpacking on board the vessel
When you are working on board a vessel, an “approved conductive service mat” is
often far away. As you still need to unpack circuit boards, make sure that you do it
in the instrument room, or at another location where you have a steel deck. Keep far
away from the bridge or any other rooms with wall-to-wall carpets! If possible, bring a
wristband and ground yourself.
Returning a circuit board
If you wish to return a circuit board to us, observe the following rules.
Note
Failure to follow these rules may result in unserviceable circuit boards.
1
Place the circuit board to be returned in the same protective plastic bag as you
originally received it in - or a protective bag of similar ESD protection quality.
2
DO NOT use standard plastic bags, such as commercial bubble wrap.
3
Fill in all the necessary information on the applicable documentation and place
it inside the bag.
4
Seal the bag.
5
Place the circuit board in a suitable carton, and secure it for shipping.
Electro-Static Discharge (ESD)
What is ESD?
Electro-Static Discharge (ESD) is the transfer of an electrostatic charge between two
bodies at different electrostatic levels, caused either by direct contact or induction by
an electrostatic field. The passing of a charge through an electronic device can cause
localised overheating, and it can also “puncture” insulating layers within the structure of
the device. This may deposit a conductive residue of the vaporised metal on the device,
and thus create a short circuit. This may result in a catastrophic failure, or degraded
performance of the device.
ESD protection
Sensitive electronic circuit boards must be transported and stored in protective packing
bags. The circuit boards must not be transported or stored close to strong electrostatic,
electro-magnetic or radioactive fields.
If it is necessary to open and touch the circuit board inside the protective bag, then
the following precautions must be taken:
198
331549/B
Appendix A Equipment handling
1
The working area must be covered by an approved conductive service mat that has
a resistance of between 50 kΩ and 2 MΩ, and is connected directly to a reliable
earth point via its earthing cord.
2
The service personnel involved must wear a wristband in direct contact with the
skin, connected to the service mat.
3
Printed circuit boards must be placed on the conductive service mat during
installation, maintenance etc.
4
If, for any reason, it is necessary to move the circuit board from the conductive
service mat, it must be placed in an approved antistatic transportation container (e.g.
static shielding bag) before transportation.
5
During installation and servicing, all electrical equipment (soldering irons, test
equipment etc.) must be earthed.
Disposal
At the end of the product lifetime, all Kongsberg Maritime products must be disposed in
an environmental friendly way.
All electrical and electronic components must be disposed of separately from the
municipal waste stream via designated collection facilities appointed by the government
or local authorities. The correct disposal and separate collection of your old appliance
will help prevent potential negative consequences for the environment and human health.
This is a precondition for reuse and recycling of used electrical and electronic equipment.
For more detailed information about disposal of your old appliance, please contact your
local authorities or waste disposal service.
All disposal of mechanical, electromechanical, electronic and chemical waste – including
all types of batteries – must thus be disposed of according to national and international
rules and regulations. Observe the relevant Waste Electronical and Electronic Equipment
(WEEE) regulations.
Kongsberg Maritime offers a product recycling service. This is described on
http://www.km.kongsberg.com →Products →Services →Product recycling.
331549/B
199
Simrad MS70
Appendix B
Basic cable
requirements
This chapter provides general information related to the installation of system cables.
Topics
• Cable trays on page 200
• Radio Frequency interference on page 201
• Physical protection on page 201
• Grounding on page 202
• Cable connections on page 202
• Cable terminations on page 202
• Cable identification on page 203
Cable trays
All permanently installed cables associated with the system must be supported and
protected along their entire lengths using conduits and/or cable trays. The only exception
to this rule is over the final short distance (maximum. 0,5 meters) as the cables run into
the cabinets/units to which they are connected. These short service loops are to allow the
cabinets to move on their shock mounts, and to allow maintenance and repair.
• Wherever possible, cable trays must be straight, accessible and placed so as to avoid
possible contamination by condensation and dripping liquids (oil, etc.). They must be
installed away from sources of heat, and must be protected against physical damage.
Suitable shields must be provided where cables are installed in the vicinity of heat
sources.
• Unless it is absolutely unavoidable, cables should not be installed across the vessel’s
expansion joints. If the situation is unavoidable, a loop of cable having a length
proportional to the possible expansion of the joint must be provided. The minimum
internal radius of the loop must be at least twelve times the external diameter of
the cable.
• Where a service requires duplicate supply lines, the cables must follow separate paths
through the vessel whenever possible.
200
331549/B
Appendix B Basic cable requirements
• Signal cables must not be installed in the same cable tray or conduit as high-power
cables.
• Cables containing insulation materials with different maximum-rated conductor
temperatures should not be bunched together (that is, in a common clip, gland, conduit
or duct). When this is impractical, the cables must be carefully arranged such that the
maximum temperature expected in any cable in the group is within the specifications
of the lowest-rated cable.
• Cables with protective coverings which may damage other cables should not be
grouped with other cables.
• Cables having a copper sheath or braiding must be installed in such a way that
galvanic corrosion by contact with other metals is prevented.
• To allow for future expansion of the system, all cables should be allocated spare
conductor pairs. Also, space within the vessel should be set aside for the installation
of extra cables.
Radio Frequency interference
All cables that are to be permanently installed within 9 m (30 ft) of any source of Radio
Frequency (RF) interference such as a transmitter aerial system or radio transmitters,
must, unless shielded by a metal deck or bulkhead, be adequately screened by sheathing,
braiding or other suitable material. In such a situation flexible cables should be screened
wherever possible.
It is important that cables, other than those supplying services to the equipment installed
in a radio room, are not installed through a radio room, high power switch gear or other
potential sources of interference. Cables which must pass through a radio room must
be screened by a continuous metal conduit or trunking which must be bonded to the
screening of the radio room at its points of entry and exit.
Physical protection
Cables exposed to the risk of physical damage must be enclosed in a steel conduit
or protected by a metal casing unless the cable’s covering (e.g. armour or sheath) is
sufficient to protect it from the damage risk.
Cables exposed to an exceptional risk of mechanical damage (for example in holds,
storage-spaces and cargo-spaces) must be protected by a suitable casing or conduit,
even when armoured, if the cable covering does not guarantee sufficient protection
for the cables.
Metallic materials used for the physical protection of cables must be suitably protected
against corrosion.
331549/B
201
Simrad MS70
Grounding
All metallic cable coverings (armour, metallic sheathing etc.) must be electrically
connected to the vessel’s hull at both ends except in the case of final sub-circuits where
they should be connected at the supply end only.
Grounding connections should be made using a conductor which has a cross-sectional
area appropriate for the current rating of the cable, or with a metal clamp which grips
the metallic covering of the cable and is bonded to the hull of the vessel. These cable
coverings may also be grounded by means of glands specially intended for this purpose
and designed to ensure a good ground connection. The glands used must be firmly
attached to, and in good electrical contact with, a metal structure grounded in accordance
with these recommendations.
Electrical continuity must be ensured along the entire length of all cable coverings,
particularly at joints and splices. In no case should the shielding of cables be used as the
only means of grounding cables or units.
Metallic casings, pipes and conduits must be grounded, and when fitted with joints these
must be mechanically and electrically grounded locally.
Cable connections
All cable connections are shown on the applicable cable plan and interconnection
diagrams.
Where the cable plan shows cable connections outside an equipment box outline, the
connections are to be made to a plug or socket which matches the plug or socket on
that particular item of equipment.
Where two cables are connected in series via a junction box or terminal block, the
screens of both cables must be connected together but not grounded.
Cable terminations
Care must be taken to ensure that the correct terminations are used for all cable
conductors, especially those that are to be connected to terminal blocks. In this case,
crimped sleeve-terminations must be fitted to prevent the conductor core from fraying
and making a bad connection with the terminal block. It is also of the utmost importance
that where crimped terminations are used, the correct size of crimp and crimping tool are
used. In addition, each cable conductor must have a minimum of 15 cm slack (service
loop) left before its termination is fitted.
202
331549/B
Appendix B Basic cable requirements
Cable identification
Cable identification codes corresponding to the cable number shown in the cable plan
must be attached to each of the external cables. These identification codes should be
positioned on the cable in such a way that they are readily visible after all panels have
been fitted. In addition, each cable conductor should be marked with the terminal board
number or socket to which it is connected.
331549/B
203
Simrad MS70
Index
1000Base-T, 147
A
About
this manual, 9
AC mains cable
230 Vac, 145
Access
sonar room, 25
Accuracy
heading sensor
location, 41
motion sensor location, 40
positioning system
location, 41
sensor measurements, 39
transducer array
location, 40
water line distance, 41
Acoustic window, 44
Air conditioning
sonar room, 26
Alignment
coordinate system, 37
measurements, 36
summary, 43
transducer array, 36
Anti-fouling
paint, 45
APC12 Processor Unit
outline dimensions
drawing, 176
Approval
classification society, 18
installation drawings, 21
B
Bilge pump
sonar room, 26
C
Cable
230 Vac, 145
circuit breaker, 146
ethernet, crossover, 149
ethernet, straight, 147
external trigger, 131–132
mouse, 152
Power Supply Units, 137
requirements, 200
RS-422 three-wire, 134
serial line adapter, 154
204
Transceiver Unit fan
module, 143
Transceiver Unit
synchronization, 144
transducer, 156
Cable plan
ethernet, 85–86
interconnections, 84
Multibeam Operator
Station, 95
transducer, 90
Cable protection
sonar room, 26
Cable requirements
connections, 202
grounding, 202
identification, 203
physical protection, 201
radio frequency
interference, 201
terminations, 202
trays, 200
Cable trays
requirements, 200
Cables, 80
Cabling
detailed drawings, 129
overview, 82
requirements, 26
shipyard cables, 81
specifications, 96
system cables, 81
transducer cables
specifications, 115
Changes
to this manual, 10
Circuit board
handling, 197
packaging, 198
returning, 198
unpacking, 197
Circuit breaker
wiring, 146
Classification society
approval, 18, 21
Cleaning
transducer face, 44
Colour display
installation, 62
Compass deviation
responsibility, 18
Computer
installation, 60
Configuration
system, 1, 10
Connections
requirements, 202
Connectors
Ethernet switch, 83
Coordinate system
sensor location, 37
D
Description
functional, 11
Multibeam Operator
Station, 14
Operator Station, 14
Power Supply Unit, 15, 54
system, 13
Transceiver Unit, 14, 47, 65
transducer, 15, 29
Diagram
system, 13
Dimensions
APC12 Processor Unit, 176
Multibeam Operator
Station, 176
Power Supply Unit, 181
Power Supply Unit,
mounting frame, 183
Transceiver Unit, 177
Transducer Array, 184
Transducer clamping
ring, 186
Transducer mounting
ring, 188
Display
installation, 62
Disposal
equipment, 199
Docking
transducer location, 18
Docking plan, 19
Drawing
Multibeam Operator
Station, outline
dimensions, 176
Power Supply Unit
mounting frame,
outline dimensions,
183
Power Supply Unit
outline dimensions, 181
Processor Unit, outline
dimensions, 176
system, 13
Transceiver Unit outline
dimensions, 177
331549/B
Index
Transducer Array,
outline dimensions,
184
Transducer clamping
ring, outline
dimensions, 186
Transducer mounting
ring, outline
dimensions, 188
Drawings, 175
installation, 10
Dry docking
transducer location, 18
E
Electro-static discharge, 198
Element
transducer organisation, 115
Environmental
specifications, 174
Equipment
disposal, 199
handling, 190
inspection, 192
lifting, 191
re-packaging, 196
receipt, 17
responsibility, 17
storage, 17
storage after unpacking, 194
storage after use, 195
storage before use, 191
transportation, 190
unpacking, 17, 192
ESD protection, 198
ESD, what is it?, 198
Ethernet
cable plan, 85–86
crossover cable, 149
straight cable, 147
Ethernet switch
connectors, 83
External trigger
cable specifications, 131–132
F
Familiarization
Simrad MS70, 11
Fan module
cable specifications, 143
Functional
description, 11
G
General supply conditions, 17
Grounding
331549/B
requirements, 202
H
Handling
circuit boards, 197
transducer, 44
Handling rules
transducer, 44
Heading sensor
location accuracy, 41
Heat, excessive
do NOT expose
transducer, 44
Heating
sonar room, 25
How to
deal with ESD, 198
pack a circuit board, 198
return a circuit board, 198
unpack a circuit board, 197
unpack a circuit board
on board, 198
Humidity
specifications, 174
I
Identification
cable requirements, 203
IEC plug, 145
IEEE 802.3ab, 147
Information
support, 19
Inspection
equipment, 192
Installation
computer, 60
display monitor, 62
drawings, 175
operator station, 59
planning, 21
Power Supply Unit, 53
requirements, 18
Transceiver Unit, 47
transducer, 28
Uninterrupted Power
Supply, 63
Installation drawings, 10
approval, 21
Installation principles
transducer, 31
Installation procedure
transducer array, 31
transducer cables, 35
Installation requirements
Operator Station, 60
Insulation
sonar room, 26
Interconnection cables, 80
Interconnections
cable plan, 84
Interface
specifications, 169
Introduction
Simrad MS70, 11
J
Jotun, 45
L
Lifting
equipment, 191
transducer, 44
Lights
sonar room, 26
Line replaceable units
Transceiver Unit, 50, 65
Location
sensors, 38, 41, 43
LRU
Transceiver Unit, 50, 65
LRUs
Transceiver Unit, 50, 65
M
Main parts
Power Supply Unit, 57
Transceiver Unit, 50, 65
Main units, 13–14, 163
Mains cable
230 Vac, 145
Maintenance
transducer, 44
Maintenance rules
transducer, 45
Manual
Target audience, 9
Maritime authority
approval, 21
Measurement
accuracy, 39
Measurements
alignment, 36
Mechanical
drawings, 175
Monitor
installation, 62
Motion sensor
location accuracy, 40
Mouse
cable, 152
MS70
main units, 13–14
205
Simrad MS70
MS70 transducer
description, 15
Multibeam Operator
Station
cable plan, 95
description, 14
N
Noise sources
inspection, 18
O
Operational principle, 11
Operator Station
cable plan, 95
description, 14
installation, 59
Installation
requirements, 60
Organisation
transducer elements, 115
Outline dimensions, 171
APC12 Processor Unit, 176
drawings, 175
Multibeam Operator
Station, 176
Power Supply Unit, 181
Power Supply Unit,
mounting frame, 183
Transceiver Unit, 177
Transducer Array, 184
Transducer clamping
ring, 186
Transducer mounting
ring, 188
Overview
Transceiver Unit, 50, 65
P
Packaging
circuit boards, 198
Paint
anti-fouling, 45
Painting
transducer face, 44
Performance
specifications, 164
Physical cable protection
requirements, 201
Planning
installation, 21
Population
Power Supply Unit, 57
Positioning system
location accuracy, 41
206
Power
specifications, 173
Power Supply Unit
cable specifications, 137
description, 15, 54
installation, 53
installation preparations, 54
installation procedure, 57
outline dimensions
drawing, 181
population, 57
steel conduits, 56
Power Supply Unit,
mounting frame
outline dimensions
drawing, 183
Preparations
Power Supply Unit
installation, 54
Transceiver Unit
installation, 49
Procedure
Power Supply Unit
installation, 57
start-up sonar, 161
Transceiver Unit, 50
transducer installation, 31
Processor Unit
outline dimensions
drawing, 176
Product recycling, 199
Protection
against ESD, 198
temperature, 197
Purpose
this manual, 9
R
Radio Frequency
interference
requirements, 201
Re-packaging
equipment, 196
Receipt
equipment, 17
Record of changes, 10
Recycling, 199
Requirements
cables, 200
cabling, 26
for installation, 18
Operator Station
installation, 60
Responsibility
compass deviation, 18
equipment, 17
Returning
a circuit board, 198
RJ45
plug, 147, 149
RS-232
serial line adapter, 154
RS-422
cable specifications, 134
S
Sensor
locations, 38, 41, 43
Sensors
coordinate system, 37
Serial line
adapter, 154
Serial line adapter
cable, 154
Shipyard
cables, 81
Simrad MS70
familiarization, 11
introduction, 11
main units, 13–14
Size
sonar room, 25
Sonar room
access, 25
bilge pump, 26
cable protection, 26
heating, 25
insulation, 26
lightning, 26
size, 25
ventilation, 26
Space requirements
Power Supply Unit, 54
Transceiver Unit, 49
Specifications, 162
environmental, 174
humidity, 174
interfaces, 169
outline dimensions, 171
performance, 164
power, 173
temperatures, 174
Uninterrupted power
supply, 15–16, 63
weights, 171
Start-up procedures, 161
Steel conduits
Power Supply Unit, 56
Storage, 17
equipment (after
unpacking), 194
equipment (after use), 195
equipment (before use), 191
Sunlight
331549/B
Index
do NOT expose
transducer, 44
Supply conditions, 17
Supply power
tolerance, 18
Support
information, 19
Synchronization
cable specifications, 144
System
cables, 81
components, 163
description, 13
diagram, 13
System configuration, 1, 10
System specifications, 162
System units, 13–14
T
T-568B, 147
Target audience, 9
Techncial
support, 19
Technical specifications, 162
Temperature
protection, 197
specifications, 174
Terminations
requirements, 202
Tolerance
supply power, 18
Transceiver Unit
description, 14, 47, 65
installation, 47
installation preparations, 49
installation procedure, 50
line replaceable units,
50, 65
Line replaceable units,
50, 65
LRU, 50, 65
main parts, 50, 65
outline dimensions
drawing, 177
overview, 50, 65
Transceiver Unit fan
module
cable specifications, 143
Transceiver Unit
synchronization
cable specifications, 144
Transducer
alignment, 36
Cable descriptions, 115
cable plan, 90
cables, 35, 156
description, 15, 29
331549/B
docking, 18
element organisation, 115
handling, 29, 44
installation, 28
installation principles, 31
installation procedure, 31
lifting, 30, 44
location accuracy, 40
maintenance, 44–45
Transducer Array
outline dimensions
drawing, 184
Transducer clamping ring
outline dimensions
drawing, 186
Transducer face
cleaning, 44
painting, 44
Transducer mounting ring
outline dimensions
drawing, 188
Transport protection, 44
Transportation
equipment, 190
WEEE, 199
Weights, 171
Wiring
general requirements, 19
U
Uninterrupted power
supply, 15, 63
included in delivery, 16, 63
minimum specifications, 16
use, 15, 63
Uninterrupted Power
Supply, 18
installation, 63
Units
main, 13–14
Unpacking, 17
circuit boards, 197
equipment, 192
UPS, 15, 18, 63
included in delivery, 16, 63
installation, 63
minimum specifications, 16
use, 15, 63
V
Ventilation
sonar room, 26
W
Waste Electronical and
Electronic Equipment, 199
Water line
measurement accuracy, 41
207
©2011
Kongsberg Maritime AS
Simrad MS70 Scientific multibeam sonar
Installation manual
Simrad MS70 Scientific multibeam sonar
Installation manual
Simrad MS70 Scientific multibeam sonar
Installation manual