1
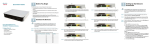
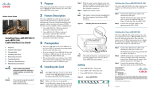
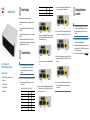
Quick Start Guide
1
Connector Pinouts Circuit
FXO 3
FXO 4
Before You Begin
Pin (Ring)
19
20
Pin (Tip)
44
45
STEP 4 Connect one end of an Ethernet cable to the Ethernet port (E). Connect
the other end of the cable to your cable/DSL modem.
3
Setting Up the Network
Connection
The following basic services and equipment are required:
• An Integrated Access Device or modem for broadband access to the
Internet
NOTE
• A computer with Microsoft Windows XP or Windows Vista for system
configuration
• An analog phone for administrative use with the Interactive Voice Response
(IVR) system
•
• (Recommended) An Uninterruptible Power Source (UPS), to ensure
continuous operation by providing continuous power to devices such as the
Integrated Access Device, switch, and router
2
NOTE
Connect the Devices
STEP 3 When the Router - Status screen appears, click the WAN Setup tab.
If the SPA8800 is pre-configured by your ITSP, then you do
not need to change the default voice settings. Refer to the
documentation supplied by your service provider for more
information.
Package Contents
• SPA8800 Analog Telephone Adapter with Router
• Power Adapter
• RJ-45 Ethernet Cable
• RJ-11 Phone Cables (4)
• Quick Start Guide
STEP 1 Start a web browser on your PC. In the Address bar, enter the
following address: 192.168.0.1/advanced
S TEP 2 If the login screen appears, enter the user name and password that
were supplied by your ITSP. If your ITSP did not supply a password,
you will not see a login screen.
•
Cisco Small Business Pro
SPA8800 Phone Adapter with Router
If you are connecting individual phone lines, connect one end of an
RJ-11 phone cable to the PHONE 1 port (B). Connect the other end
of the cable to an analog phone.
STEP 5 Connect an one end of an Ethernet network cable to the AUX port (F).
Connect the other end of the cable to the Ethernet port of your PC.
Then connect other analog phones to the remaining PHONE ports
(C).
STEP 6 Connect the included power adapter to the power port (G). Insert the
power adapter into an electrical outlet. The power LEDs on the front
panel are lit.
STEP 1 Power off your network devices, including your modem and PC.
STEP 2 Connect the phones to the SPA8800, by using one or both of the
following methods:
•
Connect an RJ-21 connector to the RJ-21 port (A).
Connector Pinouts Circuit
FXS 1
FXS 2
FXS 3
FXS 4
FXO 1
FXO 2
Pin (Ring)
1
2
3
4
17
18
If the SPA8800 is pre-configured by your ITSP, then you do
not need to change the default voice settings. Refer to the
documentation supplied by your service provider for more
information.
Pin (Tip)
26
27
28
29
42
43
STEP 3 For access to the PSTN (Public Switched Telephone Network), connect
RJ-11 cables from the Line 1 to Line 4 FXO ports (D) to the RJ-11 wall
outlet for the telephone service.
STEP 7 Power on your PC. Make sure the Ethernet adapter of the PC is set to
obtain an IP address automatically. For more information, refer to
Windows Help.
STEP 4 Configure a DHCP, Static IP, or PPPoE connection:
PPPoE (most DSL users)
DHCP
a. Select PPPoE for the Connection Type.
a. Select DHCP for the Connection Type.
b. Enter the user name in the PPPoE Login Name field, and enter the
password in the PPPoE Login Password field.
b. If you use a cable modem, you may need to configure the MAC
Clone Settings. (Contact your Internet Service Provider for more
information.) If your service uses a specific PC MAC address, then
select yes from the Enable MAC Clone Service setting. Then enter
the MAC address of the PC in the Cloned MAC Address field.
c. Click Submit All Changes.
NOTE
c. Click Submit All Changes.
For more information about configuring your SPA8800, refer
to the ATA Administration Guide on the CD.
• While entering a value, you can cancel the changes by pressing the * (star)
key twice within half a second. Be sure to press the key quickly, or the * will
be treated as a decimal point entry.
IVR Action
• If the menu is inactive for more than one minute, the SPA8800 times out. You
will need to re-enter the menu by pressing the star key four times: ****. Your
settings take effect after you hang up the telephone. The SPA8800 may
reboot at this time.
Check MAC Address
140
Check Firmware Version
150
Check Primary DNS Server
Setting
160
• To enter the decimal points in an IP address, press the asterisk key. For
example, to enter the IP address 191.168.1.105, perform the following tasks:
Set Primary DNS Server
161
Static IP
–
Press these keys: 191*168*1*105.
a. Select Static IP for the Connection Type.
–
Press the # (pound) key to indicate that you have finished entering
the IP address.
b. In the Static IP Settings section, enter the IP address in the Static IP
field, the subnet mask in the NetMask field, and the default gateway
IP address (router IP address) in the Gateway field.
c. In the Optional Settings section, enter the DNS server addresses in
the Primary DNS and the optional Secondary DNS fields.
d. Click Submit All Changes.
4
Interactive Voice Response
Menu
Press 1 to save the IP address or press the * (star) key to cancel your
entry and return to the main menu.
In addition to the administration web server, an Interactive Voice Response unit
is available to help you to configure and manage your SPA8800. You can use the
telephone keypad to select options and to make your entries.
IVR Action
IVR
Menu
Option
To access the Interactive Voice Response menu:
Enter IVR Menu
****
Check Internet Connection
Type
100
Set Internet Connection Type
101
Refer to the IVR Actions table for details.
110
Set Static IP Address
111
• To exit the menu, hang up the telephone.
• After entering a value, such as an IP address, press the # (pound) key to
indicate that you have finished your selection. To save the new setting,
press 1. To review the new setting, press 2. To re-enter the new setting,
press 3. To cancel your entry and return to the main menu, press * (star).
Enter IP address by using numbers on the
telephone key pad. Use the * (star) key
when entering a decimal point.
Check Network Mask
120
Set Network Mask
121
Check Gateway IP Address
130
Set Gateway IP Address
131
To enter the value, press numbers on the
telephone key pad. Press * (star) to enter
a decimal point.
To enter the IP address, press numbers
on the telephone key pad. Press * (star) to
enter a decimal point.
To enter the IP address, press numbers
on the telephone key pad. Press * (star) to
enter a decimal point.
Router/NAT Mode - Press 0.
Entering Text
To enter this letter...
A, B, C, a, b, or c
D, E, F, d, e, or f
G, H, I, g, h, or i
J, K, L, j, k, or l
M, N, O, m, n, or o
P, Q, R, S, o, q, r, or s
T, U, V, t, u, or v
W, X, Y, Z, w, x, y, or z
All Other Characters
Press the following key:
2
3
4
5
6
7
8
0
Bridge/Switch Mode - Press 1.
Check local IP address
210
Factory Reset of Unit
73738
Enable - Press 1.
Disable - Press 0.
When prompted, press 1 to confirm, or
press * (star) to cancel. After you hear
“Option successful,” hang up the phone.
The SPA8800 reboots.
Note: If you are prompted for a password,
enter the password that was provided by
your ITSP. To enter letters, refer to the
DHCP - Press 0.
Note: This option is available only after
you choose Static IP as the Internet
Connection Type, through option 101.
• After you select an option, press the # (pound) key.
78-18973-02
201
WARNING: All non-default
settings will be lost. This
includes network and service
provider data.
PPPoE - Press 2.
Check Internet IP Address
TIPS:
Cisco, Cisco Systems, the Cisco logo, and the Cisco Systems logo are registered trademarks or
trademarks of Cisco Systems, Inc. and/or its affiliates in the United States and certain other
countries. All other trademarks mentioned in this document or Website are the property of their
respective owners. The use of the word partner does not imply a partnership relationship between
Cisco and any other company. (0705R)
Set the Mode
instructions at the top of the next
column.
Static IP - Press 1.
STEP 2 Press the star key four times: ****
STEP 3 After the greeting plays, press the keys on the phone keypad to select
your options.
Choices and Instructions
Choices and Instructions
Check Internet web server port 170
Enable/Disable WAN access to 7932
the administration web server
STEP 1 Connect an analog phone to the Phone 1 port of the SPA8800. Only
the Phone 1 port can be used to access the IVR.
Americas Headquarters
Cisco Systems, Inc.
170 West Tasman Drive
San Jose, CA 95134-1706
USA
http://www.cisco.com
Tel: 408 526-4000
800 553-NETS (6387)
Fax: 408 527-0883
–
IVR
Menu
Option
Manual Reboot
User Factory Reset of Unit
WARNING: All user-changeable
non-default settings will be
lost. This may include network
and service provider data.
732668
877778
For example, to enter the password phone@321 by keypad, press these keys:
746630321.
Press the # (pound) key to indicate that you have finished entering the
password.
To cancel your entry and return to the main menu, press * (star).
5
Where to Go from Here
After you hear “Option successful,” hang
up the phone. The SPA8800 reboots.
Resource
Location
When prompted, press 1 to confirm, or
press * (star) to cancel. After you hear
“Option successful,” hang up the phone.
The SPA8800 reboots.
Technical Documentation
for Cisco Small Business
Analog Telephone
Adapters
www.cisco.com/en/US/products/ps10024/
tsd_products_support_series_home.html
Customer Support
www.cisco.com/go/smallbusiness
Warranty Information
http://www.cisco.com/en/US/docs/general/
warranty/English/1Y1DEN__.pdf
Open Source License
Notices
www.cisco.com/go/osln
Regulatory Compliance
and Safety Information
www.cisco.com/en/US/products/ps10024/
tsd_products_support_series_home.html
Cisco Partner Central site www.cisco.com/web/partners/sell/smb
for Small Business