1
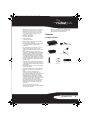
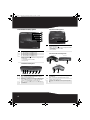
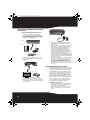
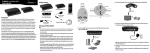
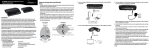
RF-WHD210_11-0537_MAN_V1.fm Page 1 Tuesday, July 12, 2011 11:24 AM
4-Port WirelessHD Kit
RF-WHD210
User Guide
RF-WHD210_11-0537_MAN_V1.fm Page 2 Tuesday, July 12, 2011 11:24 AM
4-Port WirelessHD Kit
Contents
Safety information ................................................................................................2
Features.....................................................................................................................3
Setting up the WirelessHD Kit...........................................................................5
Using the WirelessHD Kit ....................................................................................7
Specifications..........................................................................................................9
Legal notices ........................................................................................................ 10
One year warranty.............................................................................................. 13
Introduction
Thank you for purchasing this high-quality Rocketfish system, which represents the state of the art in
60 GHz wireless transceiver design, and gives you complete freedom while enjoying your music or
movies without the limitations of cables.
The system has a maximum transmission range of up to approximately 30 feet line-of-sight (within
the same room), and can be used with your HDMI-compatible home theater components, gaming
systems, or computer. Please note that the 60 GHz frequency will not penetrate walls, so this product
is not to be used to transmit AV signals from one room to another.
This User Guide explains how to correctly install, operate, and get the best performance from your
WirelessHD kit. Read this guide carefully before installing your system, and save it for future reference.
If you have any difficulty installing or operating this product after following these instructions, please
visit www.rocketfishproducts.com or call our customer service at 800-620-2790.
Safety information
The lightning flash with arrowhead symbol, within an
equilateral triangle is intended to alert the user to the
presence of uninsulated dangerous voltage within the
product’s enclosure that may be of sufficient magnitude
to constitute a risk of electric shock.
The exclamation point within an equilateral triangle is
intended to alert the user to the presence of important
operating and maintenance (servicing) instructions in the
literature accompanying the appliance.
2
RF-WHD210_11-0537_MAN_V1.fm Page 3 Tuesday, July 12, 2011 11:24 AM
Warning: To reduce the risk of fire or electric shock, do
not expose the included devices to rain or moisture.
Caution: To reduce the risk of electric shock, do not
disassemble any component of the kit. There are no
user-serviceable parts inside. Refer servicing to
qualified service personnel.
•
•
•
•
•
•
•
•
•
•
•
•
•
•
•
Read these instructions.
Keep these instructions.
Heed all warnings.
Follow all instructions.
Do not use the included devices near water.
Clean only with a dry cloth.
Do not block any ventilation openings. Install
in accordance with the manufacturer's
instructions.
Do not install near any heat sources such as
radiators, heat registers, stoves, or other
apparatus (including amplifiers) that produce
heat.
Do not defeat the safety purpose of the
polarized or grounding-type plug. A polarized
plug has two blades with one wider than the
other. A grounding type plug has two blades
and a third grounding prong. The wide blade
or the third prong is provided for your safety. If
the provided plug does not fit into your outlet,
consult an electrician for replacement of the
obsolete outlet.
Protect the power cord from being walked on
or pinched particularly at plugs, convenience
receptacles, and the point where they exit from
the apparatus.
Only use attachments or accessories specified
by the manufacturer.
Unplug the included devices during lightning
storms or when unused for long periods of
time.
Refer all servicing to qualified service
personnel. Servicing is required when a
component of the kit has been damaged in any
way, such as power-supply cord or plug is
damaged, liquid has been spilled or objects
have fallen into the apparatus, the apparatus
has been exposed to rain or moisture, does not
operate normally, or has been dropped.
The included devices shall not be exposed to
dripping or splashing and no objects with
liquids such as vases, shall be placed on the
apparatus.
The AC power adapter is used as the
disconnect device. This disconnect device shall
remain readily operable.
• Read the rating labels on the bottom of the
base station and wireless speaker for power
input and other safety information.
Features
Package contents
AC Power Adapter (Transmitter)
60 GHz WirelessHD Transmitter
60 GHz WirelessHD Receiver
Remote Control
HDMI Cables (2)
AC Power Adapter (Receiver)
Receiver Mounting
Bracket
RF-WHD210
3
RF-WHD210_11-0537_MAN_V1.fm Page 4 Tuesday, July 12, 2011 11:24 AM
Transmitter front/top panel
Receiver front/top panel
1
Item Description
1
Power and link status indicator ( )
• Blinking—The power is on and the receiver is searching for the transmitter
or is in sleep mode.
• On—The transmitter and receiver are linked.
• Off—The power is off.
Item Description
1
2
3
4
5
HDMI 4—When the indicator is on this HDMI port is in use.
HDMI 3—When the indicator is on this HDMI port is in use.
HDMI 2—When the indicator is on this HDMI port is in use.
HDMI 1—When the indicator is on this HDMI port is in use.
Receiver back and side panels
Right side view
Power and link status indicator ( )
• Blinking—The power is on and the transmitter is searching for the receiver
or is in sleep mode.
• On—The transmitter and receiver are linked.
• Off—The power is off.
Transmitter back panel
Item Description
1
2
3
4-7
4
Back view
DC IN jack—Connect the power adapter labeled “transmitter” to this jack.
Power switch—Turns the transmitter on or off.
HDMI/WVAN switch— A quick press (<1 second) toggles the HDMI switch input
to select the next HDMI input. A long press (>3 seconds) toggles WirelessHD
output between one or more WirelessHD receivers in the same room.
HDMI input—Connect up to four HDMI source devices to the HDMI inputs using
high-speed HDMI cables.
Left side view
Item Description
1
2
3
4
HDMI jack—Connect this port to an HDMI input on the TV or projector, using a
high-speed HDMI cable.
DC IN jack—Connect the power adapter labeled “Receiver” to this jack.
Power switch—Turns the receiver on or off.
Cable routing clips - Insert HDMI cable into these clips for receiver placement
stability.
RF-WHD210_11-0537_MAN_V1.fm Page 5 Tuesday, July 12, 2011 11:24 AM
Remote control
- Use only good quality high-speed HDMI cables for all
connections, such as Rocketfish brand cables. Poorly
constructed HDMI cables can negatively impact
performance and may not support all of the features
included with your connected source devices.
- Do not place the transmitter or receiver inside a
cabinet or other location where they will not have a
clear view of the room.
Refer to the following setup diagrams to
arrange your transmitter and receiver. For
best performance the transmitter and
receiver should face each other, with the
receiver mounted vertically to the wall next to
the TV (not behind the TV) or upside-down
on the ceiling next to the project, ensuring
that the Rocketfish and WiHD logos can be
seen from the position in the room where the
transmitter will be located.
Side view
Note: Remote control design subject to change.
16.4 ft. (5 m)
Item Description
1
2-5
SLEEP button -Press to put the WirelessHD receiver and transmitter into sleep
mode; or to "wake" them up from sleep mode if they do not automatically do so
on their own (this functionality varies by brand and model of connected
components). Be sure to point the remote toward the transmitter. Once the
transmitter wakes up, the receiver automatically wakes up as well.
HDMI 1-4 - Press to select the HDMI port for the signal source of your choice.
47°
Transmitter
32.8 ft. (10 m)
Receiver
47°
16.4 ft. (5 m)
Floor
Note: Remove the plastic film from the remote control
before using it for the first time. Make sure you point
the remote control at the WirelessHD transmitter.
Top view
Transmitter
Plastic film
32.8 ft. (10 m)
Setting up the WirelessHD Kit
Setup tips:
- The transmitter and receiver are pre-paired at the
factory.
- Test the placement of the transmitter and receiver for
a good signal prior to permanently mounting or
installing everything.
- For best performance and range, use the included
receiver mounting bracket to mount the receiver
vertically on the wall next to the TV (NOT behind the
TV) or upside-down on the ceiling next to the projector,
ensuring that the Rocketfish and WiHD logos can be
seen from the position in the room where the
transmitter will be located.
82°
82°
16.4 ft. (5 m)
16.4 ft. (5 m)
Receiver
Note: The transmitter and receiver must be located
within the same room. The wireless signal will not pass
through walls, floors, or ceilings.
RF-WHD210
5
RF-WHD210_11-0537_MAN_V1.fm Page 6 Tuesday, July 12, 2011 11:24 AM
Connecting the WirelessHD transmitter
and receiver
To connect the WirelessHD transmitter and receiver:
1 Connect up to 4 HDMI enabled source
components, such as a Blu-ray/DVD player,
cable/satellite box, gaming console, laptop,
etc., to the HDMI input jacks on the transmitter,
using high-speed HDMI cables.
Transmitter
4 Power on your TV or projector and switch to
Game console
HDMI cable
Cable/Satellite box
2 Connect the display device, such as a TV or
projector, to the receiver with a high-speed
HDMI cable.
Receiver
HDMI cable
Display devices
OR
3 Connect the AC power adapters to the
transmitter and receiver and to power outlets.
Note: The included AC adapters are labeled “Receiver”
and “Transmitter,” to ensure that the correct adapter is
used for each device.
the HDMI input that the WirelessHD receiver is
connected to.
5 Power on at least one source component that
is connected to the WirelessHD transmitter.
6 Power on the WirelessHD transmitter and
receiver. The HDMI input port LED on the
transmitter should light continously (stop
blinking) to indicate that the desired input is
selected with active video. If this selection does
not occur automatically, please use the
included remote control or HDMI Select Switch
on back of the transmitter to select the desired
input port. See step 5 in “Using the WirelessHD
Kit” section on page 7.
Note: The transmitter and receiver are pre-paired and
should discover each other shortly after being powered
on. However, should you experience an excessively
long delay (over five minutes) for the link to be
established, press the HDMI/WVAN switch on the back
of the transmitter for at least three seconds to establish
the link (the receiver must also be powered on during
this process).
Mounting the receiver on a wall
For best performance, mount the receiver on
the wall next to the TV (or on the ceiling next
to a projector), with a clear view of the room.
It should NOT be mounted behind the TV or
projector. Try positioning the receiver above,
below, or next to the TV or projector and
check for best signal quality before securing
the mounting bracket to the wall or ceiling.
If mounting the receiver on the wall or ceiling
is not an option for your installation, the
receiver can be placed on a flat surface, but
the operating range may be reduced.
To mount the receiver on a wall:
1 Place the included receiver mounting bracket
on the wall or ceiling in the desired location
and mark the holes with a pencil.
Note: The mounting location should be within the
length of the included power cord to an available AC
outlet.
6
RF-WHD210_11-0537_MAN_V1.fm Page 7 Tuesday, July 12, 2011 11:24 AM
2 Using appropriate wall anchors and screws
(not included) for the type of wall or ceiling
where the receiver will be mounted, securely
attach the receiver mounting bracket to the
wall.
3 Mount the receiver onto the mounting bracket
by sliding the slots on the bottom of the
receiver downward onto the tabs on the
bracket.
Mounting slots
Mounting bracket
Using the WirelessHD Kit
Upon completion of the setup process and successful
linking of the WirelessHD transmitter and receiver, follow
these steps to use the WirelessHD kit:
1 Power on the TV or projector that the
2
3
4
5
WirelessHD receiver is connected to and switch
to the corresponding HDMI input.
Power on the WirelessHD receiver.
Power on the source component you wish to
view.
Power on the WirelessHD transmitter.
Switching the WirelessHD transmitter to the
correct HDMI input:
Note: When switching between the four HDMI ports, it is
normal for the switching to take an average of about
10 seconds (sometimes up to 20 seconds). The
WirelessHD receiver will output a black video screen at
480p (720 x 480) resolution @ 60Hz with no audio
during the switching process.
• The WirelessHD transmitter may
automatically switch to the HDMI port of
the source device that is most recently
powered on (depending on the type of
source component that is connected). If it
does not automatically switch to the
correct HDMI port, or you want to switch to
a different HDMI port for another source
device, follow one of the following steps:
• Press the corresponding button on the
included remote control (HDMI 1-4) to
switch the WirelessHD transmitter to the
HDMI port for the source device you wish
to view (be sure to point the remote at
the WirelessHD transmitter).
• If you have misplaced the remote control,
or do not wish to use it, you can also
quickly press the HDMI SW button on the
back of the WirelessHD transmitter to
sequentially toggle through the four
HDMI ports.
Note: Be sure to quickly press the HDMI SW button for
less than one second to switch HDMI ports. If you hold
this button down for three seconds or more, the
transmitter will search for a different receiver and you
may lose the connection between the transmitter and
receiver. If this happens, press and hold the HDMI SW
button again for at least three seconds to re-establish
the link between the WirelessHD transmitter and
receiver.
• If your TV or projector and source devices
support CEC (consumer electronics
control), you will see the available
connected devices on the Input screen of
the TV or projector. Simply select the
device you wish to view by selecting it
from this on-screen list. Refer to the
documentation that came with your
devices to verify if CEC is supported; often
marketed under different trade names,
including: Anynet+ (Samsung); Aquos
Link (Sharp); BRAVIA Sync (Sony);
HDMI-CEC (Hitachi); Kuro Link (Pioneer);
CE-Link and Regza Link (Toshiba); RIHD
(Remote Interactive over HDMI - Onkyo);
SimpLink (LG); HDAVI Control, EZ-Sync,
VIERA Link (Panasonic); EasyLink (Philips);
NetCommand for HDMI (Mitsubishi);
INlink (Insignia).
6 To turn the WirelessHD kit off, perform one of
the following steps:
• Power off your TV or projector and source
devices - when the WirelessHD transmitter
and receiver have not detected a signal,
they will automatically go into sleep mode.
Note: When the WirelessHD transmitter and receiver go
into sleep mode, the power and link status LEDs on
both units will blink slowly.
RF-WHD210
7
RF-WHD210_11-0537_MAN_V1.fm Page 8 Tuesday, July 12, 2011 11:24 AM
Also note: Some HDMI source devices like TiVo
set-top-boxes have no easy way to shut them off. The
automatic HDMI port selection feature in the
WirelessHD transmitter will therefore always select
such an always-on source and will always keep the
WirelessHD transmitter connected to the receiver. In
this case please use steps below.
• Manually place the WirelessHD
transmitter into sleep mode by pressing
the SLEEP button on the included remote
control (be sure to point the remote
toward the WirelessHD transmitter).
• Turn the power switch on the WirelessHD
transmitter and receiver to the OFF
position.
7 To return the WirelessHD transmitter and
receiver from sleep mode to on, perform the
following steps:
a) Power on the TV or projector, and switch it to
the HDMI input with which the WirelessHD
receiver is connected.
b) Power on the source device you wish to view
that is connected to the WirelessHD
transmitter.
Note: Depending on the brands/models of devices you
have connected, the WirelessHD transmitter and
receiver may automatically return from sleep mode
and re-establish their link. If this does not happen with
your devices, use the SLEEP button on the included
remote control to manually return the WirelessHD
transmitter and receiver from sleep mode.
HDMI-CEC (Consumer Electronics
Control) support
For best operation, connect sources which are
HDMI-CEC capable (DVD, Blu-ray player, and
so on) to your WirelessHD transmitter. If your
TV is also HDMI-CEC (v1.3a or newer) capable,
your TV's OSD (on-screen display) should let
you select any of the HDMI-CEC source
devices connected to the WirelessHD
transmitter adapters on the WVAN.
Turning off an HDMI-CEC enabled TV sends a
broadcast message to all wired HDMI and
WirelessHD source devices, giving them the
opportunity to power off automatically (if
they support HDMI-CEC and this option is
enabled in the device's settings).
Similarly, when an HDMI-CEC enabled source
device (such as a Blu-ray player) is connected
to the WirelessHD transmitter and the
WirelessHD receiver is connected to an
HDMI-CEC enabled TV, pressing the Play
button on the Blu-ray player's remote does
the following:
8
• Turns on the Blu-ray player
• Establishes a WirelessHD connection from the
Transmitter to the Receiver
• Turns on the TV
• Switches the TV to the proper HDMI input
connected to the WirelessHD Receiver, so that
the video and audio from the player is seen on
the TV
Again, proper HDMI-CEC support is required
on both the source and the display.
Note that the HDMI-CEC standard (Rev 1.4a)
supports a maximum of three CEC playback
devices that can be directly displayed by
name on a CEC-enabled display. If a fourth
HDMI-CEC-enabled source is connected to
the WirelessHD transmit adapter, it will not
show up by name on the HDMI-CEC TV. In this
case, the device must be selected using the
included remote control or by quick presses
(less than 1 second) of the HDMI SW switch on
the back of the transmitter until the desired
HDMI input is selected.
Also note that if your HDMI-CEC TV is capable
of displaying the CEC names of your
HDMI-CEC sources AND switching between
them (using your TV remote via the TV's input
selection menu), you should be able to use
the TV remote control to switch from your
WirelessHD transmitter to other WirelessHD
source devices in the same room. However, if
your TV does not support changing between
HDMI-CEC sources that are connected to a
wireless or wired HDMI switch, you will need
to power on/off the WirelessHD function on
your sources to switch between them. For
example, without full TV support for CEC
source switching, you may need to power off
the Rocketfish WirelessHD transmitter in
order to be able to switch to a laptop with
embedded WirelessHD. Switching back to the
WirelessHD transmitter may require disabling
the WirelessHD function on the laptop and
will require powering on the WirelessHD
transmitter.
RF-WHD210_11-0537_MAN_V1.fm Page 9 Tuesday, July 12, 2011 11:24 AM
Troubleshooting
Symptom Possible Solutions
Receiver will
not link to
Transmitter
Remote
control does
not operate
components
• For best performance, mount the receiver on the wall next to the TV
(or on the ceiling next to a projector) with a clear view of the room. It
should NOT be mounted behind the TV or projector. Try positioning
the receiver above, below or next to the TV/projector and check for
best signal quality before securing the mounting bracket to the wall
or ceiling.
• The power LED on the transmitter and the receiver will blink
continuously while the transmitter is not linked to the receiver. This
can be caused by the receiver being located too far away from the
transmitter. The maximum line-of-sight range is approximately 30 ft.
(9.1 m). Try re-positioning the transmitter and receiver units so they
are within the specified operating range. First try to get the units to
link with each other at 3 ft. (1 m) (to prove that they are working
properly with your equipment). Then try moving them further apart
to the desired locations.
• Materials may be blocking the 60 GHz radio frequency beam from the
transmitter to the receiver. This beam can pass through many cabinet
materials such as glass and wood (depending on thickness and
density of the materials), but it cannot pass through doors, shelves, or
components that are made of metal. Try positioning the transmitter
and receiver so that they are not blocked by metal.
• Either the receiver or transmitter is not powered on. Be sure the AC
adapter is securely connected and each unit is powered on correctly.
• Power cycle both the transmitter and receiver by unplugging then
plugging them back in.
• Panasonic TVs: If your TV is made by Panasonic and you cannot
connect with your WiHD adapters, use the TV settings menu to
disable the Viera-Link (CEC) feature. Viera-Link can have problems
connecting through HDMI switches such as the switch built into the
WiHD transmitter.
• Deep Color 3D Blu-Ray or Game Console Sources: If you can connect
with 2D content, but you lose your connection when playing 3D
content from the same source, disable the “Deep Color Output”
feature for the HDMI output on your Blu-ray Disc Player or PlayStation
3 game console. Here are the steps for changing this on a PS3 starting
from the main menu:
• Go to -> Settings -> Display Settings -> Deep Color Output.
• Change the HDMI setting from Automatic (default) to Off.
• Also verify that you are using known good HDMI cables that
support 3D when the 3D HDMI source is connected directly to the
TV by your HDMI cable.
• HDMI's CEC function, which is supported by the WirelessHD Kit, is not
standard across all brands of consumer electronics. If your original
remotes do not operate your components when pointed at the TV,
projector, or transmitter, you will need to continue to point your
remotes towards the components themselves, regardless of where
they are located in the room.
• Make sure that fresh batteries are installed in your remote controls.
• Make sure that you are pointing the remote control at the correct
device. The WirelessHD Kit remote input must be pointed at the
transmitter, not at the receiver.
Symptom Possible Solutions
No video
and/or audio
• If the power LEDs on the transmitter and receiver are blinking, the
adapters are not linked. See “Receiver will not link to Transmitter”
troubleshooting steps above.
• If the power LED on the transmitter and receiver are solid (not
blinking), the adapters are linked such that video and audio sent into
the transmitter should be output from the receiver. Therefore, the TV
or Projector may not be set to the HDMI input jack that the
WirelessHD Receiver unit is connected to. Refer to the documentation
provided with your TV or Projector for information on how to select
the correct input.
• The source component (Blu-ray/DVD player, cable/satellite box, etc.)
is not powered on and/or set enable the HDMI output. Refer to the
documentation provided with your source component for information
on switching that component to the HDMI output.
• The transmitter is set to the incorrect HDMI port. Switch the
transmitter to the correct HDMI port for the component you want to
view with either the included remote control, or the HDMI SW switch
on the back of the transmitter.
• Make sure that you are using high speed certified HDMI cables for all
connections and that all cable connections are secure. We
recommend high quality Rocketfish HDMI cables, available at your
local Best Buy or Future Shop store.
• Troubleshoot by connecting the HDMI cable directly from the HDMI
source to the HDMI display (bypassing the Rocketfish adapters) to
verify that audio/video is available. Try both the HDMI source side
cable (connected originally to the transmitter) as well as the display
side cable (connected originally to the receiver) to verify that you do
not have a defective cable.
• Make sure that your content (i.e., Blu-ray or DVD disc) is original.
HDMI includes HDCP copy protection, which prevents playback of
illegally copied movies.
Specifications
Standards
WirelessHD, HDMI (V1.4a 3D)
Frequency
60 GHz
Input/Output
interface
HDMI
Antenna type
32-antenna array (integrated ceramic)
Range
30 ft. (9.1 m)
AV port
Dimensions
Weight
AC power adapter
Operating
environment (total
system)
Transmitter: 4 HDMI Inputs
Receiver: 1 HDMI Output
Transmitter: 7.39 x 6.18 x 2.17 in. (187.6 x 157.0 x 55.2 mm)
Receiver: 6.06 x 4.72 x 1.89 in. (154.0 x 120.0 x 48.0 mm)
Transmitter: 12.87 oz. (365 g)
Receiver: 8.54 oz. (242 g)
AC 90-230 V @60 Hz input
Transmitter: DC 12 V 1.0 A
Receiver: DC 5V 2.0 A
Operating temperature: 32°~104° F (0°~40° C) ambient
Storage temperature: -4°~158° F (-20°~70° C)
Operating humidity: 10% to 90% (non-condensing)
Storage humidity: 5% to 90% (non-condensing)
RF-WHD210
9
RF-WHD210_11-0537_MAN_V1.fm Page 10 Tuesday, July 12, 2011 11:24 AM
Video format
Video
format
Audio format
Vertical
refresh
Color
space
Sampling
Bits/pixel
59.94/60 Hz
YCbCr
59.94/60 Hz
RGB
YCbCr
50 Hz
RGB
YCbCr
24/30 bits
24/30 bits
24/30 bits
24/30 bits
24/30 bits
24/30 bits
24/30 bits
24/30 bits
24/30 bits
24/30 bits
24/30 bits
24/30 bits
24/30 bits
24/30 bits
24/30 bits
24/30 bits
24/30 bits
24/30 bits
24/30 bits
24/30 bits
24/30 bits
24/30 bits
24/30 bits
24/30 bits
24/30 bits
24/30 bits
24/30 bits
24/30 bits
24 bits
24 bits
24/30 bits
24 bits
24 bits
24/30 bits
24/30 bits
50 Hz
RGB
YCbCr
50 Hz
RGB
YCbCr
59.94/60 Hz
RGB
YCbCr
50 Hz
RGB
YCbCr
59.94/60 Hz
RGB
YCbCr
23.976/24 Hz
RGB
YCbCr
50 Hz
RGB
YCbCr
59.94/60 Hz
RGB
YCbCr
VGA
60 Hz
RGB
RGB
4:2:2
4:4:4
4:4:4
4:2:2
4:4:4
4:4:4
4:2:2
4:4:4
4:4:4
4:2:2
4:4:4
4:4:4
4:2:2
4:4:4
4:4:4
4:2:2
4:4:4
4:4:4
4:2:2
4:4:4
4:4:4
4:2:2
4:4:4
4:4:4
4:2:2
4:4:4
4:4:4
4:2:2
4:4:4
4:4:4
4:2:2
4:4:4
4:4:4
4:4:4
SVGA
60 Hz
RGB
4:4:4
XGA
60 Hz
RGB
4:4:4
24/30 bits
SXGA
60 Hz
RGB
4:4:4
24/30 bits
WSXGA+
60Hz
RGB
4:4:4
24/30 bits
480i
480p
576i
576p
720p
1080i
1080p
3D video support list
Frame packing
Top-to-bottom
Side-by-side
10
[email protected]/24 Hz
720p@50/59.94/60 Hz
[email protected]/24 Hz
720p@50/59.94/60 Hz
1080i@50/59.94/60 Hz
Audio up to 8-channel, 24-bit 192 kHz LPCM,
surround sound audio (6/8 channel PCM,
Dolby Digital, DTS).
Audio sample rate, F’s
LPCM
2-channel
LPCM 2/6/8-channels
Multiple of Fs DTS and Dolby Digital
2/6 channels
32 kHz
44.1 kHz
48 kHz
192 kHz
128
4.096
5.645
6.144
24.576
256
8.192
11.29
12.288
49.152
Legal notices
Federal Communication Commission
Interference Statement
This equipment has been tested and found to comply with the
limits for a Class B digital device, pursuant to Part 15 of the FCC
Rules. These limits are designed to provide reasonable
protection against harmful interference in a residential
installation. This equipment generates, uses and can radiate
radio frequency energy and, if not installed and used in
accordance with the instructions, may cause harmful
interference to radio communications. However, there is no
guarantee that interference will not occur in a particular
installation. If this equipment does cause harmful interference
to radio or television reception, which can be determined by
turning the equipment off and on, the user is encouraged to try
to correct the interference by one of the following measures:
• Reorient or relocate the receiving antenna.
• Increase the separation between the equipment and
receiver.
• Connect the equipment into an outlet on a circuit different
from that to which the receiver is connected.
• Consult the dealer or an experienced radio/TV technician
for help.
This device complies with Part 15 of the FCC Rules. Operation is
subject to the following two conditions: (1) This device may not
cause harmful interference, and (2) this device must accept any
interference received, including interference that may cause
undesired operation.
FCC Caution:
Any changes or modifications not expressly approved by the
party responsible for compliance could void the user's
authority to operate this equipment.
FCC Radiation Exposure Statement:
This equipment complies with FCC radiation exposure limits set
forth for an uncontrolled environment. This equipment should
be installed and operated with minimum distance 20cm
between the radiator & your body.
RF-WHD210_11-0537_MAN_V1.fm Page 11 Tuesday, July 12, 2011 11:24 AM
IC Class B Statement (Canada)
This Class B digital apparatus complies with Canadian ICES-003
and RSS-210.
Cet appareil numérique de la classe B conforme á la norme
NMB-003 et RSS-210 du Canada.
Operation is subject to the following two conditions: (1) this
device may not cause interference, and (2) this device must
accept any interference, including interference that may cause
undesired operation of the device.
RF-WHD210
11
RF-WHD210_11-0537_MAN_V1.fm Page 12 Tuesday, July 12, 2011 11:24 AM
12
RF-WHD210_11-0537_MAN_V1.fm Page 13 Tuesday, July 12, 2011 11:24 AM
One year warranty
Rocketfish Products (“Rocketfish”) warrants to you, the original
purchaser of this new RF-WHD210 (“Product”), that the
Product shall be free of defects in the original manufacture of
the material or workmanship for one (1) year from the purchase
of the Product (“Warranty Period”). This Product must be
purchased from an authorized dealer of Rocketfish brand
products and packaged with this warranty statement. This
warranty does not cover refurbished Product. If you notify
Rocketfish during the Warranty Period of a defect covered by
this warranty that requires service, terms of this warranty apply.
How long does the coverage last?
The Warranty Period lasts for one year (365 days), beginning on
the date you purchased the Product. The purchase date is
printed on the receipt you received with the product.
What does this warranty cover?
During the Warranty Period, if the original manufacture of the
material or workmanship of the Product is determined to be
defective by an authorized Rocketfish repair center or store
personnel, Rocketfish will (at its sole option): (1) repair the
Product with new or rebuilt parts; or (2) replace the Product at
no charge with new or rebuilt comparable products or parts.
Products and parts replaced under this warranty become the
property of Rocketfish and are not returned to you. If service of
Products and parts are required after the Warranty Period
expires, you must pay all labor and parts charges. This warranty
lasts as long as you own your Rocketfish Product during the
Warranty Period. Warranty coverage terminates if you sell or
otherwise transfer the Product.
How to obtain warranty service?
If you purchased the Product at a retail store location, take your
original receipt and the Product to the store you purchased it
from. Make sure that you place the Product in its original
packaging or packaging that provides the same amount of
protection as the original packaging. If you purchased the
Product from an online web site, mail your original receipt and
the Product to the address listed on the web site. Make sure
that you put the Product in its original packaging or packaging
that provides the same amount of protection as the original
packaging.
This warranty also does not cover:
• Damage due to incorrect operation or maintenance
• Connection to an incorrect voltage supply
• Attempted repair by anyone other than a facility
authorized by Rocketfish to service the Product
• Products sold as is or with all faults
• Consumables, such as fuses or batteries
• Products where the factory applied serial number has been
altered or removed
REPAIR REPLACEMENT AS PROVIDED UNDER THIS WARRANTY
IS YOUR EXCLUSIVE REMEDY. ROCKETFISH SHALL NOT BE
LIABLE FOR ANY INCIDENTAL OR CONSEQUENTIAL DAMAGES
FOR THE BREACH OF ANY EXPRESS OR IMPLIED WARRANTY ON
THIS PRODUCT, INCLUDING, BUT NOT LIMITED TO, LOST DATA,
LOSS OF USE OF YOUR PRODUCT, LOST BUSINESS OR LOST
PROFITS. ROCKETFISH PRODUCTS MAKES NO OTHER EXPRESS
WARRANTIES WITH RESPECT TO THE PRODUCT, ALL EXPRESS
AND IMPLIED WARRANTIES FOR THE PRODUCT, INCLUDING,
BUT NOT LIMITED TO, ANY IMPLIED WARRANTIES OF AND
CONDITIONS OF MERCHANTABILITY AND FITNESS FOR A
PARTICULAR PURPOSE, ARE LIMITED IN DURATION TO THE
WARRANTY PERIOD SET FORTH ABOVE AND NO WARRANTIES,
WHETHER EXPRESS OR IMPLIED, WILL APPLY AFTER THE
WARRANTY PERIOD. SOME STATES, PROVINCES AND
JURISDICTIONS DO NOT ALLOW LIMITATIONS ON HOW LONG
AN IMPLIED WARRANTY LASTS, SO THE ABOVE LIMITATION
MAY NOT APPLY TO YOU. THIS WARRANTY GIVES YOU SPECIFIC
LEGAL RIGHTS, AND YOU MAY ALSO HAVE OTHER RIGHTS,
WHICH VARY FROM STATE TO STATE OR PROVINCE TO
PROVINCE.
Contact Rocketfish:
For customer service please call 1-800-620-2790
www.rocketfishproducts.com
Distributed by Best Buy Purchasing, LLC
7601 Penn Avenue South, Richfield, Minnesota, U.S.A.
55423-3645
© 2011 BBY Solutions, Inc.
All rights reserved. ROCKETFISH is a trademark of BBY
Solutions, Inc. Registered in some countries. All other products
and brand names are trademarks of their respective owners.
Where is the warranty valid?
This warranty is valid only to the original purchaser of the
Product in the United States and Canada.
What does the warranty not cover?
This warranty does not cover:
• Customer instruction
• Installation
• Set up adjustments
• Cosmetic damage
• Damage due to acts of God, such as lightning strikes
• Accident
• Misuse
• Abuse
• Negligence
• Commercial use
• Modification of any part of the Product, including the
antenna
RF-WHD210
13
RF-WHD210_11-0537_MAN_V1.fm Page 16 Tuesday, July 12, 2011 11:24 AM
www.rocketfishproducts.com
(800) 620-2790
Distributed by Best Buy Purchasing, LLC
7601 Penn Avenue South, Richfield, MN 55423-3645 USA
© 2011 BBY Solutions, Inc.
All rights reserved. ROCKETFISH is a trademark of BBY Solutions, Inc.
All other products and brand names are trademarks of their respective owners.
11-0537
ENGLISH