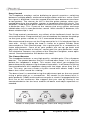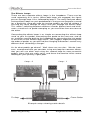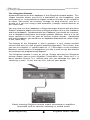
1
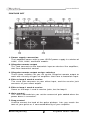
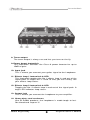
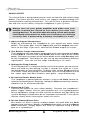
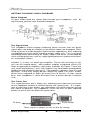
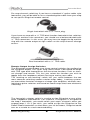
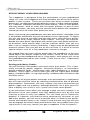
www.tonebone.com ™ Radial Loopbone Part # R800 7085 00 Owners Manual Radial Engineering 1638 Kebet Way, Port Coquitlam BC V3C 5W9 tel: 604-942-1001 • fax: 604-942-1010 email: [email protected] • web: www.tonebone.com Radial Engineering is a division of C•TEC (JP CableTek Electronics Ltd.) True to the Music RADIAL LOOPBONE OWNER’S MANUAL Table Of Contents Page Introduction ................................................................ 1 Feature Set ................................................................ 2 Quick Start ................................................................. 4 Getting To Know Your Loopbone ............................. 5 Structuring Your Pedalboard ..................................... 10 Frequently Asked Questions ..................................... 11 Warranty .............................................................. Back cover Congratulations on the purchase of the Radial Loopbone! As part of the Tonebone range of effect pedals, the Loopbone is a professional pedal that has been designed to provide years of enjoyment and add tons of flexibility to your guitar setup. Great care was taken during the development of the Loopbone to ensure the natural tone of the instrument is maintained and that you get the truest and most responsive performance possible. No chips or opamps are used in the audio circuit; only 100% discreet, true Class-A performance throughout. Furthermore, we have made every effort to perform noiseless switching while reducing the physical size so that you can maximize the real-estate on your pedalboard. At Radial, we pride ourselves in making good, dependable, high-performance tools for players. Ultimately, by producing better tools, we believe we can spur on the creative process and help you make better music. Now isn’t that why we are all here in the first place? Please take the time to read through this manual for important tips on how to make the most out of your Loopbone. Should you have any questions that are not covered in this manual, the FAQ section of the www.tonebone.com web site is a good place to look. Often times, users will submit questions to us and answers are published there. If you have a particular question, please feel free to send us an email at [email protected] and we will do our very best to respond as quickly as we can. Now turn it up “because I can’t hear the guitar over the drums!” Radial Engineering is a division of JP CableTek Electronics Ltd. Radial Loopbone Owner’s Manual - Part # R800 9660 00 • V1.0 06-20-04 Specifications and appearance are subject to change without notice. Radial Engineering Loopbone Owner’s Manual True to the Music INTRODUCTION: THINK OF ALL THE POSSIBILITIES! Today, the discerning guitarist is at once trying to capture the ‘natural essence’ of their instrument while trying to incorporate some of the cool effects that can make them sound unique. The problem with many of these ‘old gem’ effect pedals is that more often than not, these pedals are inherently noisy and tend to rob tone due to impedance loading. As the player expands their system it becomes more susceptible to noise and complicated to operate. The remedy is Loopbone. Predestined to be the centerpiece of your pedalboard setup, the Loopbone is designed to (a) control two independent effects loop chains, (b) provide a variable boost function for soloing and (c) act as a remote footswitch control for your amplifier, multi-effects processor or other Tonebone pedals such as the Headbone and Cabbone. Although this may sound complex, you will find that using the Loopbone is in fact very intuitive and the layout very logical. Start with a basic setup and then expand your pedalboard as you get familiar with the Loopbone. This gradual approach will invoke a better understanding of the power at your feet and result in a better system design. Think of the Loopbone as four separate signal paths: Path 1 - straight thru Path 2 - boost applied Path 3 - loop 1 Path 4 - loop 2 Loop-1 Tone Variations Loop-2 Tone-1 Clean (Straight Thru) Tone-2 Clean with Boost Tone-3 Loop-1 (Over-Drive Effects) X Tone-4 Loop-1 with Boost X Tone-5 Loop-2 (Time Based Effects) Tone-6 Loop-2 with Boost Tone-7 Both Loops X X Tone-8 Both Loops with Boost X X Power Boost X X X X X X Tone chart: eight different combinations. The Radial Loopbone is a simple yet powerful tool that will enhance your creative options and deliver a more seamless and professional live performance. Radial Engineering 1 Loopbone Owner’s Manual True to the Music FEATURE SET 1. Power supply connection The Loopbone comes with its own 15VDC power supply in a choice of 100V, 110V, 220V, and 240V models. 2. Slingshot remote output This jack connects to the footswitch input on devices like amplifiers, that have footswitch control. 3. Slingshot remote output assign switches These three switches let you set up the Slingshot remote output to work with virtually all types of amplifiers that have a footswitch input. 4. Effects loop-2 send & receive The send jack connects to your effect input, and the receive jack connects to your effect output. 5. Effects loop-1 send & receive Same as the loop-1 send & receive jacks, but for loop-2. 6. Gain control This recessed knob lets you set the amount of gain added when the power boost is turned on. 7. Drag control Used to correct the load of the guitar pickups. Lets you match the tone of your guitar as if connected directly to your amplifier. Radial Engineering 2 Loopbone Owner’s Manual True to the Music 8. Tuner output The tuner output is always on and lets you tune on the fly. 9. Power boost footswitch This footswitch activates the Class-A power booster for up to 15dB of gain. 10. Input jack This is where you connect your guitar signal to the Loopbone. 11. Effects loop 1 footswitch & LED This footswitch toggles the No.1 effects loop in and out of the signal path. A large LED is used so that you can clearly see your effects loop status. 12. Effects loop 2 footswitch & LED Toggles the No. 2 effects loop in and out of the signal path. A large LED indicates loop status. 13. Output jack This is where you connect the Loopbone to your amplifier. 14. Heavy duty steel enclosure Like all Radial products, the Loopbone is made tough to last. Go ahead and step on it! Radial Engineering 3 Loopbone Owner’s Manual True to the Music QUICK START This Quick Start is designed for players that are familiar with effects loop pedals. For those that are new to this, we suggest reading through the manual before making connections. This will ensure a greater satisfaction with the results when using the Loopbone in your system. Always turn off your guitar amplifier and make sure your volume controls are turned to zero before you start connecting devices. To avoid trouble-shooting, check each pedal individually beforehand to make sure that they are working correctly and, if powered by a battery, the battery is fresh. 1. Input & Output Connections Begin by connecting the Loopbone as you would any other effect pedals. The guitar goes into the Input jack and the Output jack connects to the amp. If you wish, connect the Tuner output to a tuner. 2. The Effects Loops Connections The Loopbone has two effects loop pedal chains designated as Loop1 and Loop-2. Connect the loop Send jack to the input of the effect pedal. Connect the output of the effect pedal to the loop Receive jack on the Loopbone. Two loops let you set up two completely different signal paths. You can use the loops individually or in series. 3. Setting the Drag Control The Drag control is a load correction circuit that allows you to reintroduce the load to your pickup so that it sounds the same as if connected directly to your amplifier. To begin with set the Drag control to 12 o’clock. Once everything is connected, turn the Drag control to find the ‘sweet spot’ that best matches your guitar - amp relationship. 4. Preset the Power Boost Gain The Loopbone’s power booster features a recessed Gain control located on the back panel. Begin by setting the Gain control fully counterclockwise to its minimum position. 5. Power Up & Test Connect the power to your effect pedals. Connect the Loopbone’s power supply. Always turn on your amplifier last. It is a good practice to test equipment setups at a low volume to reduce any possibility for system damage should there be an improper connection. Turn up the volume slowly while listening for excessive noise. 6. Set the Power Boost Gain Be careful, as there is plenty of boost power at hand! With the Gain control set to minimum, depress the Boost footswitch so that the Boost LED illuminates. Simply adjust the level as required using a guitar pick as a screwdriver. Radial Engineering 4 Loopbone Owner’s Manual True to the Music GETTING TO KNOW YOUR LOOPBONE Block Diagram To best understand the signal flow through your Loopbone, start by familiarizing yourself with the block diagram. The Signal Path The Loopbone circuit employs buffering which ensures that the guitar signal does not drop or change as the effects loops are engaged. Buffering also has the advantage of lowering the impedance, thus reducing susceptibility to noise while allowing longer cable runs. This is of great advantage when performing on larger stages and when surrounded by noise-emitting devices such as stage lighting dimmers, power transformers and power cables. A buffer is, in fact, an active pre-amplifier. These, like all things in life, are not all created equal. Most pedals employ integrated circuit (IC) chips or operational amplifiers (op-amps) to buffer the signal. These are very small and efficient – thus, they require very little power and produce good level with relatively low noise. The problem, however, with ICs and op-amps, is that they simply do not sound very good. For years, audiophiles have migrated to 100% discreet Class-A circuits, as they sound best. Your Loopbone is 100% discreet Class-A and its design is without rival. The Tuner Out This separate tuner out is always on, allowing you to connect your tuner to the Loopbone without it interfering with the signal chain. It is important to note that many tuners can load down the guitar pickup causing the signal to weaken. The Loopbone’s tuner out has its own separate buffer so that it will not affect the guitar tone. To Amp From Guitar Tuner ouput is always on for ‘on the fly’ tuning Radial Engineering 5 Loopbone Owner’s Manual True to the Music Drag Control The Loopbone employs active buffering to permit seamless switching between multiple pedals and to drive longer cables with less noise. Once the signal is buffered, it can be argued that the tone becomes too clean or too perfect. The reason for this is that the guitar pickup, when connected directly to the amplifier, creates a complete electrical circuit. The amplifier’s load and the guitar cable resistance cause the guitar to sound a particular way. This is part of the reason that every guitar and amp combination has its own particular sound. With a buffer in between, the direct relationship is lost. The Drag control counteracts any effect of the buffered circuit for the most natural tone. Drag control lets you reintroduce the load on the pickup so that your guitar sounds as if it is connected directly to the amp. We recommend that you set the Drag control to its 12 o’clock position to start with. At this setting the load is similar to a typical Fender Strat connected to a Twin Reverb amp. Use a guitar pick as a screwdriver to make adjustments. Once all of your pedals are set up, go back and adjust the Drag control to find the ‘sweet spot’ for your particular setup. Full clockwise removes any effect of the Drag for a brighter, more open sound. Counterclockwise will darken the tone. The Power Booster The Loopbone features a very high quality, variable gain, Class-A power booster. The power booster circuit is inserted after loops 1 & 2, and just before the Loopbone’s output. This means that when you engage the power booster by depressing the boost footswitch, it will boost anything connected before the Loopbone along with the loops when they are in use. This way, you can create a rhythm sound with effects loop-1 and boost that same sound for soloing. The boost level is controlled using the adjustment pot on the rear panel using a guitar pick as a screwdriver. Be careful as the boost level is quite powerful (15dB) and could cause quite a startle if engaged with the level set to the maximum. We suggest that you start by having it set counterclockwise for the least amount of boost and adjust upwards as needed. Detail of rear panel showing the Gain and Drag controls. Radial Engineering 6 Loopbone Owner’s Manual True to the Music The Effects Loops There are two separate effects loops in the Loopbone. These can be used separately or in series. When both loops are engaged, the signal passes through loop-1 first, followed by loop-2. The really cool part about having effects loops on your pedalboard is that you can prepare a sound for a particular song passage by turning pedals on and off without it causing any tonal change or noise until you engage the effects loop. This makes switching between different sounds professional and eliminates a mad rush of pedal-stomping as you transition from one tone to the other. Connecting the effects loops is as simple as connecting the ‘effects loop send’ to your first pedal, connecting that pedal to the next one, and so on, and then coming back to the Loopbone by connecting the last pedal in the chain to the ‘effects loop return’. We suggest experimenting with the order of pedals as you will find that ‘flanging a distortion’ sounds very different than ‘distorting a flanger’. As for what pedals go where? Well, there are no rules. We do, however, recommend that you consider using one loop for common effects that you will use often and using the second loop for more eccentric pedals, those that are really noisy, and those that tend to inflict severe loading on your primary signal path. Loop - 2 Loop - 1 From Guitar To Amp Example setup showing cable details. Radial Engineering 7 Loopbone Owner’s Manual True to the Music The Slingshot Remote A powerful feature on the Loopbone is the Slingshot remote output. This simple function allows you to hit a footswitch on the Loopbone, and while doing so, instantaneously trigger another function on an amplifier or effect. You could, for instance, change an amp channel, turn on a reverb, or if you are using a midi controller, change several devices at the same time. You can also use the Loopbone’s Slingshot output feature with the other Radial Tonebone pedals that have a Slingshot input such as the Cabbone and the Headbone. Combined with the Cabbone, you could, for instance, use a Loopbone footswitch to change speaker cabinets from a 2-12 for clean sounds to a 4-12 for your fat chunky rhythm sounds. Combined with the Headbone, you could use a Loopbone footswitch to switch amps in the same way. The beauty of the Slingshot is that it employs a very simple contact closure that acts just like a typical amplifier footswitch. This means that you can use regular ¼” guitar cables or ¼” TRS cables as the interface between various pieces of equipment just like a midi set-up, but without the prerequisite programming degree! The Slingshot remote is easy to set up. Simply connect the Slingshot remote output jack to your amplifier’s footswitch jack. Since this is a basic contact closure, it is unlikely that you can damage any type of switching system. If you are not sure, consult your dealer. Detail showing Slingshot remote output connected to amplifier’s footswitch jack for channel switching or reverb on/off. Radial Engineering 8 Loopbone Owner’s Manual True to the Music For amp channel switching, if you have a standard ¼” guitar cable style footswitch, you will be able to use a standard guitar cable from your amp to set up the Slingshot remote control. Single footswitch with a ¼” mono plug. If you have an amp with a ¼” TRS dual function footswitch that switches channels and turns the reverb on, you should use a balanced cable with ¼” TRS connectors. In this case, you may have to toggle the tip and the ring with the remote output assign switch so the amp channel change occurs. Dual footswitch with a ¼” TRS cable. Remote Output Assign Switches The Slingshot remote output uses three control switches for configuring the Slingshot output. The Tip or Ring select switch is designed for amps with TRS type dual footswitches that have two functions such as channel change and reverb. This lets you select the function you wish to toggle from the Loopbone without having to rewire your cable. The ‘latching or non-latching’ switch lets you select between the two most common switching modes used on amps today. Latching systems are most often found on vintage or vintage style amplifiers whereas nonlatching or pulse switches are found on newer amps that have electronic switching. The footswitch selector switch is used to assign Slingshot to one of the three Loopbone footswitches. For instance, if Slingshot is assigned to the loop-1 footswitch, you could switch your amp’s channels when you engage loop-1. Or if you wish, you could assign the Slingshot to the Power Boost footswitch so that when you hit the boost, Slingshot could turn on a reverb or a rack-mounted delay. Radial Engineering 9 Loopbone Owner’s Manual True to the Music STRUCTURING YOUR PEDALBOARD The Loopbone is designed to be the centerpiece of your pedalboard setup. As such, the Loopbone will likely become one of the most active pedals in your system. There are no hard rules when it comes to pedal placement, so experimenting with different setups is highly recommended. It is, however, important to note that some effects, such as wah pedals and fuzz boxes, tend to react with the guitar pickups as part of their sound. Therefore, you may want to connect these before the Loopbone should you wish to retain their particular tone. When structuring your pedalboard, consider what effects should be used in what order and where they will sound best in the signal path. To figure this out you have to consider how you play each song during a performance and what songs require which effects. You may, for instance, decide that your direct signal path will contain your wah pedal and favorite distortion, while effects loop-1 will be used for effects that you use often such as maybe a chorus and delay. Loop-2 may be designated for eccentric effects that you pull out of the hat once in a while to create special effects such as a ring modulator, octaver or flanger. You would likely put your volume pedal after the Loopbone so that you could adjust the overall output of the effects, while at the same time reducing system background noise. Once again, each player will set up their pedalboard based on their needs. There are no rules. Experiment and have fun! Dealing with Noisy Pedals You will find that some pedals emit more noise than others. This is generally caused by power supplies, electronic displays, or extraneous electro-magnetic fields. Interference from radio broadcasts is another problem. These types of noise often get into the signal path through poorly shielded cables. Using high quality shielded cables will often help minimize noise. Making sure all of your pedals and amps are connected to a single power bar will help minimize noise by reducing contamination due to groundloop problems. Sometimes, the only solution may be to disconnect the power supply and use a battery. Although batteries are a pain, pure DC from a battery can result in less system noise with some pedals. If you encounter noise when you engage a loop, the best solution is to disconnect all of your pedals and start adding them one by one and listening to them as they are added. This will allow you to isolate the problem. If, however, you find that noise continuously increases as you add more pedals, you will have to decide what is critical to the performance and remove what is not. Keep in mind that the very fact that you can disengage the effects loop (and remove that noisy pedal) from your signal chain is the very reason you got a Loopbone in the first place! Radial Engineering 10 Loopbone Owner’s Manual True to the Music The advantage of being able to bring in noisy effects when needed and take them out when not in use cannot be overstated. The same concept applies to tone-robbing pedals that inflict a load on your guitar pickups, causing the tone to change. By taking the time to listen to all of your pedals and familiarizing yourself with how each one reacts in the signal path, you will surely make important decisions that will yield better results. FAQs Q: How many effects can I drive on one effects loop? A: The number of pedals in a chain is usually limited by how these will load down the guitar pickups. Since the Loopbone employs a buffer to drive the pedals, you can use as many as you like. The only issue is noise. The more devices you put in a chain, the more susceptible to noise your pedal chain will be. Q: Can I drive long cables off the Loopbone to my amp? A: Yes. Because the Loopbone incorporates a Class-A buffering circuit, you can drive much longer cables with less noise. We recommend a maximum distance of 50 feet. Short cables will work just fine too. Q: Is the Loopbone active? A: Yes, the Loopbone employs buffering circuits. The buffering allows the Loopbone to drive pedals without loading and allows more than one loop to be used at once without affecting the guitar’s output level. Q: What is Drag Control? A: When a guitar is connected directly to an amplifier, the guitar pickup and the amplifier form a circuit. It is the relationship between the amp and the way that it loads down the pickup that creates its distinct sound. In buffered circuits, a pre-amplifier is introduced in between the pickup and the amp and this eliminates the load on the pickup. Drag Control allows the guitarist to reintroduce a corrective load into the signal path and bring back the natural relationship that would otherwise be lost. Q: Why does the Loopbone use opto-coupler switching? A: Some manufacturers claim relays are the best way to switch effects. Relays work because they are, in fact, remotely controlled mechanical switches. The problem, however, with a mechanical switch is transient switch noise caused by the contact. We use relays in several Radial products, but relegate these to applications where the signal will no longer be amplified, such as when switching speakers. For devices that pass audio before a guitar amplifier, we prefer to use opto-couplers. Optocouplers can be used to perform various functions and in this case, we use them like a switch with a set ramp-up and ramp-down time. This means that the signal does not ‘click’ on but actually rises to an ‘on’ status, eliminating the transient. Radial Engineering 11 Loopbone Owner’s Manual True to the Music Q: Can the Loopbone be used as an ABY for my amp? A: No, not really. To properly and safely perform ABY switching, one should have isolated outputs such as is found on the Radial Switchbone and the Radial JD7. Keep in mind that amplifiers can often be floating several hundred volts around their circuitry and if not connected properly, can lead to an electric shock. The Loopbone’s output, in theory, could be connected to two amplifiers and perform switching, but we would recommend that you have a qualified technician on hand to ensure that the amps are properly grounded and the connection is safe. Q: Can I use the tuner output to drive an amplifier or another effect device? A: No. Once again, you should have an isolated output if you intend to drive more than one amp at a time. Also, considering that the tuner output is on all the time, it is unlikely to provide you with any realizable benefit that could not be structured using the Loopbone as it was designed. Q: Is there a way to set the Loopbone up so that it can mute for tuning? A: Yes. All you do is insert a simple on-off mechanical footswitch in one of the loops and when you want to tune, hit the switch before you activate the loop. This will eliminate any contact switch noise from the mechanical switch. When the song stops, hit the loop and your signal will be muted and allow you to quietly tune. Q: Will the Slingshot work on all amplifiers? A: In all likelihood the answer is yes. Most traditional style amplifiers will work with the Slingshot but there are surely some amp designs that do not follow convention. If you are not sure, consult your Tonebone dealer or have a technician look at your amp to see if it can be made to be compatible. Q: How do I know if my amp will be Slingshot compatible? A: If your amp employs a basic footswitch with a ¼” or ¼” TRS, it will in all likelihood be compatible. If it employs some type of multi-pin connector or telephone style jack, it may not. Consult you dealer or amp manufacturer for advice on how you can make an adaptor that will allow you to enjoy the benefits of the Loopbone’s Slingshot. Q: Can I use another power supply other than the 15VDC that comes with the Loopbone? A: No. Never use another power supply unit other than the one included with your Loopbone. Because of the Loopbone’s Class-A circuit, a more powerful 15VDC supply is required. If you need a replacement power supply, contact your Tonebone dealer. Radial Engineering 12 Loopbone Owner’s Manual RADIAL LIMITED ONE YEAR WARRANTY Radial Engineering - a division of JP CableTek Electronics Ltd. ("Radial") warrants this product to be free from defects in material and workmanship to the original owner and will remedy any such defects free of charge according to the terms of this warranty. Radial will repair or replace at its option any defective component(s) of this product, excluding the finish, wear and tear on components under normal use, and the tube and footswitch (which are warranted for 90 days), for a period of one (1) year from the original date of purchase. In the event that a particular product is no longer available, Radial reserves the right to replace the product with a similar product of equal or greater value. To make a request or claim under this limited warranty, the product must be returned prepaid in the original shipping container (or equivalent) to Radial or to an authorized Radial repair centre and you must assume the risk of loss or damage. A copy of the original invoice showing date of purchase and the dealer name must accompany any request for work to be performed under this limited warranty. This limited warranty shall not apply if the product has been damaged due to abuse, misuse, misapplication, accident or as a result of service or modification by any other than an authorized Radial repair centre. THERE ARE NO EXPRESSED WARRANTIES OTHER THAN THOSE ON THE FACE HEREOF AND DESCRIBED ABOVE. NO WARRANTIES WHETHER EXPRESSED OR IMPLIED, INCLUDING BUT NOT LIMITED TO, ANY IMPLIED WARRANTIES OR MERCHANTABILITY OR FITNESS FOR A PARTICULAR PURPOSE SHALL EXTEND BEYOND THE RESPECTIVE WARRANTY PERIOD DESCRIBED ABOVE OF ONE YEAR. RADIAL SHALL NOT BE RESPONSIBLE OR LIABLE FOR ANY SPECIAL OR INCIDENTAL OR CONSEQUENTIAL DAMAGES OF LOSS ARISING FROM THE USE OF THIS PRODUCT. THIS WARRANTY GIVES YOU SPECIFIC LEGAL RIGHTS, AND YOU MAY ALSO HAVE OTHER RIGHTS, WHICH MAY VARY, FROM STATE/PROVINCE TO STATE/PROVINCE. Radial Engineering 1638 Kebet Way, Port Coquitlam, BC V3C 5W9 tel: 604-942-1001 • fax: 604-942-1010 email: [email protected] web: www.tonebone.com Radial Engineering is a division of JP CableTek Electronics Ltd. Radial Loopbone Owner’s Manual - Part # R800 9660 00 • V1.0 06-15-04 Specifications and appearance are subject to change without notice.