1
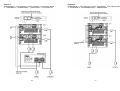
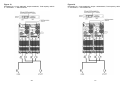
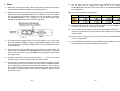
ED6-Parallel/Redundant
Cable Kit
User’s Manual
Para Systems, Inc.
1455 LeMay Drive
Carrollton, TX 75007
Phone: 1-972-446-7363
Fax: 1-972-446-9011
Internet: minutemanups.com
UPS Sizing: sizemyups.com
PN: 34000350 R2
Table of Contents
1 Important Safety Instructions .................................................. 2
2 ED6-PARALLEL Package Contents ......................................... 4
3 Product Introduction................................................................. 5
4 Installation ................................................................................. 5
5 Basic Parameter Check ............................................................ 5
6 Wiring ......................................................................................... 8
7 Setup .......................................................................................... 22
8 Obtaining Service...................................................................... 24
9 Limited Product Warranty ........................................................ 25
© Copyright 2008
1
1. Important Safety Instruction
1.1. An Important Notice
1.1.1. To ensure safety in all applications where a UPS (Uninterruptible
Power Supply) system and a MTBS (Maintenance Bypass Switch) are
hardwired to the electrical supply A Qualified Electrical Contractor
must perform the installation of the UPS and the MTBS.
MINUTEMAN accepts no liabilities and is not limited to: injury to the
Service Personnel, or damages to; the UPS system, the MTBS, or the
connected equipment caused by the incorrect installation or servicing of
the UPS system.
1.1.9. CAUTION - To reduce the risk of fire, connect the input to a circuit
provided with branch circuit over-current protection in accordance with the
National Electric Code, ANSI/NFPA 70. Use 60°C copper wire and apply
22.1lb-in Torque force when connecting to terminal block.
1.1.10. CAUTION - To reduce the risk of electrical shock with the installation
of this UPS system and the connected equipment, the installer must
ensure that the combined sum of the AC leakage current does not exceed
3.5mA.
1.1.11. CAUTION – Select a position where the UPS and Battery Pack will
have at least 12 inches of clearance around them to provide proper
ventilation.
1.1.2. The UPS has its own internal energy source (battery). If the UPS is
switched on when there is no AC power is available, there could be
voltage at the output terminals.
1.1.12. Enabling the Parallel/Redundant or N+1 operation of the UPS must
be done in the Setting mode.
1.1.3. Make sure that the input voltage rating of the UPS matches the supply
voltage.
1.1.13. Make sure the RJ45 communication cables are tightly connected
during the Parallel/Redundant or N+1 operation. If the cables are not
properly secured damage may occur to the UPSs and/or the connected
equipment.
1.1.4. This UPS series is intended to be install in a temperature controlled
environment that is free of conductive contaminants. Select a location that
will provide good air circulation for the UPS at all times. Avoid locations
near heating devices, water or excessive humidity, or where the UPS is
exposed to direct sunlight. Route power cords so they cannot be walked
on or damaged.
1.1.5. To eliminate overheating of the UPS, keep all ventilation openings
free from obstruction, and do not store anything on top of the UPS system.
Keep the UPS system at least 12” (30 cm) away from the wall.
1.1.6. Risk of Electrical Shock. Make sure the UPS is completely turned off
when moving the UPS from one location to another.
1.1.7. SAVE THESE INSTRUCTIONS - This manual contains important
instructions that should be followed during the Installation and the
Maintenance of the UPS and batteries.
1.1.8. CAUTION - A disconnect switch must be provided by the user for the
AC output circuit when the UPS’s output is hardwired. To reduce the risk
of fire, connect only to a circuit provided with branch circuit over-current
protection in accordance with the National Electric Code, ANSI/NFPA 70.
2
1.1.14. Two of the terminal resistors on the rear panel of the UPSs used in
the Parallel/Redundant or N+1 operation must be set to the “On” position
and the other terminal resistors must be set to the “Off” position;
otherwise, the Parallel/Redundant or N+1 operation of those UPSs might
cause damage to the UPSs and/or the connected equipment.
1.1.15. WARNING – Before starting the installation for the Parallel/Redundant
or N+1 application the measure the inverter output voltages (no load
connected) for each UPS used in the Parallel/Redundant or N+1
application. The inverter output voltages must have less than a 0.5Volt
tolerance. Operating the UPSs in the Parallel/Redundant or N+1
applications with 0.5Volts to 1.0Volts will cause a current in-balance.
Operating the UPSs in the Parallel/Redundant or N+1 applications with
more than a 1volt tolerance could cause damage to the UPSs and or the
connected equipment. If the inverter output voltages are out of tolerance
the UPS must be recalibrated. Contact MINUTEMAN UPS for support.
1.1.16. WARNING - All the UPSs used in the Parallel/Redundant or N+1
applications must have the same electrical ratings and the same
configuration. For instance, a 6KVA UPS cannot be used with a 10KVA
UPS. The 6KVA UPS MUST be used with another 6KVA UPS and the
10KVA UPS MUST be used with another 10KVA UPS. The UPSs without
an Isolation Transformer cannot be used with UPSs with an Isolation
Transformer.
3
2. ED6-PARALLEL Package Contents
3. Product Introduction
2.1. Package Contents:
3.1. The ED6-PARALLEL kit is used when connecting the UPSs in
Parallel/Redundant or N+1 applications. The ED6-MTBS2 and ED6-MTBS-4
(Maintenance Bypass Switch) should be used in all Parallel/Redundant and
can be use in N+1 applications where the application requires the UPS
output voltage to be 208/240VAC only. The MTBS CANNOT be used in N+1
applications where the output voltage is 120VAC.
2.1.1.
RJ45 communication cables x 3pcs
2.1.2.
User’s Manual x 1pce
2.1.3.
RJ45 communication cables mounting brackets x 4pcs
2.1.4.
ED6-PARALLEL CD x 1pce
4. Installation
4.1. The packaging and the condition of the units should be inspected carefully
before installation. Save the packing material for future use. If the UPS, the
MTBS or the RJ45 communication cables are damaged, DO NOT put them
into service.
4.2. Unpack the UPS and the MTBS and put in the desired location. See the
UPS and the MTBS user’s manual for installation instructions.
5. Basic Parameter Check
5.1. All the UPS used in the Parallel/Redundant or N+1 applications MUST have
the same settings except the Parallel ID Number. Each UPS used in the
Parallel/Redundant or N+1 applications must have their own ID number.
Each unit must be checked to verify that the other settings are the same.
5.2. All the UPSs used in the Parallel/Redundant or N+1 applications must have
the same electrical ratings. For instance, a 6KVA UPS cannot be used with
a 10KVA UPS. The 6KVA UPS MUST be used with another 6KVA UPS and
the 10KVA UPS MUST be used with another 10KVA UPS. The UPSs
without an Isolation Transformer cannot be used with UPSs with an Isolation
Transformer.
5.3. Connect the utility input to the first UPS. DO NOT connect anything to the
output of the UPS. NOTE: If using the ED6200RM the Battery Pack must be
connected to the UPS and the Battery Pack’s DC circuit breaker must be in
the On position. See the UPS user’s manual for connecting the input wires
and connecting the Battery Pack to the UPS.
5.4. Turn on the input circuit breaker on the rear panel of the UPS. The UPS will
be in the Bypass mode. DO NOT press the ON button on the front panel to
start the inverter. The UPS MUST be in the Bypass mode to enter the
Setting mode.
4
5
5.5. Press the “ON button” and the “Down arrow key” < ↓ > (on the front panel)
simultaneously for three seconds to enter the Setting mode.
5.6. See Table 1.0 for the default values and the options available. Use the down
arrow key to scroll through the items, note the settings.
5.8. If any changes were made press the “Save key” to save the settings. NOTE:
The new settings WILL NOT be saved unless the “Save Key” is pressed.
5.9. Once finished with the Setting mode the LCD will display “LINE OFF”. Turn
the input circuit breaker (on the rear panel of the UPS) to the Off position to
reset the UPS.
5.10. After approximately one minute turn the input circuit breaker (on the rear
panel of the UPS) to the On position. Press the ON button on the front panel
of the UPS to turn the UPS on. Check the LCD display to ensure that the
LCD is working properly.
5.11. Perform a basic functional test (no load connected). Turn the input circuit
breaker (on the rear panel of the UPS) to the Off position to switch the UPS
to the Battery mode. Check the LCD display to ensure that it is working
properly. Turn the input circuit breaker (on the rear panel of the UPS) to the
ON position to reset the UPS to the On-Line mode.
5.12. Connect an AC voltmeter to the output terminal block of the UPS. Turn the
input circuit breaker (on the rear panel of the UPS) to the Off position to
switch the UPS to the Battery mode. Record the inverter output voltage.
Turn the input circuit breaker (on the rear panel of the UPS) to the On
position to reset the UPS to the On-Line mode. The inverter output voltages
must have less than a 0.5Volt tolerance. Operating the UPSs in the
Parallel/Redundant or N+1 applications with 0.5Volts to 1.0Volts will cause a
current in-balance. Operating the UPSs in the Parallel/Redundant or N+1
applications with more than a 1volt tolerance could cause damage to the
UPSs and or the connected equipment. If the inverter output voltages are
out of tolerance the UPS must be recalibrated. Contact MINUTEMAN UPS
for support.
each
UPS
Item
Press <↓> to scroll
through the items
Display List
Press <↑> to change value
Default
Buzzer on/off
5.7. Use the “Up arrow key” < ↑ > to make changes, if needed.
5.13. Perform Steps 5.1 through 5.12 for
Parallel/Redundant or the N+1 applications.
Table 1.0. Setting Mode Functions List
used
in
the
Self-Test
(On-Line-Mode only)
Bypass Voltage
Range
Inverter Synchronize
Frequency Range
Inverter Output
Voltage*
Operation Mode
Output Voltage
Adjustment
Parallel ID Number**
Parallel Function
on/off ***
Press <
SAVE
After Saved
UPS Locked
6
> to Save
Shut off input AC power to reset UPS.
7
* Output voltage default value depends on the country or user requested value.
** Single unit: ID number must be “01”, or UPS will have an Er17 error occurred.
*** Single unit: Parallel function must be “OFF” (P 01), or UPS will have an Er21 error occurred.
Figure 2
ED12000RM: Input: 208/240V, Output: 208/240V, Total capacity 12KVA.
2 – ED6200RM, 2 – EDBP6000RM, 1 – ED6-MTBS2, 1 - ED-PARALLEL
6. Wiring
6.1. Make sure that the input wires, output wires and the battery cables do not
intercross with communication or signaling wires to avoid any unnecessary
noise interference (Figure 1).
6.2. The RJ45 communication cables for parallel function and other wires for
control signals must be kept away from the input, output and battery cables.
If this cannot be avoided, then put them at 90 degree or least 8 inches apart
(Figure 1).
Figure 1
A
8”
90°
B
A
B
A
B
Incorrect
Correct
A: Communication or Control signal wires
B: Power wires & cables
6.3. The maximum length of the RJ45 communication cables shall be less than
7M. They must be connected as a “Ring” loop. Connect all of the RJ45
communication cables to the Parallel Work Communication Bus card on the
rear panel of the UPSs. See Figures 2 through 14 to connect the RJ45
communication cables.
6.4. Make sure the RJ45 communication cables are tightly connected during the
Parallel/Redundant or N+1 operation. If the cables are not properly secured
damage may occur to the UPSs and/or the connected equipment.
6.5. A Qualified Electrical Contractor must perform the wiring of the UPSs
and the MTBS. The UPS inputs and outputs must be connected to an overcurrent protection device (circuit breaker) in accordance with the National
Electric Code, ANSI/NFPA 70. Apply 22.1lb-in of torque force when
connecting to the terminal blocks of the UPS and the MTBS box.
6.6. See the UPS user’s manual for the input and output Terminal Block
connections. See the MTBS user’s manual for connecting to the MTBS.
Connect all of the input and output wires and the RJ45 communication
cables according to the block diagrams in Figures 2 through 14.
8
9
Figure 3
Figure 4
ED18000RM: Input: 208/240V, Output: 208/240V, Total capacity 18KVA.
3 – ED6200RM, 3 – EDBP6000RM, 1 – ED6-MTBS4, 1 - ED-PARALLEL
ED24000RM: Input: 208/240V, Output: 208/240V, Total capacity 24KVA.
4 – ED6200RM, 4 – EDBP6000RM, 1 – ED6-MTBS4, 1 - ED-PARALLEL
10
11
Figure 5
Figure 6
ED12000T: Input: 208/240V, Output: 208/240V, Total capacity 12KVA.
2 – ED6200T, 1 – ED6-MTBS2, 1 - ED-PARALLEL
ED18000T: Input: 208/240V, Output: 208/240V, Total capacity 18KVA.
3 – ED6200T, 1 – ED6-MTBS4, 1 - ED-PARALLEL
12
13
Figure 7
Figure 8
ED20000T: Input: 208/240V, Output: 208/240V, Total capacity 20KVA.
2 – ED10200T, 1 – ED6-MTBS4, 1 - ED-PARALLEL
ED24000T: Input: 208/240V, Output: 208/240V, Total capacity 24KVA.
4 – ED6200T, 1 – ED6-MTBS4, 1 - ED-PARALLEL
14
15
Figure 9
Figure 10
ED6200RM N+1: Input: 208/240V, Output: 208/240V, Total capacity 6KVA.
2 – ED6200RM, 2 – EDBP6000RM, 1 – ED6-MTBS2, 1 - ED-PARALLEL
ED6000RM N+1: Input: 208/240V, Output: 120/208/240V, Total capacity 6KVA.
2 – ED6200RM, 2 – ED6000RMXFRM, 2 – EDBP6000RM
16
17
Figure 11
Figure 12
ED6200T N+1: Input: 208/240V, Output: 208/240V, Total capacity 6KVA.
2 – ED6200T, 1 - ED-PARALLEL
ED6000T N+1: Input: 208/240V, Output: 120/208/240V, Total capacity 6KVA.
2 – ED6000T, 1 - ED-PARALLEL
18
19
Figure 13
Figure 14
ED10200T N+1: Input: 208/240V, Output: 208/240V, Total capacity 10KVA.
2 – ED10200T, 1 - ED-PARALLEL
ED10000T N+1: Input: 208/240V, Output: 120/208/240V, Total capacity 10KVA.
2 – ED10000T, 1 - ED-PARALLEL
20
21
7. Setup
7.1. Make sure that the input wires, output wires, battery cables and the RJ45
communication cables are properly connected and secure.
7.2. Set two (2) and only two (2) of the terminal resistors on the rear panel of the
UPSs used in the Parallel/Redundant or N+1 operation to the “On” position
and the other terminal resistors must be set to the “Off” position; otherwise,
the Parallel/Redundant or N+1 operation of those UPSs might cause
damage to the UPSs and/or the connected equipment.
7.7. Use the down arrow key to scroll down to the Parallel Function on/off use
the up arrow key to change the setting to P 02 to enable the
Parallel/Redundant function for all UPSs used in the Parallel/Redundant or
N+1 applications.
Table 2.0. ID and Parallel Function settings
UPS#
ID
Number
Parallel
Function
UPS#1
UPS#2
UPS#3
UPS#4
7.8. Press the “Save key” to save the settings. NOTE: The new settings WILL
NOT be saved unless the “Save Key” is pressed.
7.9. Once finished with the Setting mode the LCD will display “LINE OFF”. Turn
the input circuit breaker (on the rear panel of the UPSs) to the Off position to
reset the UPSs.
7.10. Perform Steps 7.5 through 7.9 for each UPS used in the Parallel/Redundant
or the N+1 applications.
7.3. The output circuit breakers MUST be in the Off position. Turn on the utility
input circuit breaker. NOTE: If using the ED6200RM the Battery Pack must
be connected to the UPS and the Battery Pack’s DC circuit breaker must be
in the On position.
7.11. If using a Maintenance Bypass Switch (MTBS) see the MTBS user’s manual
for the Startup Procedure and Operation of the MTBS.
7.4. Turn on the input circuit breakers on the rear panel of all of the UPSs. The
UPSs will be in the Bypass mode. DO NOT press the ON button on the front
panel to start the inverter. The UPSs MUST be in the Bypass mode to enter
the Setting mode.
7.5. Press the “ON button” and the “Down arrow key” < ↓ > (on the front panel)
simultaneously for three seconds to enter the Setting mode.
7.6. Use the down arrow key to scroll down to the Parallel ID Number. Use the
up arrow key to set the ID number for each UPS used in Parallel/Redundant
or N+1 applications. NOTE: Set the Parallel ID Number on the first UPS to
id01. Set the Parallel ID Number on the second UPS to id02. Set the Parallel
ID Number on the third UPS to id03. Set the Parallel ID Number on the
fourth UPS to id04.
22
23
8. Obtaining Service
9. Limited Product Warranty
1. Call your dealer for assistance. If you cannot reach your dealer, or if they
cannot resolve the problem call or fax MINUTEMAN Technical Support at the
following numbers; Voice phone (972) 446-7363, FAX line (972) 446-9011 or
visit our Web site at www.minutemanups.com the "Discussion Board". Please
have the following information available BEFORE calling the Technical
Support Department.
a. Your name and address.
b. Where and when the unit was purchased.
c. All of the model information about your unit.
d. Any information on the failure.
e. A technician will ask you for the above information and, if possible, help
solve your problem over the phone. In the event that the unit requires
factory service, the technician will issue you a Return Material
Authorization Number (RMA #).
f. If the unit is under warranty, the repairs will be done at no charge. If not,
there will be a charge for repair.
2. Pack the unit in its original packaging. If the original packaging is no longer
available, ask the Technical Support Technician about obtaining a new set. It
is important to pack the unit properly in order to avoid damage in transit.
Never use Styrofoam beads for a packing material.
a. Include a letter with your name, address, daytime phone number, RMA
number, a copy of your original sales receipt, and a brief description of
the problem.
b. Mark the RMA # on the outside of all packages. The factory cannot accept
any package without the RMA # marked on the outside.
3. Return the unit by insured, prepaid carrier to:
Para Systems, Inc. (Para Systems) warrants this equipment, when properly
applied and operated within specified conditions, against faulty materials or
workmanship for a period of three years from the date of purchase. For equipment
sites within the United States and Canada, this warranty covers repair or
replacement of defective equipment at the discretion of Para Systems. Repair will
be from the nearest authorized service center. Replacement parts and warranty
labor will be borne by Para Systems. For equipment located outside of the United
States and Canada, Para Systems only covers faulty parts. Para Systems
products repaired or replaced pursuant to this warranty shall be warranted for the
un-expired portion of the warranty applying to the original product. This warranty
applies only to the original purchaser who must have properly registered the
product within 10 days of purchase.
Para Systems Inc.
MINUTEMAN UPS
1455 LeMay Drive
Carrollton, TX 75007
ATTN: RMA #
24
The warranty shall be void if (a) the equipment is damaged by the customer, is
improperly used, is subjected to an adverse operating environment, or is operated
outside the limits of its electrical specifications; (b) the equipment is repaired or
modified by anyone other than Para Systems or Para Systems-approved
personnel; or (c) has been used in a manner contrary to the product’s User's
Manual or other written instructions.
Any technical advice furnished before or after delivery in regard to use or
application of Para Systems’ equipment is furnished without charge and on the
basis that it represents Para Systems’ best judgment under the circumstances,
but it is used at the recipient’s sole risk.
Except as provided herein, Para Systems makes no warranties, expressed or
implied, including warranties of merchantability and fitness for a particular purpose.
Some states do not permit limitation of implied warranties; therefore, the aforesaid
limitation(s) may not apply to the purchaser.
EXCEPT AS PROVIDED ABOVE, IN NO EVENT WILL PARA SYSTEMS BE
LIABLE
FOR
DIRECT,
INDIRECT,
SPECIAL,
INCIDENTAL,
OR
CONSEQUENTIAL DAMAGES ARISING OUT OF THE USE OF THIS PRODUCT,
EVEN IF ADVISED OF THE POSSIBILITY OF SUCH DAMAGE. Specifically,
Para Systems is not liable for any costs, such as lost profits or revenue, loss of
equipment, loss of use of equipment, loss of software, loss of data, cost of
substitutes, claims by third parties, or otherwise. The sole and exclusive remedy
for breach of any warranty, expressed or implied, concerning Para Systems’
products and the only obligation of Para Systems hereunder, shall be the repair or
replacement of defective equipment, components, or parts; or, at Para Systems’
option, refund of the purchase price or substitution with an equivalent replacement
product. This warranty gives you specific legal rights and you may have other
rights, which vary from state to state.
25