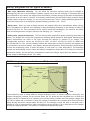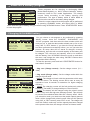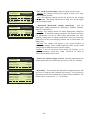
1
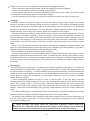
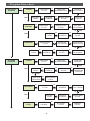
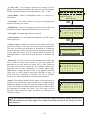
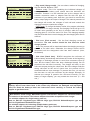
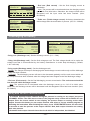
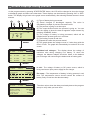
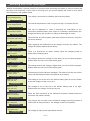
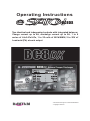
Operating Instructions
e - STATION BC8DX
Two identical and independent outputs with integrated balancer
Charge current up to 9A, discharge current up to 5A, 1 to 8
series of LiIo/LiPo/LiFe, 1 to 22 cells of NiCd/NiMH, 2 to 28V of
Lead-acid (Pb) at each output
* We reserve the right to commit modifications.
* Copyright reserved
Special features
- Operating software
The operating program in this charger is executed with mutual links and communications with every
components to prevent any possible error, so it introduces the maximum safety. Especially, the charging
algorithm is so multifarious that you can select the best program to suit your requirement. And BC8DX has
a large LCD for showing various informations including charge/discharge graphs during the process.
- High-power dual output circuit
BC8DX employs the circuit that features two totally independent but identical high-power outputs which
are powered as much as 160watts each. As a result, it can charge or discharge up to 44 cells of
NiCd/NiMH or 16 series of Lithium batteries simultaneously. Furthermore, the twin-fan cooling system is so
efficient that can hold such a power without any trouble of running the circuit.
- Dual Individual voltage balancer for Lithium batteries
BC8DX has individual cell voltage balancers at both outputs. So it does not need any balancer separately
when charging Lithium batteries (LiIo/LiPo/LiFe) for voltage balancing.
- Balance individual cells on discharge
BC8DX also can monitor and balance individual cells of the Lithium battery pack during the discharge
process as well as ‘FAST’ and ‘STORAGE’ mode. If the voltage of any one cell varies abnormally, the
process will be stopped with the error message.
- Accept various types of Lithium battery
BC8DX can accept three types of Lithium batteries - LiIo, LiPo and LiFe. They have different
characteristics by their chemistry. You can select any one of them that you are going to process before the
job. For their specifications, refer 'Warnings and safety notes' section.
- Maximum safety
Delta-peak sensitivity : The automatic charge termination program works on the principle of the
Delta-peak voltage detection. (NiCd/NiMH)
Auto-charge current limit : When charging NiCd or NiMH at 'AUTO' current mode, you can set the upper
limit of charge current to avoid from feeding high current to the battery. This is very useful when charging
the low impedance and small capacity NiMH battery in 'AUTO' mode.
Capacity limit : The charging capacity always calculated by multiple of the charging current and time. If
the charging capacity exceeds the limit the process will be terminated automatically when you set the
maximum value.
Temperature limit : The temperature of the battery on charging or discharging will be raised by its
internal chemical reaction. If you set the limit of temperature the process will be expired forcibly when the
limit has been reached.
Processing time limit : You can also restrain the maximum processing time to prevent any possible
defect.
- Cyclic charging/discharging
Perform 1 to 10 cycles of charge>discharge or discharge>charge continually for battery refreshing and
balancing at both outputs.
- PC based analysis using USB communication
For technical expert, BC8DX offers PC based program can analysis the characteristic of the battery via
USB port. It shows a graph of voltage, current, capacity and temperature curves. It also shows the
individual voltage of each cell in the Lithium battery pack. This program can run on both outputs with
single USB link to PC.
-2-
Exterior of the charger
Intelligent
cooling fan
Input (12V DC)
Power cable
CHANNEL
Graphic LCD
buttons
128 X 64 dot matrix
STOP/ESC
buttons
Intelligent
cooling fan
USB
port
▶
OUTPUT-1
Temperature MODE UP/DOWN DEC/INC
port
buttons
buttons
buttons
Individual cell
port
Temperature
port OUTPUT-2
START/ENTER
Individual cell
buttons
port
- ‘CHANNEL’ button
Switches the screen display between output-1 and output-2. The user can see the values for each
output separately when the process is running by pressing this button.
- ‘MODE’ button
Select the sub-programs in the program set-up screen.
- ‘UP’ and ‘DOWN’ buttons
Navigate the cursor through the main menus vertically, and scroll the program set-up screen.
- ‘DEC’ and ‘INC’ buttons
Decrease or increase the parameter value or enter the program mode. And also, they navigate the
cursor through the main menu horizontally. Switch the process data screen between graph, informations
and individual cell voltages during charging or discharging.
- ‘START/ENTER’ button
Commence the program by pressing this button at the program set-up screen.
Confirms the message.
- ‘STOP/ESC’ button
Suspend the program by pressing this button during the program is running.
Deletes the error message.
Returns to the previous screen.
-3-
Warnings and safety notes
Never leave the charge unsupervised when it is connected to its power supply. If any malfunction is
observed, terminate the process immediately and refer to the operating instructions.
Keep away the unit from dust, damp, rain, heat direct sunshine and vibration. Do not drop it.
The circuit of the unit is designed to be powered by a 12V DC like car battery or similar DC power
supply.
The charger and the battery to charge or discharge should be set up on a head-resistant,
non-inflammable and non-conductive surface. Never place them on a car seat, carpet or similar. Keep
all the inflammable volatile materials well away from operating area.
Be sure to understand the information of the battery to be charged or discharged accurately. If the
program is set up incorrectly the battery can severely be damaged. Especially Lithium battery can
cause a fire or an explosion by over-charging.
NiCd/NiMH voltage level: 1.2V/cell
allowable fast charge current: 1C ~ 2C depends on the performance of cell
discharge voltage cut off level: 0.85V/cell(NiCd), 1.0V/cell(NiMH)
LiIo
voltage level: 3.6V/cell
max. charge voltage: 4.1V/cell
allowable fast charge current: 1C or less
min. discharge voltage cut off level: 2.5V/cell or higher
LiPo
voltage level: 3.7V/cell
max. charge voltage: 4.2V/cell
allowable fast charge current: 1C or less
discharge voltage cut off level: 3.0V/cell or higher
LiFe
voltage level: 3.3V/cell
max. charge voltage: 3.6V/cell
allowable fast charge current: 4C or less (e.g. A123M1)
discharge voltage cut off level: 2.0V/cell or higher
Pb
voltage level: 2.0V/cell
(Lead-acid) max. charge voltage: 2.46V/cell
allowable fast charge current: 0.4C or less
discharge voltage cut off level: 1.75V/cell or higher
To avoid short-circuits between the charge lead, always connect the charge cable to the unit first and
only then to the battery to be charged or discharged. Reverse the sequence when disconnecting.
Do not attempt to charge or discharge the following types of battery.
- Battery pack, which consists of different types of cell (including different manufacturers).
- Battery, which is already fully charged or just slightly discharged.
- Non-rechargeable batteries (Explosion hazard).
- Batteries that require a different charge technique from NiCd, NiMH, LiIo, LiPo, LiFe or Pb.
- Faulty or damaged battery.
- Battery fitted with an integral charge circuit or a protection circuit.
- Batteries installed in a device, or which are electrically linked to other components.
- Batteries that are not expressly stated by the manufacturer to be suitable for the currents the charger
delivers during the charge process.
-4-
Please bear in mind of checking the following point before charge operation.
- Did you select the appropriate program, which are suitable for the type of battery?
- Did you set up adequate current for charging or discharging?
- Lithium battery pack can be composed with parallel and series circuits mixed. You have to check
the composition of the battery pack carefully before charging.
- Are all connections firm and safe, or is there an intermittent contact at any point in the circuit?
Charging
A specific quantity of electrical energy is fed into the battery during charge process. The charge
quantity is calculated by multiplying charge current by charge time. The maximum permissible charge
current varies according to the battery type or its performance, and can be found in the information
provided by the battery manufacturer. It is only allowed to charge batteries at rates higher than the
standard charge current if they are expressly stated to be capable of quick-charge.
- Connect the battery to charge to output terminal of the charger using suitable charge lead. They are
red, positive(+) and black, negative(-). Since the charger may not detect the difference between the
internal resistance of the battery pack, cable resistance and connectors transfer resistance, the first
requirement, if the charger to work properly is that the charge lead should be of adequate conductor
cross-section. And also high-quality connectors (normally gold-contact type) must be fitted to both
ends.
- Refer to the information provided by the battery manufacturer regarding charging methods, and
verify the recommended charge current and charge time. Especially for Lithium batteries, you have to
follow the charge instruction provided by the manufacturer strictly.
- Do not attempt to disassemble the battery pack arbitrarily.
- You have to pay attention to verify the capacity and the voltage of the Lithium battery pack. It may be
composed of parallel and series connection mixed. In parallel link the capacity of the battery pack is
multiplied by the number of cells but the voltage remains same. That kind of voltage imbalance causes
a fire or explosion during charge process. We recommend you compose the Lithium battery pack in
series only.
Discharging
The typical purpose of discharge is to determine the residual capacity of the battery, or to lower the
voltage of battery to a defined level. When you discharge the battery you also have to pay attention on
the process same as charging. To avoid the battery becoming deep-discharged, set the final discharge
voltage correctly. Lithium batteries should not be deep-discharged to lower than the minimum voltage,
as this leads to a rapid loss of capacity or a total failure. Generally, you do not need to discharge
Lithium battery voluntarily.
- Some rechargeable batteries are said to have a memory effect. If they are partly used and
recharged before the whole charge is drawn out, they 'remember' this and next time will only use that
part of their capacity. This is a 'memory effect'. NiCd and NiMH batteries are said to suffer from
memory effect. They prefer complete cycles; fully charge then use until empty, do not recharge before
storage - allow them to self-discharge during storage. NiMH batteries have less memory effect than
NiCd.
- The Lithium battery prefers a partial rather than a full discharge. Frequent full discharges should be
avoided if possible. Instead, charge the battery more often or use a larger battery.
- The brand-new NiCd battery pack is partially useful with its capacity until it has been subjected to 10
or more charge cycles in any case. The cyclic process of charge and discharge will lead to optimize
the capacity of battery pack.
! Those warnings and safety notes are particularly important. Please follow the
instructions for a maximum safety; otherwise the charger and the battery can be damaged
violently. And also it can cause a fire to injure a human body or to lose the property.
-5-
Program flow chart
LiPo/LiFe/LiIo
PROGRAM
UP
ENTER
Charge current
0.1~9.0A
CHARGE
DOWN
UP
Charge mode
Normal/Balance/Fast
DOWN
UP
DOWN
End current
Auto, 60~500mA
UP
UP
Safety temp.
20~80C
MODE
UP
DOWN
DOWN
Maximum capacity
50~120%
DOWN
Charge current
0.1~9.0A
STORAGE
UP
Safety timer
10~9990 min.
UP
Discharge current
0.1~5.0A
DOWN
UP
DOWN
UP
DOWN
Check Time
5~250 min.
End current
Auto, 60~500mA
UP
UP
Safety temp.
20~80C
MODE
UP
UP
Discharge current
0.1~5.0A
DISCHARGE
DOWN
DOWN
Safety timer
10~9990 min.
Discharge volt
2.70~3.70V/cell
DOWN
UP
DOWN
UP
DOWN
Safety temp.
20~80C
NiCd/NiMH
PROGRAM
Safety timer
10~9990 min.
DOWN
UP
CHARGE
DOWN
Charge current
0.1~9.0A
UP
DOWN
UP
DOWN
Maximum capacity
50~120%
Charge mode
Normal/Linear/Reflex
UP
DOWN
Discharge mode
Normal, CV mode
UP
Safety temp.
20~80C
UP
DOWN
UP
Safety timer
10~9990 min.
UP
Current mode
Manual/Auto
DOWN
DOWN
Maximum capacity
50~150%
DOWN
End current
Auto, 60~500mA
UP
MODE
DOWN
Maximum capacity
50~120%
UP
UP
DOWN
UP
DOWN
DOWN
Delta-peak
Disable/Delicate/
5~20mV/cell
DOWN
Trickle current
Off/50~300mA
UP
DISCHARGE
DOWN
UP
DOWN
Delta-peak delay
1~15min.
UP
Discharge current
0.1~5.0A
Discharge mode
Atuo/Manual
DOWN
UP
Discharge volt
0.10~1.20V/cell
DOWN
UP
Safety temp.
20~80C
MODE
DOWN
Safety timer
10~9990 min.
UP
UP
Cycle Mode
CYCLE
UP
DOWN
DOWN
-6-
No. of cycles
1~10 times
UP
DOWN
Maximum capacity
50~150%
DOWN
UP
DOWN
Waste time
0~60 min.
Pb(Lead-acid)
PROGRAM
UP
Charge current
0.1~9.0A
CHARGE
DOWN
UP
Charge volt
2.20~2.50V/cell
DOWN
UP
Charge mode
Liner/Pulse
DOWN
UP
Safety temp.
20~80C
MODE
UP
UP
UP
Safety timer
10~9990 min.
DOWN
DOWN
UP
Maximum Capacity
50~150%
DOWN
End current
Auto/60~500mA
DOWN
DOWN
Trickle curr.
Off/50~300mA
UP
Discharge current
0.1~5.0A
DISCHARGE
DOWN
UP
Discharge volt
1.40~1.80V/cell
DOWN
UP
Discharge mode
Normal/CV mode
DOWN
UP
Safety temp.
20~80C
User Setup
PROGRAM
Input voltage low
10.0~11.0V
UP
Safety timer
10~9990 min.
DOWN
UP
DOWN
UP
Temperature
mode (F/C)
DOWN
Maximum Capacity
50~150%
Key beep sound
On/Off
End current
Auto/60~500mA
DOWN
Melody sound
at ‘Full’
UP
UP
Password
DOWN
UP
Factory setup
Reset
UP
DOWN
LCD contrast
0~8
DOWN
DOWN
UP
UP
DOWN
UP
UP
DOWN
DOWN
LCD Back-light
On/Off
DOWN
User name
17 char. max.
DATA
Review
DATA
UP
UP
UP
Graph
DOWN
DOWN
-7-
Cycle
Data
DOWN
Individual cell
voltages
The first display
When you connect the crocodile clips which attached to the
charger as an input power cable to a suitable 12V power
source, the start-up display appears. The charger will carry
BC8DX V1.0
out self-test on balancer circuit instantly, and will show ‘OK’
on success at right bottom corner. Thus the power-on process
B A N TA M B C 8 D X
has been completed. If it fails to test the balancer circuit,
BALANCER Search... OK
balance function for Lixx batteries can not work, but other
programs are fine to work. Even the case, the charger needs
to be repaired. The display shows the brand name, device name and firmware version as well as the
user’s name. The default display for user’s name is ‘BANTAM BC8DX’, but you can revise it by your
name at ‘SETUP’ program.
Press ‘START/ENTER’ button to go for the main menu display.
e - S TAT I O N
Initial parameter set up
BC8DX will be operated with the default values of the initial settings which were done at the factory, when
it is connected to a 12V DC battery or any similar input power source for the first time. The user can set
these values at his/her own requirements. These setup data will be commonly applied to both output
channels.
Select
S E T U P using ‘UP/DOWN’ or ‘INC/DEC’ buttons, and press ‘START/ENTER’.
LiPo
LiFe
LiIo
NiMH
▶
PROGRAM SELECT
CH2>
NiCd
Pb
SETUP
REVIEW
START
ENTER
[ USER SETUP ]
In vol. low
Temp mode
Key beep
Melody/Full
LCD light
:
:
:
:
:
▶
10.0V
C
On
1
On
[ USER SETUP ]
▶
▶
LCD contrast :
0
Factory set
:
Reset
Password
:
****
Name(17char)
ABCDEFGH123456789
To manipulate the cursor, you can use ‘UP/DOWN’ or ‘INC/DEC’ buttons at ‘PROGRAM
SELECT’ screen. And you can use ‘UP/DOWN’ button to move the cursor in vertical direction
and use ‘INC/DEC’ buttons in horizontal direction. By pressing ‘STOP/ESC’ button, the screen
goes to previous menu at any time.
-8-
- Temp. Mode : Choice of temperature mode. (C, Celcius or F,
Fahrenheit)
▶
- In Vol. Low : This program monitors the voltage of input
battery. If the voltage drops below the value you set the operation
forcibly terminated to protect the input battery. (10.0 ~ 11.0V)
- Key Beep : The beep sounds at every time pressing the
buttons to confirm your action.
- LCD Light : LCD back-light can be on and off.
[****]
E F G H I J
O P Q R S T
Y Z 1 2 3 4
9 0
[ USER SETUP ]
▶
R eset all dat a ?
Conf irm (E N T E R)
▶
[ USER SETUP ]
▶
Old word [****]
A B C D E F G H I J
K L M N O P Q R S T
U V W X Y Z 1 2 3 4
5 6 7 8 9 0
▶
- Name : The charger shows the user name at the first screen at
power-on. You can set your name of maximum 17 alpha-numeric
characters. When you enter the mode by pressing ‘INC’ or ‘DEC’
button, the charger will ask the password, and you need to input
the password to change the name. The user name can be
entered using exactly the same procedure as described on
‘Password’ mode.
▶
START
ENTER
▶
- Password : You can set your own 4-digit password. It has been
set on ‘0000’-all zeros, at the factory. Or, you can change the
password to new one. When you press ‘INC’ or ‘DEC’ button at
this step, there will be shown all the available letters. The
password can be any combination of 4-digits within those
alphanumeric. Locate the black mark to the desired character
using ‘INC’ or ‘DEC’ buttons, and press ‘ENTER’ to input. To
move the cursor backward or forward, use ‘UP’ or ‘DOWN’
button. First, input old password, then type new password.
[ USER SETUP ]
Password
A B C D
K L M N
U V W X
5 6 7 8
- LCD Contrast : You can adjust the brightness of LCD screen,
when ‘Light’ is on.
- Factory setup : Restore all values to the default which was
done at our factory. To do this, you need to enter the password.
The way of entering the password is described on ‘Password’
mode at next step. When you perform this program successfully,
all the data will return to their default values including the
password(’0000’). It will take several seconds to initialize the
data.
▶
START
ENTER
▶
- Melody/Full : Select the melody sound at the time when the
process is finished. These audible sounds can be on or off.
[ USER SETUP ]
LCD contrast :
0
Factory set
:
Reset
Password
:
****
Name(17char)
BANTAM INC.
[ USER SETUP ]
▶
_ _ BANTAM
_ _ _ _ _ _ _ BC8DX
________
A B C D E F G H I J
K L M N O P Q R S T
U V W X Y Z 1 2 3 4
5 6 7 8 9 0
. [ ]
! If you forgot the password, you can not reset the charger to factory default, and also you
can not amend the user name again. The charger should be returned to our factory to revive
the password.
-9-
Lithium battery (LiIo/LiPo/LiFe) program
These programs are only suitable for charging and discharging
Lithium batteries with a nominal voltage of 3.3V, 3.6V or 3.7V per
cell. These batteries need to adopt different charge technique is
NiCd
LiPo
termed constant voltage(CV) and constant current (CC) method.
LiFe
Pb
The charge current varies according to the battery capacity and
LiIo
SETUP
performance. The final voltage of charge process is also very
NiMH
REVIEW
important, it should be precisely matched with the charged
voltage of the battery. They are 4.2V for LiPo, 4.1V for LiIo and
3.6V for LiFe. The charge current and nominal voltage as for cell-count set on the charge program must
always be matched with the battery being charged.
Select the output channel that the program will be performed by pressing ‘CHANNEL’ button. Then, select
one of the program which suits the type of battery being processed using UP/DOWN’ button and press
‘START/ENTER’ button to enter the program.
PROGRAM SELECT
CH2>
Charging Lithium battery (LiIo/LiPo/LiFe)
LiPo[ 1 ]
3000mAh
Chg curr
Chg mode
End curr
Chk time
Max capa
6S(22.2V) ▶
CHARGE
:
5.0A
:
Normal
:
Auto
:
10min
:
100%
LiPo[ 1 ]
3000mAh
6S(22.2V) ▶
CHARGE
Set
Read
:
:
6S(22.2V)
6S(22.2V)
Confirm(ENTER)
LiPo[ 1 ]
3000mAh
Chg
Chg
End
Chk
Max
curr
mode
curr
time
capa
6S(22.2V)
CHARGE
:
:
:
:
:
You can choose a sub-program to be performed by pressing
‘MODE’ button, there are ‘CHARGE’, ‘DISCHARGE’ and
‘STORAGE’ programs. And then select the data number which
will newly set up, or load the data number already set up for
re-use using ‘INC’ or ‘DEC’ buttons. If you have the set-up data
which had been performed successfully before, you can just start
the process after loading the data number. All setup data will be
stored at charger’s memory automatically after setting them all.
Input the cell-count and capacity of the battery will be charged.
The cell-count and capacity need to be matched with the battery.
Use ‘UP/DOWN’ buttons to scroll up and down the menu, and
change the value using ‘INC/DEC’ buttons when the pertinent
field is blinking.
To start the process, press and hold ‘START/ENTER’ button for
more than 3 seconds regardless of cursor position.
This shows the number of cells you set up and the charger
detects. 'Read' shows the cell-count found by the charger and
'Set' is the number of cells selected by you at the previous
screen. If both numbers are identical you can start charging by
press ‘START/ENTER’ button. If not, press ‘STOP/ESC’ button
to go back to previous screen. Then carefully check the number
of cells of the battery pack again.
- Charge current : Set the charge current. (0.1 ~ 9.0A)
5.0A
Normal
Auto
10min
100%
- 10 -
LiPo[ 1 ]
3000mAh
6S(22.2V) ▶
CHARGE
Chg
Chg
End
Chk
Max
:
:
:
:
:
curr
mode
curr
time
capa
5.0A
Normal
Auto
10min
100%
LiPo[ 1 ]
3000mAh
6S(22.2V) ▶
CHARGE
Chg
Chg
End
Chk
Max
:
:
:
:
:
curr
mode
curr
time
capa
5.0A
Normal
Auto
10min
100%
LiPo[ 1 ]
3000mAh
6S(22.2V) ▶
CHARGE
Chg
Chg
End
Chk
Max
:
:
:
:
:
curr
mode
curr
time
capa
5.0A
Normal
Auto
10min
100%
- Chg. mode (Charge mode) : You can select a method of charging,
they are Normal, Balance, FAST.
Balance mode; This is for equalizing the individual voltages of
battery pack. The battery pack should have the individual cell
connector. Connect it to the individual port at the charger with a
suitable connection cable or adaptor that fits with the type of
connector of your battery pack. And also, you should to connect the
battery output plug to the output of charger. The internal processor of
the charger will monitor the voltages of each cell and controls the
charging current to equalize the voltage.
FAST mode; To charge the battery earlier, this program eliminates
certain term of CV range. Actually, the charging current will go to 1/5
of initial value gradually at the end of process, while the normal
charging goes to 1/10 at the end of CV term. The charging capacity
may be bit smaller than normal charging but the charging time can be
reduced.
- End curr. (End current) : Set the final charging current at
termination. The end current should be less than the initial
charge current.
Auto; The process will be terminated when the charging current go
to 1/10 of its initial value. Otherwise, the charge current will be
decreased until the designated value has been reached. (Auto,
60~500mA)
- Chk. time (Check time) : BC8DX recognizes the cell-count of
Lithium battery automatically and shows the counts at the beginning
of charge or discharge process to avoid from erroneous input by
user. But the battery which has been discharged deeply can be
perceived the cell-count incorrectly. The charger will work on the
cell-count anyway during the check time. But if the charger finds the
wrong cell-count at the end of check time, the process will be
terminated with an error message. To prevent the error, you can set
the time term to verify the cell-count by the charger. Normally, 10
minutes are enough to perceive the cell-count correctly. For the
battery of larger capacity, you may extend the time term. (5 ~ 250
min.)
! It is very important to know the exact type of battery to be charged, nominal voltage and
capacity. Not to know these facts is the reason why batteries are damaged and improperly
cared for. Read the battery’s label and instruction sheet carefully, or consult the battery
supplier to get those facts.
! For balance mode charge, BANTAM supplies some balance adaptors for various brands of
Lixx batteries in the market. The balance adaptor should be acceptable at this charger.
The suitable adaptors for single battery pack are;
Part no. EAC133: PolyQuest type, EAC134: Align type, EAC138: Kokam/Graupner type and
EAC139: FlightPower/ThunderPower type.
The suitable adaptors for balancing multiple battery packs are;
Part no. EAC153: PolyQuest type, EAC154: Align type, EAC158: Kokam/Graupner type and
EAC159: FlightPower/ThunderPower type.
- 11 -
'STORAGE' program for Lithium battery
This is for Lithium battery not to be used for long time. The program will determine to charge or discharge
the battery to a certain voltage depending on the voltage of the battery at its initial stage. The final voltage
are different from type of batteries, 3.75V for LiIo, 3.85V for LiPo and 3.3V for LiFe per cell. If the voltage
of battery at its initial stage is over the voltage level to storage, the program will start to discharge.
LiPo[ 1 ]
3000mAh
Chg curr
Dchg curr
End curr
Max capa
Safety time
6S(22.2V) ▶
STORAGE
:
:
:
:
:
6S(22.2V) ▶
STORAGE
LiPo[ 1 ]
3000mAh
Dchg curr
End curr
Max capa
Safety time
Safety temp
5.0A
3.0A
Auto
100%
720min
:
:
:
:
:
3.0A
Auto
100%
720min
50C
- Chg. curr. (Charge current) : Set the charge current. (0.1 ~ 9.0A)
- Dchg. curr. (Discharge current) : Set the discharge current for the case of discharging. (0.1 ~ 5.0A)
- End curr. (End current) : Set the final charging current at termination. (Auto, 60~500mA)
Discharging Lithium battery
LiPo[ 1 ]
3000mAh
Dchg curr
Dchg volt
Dchg mode
End curr
Max capa
6S(22.2V) ▶
DISCHARGE
:
:
:
:
:
5.0A
2.70V/C
Normal
Not use
100%
LiPo[ 1 ]
3000mAh
Dchg mode
End curr
Max capa
Safety time
Safety temp
6S(22.2V) ▶
DISCHARGE
:
:
:
:
:
Normal
Not use
100%
720min
50C
- Dchg. curr. (Discharge current) : Set the discharge current. The value may not exceed 1C for a
maximum safety. and (0.1 ~ 5.0A)
- Dchg. volt (Discharge volt) : Set the final voltage per cell. The final voltage should not be under the
voltage level that is recommended by the battery manufacturer to avoid deep discharging. The default is
2.70V/cell. (2.70~3.70V/cell)
- Dchg. mode (Discharge mode) : Set the discharge mode.
Normal; The charger will keep on discharging with the discharge current continuously until the discharge
voltage has been reached.
CV mode; The discharging current will start to be decreased gradually until the end current which will
be set up at next has been reached, when the voltage has been dropped to the final discharge voltage.
For maximum discharge, use this mode.
- End curr. (End current) : Set the final discharging current at termination. The end current should be
less than the initial discharge current.
Auto; The process will be terminated when the discharge current go to 1/10 of its initial value.
Otherwise, the discharge current will be decreased until the designated value has been reached. (Auto,
60~500mA)
- 12 -
Safety programs for all types of battery
- Max. capa. (Maximum capacity) : You can define the maximum capacity which can be charged or
discharged by the form of a percentage of battery capacity set in the top of display. If full-charge has not
been detected for any reason, the charger limits the quantity of feeding energy by the value and terminates
the process as on the value is reached. If the battery manufacturer recommends to apply a partial charge
to battery before long-term storage, you can use this function also. This is a safety feature programmed to
protect the battery from over-charging or deep-discharging condition. (50 ~ 120%)
- Safety timer : When you start a charge process, the integral safety timer automatically starts running.
This is programmed to prevent over-charging or deep-discharging the battery, if the charger or battery is
proved to be fault. Or, if the termination circuit cannot detect the full-charging. The value for the safety
timer should be generous enough to allow the full-charging. (10 ~ 1380 min.)
- Safety temp. (Safety temperature) : This is a feature using temperature probe contacting the surface of
battery. The charger can monitor the temperature of battery being charged or discharged. Monitoring the
battery temperature can result in the most accurate full charges in addition to its voltage. The
recommended maximum values are 45~55C(113~130F) for NiCd, 43~52C(110~125F) for NiMH and
32~35C(90~95F) for Lixx. Once the battery reaches this temperature during the process, the program will
be terminated to protect the battery. If the battery reaches the temperature during discharge, the discharge
process will temporarily pause to allow the battery to cool down to a safe temperature. The discharge
process will automatically resume when the battery’s temperature drops about 4°C below the maximum
temperature setting. Set the maximum temperature at which the charger should allow the battery to reach
during charge or discharge process. (20 ~ 80C)
CC/CV charging process for Lixx and Pb(Lead-acid)
V/A/Ah
Volt
CV
(Constant Voltage)
Amps
CC
(Constant Current)
approx.
80~90%
Ah
approx.
98%
Time
These batteries need to adopt different charge technique which is termed constant current(CC) and
constant voltage(CV) method. As the process starts, the CC phase will be committed first, in which the
charging current is maintained at a constant level until the battery reaches their final charge voltage. And
then, the CV phase will be initiated, in which the voltage is maintained at a constant level. At this point the
battery already has been charged about 80~90% full. The charging current will start to decrease until it
reached its 1/10 of starting amount. When the charging current reaches 1/10 of initial amount, the charger
will stop the charging process. The battery is virtually fully charged at this point.
- 13 -
NiMH/NiCd battery program
These programs are for charging or discharging NiMH
(Nickel-Metal-Hydride) or NiCd (Nickel-Cadmium) battery
commonly used for R/C model applications. The charge
NiCd
LiPo
current varies according to the battery capacity and
LiFe
Pb
performance. The type of battery which is either NiMH or
LiIo
SETUP
NiCd must be correct for the battery being charged.
NiMH
REVIEW
Select the output channel that the program will be performed
by pressing ‘CHANNEL’ button, and select ‘NiCd’ or ‘NiMH’
which suits the type of battery being processed using UP/DOWN’ button. Press ‘START/ENTER’ button
to enter the program.
PROGRAM SELECT
CH2>
Charging NiCd/NiMH battery
NiMH[ 1 ]
3000mAh
Chg curr
Chg mode
Curr mode
Delta-peak
Max capa
NiMH[ 1 ]
3000mAh
Chg curr
Chg mode
Curr mode
Delta-peak
Max capa
NiMH[ 1 ]
3000mAh
Chg curr
Chg mode
Curr mode
Delta-peak
Max capa
▶
7S(8.4V)
CHARGE
:
5.0A
:
Normal
:
Manual
:
10mV/C
:
100%
7S(8.4V)
▶
CHARGE
:
:
:
:
:
5.0A
Normal
Manual
10mV/C
100%
▶
7S(8.4V)
CHARGE
:
:
:
:
:
5.0A
Normal
Manual
10mV/C
100%
You can choose a sub-program to be performed by pressing
‘MODE’ button, there are ‘CHARGE’, ‘DISCHARGE’ and
‘CYCLE’ programs. And then select the data number which will
newly set up, or load the data number already set up for re-use
using ‘INC’ or ‘DEC’ buttons. If you have the set-up data which
had been performed successfully before, you can just start the
process. All setup data will be stored at charger’s memory
automatically. Input the cell-count and capacity of the battery will
be charged. The cell-count and capacity need to be matched
with the battery. Use ‘UP/DOWN’ buttons to scroll up and down
the menu, and change the value using ‘INC/DEC’ buttons when
the pertinent field is blinking.
To start the process, press and hold ‘START/ENTER’ button for
more than 3 seconds.
- Chg. curr. (Charge current) : Set the charge current. (0.1 ~
9.0A)
- Chg. mode (Charge mode) : Set the charge mode which the
charger will work with.
Normal; The charger will work with the parameters which were
set at the screen. The feeding current will be zero at every 90
seconds to have 6 seconds of waste-time for higher charging
efficiency.
Linear; The charging current will be fed continuously without
hesitating. The battery is charged with pure ‘Direct-Current’.
Reflex; The battery will be charged using the pulsed current
which is very brief and high-rate discharge pulses. This will help
to prevent from undesired side effect like ‘memory effect’. When
you select this mode, you need to set the partial capacity percent
which will be charged with pulsed current. After set the percent
using ‘INC’ or ’DEC’ buttons, press ‘ESC’ to exit. The charger will
work with ‘Reflex’ mode only until the capacity has been charged
to the percent. After that, the charger will work at ‘Normal mode’
- 14 -
NiMH[ 1 ]
3000mAh
Chg curr
Chg mode
Curr mode
Delta-peak
Max capa
NiMH[ 1 ]
3000mAh
Chg curr
Chg mode
Curr mode
Delta-peak
Max capa
NiMH[ 1 ]
3000mAh
Delta-peak
Max capa
Safety timer
Safety temp
Tr i c k l e c u r r
NiMH[ 1 ]
3000mAh
Max capa
Safety timer
Safety temp
Tr i c k l e c u r r
Peak delay
▶
7S(8.4V)
CHARGE
:
:
:
:
:
5.0A
Normal
Manual
10mV/C
100%
7S(8.4V)
▶
CHARGE
:
:
:
:
:
5.0A
Normal
Manual
10mV/C
100%
7S(8.4V)
▶
CHARGE
:
:
:
:
:
- Delta-peak (Delta-peak voltage sensitivity) : Set the
Delta-peak voltage sensitivity at termination. (Disable, Delicate,
Default, 5~20mV/cell)
Disable; The charger would not detect Delta-peak voltage for
termination. To terminate charging process, the charger will check
the parameters set up at other safety parameters like max.
capacity, safety timer or safety temperature. If any one has been
reached at its limit, the charging process will be terminated. (for
NiMH only)
Delicate; The charger will detect a very small variation at
delta-peak voltage. Some NiMH batteries which shows small
voltage-drop at peak need to be use this option.
Default; If you do not know much about this function, or for
ordinary batteries, select this mode. 15mV/cell for NiCd or
10mV/cell for NiMH will be used.
- Tickle curr. (Trickle charge current) : Activate or deactivate the
trickle charge after the termination of process. (Off, 50 ~ 300mA)
10mV/C
100%
720min
50C
100mA
7S(8.4V)
▶
CHARGE
:
:
:
:
:
- Curr. mode (Current mode) : Set the charge current mode.
Manual; The charger will feed the charge current set at ‘Chg.
curr.’ for whole process.
Auto; The optimum charge current will be set by the charger
automatically. The charge current set at ‘Chg. curr.’ will be upper
limit of charge current.
100%
720min
50C
100mA
5min.
- Peak delay : This restrains the delta-peak voltage detection until
the time is reached after starting the process. This prevents a
premature cut-off from the battery of high internal resistance. The
default value is one minute. (1 ~ 15 minutes)
- 15 -
Discharging NiCd/NiMH battery
NiMH[ 1 ]
3000mAh
Dchg curr
Dchg mode
Dchg volt
Max capa
Safety timer
▶
7S(8.4V)
DISCHARGE
:
:
:
:
:
5.0A
Normal
Default
100%
720min
NiMH[ 1 ]
3000mAh
Dchg mode
Dchg volt
Max capa
Safety timer
Safety temp
▶
7S(8.4V)
DISCHARGE
:
Normal
:
Default
:
100%
:
720min
:
50C
- Dchg. curr. (Discharge current) : Set the discharge current. (0.1 ~ 5.0A)
- Dchg. mode (Discharge mode) : Set the discharge mode which the charger will work with.
Manual; The charger will stop discharging at the time when the voltage drops to the final voltage set at
next parameter-’Dchg volt’.
Auto; The process will be finished, when the voltage drops to 0.90V per cell.
- Dchg. volt (Discharge volt) : Set the final voltage which the battery will reach at the end of discharge.
The default value is 0.90V/cell. (0.1 ~ 1.2V/cell)
Charge-to-discharge & discharge-to-charge cycles NiMH/NiCd battery
You can use this function for balancing, refreshing and break-in the battery. All of charging and
discharging parameters will be adopted from the values of ‘CHARGE’ and ‘DISCHARGE’ programs.
NiMH[ 1 ]
3000mAh
▶
7S(8.4V)
CYCLE
Cycle mode : CHG>DCHG
No. cycles
:
2T
Wa s t e t i m e :
10min
- Cycle mode : Set the sequence of performing program.
CHG>DCHG; The charger starts with charging process,
after the battery will be discharged again.
DCHG>CHG; It starts with discharging process, after which
the battery will be charged again.
- No. cycles : The number of cycles in the process. (1~10 times)
- Waste time : To avoid the battery from rising temperature caused by the internal chemical reactions,
there should be a brief cool-off time between cycles. (0~60 minutes)
! Cautions for NiMH batteries
- Do not allow NiMH batteries to over-heat. Using the battery cooler will prevent over-heating at
charge and discharge.
- Small size batteries like ‘AAA’, ‘AA’ and ‘A’ can safely be full charged at currents up to 1.0C.
Higher charge current can easily over-heat batteries and thus damage batteries.
- NiMH batteries have higher self-discharge rate compare to NiCd, so it is necessary to
recharge the battery immediately prior to use.
- Store NiMH batteries with some voltages remaining.
- 16 -
Pb (lead-sulphuric acid) battery program
This is programmed for charging Pb (lead-acid) battery with
nominal voltage from 2 to 28V. Pb batteries are totally
NiCd
LiPo
different from NiCd or NiMH batteries, but very similar with
LiFe
Pb
Lithium batteries. They can only deliver relatively lower current
compare to their capacity, and similar restrictions definitely
LiIo
SETUP
apply to charge. So the optimal charge current will be 1/10 of
NiMH
REVIEW
the capacity. Pb batteries must not be charged rapidly.
Always follow the instruction which was supplied by the battery manufacturer.
Select the output channel that the program will be performed by pressing ‘CHANNEL’ button and select
‘Pb’ program using UP/DOWN’ button. Press ‘START/ENTER’ button to enter the program.
PROGRAM SELECT
CH2>
Charging Pb battery
Pb[ 1 ]
12000mAh
Chg
Chg
Chg
End
Max
curr
volt
mode
curr
capa
6S(12.0V) ▶
CHARGE
:
:
:
:
:
5.0A
Default
Linear
Auto
100%
Pb[ 1 ]
12000mAh
6S(12.0V) ▶
CHARGE
Chg
Chg
Chg
End
Max
:
:
:
:
:
You can choose a sub-program to be performed by pressing
‘MODE’ button, there are ‘CHARGE’ and ‘DISCHARGE’ programs.
And then select the data number will newly set up or load the data
already set up for re-use using ‘INC’ or ‘DEC’ buttons. If you have
the set-up data which had been performed successfully before,
you can just start the process. Set the cell-count and capacity of
the battery will be charged. The cell-count (or, voltage) and
capacity need to be identical with the battery. Use ‘UP/DOWN’
buttons to scroll up and down the menu, and change the value
using ‘INC/DEC’ buttons when the pertinent field is blinking.
To start the process, press and hold ‘START/ENTER’ button for
more than 3 seconds.
5.0A
Default
Linear
Auto
100%
- Chg. curr. (Charge current) : Set the charge current. (0.1 ~
9.0A)
Pb[ 1 ]
12000mAh
Chg curr
Chg volt
Chg mode
End curr
Max capa
▶
6S(12.0V)
CHARGE
:
5.0A
:
Default
:
Linear
:
Auto
:
100%
- Chg. volt (Charge volt) : Set the final charge voltage per cell.
The charger will charge the battery until the voltage has been
reached. The default values is 2.45V/cell. (2.20~2.50V/cell)
Pb[ 1 ]
12000mAh
Chg curr
Chg volt
Chg mode
End curr
Max capa
6S(12.0V)
▶
CHARGE
:
5.0A
:
Default
:
Linear
:
Auto
:
100%
curr
volt
mode
curr
capa
- Chg. mode (Charge mode) : Set the charge mode which the
charger will work with.
Linear; The charging current will be fed continuously without
hesitating. The battery is charged with pure ‘Direct-Current’.
Pulse; The charger will work with the parameters which were set
at the screen. The feeding current will be zero at every 30
seconds to have 3 seconds of waste-time for higher charging
efficiency.
- 17 -
Pb[ 1 ]
12000mAh
Chg
Chg
Chg
End
Max
curr
volt
mode
curr
capa
Pb[ 1 ]
12000mAh
End curr
Max capa
Safety timer
Safety temp
Tr i c k l e c u r r
6S(12.0V) ▶
CHARGE
:
:
:
:
:
5.0A
Default
Linear
Auto
100%
6S(12.0V) ▶
CHARGE
:
Auto
:
100%
:
720min
:
50C
:
100mA
- End curr. (End current) : Set the final charging current at
termination.
Auto; The process will be terminated when the charging current
go to 1/10 of its initial value. Otherwise, the charge current will be
decreased until the input value has been reached. (Auto,
60~500mA)
- Tickle curr. (Trickle charge current) : Activate or deactivate the
trickle charge after the termination of process. (Off, 50 ~ 300mA)
Discharging Pb battery
Pb[ 1 ]
12000mAh
Dchg curr
Dchg volt
Dchg mode
End curr
Max capa
6S(12.0V) ▶
DISCHARGE
:
5.0A
:
Default
:
Normal
:
Not use
:
100%
Pb[ 1 ]
12000mAh
Dchg mode
End curr
Max capa
Safety timer
Safety temp
6S(12.0V) ▶
DISCHARGE
:
Normal
:
Auto
:
100%
:
720min
:
50C
- Dchg. curr. (Discharge ent) : Set the discharge current. (0.1 ~ 5.0A)
- Dchg. Volt (Discharge volt) : Set the final voltage per cell. The final voltage should not be under the
voltage level that is recommended by the battery manufacturer to avoid deep discharging. (Default,
1.40~1.80V/cell)
- Dchg. mode (Discharge mode) : Set the discharge mode.
Normal; The charger will keep on discharging with the discharge current continuously until the discharge
voltage has been reached.
CV mode; The discharging current will start to be decreased gradually until the end current which will
be set up at next has been reached, when the voltage has been dropped to the final discharge voltage.
- End curr. (End current) : Set the final discharging current at termination. The end current should be
less than the initial discharge current.
Auto; The process will be terminated when the discharge current go to 1/10 of its initial value.
Otherwise, the discharge current will be decreased until the designated value has been reached. (Auto,
60~500mA)
Using both OUTPUT-1 and OUTPUT-2
To activate opposite output channel during the process is running on an output, just press
‘CHANNEL’ button. The main menu screen or the program set-up screen will be shown for new
output. Even the screen switch to new display, the process keeps on running at the other
output. Connect the battery to new output channel, and select or set up suitable program by
following the instruction. After finishing the setup, press ‘START/ENTER’ button for more than
3 seconds to start the process at the output channel. Now, both output channels are running
their own process.
Remember both output channels have the circuit which is independent, but identical.
- 18 -
Screen displays during process
As the program starts by pressing ‘START/ENTER’ button, the LCD will be changed to show the charge
or discharge graph, and also some other data. Those displays can be altered by pressing ‘INC’ or ‘DEC’
button. The display will go back to the graph screen automatically, after showing the data screen in three
minutes.
2
1
6
5
4
3
7
CHG ▶
0039:15
NiMH 00298mAh
13.07V
1.25A
8
INC/DEC
BAL ▶
0039:15
LiPo
00298mAh
12.43V
1.25A
C1:
C2:
C3:
C4:
4.12V
4.12V
4.13V
0.00V
C5:
C6:
C7:
C8:
0.00V
0.00V
0.00V
0.00V
(1) Type of battery being processed.
(2) Actual charged or discharged capacity. The value is
calculated by multiple of process time and current.
(3) The process is going on at the output.
(4) The output channel which the process is going on. You can
alter the display to show the data at opposite output channel by
pressing ‘CHANNEL’ button.
(5) The voltage of battery is being processed, which will be
updated as the process goes on in real time.
(6) The feeding current at real time.
(7) Elapsed time after the process started.
(8) The graph shows the voltage curves in Y-axis along with the
time in X-axis. The graph will automatically be scaled to fit in the
screen.
Individual cell voltages : The display shows the voltage of
individual cells during charging Lixx battery. To show the
voltages, the balance adaptor should be linked to the balance
port of charger with connecting the balance tab of battery pack.
INC/DEC
NiMH 00298mAh
13.07V
1.25A
End volt
End capa
In volt
Ext temp
Curr mode
:
:
:
:
:
CHG ▶
0039:15
In volt : The voltage of battery or DC power source, which is
being used as an input power supply for the charger.
Auto
1210mAh
13.90V
33C
Auto
Ext. temp. : The temperature of battery is being process in real
time. The temperature sensor should contact the surface of
battery firmly to read out the data accurately.
INC/DEC
NiMH 00298mAh
13.07V
1.25A
In volt low
:
Safety timer :
Te m p c u t - o f f :
Tr i c k l e c u r r
:
Peak sens
:
CHG ▶
0039:15
10.0V
720min
50C
100mA
off
The other values show the data you already done at the program
set-up to verify what you have done.
- 19 -
Review the data after finishing the process
PROGRAM SELECT
CH2>
NiCd
Pb
SETUP
REVIEW
LiPo
LiFe
LiIo
NiMH
DAT GRP
Input vol
Output vol
Ext. temp
Chg time
Dchg time
Capacity
CYE
:
:
:
:
:
:
CEL ▶
12.35V
10.54V
42C
52min
0min
898mAh
UP/DOWN
4
2
1
After finishing the program, you can review the data which
had been pertained to the input and output of the charger by
selecting
R E V I E W menu at the main screen.
These data can not be shown while the program is being on
process.
Input vol : DC voltage at the charger’s input lead.
Output vol : DC voltage of battery at the end of process.
Ext. temp. : The temperature of battery as measured with
temperature sensor connected to temp. port of charger at the end
of process.
CHG time : The total amount of time needed to complete charge
process.
DCHG time : The total amount of time needed to complete
discharge process.
Capacity : The total amount of charged or discharged capacity for
whole process.
3
DAT GRP CYE CEL ▶
10.54V
898mAh
52m
5
(1) Output voltage : Shows the DC voltage at the output on end of
process.
(2) Charged or discharged capacity
(3) Time : Records the amount of time in minutes, which needed
to complete the process, not counting the time in trickle charge.
(4) Output channel mark : The output channel which the process
had been performed.
(5) The graph shows the voltage curves in Y-axis along with the
time in X-axis, after the process has finished.
UP/DOWN
No
DAT GRP CYE CEL ▶
Capacity
Voltage
1
2
C
D
C
D
00000mAh
00000mAh
00000mAh
00000mAh
0.00V
0.00V
0.00V
0.00V
This display shows the battery’s capacity and peak voltage
readings for each charge and discharge period for up to 10
cycles. The cycle number is show on the left side of the display.
Pressing ‘INC’ or ‘DEC’ button will scroll the display up and down.
Charge data is marked by ‘C’ and discharge data is marked by
‘D’.
UP/DOWN
DAT GRP CYE CEL ▶
No
Vol
No
Vol
C1:
C2:
C3:
C4:
4.20V
4.19V
4.20V
0.00V
C5:
C6:
C7:
C8:
0.00V
0.00V
0.00V
0.00V
The display shows the final voltage of individual cells, when the
balance tab was connected to the individual port of charger
during the process of Lixx battery. ith balance mode.
- 20 -
Warning and error messages
BC8DX incorporates a various functions of protective and monitoring the system to verify functions and
the state of its electronics. In any case of occurring error, the screen displays the cause of error that is
self-explanatory with audible sound.
Check connection ...
Reversed polarity
The output is connected to a battery with incorrect polarity.
STOP/ESC
Check charger ...
Over-temperature
The internal temperature of the unit goes too high. Cool down the unit.
STOP/ESC
Check connection ...
Connection break
STOP/ESC
Check cell-count ...
Incorrect cell-count
This will be displayed in case of detecting an interruption of the
connection between battery and output or voluntarily disconnecting the
charge lead during the operation of charge or discharge on output.
The cell-count of Lithium battery pack was selected incorrectly. Verify the
cell-count carefully.
STOP/ESC
Check charger ...
Break-down
There happens the malfunction at the charger circuit by any reason. The
charger should be repaired at the factory.
STOP/ESC
Check connection ...
Short-circuit
There is a short-circuit at output. Please check the charging leads or
output cable of battery pack.
STOP/ESC
Check battery ...
Low voltage
The charger detects the voltage is lower than you set at Lithium program.
Please check the cell-count of the battery pack.
STOP/ESC
Check battery ...
High voltage
The charger detects the voltage is higher than you set at Lithium program.
Please check the cell-count of the battery pack.
STOP/ESC
Check balancer ...
Comm. error
The balancing circuit had been damaged. The balance function can not be
used, and the charger needs to be repaired at our factory.
STOP/ESC
Balance error ...
Low cell vol.
The voltage of one of the cell in the Lithium battery pack is too low. Please
check the voltage of cells one by one.
STOP/ESC
Balance error ...
High cell vol.
The voltage of one of the cell in the Lithium battery pack is too high.
Please check the voltage of cells one by one.
STOP/ESC
Balance error ...
Bad connection
There are bad connection at the individual connector. Please check the
connector and cables carefully.
STOP/ESC
Balance error ...
Ref. data fail
The charger can not read out the individual voltages correctly because of
malfunction of main processor. The charger needs to be repaired.
STOP/ESC
Check power ...
Low input volt
STOP/ESC
The voltage of input power drops below the limit.
- 21 -
Glossary of terms
Amps(A): The unit of measure for charge or discharge electric current. The program of the charger will
show most of the current in amps(A) at its LCD screen.
Milliampere(mA): The electric current, being amps(A) multiplied by 1000 and noted as 'mA'. So 2.0A is
the same as 2000mA (2.0x1000). Or, to convert mA to amps, divide the mA number by 1000. So 200mA
is the same as 0.2A. If a current value is below 1.0A, the LCD screen of the charger will still show the
current in amps, not milliampere. For example, a current of 600mA will be displayed as 0.6A, and a
current of 100mA will actually be shown as 0.1A.
Capacity,milliampere hours (mAh), and amp-hours (Ah): Charge energy stored by a battery is called
capacity, which is defined as how much current a battery can supply constantly over one hour of time.
Most hobby batteries are rated for capacity in 'mAh' or milliampere hours. A 650mAh battery can deliver
650mA of current for one hour (650mAx1hr = 650mAh). The batteries of very large capacity, such as
lead-acid(Pb) batteries, are usually rated in 'Ah' or amp-hours. A '12V 60Ah' car battery can deliver 60
amps of current for one hour (60Ax1hr = 60Ah).
Nominal voltage(V): The nominal voltage of the battery pack can be determined as follows;
-.NiCd or NiMH: multiply the total number of cells in the pack by 1.2. A 8-cell pack will have a nominal
voltage of 9.6 volts (8x1.2).
-.LiPo: multiply the total number of cells in the pack by 3.7. A 3-cell LiPo wired in series will have a
nominal voltage of 11.1 volts (3x3.7).
-.LiIo: multiply the total number of cells in the pack by 3.6. A 2-cell LiIo wired in series will have a nominal
voltage of 7.2 volts (2x3.6).
-.LiFe: multiply the total number of cells in the pack by 3.3. A 4-cell LiIo wired in series will have a
nominal voltage of 13.2 volts (4x3.3).
If the nominal voltage of the battery is not printed on the battery's label, consult your battery
manufacturer or supplier. Do not guess the rated voltage of battery.
'C'-rating: Capacity is also referred to as the 'C' rating. Some battery suppliers recommend charge and
discharge currents based on the battery 'C' rating. A battery's '1C' current is the same number as the
battery's rated capacity number, but noted in mA or amps. A 600mAh battery has a 1C current value of
600mA, and a 3C current value of (3 x 600mA) 1800mA or 1.8A. The 1C current value for a 3200mAh
battery would be 3200mA (3.2A).
- 22 -
Maximum circuit power chart
For the voltage of battery is more than 16V, the actual amount of charge current feeds to the battery
might automatically be limited, so not to exceed the charger's maximum rated charging power of 160
watts at an output channel. And also, for the battery having more than 5V, the discharge current delivered
to the battery might be limited by the maximum rated discharge power of 25 watts per output.
Maximum charge/discharge current at 12V DC input
NiCd/NiMH
LiPo
LiFe
Pb
No. of cells
1
2
3
4
5
6
7
8
9
10
11
12
13
14
15
16
17
18
19
20
21
22
1S
2S
3S
4S
5S
6S
7S
8S
1S
2S
3S
4S
5S
6S
7S
8S
Rated voltage(V)
1.2
2.4
3.6
4.8
6.0
7.2
8.4
9.6
10.8
12.0
13.2
14.4
15.6
16.8
18.0
19.2
20.4
21.6
22.8
24.0
25.2
26.4
3.7
7.4
11.1
14.8
18.5
22.2
25.9
29.6
3.3
6.6
9.9
13.2
16.5
19.8
23.1
26.4
6.0
8.0
10.0
12.0
14.0
16.0
18.0
20.0
22.0
24.0
26.0
28.0
Charge current(A)
9.0
9.0
9.0
9.0
9.0
9.0
9.0
9.0
9.0
9.0
9.0
9.0
9.0
9.0
8.9
8.3
7.8
7.4
7.0
6.7
6.3
6.1
9.0
9.0
9.0
9.0
8.6
7.2
6.2
5.4
9.0
9.0
9.0
9.0
9.0
8.1
6.9
6.1
9.0
9.0
9.0
9.0
9.0
9.0
8.9
8.0
7.3
6.7
6.2
5.7
- 23 -
Discharge current(A)
5.0
5.0
5.0
5.0
4.2
3.5
3.0
2.6
2.3
2.1
1.9
1.7
1.6
1.5
1.4
1.3
1.2
1.2
1.1
1.0
1.0
0.9
5.0
3.4
2.3
1.7
1.4
1.1
1.0
0.8
5.0
3.8
2.5
1.9
1.5
1.3
1.1
0.9
4.2
3.1
2.5
2.1
1.8
1.6
1.4
1.3
1.1
1.0
1.0
0.9
Specifications
Operating voltage range :
Circuit power :
Charge current :
Discharge current :
NiCd/NiMH battery cell count :
Lithium battery cell count :
Pb battery voltage :
Battery data memory :
Battery capacity range :
Delta-peak sensitivity :
Temperature cut-off range :
Trickle charge current :
Cycle count :
Cycle cool-off waste time :
Current drain for balancing Lixx :
Weight :
Dimensions :
10.0 ~ 18.0V DC
12V Lead-acid battery or equivalent high power PSU
Charge
max. 160W per output
Discharge max. 25W per output
0.1 ~ 9.0A
0.1 ~ 5.0A
1 ~ 22 cells at an output
1 ~ 8 series at an output
2 ~ 28V at an output
5 memories per program
100 ~ 65000mAh
Disable/Delicate/5 ~ 20mV adjustable
20 ~ 80C/68 ~ 176F
Off, 50 ~ 300mA adjustable (N/A for Lixx)
1 ~ 10 times (N/A for Lixx)
0 ~ 60 minutes adjustable
200mAh/cell
1100 g
200 X 150 X 55 mm
Warranty and service
We warrant this product for a period of one year (12 months) from the date of purchase. The guarantee
applies only to such material or operational defects, which are present at the time of purchasing the
product. During that period, we will repair or replace without service charge any product deemed
defective due to those causes. Any repairs carried out under warranty do not extend the original
warranty period. You will be required to present proof of purchase (invoice or receipt). The defective unit
has to be sent to us by pre-paid delivery; we will pay for return shipping cost. This warranty does not
cover the damage due to wear, overloading, incompetent handling or using of incorrect accessories.
BANTAM Inc.
#623 Unitech Ville 1141-2
BAEKSEOKDONG ILSANDONGGU
GOYANGSI KYUNGGIDO
KOREA 410-722
Phone: +82 31 904 3939, Fax: +82 31 901 6439
E-mail: [email protected]
Web: www.bantamtek.com
Date of purchase/delivery :
Dealer :
Electrical equipment marked with
the cancelled waste bin symbol
must not be discarded in the
standard household waste; instead it should
be taken to a suitable specialist disposal
system.