1
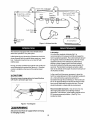
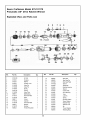
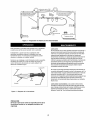
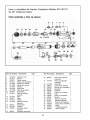
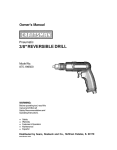
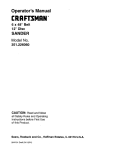
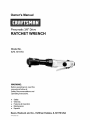
Owner's Manual
Pneumatic 3/8" Drive
RATCHET WRENCH
Model No.
875.191170
WARNING:
Before operating tool, read this
manual and follow all
Safety Recommendations
Operating Instructions.
•
•
•
•
Safety
Warranty
Features & Operation
Maintenance
•
EspaSol
and
Sears, Roebuck and Co., Hoffman Estates, IL 60179 USA
w3_rw.sears.cGn_
FULL TWO YEAR WARRANTY ON
CRAFTSMAN AIR-DRIVE TOOLS
If this Craftsman tool fails to give complete satisfaction
within two years from the date of purchase, RETURN IT
TO THE NEAREST SEARS STORE IN THE UNITED
Read Operating instructions
Please become familiar with all the instructions and
warnings before operating any pneumatic tool.
Always Wear Approved Eye Protection
Impact resistant eye protection should meet or exceed
the standards set forth in ANSI Z87.1, Occupational and
Educational Eye and Face Protection. Look for marking
Z87.1 on your eye protection to ensure that it is an
approved style.
Hearing Protection is Recommended
Hearing protection should be used when the noise level
exposure equals or exceeds an 8 hour time-weighted
average sound level of 85dBA. Process noise, reflective
surfaces, other tools being operated nearby, all add to the
noise level in a given work area. If you are unable to
determine your noise level exposure, we recommend the
use of hearing protection.
Avoid Prolonged Exposure to Vibration
Pneumatic tools can vibrate during use. Prolonged
exposure to vibration or very repetitive hand and arm
movements can cause injury. Discontinue the use of any
tool if you experience tingling, numbness, discomfort or
pain in your hands or arms. You should consult your
physician before resuming use of tool.
90 PSiG Maximum
This tool is designed to operate at an air pressure of 90
pounds per square inch gauge pressure (90 PSIG)
maximum, at the tool. Use of higher air pressure can, and
may cause injury. Also, the use of higher air pressure
places the internal components under loads and
stresses they were not designed for, causing premature
tool failure.
NOTE: THE AIR SUPPLY SHOULD BE CLEAN, DRY AND
PREFERABLY LUBRICATED. FOR BEST RESULTS
DRAIN THE MOISTURE FROM YOUR COMPRESSOR
DAIL_
Use Only Impact Sockets & Accessories
Sockets and accessories used shall be of the impact
socket type. Always check sockets, retainers and drives
regularly for wear or damage and replace when
necessary.
STATES, and Sears will repair it free of charge. If this
Craftsman tool is used for commercial or rental
purposes, this warranty applies for only 90 days from the
date of purchase. This warranty gives you specific legal
rights, and you may also have other rights which vary
from state to state.
Sears, Roebuck and Co. Dept. 817WA, Hoffman
Estates, iL 60179.
The Companion Model 875.191170 3/8" Drive
Ratchet Wrench is designed for applications such as
automotive repair, general assembly, transmission
teardown and maintenance. Features include a lever
throttle for speed control and low profile head for work in
close quarters.
Features
Lever throttle for ease of operation.
1-1/8" Ratchet head height (without socket) for use in
close-quarter applications.
Front exhaust directs air away from operator.
Specifications
Maximum Torque .........................................
Air inlet ........................................................
45 ft.-Ibs.
1/4" NPT
Maximum operating pressure .......................... 90 PSI
Free speed ..................................................
160 RPM
Air consumption ..............................................
4 CFM
Drive size .............................................................
3/8"
Overall length ........................................................
10"
Weight ...........................................................
2½ Ibs.
Hose Size ............................................................
3/8"
Pre-Operation
[ WARNINGI
Before the tool is connected to the air supply, clear the air
hose of accumulated dust and moisture by running air
freely through the air hose for 5-19 seconds. Before
removing a tool for service or changing sockets, make
sure the air line is shut-off at the compressor. This will
prevent the tool from operating if the throttle is accidenfiy
engaged.
Installation
(See figure 1)
Some dust created by power sanding, sawing, grinding,
drilling and other construction activities contains chemicals known to cause cancer, birth defects or other
reproductive harm. Some examples of these chemicals
are:
This tool is designed to operate at 99 psi. Lower pressure (below 90 psi) will reduce performance of the tool
while higher air pressure (over 90 psi) raises the performance of the tool beyond its rated capacity and could
cause serious damage to tool and user.
Lead from lead based paint
crystalline silica from bricks and cement
and other masonry products, and
arsenic and chromium from chemicallytreated lumber.
Always use clean dry air. Excessive moisture and dirt will
greatly reduce the life of any air motor. We recommend
the installation of an in-line filter-regulator-lubricator
as
close to the tool as possible.
Your risk from those exposures varies, depending on how
often you do this type of work. To reduce your exposure to
these chemicals: work in a well ventilated area, and work
with approved safety equipment, such as dust masks that
are specifically designed to filter out microscopic particles.
(2)
A 3/8" air hose is required up to
hose is required a 1/2" air hose
compressor. Attach a 3/8" whip
4 - 8 ft. for flexibility. Be sure all
correct size and tightly secured
a length of 8 ft. If more
should be used at the
hose for the remaining
hoses and fittings are the
before using air tool.
More than 1/100 slope
JI
Main line = 3 times
Tool inlet/hose size
Filter
Stop
Valve
Lubricator
olinlet_ose_
Stop
Valve!
AutoDrain
Iianch
line=2times
VaIve
to Drain
lye
Air Tool
Figure 1 * Air Hose Hook Up
This ratchet is equipped with a lever throttle which
allows the operator to vary the speed.
Lubrication
An in-line fitter-regulator-lubricator (fig 1) is
recommended as it increases tool life and keeps the
tool in sustained operation. The in-line lubricator should
be regularly checked and filled with air toot oil. Proper
adjustment of the in-line lubricator is performed by
placing a sheet of paper next to the tools exhaust
ports and holding the throttle open approximately 30
seconds. The lubricator is properly set when a light
stain of oil collects on the paper. Excessive amounts of
oil should be avoided.
Initial tightening and loosening of fasteners should be
done manually with the ratchet being used as a hand
tool. Fasteners maythen be run on and off with
relative ease.
During use keep socket firmly against work surface to
avoid dislodging the socket from the anvil. Direction
control is located on the back of the ratchet head
(Fig 2).
In the event that it becomes necessary to store the
tool for an extended period of time (overnight, weekend,
etc.), it should receive a generous amount of
lubrication through the air inlet (fig 2). The tool should
be run for approximately 30 seconds to ensure oil has
been evenly distributed throughout the tool. The tool
should be stored in a clean and dry environment.
I ICAUTiONI
Excessive torque leverage above tool specifications
will result in premature gear wear.
1t_7I;<Ii!7
Recommended lubricants:
Use air tool oil orany
other high grade turbine oil containing moisture
absorbent, rust inhibitors, metal wetting agents and an
EP (extreme pressure) additive. (See Fig. 2 for
location/air inlet).
Figure 2 - Tool Diagram
IAiWARNING]
Disconnect tool from air supply before servicing
or changing sockets.
(3)
Sears Craftsman Model 875.191170
Pneumatic 3/8" Drive Ratchet Wrench
Exploded
View and Parts List
9
8
7
6
33
5
35
36
37
32
Ref.
Part No.
Description
Description
Qty.
1
910341B
Air Inlet
1
19
2
910302
Housing
1
20
962824
Idler Gear
1
965825
Idler Gear Pin
3
910303
Roll Pin
1
1
21
9110321
Idler Gear Plate
1
4
910304
Throttle
5
9110305
Valve Pin
1
22
9110322
Spacer
1
1
23
910323
Clamp Nut
6
9110306
1
Valve Pin
1
24
910324
Ratchet Housing
7
1
9110307
Spring
1
25
962829
Spacer
1
8
9103120
O Ring
1
26
910326
Crank Shaft
1
9
9110309
Valve Plug
1
27
910327
Drive Bushing
1
10
11
965815
9110311
Ball Bearing
Rear End Plate
1
1
28
910328
Yoke
1
29
910329
Lock Pin
1
12
9110312
Rotor
1
13
962817
Vanes
1
30
31
910330
910331
Spring
Reverse
14
15
9110314
9110315
Cylinder
Front end Plate
1
1
32
910332
Wave Washer
2
33
910333
Ratchet Pawl
1
16
17
962821
9110317
Bearing
Washer
1
1
34
910334
Ratchet Anvil
1
35
962840
Pin
1
18
962823
Thread Ring Gear
1
36
910338
Thrust Washer
1
37
962844
Retaining Ring
1
Lever
Qty.
Ref.
(4)
Part No.
Button
1
1
Troubleshooting
Tool runs slowly or will not operate
1. Grit or gum in tool
1, Flush the tool with air tool oil or gum
solvent.
2. No oil in tool
2. Lubricate the tool according to the lubrication
instructions in this manual
3. Adjust the compressor regulator to tool maximum of 90 psi.
4. Tighten and seal hose fittings if leaks are found.
Use teflon tape.
5. a. Be sure the hose is the proper size. Long
hoses or tools using large volumes of air may
require a hose with an I.D. of 1/2" or larger
depending on the total length of the hose
b. Do not use a multiple number of hoses
connected together with quick connect fittings.
This causes additional pressure drops and
reduces the tool power. Directly connect the
hoses together
6. Replace rotor blade
7. Remove and inspect bearing for rust, dirt and
grit. Replace or clean and grease bearing with
bearing grease
3. Low air pressure
4. Air hose leaks
5. Pressure drops
6. Worn rotor blade in motor
7. Worn ball bearing in motor
Moisture blowing out of tool exahust
1, Water in tank
1. Drain tank, (See air compressor manual). Oil tool
and run until no water is evident. Oil tool again and
run 1-2 seconds
(5)
Lea las instrucciones de operacibn
Por favor famiiiaricese con todas ias instrucciones y
advertencias antes de operar cualquier herramienta
neum_tica.
Siempre use proteccibn aprobada para la vista
La protecci6n a la vista resistente al impacto debe
satisfacer o exceder las normas establecidas en ANSi
Z87.1, Protecci6n Educativa y Ocupacional de los Ojos y
el Rostro. Busque la marca Z87.1 en su protecci6n de la
vista para asegurarse que es un estilo aprobado.
Se recomienda proteccibn del Dido
La protecci6n del Dido debe usarse cuando la exposici6n
al nivel del ruido iguaia o excede un nivel promedio de
sonido ponderado de tiempo en 8 horas, de 85dBA.
Ruido del proceso, superficies reflectoras, otras
herramientas que se operan en ia cercania, todos
agregan al nivel del ruido en una _rea de trabajo dad& Si
usted no puede determinar su exposici6n al nivel de
ruido, recomendamos el use de protecci6n de Dido.
Evite exposicibn prolongada a la vibrscibn
Las herramientas neum_ticas pueden vibrar durante el
uso. Una exposici6n prolongada a la vibraci6n o
movimientos muy repetitivos de ia mano y el brazo
pueden causar lesiones. DiscontinQe el uso de
cuaiquiera
herramienta si usted experimenta cosquilleo,
entumecimiento, incomodidad o dolor en sus manos o
brazos. Usted debe consultar con su medico antes de
reanudar el uso de herramienta.
90 PSI milximas
Esta herramienta est_ disefiada para operar a una
presi6n atmosf6rica m_xima de 90 libras por pulgada
cuadrada de medidor de presi6n (90 PSI), en la
herramienta. El uso de presiones atmosf6ricas m_s
altas puede causar iesiones. Tambi6n, el uso de
presiones atmosf6ricas m_s aitas coloca a los
componentes interiores bajo cargas y tensiones para las
que no fueron disefiados, causando una falla prematura
de la herramienta.
HERRAMIENTAS
La Ilave a cremallera de impulso Companion Modelo 875.191170
de 3/8" est_ dlsefiada para aplicaciones tales como reparaciones
automotrices, ensamble general, desarmado y mantenimiento de
transmisiones.
Las caracteristicas incluyen una acelerador
a palanca para el control de velocidad y un cabezal de bajo
perfil para trabajos en espacios estrechos.
Caracteristicas
•
Acelerador a palanca para facilidad de operaci6n.
•
Altura del cabezal a cremallera de 1-1/8" (sin cubo) para usar
en aplicaciones en espacios estrechos.
•
Escape delantero dirige el escape de aire alejado del
operador.
NOTA: EL SUMiNISTRO NEUMATiCO DEBE ESTAR
LIMPIO, SECO Y PREFERENTEMENTE LUBRIFICADO.
PARA OBTENER LOS MEJORES RESULTADOS, DRENE
DiARiAMENTE LA HUMEDAD DE SU COMPRESOR.
Use sblo cubes y accesorios contra impacto
S6io use cubos designados PARA USO CON LLAVES DE
iMPACTO .Los cubos de la herramienta manual pueden
romperse, creando un riesgo por ]as piezas expeiidas.
inspeccione siempre regularmente los cubos,
retenedores e impulsores por desgaste o dafios y
reempiace cuando sea necesario.
Espeeificaciones
Par torsor m_ximo ..................................
Entrada neum_tica .................................
45 pies. libras
1/4" NPT
Presi6n max. de operaci6n ....................
Velocidad libre ........................................
Consumo neum_tico ...............................
Tamafio del impulsor ..............................
Largo total ...............................................
Peso .........................................................
Tamafio de la manguera .........................
90 PSi
160RPM
4PCM
3/8"
10"
2 1/2 Ibs.
3/8"
Pre-Operacibn
Antes que la herramienta
se conecte al suministro
neum&tico,
limpie ia manguera neum&tica de polvo y humedad acumulados,
haciendo circular aire a trav6s de la manguera neum_tica durante
5-10 segundos. Antes de extract una herramienta para prestar
servicio o cambiar cubos, asegt_rese que la tuberia neum&tica est6
cerrada en el compresor. Esto evitar_ que la herramienta funcione
si el acelerador se activa accidentalmente.
Instalacibn
(Yea la figura 1}
Esta herramienta est& disefiada para operar a 90 psi, una presi6n
menor (menor de 90 psi) reduce el rendimiento de la herramienta,
mientras que una presi6n neum_tica mayor (mayor de 90 psi)
eleva el rendimiento de la herramienta m_s all_ de su capacidad
nominal y puede causar lesiones graves y daf_os extensos al
usuario y a ia herramienta.
ADVERTENCIA
Aigo del polvo creado por iijado, aserrado, desgastado
mec_nico, y otras actividades de construcci6n, contienen
quimicos conocidos coreD causantes de c_ncer,
defectos cong6nitos o otras iesiones al sistema
reproductivo. Aigunos ejemplos de estos quimicos son:
•
El plomo en la pintura basada en plomo.
•
La silice cristalina de los iadrillos y cemento
y otros productos de albafiileria, y el ars6nico y
cromo de ia madera quimicamente tratada.
Su riesgo de esas exposiciones varia, dependiendo de
cu_n a menudo usted hace este tipo de trabajo. Para
reducir su exposici6n a estos quimicos: trabaje en una
_rea bien ventilada, y con un equipo de seguridad
aprobado, como m_scaras protectoras contra el polvo
que se disefian especificamente
para filtrar particulas
microsc6picas.
DE OPERACION NEUMATICA CRAFTSMAN
Siesta herramienta Craftsman no ie proporciona una satisfacci6n
compieta dentro de los dos afios de la fecha de compra,
DEVUELVALAA LATiENDA MAS CERCANA DE SEARS EN LOS
ESTADOS UNIDOS, y Sears la reparaci6n libre de cargo. Siesta
herramienta Craftsman se usa para fines comerciales o de alquiler,
esta garantfa s61ose aplica durante 90 dias desde la fecha de
compra. Esta garantia le proporciona derechos iegales
especificos, y usted tambi6n puede tener otros derechos que
varian de estado a estado.
Sears, Roebuck y Cia., Dept. 817WA, Hoffman
Estates, IL 60179.
Use siempre aire limpiD seco. Una humedad y suciedad excesivos
reducir_ substancialmente
la duraci6n de cualquier motor
neum_tico. Recomendamos
la instalaci6n de un filtro-reguladorlubricador en linea tan cerca como sea posible de la herramienta.
Se requiere una manguera neum_tica de 3/8" hasta un largo de 8
pies. Si se requiere una largo mayor debe usarse una manguera
neum_tica de 1/2" en el compresor. Fije una manguera de tipo
"l&tigo" de 3/8" para los 4-8 pies restante, por flexibilidad. Antes
de usar la herramienta neum&tica, asegQrese que todas las
mangueras y adaptadores scan del tamafio correcto y est6n bien
asegurados
(6)
_.,
_]
In_inaciOn
m_sde 1/100
-
Tu
Filtro
tamaao d
_i_TUnbenc_
deerlla
la_ahdear
r a12iVeenC
e _ la
V41vula
Regulador
rl
rln I I
v
la ]-_
be ap
cpa =3 eces
entrada
de la herramienta/
Ve% ro
V_lvula de
autodrenaje
aire
Compresor
.,%\\.,\\\\\\..t
Figura
1 - Preparaci6n
de Tuberia
de Aire
Esta herramienta a cremallera est& equipada con un acelerador
a palanca que permite que el operador varie la velocidad.
\\
Recomendada
Lubricacide
Se recomienda usar un flltra-reg ulador-lubricador en linea (fig 1)
ya que incrementa la duraciOnde la herramienta y mantiene la
misma en una operaci6n sostenida, El lubricador en llnea debe
inspeccionarse regularmente y Ilenarse con aceite para
herramientas neum&ticas, Un ajuste apropiado del lubricador en
linea se efectQa co]ocando una haja de papel cerca de los
orificios de escape neum&ticos de la herramienta y manteniendo
el acelerador abierto par 30 segundos aproximadamente, El
lubdcador est_ aprapiadamente regulado cuando una mancha
leve de aceite se deposita sabre el papeL Deben evitarse
cantidades excesivas de aceite.
El aflojamiento y ajuste inicial de los sujetadores debe
efectuarse manualmente usando la cremallera coma una
herramienta manual. A continuaci6n los sujetadores
colocarse y extraerse con relativa facilidad.
de aire
pueden
Durante el usa mantenga el cuba firmemente contra la superficie
de trabajo para evitar que el cuba se separe del yunque. El
control de direcciOn esta ubicado en la parte posterior del
cabezal de cremallera (Fig,2),
En el caso que se haga necesario almacenar la herramienta par
un periodo prolongado (durante la noche, fin de semana, etc,), ]a
misma debe recibir una gran cantidad de lubricaci6n a trav6s de
la entrada neum_tica (fig 3). La herramienta debe hacerse
funcionar par 30 segundos aproximadamente para asegurar que
el aceite se haya distribuido uniformementa a trav6s de ]a
herramienta, La herramienta debe almacenarse en un ambiente
limpio y seco.
Lubricantes recomendados: Use aceite de herramienta
neum&tica o cualquier otro aceite de turbina de grado elevado
que contenga un absorbenta de humedad, inhibidores de 6xido,
agentas humectantes de metal y un aditivo EDP (presi6n
extrama), (Vea la Fig, 3 par la ubicaci6n/entrada neum&tica),
Figura 2 - Diagrama
de la herramienta
PRECAUCION
El forzar el par torsor sabre las especificaciones de la
herramienta resulta en un desgaste prematuro del
engranaje
(7)
Llave a cremallera de impulso
de 3/8" Craftsman Sears
Vista ampliada
Companion
Modelo 875.191170
y lista de piezas
9
8
7
6
5
_ 33
35
36
37
28
Ref. No. depieza
8
9
16
11
910341B
910362
910303
910304
9110306
9110306
9110307
9103120
9110309
965815
9110311
12
13
14
15
9110312
962817
9116314
9110315
16
17
18
962821
9110317
962823
19
962824
2
3
4
5
6
Descripcibn
Entrada de aire
Recinto
Clavija rodante
Palanca del acelerador
Clavija de la v_lvula
Clavija de la vblvu]a
Resorte
Anillo t6rico
Tap6n de la v_lvula
Rodamiento
Placa del extremo
posterior
Rotor
Aletas
Cilindro
Placa del extremo
delantero
Rodamiento
Arandela
Engranaje anular
roscado
Engranaje intermedio
Cant.
1
1
1
1
1
1
1
1
1
1
1
1
1
1
1
1
1
Ref. No. depieza
20
965825
21
9110321
22
23
24
25
26
27
28
29
30
31
32
33
34
38
36
37
9116322
910323
916324
962829
910326
910327
916328
910329
916330
910331
910332
910333
916334
962840
910338
962844
1
1
(8)
Descripcibn
Cant.
Clavija del engranaje
intermedio
Placa del engranaje
intermedio
Separador
Tuerca de la mordaza
Recinto de la cremallera
Separador
CigL_eSal
Cojinete del impulsor
Yugo
Clavija de seguridad
Resorte
Bot6n de retroceso
Arandela ondulada
Ret6n de la cremailera
Yunque de la cremallera
Clavija
Arandela de empuje
Anillo retenedor
1
1
1
1
1
1
1
1
1
1
1
1
2
1
1
1
1
1
Localizacibn
de fallas
La herramienta funciona con lentitud o no funciona
1. Suciedad o goma en la herramienta
1. Limpie la herramienta con aceite de herramienta
neum_tica o solvente para goma.
2. No hay aceite en la herramienta
2. Lubrique la herramienta de acuerdo con las
instrucciones de lubricaci6n en este manual
3. PresiSn neum_tica
3. Ajuste el regulador del compresor
la herramienta de 90 psi.
baja
4. Pedida de la manguera neum_tica
4. Ajuste y selle los adaptadores de la manguera si
se hallan p6rdidas. En ese caso use cinta de tefl6n.
5. Baja de presiSn
5. a. Asegt]rese que la manguera tenga el tamaSo
apropiado. Mangueras largas o herramientas que
usan un gran volumen de aire pueden requerir una
manguera con un di_metro interno de 1/2" o mayor
dependiendo de la Iongitud total de la manguera.
b. No use una cantidad mt]ltiple de mangueras
conectadas juntas con adaptadores de conexiSn
r_pida. Esto causa caidas de presiSn adicionales y
reduce la potencia de la herramienta. Conecte
directamente las mangueras juntas
6. Hoja del rotor desgastada
motor
7. Rodamiento
motor
Escape hQmedo de la
herramienta
a la m_xima de
desgastado
en el
en el
1. Agua en el tanque
6. Reemplace
la hoja del rotor
7. Extraiga e inspeccione el rodamiento por
desgaste, suciedad y hollin. Reemplace o limpie y
engrase el rodamiento con grasa para rodamientos
1. Drene el tanque. (Vea el manual del compresor
neum_tico). Aceite la herramienta y haga funcionar
hasta que no sea evidente la presencia de agua.
Aceite nuevamente la herramienta y haga funcionar
por 1-2 segundos
(9)
Your Home
For repair - in your home - of all major brand appliances,
lawn and garden equipment, or heating and cooling systems,
no matter who made it, no matter who sold it!
For the replacement parts, accessories and
owner's manuals that you need to do-it-yourself.
For Sears professional installation of home appliances
and items like garage door openers and water heaters.
1-800-MY-HOME ® (1-800-469-4663)
Call anytime, day or night (U.S.A. and Canada)
www.sears.com
www.sears.ca
Our Home
For repair of carry-in items like vacuums, lawn equipment,
and electronics, call or go on-line for the location of your nearest
Sears Parts & Repair Center.
1-800-488-1222
Call anytime, day or night (U.S.A. only)
www.sears.com
To purchase
a protection agreement
1-800-827-6655
(U,S,A.)
on a product serviced by Sears:
1-800-361-6665
(Canada)
For after sale
support and assistance
1-800-290-9054
® Registered Trademark / TMTrademark / SMService Mark of Sears, Roebuck and Co.
® Marca Registrada / TM Marca de F_brica / SMMarca de Servicio de Sears, Roebuck and Co.
MCMarque de commerce / MDMarque d6pos6e de Sears, Roebuck and Co.
© Sears, Roebuck
and Co.