1
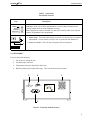
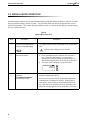
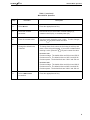
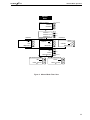
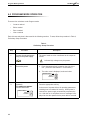
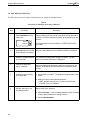
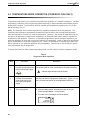
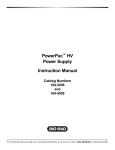
POW
ER
PAC
3000
1
2
3
4
–+
5
6
7
–+
8
9
EXIT
–+
0
CLR
–+
POWER
PAC 1000
AND
POWER
PAC 3000
INSTRUCTION MANUAL
Catalog Numbers
PowerPac 1000
165-5054
165-5055
PowerPac 3000
165-5056
165-5057
165-5058
165-5059
165-5060
POWER
PAC
Table of Contents
TABLE OF CONTENTS
Safety ................................................................................................................................................
2
Section 1.0
1.1
1.2
1.3
Introduction.................................................................................................................
Overview .....................................................................................................................
Features ......................................................................................................................
Unpacking ...................................................................................................................
4
4
5
5
Section 2.0 Control Features.........................................................................................................
2.1 Front Panel controls ....................................................................................................
2.2 Rear Panel ..................................................................................................................
6
6
7
Section 3.0 Manual Mode Operation.............................................................................................
8
Section 4.0
4.1
4.2
4.3
4.4
Program Mode Operation ..........................................................................................
Create and Run a Method...........................................................................................
Edit and Run a Method ...............................................................................................
View a Method ............................................................................................................
Run a Method..............................................................................................................
12
13
16
18
19
Section 5.0 Temperature Mode Operation (PowerPac 3000 only) ............................................
22
Section 6.0 Maintenance and Troubleshooting ...........................................................................
6.1 Maintenance................................................................................................................
6.2 Troubleshooting...........................................................................................................
27
27
27
Appendix A. Specifications ............................................................................................................
Appendix B. Warranty and Ordering Information ........................................................................
30
33
List
1.
2.
3.
4.
5.
6.
7.
of Figures
PowerPac 3000 Power Supply ................................................................................................
PowerPac Rear Panel..............................................................................................................
Manual Mode Flow Chart.........................................................................................................
Create Method Flow Chart.......................................................................................................
Display while Programmed Method is in Progress ..................................................................
Display upon Completion of Method ........................................................................................
Temperature Mode Flow Chart (PowerPac 3000 only)............................................................
4
7
11
15
20
21
26
List
1.
2.
3.
4.
5.
6.
7.
8.
9.
of Tables
Front Panel Controls ................................................................................................................
Manual Mode Operation ..........................................................................................................
Preliminary Setup Procedure ..................................................................................................
Procedure for Creating and Running a Method .......................................................................
Procedure for Editing and Running a Method .........................................................................
Procedure for Viewing a Method..............................................................................................
Procedure for Running a Stored Method .................................................................................
Temperature Mode Operation (PowerPac 3000 only) .............................................................
Examples of Power Requirements...........................................................................................
6
8
12
13
16
18
19
22
25
1
Safety
POWER
PAC
SAFETY
!
Caution/Warning
PowerPac power supplies use high output voltages that are electrically isolated from
earth ground to minimize the risk of electrical shock to the user. The following guidelines should be observed and followed when using a PowerPac power supply.
PowerPac power supplies have passed tests for operation at temperatures between 0°
and 40° C, with relative humidity between 0 and 95% non-condensing. Operating the
power supply outside these conditions is not recommended by Bio-Rad and will void the
warranty.
1. To ensure adequate cooling of the power supply, be sure that there is at least 6 cm clearance
around the power supply. Do not block the fan vents at the rear of the unit.
2. Always connect the power supply to a 3-prong, grounded AC outlet, using the 3-prong AC power
cord provided with the power supply.
3. Bio-Rad electrophoresis cells have molded two-prong plugs which are inserted into the power supply’s high voltage output jacks. These plugs have been I.E.C. 1010 certified for safety compliance
for use with PowerPac power supplies. Use of other plugs or banana jacks is done at the user’s
own risk and is not recommended by Bio-Rad. When inserting and removing the molded two-prong
plug, always grasp the plug by the molded support at the rear of the plug. Do not grasp the individual prong ends!
4. Do not operate the power supply in extreme humidity (≥95%) or where condensation can short the
internal electrical circuits of the power supply.
5. When taking the power supply into a cold room, the unit can be operated immediately. However,
when removing the power supply from the cold room, let the unit equilibrate to room temperature for
a minimum of 2 hours before using it.
6. Never connect a high voltage output lead to earth ground. This defeats the floating electrical isolation of the power supply and exposes the user to potentially lethal high voltages. The PowerPac will
detect ground leakage and automatically shut down the power supply.
7. The PowerPacs are designed to detect electrical arcing of the high voltage cables and to
automatically shut down.
2
POWER
PAC
Safety
Important
This instrument is intended for laboratory use only.
This product conforms to the class A standards for Electromagnetic Emissions, intended for laboratory
equipment applications. It is possible that emissions from this product may interfere with some sensitive
appliances when placed nearby or on the same circuit as those appliances. The user should be aware of
this potential and take appropriate measures to avoid interference.
Bio-Rad’s PowerPac power supplies are designed and certified to meet I.E.C. 1010* safety standards.
Certified products are safe to use when operated in accordance with the instruction manual. This safety certification does not extend to electrophoresis cells or accessories which are not I.E.C. 1010 certified, even
when connected to this power supply.
This instrument should not be modified or altered in any way. Alteration of this instrument will void the manufacturer’s warranty, void the I.E.C. 1010 certification, and create a potential safety hazard for the user.
Bio-Rad is not responsible for any injury or damage caused by the use of this instrument for purposes other
than those for which it is intended, or by modifications of the instrument not performed by Bio-Rad or an
authorized agent.
*I.E.C. 1010 is an internationally accepted electrical safety standard for laboratory instruments.
3
Introduction
POWER
PAC
1.0 INTRODUCTION
1.1 OVERVIEW
PowerPac power supplies provide constant voltage, power, and current for electrophoresis applications.
The PowerPac 3000 is ideal for DNA sequencing, isoelectrofocusing (IEF), and electrophoresis; the
PowerPac 1000 may be used for most isoelectrofocusing (IEF) applications, blotting, and general electrophoresis. Either PowerPac can be used also for SDS-PAGE, two-dimensional electrophoresis, native gel
electrophoresis, and horizontal DNA/RNA electrophoresis.
PowerPac 1000
Voltage output: Adjustable from 5 to 1000 volts dc (VDC) in increments of 1 volt.
Current output: Adjustable from 1 to 500 milliAmps (mA) in increments of 1 mA.
Power output:
Adjustable from 1 to 250 watts (W) in increments of 1 W
PowerPac 3000
Voltage output: Adjustable from 25 to 3000 volts dc (VDC) in increments of 1 volt.
Current output: Adjustable from 1 to 400 milliAmps (mA) in increments of 1 mA.
Power output:
Adjustable from 1 to 400 watts (W) in increments of 1 W
The PowerPac 1000 and PowerPac 3000 are fully programmable, with the capacity to store up to 9 separate
methods, with each method consisting of up to 9 steps. PowerPac default limit values for voltage, current,
and power are displayed when the unit first is turned on. These values may be changed for each application. PowerPac power supplies can run continuously, or they can be programmed to run under time or volthours control. Up to four electrophoresis cells can be connected to a power supply.
POW
ER
PAC
1
2
3
4
–+
5
6
7
–+
8
9
EXIT
0
–+
CLR
–+
Figure 1. PowerPac 3000 Power Supply
4
POWER
PAC
Introduction
PowerPac power supplies operate at the value specified by the constant parameter. However, to prevent
damage to your electrophoresis cell, PowerPacs provide automatic crossover to either constant current, constant voltage, or constant power, depending on which set value is first reached. When the set limit of a nonconstant parameter is reached, and the power capability of the unit is not exceeded, the power supply will
switch, making the non-constant parameter the new constant parameter.
1.2 FEATURES
PowerPac power supplies offer a number of features, including the following:
•
Constant voltage, constant power, or constant current operation with automatic crossover.
•
Continuous, timer, or volt-hour control.
•
Manual and Program modes of operation. In addition, the PowerPac 3000 offers Temperature mode
operation.
•
I.E.C. 1010 international safety certification.
•
Automatic detection of no-load, rapid change in resistance, arcing, short circuit, and ground leakage.
•
Automatic completion (if desired) of a run interrupted by a power failure.
•
Backlit LCD graphics display.
•
Stackable case.
•
Viewing angle adjustment provided by two position leg.
1.3 UNPACKING
When you receive the power supply, carefully inspect the container for any damage which may have
occurred in shipping. Severe damage to the container may indicate damage to the power supply itself. If
you suspect damage to the unit may have occurred, immediately file a claim with the carrier in accordance
with their instructions before contacting Bio-Rad Laboratories.
Unpack the power supply. PowerPac power supplies are shipped with the following:
•
Power supply unit.
•
3-prong, AC power cord.
•
User Manual.
If any part is missing or damaged, contact Bio-Rad Laboratories immediately.
5
Control Features
POWER
PAC
2.0 CONTROL FEATURES
2.1 FRONT PANEL CONTROLS
Table 1.
Front Panel Controls
POWER
PAC
1
2
3
POWER FAIL DETECT OFF
MANUAL >>
4
5
6
PROGRAM >>
7
8
9
EXIT
0
CE
–+
–+
Key
–+
–+
Description
Start key: Starts a run.
Stop key: Stops the run which is currently in progress. The end of run parameters
are displayed.
Pause key: Interrupts a run. The LCD displays the voltage, current and power at
the time the key was pressed. Power output is stopped. The run parameters cannot be changed during a pause.
To resume the run, press the
key.
EXIT
Exit key: Returns you to the main menu.
Clear Entry key: Allows you to clear or re-enter the displayed value.
CE
6
POWER
Control Features
PAC
Table 1. (continued)
Front Panel Controls
Key
Description
Soft keys: Allow you to select that parameter or execute that command on the
graphic display which is located adjacent to its key.
Note: Temperature mode is available only with the PowerPac 3000, and it requires
that the Temperature Probe be attached.
DETECT OFF
MANUAL >>
PROGRAM >>
MPERATURE >>
1
1. Power switch: Turns the power supply on and off. To turn the unit on, press the
side labeled “l” on the switch; to turn the unit off, press the side labeled “O”.
2
2. Power-on indicator: This is lit when the power switch is turned on.
2.2 REAR PANEL
Figure 2 shows the following:
1. Fan vents, for cooling the unit.
2. AC power input connector.
3. Temperature probe jack (PowerPac 3000 only).
4. RS-232 serial port (PowerPac 3000 only). This is reserved for a future option.
3
4
1
Made in U.S.A.
TEMPERATURE
PROBE JACK
RS-232 SERIAL
PORT
Model No.
Serial No.
Max Power
Frequency
PowerPac 3000
117BR
Circuit Breaker 8 A
600VA
100-130 V ~
50-60 Hz AC Voltage
CAUTION
WARNING
!
Warning: Disconnect supply before servicing.
Avertissement: Couper l'alimentation avant
l'entretien et depannage.
IEC
1010
2
Figure 2. PowerPac 3000 Rear Panel
7
Manual Mode Operation
POWER
PAC
3.0 MANUAL MODE OPERATION
PowerPac power supplies may be operated automatically using pre-defined methods, or may be run manually at a specified voltage, current, or power. The PowerPac 3000 may also be programmed to run at a
specified temperature. This chapter discusses Manual mode, in which the power supply is operated using
one set of parameters only.
Table 2.
Manual Mode Operation
Step
1.
Procedure
Connect the electrophoresis
cell(s) to the power supply.
–+
2.
Turn on the power.
Description
The power leads are color coordinated to the output terminals.
indicates high voltages may be present.
a. Press the Power switch, located on the side of the
unit. (Press the side labeled “l” on the switch.)
Note that the copyright screen and the firmware version number appear briefly when the unit is turned on.
b. The main menu is displayed, as shown below:
POWER FAIL DETECT OFF
MANUAL >>
PROGRAM >>
3.
8
(Optional)
Set POWER FAIL DETECT
from the main menu.
Press the appropriate soft key.
In the event of a power failure, all operating parameters
including time are retained in memory. When power is
restored, the power supply automatically completes the
run. After the run is completed, an error message is displayed to alert the operator that a power failure occurred.
POWER
Manual Mode Operation
PAC
Table 2. (continued)
Manual Mode Operation
Step
Procedure
Description
4.
Select Manual.
Press the appropriate soft key.
5.
Select the constant
parameter.
Use the soft key to select either constant voltage (V),
constant current (mA), or constant power (W).
6.
Enter the constant value.
Use the numeric keypad to enter a value. To make changes,
press the
key and re-enter the value.
CE
7.
Change the default limits,
if desired
To change these limits, select the limit using its soft key and
enter a value using the keypad. If you make a mistake when
entering a value, press the
key and re-enter the value.
CE
PowerPac 1000
Constant voltage: The default limits are 500 mA and 250 W.
Constant current: The default limits are 1000 V and 250 W.
Constant power: The default limits are 1000 V and 500 mA.
PowerPac 3000
Constant voltage: The default limits are 400 mA and 400 W.
Constant current: The default limits are 3000 V and 400 W.
Constant power: The default limits are 3000 V and 400 mA.
8.
Select TIME/V-HOUR
to continue.
Press the appropriate soft key.
9
Manual Mode Operation
POWER
PAC
Table 2. (continued)
Manual Mode Operation
Step
9.
Procedure
Description
Select one of the following:
a. TIME
a. TIME: To specify automatic time control. You may then
enter a time from 1 minute to 99 hours and 59 minutes.
After you have entered a value, press
to start the run.
b. V-HOUR
b. V-HOUR: To specify automatic volt-hour control for the run.
You may then enter a value from 1 to 99,999 volt-hours.
Volt-hours is the integration of voltage as a function of time.
By programming the unit to run for a specified number of
volt-hours, you get more accurate run-to-run reproducibility.
After you have entered a value, press
to start the run.
c.
Press
the run.
to start
c.
Pressing
will start the run. The run will continue until
you stop it, or the run is completed.
Note: The run may be stopped at any time using either of the
following keys:
Stops the run and displays the end-of-run parameters.
Interrupts operation of the power supply until the
key is pressed. During the pause, the LCD display
shows the status of the run at the time the key was
pressed. Run parameters cannot be changed during a
pause. If you do not wish to continue the run, press the
key.
10
POWER
Manual Mode Operation
PAC
Manual
Mode
(Optional)
POWER FAIL DETECT OFF
MANUAL >>
PROGRAM >>
CONSTANT V
>>
(Or)
CONSTANT mA >>
CONSTANT W
(Or)
>>
CONSTANT V
CONSTANT W
CONSTANT mA
CONSTANT
xV
xxx mA
CONSTANT
xxx W
xxxx V
xxxx V
x mA
xxx mA
xxx W
CONSTANT
xW
TIME/V-HOUR >>
TIME/V-HOUR >>
TIME/V-HOUR >>
SET: xxxx V / xxx mA / xxx W
TIME >>
(Or)
V-HOUR >>
PRESS
TIME
SET: xxxx V / xxx mA / xxx W
TIME 00:00
PRESS
TO RUN
TO RUN
(Optional)
V-HOUR
SET: xxxx V / xxx mA / xxx W
V-HOUR 00000
PRESS
TO RUN
Figure 3. Manual Mode Flow Chart
11
Program Mode Operation
POWER
PAC
4.0 PROGRAM MODE OPERATION
There are four selections under Program mode:
•
Create a method
•
Edit a method
•
Run a method
•
View a method
Each of these selections is discussed in the following sections. To start, follow the procedure in Table 3,
Preliminary Setup Procedure.
Table 3.
Preliminary Setup Procedure
Step
1.
Procedure
Connect the electrophoresis
cell(s) to the power supply.
–+
2.
Description
The power leads are color coordinated to the output terminals.
indicates high voltages may be present.
Turn on the power.
a. Press the Power switch, located on the side of the
unit. (Press the side labeled “l” on the switch.)
b. The main menu is displayed, as shown below:
POWER FAIL DETECT OFF
MANUAL >>
PROGRAM >>
3.
(Optional)
Set POWER FAIL DETECT
from the main menu.
POWER FAIL DETECT OFF
MANUAL >>
PROGRAM >>
12
Press the appropriate soft key.
In the event of a power failure, all operating parameters
including time are retained in memory. When power is
restored, the power supply automatically completes the
run. After the run is completed, an error message is displayed to alert the operator that a power failure occurred.
POWER
Program Mode Operation
PAC
4.1 CREATE AND RUN A METHOD
Table 4.
Procedure for Creating and Running a Method
Step
1.
Procedure
Select PROGRAM from the
main menu.
POWER FAIL DETECT OFF
MANUAL >>
PROGRAM >>
2.
Select CREATE to generate
a new method.
CREATE >>
MANUAL >>
Description
This procedure assumes you have set up the unit as discussed
in Table 3, Preliminary Setup Procedure, at the beginning of
this chapter.
The Program menu lists the following: CREATE, EDIT, RUN,
and VIEW.
Each step is defined by the following parameters:
•
•
Constant, which may be voltage, current or power.
Duration, which may be Time or Volt-hours.
PROGRAM >>
VIEW >>
3.
Specify the constant parameter for the step.
Select voltage (V), current (mA), or power (W) as the constant
value.
4.
Enter the constant’s value.
Use the keypad to enter a value.
5.
Change the default limits,
if desired.
To change these limits, select the limit to be changed and enter
a value using the numeric keypad.
PowerPac 1000
Constant voltage: The default limits are 500 mA and 250 W.
Constant current: The default limits are 1000 V and 250 W.
Constant power: The default limits are 1000 V and 500 mA.
PowerPac 3000
Constant voltage: The default limits are 400 mA and 400 W.
Constant current: The default limits are 3000 V and 400 W.
Constant power: The default limits are 3000 V and 400 mA.
6.
Program a run controlled
by time or volt-hours.
Select TIME/V-HOUR. You must specify time or volt-hours for
each step.
7.
Enter a value for time or
volt-hours.
TIME: Enter a value from 1 minute to 99 hours 59 minutes.
V-HOUR: Enter a value up to 99,999 volt-hours. Volt-hours is
the integration of voltage as a function of time.
13
Program Mode Operation
POWER
PAC
Table 4. (continued)
Procedure for Creating and Running a Method
Step
8.
Procedure
Program the next step or
save the program.
Description
Select either of the following:
a. If you are defining another step, select ADD STEP. Repeat
procedures 3 through 6 above.
b. If your method is complete, select SAVE PROGRAM.
9.
Enter the method number.
Using the keypad, select a number from 1 to 9.
Note: The available method numbers are listed. Choosing a
number which is not listed overwrites an existing method.
10.
Start the run or exit to the
main menu.
To start the run using the method’s new parameter values,
press
.
Figure 5 shows the contents of the Run screen.
Figure 6 shows the contents of the screen after completion of
a run.
To quit and return to the main menu, press the Exit key.
11.
To stop the run at any time,
press either of the following
keys:
The following keys can be used to stop the run before it is
completed:
Stops the run and displays the end-of-run parameters.
Interrupts operation of the power supply until the
key is pressed. During the pause, the LCD display
shows the status of the run at the time the key was
pressed. Run parameters cannot be changed during
a pause. If you do not wish to continue the run, press
the
key.
14
POWER
Program Mode Operation
PAC
Program Mode:
Creating a Method
(Optional)
POWER FAIL DETECT OFF
MANUAL >>
PROGRAM >>
CREATE >>
EDIT >>
RUN >>
VIEW >>
STEP 1
CONSTANT
V
CONSTANT
mA >>
CONSTANT
W
>>
(Or)
(Or)
>>
CONSTANT V
CONSTANT W
CONSTANT mA
CONSTANT
xV
xxx mA
xxxx V
xxxx V
x mA
xxx mA
CONSTANT
xxx W
xxx W
CONSTANT
xW
TIME/V-HOUR >>
TIME/V-HOUR >>
TIME/V-HOUR >>
SET: xxxx V / xxx mA / xxx W
TIME >>
(Or)
V-HOUR >>
TIME
V-HOUR
SET: xxxx V / xxx mA / xxx W
ADD ANOTHER STEP
STEP 1
SET: xxxx V / xxx mA / xxx W
TIME 00:00
STEP 1
V-HOUR 00000
SAVE PROGRAM >>
SAVE PROGRAM >>
OR ADD STEP 2 >>
OR ADD STEP 2 >>
ADD ANOTHER STEP
SAVE METHOD #1-9:
MEMORY AVAILABLE:
1, 2, 3, 4, 5, 6, 7, 8, 9
PRESS
TO RUN
(Optional)
METHOD 1 SAVED
PRESS
TO RUN
PRESS EXIT TO RETURN
TO MAIN MENU
Figure 4. Create Method Flow Chart
15
Program Mode Operation
POWER
PAC
4.2 EDIT AND RUN A METHOD
The Edit selection of the Program mode allows you to change an existing method.
Table 5.
Procedure for Editing and Running a Method
Step
1.
Procedure
Select PROGRAM from the
main menu.
POWER FAIL DETECT OFF
MANUAL >>
PROGRAM >>
Description
This procedure assumes you have set up the unit as discussed
in Table 3, Preliminary Setup Procedure, at the beginning of this
chapter.
The Program menu lists the following: CREATE, EDIT, RUN,
and VIEW.
2.
Select EDIT and the number
of the method to be edited.
After you select EDIT, the list of available methods is displayed.
3.
Select the constant parameter for the step.
You must select either power, voltage, or current. The programmed constant parameter is highlighted.
4.
Change the parameter
values, if desired.
Select the appropriate parameter, and enter its value using the
keypad. Note that the constant parameter is displayed on the
screen.
5.
Change the programming
for a timed step.
a. Select TIME or V-HOUR. The programmed parameter is highlighted.
b. Modify the value of the selected parameter:
• TIME: Duration may be from 1 to 99 hours 59 minutes.
• V-HOUR: From 1 to 99,999 V.
6.
Edit the next step or quit
the editing function.
Select either of the following:
a. Select ADD STEP. If you are editing additional steps or adding
a step, repeat procedures 3 through 5 above.
b. Select SAVE PROGRAM.
16
POWER
Program Mode Operation
PAC
Table 5. (continued)
Procedure for Editing and Running a Method
Step
7.
Procedure
Enter the method number.
Note: If you select a
method number different
from that which you select
ed to edit, both the original
method and the new
method will be saved.
Description
Make your selection based on the following:
• To save the original method and all its parameter values,
select a number different from that of the method being edited. This in effect creates a new method.
• To overwrite the method’s original parameter values, be sure
to select the same method number as that which was selected for editing.
Note that the available method numbers are listed.
8.
Start the run or exit to the
main menu.
To start the run using the method’s new parameter values, press
.
Figure 5 shows the contents of the Run screen.
Figure 6 shows the contents of the screen after completion of a
run.
Press the Exit key to return to the main menu.
9.
To stop the run at any time,
press either of the following
keys:
The following keys can be used to stop the run before it is completed:
Stops the run and displays the end-of-run parameters.
Interrupts operation of the power supply until the
key
is pressed. During the pause, the LCD display shows the
status of the run at the time the key was pressed. Run
parameters cannot be changed during a pause. If you do
not wish to continue the run, press the
key.
17
Program Mode Operation
POWER
PAC
4.3 VIEW A METHOD
This selection allows you to quickly view the contents of a stored method.
Table 6.
Procedure for Viewing a Method
Step
1.
Procedure
Select PROGRAM from the
main menu.
POWER FAIL DETECT OFF
MANUAL >>
PROGRAM >>
Description
This procedure assumes you have set up the unit as discussed
in Table 3, Preliminary Setup Procedure, at the beginning of this
chapter.
The Program menu lists the following: CREATE, EDIT, RUN,
and VIEW.
2.
Select VIEW and the number of the method to be
edited.
After you select VIEW, the list of available methods is displayed.
Select the number of the method you want to review, using the
numeric keypad to enter a number.
3.
Review the contents of
each step in the method.
Press the appropriate soft key.
Press the Exit key to return to the main menu.
18
POWER
Program Mode Operation
PAC
4.4 RUN A METHOD
This procedure allows you to quickly select and run a stored method.
Table 7.
Procedure for Running a Stored Method
Step
1.
Procedure
Select PROGRAM from the
main menu.
Description
This procedure assumes you have set up the unit as discussed in
Table 3, Preliminary Setup Procedure, at the beginning of this
chapter.
POWER FAIL DETECT OFF
MANUAL >>
PROGRAM >>
2.
Select RUN.
The Program menu lists the following: CREATE, EDIT, RUN, and
VIEW.
Press the appropriate soft key.
CREATE >>
• To run an existing method without changes, select RUN.
EDIT >>
RUN >>
VIEW >>
• If you want to verify the contents of a method before running it,
select VIEW and enter the method’s number. This displays the
contents of the first step. This procedure is discussed in Table
6.
• If you have not yet created a method, or if the method you
want to run requires modifications, select either CREATE or
EDIT. Follow the procedures provided in Tables 4 and 5 for
creating and editing methods.
3.
Enter the method number
and start the run.
Press the
key to start operation.
Figure 5 shows the contents of the Run screen.
Figure 6 shows the contents of the screen after completion of a
run.
4.
To stop the run at any time,
press either of the following
keys:
The following keys can be used to stop the run before it is completed:
Stops the run and displays the end-of-run parameters.
Interrupts operation of the power supply until the
key
is pressed. During the pause, the LCD display shows the
status of the run at the time the key was pressed. Run
parameters cannot be changed during a pause. If you do
not wish to continue the run, press the
key.
19
Program Mode Operation
POWER
PAC
During operation of the power supply, the LCD display shows the operating parameter values, as shown in
Figure 5.
1
2
POWER
RUN
PAC
TIME 00:10
M1 S1
3
800 V
300 mA 240 W
–+
–+
–+
4
Legend
1.
2.
3.
4.
Status of the run.
Elapsed time in hours and minutes (or total volt-hours).
The method (M) and step (S) that is currently running.
Actual output voltage, current, power.
Note: The constant parameter is highlighted.
Figure 5. Display while Programmed Method is in Progress
20
POWER
Program Mode Operation
PAC
After the programmed time or volt-hours, the power supply automatically continues with the next step or if
there is none, it stops. When the method stops running, the final operating parameters, along with the original set parameters of the last step completed, are displayed, as shown in figure 6.
POWER
PAC
1
2
3
4
END: 574V/174mA/100W
SET: 1000V/500mA/100W
M1 S3
PRESS
–+
TIME: 10:00
TO REPEAT
–+
–+
Legend
1.
2.
3.
4.
Final voltage, current, and power.
Programmed voltage, current, and power.
Final method (M) and step (S) number and elapsed time.
Repeat the run using the same method number.
Figure 6. Display upon Completion of Method
21
Temperature Mode Operation
POWER
PAC
5.0 TEMPERATURE MODE OPERATION (POWERPAC 3000 ONLY)
Temperature mode allows you to operate an electrophoresis apparatus at a constant temperature. Constant
temperature is extremely useful for performing DNA sequencing or single stranded conformational polymorphism (SSCP) analysis. The PowerPac 3000 can maintain gel temperatures anywhere from 0°C to 90°C
with an accuracy of ± 1°C.
NOTE: The PowerPac 3000 controls temperature by regulating temperature as a limit parameter. The
PowerPac 3000 will begin to automatically regulate the output of watts to the electrophoresis apparatus
when the temperature is within 3°C of the set temperature. However, if the number of watts entered is not
enough for the apparatus to reach the set temperature, the PowerPac 3000 will be unable to regulate the
temperature of the apparatus. Therefore, it is important to optimize the power conditions required for your
particular application to insure that your gel will reach the set temperature. Refer to Table 8 for approximate
power requirements for Sequi-Gen® sequencing cell. There is no substitution for optimizing the power conditions required for your particular application and gel apparatus. This will help to ensure that your gel will
reach and maintain the set temperature.
To access the PowerPac 3000 constant temperature mode, you will need a PowerPac temperature probe.
Table 8.
Temperature Mode Operation
Step
1.
Procedure
Connect the electrophoresis
cell(s) to the power supply.
–+
Description
The power leads are color coordinated to the output terminals.
indicates high voltages may be present.
2.
Connect the temperature
probe to the jack on the
rear panel of the power
supply.
Use the port labeled “Temperature Probe Jack”. Figure 2 in section 2.2 shows the location of the temperature probe port.
3.
Turn on the power.
a. Press the Power switch, located on the side of the unit.
(Press the side labeled “l” on the switch.)
b. The main menu is displayed, as shown below:
POWER FAIL DETECT OFF
MANUAL >>
PROGRAM >>
TEMPERATURE >>
22
POWER
Temperature Mode Operation
PAC
Table 8. (continued)
Temperature Mode Operation
Step
4.
Procedure
Attach the temperature
probe to the apparatus.
Description
Before attaching the temperature probe to the front glass plate of
the electrophoresis apparatus. be sure the glass plate is clean to
guarantee proper probe attachment. Slowly roll the probe out
against the clean glass surface. Firmly press the probe against
the plate to secure the seal. If the probe will not remain
attached, place a little vacuum grease on the probe before
attaching.
If the probe becomes dislodged from the glass plate during a run,
the temperature control will not work properly.
To remove the probe from the glass plate, simply pull on the
small tab at the edge of the probe.
5.
(Optional)
Set POWER FAIL DETECT
from the main menu
POWER FAIL DETECT OFF
MANUAL >>
PROGRAM >>
TEMPERATURE >>
6.
Select TEMPERATURE.
Press the appropriate soft key.
In the event of a power failure, all operating parameters including
time are retained in memory. When power is restored, the power
supply automatically completes the run. After the run is completed, an error message is displayed to alert the operator that a
power failure occurred.
Press the appropriate soft key.
POWER FAIL DETECT OFF
MANUAL >>
PROGRAM >>
TEMPERATURE >>
23
Temperature Mode Operation
POWER
PAC
Table 8. (continued)
Temperature Mode Operation
Step
Procedure
Description
7.
Enter the desired temperature in degrees centigrade.
The temperature range is 0°C to 90°C.
8.
Select POWER.
Press the appropriate soft key. The power supply will always run
constant power while operating in temperature mode, unless
there is cross-over.
9.
Enter the power required to
maintain the gel at the programmed temperature.
Enter the watts required to maintain the gel at the programmed
temperature. If desired, change the default voltage and current.
If desired, change the
default voltage and current.
Voltage may be a value between 25 and 3000 V.
Current may be a value between 1 and 300 mA.
Power may be a value between 1 and 400 W.
Warning: Excessive power will cause a rapid rise in gel tempera-
ture, which in turn may crack glass plates as well as make it difficult for the PowerPac 3000 to properly control gel temperature.
Refer to Table 9 at the end of this chapter for approximate power
requirements.
10.
24
Select TIME/V-HOUR to continue.
Press the appropriate soft key.
POWER
Temperature Mode Operation
PAC
Table 8. (continued)
Temperature Mode Operation
Step
11.
Procedure
Description
Select one of the following:
a. TIME
a. TIME: To specify automatic time control. You may then enter
a time from 1 minute to 99 hours and 59 minutes. After you
have entered a value, press
to start the run.
b. V-HOUR
b. V-HOUR: To specify automatic volt-hour control for the run.
You may then enter a value from 1 to 99,999 volt-hours. Volthours is the integration of voltage as a function of time. By
programming the unit to run for a specified number of volthours, you get more accurate run-to-run reproducibility. After
you have entered a value, press
to start the run.
c. Press
run.
to start the
c. Pressing
stop it.
will start the run. The run will continue until you
Note: The run may be stopped at any time using either of the following keys:
Stops the run and displays the end-of-run parameters.
Interrupts operation of the power supply until the
key
is pressed. During the pause, the LCD display shows the
status of the run at the time the key was pressed. If you
do not wish to continue the run, press the
key.
Table 9.
Examples of Power Requirements
The following table shows approximate power requirements to maintain 50°C using a Bio-Rad Sequi-Gen®
sequencing apparatus with 0.4 mm spacer, 5% gel and 1xTBE buffer.
Gel
Dimensions
21 x 40 cm
21 x 50
21 x 80
38 x 50
Watts
80
100
140
120
25
Temperature Mode Operation
POWER
Temperature
Mode
(Optional)
POWER FAIL DETECT OFF
MANUAL >>
PROGRAM >>
TEMPERATURE >>
ENTER TEMPERATURE
IN DEGREE C:
45 °C
SET POWER >>
3000 V
400 mA
CONSTANT
0 W
TIME/V-HOUR >>
SET:
45 °C / xxx W
TIME >>
(Or)
V-HOUR >>
PRESS
TIME
SET:
45 °C / xxx W
TIME 00:00
PRESS
TO RUN
TO RUN
(Optional)
V-HOUR
SET:
45 °C / xxx W
V-HOUR 00000
PRESS
TO RUN
Figure 7. Temperature Mode Flow Chart
26
PAC
POWER
Maintenance and Troubleshooting
PAC
6.0 MAINTENANCE AND TROUBLESHOOTING
6.1 MAINTENANCE
PowerPac power supplies require very little maintenance to assure reliable operation. During normal operation, spills and splashes may cause residues to form on the case. Unplug the power supply. Use a damp
cloth to wash down the outer case. Avoid wetting the connectors located below the front panel and on the
rear of the unit.
6.2 TROUBLESHOOTING
If a system or operator error occurs, the appropriate error message will appear on the LCD display. The
power does not operate when an error message is displayed.
If a no-load or rapid change in resistance error is inadvertently activated, it is possible to temporarily deactivate it. To deactivate, press the number 6 key and the STOP key simultaneously to access the deactivation
menu.
Error
Message
Solution
RAPID CHANGE IN
RESISTANCE
SYSTEM WAS SHUT DOWN
PRESS CE TO RESET
An unusually rapid change in resistance was detected during an electrophoresis run. This may be due to a leaking cell.
• Check the cell for leaks.
• Reset the power supply by pressing the CE key to return to the last
screen. The power supply then is ready to run.
ARCING WAS DETECTED
SYSTEM WAS SHUT DOWN
CORRECT THE FAULT
PRESS CE TO RESET
System detected electrical arcing (current jumping from one wire to
another) during the run.
• Check the cell for arcing hazards.
• Reset the power supply by pressing the CE key to return to the last
screen. The power supply then is ready to run.
GROUND LEAK DETECTED
SYSTEM WAS SHUT DOWN
CORRECT THE FAULT
AND RESTART THE SYSTEM
A ground current leak was detected during the run.
• Check the cell for improper grounding. If the cell is being cooled
with an external chiller, make sure there are no leaks from the
coolant circuit into the cell.
• Restart the power supply by turning the Power switch off and on.
27
Maintenance and Troubleshooting
Error
Message
POWER
PAC
Solution
NO LOAD DETECTED
SYSTEM WAS SHUT DOWN
CORRECT THE FAULT
PRESS CE TO RESET
The resistance to the load is too high. (It should not be greater than
6 mega-ohms.)
• Check the cell to insure it is properly connected to the power supply.
• Reset the power supply by pressing the CE key to return to the last
screen. The power supply then is ready to run.
POWER FAILURE !
POWER FAIL DETECT OFF
RUN WAS TERMINATED
PRESS CE TO RESET
The run was terminated due to an AC power failure. Power failure
detection was not activated and the run was terminated.
• Reset the power supply by pressing the CE key to return to the last
screen. The power supply then is ready to run.
POWER FAILURE !
POWER FAIL DETECT ON
RUN WAS COMPLETED
PRESS CE TO RESET
The run was terminated due to an AC power failure. Power failure
detection was activated and the run was completed after power was
restored.
• Reset the power supply by pressing the CE key to return to the last
screen. The power supply then is ready to run.
EEPROM IS FAULTY
OR MISSING
SYSTEM WAS SHUT DOWN
CALL BIO-RAD
A software problem has occured. The power supply cannot operate
until the EEPROM is repaired.
Call Bio-Rad for assistance.
ROM IS FAULTY
OR MISSING
SYSTEM WAS SHUT DOWN
A hardware problem has occured. The power supply cannot operate
until the ROM is repaired.
Call Bio-Rad for assistance.
OPERATING UNDER
VOLTAGE DETECTED
CORRECT THE FAULT
PRESS CE TO RESET
The voltage in the cell is below the minimum voltage of the
power supply.
• Check your experiment’s power requirements.
• Reset the power supply by pressing CE.
VOLT mA NOLOAD
ARE NOT CALIBRATED
Calibration has been lost. Call Bio-Rad for assistance.
28
POWER
Maintenance and Troubleshooting
PAC
Error
Message
Solution
PowerPac 1000 only:
OPERATING OVER 1000 V, or
OPERATING OVER 500 mA, or
OPERATING OVER 250 W
SYSTEM WAS SHUT DOWN
CORRECT THE FAULT AND
RESTART, OR IF FAULT
PERSISTS, CALL BIO-RAD
The voltage, current, or power output has exceeded the power
supply’s maximum output capability.
• Check cell for short circuits.
• Check buffer concentration.
• Restart the power supply by turning the Power switch off and
then on.
If the problem persists, there may be a firmware or hardware problem.
Call Bio-Rad for assistance.
PowerPac 3000 only:
OPERATING OVER 3000 V, or
OPERATING OVER 400 mA, or
OPERATING OVER 400 W
SYSTEM WAS SHUT DOWN
CORRECT THE FAULT AND
RESTART, OR IF FAULT
PERSISTS, CALL BIO-RAD
The voltage, current, or power output has exceeded the power
supply’s maximum output capability.
• Check cell for short circuits.
• Check buffer concentration.
• Restart the power supply by turning the Power switch off and
then on.
If the problem persists, there may be a firmware or hardware problem.
Call Bio-Rad for assistance.
TEMPERATURE PROBE REMOVED
SYSTEM WAS SHUT DOWN
CORRECT THE FAULT
PRESS CE TO RESET
CALL BIO-RAD
Temperature probe was removed from the power supply during the run.
• Reconnect the probe to the power supply.
• Reset the power supply by pressing the CE key to return to the last
screen. The power supply then is ready to run.
Call Bio-Rad for assistance.
ILLEGAL INT DETECTED
SYSTEM WAS SHUT DOWN
CALL BIO-RAD
A software problem has occured. The power supply cannot operate
until the illegal interrupt condition is repaired.
Call Bio-Rad for assistance.
FOLLOW ERROR DETECTED
SYSTEM WAS SHUT DOWN
CALL BIO-RAD
A hardware problem has occured. The power supply cannot operate
until the follow error condition is repaired.
Call Bio-Rad for assistance.
DIV ERROR DETECTED
SYSTEM WAS SHUT DOWN
CALL BIO-RAD
A software problem has occured. The power supply cannot operate
until the division error condition is repaired.
Call Bio-Rad for assistance.
29
Specifications
POWER
PAC
APPENDIX A. SPECIFICATIONS
Note: All specifications subject to change without notice.
Input Rating:
100/120 V model: 90 - 132 VAC, 47 Hz - 63 Hz
220/240 V model: 198 - 264 VAC, 47 Hz - 63 Hz
Input Power Cable:
3-wire; grounded
I.E.C. power entry module
Output Range:
(Programmable)
Constant voltage, constant current, constant power.
Automatic cross-over upon reaching limits.
Voltage:
PowerPac 1000: 5 V DC to 1000 V DC; fully adjustable in 1 V steps
PowerPac 3000: 20 V DC to 3000 V DC; fully adjustable in 1 V steps
Current:
PowerPac 1000: 1 mA to 500 mA; fully adjustable in 1 mA steps
PowerPac 3000: 1 mA to 400 mA; fully adjustable in 1 mA steps
Power:
PowerPac 1000: 1 W to 250 W; fully adjustable in 1 W steps
PowerPac 3000: 1 W to 400 W; fully adjustable in 1 W steps
Output Terminals:
4-pair recessed female banana jacks,
floating, and wired in parallel
Timer Control:
1 minute to 99 hours and 58 minutes, or
99,999 volt-hours
No Load Detection:
PowerPac 1000: 58 µA (or greater than 6 mega-ohm) at greater than 350 V
PowerPac 3000: 200 µA at greater than 350 V
Performance
Ripple :
PowerPac 1000:
PowerPac 3000:
Line Regulation: PowerPac 1000:
PowerPac 3000:
Load Regulation: PowerPac 1000:
(200 mA to 400
PowerPac 3000:
Drift:
PowerPac 1000:
PowerPac 3000:
Noise:
30
35 dBA
±1% at 1000 V and 250 W
±1% at 3000 V and 400 W
±1% at 1000 V and 225 W from 90 - 132 V AC and 198 - 264 V AC
±1% at 3000 V and 400 W from 90 - 132 V AC and 198 - 264 V AC
±1% at 1000 V for a 50% change in output load
mA; 400 mA to 200 mA)
±1% at 3000 V for a 50% change in output load
±0.5% after a 30 minute warm-up at 1000 V and 225 W
±0.5% after a 30 minute warm-up at 3000 V and 400 W
POWER
Specifications
PAC
Readout Stability:
Volts:
Current:
Power:
PowerPac 1000
±1% at 1000 V full scale
±1% at 500 mA full scale
±1% at 250 W full scale
PowerPac 3000
±1% at 3000 V full scale
±1% at 400 mA full scale
±1% at 400 W full scale
Set Point Accuracy:
PowerPac 1000
±1% at 1000 V full scale
PowerPac 3000
±1% at 3000 V full scale
Safety Features
No load detection: LCD alarm display if initial load is greater than 6 million ohm upon start of run.
Continual checking during the run if the load is greater than 6 million ohm
Sudden load
change detection: Alarm display and power down upon sudden load change.
Ground Leakage: Alarm display if ground leakage is greater than 500µA; power down on failure
Arc detection*:
Alarm display and power down upon arc detection
Overload/short
circuit protection: Alarm display and power down upon short circuit detection
PowerPac 1000: 3000 V DC rms isolation from high voltage outputs to earth ground
PowerPac 3000: Internal fusing on both hot and neutral
4000 V DC rms isolation from high voltage outputs to earth ground
Auto power up
after power failure: Alarm display and completion of run if a power failure occurs
Safety
Compliance:
EMI
IEC 1010
Conforms to CE standards for Emissions and Immunity; tested only at 220 V.
See Declaration of Conformity for details.
TUV EMC certification.
Display:
128 x 64 dot backlit LCD graphics display
Function Modes:
Memory for up to 9 programmed methods, each with up to 9 steps
Constant voltage, constant current, constant power; time and volt-hour control
Final run conditions (power, volts, and amps) displayed at completion of run
Housing:
Spill-resistant design (complies with U.L. 94V0)
No external heat sinks
Gel Temp. Range:
(PowerPac 3000)
Control range for gel is 0° C to 90° C (±2%)
*Arc Detection: U.S. patent number 5,280,404
31
Specifications
POWER
Operating Conditions
Temp.:
0 - 40°C
Humidity:
0 - 95% relative humidity, non-condensing
Dimensions:
29 (L) x 28 (W) x 11 (H) cm; unit is stackable
Weight:
PowerPac 1000: 3.1 kg
PowerPac 3000: 3.7 kg
32
PAC
POWER
Warranty and Ordering Information
PAC
APPENDIX B. WARRANTY AND ORDERING INFORMATION
The PowerPac power supply is warranted for 1 year against defects in materials and workmanship. If any
defects should occur during this warranty period, Bio-Rad Laboratories will replace the defective parts without charge. However, the following defects are specifically excluded:
1.
2.
3.
4.
5.
Defects caused by improper operation.
Repair or modification done by anyone other than Bio-Rad Laboratories or their authorized agent.
Use with cables or connectors not specified by Bio-Rad Laboratories for this power supply.
Deliberate or accidental misuse.
Damage caused by disaster.
For inquiry or request for repair service, contact your local Bio-Rad office.
Bio-Rad Laboratories
2000 Alfred Nobel Drive
Hercules, California 94547
Phone: (510) 741-1000
1-(800) 4-BIORAD
1-(800) 424-6723
Fax:
(510) 741-1060 or
1-(800) 879-2289
Telex: 335-358
Eastern Regional Office
85A Marcus Drive
Melville, New York 11747
Phone: (516) 756-2575
1-(800) 4-BIORAD
1-(800) 424-6723
Fax:
(516) 756-2594 or
1-(800) 756-4246
Australia
Bio-Rad Laboratories Pty., Ltd.
Unit 11
112-118 Talavera Rd.
P.O. Box 371
North Ryde
New South Wales 2113
Phone: 02-805-5000
008-224-354
Fax:
02-805-1920
Telex: 79070166
Austria
Bio-Rad Laboratories Ges.m.b.H.
Auhofstrasse 78D
A-1130 Wien
Phone: 1-877 89 01
Fax:
1-876-56-29
Belgium
Bio-Rad Laboratories S.A.-N.V.
Begoniastraat 5
B-9810 Nazareth Eke
Phone: 09-385-55-11
Fax:
09-385-65-54
Canada
Bio-Rad Laboratories Ltd.
5671 McAdam Road
Mississauga, Ontario L4Z 1N9
Phone: (905) 712-2771
1-(800) 268-0213
Fax:
(905) 712-2990
China
Bio-Rad Laboratories
14, Zhi Chun Road
Haidian District
Beijing 100088
Phone: (01) 2046622
Fax:
(01) 1-2051876
Denmark
Bio-Rad Laboratories
Symbion Science Park
Fruebjergvej 3
DK-2100 Copenhagen
Phone: 39 17 99 47
Fax:
39 27 16 98
Finland
Bio-Rad Laboratories
Business Center Lansikeskus
Pihatorma 1A
SF-02240, Espoo
Phone: 90 804 2200
Fax:
90 804 1100
France
Bio-Rad S.A.
94/96 rue Victor Hugo
B.P. 220
94203 Ivry Sur Seine Cedex
Paris
Phone: 16 1 49 60 68 34
Fax:
16 1 46 71 24 67
Germany
Bio-Rad Laboratories GmbH
Heidemannstrasse 164
D-80939 Munchen
Postfach 45 01 33
D-80901 Munchen
Phone: 089 318 84-0
Fax:
089 318 84-100
Italy
Bio-Rad Laboratories S.r.l
Via Cellini, 18A
20090 Segrate - Milano
Phone: 02/21609.1
Fax:
02/21609.399
Japan
Nippon Bio-Rad Laboratories KK
7-18, Higashi-Nippori 5-Chome
Arakawa-ku, Tokyo 116
Phone: 03-5811-6270
Fax:
03-5811-6272
Netherlands
Bio-Rad Laboratories B.V.
Fokkerstraat 10
3905 KV Veenendaal
Phone: 0318-540666
Fax:
0318-542216
New Zealand
Bio-Rad Laboratories Pty., Ltd.
Unit 15 Poland Court
21 Poland Road
P.O. Box 100-051
North Shore Mail Centre
Glenfield, Auckland 10
Phone: 09-443 3099
0508-805 500
Fax:
09-443 3097
Pacific
Bio-Rad Pacific Ltd.
Unit 1111, 11/F., New Kowloon Plaza
38 Tai Kok Tsui Road
Tai Kok Tsui , Kowloon, Hong Kong
Phone: 7893300
Fax:
7891257
Singapore
Bio-Rad Laboratories (Singapore)
464 Siglap Road
#01-02 Flamingo Valley
Singapore 1545
Phone: (65) 4432529
Fax:
(65) 4421667
Spain
Bio-Rad Laboratories, S.A.
Avda, Valdelaparra, 3
Poligono Industrial de Alcobendas
E-28100 Alcobendas (Madrid)
Phone: (91) 661 70 85
(900) 100 204
Fax:
(91) 661-96-98
Sweden
Bio-Rad Laboratories AB
Gardsvagen 7D
Box 1267
S-171 24 Solna
Phone: 08-735-83 00
020 660 660
Fax:
08 735 54 60
Switzerland
Bio-Rad Laboratories, A.G.
Kanalstrasse 17
Postfach
CH-8152 Glattbrugg
Phone: 01-809-55 55
Fax:
01-809-55 00
United Kingdom
Bio-Rad Laboratories, Ltd.
Bio-Rad House
Maylands Avenue
Hemel Hempstead
Hertfordshire HP2 7TD
Phone: 01442-232552
0800-181134
Fax:
01442-259118
India
Bio-Rad Laboratories
C-248 Defence Colony
New Delhi 110 024
Phone: (91-11) 461 0103
Fax:
(91-11) 461 0765
(91-11) 462 1863
33
Warranty and Ordering Information
WARRANTY INFORMATION
Model:
Serial Number:
Date of Delivery:
Warranty Period:
ORDERING INFORMATION
Catalog
Number
Product Description
PowerPac 3000
165-5056
165-5057
165-5058
165-5059
165-5060
PowerPac 3000, 100/120 V
PowerPac 3000, 200/240 V
Temperature Probe
PowerPac 3000 with temperature probe, 100/120 V
PowerPac 3000, with temperature probe, 220/240 V
PowerPac 1000
165-5054
165-5055
PowerPac 1000, 100/120 V
PowerPac 1000, 200/240 V
PowerPac 300
165-5050
165-5051
PowerPac 300, 100/120 V
PowerPac 300, 200/240 V
PowerPac 200
165-5052
165-5053
PowerPac 200, 100/120 V
PowerPac 200, 200/240 V
PowerPac Accessories
165-5061
PowerPac Adapter
165-5062
PowerPac Shelf
34
POWER
PAC
Bio-Rad
Laboratories
Life Science
Group
Bulletin 0000
US/EG
Web site www.bio-rad.com Bio-Rad Laboratories Main Office 2000 Alfred Nobel Drive, Hercules, CA 94547, Ph. (510) 741-1000, Fx. (510) 741-5800
Also in: Australia Ph. 02 9914 2800, Fx. 02 9914 2889 Austria Ph. (01) 877 89 01, Fx. (01) 876 56 29 Belgium Ph. 09-385 55 11, Fx. 09-385 65 54
Brazil Ph. 55 21 507 6191 Canada Ph. (905) 712-2771, Fx. (905) 712-2990 China Ph. 86-10-8201-1366/68, Fx. 86-10-8201-1367
Denmark Ph. 45 44 52-1000, Fx. 45 4452 1001 Finland Ph. 358 (0)9 804 2200, Fx. 358 (0)9 804 1100 France Ph. 01 47 95 69 65, Fx. 01 47 41 9133
Germany Ph. 089 318 84-177, Fx. 089 318 84-123 Hong Kong Ph. 852-2789-3300, Fx. 852-2789-1257 India Ph. (91-124)-6398112/113/114, Fx. (91-124)-6398115
Israel Ph. 03 951 4124, Fx. 03 951 4129 Italy Ph. 34 91 590 5200 , Fx. 34 91 590 5211 Japan Ph. 03-5811-6270, Fx. 03-5811-6272
Korea Ph. 82-2-3473-4460, Fx. 82-2-3472-7003 Latin America Ph. 305-894-5950, Fx. 305-894-5960 Mexico Ph. 52 5 534 2552 to 54, Fx. 52 5 524 5971
The Netherlands Ph. 0318-540666, Fx. 0318-542216 New Zealand Ph. 64-9-4152280, Fx. 64-9-443 3097 Norway Ph. 47-23-38-41-30, Fx. 47-23-38-41-39
Russia Ph. 7 095 979 98 00, Fx. 7 095 979 98 56 Singapore Ph. 65-2729877, Fx. 65-2734835 Spain Ph. 34-91-590-5200, Fx. 34-91-590-5211
Sweden Ph. 46 (0)8-55 51 27 00, Fx. 46 (0)8-55 51 27 80 Switzerland Ph. 061-717-9555, Fx. 061-717-9550 United Kingdom Ph. 0800-181134, Fx. 01442-259118
Rev A
00-000
0000
Sig 1200
4006038 Rev B
Table of Contents
36
POWER
PAC