1
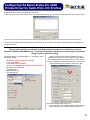
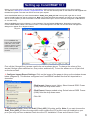
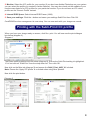
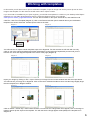
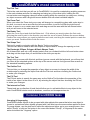
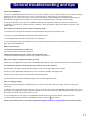
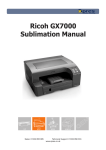
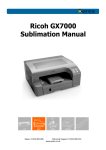
Epson 4450 Subli-Print
Instruction Manual
CONTENTS
Section 1
Page 1-2
Section 2
Page 3-4
Section 3
Page 4
Section 4
Page 5
Section 5
Page 6-7
Page 7
Section 6
Page 7
Section 8
Page 8
Page 9
Page 9-10
Section 9
Page 10
Section 10
Page 11
Version 1.2 01/05/2008 NJE
Driver Installation & Setup
Installing & setting up the Epson Stylus 4450 Printer
CorelDRAW setup
Installing & setting up the Xpres Subli-Print colour profile
Printing
Printing with the Xpres Subli-Print colour profile
Installing Cartridges
Installing the Subli-Print cartridges
Templates
Working with CorelDRAW sublimation templates
Tips on using templates
Sublimation paper
Sublimation paper usage and tips
CorelDRAW
Introducing CorelDRAW and its tools
CorelDRAW's most common tools
Common CorelDRAW tasks
Printable's
Sublimation printable's hints and tips
Troubleshooting
General troubleshooting and tips
Configuring the Epson Stylus Pro 4450
Printer Driver for Subli-Print .ICC Profiles
1. On the PC desktop, click Start then select Printers and
Faxes as shown to the right:
3. Click on the Main tab to show the screen you will be
working in.
4. Under Mode, select the Custom option.
5. Then click on the advanced tab to setup the necessary
options for Subli-Print profiles.
2. Right click on the Epson Stylus Pro 4400/50 Printer Icon
and select Properties from the context menu.
6. Select the settings as shown below:
Media Type: Photo Quality Ink Jet Paper
Color: Color/B&W
Print Quality: Fine 720dpi
Printer Color Management: Off (No Color Adjustment)
Microweave: Preset to On
High Speed: On
Flip Horizontal: On
Finest Detail: On
**For Windows XP users Only **
This is the first screen that will pop-up. Click on Printing
Preferences to get to the next screen.
7. Once settings are complete, click on the Save Settings
button to save these options so this process doesn’t have to be
completed each time printing is done.
Note: Please be advised that the above driver settings may appear different from Windows 2000,
XP and Vista. Also driver release versions can appear different to the above.
1
Configuring the Epson Stylus Pro 4450
Printer Driver for Subli-Print .ICC Profiles
8. Type Subli-Print in the Name Field and click Save.
Note: You don’t have to use Subli-Print as the name for this setting; you can use any name that will work for your process.
Subli-Print
9. Once you have your name saved and it is showing in the list window, click on close to return to the previous screen.
10. Click on OK under the Advanced Tab to close that window. Then click on OK under the printing preferences window to
complete this task.
The previous settings are ideal for printing/transferring onto hard substrates such as
Ceramics, Metal, all Hardboard, etc. For softer substrates, the driver can be setup to print faster
using a lower resolution setting.
To add this setting, go through Steps 1-5. For step 6, select
the settings below.
Media Type: Photo Quality Ink Jet Paper
Color: Color/B&W
Print Quality: Normal 360dpi
Printer Color Management: Off (No Color Adjustment)
Microweave: Preset to On
High Speed: On
Flip Horizontal: On
Finest Detail: On
When using the lower resolution settings for softer
substrates, you may need to increase the color density
when printing solid filled images. To do this, click on the
Paper Config button on the Advanced screen and increase
the Color Density to around 20% and click on OK.
To save this setting follow steps 8-10.
*** Note - Be sure to use a different Name for this setting
so that you don’t over write the previous options.***
2
Setting up CorelDRAW 10 +
Before you start this section you will need to download the Xpres Subli-Print colour profile from the Xpres website.
The address is www.xpres.co.uk/tech_support/downloads You can also find the profile on the Subli-Print CD supplied with
the bulk feed system. This disk can also be sent out upon request.
Close CorelDRAW. When you have downloaded the 'Subli_Print_4450_V1.icm' colour profile, right click on it and
choose 'Install Profile' from the top of the menu. Note: The profile will install automatically and will not give any feedback.
Also on some systems you will not be able to see the 'Install Profile' option. If this is the case change the .ICM extension
to .ICC then re-try.
Start CorelDRAW and click on Window > Colour Palettes. Tick the 'Default RGB palette'. Repeat the process then
un-tick 'Default CMYK palette'. Now click on Tools > Colour Management. You will now see the colour management
dialogue box appear as in diagram 1 below.
Diagram 1
1
For CorelDRAW X3,
ensure you select RGB
under the 'color mode
used for effects' section
at the bottom on the
colour management
console.
4450
4
2
5
3
First, all the (Orange/Grey) arrows need to be set as shown above. To change the colour of the
arrows (Orange colour switched on, Gray colour switched off). To turn the arrows on or off just click
on the arrow itself.
1. Configure Import-Export Settings: Click on the image of the paper to bring up the window shown
below (diagram 2). This window configures how CorelDRAW handles files that are imported to a
document.
Diagram 2
Click Import: Always covert Using- Select Internal RGB Fraser
(1998) from the drop down menu.
Click Export: Always embed using- Select Internal RGB Fraser
(1998) from the drop down menu.
Click OK.
2. Composite Printer: Select the Subli_Print_4450_V1 printer profile. Note: if you cant choose the
Subli_Print_4450_V1 from the drop down menu means the ICC profile is not yet installed on your
pc or you may not have restarted Corel since the ICC installation. Close and re-launch Corel.
3
3. Monitor: Select the ICC profile for your monitor (If you also have Adobe Photoshop on your system
you can select the profile you created in Adobe Gamma). You may also check out the website of your
monitor manufacturer for ICC profiles for your particular monitor. If you do not have an ICC colour
profile use the 'Generic Profile' instead.
4. Internal RGB Space: Select Internal RGB Fraser (1998)
5. Save your settings: Click the + button and name your settings Subli-Print then Click OK.
CorelDRAW's colour management is now setup. You can now work with your images as normal.
Printing with the Subli-Print ICC profile
When you have your image ready on screen, click file > print. You will now see the print dialogue
box below (diagram 1).
Diagram 1
The Epson 4400 properties will now show (diagram 2). Ensure the Subli-Print setting is highlighted.
If it is not click on 'Subli-Print' from the drop down list. Then click OK.
Now click on the Misc tab (diagram 3) and ensure the Subli_Print_4450_V1 is ticked.
Note: Ensure the 'Apply ICC profile' is un-ticked when using other printers.
Now click the print button.
Diagram 2
Diagram 3
4
CHARGING THE PRINTER WITH INK
Please read this section carefully before proceeding.
The Epson 4400 is shipped with 4 seperate cartridges. These are listed 1 to 4
in the left hand bay only.
1. Matte Black 2. Cyan 3. Magenta 4. Yellow
The genuine Epson inks supplied with the printer are not required, please store these
with your printers documentation for future use.
Do not insert the original Epson inks into bays 1, 2, 3 and 4. Only insert the Subli-Print
cartridges into these bays.
1. Turn the printer on by pressing the power button. After a short time 'NO INK CRTG'
appears on the LCD.
2. Open the ink compartment covers and raise the blue ink levers.
3. Remove the Subli-Print ink cartridge from its pack and then shake ink cartridge
for best results.
4. Insert the cartridge into the slots using the configuration above, or the ink assignment
guide below. Incorrect installation of cartridge could damage the printer.
5. After inserting all ink cartridges in their corresponding slot, lower the ink levers.
The printer will now start the initial charging.
6. After approximately two minutes, ink lever messages appear on the LCD. Raise
or lower the ink levers accordingly until 'READY' appears on the LCD, which indicates
initial ink charging is completed.
INK ASSIGNMENT GUIDE
BLACK
CYAN
MAGENTA
YELLOW
1
2
3
4
Xpres Subli-Print
Sublimation Inks
5
Working with templates
In this section you will learn how to open a sublimation template, import an image and use the power clip tool to fit the
image to the template. For this exercise we will use the 9cm² square coaster.
If you have had an installation by an Xpres engineer, you will find the templates in a folder on your desktop called 'Xpres'.
Otherwise you can either download these from the Technical Support section of our website
www.xpres.co.uk/tech_support/downloads You can also find these on the Xpres Technical CD, and Subli-Print CD.
Click File > New From Template (diagram 1), click on the 'Browse' tab then point it towards where your Sublimation
templates are stored. Select the 'Coaster square.cdt' then click OK.
Diagram 1
Diagram 2
1
2
3
Select
template
You will now see six square coaster templates open as in diagram 2. For this exercise we will work with one only.
Click on one of the coaster templates and hit the delete button on the keyboard. Repeat this process until you are
left with one. Click and drag the template to the centre of the page (diagram 3).
Diagram 3
Diagram 4
Import your image by clicking on File > Import. Select your image from the browse window and click the import button.
You will now see you image as in diagram 4. Click on the corner selection handles to down size the image slightly larger
than the template, as in diagram 5 below.
Diagram 5
Diagram 6
Click on Effects > Power clip > Place inside container. You will now see a large black arrow appear, click on the edge or
inside to power clip the object to the template. You will now see the image appear inside (fitted) to the template as in
diagram 6.
6
Working with templates continued
Diagram 1
If your image does not fit the power clip correctly first time, right
click on the image and choose 'Edit Contents' from the drop down
menu (diagram 1). You can also click on Effects > Power Clip >
Edit Contents. Drag the image (you will see the image and the
template on the screen) until you have it in the right place. You can
even re-size the object in the 'Edit' state. When you are happy with
the image placement, right click and choose 'Finish Editing This
Level', from the drop down menu. You can also access this by
clicking on Effects > Power Clip > Finish Editing This Level.
Your image is now ready to print. Refer to page 4 on
printing with the .ICC colour profile.
Tips on using templates
All Xpres Sublimation templates are slightly larger than the actual substrate. You can leave the border of the template
visible as this helps to line up the substrate before taping it onto the transfer paper (use XP6006 Heat Tape to secure
the substrate to the transfer paper).
The only template you cannot leave the border on is the mug template as this will show up when printed.
To duplicate your image once fitted to the template refer to page 10 on duplicating objects
Sublimation paper usage and tips
XP4072a (A4) & XP4073a (A3) XP4047 (A3+) is used for all hard surface and fabric substrates.
Print onto the bright white side only.
7
Introducing CorelDRAW
& its tools
CorelDRAW is an extremely powerful program of which you will probably only need to use half
of the tools and features of the program. In this section we will introduce you to the tools in
CorelDRAW and what they do and also take you through the most common tasks you will need
to complete in CorelDRAW.
Below is an image of the toolbox in CorelDRAW with explanations of the tools based on Corel 11.
Pick Tool
Shaping Tools
Zoom Tools
Drawing Tools
Rectangle Tools
Ellipse Tools
Each of the tools shown here except the Pick tool and the Text tool
have extra tools hidden in what are called flyout menu's, to access
a fly out menu hold the left mouse button down on the corresponding
button and the menu will pop out allowing you access to the extra
tools.
Each of the flyout menus are shown below giving you a breakdown
of where all the tools are stored, on the next page we will go over the
most common tools and their functions.
Polygon Tools
Basic Shapes Tool
Shaping Tools
Text Tool
Interactive Tools
Eyedropper Tools
Outline Tool
In order:
Shape Tool, Knife Tool, Eraser Tool, Smudge Brush, Roughen Brush,
Free Transform Tool
Zoom Tools
Drawing Tools
In order:
Zoom Tool, Pan Tool
In order:
Freehand tool, Bezier Tool, Artistic Media Tool, Pen Tool,
Polyline Tool, 3 Point Curve, Interactive Connector,
Dimension Tool
Fill Tool
Interactive Fill Tool
Rectangle Tools
Ellipse Tools
Polygon Tools
In order:
Rectangle Tool,
3 Point Rectangle
In order:
Ellipse Tool,
3 Point Ellipse Tool
Basic Shapes Tools
In order:
Polygon Tool,
Graph Paper Tool,
Spiral Tool
In order:
Basic Shapes Tool, Arrow Shapes Tool,
Flowchart Shapes, Star Shapes, Callout Shapes
Interactive Tools
Eyedropper Tools
Outline Tool
In order:
Blend Tool, Contour Tool,
Distortion Tool, Envelope Tool
Extrude Tool, Shadow Tool,
Transparency Tool
In order:
Eyedropper Tool,
Paintbucket Tool
In order:
Outline Pen Tool, Outline Colour Tool, No outline,
Various widths of line, Colour Docker Window
Interactive Fill Tools
Fill Tool
In order:
Interactive Fill, Mesh Fill
In order:
Fill Tool, Fountain Fill, Pattern Fill, Texture Fill,
Postscript Fill, No Fill, Colour Docker Window
8
CorelDRAW's most common tools
The Pick Tool
This is the main tool that you will use in CorelDRAW, it is used for manipulating anything onscreen
in the main window and also for selecting and using any of the other tools, holding the left
mouse button and dragging a box will select anything within the area that you drag over, clicking
an object onscreen with a single left mouse button click will select individual objects.
The Zoom Tool
When you select the Zoom tool your cursor will change to a magnifying glass with a plus sign in
the lens, to zoom in on an are click the left mouse button, to zoom out click the right mouse
button, to zoom in on a certain area click and drag around the area with the left mouse button
and you will zoom to the selected area.
The Bezier Tool
Open the Curve flyout and click the Bézier tool . Click where you want to place the first node,
and drag the control point in the direction you want the curve to bend. Release the mouse button.
Position the cursor where you want to place the next node, and drag the control point to create the
curve you want. Double-click to finish the curve.
The Shape Tool
This tool is used in conjuntion with the Bezier Tool to curve lines.
This tool can also be used to alter the shapes of objects and to change the spacing on text.
The Rectangle, Ellipse, Polygon & Basic Shapes Tools
All of these tools work on a very simple basis in that you clickand hold the left most button down
and drag out the shape that you would like to the sizes you require.
The Text Tool
Simply click on screen with this tool and then type as normal with the keyboard, you will see that
you have all the standard options at the top of the screen such as font type and size as well as
the standard formatting options.
The Outline Tool
This tool lets you change the properties of any object on screen to change the width of the
outside edge by selecting the object first with the Pick tool and then choosing the Outline tool
to make your changes.
The Fill Tool
The Fill tool works in exactly the same way as the Outline Tool but alters the properties of the
inside of an object i.e the colour fill of it, by selecting the object first then choosing the Fill tool
to make your changes.
The Interactive Tools
These tools are a collection of tools that will allow you to add artist effects to any object in the
main CorelDRAW window such as shadows, contours and transparencies etc.
Common CorelDRAW tasks
Grouping & Ungrouping
CorelDRAW allows objects to be grouped with other objects this means that when one object is
moved or resized and other objects grouped with it will also have the same action applied to them.
To group objects, use the pick tool to select the objects and either go to your arrange menu, then
select "Group" or click on the button in the menu bar labeled "Group", to Ungroup do the same
action but select the "Ungroup" option.
9
Common CorelDRAW tasks continued
Sizing images
There are many ways to resize an object in CorelDRAW. You can click and drag the selection handles around the object
by using the
pick tool.
Property bar
Object
position
on page
Object
size
Scale
factor
Non-proportional
scaling/sizing
ratio
Selection
handles
You change the dimensions of an object proportionally by preserving its aspect ratio. You can size an object’s dimensions
by specifying values or changing the object directly. Scaling changes an object’s dimensions by a specified percentage.
You can change an object’s anchor point from its centre to any of its eight selection handles.
You can also click on the object you wish to re-size and type in the object size box. If you lock the non-proportional scaling/
sizing ratio the width and height of the object will scale/size in proportion. If you un-lock it, you can make the object any size
you wish.
Duplicating objects
There are a couple of ways you can duplicate objects on CorelDRAW. The easiest but
not that accurate in terms of plotting your design out is to select the object with the
pick
tool, then press CTRL+D. You can then place the image manually on the layout
screen.
The accurate way to duplicate objects is to use the Transformation docker window.
Click on Arrange > Transformations > Position. The Transformation docker window
will pop up on the right hand side in CorelDRAW. When you select an object the Position,
relative position and the apply buttons will illuminate. The example on the right shows an
object which is selected and ready to be duplicated. To increase or decrease the horizontal
positioning enter the size or click the up/down arrows. This function specifies the
duplication distance from the original object.
The relative position option is there to select where you want the duplicated object
to appear. On the example I have selected the duplicate to appear on the left of the
original object. Now click 'Apply To Duplicate' to duplicate the object(s).
From the transformation docker window you can also select Rotate, Scale and mirror,
Size and skew.
Sublimation printable's hints and tips
Some sublimation printable's (substrates) have a protective coating on which must be removed before pressing.
The most common of these is the desk clocks, all pre-cut metal, hardboard placemat's and coasters. Also check
other plastic products for coatings.
Ensure the substrate is facing up when placed on the heat press and the transfer is face down onto it. If this is not
done you will get a faded or no image transferred to the substrate.
Sublimation mugs differ in time and temperature depending which mug you are using. All times and temperatures
below are based on the Xpres Mug Press 2000.
XP5013 Coated ceramic mugs - Time 3min 30sec at 200°c (increase time to 4min 30sec for top to bottom mug printing).
XP5011 Colour change mugs - Time 3min 30sec at 190°c (increase time to 4min 30sec for top to bottom mug printing).
XP5015 Coated metallic mugs - Time 3min 30sec at 200°c (increase time to 4min 30sec for top to bottom mug printing).
XP5014 Coated porcelain mugs - Time 3min 30 sec at 200°c (top to bottom is not recommended for this type of mug).
XP5013 and XP5014 are dishwasher safe.
Tip: Refer to the Xpres sublimation printables wall chart or product information sheets for times and temperatures for
other products.
10
General troubleshooting and tips
Useful CorelDRAW tips
To ensure CorelDRAW performs at it's best, click on Tools > Options, click on 'snap to objects' and un-tick the 'snap to
objects on (ALT+Z)'. Now click on the + next to 'Text' and click on 'Quick correct'. Un-tick all five boxes.
Depending on your system memory you can increase the memory usage available to CorelDRAW (default 25%). If
CorelDRAW is sluggish and running out of memory try increasing this (10% increments recommended).
To see the actual size of your text in CorelDRAW (rather than font points) activate the 'Transform' toolbar. Click
on 'Window', scroll down to 'Toolbars' and tick 'Transform'. Drag the toolbar to the top and drop it to place it in the
toolbar cluster.
Print quality on ceramics, plastic, metal etc appears weak?
1. Check the time, temperature and pressure as illustrated in the printing information guide.
2. Ensure you have installed the Xpres Subli-Print profile correctly.
3. Check whether the substrate is facing up on the heat press.
4. If you are printing mugs top to bottom ensure you have pressed them for the correct times and temperatures (see
page 10 for more information).
Subli-T hints and tips
• Is the transfer permanent on Subli-T's?
Yes as the process is direct to the polyester.
• When heat applying the press leaves a severe press mark?
The pressure on the heat press is set too high. Reduce the pressure.
Why is the image on mugs blurred after printing?
Ensure you have dipped the mug in water immediately after printing, and/or increase the pressure on the mug press.
The sublimation transfer colour appears very washed out on the transfer?
All sublimation ink appears weak until heat applied, colours will change and become vibrant.
Ensure you have applied the Subli-Print ICC colour correction software. See pages 3-4.
Ensure you are printing onto the correct side of the transfer paper.
For XP4072a/73a & XP4047 Sublimation paper, print onto the bright white side.
Tips on cropping images
After importing your image into CorelDRAW you may need to crop (down size) the image. There are 2 ways you
can do this.
1. Highlight your image with the pick tool, then click on the shape tool (F10) in CorelDRAW, hold down the CTRL key
then resize you image by moving the selection handles in the corner of the image. Tip: While in the shape tool you can
also add new node and convert the lines to curves.
2. If you double click on the image in CorelDRAW it should launch Corel PHOTO-PAINT. Use the crop tool
to achieve similar results as above. CorelDRAW X3 has a crop tool
now built in.
Check out the FAQ section on the Xpres website www.xpres.co.uk/tech_support/faq for more hints and tips.
11