1
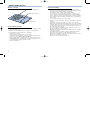
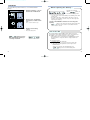
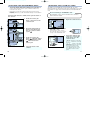
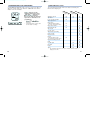
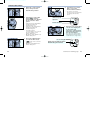
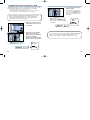
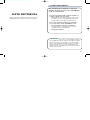
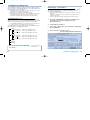
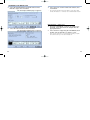
DM9E 12/15/98 11:37 AM Page 1
E INSTRUCTION MANUAL
DM9E 12/15/98 11:37 AM Page 2
FOR PROPER AND SAFE USE
Designed exclusively for the Maxxum/Dynax 9, the Data
Memory Back DM-9 makes it possible to record 18 separate
data items for each exposure to a SmartMedia™ card. The
data from as many as 400 36-exposure rolls of film can be
saved to a single 2MB card.
Read and understand all warnings and cautions before using
this product.
Data collected by the DM-9 can be displayed on the camera
and data back data panels or compiled to a list and displayed
on your PC in a plain text format .
Batteries may become hot or explode due to improper use.
The DM-9 can also imprint a data number for the entire roll on
the film tip and user selectable data between the frames.
•
•
•
SmartMedia™ is a trademark of the Toshiba Corporation.
Windows®, Microsoft®, and Microsoft Excel® are
registered trademarks of the Microsoft Corporation.
Other corporate and product names are the trademarks
and registered trademarks of their respective companies.
WARNING
•
•
•
•
•
Use only the batteries specified in this instruction manual.
Do not install the batteries with the polarity (+/-) reversed.
Do not subject batteries to fire or high temperatures.
Do not attempt to recharge, short, or disassemble.
Follow local regulations for battery disposal. Tape over lithium
battery contacts before disposal.
Use caution, accidents may occur when using this product
near young children.
Keep batteries and other things that could be swallowed away
from young children. Contact a doctor immediately if an object
is swallowed.
Immediately remove the batteries and discontinue use if…
This device complies with Part 15 of the FCC Rules. Operation is subject to
the following two conditions: (1) This device may not cause harmful interference, and (2) this device must accept any interference received, including
interference that may cause undesired operation. Changes or modifications not
approved by the party responsible for compliance could void the user's authority to operate the equipment. This equipment has been tested and found to
comply with the limits for a Class B digital device, pursuant to Part 15 of the
FCC Rules. These limits are designed to provide reasonable protection against
harmful interference in a residential installation. This equipment generates,
uses and can radiate radio frequency energy and, if not installed and used in
accordance with the instructions, may cause harmful interference to radio communications. However, there is no guarantee that interference will not occur in
a particular installation. If this equipment does cause harmful interference to
radio or television reception, which can be determined by turning the equipment off and on, the user is encouraged to try to correct the interference by
one or more of the following measures:
• Reorient or relocate the receiving antenna.
• Increase the separation between the equipment and the receiver.
• Connect the equipment to an outlet on a circuit different from that to which
the receiver is connected.
• Consult the dealer or an experienced radio/TV technician for help.
This Class B digital apparatus complies with ICES-003.
• the product is dropped or subjected to an impact in which the
interior is exposed.
• the camera emits a strange smell, heat, or smoke.
This mark on your camera certifies that this camera meets
the requirements of the EU (European Union) concerning
interference causing equipment regulations. CE stands for
Conformité Européenne (European Conformity).
1
DM9E 12/15/98 11:37 AM Page 2
SMART MEDIA NOTES
Names of Parts
Proper Handling
Electrical contact area
Write-protect area
Index label area
Proper Data Storage
Important files should be copied to other media (floppy disk, MO
disk, hard drive, etc.)
Minolta is not responsible for lost, erased, or corrupted data.
The following may cause data loss or damage:
• Improper use of card.
• Static discharge near the card or electric noise.
• Removing or interrupting the cards power supply while the card is
being accessed. (reading, writing, formatting)
• Non-use of the card for extended periods of time. Data stored on
SMARTMEDIA cards can degrades over time. Data left on a card
for an extended period may be irrecoverable.
• Wear for ordinary use.
2
• Data loss or card damage may occur if the camera back is
opened or the card or batteries are removed while the card is
being accessed (reading, writing, formatting).
• Do not bend, drop, or subject the card to impact.
• Do not expose the card to static electricity or electric noise.
• Do not store the card in high temperatures or high humidity
(80% or higher). Keep the card away from corrosive materials
and conditions. Avoid conditions that will cause condensation
on the card.
• Do not touch the cards electrical contacts.
• When necessary, gently wipe the card clean with a soft, clean,
dry cloth.
• Return the card to its anti-static case when it is not in use.
• Affix labels only within the index label area. Use only the labels
provided. Write only in the area provided. Pencil may be used.
• To write protect the card, place the write-protection seal over
the card’s write-protect area.
- Be sure to affix the seal within the write -protect area so the seal
lays flat (no bubbles or raised edges).
- Write-protect may not work if the seal is dirty. Clean the seal with a
soft, clean, dry cloth.
- The DM-9 cannot read, write, or delete data when the write
protection seal is placed over the write protect area.
- Data can be read by your PC when the write protection seal is
placed over the write protect area.
- Remove the seal to cancel write-protect.
3
DM9E 12/15/98 11:37 AM Page 4
TABLE OF CONTENTS
Names of Parts . . . . . . . . . . . . . . . . . . . . . . . . . .6
Battery . . . . . . . . . . . . . . . . . . . . . . . . . . . . . . . . .8
Attaching the Data Memory Back . . . . . . . . . . .10
Inserting the SmartMedia Card . . . . . . . . . . . . .11
Setting the Date and Time . . . . . . . . . . . . . . . . .13
Data Memory
Recording Data . . . . . . . . . . . . . . . . . . . . . . . . . .16
Film Area . . . . . . . . . . . . . . . . . . . . . . . . . . . . . . .18
Overwriting the Film Area . . . . . . . . . . . . . . . . . . .20
Data Recall List . . . . . . . . . . . . . . . . . . . . . . . . . .21
Recalling Data . . . . . . . . . . . . . . . . . . . . . . . . . . .22
Removing the SmartMedia Card . . . . . . . . . . . . .27
Formatting the SmartMedia Card . . . . . . . . . . . . .28
Data Retrieval
System Requirements . . . . . .
Opening the Data File
SmartMedia Directory . . . .
Data display - Spreadsheet
Data display - Plain Text . .
Reading the Data . . . . . . . . . .
. . . . . . . . . . . . . . .41
.
.
.
.
.
.
.
.
.
.
.
.
.
.
.
.
.
.
.
.
.
.
.
.
.
.
.
.
.
.
.
.
.
.
.
.
.
.
.
.
.
.
.
.
.
.
.
.
.
.
.
.
.
.
.
.
.42
.43
.45
.46
.
.
.
.
.
.
.
.
.
.
.
.
.
.
.
.
.
.
.
.
.
.
.
.
.
.
.
.
.
.
.
.
.
.
.
.
.
.
.
.
.
.
.
.
.
.
.
.
.
.
.
.
.
.
.
.
.49
.50
.52
.53
Appendix
Handling Cautions
Troubleshooting . .
Care and Storage
Specifications . . . .
.
.
.
.
.
.
.
.
.
.
.
.
.
.
.
.
.
.
.
.
.
.
.
.
.
.
.
.
.
.
.
.
.
.
.
.
Imprinting Data
Imprinting Between the Frames . . . . . . . . . . . . . .31
Selection . . . . . . . . . . . . . . . . . . . . . . . . . . . .32
Updating the data items . . . . . . . . . . . . . . . . .34
Data Number
Imprinting . . . . . . . . . . . . . . . . . . . . . . . . . . . .36
Cancelling . . . . . . . . . . . . . . . . . . . . . . . . . . .37
Imprinting Intensity` . . . . . . . . . . . . . . . . . . . . . . .38
4
5
DM9E 12/15/98 11:37 AM Page 6
NAMES OF PARTS
Doors Opened
Outside
Card window
Data panel
Film window
AF button
Control panel door
Mode button
+ button
Select button
– button
Card-slot door
Inside
Release pin
Battery-chamber cover
Contacts*
* Do not touch.
6
7
DM9E 12/15/98 11:37 AM Page 8
BATTERY
The Data Memory Back DM-9 uses one CR2025 lithium
battery.
When replacing the battery…
1. Slide the battery cover in
the direction indicated.
Replace the battery
when
blinks in
the DM-9’s data panel.
• 1~2 rolls can be taken after bAttEry starts blinking in the DM9 data panel.
2. Remove the old battery
and replace it with a new
one.
• The + side should face up.
• Reset the date,time, data number ON/OFF, count-up
number, fixed number, and the exposure intensity after
replacing the battery.
Insert a SmartMedia card before removing the
battery.
•
blinks in the data panel and the data number will
not be imprinted (p.36) if a card is not installed when the
camera back is closed.
3. Replace the battery
cover.
• Reset the date, time.
Auto Power Off
The Data Memory Back DM-9 shuts down if it is not
operated for more than 4 minutes. Press any button on
the DM-9 or the camera body to restore power.
appears in the
data panel if the battery is
correctly installed.
• Data will not be recorded to the SmartMedia card if
the last frame’s exposure time is longer than four
minutes.
To record the data
1. Remove the rewound film.
2. Close the back cover (do not load a new roll).
3. Open the control panel door, then press the
rewind button.
• Data is recorded to the SmartMedia card.
•
appears in the DM-9 data panel.
8
9
DM9E 12/15/98 11:37 AM Page 10
ATTACHING THE DATA MEMORY BACK
• The camera supplies power to the DM-9 when it is mounted on the
camera. The DM-9’s lithium battery supplies power to the data
memory back when the back is open or when the DM-9 is not
mounted on the camera.
• Data will be stored in the camera’s data memory function and
imprinting will not be possible if the lithium battery is not installed in
the DM-9.
Turn the main switch to LOCK, then open the back of
the camera…
1. Push the release pin
down , then remove the
camera back.
2. Insert the data memory
back’s lower hinge pin
into the camera’s lower
eyelet
.
3. Push the release pin
down
, align the upper
hinge pin with the eyelet
, then release the
release pin.
4. Close the back of the
camera.
10
INSERTING THE SmartMedia CARD
The 2MB 3.3V SmartMedia card provided with the Data
Memory Back has already been properly formatted for use with
the DM-9. See page 28 to format cards not included with this
unit.
Before inserting a SmartMedia card…
Mount DM-9 on the camera and turn the camera’s
main switch to LOCK.
1. Open the card-slot door.
2. Remove the card from it’s
anti-static case.
• Don’t touch the card’s contacts.
• Save the anti-static case for future
storage of the SmartMedia card.
3. Insert the card into the
card slot, contact-side
down, then close the
card-slot door
•
appears in the data
panel if the card was correctly
inserted.
•
blinks in the data
panel if the card was inserted
incorrectly. Remove and
correctly reinsert the card.
• If no display appears, press
any button on the control
panel.
11
DM9E 12/15/98 11:37 AM Page 12
INSERTING THE SmartMedia CARD
SETTING THE DATE AND TIME
The Data Back DM-9 has an automatic calendar through the
year 2029.
SmartMedia NOTES
The DM-9 can use 2 , 4, 8 or 16MB, 3.3 or 5V
SmartMedia cards. The storage capacity of these cards is
listed in the table below.
Card Size
Card Capacity
2MB
4MB
8MB
16MB
400
400
900
900
• Data for a maximum of 36 exposures can be stored in each
film area.
• 2 and 4MB SmartMedia cards have the same capacity
because they have the same number of data clusters. A
similar situation exists between 8 and 16MB SmartMedia
cards.
• Recording and formatting takes longer with 8 and 16MB
SmartMedia cards.
SmartMedia cards not included with this unit
need to be properly formatted for this device. See
page 28 to format SmartMedia cards for use in
the DM-9.
• Press the mode button after setting the time to reset the seconds
counter to 0 (not shown).
• Reset the date and time after replacing the DM-9’s lithium battery.
IMPORTANT
Data may be irrecoverably lost or the SmartMedia
card damaged if the settings are changed when the
DM-9 is not powered by the camera batteries (ex
back open, DM-9 not mounted)
Open the control panel door…
1. Press the mode button
until the date is
displayed in the data
panel.
• M appears above the month.
Reformat RM-2S and RM-4S SmartMedia cards
distributed by Minolta before trying to record data using
this device (p. 28). These cards have been specially
formatted for use in the Minolta Dimâge V digital camera.
2. Use the select button to
choose the item you
want to change.
• The selected item will blink.
12
Continued on following page
13
DM9E 12/15/98 11:37 AM Page 14
SETTING THE DATE AND TIME
3. Press the + or – button
to change the value of
the selected item.
• Press and hold the + or – button
to change the value rapidly.
DATA MEMORY
4. Repeat steps 2 and 3
until all the data is
correct.
5. When the data is correct,
press the mode or select
button until the blinking
stops.
14
DM9E 12/15/98 11:37 AM Page 16
RECORDING DATA
The Data Memory Back DM-9 records 18 separate data items
for each exposure to a SmartMedia card. The data from up to
400 36-exposure rolls of film can be saved to a single 2MB
card.
• The camera’s data memory
function will be activated if a
card is not installed in the DM-9
when the data memory function
is turned on.
will
blink in the DM-9’s data panel
every time the data or shutterrelease buttons are pressed.
1. Open the camera’s
control panel door, then
press the data-memory
button.
2. Turn either control dial
until On appears in the
data panel.
• The film area to which the
data will be stored is displayed
in the frame counter.
Recording Note
Data is written to the SmartMedia card just before the film
is rewound.
The data number is displayed in
the DM-9’s data panel.
•
blinks in the data panels while the
data is being recorded.
3. Press the shutter-release
button partway down to
enter the selection.
•
Data will be irretrievably lost if back of the camera is
opened or the SmartMedia card or camera battery are
removed while data is being recorded.
appears in the camera’s
data panel and ▲ appears
under DATA in the DM-9’s
data panel when data-memory
is on.
• Select OFF at step 2 to turn data-memory off.
• Only the data for the first exposure of a multiple exposure
series is stored.
• Data is not stored unless film is loaded.
16
17
DM9E 12/15/98 11:37 AM Page 18
FILM AREA
2 and 4MB SmartMedia cards formatted by the DM-9 store
data in 400 separate film areas. Area 1 stores the data
from the first roll, area 2 the second, etc.
1st Roll
2nd Roll
Press the data button to
display the currently
selected film area.
3rd Roll
When the DM-9 is mounted and the
data memory function is selected…
SmartMedia card loaded…
When all the data areas are full, new data is written to area
1, erasing the data stored there.
• Film area assignments are not user selectable.
• 8 and 16MB SmartMedia cards can store exposure data for up
to 900 36-exposure rolls.
Data Panel Display of Film Area
The film area number is
displayed in the camera’s data
panel.
• Data will be saved to the
SmartMedia card.
• ▲ appears below data in the DM-9’s
data panel.
• The data number for the roll is
displayed in the DM-9’s data panel
(p. 36).
SmartMedia card not loaded…
F and the film area number is
displayed in the camera data
panel.
will blink
in the DM-9’s data panel.
• Data will be saved to the camera’s
data memory area.
Film Area 12
18
Film Area 100
Film Area 256
19
DM9E 12/15/98 11:37 AM Page 20
OVERWRITING THE FILM AREA
2 and 4MB SmartMedia cards can store exposure data for
400 rolls of film. Exposure data for additional rolls can be
written over the old data.
appears in the
camera’s data panel and
appears in
the DM-9’s data panel
before the data for the first
exposure in Film Area 1 is
overwritten.
.
•
and
disappear after the first
exposure.
• Overwriting takes longer than
normal data recording.
DATA RECALL LIST
The following table details where the data recorded by the
DM-9 can be displayed.
Ca
DM
me
-9
r
Pa Data
Pa a Da
ta
ne
ne
l
l
PC
Shutter speed
✔
✔
✔
Aperture
✔
✔
✔
Lens Focal Length/
Max Aperture*
✔
✔
Exposure
compensation value
✔
✔
Exposure mode
✔
✔
Metering mode
✔
✔
(incl. exp. bracketing value)
AF mode
✔
Focus area
✔
AF/Release priority
✔
Drive mode
✔
Flash mode
✔
Flash
compensation value
✔
✔
(incl. flash bracketing value)
Flash metering mode
✔
ISO
✔
Count up #
✔
✔
Fixed #
✔
✔
Date
✔
✔
Time
✔
✔
* The maximum aperture can only be viewed when the data is
displayed on a PC.
20
21
DM9E 12/15/98 11:37 AM Page 22
RECALLING DATA
4. Turn the front control
dial to select the
desired frame number.
1. Open the control panel
door, then press the
data-memory button.
– The shutter speed and
aperture for the selected frame
are displayed in the data
panel.
2. Turn either control dial
until
and the
desired film area appears
in the camera’s data
panel.
- Turn the front control dial to
change the film area
increment by one.
- Turn the rear control dial to
change the film area
increment by ten.
• The data number
corresponding to the selected
film area appears in the
DM-9’s data panel.
• ▲ appears under READ in the
DM-9’s data panel.
3. Press the adjust button
to view the film areas.
•
blinks in the camera’s
data panel.
• ▲ blinks under READ in the
DM-9’s data panel.
22
Shutter Speed
Aperture
Frame Number
5. Turn the rear control dial
one click to display the
focal length and
exposure compensation/
bracketing increment for
the selected frame.
• The exposure compensation
and bracketing increment are
combined into a single value.
Focal Length
Exposure Compensation/
Bracketing Increment
Continued on following page
23
DM9E 12/15/98 11:37 AM Page 24
RECALLING DATA
6. Press the AE-lock button
at step 4 or 5 to display
the metering mode, flash
compensation/ flash
bracketing increment
and exposure mode.
7. Press the mode button
to cycle through the
items that can be
displayed on the DM-9’s
data panel.
• The flash compensation and
bracketing increment are
combined into a single value.
The data items cycle as follows…
Metering Mode
Flash Compensation/
Bracketing Increment
Shutter Speed/Aperture
Count up number
Exposure Mode
Fixed number
Details
Month/Day/Year
Metering Mode Display
– 14-Segment Honeycomb Pattern
Day/Month/Year
– Center Weighted Average
– Spot
Year/Month/Date
Flash Compensation Display
– Flash fired without compensation.
Day/Time
– Flash didn’t fire.
No Display
24
Continued on following page
25
DM9E 12/15/98 11:37 AM Page 26
RECALLING DATA
REMOVING THE SmartMedia CARD
8. Open the camera’s
control panel door and
press the adjust button.
Do not remove the card if
or
is blinking in
the DM-9’s data panel.
1. Turn the camera’s main
switch to LOCK.
•
appears in the
camera’s data panel.
• ▲ appears below READ in the
DM-9’s data panel.
9. Turn either control dial
to select data memory
On or Off, then press the
shutter-release button
partway down to enter
the selection.
2. Open the card-slot door
and remove the card.
• Do not touch the electrical
contact area.
• Store the card in its antistatic case.
• Or press the shutter-release
button partway down to return to
standard operation mode with
data memory on.
Data is written to the SmartMedia card after the
last exposure is taken and before the film is
rewound.
• All stored data is written to the card loaded when the film
is rewound.
26
27
DM9E 12/15/98 11:37 AM Page 28
FORMATTING THE SmartMedia CARD
SmartMedia cards must be formatted before they are used in
the DM-9. Formatting erases all previously stored data.
3. Press the data-memory
button again.
• Formatting resets the film area to area 1.
• The data number sequentially numbers every roll exposed
while the DM-9 is mounted and does not reset to 1.
Minolta RM-2S and RM-4S SmartMedia cards have
been specially formatted for use in the Dimâge V
digital camera and need to be reformatted before
they can be used in the DM-9.
1. Open the card-slot door
and insert the card to be
formatted.
2. Open the control-panel
door, then press the
data-memory and adjust
buttons until
appears and
blinks
in the camera data panel.
•
28
•
•
blinks in the camera’s
data panel and
blinks in the DM-9’s data
panel while the card is being
formatted.
blinks in the camera’s
data panel and
blinks in the DM-9’s data
panel while the card is being
formatted.
Do not remove the camera battery or the SmartMedia
card, or open the back of the camera while
blinks in the camera or DM-9 data panels.
will appear in
the DM-9’s data panel.
29
DM9E 12/15/98 11:37 AM Page 30
IMPRINTING BETWEEN THE FRAMES
User selected data items are imprinted to the left of the
exposed frame.
IMPRINTING DATA
The DM-9’s data imprinting function imprints the data
number at the beginning of each roll to ease the task
of roll identification. Additional data can be imprinted
in between the exposed frames as well.
1st Frame Data
The table below details the data items which can be imprinted
in between the frames.
Data Item
Display
Shutter Speed/Aperture
(ex. 1/250 sec. f/5.6)
Count-up Number *
Fixed Number *
Data Number
Month / Day / Year *
Day / Month / Year *
Year / Month / Day *
Day / Hour / Minute *
No Imprinting
* User changeable items
31
DM9E 12/15/98 11:37 AM Page 32
IMPRINTING BETWEEN THE FRAMES
Selection
Press the MODE button to
select the desired data
item.
▲ appears under PRINT
when the data item will be
imprinted.
▲ blinks under PRINT for 4
seconds after the data has
been imprinted
The data items cycle as follows…
Shutter Speed/Aperture
• The Maxxum/Dynax 9’s maximum drive speed drops to 4.5 fps
when the DM-9’s imprinting function is activated.
• The DM-9 only imprints the data from the first exposure when
the multiple exposure drive mode is selected.
• Imprinted data may be obscured if your composition places the
sun or a bright subject at the edge of the frame.
Count-up number
Fixed number
To avoid cutting errors, we recommend you request
your photo lab not to cut your film.
Month/Day/Year
Day/Month/Year
Year/Month/Date
Day/Time
No Imprinting
32
33
DM9E 12/15/98 11:37 AM Page 34
IMPRINTING BETWEEN THE FRAMES
Updating the Data Items
The values of the data items need to be reset after replacing
the battery in the DM-9 Data Memory Back.
• When the Fixed or Count-up number data items are selected,
pressing the + and – buttons for 2 seconds resets the fixed or
count-up numbers to 00001.
• After updating the time, press the mode button to sync the
seconds counter to 00 (not shown).
4. Repeat steps 2 and 3
until all the data is
correct.
5. Press the select button
until all the data stops
blinking or press the
MODE button.
1. Press the MODE button
to select the data item
you want to update.
2. Press SELECT button to
choose the item you
want to change.
• The selected item will blink.
3. Press the + and –
buttons to change the
value of the blinking
item.
• Press and hold the + or – button
to change the value rapidly.
34
35
DM9E 12/15/98 11:37 AM Page 36
DATA NUMBER
Cancelling Data Number Imprinting
Imprinting
Cancel data number imprinting when the film will be loaded
multiple times (Mid Reload).
Data Number
• The data number is recorded even if it is not imprinted.
Cancel data number imprinting before loading the film.
• The data number is imprinted when the film is loaded.
When the DM-9 is mounted, the Data Number is automatically
imprinted when film is loaded into the camera.
• The data number is imprinted even if a SmartMedia card is not
loaded.
1. Press the MODE and +
buttons until
appears in the DM-9 data
panel.
•
The data number is displayed in the DM-9’s data panel
after the back is closed when loading a new roll of
film.
• ▲ blinks under PRINT for 4
seconds when the data
number is imprinted.
• Data numbers start from 0001 and go to 9999. After 9999, the
data number resets to 0000 then cycles from 0001 to 9999
again.
• Press the camera’s DATA button to confirm the data number.
will blink in the data panel.
2. Press the + or – button
to select
.
•
will blink in the data
panel.
3. Press the MODE button
or press the shutterrelease button partway
down to enter the
selection.
• The data number will not be
imprinted until
is
selected or the DM-9’s battery
is replaced.
36
37
DM9E 12/15/98 11:37 AM Page 38
IMPRINTING INTENSITY
Imprinting intensity is set automatically when DX coded film is
loaded. The imprinting intensity can also be set manually when
necessary. There are eight manual imprinting intensity levels.
3. Press the MODE button
or press the shutterrelease button partway
down to return to
standard operation.
• Higher numbers indicate a stronger imprinting intensity.
• Manual imprinting intensities are set in 1EV increments.
• L6 is approximately equivalent to an ISO 100 exposure.
• The manual imprinting
intensity setting remains until
reset or the DM-9’s battery is
replaced.
• A manual imprinting intensity setting will need to be changed if
a different speed film is loaded into the camera.
Repeat the following procedure and select
to return to automatic selection of the
imprinting intensity level.
Select
imprinting.
1. Press the SELECT and +
buttons until
appears and the
intensity level blinks in
the data panel.
at step 2 to cancel all data
• The data number continues to be recorded even
when it is not imprinted.
• The data can still be displayed in the DM-9’s data
panel.
2. Press the + or – button
to select the desired
intensity level.
• A indicates the intensity
setting is automatic. L
indicates a manual setting.
•
indicates that
no imprinting will occur.
38
39
DM9E 12/15/98 11:37 AM Page 40
SYSTEM REQUIREMENTS
The following are required to read and
display the data stored on the SmartMedia
card on a PC monitor.
DATA RETRIEVAL
Retrieve, display, and print the data stored on the
SmartMedia card using your personal computer.
Personal Computer with software capable of
reading a plain text document.
• The Windows 95 and 98 operating systems have
been fully tested for compatibility with the data
formatted by the Data Memory Back DM-9.
One of the following adapters is required to
access the data on the SmartMedia card.
• PC Card Reader and a PC Card Adapter
- The Minolta PC Card Adapter CA-1S is only
compatible with 5V SmartMedia.
• Floppy Disk Adapter.
IMPORTANT
Do not write, rewrite, delete, or add additional data to
the SmartMedia card used by the Data Memory Back
DM-9 using a personal computer or another digital
device. The additional data will reduce the amount of
data the DM-9 can store on the SmartMedia card,
and the DM-9’s formatting may prevent the new data
from being recorded.
41
DM9E 12/15/98 11:37 AM Page 42
OPENING THE DATA FILE
The formatting used by the DM-9 stores the data collected
from each roll in a file identified by the same data number the
DM-9 imprints on the film leader.
• The DM-9 saves all the data, except the Nextdno file, to the
SmartMedia in DOS type text format.
• Data blocks are separated (delimited) by tabs.
• SmartMedia is not designed for long term data storage. We
recommend printing or transferring your data to a more
permanent storage media (floppy disk, MO, hard drive).
Data Display - Spreadsheet
The following instructions use Microsoft Excel as the example
spreadsheet application. Operation may differ with other
spreadsheet applications.
• Some spreadsheet applications may not be able to open the
data file.
• Refer to the manual for your spreadsheet program for data
editing instructions.
• Refer to page 45 to display the data file in plain text form.
SmartMedia Directory
The data is organized into folders. Each folder contains the
data from 100 rolls of film. 2 and 4MB SmartMedia have four
folders and can hold the data for up to 400 rolls of film.
• 8 and 16MB SmartMedia are formatted to have 9 folders to
record the data for up to 900 36-exposure rolls.
The following is a sample directory for a SmartMedia card
reformatted after the 156th roll of film.
Fdata1
Dno-0157.txt - Data stored in film area 1
Dno-0158.txt - Data stored in film area 2
1. Insert the SmartMedia card into the adapter (not
included), then insert the adapter into the
appropriate drive.
2. Launch Microsoft Excel.
3. Select File > Open, then select the drive supporting
the SmartMedia.
4. Select the file you want to open.
The Text Import Wizard will launch.
Dno-0256.txt - Data stored in film area 100
Fdata2
Dno-0257.txt - Data stored in film area 101
Dno-0258.txt - Data stored in film area 102
Dno-0306.txt - Data stored in film area 150
Fdata3
Fdata4
Nextdno
Do not delete the file Nextdno.
Nextdno is required to write/recall the data to/from the
SmartMedia.
42
Continued on following page
43
DM9E 12/15/98 11:37 AM Page 44
OPENING THE DATA FILE
5. Select the delimited data type Radio button and a
DOS file origin, then click Next.
The Text Import Wizard page 2 appears.
7. Select the Text column format radio button, then
click Finish.
• The text data format treats all the data as text. Other data
formats will treat the “/” character as a mathematical function.
Data Display - Plain Text
6. Select the Tab checkbox, then click Next.
The Text Import Wizard page 3 appears.
1. Insert the SmartMedia card into the adapter (not
included, p.41), then insert the adapter into the
appropriate drive.
2. Select the drive supporting the SmartMedia, then
double click the data file you want to open.
• If the .txt file extension is not recognized, launch your plain
text software then open the desired data file.
44
45
DM9E 12/15/98 11:37 AM Page 46
READING THE DATA
dno-0529
Frame Shutter FNo. Lens
1
250
4
50/1.4
2
300
4
50/1.4
3
12000 1.4 50/1.4
4
12000 1.4 50/1.4
5
Bulb
6.7 35/3.5
6
125
3.5 35/3.5
7
30”
16 85/4.5
8
30
4
35/3.5
+/- PASM Meter AF Area AFP/RP
0.0
P
Multi A
[]
AFP
+0.5
A
Multi S -oAFP
0.0
S
Multi C --o
RP
0.0
S
Multi C --o
RP
0.0
M
Ave M
--0.0
A
Multi M
--0.0
M
Multi S o-RP
0.0
P
Multi A
[]
AFP
Drive Flash FL+/- FLMeter ISO
DR-S OFF OFF
OFF
400
Self
ON
0.0
Multi
400
DR-C OFF OFF
OFF
400
DR-C OFF OFF
OFF
400
ME
OFF OFF
OFF
400
DR-S RedEye 0.0
Spot
400
DR-S Rear -0.5
Ave
400
DR-S
WL
+1.0
Multi
400
Up No.
01001
01002
01003
01004
01005
01006
01007
01008
Fix No.
12345
12345
12345
12345
12345
12345
12345
12345
yy/mm/dd
98/12/24
98/12/24
98/12/24
98/12/24
98/12/24
98/12/24
98/12/24
98/12/24
Time
15:26
15:41
15:52
15:52
19:39
20:03
20:44
21:10
• Refer to page 48 for data display notes
Data Number
imprinted on the film leader
Drive Mode
DR-S - Single Frame Advance
DR-C - Continuous Advance
BR-S - Bracketing-Single Frame
Advance
BR-C - Bracketing-Continuous
Advance
Self - Self Timer
ME - Multiple Exposure
exp bracketing increment incl.
Flash Mode
ON OFF RedEye
Rear WL -
Flash
Compensation Value
flash bracketing increment incl.
OFF - Flash did not fire
Flash Metering Mode
Multi - 4-Segment metering
Ave - Average metering
Spot - Spot metering
Frame Number
Shutter Speed
Aperture
Focal Length/ Largest
Aperture
Exposure
Compensation Value
Exposure Mode
Metering Mode
Multi- 14-Segment Metering
Ave- Center Weighted Average
Metering
Spot- Spot Metering
Focus Mode*
ACSM-
Automatic Autofocus
Continuous Autofocus
Single Shot Autofocus
Manual Focus
[]
-oo- --o
---
-Wide Focus Area
-Center Local Focus Area
-Left Local Focus Area
-Right Local Focus Area
-Manual Focus
Focus Frame*
Focus Priority*
46
AFP-AF Priority
RP-Release Priority
–Manual Focus
Flash on
Flash off
- Redeye reduction mode
Rear flash sync
Wireless/remote flash
mode
ISO
Count -up number
Fixed number
Date
format is always YY/MM/DD
Time
47
DM9E 12/15/98 11:37 AM Page 48
READING THE DATA
NOTES
• The Focus Mode, Focus Frame, and Focus Priority
data fields display the focus mode selected on the
camera even when a lens which must be focused
manually is mounted. Manual focus is only recorded
if the AF-mode switch is set to M .
APPENDIX
Handling Cautions
Battery Performance
• The Maxxum/Dynax 9’s battery performance decreases
when the Data Memory Back DM-9 is attached. When
mounted, the DM-9 is powered by the batteries in the
camera.
Operating Temperature
• Data can be saved to memory in the temperature range
from 0 to 50 °C (32 to 122 °F).
• Data can only be imprinted to film in the temperature
range from -20 to 50 °C (4 to 122 °F).
• Never leave this product where it may be subjected to
extreme temperatures such as the glove compartment of a
car.
• Data panel response time will be slow at colder
temperatures. The display will temporarily darken at higher
temperatures, but will restore when the temperature
normalizes.
Mid Reload Function
• A separate data file is written to the SmartMedia each time
a roll of film is loaded into the camera. Film reloaded two
or more times will have two or more data numbers and
data files.
48
DM9E 12/15/98 11:37 AM Page 50
TROUBLESHOOTING
indicates that the enclosed items are blinking.
• When inserting a new SmartMedia card after a CArdErr,
press the DATA button in the camera’s data panel to make
SmartMedia card is full. Data
will be overwritten.
sure the data memory function is on (p. 19).
• Data is not recorded by the DM-9 or the camera when
[CArdErr] blinks in the DM-9 data panel.
Card not inserted. Appears
when the shutter release or
data button are pressed (p.16).
Back is open, not mounted, or
the contacts aren’t clean.
SmartMedia card not inserted
properly.
SmartMedia card not usable.
SmartMedia card is write
protected. Remove the writeprotect seal to read or write
data.
Replace the battery.
Back closed without inserting a
SmartMedia card after changing
the battery. Data number will
not be imprinted. Turn the
camera’s main switch to LOCK,
insert a SmartMedia card, then
turn the main switch to ON.
SmartMedia card is not
formatted properly for use in
this device. Remove and insert
a new card or reformat (p.28).
Data not successfully recorded
to the card at rewind.
To Record the Data
Data being recorded. Do not
remove the Batteries or the
SmartMedia card or open the
back of the camera.
Card being formatted. Do not
remove the Batteries or the
SmartMedia card or open the
back of the camera.
50
1. Remove the rewound film.
2. Close the back cover (do not load a new roll).
3. Format or replace the SmartMedia card.
4. Open the control panel door, then press the rewind
button.
• Data is recorded to the SmartMedia card.
• dAtA REc appears in the DM-9 data panel.
51
DM9E 12/15/98 11:37 AM Page 52
CARE AND STORAGE
Cleaning
• If the data memory back is dirty, wipe it gently with a soft,
clean, dry cloth. If it comes in contact with sand, gently
blow away loose particles - wiping may scratch the
surface.
• Never use organic solvents to clean the data memory
back.
SPECIFICATIONS
Type
Storage Media
Format Type
File Type
Data Memory Items
Storage
• Attach the DM-9 to the camera body when storing (lithium
batteries should be installed in the camera during storage).
If the VC-9 is attached during storage remove alkaline
batteries and set the power source dial to a lithium power
source.
• The life of the DM-9’s battery will be extremely short if it is
not attached to the camera body during storage.
• Store in a cool, dry, and well-ventilated area away from
dust and chemicals such as moth balls. For long periods,
place the DM-9 in an airtight container with a silica gel
drying agent.
Data Imprinting
Method
Imprinted Items
Questions and Service
• If you have questions about this device, contact your local
camera dealer or write to the Minolta distributor in your
area.
• Before shipping this device for repair, please contact an
authorized Minolta Service Facility for details.
Data Memory Back
3.3 and 5V SmartMedia (2, 4, 8,
and 16MB)
DM-9 optimized file format
plain text (.txt)
shutter speed, aperture, focal
length/smallest f#, exposure
compensation (exp. bracket
increment included), exposure
mode, metering mode, AF
mode, focus area, AF/Release
priority, drive mode, flash mode,
Flash compensation (flash
bracket increment included),
flash-metering mode, ISO,
count-up number, fixed number,
YY/MM/DD, Hr/Min
LED exposure through the back
of the film
Data number exposed on the
leader. User selected data
exposed in between the frames.
Operating Temperature Data Memory:
Power Source
Dimensions
Weight (w/o battery)
0~50 °C
(32~122 °F)
Data Imprinting: -20~50 °C
(4~122 °F)
(1) CR2025
147 x 59 x 17.5mm
(5.8 x 2.0 x 0.7 in.)
125g (4.41 oz.)
Specifications are based on the latest information available at
the time of printing and are subject to change without notice.
52
53
DM9E 12/15/98 11:37 AM Page 54
Minolta Co., Ltd.
3-13, 2-Chome, Azuchi-Machi, Chuo-Ku, Osaka
541-8556, Japan
Kurt-Fischer-Strasse 50, D-22923 Ahrensburg,
Germany
Minolta France S.A.
365 Route de Saint-Germain, F-78420 Carrieres-SurSeine, France
Minolta (UK) Limited
7 Tanners Drive, Blakelands, Milton Keynes, MK14
5BU, England
Minolta Austria Ges. m.b.H.
Amalienstrasse 59-61, A-1131 Wien, Austria
Minolta Camera Benelux B.V. Zonnebaan 39, P.O. Box 6000, NL-3600 HA
Maarssen, The Netherlands
Belgium Branch
Kontichsesteenweg 38, B-2630 Aartselaar, Belgium
Minolta (Schweiz) AG
Riedstrasse 6, CH-8953 Dietikon, Switzerland
Minolta Svenska AB
Albygatan 114, S-171 54 Solna, Sweden
Finland Branch
Niittykatu 6 PL 37, SF-02201 Espoo, Finland
Minolta Portugal Limitada
Av. do Brasil 33-A, P-1700 Lisboa, Portugal
Minolta Corporation
Head Office
101 Williams Drive, Ramsey, New Jersey 07446,
U.S.A.
Los Angeles Branch
11150 Hope Street Cypress, CA 90630, U.S.A.
Minolta Canada Inc.
Head Office
369 Britannia Road East, Mississauga, Ontario L4Z
2H5, Canada
Vancouver Branch
230-3771 Jacombs Road, Richmond, B.C. V6V 2L9,
Canada
Minolta Hong Kong Limited Room 208, 2/F, Eastern Center, 1065 King’s Road,
Quarry Bay, Hong Kong
Minolta Singapore (Pte) Ltd. 10, Teban Gardens Crescent, Singapore 608923
Shanghai Minolta Optical
Products Co., Ltd.
368 Minolta Road, Songjiang, Shanghai, China
Minolta GmbH
© 1998 Minolta Co., Ltd. under the Berne Convention and Universal
Copyright Convention
Printed in Japan
9222-2098-11 P-A811