1
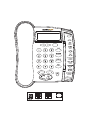
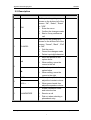
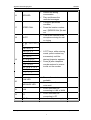
Signamax Connectivity System
065-9013
Signamax™ Connectivity Systems
VoIP IP Phone
Model:065-9013
User’s Manual
www.signamax-us.com
www.signamax-eu.com
1
Signamax Connectivity System
065-9013
CONTENTS
CONTENTS .................................................................................................................................................. 1
1. TECHNICAL PARAMETERS INTRODUCTION............................................................................... 4
1.1 CONTENTS .......................................................................................................................................... 4
1.1.1 Standard: ................................................................................................................................... 4
1.1.2 Optional: .................................................................................................................................... 4
1.2 SUPPORT PROTOCOL .......................................................................................................................... 4
1.3 SUPPORT CODEC ................................................................................................................................ 4
1.4 HARDWARE PARAMETERS .................................................................................................................. 5
1.4.1 Standard: ................................................................................................................................... 5
1.4.2 Optional: .................................................................................................................................... 5
1.5 ENVIRONMENT .................................................................................................................................... 5
2. DESCRIPTION OF KEYPAD ................................................................................................................ 6
2.1 SILKSCREEN ........................................................................................................................................ 6
2.2 DESCRIPTION ...................................................................................................................................... 7
3. PHONE CONFIGURATION ................................................................................................................ 10
3.1 NETWORK CONFIGURATION .............................................................................................................. 10
3.1.1 Select IP Addressing Mode................................................................................................... 10
3.1.2 Configure Network Parameters.............................................................................................11
3.1.3 Review Network Parameters ................................................................................................ 12
3.2 USER ACCOUNT CONFIGURATION .................................................................................................... 13
3.3 CHANGE PASSWORDS OF USER AND ROOT ..................................................................................... 17
3.4 CONFIGURE THE PARAMETERS OF UPGRADE AND UPGRADE .......................................................... 18
3.5 FACTORY SETTINGS .......................................................................................................................... 21
3.6 CONFIGURE BY WEB BROWSER ....................................................................................................... 21
4. PHONE FUNCTIONS OPERATION................................................................................................... 28
4.1 CALL FUNCTIONS .............................................................................................................................. 28
4.1.1 Make a Call ............................................................................................................................. 28
4.1.2 Redial ....................................................................................................................................... 29
4.1.3 Speed Dial ............................................................................................................................... 29
4.1.4 Receiving a Call...................................................................................................................... 30
4.1.5 Call Hold .................................................................................................................................. 30
4.1.6 Call Transfer ............................................................................................................................ 30
4.1.7 Call Waiting ............................................................................................................................. 30
www.signamax-us.com
www.signamax-eu.com
2
Signamax Connectivity System
065-9013
4.1.8 Call Forward...................................................................................................................................... 31
4.1.9 Shared Lines Function........................................................................................................... 31
4.1.10 3-way Conference................................................................................................................ 31
4.1.11 Conference Function............................................................................................................ 31
4.1.12 Do Not Disturb (DND).......................................................................................................... 31
4.1.13 Mute ....................................................................................................................................... 31
4.2 TIME SETTING ................................................................................................................................... 32
4.3 RING, VOLUME AND SIDETONE ......................................................................................................... 33
4.4 SPEVOLUME OF CALL ADJUSTING .................................................................................................... 35
4.5 PHONEBOOK ...................................................................................................................................... 35
4.6 CALL LOG .......................................................................................................................................... 36
4.7 MESSAGE AND RECORD .................................................................................................................... 37
4.7.1 Message .................................................................................................................................. 37
4.7.2 Recording Function ................................................................................................................ 38
4.7.3 Recording Message Specifications ..................................................................................... 38
4.8 NETWORK CHECKING ........................................................................................................................ 38
4.9 PHONE LOGO .................................................................................................................................... 38
4.10 PHONE LOCK ................................................................................................................................... 38
4.11 HARDWARE EXAMINATION ............................................................................................................... 39
4.12 PROVISION ...................................................................................................................................... 39
www.signamax-us.com
www.signamax-eu.com
3
Signamax Connectivity System
065-9013
1. TECHNICAL PARAMETERS INTRODUCTION
1.1 Contents
1.1.1 Standard:
Telephone base unit
Handset
Handset cord
Power adaptor
User’s manual
1.1.2 Optional:
RJ-45 Ethernet cable
Headset
CD
1.2 Support Protocol
SIP: RFC3261
DTMF: inband, RFC2833, SIP Info
RTP: RFC1889
RTCP: RFC3605, RFC3611
DNS: RFC1035
FTP: RFC959
TFTP: RFC1350
HTTP: RFC1945, RFC2616
SNTP: RFC1361, RFC2030
SNMP: RFC1157
STUN: RFC3489
DHCP: RFC2131, RFC2132
PPPoE: RFC2516
NAT: RFC1631, RFC2663
1.3 Support Codec
G.711a
G.711µ
G.722*
G.723.1 5.3/6.3
G.729AB
www.signamax-us.com
www.signamax-eu.com
4
Signamax Connectivity System
065-9013
1.4 Hardware Parameters
1.4.1 Standard:
CPU: Infineon PSB21553
Data Memory: 8MB SDRAM
Software Memory: 2MB Flash memory
Ethernet Port: 2 RJ-45 plugs,IEEE802.3 10/100 Base-T
Power Adaptor: Input 110-250V, Output 5V DC, 1A
Keypad: 36keys
LCD: 4x20 char-based, white backlight
LED: 2 Leds
1.4.2 Optional:
Data Memory: 16MB/32MB SDRAM
Software Memory: 4MB/8MB Flash memory
PoE: 802.3af
LCD:128x64 Pixel-base with blue/white backlight
Headset Port: RJ-7 or 3.5mm plug set
1.5 Environment
Operating Temperature: 0℃ to 50℃(32℉ to 122℉)
Storage Temperature: -10℃ to 60℃(14℉ to 140℉)
Relative Humidity: 10% to 90%, non-condensing
www.signamax-us.com
www.signamax-eu.com
5
Signamax Connectivity System
065-9013
2.2 Description
NO.
1
2
TITLE
DEFINITION
OK
Soft key for the guiding text
shown on the bottom-left of the
screen: “OK”, “Select”, “Erase”
or “YES”
Enter the menu
Confirm the changes made
Start a 3-way conference
call
CANCEL
Soft key for the guiding text
shown on the bottom-left of the
screen: “Cancel”, “Back” , “Exit”
or “NO”
Quit the menu
Cancel the changes made
Delete input digit/character
W
Move the pointer to the
option above
When editing, move the
cursor to the left
X
Move the pointer to the
option below
When editing, move the
cursor to the right
3
4
5
MIC +
-
VOL +
-
HANDSFREE
NOTE
When pick up the handset,
adjust the handset volume
When press hands free,
adjust the speaker volume
Enable handsfree mode
and seize the line
Receive a call
Dial out when selecting a
phonebook entry
www.signamax-us.com
www.signamax-eu.com
7
Signamax Connectivity System
6
7
REDIAL
HOLD
065-9013
Dial out the last called
number in
talk/speakerphone mode
Switch the input mode
between the number and
the character when editing
Enter the list of number
dialed
During the call, put a call on
hold
Press and hold to enter the
upgrade firmware menu
Check the phone’s IP in
idle mode
8
TRANSFER
Transfer the call during a
call
9
FORWARD
Enter call forward setting
menu
10
DND
Enable Do Not Disturb
function
LINE1
LINE2
11
LINE3
Receive the new call
during the call
Make a new call during
the call
Switch between different
conversations
12
CONF
Diagnose network status
when in idle mode
Establish platform
supported conference call
13
PHONEBOOK
Add/search/edit/erase the
phonebook entries
14
CALL LOG
Check/edit/erase/empty the
received, called and missed
entries
15
MESSAGE
Access platform’s voice
mail
www.signamax-us.com
www.signamax-eu.com
8
Signamax Connectivity System
16
17
RECORD
SPEED DIAL
065-9013
Record call during
conversation
Play and Access the
recorded messages
Configure speed dial
numbers
Press the location number
and 【SPEED DIAL】to dial
out
18
MUTE
Turn off the volume of the
microphone during the call
or ringing
1.@,:%!?<>()
&'"
abcABC2
defDEF3
ghIGHI4
jklJKL5
19
mnoMNO6
pqrsPQRS7
tuvTUV8
wxyzWXYZ9
CCITT keys, while entering
words, press number key
successively until the
desired character appears.
Press [#] after telephone
number entered to ensure
to dial out the number
(blank) 0
*/ + - =
#
LINK LED
Turn on if service is not
available
MESSAGE LED
Turn on when there is new
voice mail
21
LAN
RJ-45 connector for
connecting to LAN or WAN
22
PC
RJ-45 connector for
connecting to PC
23
DC-5V
Interface of power supply
20
www.signamax-us.com
www.signamax-eu.com
9
Signamax Connectivity System
065-9013
3. PHONE CONFIGURATION
NOTE:
1. It will take 15 seconds to start up because of network initialization.
Please wait and DO NOT cut off power.
2. DO NOT cut off power during upgrading. Maybe it will lead to fatal error.
3. The default user name and password of the phone and web
configuration are user/000000 and root/111111. Please DO remember
your password if you have it changed.
3.1 Network Configuration
If the network administrator assigns your phone a static IP or the DHCP
function has been disabled (generally enterprise users having LAN network
use this mode), please refer to Static Mode.
If the network administrator has enabled the DHCP function, and the phone
get IP address by DHCP, please refer to DHCP Mode.
If you connect to the Internet directly by ADSL (most home users and
company users without LAN use this mode), please refer to PPPoE Mode.
3.1.1 Select IP Addressing Mode
1. In idle mode, Press【OK】to enter the main menu, select【User】.
Settings
1
&User
▌
▌
Back
Root
Select
2. You are prompted to enter the password.
Password
******
OK
123
6/20
Clear
3. Select【Network】, And the current setting is displayed. The example below is
in Static Mode.
User
Network
1-1
▌
▌
Back
Select
www.signamax-us.com
www.signamax-eu.com
10
Signamax Connectivity System
065-9013
Network
External mode
1-1-1
▌
STATIC ▌
Back
Select
4. Enter the【External Mode】 menu. Select a correct IP addressing mode: Static,
DHCP or PPPoE.
1-1-1-1
&STATIC
▌
▌
Back
DHCP
Select
3.1.2 Configure Network Parameters
STATIC Mode
Select 【STATIC】 mode, enter the network parameters by the telephone keypad.
1. Enter the IP address. It is default separated into 4 parts; each part consists of
3 digits. For example: 192.168.1.58 can be entered as in sequence as
“1921681【RIGHT】58” or “1921681*58”.
Ext
ip
address
192.168. 1 .58
OK
Back
2. Enter the gateway address.
Ext gw
address
192.168. 1 . 4
OK
Back
3. Enter the subnet mask address.
Ext
subnet
255.255.255. 0
mask
OK
Back
4. Enter the DNS address. You can input 3 DNS servers, it is no need to input all
3 DNS entries.
Ext dns1
192.168. 1 . 4
OK
Back
www.signamax-us.com
www.signamax-eu.com
11
Signamax Connectivity System
065-9013
DHCP Mode
1. Select【DHCP】mode and return, there is no need to input any other parameter.
Network
External mode
1-1-1
▌
DHCP ▌
Back
Select
PPPoE mode
1. Select【PPPoE】mode.
Network
External mode
1-1-1
▌
PPPoE ▌
Back
Select
2. Enter the PPPoE user ID provided by the service provider. The username for
example below is “user”.
PPPoE user ID
User
OK
abc
4/40
Back
6/40
Clear
3. Enter the password.
Password
******
OK
abc
4. Return and reboot the phone, The LCD will be displaying “ PPPoE
connecting…” until registration succeeds. If not, the phone will prompt to
reconnect again.
PPPoE connecting ……
If fail, please check your configuration or contact your ADSL service provider.
Retry?
Yes
No
3.1.3 Review Network Parameters
www.signamax-us.com
www.signamax-eu.com
12
Signamax Connectivity System
065-9013
Enter 【External NIC】 menu or press 【HOLD】 in idle mode, then use 【W】
and 【 X】 to review all the parameters.
3.2 User Account Configuration
1. In idle mode, press 【OK】 to enter the main menu and select 【Root】 menu.
And enter the root password.
Settings
User
2
▌
&Root
▌
Back
Select
Password:
******
OK
123
6/20
Back
2. Enter【Line1 Settings】 menu, select 【Line1】 menu.
Root
Line1 Settings
2-1
▌
▌
Back
Select
Line1 Settings
Line1
2-1-1
▌
&Crypto1
▌
Back
Select
3. Enter the proxy server edit mode, then input the proxy server address.
Line1
Proxy
2-1-1-1
▌
xxx.xxx.xxx ▌
Back
Server
Select
Proxy Server
xxx.xxx.xxx
OK
abc
11/40
Clear
4. Enter the proxy server port.
www.signamax-us.com
www.signamax-eu.com
13
Signamax Connectivity System
065-9013
Line1
Proxy
2-1-1-2
▌
xxxx ▌
Back
Port
Select
Proxy Port
xxxx
OK
123
4/6
Clear
5. Enter the username provided by service provider.
Line1
UserName
2-1-1-3
▌
123456 ▌
Back
Select
UserName
123456
OK
123
6/40
Clear
6. Enter the auth name ( This parameter maybe is the same as username, or you
can leave it blank ).
Line1
Auth Name
2-1-1-4
▌
▌
Back
Select
Auth Name
123456
OK
abc
6/40 Clear
7. Enter the password.
Line1
Password
2-1-1-5
▌
****** ▌
Back
Select
www.signamax-us.com
www.signamax-eu.com
14
Signamax Connectivity System
065-9013
Password
******
OK
123
6/40
Clear
8. Enter the realm address.
Line1
Realm
2-1-1-6
▌
xxx.xxx.xxx ▌
Back
Select
Realm
xxx.xxx.xxx
OK
abc
11/40
Clear
9. If you need to setup parameters for register interval, heartbeat interval, options
interval or DTMF mode and so on, configure them in a similar way.
10. Return the menu to one level up, select【Crypto1】 menu, input the encrypt
server address.
Line1 Settings
Line1
2-1-2
▌
&Crypto1
▌
Back
Select
Crypto1
Encrypt server ip
Select
2-1-2-1
▌
xxx.xxx.xxx ▌
Back
Encrypt server ip
xxx.xxx.xxx
OK abc
11/49
Clear
11. Enter the encrypt server port.
Crypto1
Encrypt server port
Select
www.signamax-us.com
2-1-2-2
▌
55060 ▌
Back
www.signamax-eu.com
15
Signamax Connectivity System
065-9013
Encrypt server port
55060
OK 123 5/6
Clear
12. Enter the encrypt depth, 128 or 256.
Crypto1
Sip Encrypt depth
Select
2-1-2-3
▌
256 ▌
Back
Sip Encrypt depth
256
OK 123 3/10
Clear
13. Select the Cryptographic algorithm.
Crypto1
SIP crypt
2-1-2-4
▌
None ▌
Back
Select
SIP crypt
None
2-1-2-4-2
▌
&AES
▌
Back
Select
14. Return the menu to one level up, select 【Forward1】 menu to configure
forward parameters.
Line1 Settings
2-1-3
Crypto1
▌
&Forward1
▌
Back
Select
Forward1
Forward Type
2-1-3-1
▌
None ▌
Back
Select
15. Select a forward type from 【None】, 【All】, 【Busy】, 【No Answer】.
www.signamax-us.com
www.signamax-eu.com
16
Signamax Connectivity System
065-9013
2-1-3-1-2
None
▌
&All
▌
Back
Select
16. Enter the forward number.
Forward1
Forward No
2-1-3-2
▌
10000 ▌
Back
Select
Forward No
10000
OK 123
5/39
Clear
You can also press 【FORWARD】 key in idle mode to configure forward
parameters, input the password of root, enter Forward menu to set them.
17. If you have more accounts, configure Line2 and Line3 in similar way. Please
set the switch of Line2 and/or Line3 to 【on】, if you want to enable Line2
and/or Line3. If not, please set them to 【off】.
Line2 Settings
Sip Switch2
2-2-1
▌
On ▌
Back
Select
18. Return to reboot the telephone. If the registration is successful, the “U” on the
upper left corner of LCD will be disappeared, the link led will be turned off, the
telephone is ready for making calls.
3.3 Change Passwords of User and Root
1. In idle mode, press 【OK】 to enter main menu, select 【User】 menu, input
the password of User.
Settings
1
& User
▌
▌
Back
Root
Select
2. Select 【User Password】 menu.
www.signamax-us.com
www.signamax-eu.com
17
Signamax Connectivity System
065-9013
Select
Back
If using default setting, the route of upgrade will be directly to our update
server, the parameters about such upgrade cannot be changed.
Update config
Use default
1-1
▌
Yes ▌
Back
Select
If you want to set the route by yourself or set it to another address, please
change “Use default” to “No”.
Use dafault
1-1-1
&No
▌
▌
Back
Yes
Select
Enter the update server address.
Update config
1-2
FTP Serveraddr
▌
xxx.xxx.xxx ▌
Select
Back
FTP Serveraddr
xxx.xxx.xxx
OK
abc
11/30
Clear
Enter the update server port.
Update config
FTP Port
1-3
▌
21▌
Back
Select
FTP Port
21
OK
123
2/6
Clear
Enter the path of files.
www.signamax-us.com
www.signamax-eu.com
19
Signamax Connectivity System
065-9013
Update config
FTP Path
1-4
▌
/update ▌
Back
Select
FTP Path
/update
OK
abc
7/30
Clear
Enter the username of server.
Update config
FTP User
1-5
▌
user ▌
Back
Select
FTP User
user
OK
abc
4/30
Clear
Enter the password of server.
Update config
FTP Password
1-6
▌
password▌
Back
Select
FTP Password
password
OK
abc
8/30
Clear
4. Make sure that the parameters are correct, then back to select 【Update】 and
press 【OK】, the phone will connect the update FTP server to check version
of program and upgrade.
Update
Update config
&Update
1
▌
▌
Back
Select
www.signamax-us.com
www.signamax-eu.com
20
Signamax Connectivity System
065-9013
3.5 Factory Settings
NOTE: This operation will erase all parameters and reset them to factory
settings, please consult the network administrator first.
1. Enter 【ROOT】 menu, select 【RESET】.
Root
Reset
▌
Select
2-7
▌
Back
2. Press 【OK】, the phone will display warning message.
Warning! This operation will
delete all user settings.
OK
Cancel
3. Press 【OK】, the phone will restart automatically.
Phone is rebooting.
3.6 Configure by Web Browser
065-9013 IP Phone has a built-in HTTP server for the user to do the configuration
via web browser. Editing the parameters on the web, then press “apply” at lower
right corner and reboot the phone to make the change activated.
1. Launch IE on a computer. In the address field of IE, enter the IP address of the
phone (press【HOLD】in idle mode to check the Phone’s IP address), and then
select the user name (user or root) and input password to logon.
2. After logon, the page will show the current settings about account and
network.
www.signamax-us.com
www.signamax-eu.com
21
Signamax Connectivity System
065-9013
4. PHONE FUNCTIONS OPERATION
4.1 Call Functions
4.1.1 Make a Call
1. In idle mode, pick up the handset or press【HANDFREE】,or press【Line1】
【Line2】
【Line3】, dial the telephone number, press【#】to make a call. If there
is a dial plan, the call number will be limited by the dial plan.
Pick up the handset:
1
Dialing
00:00:00
1
Calling
1234567
2 Idle
3 Idle
00:00:00
2 Idle
3 Idle
During calling:
Dialed number connected:
1
Connected
1234567
2 Idle
3 Idle
00:00:04
Called party hangs up:
1
Closed
1234567
2 Idle
3 Idle
00:00:00
Call failed:
1
Fail
00:00:00
1234567
2 Idle
3 Idle
2. Make a call from phonebook (also refer section 4.5 for editing phonebook
entry):
In idle mode, press【W】or【X】or use “search” function in phonebook to find
the party you want to make a call.
www.signamax-us.com
www.signamax-eu.com
28
Signamax Connectivity System
065-9013
Name1
▌
Name2
▌
Name3
▌
Detail
Exit
Select the name, press【OK】, then select the tel number or mobile number,
pick up handset or press【HANDFREE】to start the call.
3. Make a call from call log:
In idle mode, press【CALL LOG】to select Missed/Received/Dialed call list and
then select the number, then pick up handset or press 【HANDFREE】to start
the call.
4.1.2 Redial
In dialing mode, press【REDIAL】to call the last number dialed.
4.1.3 Speed Dial
In idle mode, press 【SPEED DIAL】to enter speed dial menu, Select an empty
item which shows “None” and at the bottom of this item, “Speed Dial Num: [0]”
means its speed dial number is 0. Press【OK】and input telephone number, then
return. There are total 10 speed dial memory locations, from 0 to 9.
None
Speed
Select
Dial
1
▌
Num : [0]
▌
Back
Reset Speed Dial:
123457
OK
123
1
123457
Speed Dial
Select
6/20
Clear
Num : [0]
▌
▌
Back
1. In idle mode, press the speed dial number, and then press【SPEED DIAL】,the
phone will dial out the number stored in that memory location.
2. In idle mode, press and hold the speed dial number, the phone will then dial
out the number stored in that memory location.
www.signamax-us.com
www.signamax-eu.com
29
Signamax Connectivity System
065-9013
4.1.4 Receiving a Call
When the phone is ringing, the incoming call number will be displayed on the LCD.
Pick up the handset or press【HANDFREE】to answer the call.
Ringing:
1
Ringing
1234567
2 Idle
3 Idle
00:00:00
1
Connected
1234567
2 Idle
3 Idle
00:00:04
1
Closed
1234567
2 Idle
3 Idle
00:00:00
Connected:
Calling party hangs up:
4.1.5 Call Hold
During a call, press【HOLD】 to put the call on hold. Press 【HOLD】again to
resume the call.
1
Holding
1234567
2 Idle
3 Idle
00:00:00
4.1.6 Call Transfer
During a call, press【TRANSFER】and enter the phone number to which you want
the call to be transferred, then press【#】to transfer the call.
NOTE: The usages of TRANSFER may be different according to different VoIP
service providers. Please consult your server provider if any problem.
4.1.7 Call Waiting
When new call comes during a call (assume using LINE 1), user will hear a hint
tone. If user does nothing, the new call will be ignored. Or user can press
www.signamax-us.com
www.signamax-eu.com
30
Signamax Connectivity System
065-9013
【LINE2】 to receive the new call (assume the new call is from LINE 2), and
then the previous call will be held. And then press【LINE1】to resume the previous
call and the new call becomes to be held.
4.1.8 Call Forward
If call forward function is enabled, the incoming call will be forwarded to the
number as per the configuration. Also refer to section 3.2, item 15 for the setup of
call forward.
4.1.9 Shared Lines Function
When new call comes or user wants to make a new call during a call, the use can
use the Shared Lines function if supported by service provider. While making a
new call or the LCD indicating a new call coming, user can press another line key
(for a new coming call, press the line as LCD indicated). The original call is put on
hold, press the corresponding【LINE】to Switch between different conversations.
4.1.10 3-way Conference
If the user want to make a conference for three persons, first establish call with A,
press another 【LINE】and dial to B, then press【OK】to establish the conference
call.
4.1.11 Conference Function
This function needs platform support. First establish call with A, then press
【CONF】 and dial to B, press【CONF】to have B joined the conference. Repeat
the steps to get other people to join the conference call. Finally press【CONF】
once more to make yourself join the conference call.
4.1.12 Do Not Disturb (DND)
In idle mode, press【DND】and the unit will be in Do Not Disturb mode. Press the
key again, it will disable the function. In DND mode the phone will not ring. (The
information received by the call will depend on the platform).
AUG 11
05:10:32
DND
4.1.13 Mute
During talk mode, press【MUTE】to turn off the microphone. Press【MUTE】again
www.signamax-us.com
www.signamax-eu.com
31
Signamax Connectivity System
065-9013
to deactivate the function. When the phone is ringing, press 【MUTE】, the ring
will be shut off.
4.2 Time Setting
1. In idle mode, enter User setting menu. Select the option【Clock】. Set the date
by entering year, month and day.
User
Clock
1-3
▌
▌
Back
Select
Clock
Date
Select
1-3-1
▌
Fri 2006-08-04 ▌
Back
ٛٛٛٛٛٛٛٛٛٛٛٛٛٛٛٛٛٛٛٛٛٛٛٛٛٛٛٛٛٛٛٛٛٛٛٛٛٛٛٛٛٛٛ
Current
date:
2006-08-04
OK
Back
2. Select【Time】. Set the time by entering hour, minute and second.
Clock
Time
1-3-2
▌
15:36:18 ▌
Back
Select
Current
time:
15:36:18
OK
Back
3. Select【GMT offset】. The default is “+08:00” meaning Eastern District 8.
Clock
GMT Offset
1-3-3
▌
+08:00 ▌
Back
Select
www.signamax-us.com
www.signamax-eu.com
32
Signamax Connectivity System
065-9013
&GMT+08:00
GMT+09:00
GMT+10:00
OK
Exit
4. To get the time from network time server, select【SNTP Server】. The phone
has 9 time network servers. Select the desired server.
Clock
SNTP Server
time-nw.nist.gov
Select
SNTP Server
time-nw.nist.gov
Select
1-3-4
▌
▌
Back
1-3-4-8
▌
▌
Back
5. Select【Synchronization】. The phone will start synchronizing with the network
time server.
Clock
Synchronization
Select
1-3-5
▌
▌
Back
Time synchronizing...
4.3 Ring, Volume and Sidetone
1. In idle mode, enter the User menu and select【Tones】. Press【OK】again to
enter Ringing tone menu. Select the ringer type (type 1 to type 5) for incoming
call.
User
Tones
1-2
▌
▌
Back
Select
www.signamax-us.com
www.signamax-eu.com
33
Signamax Connectivity System
065-9013
Tones
Ringing tone
Select
Ringing tone
1-2-1
▌
Type 2 ▌
Back
1-2-1-2
&Type1
▌
▌
Back
Type2
Select
2. Select【Ringing volume】. User can select the volume level (from level 1 to
level 5).
Tones
Ringing volume
1-2-2
▌
Level 2 ▌
Back
Select
1-2-2-1
&Level1
▌
▌
Back
Level2
Select
3. Incoming call alert.
Tones
Incoming call alert
Select
1-2-3
▌
Ringing ▌
Back
1-2-3-1
&Ringing
▌
▌
Back
Off
Select
4. Adjust sidetone (level 1-10, and off)
Tones
Sidetone Volume
Select
www.signamax-us.com
1-2-4
▌
Off ▌
Back
www.signamax-eu.com
34
Signamax Connectivity System
065-9013
1-2-4-1
&Off
▌
▌
Back
Level 1
Select
4.4 SpeVolume of Call Adjusting
In dialing mode or during a call, press【MIC】to adjust the microphone volume.
Press【VOL】to adjust the volume of receiver (in handset mode) or speaker (in
speakerphone mode).
4.5 Phonebook
In idle mode, press【PHONEBOOK】to enter phonebook menu.
1. Select【ADD】to add new entry to the phonebook. You are prompted to input
name. If no name is entered, it will be saved as “Noname”.
Then edit telephone number and mobile number. At least input one number or
the item will not be saved.
-Name Search
2
▌
&Add
▌
Back
Select
Name:
_
OK
abc
0/19
Back
123
0/20
Back
123
0/20
Back
Tel:
_
OK
Mobile:
_
OK
2. Select【Search】. There are 3 methods: Name, Tel and Mobile. Select a method
and input number or name. Then the results will be indicated.
www.signamax-us.com
www.signamax-eu.com
35
Signamax Connectivity System
065-9013
Search by...
1
&Name
▌
▌
Back
Tel
Select
3. Select【Erase】. User can delete items one-by-one or delete all items.
NOTE: The deleted items cannot be recovered, so please be cautious
when performing this operation.
-Erase-
1
&One-by-one
▌
▌
Back
All
Select
4.6 Call Log
1. In idle mode, press【CALL LOG】to enter the call log menu. Select missed calls,
received calls or dialed call list.
-Call-
1
&Missed
[1/60] ▌
[29/60] ▌
Back
Received
Select
Missed-1
123456
08-04-2006 17:04:52
Select
▌
▌
Back
2. While an entry is selected, press【OK】to enter the edit mode. The edit mode
has 4 options: SAVE, EDIT, ERASE, and EMPTY LOG.
No [123457]
1
&save
▌
▌
Back
edit
Select
No [123457]
4
erase
▌
&empty log
▌
Back
Select
ⅰ. SAVE: User can save the number as Tel or Mobile to Phonebook.
www.signamax-us.com
www.signamax-eu.com
36
Signamax Connectivity System
065-9013
Save number to...
&Tel
1
▌
▌
Back
Mobile
Select
Name
_
OK
abc
0/20
Back
ⅱ. EDIT: User can edit the telephone number.
Reset number to:
123457
OK
123
6/20
Clear
ⅲ. ERASE: The unit will prompt you if you are sure to erase the entry.
Erase 123457?
Yes
No
ⅳ. EMPTY LOG: The unit will prompt you to confirm if you want to empty the
all entries of the selected call log.
NOTE: The operation will delete all entries of selected log and cannot be
recovered.
Empty log?
Yes
No
4.7 Message and Record
4.7.1 Message
1. This function requires platform support. In idle mode, press【MESSAGE】will
call directly to the mailbox of the platform and the user can hear messages
recorded in his/her mailbox.
2. Some platforms show on the LCD how many new messages and/or the total
number of messages left in the mailbox, for example: Msg:1/5.
www.signamax-us.com
www.signamax-eu.com
37
Signamax Connectivity System
065-9013
4.7.2 Recording Function
1. Recording: Press【RECORD】during a call to record the phone conversation.
Recording can be pauses and stopped.
2. Play back recording messages: In idle mode, press【RECORD】.
3. Delete recording messages: During message playback, press【OK】.
WARNING: Recording of phone conversation may be illegal in some
countries or areas. This phone only provides recording function and the
company is not responsible for any legal disputes that may arise.
4.7.3 Recording Message Specifications
Recording time: total 10 minutes
Recording format: high quality compressed digital stream
Messages storage: Flash memory (messages will not be erased in case of power
failure)
NOTE: When rebooting the phone, all recorded messages will be deleted.
4.8 Network Checking
In idle mode, press【CONF】to diagnose network status. The LCD will indicate the
speed connecting to the server.
4.9 Phone Logo
Through the web browser, it can configure the phone logo to be displayed on the
LCD. Logo1 will be shown on the second line of the display and Logo2 will be
shown on the third line. For example, if “VOIP” is entered in Logo1 and “Welcome”
is entered in Logo2:
Aug
11
17:53:12
VOIP
Welcome
4.10 Phone Lock
In idle mode, long press【MUTE】to lock phone. Input either the user or the root
password to disable the phone lock. Under phone lock condition, user can only
receive call and cannot dial any number.
www.signamax-us.com
www.signamax-eu.com
38
Signamax Connectivity System
065-9013
Aug 11
17:53:12
System locked
Password<_
>
IME:123 0/8
4.11 Hardware Examination
The Phone has the hardware test program which is under 【Root】 menu. If user
enter the menu by mistake, he/she can power off the unit to exit. Then power on
the unit will reboot the phone back to idle mode.
Root
HD_TEST
2-9
▌
▌
Back
Select
4.12 Provision
Provisioning is a convenient way for the service providers to configure some of
the settings to specific values for all its customers. The detail operation of this
feature is provided in a separate manual.
www.signamax-us.com
www.signamax-eu.com
39