1
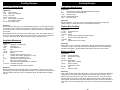
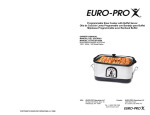
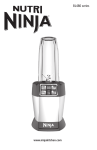
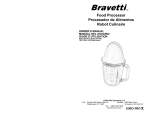
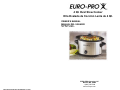
4 Qt. Oval Slow Cooker
Olla Ovalada de Cocción Lenta de 4 Qt.
OWNER’S MANUAL
MANUAL DEL USUARIO
Model/Modelo KC241
120V., 60Hz., 225 Watts
EURO-PRO Operating LLC
Boston, MA, 02465
1 (800) 798-7398
www.euro-pro.com
COPYRIGHT© EURO-PRO OPERATING LLC 2008
GETTING TO KNOW YOUR SLOW COOKER
IMPORTANT SAFETY INSTRUCTIONS
When using your Slow Cooker, basic safety precautions should always be
observed, including the following:
1.
2.
3.
4.
5.
6.
7.
8.
9.
10.
11.
12.
13.
14.
15. Never put cold water in a heated ceramic
pot as the pot may crack.
16. Never cook directly in metal housing. Use
the removable ceramic pot.
17. Never turn the switch "On" when the
ceramic pot is empty as this could cause a
malfunction.
18. Clean the ceramic pot with caution. If a wet
sponge or cloth is used to wipe spills on a
hot cooking area, be careful to avoid steam
burn. Some cleaners can produce noxious
fumes if applied to a hot surface.
19. Never touch the exterior of the slow cooker
during its operation and before it cools after
switching to "Off" position.
20. Avoid sudden temperature changes, such
as adding frozen foods into the heated
ceramic pot.
21. Always keep the slow cooker dry,
especially the metal housing.
22. When using this appliance, provide
adequate air space above and on all sides
for air circulation. On surfaces where heat
may cause a problem, an insulated heat
pad is recommended.
23. Do not use outdoors or while standing in a
damp area.
24. Do not use appliance for other than
intended use.
25. Lift and tilt cover away from you carefully to
avoid scalding and allow water to drip into
unit.
Read all instructions before using your
Slow Cooker.
Do not touch hot surfaces. Always use
handles or knobs.
Close supervision is necessary when any
appliance is used by or near children.
To protect against electric shock, do not
immerse cord, plug or any parts of the slow
cooker in water or any other liquids.
Do not let cord hang over edge of table or
counter, or touch hot surfaces.
Do not operate appliance with damaged
cord or plug or after the appliance
malfunctions or has been damage in any
manner. Return appliance to EURO-PRO
Operating LLC for examination, repair or
adjustment.
Unplug appliance from outlet when not in
use and before cleaning. Allow to cool
before putting on or taking off parts and
before cleaning the appliance.
Do not place on or near a hot gas or
electric burner.
The use of accessory attachments not
recommended by the appliance
manufacturer may cause hazard or injury.
Never place ceramic directly on a heated
surface as this could cause the cracking.
Do not cook in broken ceramic pot. If
ceramic pot should break, cleaning
solutions and spillovers may penetrate the
broken ceramic pot and create a risk of
electric shock.
To disconnect, turn the control knob to
OFF, then remove the plug. Always hold
the plug, and never pull the cord.
Extreme caution must be used when
moving an appliance containing hot food,
water or other liquids.
The glass lid and ceramic pot are fragile.
Handle them with care.
This unit has a short power supply cord to
reduce the risk resulting from becoming
entangled in or tripping over a long cord. An
extension cord may be used if you are careful in
its use:
1. The electrical rating of the extension
cord should be at least as great as the
electrical rating of the appliance.
2. An extension cord with the power cord
must be arranged so that it will not drape
over the countertop or tabletop where they
can be pulled on by children or tripped
over accidentally.
SAVE THESE INSTRUCTIONS
For Household Use Only
1
2
5
3
4
1. Cover
2. Removable Ceramic Pot
3. Metal Housing
4. Control Knob
5. Inner Metal Lining (attached to metal housing - not removable)
Technical Specifications
Voltage:
Power:
120V., 60Hz.
225 Watts
*Note: Illustrations may differ from actual unit.
WARNING: To reduce the risk of electric shock, this appliance has a polarized plug
(one blade is wider than the other). This plug will fit in a polarized outlet only one
way. If the plug does not fit fully in the outlet, reverse the plug. If it still does not fit,
contact a qualified electrician to install the proper outlet. Do not modify the plug in
any way.
1
Rev. 06/07B
2
Using Your Slow Cooker
Read all the sections of this booklet and follow all the instructions carefully.
Before Using Your Slow Cooker
Prior To First Use, Clean The Unit Thoroughly
•
•
•
•
•
•
•
•
Before using for the first time, wash the cover and the ceramic pot in hot,
soapy water.
Do not immerse metal housing in water or any other liquid.
Rinse and dry thoroughly.
Plug cord into a 120 volt AC outlet.
Always cook with the cover on and the ceramic pot in position. Remember that
frequent lifting of the cover delays the cooking time.
When cooking a meat and vegetable combination, place the meat in the
bottom of the ceramic pot.
Unplug the slow cooker when cooking is complete. Before cleaning, allow
to cool completely.
The ceramic pot cannot withstand the shock of sudden temperature
changes.
Do not use frozen meat or poultry in a slow cooker. Thaw any meat or
poultry before slow cooking.
•
•
Prepare recipe according to instructions.
Place prepared food into the removable ceramic pot and cover with the glass
cover.
• Plug the unit into an electrical outlet and switch to desired temperature setting
(Low, High or Keep Warm) position. It is not necessary to stir the ingredients,
leave the cooking to the slow cooker.
• Cooking time differs by the amount of ingredients, room temperature and many
other factors. Adjust the cooking time in reference to the actual result.
• Repeatedly removing the glass cover will decrease the temperature in the ceramic
pot.
• Certain dishes may not cook if the room temperature is below 5°C or 41°F.
• Carefully lift the glass cover away from you. Remember there is steam trapped
under the glass cover.
* Note: The glass cover and the ceramic pot are hot. Use a cloth or pot holder to hold
them. Exercise caution to avoid burns.
• When finished, turn to "Off" position and unplug the unit. You can serve the meal in
the removable ceramic pot.
• Let ceramic pot and glass cover cool completely before washing.
CAUTION: Be careful when adding additional liquids to ceramic pot - Never add
cold liquids as this might cause the ceramic pot to crack. Always
warm the liquids before adding.
Setting the Temperature
The slow cooker has been developed with a wrap-around side element concealed in
the unit. This element provides the low, even temperature that makes lengthy
cooking times possible. As a result of the wrap-around element, food will not stick to
the base of the ceramic pot despite the long cooking time and the need to stir food is
almost unnecessary. As food cooks just below boiling point, very little steam is given
off and there is next to no evaporation, all of which provides flavorful, tender and
moist results, even with budget cuts of meat.
LOW: The low heat setting gently simmers food for an extended period of time
without overcooking or burning. No stirring is required when using this setting. Ideal
for vegetable dishes and re-heating.
HI: The high heat setting is used when baking or cooking dried beans and will cook
food in half the time required for the low setting. as food will boil when cooked on the
high setting. Occasional stirring of stews and casseroles will improve the flavor
distribution, food should be monitored when using the high setting, just like cooking in
a pot with the lid on.
KEEP WARM: The keep warm setting is for holding the
Low
Hi
prepared recipe at a perfect serving temperature. This
setting should only be used after a recipe has been
thoroughly cooked. If food has been refrigerated, it
Off
Keep
must be heated on low or high and then switched
Warm
to keep warm.
WARNING: Do Not Cook on Keep Warm Setting.
3
Removing Cover and Ceramic Pot
Note: The glass cover and the ceramic pot are hot. Use a cloth or
pot holder to hold them.
• When removing the cover, tilt so that the opening faces away from you to
avoid being burned by the steam.
• The sides of the metal housing of the slow cooker get very warm. Use
oven mitts or pot holders to remove the ceramic pot.
• The removable ceramic pot can be used for serving the meal at the table.
4
Guide to Slow Cooking
Always allow sufficient time for the food to cook. It is almost impossible to overcook food
in the slow cooker, particularly when using the low or keep warm settings. Most of the
recipes contained within this book can be cooked on any one of the temperature
settings, however the cooking times will vary accordingly. Each recipe in this book will
give specific instructions indicating the appropriate temperature setting as well as the
suggested cooking times to use.
Tips for Slow Cooking
•
•
•
Adapting Cooking Times
Your favorite traditional recipes can be adapted easily by halving the amount of liquid
and increasing the cooking time considerably. See the guide below for suggested
cooking times and settings when adjusting your favorite recipes.
•
•
Traditional Recipe Time
Slow Cooker Recipe Time
15-30 minutes
4-6 hours on LOW
60 minutes
6-8 hours on LOW
•
1-3 hours
8-12 hours on LOW
•
•
Note: These times are approximate. Times can vary depending on ingredients and
quantities in recipes.
All food should be cooked with the glass lid in place. Each time the lid is lifted, both the
heat and moisture in the food are lost. Cooking times should thus be extended by
approximately 30 minutes.
Liquid Amounts
When food is cooking in your slow cooker, very little moisture boils away. To
compensate this, it is advisable to halve the liquid content of traditional recipes.
However, if after cooking, the liquid content is excessive, remove the lid and operate the
slow cooker on the high setting for 30-45 minutes or until the liquid reduces by the
desirable amount.
Stirring Food
Little or no stirring is required when using the low or keep warm setting. when using the
high setting, stirring ensures even flavor distribution.
Basic Cooking Time Guide
H eat S etting
Low
H igh
3-4 Lb . C hicken
6-8 H ours
3-4 H ours
3-4 Lb. P ot R oast
6-8 H ours
4-5 H ours
3 Q t. B eef S tew
8-10 H ours
4-5 H ours
3 Q t. C hili
8-10 H ours
4-5 H ours
3 Q t. V egetable Soup
6-8 H ours
3-4 H ours
•
•
The cover of the slow cooker does not form a tight fit on the ceramic pot but
should be centered on the ceramic pot for best results. Do not remove the
glass cover unnecessarily - this will result in major heat loss. Do not cook
without the glass cover in place.
Stirring is not necessary when using a slow cooker. However, if cooking on high,
you may want to stir occasionally.
Slow cooking retains most of the moisture in foods. If a recipe results in too much
liquid at the end of the cooking time, remove glass cover, turn the control knob to
high, and reduce the liquid by simmering. This will take 30-45 minutes.
The slow cooker should be at least half-filled for best results.
If cooking soups or stews, leave a 2-inch space between the top of the ceramic
pot and the food so that the recipe can come to a simmer.
Many recipes call for cooking all day. You can also prepare the recipe the night
before by placing all ingredients in the ceramic pot, cover and refrigerate
overnight. In the morning, simply place the ceramic pot in the slow cooker and
select the temperature setting.
Meat & Poultry require at least 7 to 8 hours on LOW. Do not use frozen meat in
the slow cooker. Thaw any meat or poultry before slow cooking.
Trim all visible fat from meat or poultry.
Cook dried beans 1-2 hours on high setting, then add the remaining ingredients,
cook on low for the remaining time.
When cooking curries and casseroles, richer, more intensive flavors will develop
when the first stage is prepared by traditional methods, i.e. brown the onions,
meat and spices first in a non-stick pan.
DO’s
•
•
•
Handle the ceramic pot and glass lid with care.
Use oven mitts when lifting the ceramic pot containing hot foods.
Avoid extreme temperature changes in the ceramic pot or glass lid. For
example, do not place into or under cold water while still hot.
DO NOT’s
•
•
•
•
•
Use the ceramic pot if chipped or cracked.
Operate the slow cooker without the ceramic pot in place.
Place the hot ceramic pot onto a wet surface.
Use frozen meats or foods in slow cooker. Always defrost them first.
Place the glass lid in oven or microwave.
NEVER
•
•
•
•
Use abrasive cleansers or metal scouring pads when cleaning the ceramic pot.
Place water or other liquids into the base of the slow cooker.
Immerse the base, cord or plug of the slow cooker into water.
Touch hot surfaces with bare hands.
*The cooking times given above should be used ONLY as a guide. It is recommended
that a thermometer be used to check the temperature to ensure the food is completely
cooked.
5
6
Cleaning & Maintenance
CAUTION: Make sure that the unit is unplugged from the power
source and the control button is on “Off” before cleaning.
•
•
•
•
•
•
•
•
Always allow unit to cool before cleaning.
Remove the ceramic pot and glass lid and wash in hot, soapy water using a mild
household detergent. Rinse and dry thoroughly.
Never use abrasive cleansers or metal scouring pads to clean the ceramic pot
or glass lid.
To soften stubborn, cooked on foods, fill the ceramic pot with warm, soapy water
and allow to soak. Remove by lightly scrubbing with a nylon kitchen brush.
The ceramic pot and glass slid can be washed in the dishwasher. However care
should be taken not to chip or crack the ceramic pot or glass lid.
Never immerse the metal housing, cord or plug in water or any other liquid.
Clean the metal housing only with a damp cloth. Do NOT immerse in water.
When storing your slow cooker, loosely coil the power cord , don’t wrap the cord
around the unit.
Cooking Recipes
Hot Spiced Cherry Cider
Ingredients:
3 1/2
quarts apple cider
3
cinnamon sticks
4.5 oz. orange flavored gelatin
4.5 oz. cranberry flavored gelatin
Directions:
Mix together the apple cider and cinnamon sticks in the Slow cooker. Heat on
High for 3 hours. Stir in cranberry & orange flavored gelatin. Keep on High 1 more
hour and allow gelatin to dissolve. Turn to Low to keep warm. Serve directly from
the Slow cooker。
Hot Cheese Dip
Ingredients:
3/4 cup butter
2
stalks celery, thinly sliced
1
medium onion, chopped
1
4 oz can sliced mushrooms, drained
3 tbs.
flour
1
10 1/2 oz can cream of celery soup
1
5 to 6 oz garlic cheese roll, cut up
1
10 oz package chopped broccoli
Directions:
In a small skillet, melt the butter and sauté the celery, onion and mushrooms. Stir
in the flour. Turn into a lightly greased slow cooker; stir in remaining ingredients.
Cover; cook on High, stirring about every 15 minutes until the cheese is melted.
Turn to Low for about 2 to 4 hours or until ready to serve. Serve with corn chips,
cauliflower, broccoli, carrot strips, celery and radishes.
Spinach Artichoke Dip
Ingredients:
1
8 oz. packages of softened cream cheese
1/4 cup light cream
1/3 cup grated Parmesan cheese
1/4 tsp. garlic powder
1
8 oz. box frozen cut leaf spinach, thawed and well drained
1
12 oz jar or can quartered artichoke hearts, rinsed
2/3 cup shredded Monterey Jack cheese
1 cup
prepared salsa mixture, canned or fresh
Directions:
In a food processor, process the cream cheese, cream, Parmesan cheese and
garlic powder until smooth and creamy. Add the spinach and process until
thoroughly mixed. Add the artichokes and process until coarsely chopped. Spoon
the mixture in to the Slow cooker. Cover and cook on High for 1 to 1.5 hours until
hot in the center. Sprinkle the top evenly with Monterey Jack cheese and spoon
the salsa in a ring around the inside edges of the Stoneware. Cover and continue
heating on High 15 minutes longer, or until the cheese is melted.
7
8
Cooking Recipes
Cooking Recipes
Traditional Baked Beans
Teriyaki Chicken Wings
Ingredients:
4
cans (28 ounces each) vegetarian baked beans, drained
11/2
medium onion, chopped (3/4 cup)
1 cup
barbecue sauce
3/4 cup packed brown sugar
3 tbs
ground mustard
Ingredients:
2 lbs
chicken wings
1 1/2
large onion, chopped
2/3 cup soy sauce
2/3 cup brown sugar
1 tsp.
ground ginger (or to taste)
2
cloves garlic, minced
1/2 cup dry cooking sherry
Directions:
Mix all ingredients. Cover and cook on low heat setting 4 to 5 hours (or high heat
setting 2 hours to 2 hours 30 minutes) or until desired consistency.
Directions:
Rinse the chicken and pat dry. Cut off and discard wing tips. Cut each wing at the joint
to make two sections. Place the wing parts on a broiler pan. Broil 4 to 5 inches from the
heat for 20 minutes, 10 minutes on each side or until chicken is brown. Transfer to the
slow cooker.
Mix together the onion, soy sauce, brown sugar, ginger, garlic, and cooking sherry in a
bowl. Pour over the chicken wings. Cover; cook on Low for 5 to 6 hours or on High for 2
to 3 hours. Stir chicken wings Be sure wings are evenly coated with sauce.
Vegetable Minestrone
Ingredients:
4 cups
vegetable or chicken broth
4 cups
tomato juice
1 tbs.
dried basil leaves
1/tsp.
salt
1/2 tsp.
dried oregano leaves
1/2 tsp.
pepper
3
medium carrots, sliced (I 1/2 cups)
3
medium celery stalks, chopped (1 1/2 cups)
2
medium onion, chopped (1 cup)
1 cup
sliced fresh mushrooms (6 ounces)
3
garlic cloves, finely chopped
2
cans (28 ounces) diced tomatoes, undrained
11/2 cups uncooked rotini pasta
Shredded Parmesan cheese, if desired
Directions:
Mix all ingredients except pasta and cheese in slow cooker. Cover and cook on low
heat setting 7 to 8 hours or until vegetables are tender. Stir in pasta. Cover and cook on
high heat setting 15 to 20 minutes or until pasta is tender. Sprinkle each serving with
cheese.
9
Classic Rice Pudding
Ingredients:
4 cups
cooked white rice
3/4 cup
raisins
1 1/4 tsp vanilla
11/4
can (14 ounces) sweetened condensed milk
11/4
can (12 ounces) evaporated milk
11/2 tbsp sugar
1tsp
ground cinnamon (or to taste)
Directions:
Spray inside of slow cooker with cooking spray. Mix all ingredients except sugar and
cinnamon in cooker. Cover and cook on low heat setting 3 to 4 hours or until liquid is
absorbed. Stir pudding. Sprinkle pudding with sugar and cinnamon. Serve warm
Barbecued Ribs
Ingredients:
2 1/2 lbs pork loin back ribs
1/2 cup
packed brown sugar
1/2 tsp.
pepper
11/2 tbsp liquid smoke
2
garlic cloves, chopped
1/2 tsp.
salt (or to taste)
2
small onions, sliced
1/2 cup
cola
1 cup
barbecue sauce
Directions:
Spray inside of slow cooker with cooking spray. Remove inner skin from ribs. Mix brown
sugar, pepper, liquid smoke, garlic and salt; rub mixture into ribs. Cut ribs into 4-inch
pieces. Layers ribs and onion in slow cooker. Pour cola over ribs. Cover and cook on
low heat setting 8 to 9 hours or until tender. Remove ribs from slow cooker. Drain and
discard liquid. Pour barbecue sauce into shallow bowl. Dip ribs into sauce. Place ribs in
slow cooker. Pour any remaining sauce over ribs. Cover and cook on low heat setting 1
hour.
10
KC241
INSTRUCCIONES IMPORTANTES DE SEGURIDAD
ONE (1) YEAR LIMITED WARRANTY
EURO-PRO Operating LLC warrants this product to be free from defects in material and
workmanship for a period of one (1) year from the date of the original purchase, when utilized for
normal household use, subject to the following conditions, exclusions and exceptions.
If your appliance fails to operate properly while in use under normal household conditions within
the warranty period, return the complete appliance and accessories, freight prepaid. For Customer
Service support, call 1 (800) 798-7398 or visit our website www.euro-pro.com.
Al usar su olla de cocción lenta BRAVETTI, siempre debe seguir precauciones
básicas de seguridad, incluyendo las siguientes:
1.
2.
3.
4.
If the appliance is found to be defective in material or workmanship, EURO-PRO Operating LLC
will repair or replace it free of charge. Proof of purchase date and $ 12.95 to cover the cost of
return shipping and handling must be included. *
The liability of EURO-PRO Operating LLC is limited solely to the cost of the repair or replacement
of the unit at our option. This warranty does not cover normal wear of parts and does not apply to
any unit that has been tampered with or used for commercial purposes. This limited warranty does
not cover damage caused by misuse, abuse, negligent handling or damage due to faulty
packaging or mishandling in transit. This warranty does not cover damage or defects caused by
or resulting from damages from shipping or repairs, service or alterations to the product or any of
its parts, which have been performed by a repair person not authorized by EURO-PRO Operating
LLC.
This warranty is extended to the original purchaser of the unit and excludes all other legal and/or
conventional warranties. The responsibility of EURO-PRO Operating LLC if any, is limited to the
specific obligations expressly assumed by it under the terms of the limited warranty. In no event is
EURO-PRO Operating LLC liable for incidental or consequential damages of any nature
whatsoever. Some provinces do not permit the exclusion or limitation of incidental or
consequential damages, so the above may not apply to you.
This warranty gives you specific legal rights, and you may also have other rights which vary from
province to province.
*Important: Carefully pack item to avoid damage in shipping. Be sure to include proof of
purchase date and to attach tag to item before packing with your name, complete address
and phone number with a note giving purchase information, model number and what you
believe is the problem with item. We recommend you insure the package (as damage in
shipping is not covered by your warranty). Mark the outside of your package “ATTENTION
CUSTOMER SERVICE”. We are constantly striving to improve our products, therefore the
specifications contained herein are subject to change without notice.
5.
6.
7.
8.
9.
10.
11.
12.
OWNERSHIP REGISTRATION CARD
FOR CANADIAN CONSUMERS ONLY
Please fill out and mail the product registration card within ten (10) days of purchase. The
registration will enable us to contact you in the unlikely event of a product safety notification. By
returning this card you acknowledge to have read and understood the instructions for use, and
warnings set forth in the accompanying instructions.
RETURN TO: EURO-PRO Operating LLC, 4400 BOIS FRANC, ST. LAURENT, QUEBEC, H4S 1A7
KC241
______________________________________________________________________
Appliance model
______________________________________________________________________
Date purchased
Name of store
______________________________________________________________________
Owner’s name
______________________________________________________________________
Address
City
Prov.
Postal code
Printed in China
11
13.
14.
15.
Lea completamente las instrucciones antes
de utilizarla.
No toque las superficies calientes. Utilice
siempre las asas o perillas.
Tenga mucho cuidado al utilizar cualquier
aparato eléctrico cerca de niños.
Para evitar una descarga eléctrica, no
sumerja el cable, enchufe o cualquier otra
parte de la olla en agua o cualquier otro
líquido.
No permita que el cable cuelgue sobre el
borde de la mesa o mesada, o que toque
superficies calientes.
No utilice ningún artefacto si el cable o el
enchufe están dañados o luego de una
falla, o si ha sufrido cualquier tipo de daño.
Retórnelo a EURO-PRO Operating LLC
para que sea examinado, reparado o
ajustado.
Desenchúfela del tomacorriente cuando no
la utilice y antes de limpiarla. Deje que se
enfríe antes de ponerle o quitarle partes, y
antes de limpiarla.
No la coloque sobre o cerca de un
quemador a gas o eléctrico.
El uso de accesorios no recomendados por
el fabricante puede ocasionar peligros o
daños.
Nunca coloque la fuente de cerámica
directamente sobre superficies calientes ya
que podría rajarse.
No cocine en la fuente cerámica roto. Si el
fuente cerámica se rompe, los líquidos
limpiadores y derrames podrían penetrar el
fuente cerámica roto y crear un riesgo de
descarga eléctrica.
Para desconectarla, gire la perilla de
control a OFF, luego desenchúfela.
Siempre sostenga el enchufe, nunca jale
del cable.
Debe tener mucho cuidado al mover un
artefacto que contenga alimentos, agua u
otros líquidos calientes.
La tapa de vidrio y la fuente de cerámica
son frágiles. Trátelas con cuidado.
Nunca agregue agua fría en una fuente de
cerámica caliente ya que podría rajarse.
16. Nunca cocine directamente en el gabinete
de metal. Use la fuente removible de
cerámica.
17. Nunca encienda la unidad con la fuente de
cerámica vacía ya que podría dañarse.
18. Limpie el fuente cerámica con cuidado. Si
usa una esponja o trapo húmedo para
limpiar los derrames en un área de cocción
caliente, tenga cuidado de no quemarse
con el vapor, algunos limpiadores pueden
producir vapores nocivos al aplicarlos en
una superficie caliente.
19. Nunca toque el exterior de la olla de
cocción lenta cuando esté funcionando y
antes de que se haya enfriado luego de
haberla apagado.
20. Evite los cambios bruscos de temperatura,
tales como el agregar alimentos
congelados dentro de la fuente cerámica
caliente.
21. Manténgala siempre seca, especialmente
su cubierta metálica.
22. Al usar este artefacto, verifique que haya
suficiente espacio por encima y en los
costados para que circule el aire. Le
recomendamos usar una base aislante en
superficies que puedan ser afectadas por
el calor.
23. No la use en el exterior o cuando esté
parado en un lugar húmedo.
24. No utilice el artefacto para ningún otro uso
distinto al indicado.
25. Levántela e inclínela cuidadosamente
hacia un costado para evitar quemaduras y
permitir que el agua caiga dentro de la
unidad.
Esta unidad tiene un cable de alimentación
corto para reducir el riesgo de enredarse o
tropezarse con un cable más largo. Un cable
de extensión puede utilizarse con cuidado:
1. La capacidad eléctrica del cable de
extensión debe ser por lo menos igual al
consumo del artefacto.
2. No debe permitir que el cable de
extensión cuelgue de la mesada o mesa
de tal forma que pueda ser jalado por
niños o causar que alguien se tropiece.
CONSERVE ESTAS INSTRUCCIONES
Para Uso Doméstico Solamente
ADVERTENCIA: Para reducir el riesgo de una descarga eléctrica, este artefacto posee
un enchufe polarizado (una pata es más ancha que la otra). Este enchufe entra
completamente en un tomacorriente polarizado en una sola posición. De no ser así,
inviértalo, y si aún así no entra completamente, llame a un electricista calificado para
que instale un tomacorriente apropiado. No intente modificar el enchufe de ninguna
manera.
12
Rev. 06/07B
PARTES DE SU OLLA DE COCCIÓN LENTA
Lea todas las secciones de este manual y siga todas las instrucciones cuidadosamente.
Antes de Usar su Olla de Cocción Lenta
Antes de Usarla por Primera Vez, Limpie Bien la Unidad
1
2
5
• Antes de usarla por primera vez, lave la tapa y la fuente cerámica con agua caliente
y jabón.
• No sumerja la cubierta de metal en agua o ningún otro líquido.
• Enjuáguelas y séquelas completamente.
• Enchufe el cable en un tomacorriente de 120 voltios de CA.
• Siempre cocine con la tapa puesta y con la fuente de cerámica en su lugar.
Recuerde que el abrir la tapa muy seguido prolongará el tiempo de cocción.
• Al cocinar una combinación de carne con verduras, coloque la carne en el fondo de
la fuente de cerámica.
• Desenchufe la olla al terminar de cocinar. Deje que se enfríe completamente antes
de limpiarla.
La fuente de cerámica no resiste los cambios bruscos de temperatura.
• No coloque carne o aves congeladas en una olla de cocción lenta. Descongele la
carne o las aves antes de cocinarlas.
CUIDADO: Tenga cuidado al agregar líquido adicional en la fuente de
cerámica - Nunca agregue líquidos fríos ya que podrían hacer
que la fuente se rajara. Siempre caliente los líquidos antes de
agregarlos.
3
4
1.
2.
3.
4.
5.
Tapa
Fuente Cerámica Removible
Cubierta de Metal
Perilla de Control
Revestimiento interno de metal (adherido a la cubierta de metal – no
removible)
Ajuste de Temperatura
La olla de cocción lenta ha sido diseñada con un elemento calefactor envolvente oculto
dentro de la unidad. Este elemento proporciona la baja y constante temperatura que
hace posible el cocinar lentamente. Gracias a este elemento envolvente, la comida no se
pegará al fondo de la fuente de cerámica a pesar del tiempo prolongado de cocción y no
hace falta revolver los alimentos. Como la comida se cocina justo por debajo del punto
de ebullición, despide muy poco vapor y casi no hay evaporación, lo que provee
resultados más sabrosos, tiernos y jugosos, incluso con cortes de carne económicos.
LOW (BAJO): La posición de baja temperatura cocina la comida lentamente sin que se
pase o se queme. No hace falta revolver al usar esta posición. Ideal para platos con
verduras o para recalentar.
HI (ALTO): La posición de alta temperatura se usa para cocinar frijoles secos y cocinará
los alimentos en la mitad del tiempo requerido en la posición de LOW temperatura. Ya
que la comida hervirá al cocinarla en HI. El revolver ocasionalmente los guisos y
estofados mejorará la distribución del sabor, debe controlar la comida al cocinar en HI,
de la misma forma que lo hace con una olla sin tapar.
Especificaciones Técnicas
Voltaje: 120V., 60Hz.
Potencia:
225 Vatios
*Nota: El dibujo puede no ser igual al producto real.
13
KEEP WARM (MANTENER CALIENTE): Esta posición
es para mantener la comida ya hecha a la
Bajo
temperatura justa para servirla. Esta posición
debe usarse únicamente después de haber
cocinado completamente los alimentos. Si la
Apagado
comida fue refrigerada, deberá recalentarse
en LOW o HI y luego pasar a KEEP WARM.
ADVERTENCIA: No cocine en KEEP WARM.
14
Alto
Mantener
Caliente
Cómo Usar su Olla de Cocción Lenta
•
•
•
Prepare la receta siguiendo las instrucciones.
Coloque la comida en la fuente cerámica y tápela con la tapa de vidrio.
Enchufe la unidad en un tomacorriente y ajústela a la temperatura deseada (HI,
LOW o KEEP WARM). No hace falta mezclar los ingredientes, deje que la olla de
cocción lenta haga el trabajo.
• Los tiempos de cocción varían con la cantidad de ingredientes, la temperatura
ambiente y muchos otros factores. Ajuste los tiempos de cocción con respecto a
los resultados obtenidos.
• El levantar seguido la tapa de vidrio disminuirá la temperatura de la fuente
cerámica.
• Ciertos platos pueden no cocinarse si la temperatura ambiente está por debajo
de los 41°F o 5°C.
• Levante cuidadosamente la tapa de vidrio hacia un costado. Recuerde que hay
vapor atrapado debajo de la tapa de vidrio.
* Nota: La tapa de vidrio y la fuente de cerámica se calientan. Use agarraderas para
levantarlos. Tenga cuidado para evitar quemaduras.
• Al terminar, apague y desenchufe la unidad. Puede servir la comida en la fuente
cerámica removible.
• Deje que la fuente de cerámica y la tapa de vidrio se enfríen completamente
antes de lavarlos.
Para Remover la Tapa y la Fuente Cerámica
Nota: La tapa de vidrio y la fuente de cerámica se calientan. Use agarraderas
para levantarlos.
•
•
•
Al sacar la tapa, inclínela para un costado para evitar quemarse con el vapor.
Los costados del gabinete metálico de la olla se calientan. Use guantes para
horno o agarraderas para sacar la fuente de cerámica.
Puede usar la fuente cerámica removible para servir la comida en la mesa.
Guía de Cocción Lenta
Siempre espere el tiempo necesario como para que la comida se cocine. Es casi
imposible que la comida se queme en la olla de cocción lenta, especialmente usando
las posiciones LOW y KEEP WARM. La mayoría de las recetas incluidas en este
manual se pueden cocinar en cualquiera de las posiciones de temperatura, sin
embargo, los tiempos de cocción variarán de acuerdo con ellas. Cada receta de este
manual le indicará específicamente la posición apropiada de la temperatura así como el
tiempo sugerido de cocción.
Adaptación de Tiempos de Cocción
Usted puede adaptar fácilmente sus recetas tradicionales reduciendo a la mitad la
cantidad de líquido y aumentando considerablemente el tiempo de cocción. Vea la
siguiente guía de tiempos sugeridos de cocción y temperatura al adaptar sus recetas
preferidas.
Tiempo de la Receta
Tradicional
Tiempo en la Olla de Cocción
Lenta
15-30 minutos
4-6 horas en LOW
60 minutos
6-8 horas en LOW
1-3 horas
8-12 horas en LOW
Nota: Estos tiempos son aproximados. Los tiempos pueden variar de acuerdo con los
ingredientes y las cantidades.
Todos los alimentos deben cocinarse con la tapa colocada. Cada vez que se levante la
tapa, se pierde calor y humedad de la comida. Por lo tanto los tiempos de cocción
deberán extenderse unos 30 minutos.
Cantidad de Líquido
Al cocinar en una olla de cocción lenta, se evapora muy poca cantidad de líquido. Para
compensarlo, se recomienda reducir a la mitad la cantidad de líquido de las recetas
tradicionales. Sin embargo, si al terminar de cocinar queda demasiado líquido, saque
la tapa y haga funcionar la olla en HI durante 30-45 minutos o hasta que el líquido se
reduzca lo necesario.
Mezclando la Comida
El mezclar es casi innecesario al usar las posiciones de LOW o KEEP WARM. Al usar
la posición HI, el mezclar le asegura una distribución uniforme del sabor.
Guía Básica de Tiempos de Cocción
Ajuste de Calor
Bajo
Alto
3-4 Lb. de Pollo
6-8 Horas
3-4 Horas
3-4 Lb. de Cazuela
6-8 Horas
4-5 Horas
3 Qt. de guiso de carne
8-10 Horas
4-5 Horas
3 Qt. de Chili
8-10 Horas
4-5 Horas
3 Qt. de Sopa de Verduras
6-8 Horas
3-4 Horas
* Los tiempos de cocción suministrados deberán usarse como guía ÚNICAMENTE. Le
recomendamos usar un termómetro para controlar la temperatura y verificar que la
comida esté completamente cocida.
15
16
CONSEJOS PARA LA COCCIÓN LENTA
• La tapa de la olla no cierra herméticamente contra la fuente de cerámica, pero debe
colocarse lo mejor posible para obtener los mejores resultados. No levante la tapa
de vidrio innecesariamente – producirá una pérdida considerable de calor. No
cocine sin la tapa colocada.
• No es necesario revolver al cocinar lento. Sin embargo, al cocinar en HIGH, es
aconsejable revolver ocasionalmente.
• La cocción lenta retiene casi toda la humedad de la comida. Si su receta resulta
demasiado líquida al final del tiempo de cocción, quite la tapa de vidrio, ajuste la
temperatura a HI, y reduzca el líquido por evaporación. Esto le llevará 30-45
minutos.
• La olla debe estar llena hasta la mitad como mínimo para obtener los mejores
resultados.
• Al cocinar sopas o guisos, deje unas 2 pulgadas entre la comida y la parte de arriba
de la fuente de cerámica para permitir que la comida hierva lentamente.
• Muchas de las recetas necesitan todo un día de cocción. También puede preparar
la receta la noche anterior poniendo todos los ingredientes en la fuente de
cerámica, tapándola y guardándola en la heladera durante la noche. En la mañana,
coloque la fuente de cerámica en la olla y elija la temperatura deseada.
• La carne y las aves requieren por lo menos 7-8 horas en LOW. No use carne
congelada en la olla de cocción lenta. Descongele la carne o las aves antes de
cocinarlas.
• Saque toda la grasa visible de la carne o las aves.
• Cocine frijoles secos 1-2 horas en High, luego agregue el resto de los ingredientes y
cocine en Low por el tiempo restante.
• Al cocinar guisos y estofados, obtendrá un sabor más rico e intenso si prepara los
primeros pasos con métodos convencionales, por ejemplo dorando las cebollas, la
carne y condimentos primero en una sartén antiadherente.
LIMPIEZA Y MANTENIMIENTO
CUIDADO: Verifique que la unidad esté desenchufada y que el
control esté en “Off” antes de limpiarla.
•
•
•
•
•
•
•
•
Permita que se enfríe antes de limpiarla.
Quite la fuente de cerámica y la tapa de vidrio y lávelas con agua caliente y
detergente suave para vajilla. Enjuáguelas y séquelas completamente.
Nunca use limpiadores abrasivos o esponjas de metal para limpiar la fuente de
cerámica o la tapa de vidrio.
Para ablandar comida pegada, llene la fuente de cerámica con agua tibia
jabonosa y deje que se ablande. Quítelas fregando suavemente con una
esponjita de nylon.
La fuente de cerámica y la tapa de vidrio se pueden lavar en el lavavajillas. Sin
embargo, deberá tener cuidado para que no se dañen.
Nunca sumerja el gabinete metálico, cable o enchufe en agua o ningún otro
líquido.
Limpie el gabinete metálico con un trapo húmedo. No lo sumerja en agua.
Al guardar su olla de cocción lenta, enrolle ligeramente el cable, no lo enrosque
alrededor de la unidad.
LO QUE DEBE HACER
• Tenga cuidado al manipular la fuente de cerámica y la tapa de vidrio.
• Use agarraderas al levantar la fuente de cerámica con comida caliente.
• Evite los cambios extremos de temperatura en la fuente de cerámica y la tapa de
vidrio. Por ejemplo, no los coloque debajo de agua fría mientras estén calientes.
LO QUE NO DEBE HACER
•
•
•
•
Usar la fuente de cerámica cuando esté rajada o rota.
Usar la olla de cocción lenta sin la fuente de cerámica colocada.
Colocar la fuente de cerámica sobre una superficie húmeda.
Usar carne o comida congelada en la olla de cocción lenta. Siempre descongelarlos
primero.
• Colocar la tapa de vidrio en el horno o el microondas.
NUNCA
•
•
•
•
Usar limpiadores abrasivos o esponjas de metal para limpiar la fuente de cerámica.
Colocar agua u otros líquidos en la base de la olla de cocción lenta.
Sumergir la base, cable o enchufe de la olla en agua.
Tocar las superficies calientes con las manos.
17
18
RECETAS DE COCINA
RECETAS DE COCINA
Cidra de Cereza Caliente y Picante
Alas de Pollo Teriyaki
Ingredientes:
3 1/2Qt.
3
4,5 oz.
4,5 oz.
Ingredientes:
2 lbs.
1 1/2
2/3 taza
2/3 taza
1 cucharadita
2
1/2 taza
Cidra de manzana
Ramitas de canela
Gelatina de naranja
Gelatina de arándanos agrios
Instrucciones:
Mezcle la cidra de manzana con la canela en la olla. Caliéntelo en HI durante 3 horas.
Agregue la gelatina de naranja y arándano y mezcle bien. Manténgalo en HI por una hora
más para que se disuelva la gelatina. Colóquelo en LO para mantenerlo tibio. Sírvalo
directamente desde la olla.
Queso Caliente para Mojar
Ingredientes:
3/4 taza
2
1
1
3 cucharaditas
1
1
1
Manteca
Tallos de apio, rebanados fino
Cebolla mediana picada
Lata de 4 oz de champiñones en lata rebanados y escurridos
Harina
Lata de 10 ½ oz. de sopa crema de apio
Rollo de 5 – 6 oz. de queso de ajo, cortado
Paquete de 10 oz. de brócoli picado
Instrucciones:
En una sartén pequeña, derrita la manteca y salte el apio, la cebolla y los champiñones.
Cúbralos con harina. Colóquelos en la olla de cocción lenta levemente aceitada,
mézclelos con el resto de los ingredientes. Tápela, cocine en HI mezclando cada 15
minutos hasta que se derrita el queso. Colóquela en LO por unas 2 - 4 horas o hasta que
esté listo para servir. Sírvalo con nachos, coliflor, brócoli, palitos de zanahoria, apio y
rábano.
Salsa de Espinaca y Alcachofa para Mojar
Ingredientes:
1
1/4 taza
1/3 taza
1/4 cucharadita
1
1
2/3 taza
1
Paquete de 8oz. de queso crema suave
Crema liviana
Queso parmesano rallado
Sal de ajo
Caja de 8oz. de hojas de espinaca, descongelada y escurrida
Frasco o lata de 12oz. de corazones de alcachofa cortados, escurridos
Queso Monterrey rallado
Taza de mezcla preparada de salsa, en lata o fresca
Instrucciones:
Coloque el queso crema, la crema, queso Parmesano y ajo en polvo en una procesadora
hasta que se haga una crema pareja. Agregue la espinaca y procésela hasta que se
mezcle bien. Agregue las alcachofas y procéselas hasta que queden bien picadas. Vierta
la mezcla en la olla de cocción lenta. Tápelo y cocínelo en HI durante 1-1,5 horas hasta
que se caliente en el medio. Desparrame el queso Monterrey por encima y coloque la
salsa en un anillo junto al borde interior de la fuente de cerámica. Tápelo y continúe
calentándolo en HI durante 15 minutos más, o hasta que se derrita el queso.
19
Alas de pollo
Cebolla grande, picada
Salsa de soja
De azúcar negra
Jengibre molido (o al gusto)
Dientes de ajo, picados
Jerez seco de cocina
Instrucciones:
Enjuague y seque el pollo. Corte y deseche la punta de las alas. Corte cada ala en el
medio para hacer dos pedazos. Coloque el pollo en una bandeja doradora. Dórelo a 4 o
5 pulgadas del calor durante 20 minutos, 10 minutos de cada lado o hasta que se
ponga marrón. Colóquelo en la olla de cocción lenta.
Mezcle la cebolla, salsa de soja, azúcar negra, jengibre, ajo y Jerez de cocina en un
tazón. Colóquelo sobre las alas de pollo. Tápelos y cocínelos en Bajo durante 5-6 horas
o en Alto durante 2-3 horas. Mezcle ocasionalmente. Verifique que el pollo esté
completamente cubierto por la salsa.
Minestrón de Verduras
Ingredientes:
4 tazas
4 tazas
1 cucharadita
1 cucharadita
1/2 cucharadita
1/2 cucharada
3
3
2
1 taza
3
2
11/2 taza
Caldo de verduras o de pollo
Jugo de tomate
Hojas secas de albaca
Sal
Orégano seco
Pimienta
Zanahorias medianas en trocitos (1 taza)
Tallos medianos de apio picado (1½ taza)
Cebollas medianas picadas (1 taza)
Hongos frescos en trocitos (6 onzas)
Dientes de ajo picados
Latas de tomates (28 onzas) picados, sin escurrir
Fideos rotini crudos
Queso rallado, si lo desea
Instrucciones:
Mezcle todos los ingredientes menos los fideos y el queso en la olla. Tápelos y
cocínelos en ‘Low’ durante 7-8 horas o hasta que las verduras estén tiernas. Agregue
los fideos. Tápelos y cocínelos en ‘High durante 15-20 minutos o hasta que los fideos
estén hechos. Agregue queso a cada porción.
20
RECETAS DE COCINA
Frijoles Cocidos Tradicionales
Ingredientes:
4
1 1/2
1 taza
3/4 taza
3 cucharaditas
GARANTÍA LIMITADA DE UN (1) AÑO
Latas (28 oz. c/u) de frijoles vegetarianos cocidos, escurridos
Cebolla mediana picada (3/4 taza)
Salsa BBQ
Azúcar negra
Mostaza molida
EURO-PRO Operating LLC garantiza este producto contra defectos de materiales y mano de obra por un término
de un (1) año a partir de la fecha de compra original, siempre que sea utilizado para uso doméstico normal, sujeto
a las siguientes condiciones, exclusiones y excepciones.
Si su artefacto no funciona correctamente al utilizarlo bajo condiciones domésticas normales dentro del período de
garantía, devuelva el artefacto completo y los accesorios, con envío prepagado. Para Servicio al Cliente, llame al 1
(800) 798-7398 o visite nuestro sitio Web www.euro-pro.com.
Si el artefacto presenta un defecto de materiales o mano de obra, EURO-PRO Operating LLC lo reparará o
remplazará sin cargo. El envío debe incluir un comprobante de la fecha de compra y $12,95 para cubrir los gastos
de envío. *
Instrucciones:
Mezcle todos los ingredientes. Tápelos y cocínelos en Low durante 4-5 horas (o en
Hight durante 2-2,5 horas) o hasta que tenga la consistencia deseada.
Arroz con Leche Clásico
Ingredientes:
4 tazas
3/4 taza
1 1/4 cucharadita
1 1/4
1 1/4
11/2 cucharadita
1 cucharadita
KC241
Arroz blanco cocido
Pasas de uva
Vainilla
Lata (14 oz) leche condensada dulce
Lata (12 oz) leche evaporada
Azúcar
Canela molida (o al gusto)
Instrucciones:
Cubra el interior de la olla con spray para cocinar. Mezcle todos los ingredientes menos
el azúcar y la vainilla en la olla. Tápelos y cocínelos en ‘Low’ durante 3-4 horas o hasta
que se absorba todo el líquido. Revuélvalo. Espolvoree con azúcar y vainilla. Sírvalo
tibio.
La responsabilidad de EURO-PRO Operating LLC se limita únicamente al costo de reparación o reemplazo de la
unidad, a nuestro criterio. Esta garantía no cubre el desgaste normal de las partes y no cubre ninguna unidad que
haya sido alterada o utilizada con fines comerciales. Esta garantía limitada no cubre daños ocasionados por uso
inadecuado, abuso, negligencia o daños causados por embalaje inapropiado o maltrato durante el transporte. Esta
garantía no cubre daños o defectos causados o resultantes durante el transporte para su reparación o alteraciones
del producto o cualquiera de sus partes, realizadas por una persona no autorizada por EURO-PRO Operating
LLC.
Esta garantía es válida para el comprador original del producto y excluye cualquier otra garantía legal y/o
convencional. La responsabilidad de EURO-PRO Operating LLC, de existir, se limita a las obligaciones
específicas asumidas expresamente bajo los términos de esta garantía limitada. Bajo ninguna circunstancia
EURO-PRO Operating LLC será responsable por daños incidentales o indirectos de ninguna clase. Algunas
provincias no permiten la exclusión o limitación de daños consiguientes o incidentales, por lo tanto lo anterior
puede no ser válido para usted.
Esta garantía le otorga derechos legales específicos, y usted puede también tener otros derechos los que varían
de provincia a provincia.
*Importante: Embale el producto cuidadosamente para evitar daños durante el transporte. Asegúrese de
incluir un comprobante de la fecha de compra y de colocarle una etiqueta al producto con su nombre,
dirección completa y número de teléfono, una nota proporcionando información de la compra, número de
modelo y una descripción del problema. Le recomendamos asegurar el paquete (puesto que la garantía no
cubre daños de envío). Escriba en el exterior del paquete “ATTENTION CUSTOMER SERVICE”. Nosotros
nos esforzamos constantemente en mejorar nuestros productos, por lo tanto las especificaciones aquí
indicadas pueden cambiar sin previo aviso.
Costillas Asadas
Ingredientes:
2 1/2 lbs.
1/2 taza
1/2 cucharada
1 1/2 cucharadita
2
1/2 cucharadita
2
1/2 taza
1 taza
Costillas de cerdo
Azúcar negra
Pimienta
Líquido de ahumar
Dientes de ajo picados
Sal (o al gusto)
Cebollas chicas picadas
Cola
Salsa BBQ
TARJETA DE REGISTRO DEL CLIENTE
SÓLO PARA CONSUMIDORES CANADIENSES
Complete y envíe la tarjeta de registro del producto dentro de los diez (10) días posteriores a la
compra. El registro nos permitirá contactarnos con usted en caso de existir alguna notificación de
seguridad con respecto al producto. Retornando esta tarjeta usted reconoce haber leído y
entendido las instrucciones de uso y advertencias incluidas en estas instrucciones.
ENVIAR A:
EURO-PRO Operating LLC, 4400 BOIS FRANC, ST. LAURENT, QUEBEC, H4S 1A7
Instrucciones:
Cubra el interior de la olla con spray para cocinar. Quite la piel de las costillas. Mezcle
el azúcar negra, pimienta, líquido de ahumar, ajo y sal y recubra las costillas con la
mezcla. Corte las costillas en pedazos de 4 pulgadas. Coloque capas de costillas y
cebolla en la olla de cocción lenta. Vierta la cola sobre las costillas. Tápelos y
cocínelos en ‘Low’ durante 8-9 horas o hasta que esté tierno. Saque las costillas de la
olla. Escúrralas y deseche el líquido. Vierta salsa BBQ en un tazón bajo. Moje las
costillas en la salsa. Colóquelas en la olla de cocción lenta. Vierta lo que quede de la
salsa sobre las costillas. Tápelo y cocínelo en Low durante 1 hora.
21
KC241
_______________________________________________________________________________
Modelo del Artefacto
_______________________________________________________________________________
Fecha de compra
Nombre del Negocio
_______________________________________________________________________________
Nombre del Dueño
_______________________________________________________________________________
Dirección
Ciudad
Provincia
Código Postal
Impreso en China
22