1
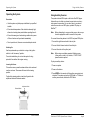
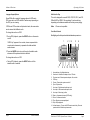
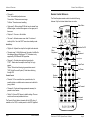
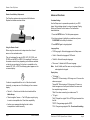
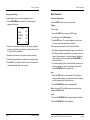
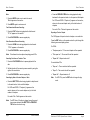
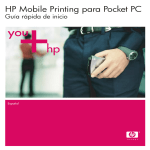
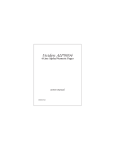
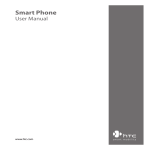
Notes
Notes
Table of Contents
Quick Reference .................................................................. 3
Powering on the system
Watching a DVD
Listening Over Vehicle Speakers
Using Other Video Sources
Watching TV
About the ClearVue 6821 DVD System ............................... 4
Operating the System .......................................................... 5
Precautions .................................................................... 5
Switching On .................................................................. 5
Lowering the Screen ....................................................... 5
What You Can Play ........................................................ 6
Front Panel Controls ....................................................... 6
Using the Headphones .................................................... 7
Using the Car Speakers .................................................. 8
Using the TV Tuner ......................................................... 9
Remote Control Reference ............................................... 10
Remote Control Battery Replacement ........................... 11
Basic Remote Functions .............................................. 11
Basic Functions ................................................................. 12
Changing View Settings ................................................ 15
Advanced Functions .......................................................... 16
Customize Settings ...................................................... 16
DVD Menus .................................................................. 19
Viewing Options ............................................................ 20
Language Support Options ........................................... 21
Using Auxiliary Sources .................................................... 22
Important Safety Notices ................................................... 24
ClearVue 6821 DVD System Owner’s Manual
Page 2
Important Safety Notices
Quick Reference
To power on the system:
DANGER AN IMPROPERLY LOCATED OR INSTALLED
MONITOR CAN CAUSE DEATH OR SERIOUS BODILY
INJURY
1 Turn ignition switch to Run or ACC.
2 Press the release button as shown.
READ THE FOLLOWING INFORMATION
THOROUGHLY BEFORE INSTALLATION
3 Screen will power on automatically.
To watch a DVD:
1 Power on the system.
2 Point the remote at the screen and press the POWER
button to turn on the DVD player.
3 Press the Eject button on DVD player or remote to open
tray.
4 Insert a disc into the DVD and press Eject button to close
tray. Playback begins.
To listen over the vehicle speakers:
1 Turn on the vehicle radio and tune it to 88.7 FM.
2 Press SPEAKER ON/OFF on the remote until “FM ON”
appears on the screen.
3 If you hear no audio, try tuning the radio to 89.1 FM.
To use another video source:
1 Connect the RCA audio and video outputs of the device to
the Audio and Video RCA Inputs on the front of the DVD
player.
2 Press MODE on the remote until the video image appears
on the screen.
To watch broadcast television:
1 Press POWER on the remote.
2 Press MODE until ”TV Mode” appears on the screen.
3 Press the up and down arrow buttons on the remote to
change channels.
Page 3
Rosen Products
It is unlawful in most jurisdictions for a person to
operate a motor vehicle equipped with a television
monitor located where the operator can directly or
indirectly view it. In some jurisdictions, television
monitors in motor vehicles may be prohibited or may
require the television monitor to be located behind the
operators seat.
Ensure that you are completely aware of and familiar
with all applicable regulations and restrictions related
to the use of this equipment in a motor vehicle for
your local jurisdiction.
In the event of an accident, passengers can be thrown
against objects in the vehicle. Ensure that the monitor
location is in a position where it will not be struck by a
passenger in the event of an accident.
ALWAYS mount the monitor securely using appropriate
hardware to a structural component in the vehicle. Failure
to properly secure a monitor could result in the
monitor coming loose and endangering the
passengers in the event of an accident.
The INSTALLER accepts all responsibility for proper
installation of the monitor. Rosen Products, LLC, is not
liable for any damages, incidental or otherwise, which
may result from the installation of this product.
ClearVue 6821 DVD System Owner’s Manual
Page 24
About the ClearVue 6821 DVD System
Frequently Asked Questions
Frequently Asked Questions
About the ClearVue 6821 DVD System
Why don’t I hear ClearVue sound over my radio?
Welcome to the ClearVue 6821 DVD System Owner’s Manual.
The ClearVue 6821 DVD system includes the following
components:
Try both 89.1 FM and 88.7 FM on your radio dial, and make sure
that the FM Modulator is on by pressing and releasing the
“SPEAKER ON/OFF” button on the remote until “FM ON” is
displayed on the screen.
Why doesn’t the TV button on the remote turn on the
TV Tuner?
• Overhead Monitor
• DVD Player with TV Tuner
• Wireless IR Headphones (2 pair)
Some buttons on your ClearVue remote are for other Rosen
systems and products. Use the MODE button to turn the TV
Tuner on with your system.
• Wireless IR Transmitter Dome
How do I change channels on the TV Tuner?
• FM Modulator (enables the DVD sound to be
Press the up and down arrow buttons on the remote.
• Remote Control
heard over your vehicle’s speakers).
• Vehicle Trim Ring
Why did the headphones stop working?
Check the power switch and the volume control. Check the
MUTE button on the remote. Then try adding new batteries.
Why did the remote stop working?
Direct remote towards the black oval above the monitor when
pressing buttons. Then try adding new batteries.
Why do I have poor ClearVue sound quality sometimes
over the speakers?
• Other parts and cables which are installed out of sight
in your vehicle.
Note:
The system is intended to be used with your ignition
key switch in the Run or Acc position. Extended use
of the system without the engine running should be
avoided, as it could drain the battery.
You may be in an area that has a strong radio signal at the same
FM frequency as the FM Modulator. See your Rosen dealer to
have the ClearVue FM frequency reset.
Why do I have a poor Video on my screen?
Your DVD players setup may be set to PAL. Check to verify that
your “TV Type” in the setup menu is set to NTSC.
Page 23
Rosen Products
ClearVue 6821 DVD System Owner’s Manual
Page 4
Operating the System
Using Auxiliary Sources
Operating the System
Using Auxiliary Sources
Precautions
• Use this system only after proper installation by a qualified
installer.
• If the internal temperature of the vehicle is extremely high,
allow a short cooling down period before operating the unit.
The system includes RCA inputs on the front of the DVD player
that enable you to attach an external source device such as a
video game or camcorder. You can also listen to an external
audio source such as an MP3 player, portable CD player, or
MiniDiscTM.
Note:
Before attempting to use any auxiliary source, be sure you
have the appropriate cable to connect to the system.
• If the unit shows signs of overheating or malfunction, power
off the unit and consult your dealer immediately.
To connect the auxiliary device to the DVD front panel RCA jacks:
• Do not open the unit; there are no serviceable parts inside.
1 Connect the right channel audio to the red jack.
2 Connect the left channel audio to the white jack.
Switching On
Use the system when your vehicle is running or the ignition
switch is in the “accessory” position.
To avoid a dead battery, do not use the system for long
periods of time without the engine running.
3 Connect the video to the yellow jack.
Note:
When using a non-battery operated Auxiliary source
(video game, or other) in a vehicle, a 12VDC/110VAC
power inverter is required.
To play an auxiliary device:
Lowering the Screen
1 Power on system.
To lower the screen, press the release button on the overhead
monitor, as shown. The screen will lower into the viewing
position.
To adjust the viewing position, insert two fingers into the
adjustment knob and rotate as needed.
2 Power on the device.
3 Press MODE on the remote until the auxiliary source device is
activated. The system cycles from DVD Mode, to TV Mode, to
auxiliary source mode, and back to DVD Mode.
Adjustment Knob
Release Button
Page 5
Rosen Products
ClearVue 6821 DVD System Owner’s Manual
Page 22
Advanced Functions
Operating the System
Language Support Options
What You Can Play
Some DVDs offer a variety of language options for DVD audio,
DVD menu text, and DVD subtitles. Features vary depending on
the DVD you are viewing.
This unit is designed for use with DVD, VCD, CD, CD-R, and CDRW with MP3 or MPEG-1 file recordings. Functions will vary
depending on the features available on the disc you are playing.
If DVDs and VCDs contain multiple audio tracks, the same video
can be viewed with different audio.
Note:
LDs are not compatible.
Front Panel Controls
To change the audio on a DVD:
1 During DVD playback, press the AUDIO button on the remote
control.
Backlighting on the front panel controls indicates when power is on.
1
“AUDIO x/y” appears in the monitor, where x represents the
current audio stream and y represents the total available
audio streams.
2 Press the AUDIO button to cycle through all available audio
streams until the preferred audio is selected.
2 3 4
5
6
VIDEO
To change the audio on a VCD:
M
• During VCD playback, press the AUDIO button until the
desired audio is selected.
7
1
2
3
4
5
6
7
8
9
10
11
12
13
14
Page 21
Rosen Products
8 9
10 11 12 13
14
Arrow buttons—Highlight selections.
Next track—Selects next chapter, title, or CD track.
Previous track—Selects previous chapter, title, or track.
DVD tray.
Power—Powers the system on and off.
Eject—Ejects a disc.
Aux input—Right channel audio input, red.
Aux input—Left channel audio input, white.
Aux input—Video input, yellow.
Menu—Accesses main menu (DVDs only).
Enter—Confirms a selection.
Play—Begins or resumes playback.
Stop—Stops playback.
Infrared sensor—For use with DVD remote control only. Does not
operate with the ClearVue system remote.
ClearVue 6821 DVD System Owner’s Manual
Page 6
Operating the System
Advanced Functions
• “Chapter remain”—Chapter remaining time.
Using the Headphones
To display status information for audio CDs:
IR
Transmitter
Dome
Press the DISP button repeatedly to cycle through the following
information:
• “Single elapsed”—Track time.
• “Single remain”—Track remaining time.
Using the headphones with your system allows rear-seat
passengers to listen to their DVD or video game without
disturbing front-seat passengers. When using the headphones the
IR transmitter dome must have a direct line of sight to the
headphones to work properly.
The system comes with two wireless IR headphones that receive a
signal from the IR transmitter dome near the overhead console.
• “Total elapsed”—Disc time.
• “Total remain”—Disc remaining time.
• Display off.
Viewing Options
Camera Angle
Some DVD discs contain scenes with more than one viewing
angle. For these discs, the same scene can be viewed from a
different angle by using the ANGLE button on the remote
control.
To view a scene from another angle:
Volume
Power ON/OFF
Power LED
To turn the headphones on and off, push the Power ON/OFF
button on the right ear piece. The Power LED on the left ear
piece indicates when headphone power is on. Power turns off
automatically after 3 minutes of no audio to preserve battery life.
To adjust the headphone volume, rotate the thumb wheel switch
on the headphones.
1 During DVD playback, press the ANGLE button.
“ANGLE x/y” appears in the monitor, where x represents the
current camera angle and y represents the total available
camera angles.
2 Press the ANGLE button again to cycle through all available
camera angles until the preferred angle is selected.
Note:
This function is only available on DVDs that contain
multiple viewing angles.
The wireless IR headphones require two AAA batteries. To replace
Page 7
Rosen Products
ClearVue 6821 DVD System Owner’s Manual
Page 20
Operating the System
Advanced Functions
DVD Menus
Most DVD discs have unique menu structures. DVD menu
contents and operation may differ from disc to disc.
the batteries, remove the battery compartment cap on the right
earpiece and insert batteries, as shown.
To use DVD menus:
1 During DVD playback, press the MENU button. The DVD
menu available on the disc appears on the screen.
2 Use the up, down, left and right arrows to select the preferred
menu option.
3 Press PLAY/PAUSE when the desired option is selected.
Title Menu
Some DVD discs also include more than one title.
Using the Car Speakers
To change titles:
To listen to system audio through your car speakers:
1 During DVD playback, press the TITLE button. A list of the
titles available on the DVD appears on the screen.
1 Insert a disc.
2 Use the up, down, left and right arrows to select a title.
2 Turn on the car radio.
3 Press the ENTER button when the desired option is selected.
3 Tune the car radio to the FM frequency 88.7; this is the default
system frequency.
Display Menu
If audio from the system does not play over the car speakers:
The DISPLAY function enables you to view the status, current
title number, track number and the total playing time of the disc
on the monitor.
1 Press SPEAKER ON/OFF on the remote control until “FM ON”
appears on the screen.
To display status information for VCDs and DVDs:
Press the DISP button repeatedly to cycle through the following
information on the monitor:
• “Title x/y and Chapter x/y”—Title elapsed time, where x is the
current chapter or title and y is the total number of chapters
or titles.
• “Title remain”—Title remaining time.
• “Chapter elapsed”—Chapter elapsed time.
Page 19
Rosen Products
and /or
2 Tune the radio to 89.1 FM. This is an alternate system frequency.
To turn off audio over the car speakers, press SPEAKER ON/OFF
on the remote. Audio from the system is then available over the
headphones only.
Note:
Leaving the system to SPEAKER ON mode will
reduce the performance of normal radio reception. To
receive the best reception, always turn the system to
SPEAKER OFF when not in use.
ClearVue 6821 DVD System Owner’s Manual
Page 8
Operating the System
Advanced Functions
To access the parental control rating system:
Using the TV Tuner
To view television on the system:
1 Press the SETUP button. The Setup menu appears.
1 Press MODE on the remote control until “TV
2 Use the up and down arrows to highlight “Parental Control”
and press PLAY/PAUSE twice to confirm your selection.
Mode” appears on the screen.
3 Use the up and down arrows to highlight “Parental”.
2 Press the up and down arrow buttons on the remote to change
channels.
3 Press MODE on the remote twice to return to DVD Mode.
Note:
Broadcast television reception varies with location,
terrain, distance from the broadcast tower, and other
factors. Signal quality is likely to vary in a moving vehicle.
4 To set a parental control level, press the right arrow and then
use the up and down arrows to highlight the desired level of
control.
5 Press PLAY/PAUSE twice to confirm your selection.
“Input pwd” appears, prompting you to enter a password.
6 Enter a four-digit password and press PLAY/PAUSE twice to
confirm your selection. The factory default password is 0000.
7 Press SETUP to exit the Setup menu and begin playback.
To change the password:
1 Press the SETUP button. The Setup menu appears.
2 Use the up and down arrows to highlight “Parental Control”
and press PLAY/PAUSE twice to confirm your selection.
3 Use the up and down arrows to highlight “Password”.
4 Press the right arrow to highlight “Change” and press PLAY/
PAUSE.
4 Enter the existing four digit password using the number
buttons on the remote. The factory default password is 0000.
5 Enter a new four digit password.
6 Enter the new password again to confirm it.
7 Press SETUP to exit the Setup menu and begin playback.
Page 9
Rosen Products
ClearVue 6821 DVD System Owner’s Manual
Page 18
Advanced Functions
Remote Control Reference
• “Pic mode”—
“Auto”: Automatically adjusts screen.
Remote Control Reference
The ClearVue system remote control includes the following
features. Only the buttons labeled below are active.
“Hi-resolution”: Enhances screen image.
“N-flicker”: Prevents screen trembling.
• “Angle mark”—When playing DVDs that can be viewed from
different angles, a camera icon appears on the upper part of
the screen.
• “Captions”—Turns on or off subtitles.
• “Scr saver”—Activates screen saver after 10 minutes of
inactivity. After 1 hour the DVD Tuner enters standby mode.
Video Menu
Power
Eject
Mode
Mute
Audio Setup
• “Digital out”—Adjusts the output for the digital audio terminal.
• “Dynamic range”—Dolby Digital sound. Use when it is difficult to
hear dialogues through the stereo or TV. This feature is only
supported by DVD titles with DRC properties.
• “Downmix”—Controls stereo and two channel audio.
“LT/RT”: Select when the amplifier has Dolby Pro Logic
support.
“Stereo”: Select when listening to general stereo sound.
“VSS (Virtual Surround System)”: Select when listening
through VSS.
Parental Control
• “Parental”—If the current disc has a parental code, it is
possible to skip or substitute various scenes not suitable for
young children.
• “Password”—Create and change password necessary for
parental control feature.
Channel Up
Menu
Adjustment
Exit
Previous
Track
Number
Buttons
Channel Down
Next Track
Menu
Title
Rewind
Slow
Fast Forward
Stop
Advanced
Functions
The Parental Control feature interacts with the DVD rating, if
available on the DVD, to enable parents to limit DVD playback.
Rosen Products
Menu
Adjustment
Play/Pause
• “Default”—Returns DVD player to default settings. The user
must know the current password to do so.
Page 17
Speaker On/Off
ClearVue 6821 DVD System Owner’s Manual
Page 10
Advanced Functions
Remote Control Reference
Remote Control Battery Replacement
Advanced Functions
The ClearVue system remote requires two AAA batteries.
Replace the batteries as shown below.
Customize Settings
Use the Setup menu to personalize operation of your DVD
player. Setup includes options for various Language, Display,
Audio, and Parental Control features. The features are
described below.
1 Press the SETUP button. The Setup menu appears.
2 Use the arrow keys to highlight your selection and press
PLAY/PAUSE to confirm your selection.
3 Press SETUP again to begin playback.
Using the Remote Control
Language Setup
When using the remote control, always aim at the infrared
sensor on the overhead monitor.
This unit is designed for use with DVD, VCD, CD, CD-R, and
CD-RW, and with MP3 or MPEG-1 file recordings. Functions on
the remote control will vary depending on the features available
on the disc you are playing. If a function is unavailable on the
inserted CD, VCD, or DVD, the following symbol appears on the
on-screen display:
• “OSD Language”—Selects language used in Setup menu.
• “Audio”—Selects the language of DVD audio.
• “Subtitle”—Selects the caption language.
• “Disc menu”—Selects the DVD menu language.
Note:
Audio, Subtitle, and Disc menu can only be adjusted
when playback is stopped.
Display Setup
If a disc is incompatible with the unit or if the disc is loaded
incorrectly, you may see one of the following on the on-screen
display:
• “No disc” — Check to see that the disc is loaded with the
label side up.
• “Smart navigation” screen — The DVD player may be trying
to read an incompatible disc. Check disc compatibility.
• Another error message indicating the disc is either
incompatible or loaded incorrectly.
Page 11
Rosen Products
• “TV display”—
“Normal/PS”: When viewing a 16:9 image on a 4:3 screen the
sides are cropped.
“Normal/LB”: When viewing a 16:9 image on a 4:3 screen, a
black bar appears on the top and bottom of the screen and
the complete image is shown.
“Wide”: Use when connecting to a wide-screen TV.
• “TV type”—
“Multi”: Outputs the original PAL or NTSC signal recorded into
the title.
“NTSC”: Changes image signal to NTSC.
“PAL”: Changes image signal to PAL. Do not use this setting.
ClearVue 6821 DVD System Owner’s Manual
Page 16
Basic Functions
Basic Functions
Changing View Settings
Basic Functions
To adjust settings for color, contrast, brightness, or tint:
Inserting or Ejecting Discs
1 Press VIDEO MENU on the remote. The following menu
appears in the screen.
Press the EJECT button to insert or eject a disc.
***MENU***
COLOR
(32)
CONTRAST
(32)
BRIGHT
(32)
TINT
(32)
Playback
To play a disc:
1 Press the EJECT button to open the DVD player.
2 Load the disc with the label side up.
3 Press EJECT again. “Disc loading” appears on the screen.
The disc commences playback automatically.
2 Press the up and down arrow keys on the remote to highlight
a menu option. Each menu option has a range of values from
0 to 63, with 32 as the default.
3 Press the left arrow key on the remote to reduce a setting.
4 Press the right arrow key on the remote to increase a setting.
5 Press EXIT on the remote to close the menu. The menu also
closes automatically after a few seconds.
DVD playback varies from disc to disc. Options include:
• DVD playback begins automatically when you insert the disc.
• DVD playback begins automatically, but proceeds only until a
menu of options appears. To continue playback, highlight an
option using the arrow buttons then press PLAY/PAUSE on
the remote control.
• The screen displays a menu of options before proceeding. To
continue, highlight an option using the arrow buttons then
press PLAY/PAUSE on the remote control.
Stop
1 Press the STOP button to stop playback. The DVD player
saves in internal memory the exact position where it stopped
and will playback again from that position.
2 Press PLAY/PAUSE to resume normal playback.
Note: For some VCDs, the Stop function can be enabled by
pressing the NEXT button.
Pause
1 Press the PLAY/PAUSE button to pause playback of the disc.
2 Press PLAY/PAUSE to resume playback.
Page 15
Rosen Products
ClearVue 6821 DVD System Owner’s Manual
Page 12
Basic Functions
Basic Functions
• Press the PREVIOUS TRK button during playback to skip
Mute
1 Press the MUTE button once to mute the sound.
“Mute” appears on the monitor.
2 Press MUTE again to restore sound.
Fast Forward and Reverse Searching
1 Press the FAST button during playback to fast forward.
“FF 2x” appears on the monitor.
backward to the previous track or to the previous title/chapter.
For VCDs and DVDS—“Chapter x/y” appears on the monitor,
where x is the current chapter and y is the total number of
chapters.
For audio CDs—“Previous” appears on the monitor.
Repeating a Track or Chapter
The DVD player will repeat a track or chapter, or an audio disc.
3 Press PLAY/PAUSE to resume regular play.
Slow Forward and Reverse Searching
1 Press the SLOW button during playback to slow forward.
“SF 2x” appears on the monitor.
Press the REP button on the remote control to cycle through the
following on-screen display options.
For DVDs:
3 Press PLAY/PAUSE to resume regular play.
• “Chapter repeat on”—The current chapter will be repeated.
Note:
• “Title repeat on”—The current title will be repeated.
Slow forward is not an option when playing audio CDs.
Searching One Scene or Track at a Time
• “Repeat off”—Repeat mode is off.
1 Press the PLAY/PAUSE button to pause playback of the
disc.
For audio/video CDs:
2 Set the direction of the scene-by-scene search by using the
right or left arrow button.
• “Rep all”— The current disc will be repeated.
• “Rep one”— The current track will be repeated.
3 Press PLAY/PAUSE to resume regular play.
• “Repeat off”— Repeat mode is off.
Searching by Next or Previous Chapter or Track
Note:
• Press the NEXT TRK button during playback to skip forward
For MP3 CDs, press the REP button to change the play
mode.
to the next track or to the next title/chapter.
For VCDs and DVDS—“Chapter x/y” appears on the
monitor, where x is the current chapter and y is the total
number of chapters.
For audio CDs—“Next” appears on the monitor.
Note:
Page 13
For MP3 discs, if the disc is stopped, press the up and
down arrows instead of the NEXT TRK or PREVIOUS
TRK buttons to select a song.
Rosen Products
ClearVue 6821 DVD System Owner’s Manual
Page 14