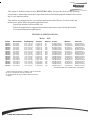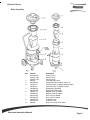
1
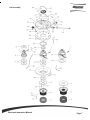
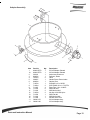
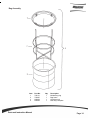
Parts and Instruction Manual
X839 Asbestos Series
15, 30, & 55 Gallon
This manual is furnished with each new MINUTEMAN X839. This provides the necessary operating
and preventive maintenance instructions. Operators must read and understand this manual before operating or servicing this machine.
This machine was designed to give you excellent performance and efficiency. For best results and
minimal cost, please follow the general guidelines below:
·
Operate the machine with reasonable care.
·
Follow the manufacturers suggested maintenance instructions as provided in this booklet.
·
Use original Minuteman supplied parts.
TECHNICAL SPECIFICATIONS
Model
X839
Number
Wet Capacity**
Dry Capacity
Tank Size
Material
Air Flow
Waterlift
Filter Area
C83985-01
C83905-01
C83930-01
C83985-03
C83905-03
C83930-03
C83985-05
C83905-05
C83930-05
C83985-06
C83905-06
C83930-06
C83985-30
C83905-30
C83930-30
C83985-55
C83905-55
C83930-55
12
12
12
12
12
12
13
13
13
19
19
19
27
27
27
47
47
47
.82
.82
.82
.82
.82
.82
.82
.82
.82
1.3
1.3
1.3
3.6
3.6
3.6
7.2
7.2
7.2
15 gal (57 ltr)
15 gal (57 ltr)
15 gal (57 ltr)
15 gal (57 ltr)
15 gal (57 ltr)
15 gal (57 ltr)
15 gal (57 ltr)
15 gal (57 ltr)
15 gal (57 ltr)
20 gal (76 ltr)
20 gal (76 ltr)
20 gal (76 ltr)
30 gal (113 ltr)
30 gal (113 ltr)
30 gal (113 ltr)
55 gal (208 ltr)
55 gal (208 ltr)
55 gal (208 ltr)
SS
SS
SS
PTD
PTD
PTD
POLY
POLY
POLY
POLY
POLY
POLY
PTD
PTD
PTD
PTD
PTD
PTD
95 CFM(2.7m3/min)
115 CFM(3.2m3/min)
100 CFM(2.8m3/min)
95 CFM(2.7m3/min)
115 CFM(3.2m3/min)
100 CFM(2.8m3/min)
95 CFM(2.7m3/min)
115 CFM(3.2m3/min)
100 CFM(2.8m3/min)
95 CFM(2.7m3/min)
115CFM(3.2m3/min)
100CFM(2.8m3/min)
95 CFM(2.7m3/min)
115CFM(3.2m3/min)
100CFM(3.2m3/min)
95 CFM(2.7m3/min)
115CFM(3.2m3/min)
100CFM(3.2m3/min)
85" (2159 mm)
105" (2667 mm)
130" (3302 mm)
85" (2159 mm)
105" (2667 mm)
130" (3302 mm)
85" (2159 mm)
105" (2667 mm)
130" (3302 mm)
85" (2159 mm)
105" (2667 mm)
130" (3302 mm)
85" (22159 mm)
105" (2667 mm)
130" (3302 mm)
85" (22159 mm)
105" (2667 mm)
130" (3302 mm)
1137in2(7336cm2)
2592in2(16,724cm2)
2592in2(16,724cm2)
1137in2(7336cm2)
2592in2(16,724cm2)
2592in2(16,724cm2)
1137in2(7336cm2)
2592in2(16,724cm2)
2592in2(16,724cm2)
1137in2(7336cm2)
2592in2(16,724cm2)
2592in2(16,724cm2)
1137in2(7336cm2)
2592in2(16,724cm2)
2592in2(16,724cm2)
1137in2(7336cm2)
2592in2(16,724cm2)
2592in2(16,724cm2)
gal
gal
gal
gal
gal
gal
gal
gal
gal
gal
gal
gal
gal
gal
gal
gal
gal
gal
(45 ltr)
(45 ltr)
(45 ltr)
(45 ltr)
(45 ltr)
(45 ltr)
(49 ltr)
(49 ltr)
(49 ltr)
(72 ltr)
(72 ltr)
(72 ltr)
(102 ltr)
(102 ltr)
(102 ltr)
(178 ltr)
(178 ltr)
(178 ltr)
cu.
cu.
cu.
cu.
cu.
cu.
cu.
cu.
cu.
cu.
cu.
cu.
cu.
cu.
cu.
cu.
cu.
cu.
ft
ft
ft
ft
ft
ft
ft
ft
ft
ft
ft
ft
ft
ft
ft
ft
ft
ft
(.02
(.02
(.02
(.03
(.02
(.02
(.02
(.02
(.02
(.03
(.03
(.03
(.09
(.09
(.09
(.20
(.20
(.20
m3)
m3)
m3)
m3)
m3)
m3)
m3)
m3)
m3)
m3)
m3)
m3)
m3)
m3)
m3)
m3)
m3)
m3)
SS= Stainless Steel; PTD= Painted; POLY= Polyethylene
** Units must have an optional 1:1 adapter in order to operate wet.
All 15, 30, or 55 gallon dry recovery vacuums can
be converted to wet recovery by adding a water shut-off and
1:1 adaptor.
Parts and Instruction Manual
Table of Contents
IMPORTANT SAFETY INSTRUCTIONS .............................................................................................. 1
Inspection ............................................................................................................................................ 2
Electrical- 115 Volt .............................................................................................................................. 2
Grounding Instructions ...................................................................................................................... 2
User Maintenance Instructions ......................................................................................................... 3
Cloth Bag & Hose Assembly .............................................................................................................. 3
Cord Storage ....................................................................................................................................... 3
Operation and Filter Care Instructions ............................................................................................. 4
Tank/Filter Set-Up Procedure ............................................................................................................ 4
Procedure for Removing Contaminated Filters and for Cleaning of Contaminated Tank ........... 4
Changing the Prefilter ........................................................................................................................ 5
Assembly Instructions for Dry Recovery - Models 30/55 gallon .................................................... 5
Emptying Procedure After Dry Recovery ......................................................................................... 5
Exploded Views ............................................................................................................................... 6
Main Assembly ................................................................................................................................ 6
Lid Assembly ................................................................................................................................... 7
Lid Assembly BOM .......................................................................................................................... 8
Tank Assembly - 15 Gallon .............................................................................................................. 9
Tank Assembly - 15 Gallon BOM................................................................................................... 10
Tank Assembly - 30 & 55 Gallon ................................................................................................... 11
Adapter Assembly ......................................................................................................................... 12
Dolly Assembly .............................................................................................................................. 13
Bag Assembly ............................................................................................................................... 14
Minuteman International Made Simple Commercial Limited Warranty ........................................ 15
Parts and Instruction Manual
FOR COMMERCIAL USE ONLY
IMPORTANT SAFETY INSTRUCTIONS
When using an electrical appliance, basic precautions should always be followed,
including the following:
READ ALL INSTRUCTIONS BEFORE USING
WARNING - To reduce the risk of fire, electric shock, or injury:
•
Do not leave appliance when plugged in. Unplug from outlet when not
in use and before servicing.
WARNING
Electrical shock could occur if used on wet surfaces. Do not expose to rain.
Store indoors.
• Do not allow to be used as a toy. Close attention is necessary when used by
or near children.
• Use only as described in this manual. Use only manufacturer’s recommended
attachments.
• Do not use with damaged cord or plug. If appliance is not working as it
should, has been dropped, damaged, left outdoors, or dropped into water,
return it to a service center.
• Do not pull or carry by cord, use cord as a handle, close a door on cord, or
pull cord around sharp edges or corners. Do not run appliance over cord.
Keep cord away from heated surfaces.
• Do not unplug by pulling on cord. To unplug, grasp the plug, not the cord.
• Do not handle plug or appliance with wet hands.
• Do not put any object into openings. Do not use with any opening blocked;
keep free of dust, lint, hair, and anything that may reduce air flow.
• Keep hair, loose clothing, fingers, and all parts of body away from openings
and moving parts.
• Do not pick up anything that is burning or smoking, such as cigarettes,
matches or hot ashes.
• Do not use without dustbag and/or filters in place.
• Turn off all controls before unplugging.
• Use extra care when cleaning on stairs.
• Do not use to pick up flammable or combustible liquids such as gasoline
or use in areas where they may be present.
• Connect to a properly grounded outlet only. See grounding instructions.
SAVE THESE INSTRUCTIONS
Parts and Instruction Manual
Page 1
Inspection
Carefully unpack and inspect your machine for shipping damage. Each unit is tested and thoroughly
inspected before shipment, and any damage is the responsibility of the delivery carrier who should
be notified immediately.
Electrical- 115 Volt
This machine is designed to operate on a standard 15 amp. 115 volt, 60 hz, AC circuit. Voltages
below 105 volts AC or above 125 volts AC could cause serious damage to the motor.
WARNING
Electric motors can cause explosions when operated near explosive materials or vapors. Do not
operate this machine near flammable materials such as solvents, thinners, fuels, grain dust, etc.
Grounding Instructions
This appliance must be grounded. If it should malfunction or breakdown, grounding provides a
path of least resistance for electric current to reduce the risk of electric shock. This appliance is
equipped with a cord having an equipment-grounding conductor and grounding plug. The plug
must be plugged into an appropriate outlet that is properly installed and grounded in accordance
with all local codes and ordinances.
DANGER - Improper connection of the equipment-grounding conductor can result in a risk
of electric shock. Check with a qualified electrician or service person if you are in doubt as to
whether the outlet is properly grounded. Do not modify the plug provided with the appliance — if
it will not fit the outlet, have a proper outlet installed by a qualified electrician.
This appliance is for use on a nominal 120-volt circuit and has a grounding plug that looks like the
plug illustrated in sketch A below. Make sure that the appliance is connected to an outlet having
the same configuration as the plug. No adapter should be used with this appliance.
Parts and Instruction Manual
Page 2
User Maintenance Instructions
All service and repair should be performed by a qualified vacuum service representative or
electrician. No user serviceable components are employed in the electrical vacuum lid head
assembly. No lubrication of the motor is required.
Cloth Bag & Hose Assembly
Cloth bag and hose assy. are user maintenance items and can be replaced when worn out. Cloth
bags can be maintained by blowing dust off of the bag and then laundered. Cloth bags should be
completely dryed before re-installing into machine. For optimum performance, empty and clean
filter bag regularly. A clogged and dirty bag restricts the flow of air and results in reduced vacuum.
The Hose Assy. can be maintained by wiping off with a dampened cloth of mild liquid soap and
water, then allowed to dry.
Cord Storage
While not in use storage can be accomplished by winding cord around motor lid assy. Cord
should be completely unwound from Lid Assy. during operation.
• Do not use with damaged cord or plug. If appliance is not working as it should, has been
dropped, damaged, left outdoors, or dropped into water, return to service center.
• Do not pull or carry by cord, use cord as handle, close a door on cord, or pull cord around sharp
edges or corners. Do not run appliance over cord. Keep cord away from heated surfaces.
• Do not unplug by pulling cord. To unplug, grasp the plug, not the cord.
• Do not handle plug or appliance with wet hands.
• Always unplug the machine when removing the head off the tank. This equipment should be
stored indoors and not exposed to rain.
Parts and Instruction Manual
Page 3
Operation and Filter Care Instructions
The Minuteman Asbestos Vacuum has been specifically designed to clean up fibrous asbestos and asbestos dust
of all types. Special filters reduce the incidence of airborne dust that would be created by any other method of
cleaning.
During the removal of asbestos dust, do not sweep, scoop, shovel, or in any manner handle other than by
vacuuming.
Do not at any time attempt to bypass, remove, substitute or by any other means change the filters used in
this vacuum.
Use only approved Minuteman Asbestos Vacuum filters and filter bags.
Before attempting to use and before cleaning, be certain that you fully understand the instructions given
for the setting up or cleaning/changing of filters of this vacuum.
Each facility has its own individual and unique cleaning problems, it is suggested that you use the following:
Tank/Filter Set-Up Procedure
Refer to Main Assembly, figure 1.
1. Fully open the plastic bag and place it down into the tank; #4 on the underside of the intake tube as shown.
2. Take the paper bag that has the cardboard collar attached and open it up by gently pulling the folds apart.
3. You will notice two creases on the top side of the collar; carefully bend the ends down (toward) the bag.
4. Insert this bag into the tank and push it to the bottom, taking care not to snag the plastic bag.
5. Locate the cardboard collar around the intake tube and gently work it up past the raised ring that runs around
the tube.
6. Push the plastic bag down past the paper bag; position it about 1/2 to 2/3 down past the top of the bag.
7. Take the paper filter protector bag and insert it into the tank and snap the elastic band around the rim of the
tank. ( About 2 inches of the bag should be outside of the tank.)
8. Place the cloth filter bag onto and into the tank, using the formed outer rim as a guide and press down firmly
onto the tank rim.
9. Position the lid onto the tank, making sure that the gasket of the lid is seated onto the ring of the cloth bag
frame completely around the tank.
10. Snap the lid latches into place.
For proper cleaning of tank and removal/changing of filters, see “Procedure for Removing Contaminated Filters
and for Cleaning of Contaminated Tank”.
Procedure for Removing Contaminated Filters and for Cleaning of Contaminated Tank
For the benefit of your health, you should always wear a face mask approved for use with asbestos any time you
are using or cleaning this vacuum cleaner. You should also wear gloves.
1. Unplug machine from power source.
2. Carefully and slowly remove lid only (be sure you have not accidentally lifted the cloth filter bag at the
same time). Set the lid/filter assembly aside.
3. Gently tap the inside of the cloth bag to loosen any particles that may be on the opposite surface. Do this
all around the inside surface of the bag.
4. Gently remove the cloth bag and set aside.
5. Carefully undo the elastic band from around the tank and push the entire bag “slowly” into the tank. Do
not allow the elastic band to snap the bag closed.
6. Using a wiping cloth, dampened with water (not soaking wet), wipe down all of the exposed surfaces
inside to the tank; put the cloth aside, do not discard.
7. Carefully and “very” slowly, push the paper bag down and off of the intake tube, using the attached
cardboard collar. After the collar is removed from the intake tube, take the damp cloth and wipe off any
surfaces that were not previously wiped; at this time, re-wipe the entire inside of the tank and drop the
wiping cloth into the tank.
8. Now reach in and gently pull up and around the paper bag the plastic bag that had been previously
inserted. When you have the plastic bag fully extended, “gently” and “slowly” squeeze the bag closed
Parts and Instruction Manual
Page 4
as close to the filled bag as possible in order to avoid trapping excessive air.
9. Gently remove the bag from the tank. Twist the unfilled portion closed and tie it into a knot.
10. CAUTION: Hazardous materials must be disposed of properly. Never throw contaminated debris in your
usual trash receptacle. Place debris in a plastic bag or can marked “HAZARDOUS MATERIALS” and take
to a hazardous waste handler.
11. For proper assembly of new filters, see “Tank/Filter Set-Up Procedure”.
Changing the Prefilter
The pink impaction filter should be changed, using all of the precautions previously mentioned.
The impaction filter should be changed when any of the following takes place:
1. Anytime there is an indication of a filter tear during normal operation of the unit. This tear
could be in any of the filters used.
a. paper dust containment bag
b. paper bag protector
c. cloth filter bag
These tears would show up during the tank clean-out procedure, or....
2. Every other tank clean-out period. To change the impaction filter, do the following before you do Step #3
of the normal clean-out procedure.
a. Wipe down all of the exposed surfaces on the underside of the removed lid, using the
dampened wiping cloth.
b. Remove the pre-filter from the high efficiency filter. Be careful so as not to damage or puncture the
H.E.P.A. / U.L.P.A media used in the final filter. Do not attempt to clean the pre-filter in any way;
dispose of by placing it into the tank you are now in the process of cleaning. DO NOT USE ANY
TOOLS TO REMOVE THE PRE-FILTER.
d. Before proceeding any further in cleaning the tank, first place a newpre-filter (one only)
onto the H.E.P.A. / U.L.P.A filter.
Assembly Instructions for Dry Recovery Models 30/55 gallon
Refer to Main Assembly, Fig. 2
1. Place 6 mil. plastic bag liner #7 into drum. Drape bag liner over rim of drum.
2. Place adaptor ring #6 onto drum.
3. Insert paper filter protector #3 into drum adaptor ring and drape elastic over rim to secure in place.
4. Insert cloth filter assembly #2 into adaptor ring and center around rim.
5. Place vacuum motor lid assembly onto adaptor ring. Attach lid latches.
Emptying Procedure After Dry Recovery
1. Remove the vacuum lid assembly and place on work table upside down.
2. Remove and inspect cloth filter assembly. If dust has accumulated on the cloth bag, it will require cleaning
by vacuuming. A second cloth filter assembly should be kept on hand for installation into vacuum so that
soiled filter bag can be cleaned and reused.
3. Remove filter bag protector elastic from around adaptor rim and push bag into drum for disposal.
4. Inspect prefilter on side of H.E.P.A. / U.L.P.A filter on vacuum motor lid assembly. If prfilter has been soiled,
remove and place it into drum with other debris.
5. Install clean prefilter onto H.E.P.A. / U.L.P.A filter.
6. Using a damp towel, wipe inside of adaptor ring as you remove it from drum. Place soiled towels into
drum liner bag.
7. Gather plastic liner bag while in drum. Seal and tie liner bag before removing from drum. Tilt drum over on
its side and slide bag liner out of drum. Place into a second 6 mil. liner bag with proper markings for
disposal.
8. Follow assembly procedure above before putting vacuum back into use.
Parts and Instruction Manual
Page 5
Exploded Views
Main Assembly
Item
1
2
3
4
5
6
7
8
9
Part No.
801085 (85)
801105 (105)
801130 (130)
805058
805038 Pkg
750221-01
750220-01
760598 Pkg
805037 Pkg
C80601-70
C80601-80
805037 Pkg
805046 Pkg
C90007-80
900015 PTD
900048
Parts and Instruction Manual
Description
Lid Asy Comp
Lid Asy Comp
Lid Asy Comp
Cloth Bag Asy Comp
Disposable Fliter Protector Pkg of 12
Tank Asy Comp 15 Gallon Stainless Steel
Tank Asy Comp 15 Gallon Painted
Disposable Paper Bag
Disposable Plastic Bag
Adapter Comp 30 Gallon
Adapter Comp 55 Gallon
Drum Liner 30 Gallon
Drum Liner 55 Gallon
30 Gallon Drum
55 Gallon Drum
Dolly Cart Comp 30/55 Gallon
Page 6
Lid Assembly
Parts and Instruction Manual
Page 7
Lid Assembly BOM
ITEM
1
2
3
4
5
6
7
8
9
10
11
12
13
14
15
16
17
18
19
20
21
22
23
24
25
26
27
28
29
30
31
31A
31B
32
33
34
35
36
37
38
39
40
41
42
43
44
45
46
47
48
49
50
51
52
53
54
PART NO.
110003
110012
110028PKG
110030PKG
110038
110039
255008
255039
290030
380001-4
380005
380064
381020
450088
710329
710355
711124
711126
711310
711373
711502
711505
711519
711552
711553
711803
712532
712908
715029
715069
715102
715103
715104
715115
715501
740014
740088
740116-1
760212
760213
760896PLT
760897PLT
760898PLT
760899
760903
760904
760905
809754
828995
831478
831484
831524
831626
831652
832070
833237
Parts and Instruction Manual
REQ’D
1
1
1
1
1
1
2
1
1
1
2
1
1
1
8
2
1
6
2
4
8
2
4
8
3
2
3
3
1
1
1
1
1
1
1
4
1
1
1
1
1
1
1
1
1
1
1
1
2
1
1
1
1
3
2
1
DESCRIPTION
MOUNTING PLATE (110038)
MOUNTING PLATE (110039)
PREFILTER SLEEVE, PKG OF 6 (110038)
PREFILTER SLEEVE, PKG OF 6 (110039)
FILTER-HEPA, 10"
FILTER-ULPA, X839 SERIES
BRUSH, CARBON - 105/130
VACUUM MOTOR, BYPASS 115V-105
LID GASKET DIECUT 15G 290
VACUUM MOTOR, BYPASS (ECM) 115V-85
BRUSH, CARBON (ECM) - 85
RING, FOAM
CORD-16GA-3 50FT MED GREY
SPACER-SWITCH, FOAM
SCR-MC 8-32 X .50 ZINC
SCR-MC RD HD 10-32 X .50 ZINC
SCR-ST-B 10 X .37 NI
SCR-ST-B 10 X .75
NUT-HEX 10-32 ST PL
NUT-NYLOC 1/4-20
WSR-FLT #8
WSR-FLT 1/4
WSR-FLT .25 X 1.01 X .06
WSR-INT LOCK #8
WSR-INT LOCK #10
PIN-COTTER .06 X .75
SCR-MC 10-24 X 1.00 SS
NUT-FLANGED WIZZ 10-24
DECAL-NAME PLATE SERIAL
DECAL-FILTERS CHECK
DECAL-P/V HEPA 85
DECAL-P/V HEPA 105
DECAL-P/V HEPA 130
DECAL-WARNING PV DRY
DECAL-MADE IN USA
QC-14-16G 1/4 FULL INS FEMALE
SWITCH-VAC LIGHT SENSOR
WIRE ASSY 16G GRN/YEL 14.50"
VAC SENSOR TUBE
VENTURI TUBE
SHROUD, MOTOR PLATED
MOTOR COVER PLATED P/V
CAP MOTOR P/V PLATED
HANDLE BAIL PIC VAC
MOTOR LID ASY PV HEPA
BUSHING-SNUB .375 X .469 X .43
GASKET, FILTER MOUNTING PLATE
SWITCH-ROCKER
GASKET-NEOP 2.5X6X.62
GASKET-NEOP 6 X 7.5 X .37
GASKET 3.5 X 4.5 X .37
VACUUM MOTOR, 3-STAGE 115V-130
GASKET 4 X 7.37 X .250
SPACER-.264 X .344 X .750 ALM
CONNECTOR
STRAIN RELIEF W/ NUT
Page 8
Tank Assembly - 15 Gallon
Parts and Instruction Manual
Page 9
Tank Assembly - 15 Gallon BOM
Item
1
1A
2
3
4
5
6
7
8
9
10
11
12
13
14
15
16
17
18
19
20
21
22
23
24
25
26
27
28
29
30
31
32
33
34
***
***
***
Part No.
900001PTD
900003POL
711352
900038
390001
761054
900037PLT
711310
711543
711503
711304
711542
711502
900035
390016
711713
710530
390087
390002
390101
710154
711915
900033
711005
711006
760984PTD
900066
711524
900040
130032
711591
711505
711202
711594
390110
390013
390014
390019
Parts and Instruction Manual
Qty.
1
1
2
2
1
2
1
2
2
2
1
1
1
1
1
2
1
1
1
1
2
4
2
4
6
1
2
2
2
2
4
4
2
2
1
Description
Tank, PTD 15 Gal
Tank, Polished 15 Gal SS
Nut-Acorn 1/4-20
Clamp, Handle
Trigger with Pins
Latch
Handle, Plated
Nut-Hex 10-32 ST PL
Washer-Helical #10
Washer-Flat #10
Nut-Hex 8-32
Washer-Helical #8
Washer-Flat #8
Deflector, Intake
Molded Downtube, New Style
Retaining Ring-E Ext
SCR-MC 8-32 x .5 BR
Gasket
Spring
Intake Aluminum
SCR-MC 10-32 x .562 SS
Rivet-Tube .19X.28
Caster, Swivel
SCR-SK 1/4-20 x .31
SCR-SK 1/4-20 x .62
Bracket, Wheel
Axle
Washer-Wave .52 x .87 x .01
Wheel
Cap, Retainer
Washer-Rubber
Washer-Flat
Blt-HH 1/4-20 X .50
Washer-Flat .88 x .03 NI
Intake Assy Aluminum
Molded Adapter 1-1/4
Molded Adapter 1-1/2
Molded Adapter 2
Page 10
Tank Assembly - 30 & 55 Gallon
Item
1
1a
2
3
4
5
6
***
***
***
Part No.
900078PTD
900015PTD
900047
900031POL
711203
711591
711505
C90007-80
805037PKG
805046PKG
Parts and Instruction Manual
Qty
1
1
1
2
4
4
4
Description
Tank 30 Gal. PTD Less Handles
Tank 55 Gal. PTD No Handles
Dump Valve
Handle, Tank Polished
BLT, HH 1/4-20 x .62
Washer, Rubber
WSR, Flat 1/4
Tank 30 Gal. Complete
Drum Liner 30 Gal. Pkg. 12
Drum Liner 55 Gal. Pkg. 12
Page 11
Adapter Assembly
Item
1
1a
2
3
4
5
6
7
8
9
10
11
12
13
14
15
****
****
Parts and Instruction Manual
Part No.
806016PTD
806015PTD
390110
900035
761054
390087
806006
710530
712824
711915
711503
711543
712638
711502
711542
711304
C80601-70
C80601-80
Qty
1
1
1
1
2
1
1
1
2
4
6
2
2
1
1
1
Description
55 Gal. Adapter Painted
30 Gal. Adapter Painted
Intake Assy Aluminum
Deflector, Intake
Latch
Gasket Diecut Poron Intake
Gasket, Raw
SCR-MC 8-32 x .50 BR
SCR-THMS 10-24 x .75 STPL
Rivet-Tube .19 x .28 NI PL
WSR-Flat #10
WSR-Helical #10
Nut Hex 10/24 SS Nyloc
WSR-Flat #8
WSR-Helical #8
Nut-Hex 8-32 STPL
30 Gal. Adapter Assy.
55 Gal. Adapter Assy.
Page 12
Dolly Assembly
Item
1
2
3
4
5
6
7
8
9
10
***
Part No.
750045
900051
900052
900080
900081
711642
761050
761049
711545
711379
900048
Parts and Instruction Manual
Qty
1
1
2
1
1
2
2
2
16
16
Description
Weldment dolly 30/55
Weldment, handle
Grip, handle
Spring, torsion RH
Spring LH
Rollpin
Caster, rigid 5"
Caster, swivel 5"
WSR, helical Spr Loc 5/16
Nut-Flanged Wizz 5/16-18
Dolly cart complete
Page 13
Bag Assembly
Item
1
2
3
4
Parts and Instruction Manual
Part No.
760131
750097
805054
805058
Qty.
1
1
1
1
Description
Molded bag ring
Bag frame
Cloth bag only
Bas assy. complete
Page 14
Minuteman International Made Simple Commercial Limited Warranty
Minuteman International, Inc. warrants to the original purchaser/user that the product is free from defects in
workmanship and materials under normal use. Minuteman will, at its option, repair or replace without charge, parts
that fail under normal use and service when operated and maintained in accordance with the applicable operation and
instruction manuals. All warranty claims must be submitted through and approved by factory authorized repair
stations.
This warranty does not apply to normal wear, or to items whose life is dependent on their use and care, such as belts,
cords, switches, hoses, rubber parts, electrical motor components or adjustments. Parts not manufactured by
Minuteman are covered by and subject to the warranties and/or guarantees of their manufacturers. Please contact
Minuteman for procedures in warranty claims against these manufacturers.
Special warning to purchaser -- Use of replacement filters and/or prefilters not manufactured by Minuteman or its
designated licensees, will void all warranties expressed or implied. A potential health hazard exits without original
equipment replacement.
All warranted items become the sole property of Minuteman or its original manufacturer, whichever the case may be.
Minuteman disclaims any implied warranty, including the warranty of merchantability and the warranty of fitness for a
particular purpose. Minuteman assumes no responsibility for any special, incidental or consequential damages.
This limited warranty is applicable only in the U.S.A. and Canada, and is extended only to the original user/purchaser
of this product. Customers outside the U.S.A. and Canada should contact their local distributor for export warranty
policies. Minuteman is not responsible for costs or repairs performed by persons other than those specifically
authorized by Minuteman. This warranty does not apply to damage from transportation, alterations by unauthorized
persons, misuse or abuse of the equipment, use of non-compatible chemicals, or damage to property, or loss of
income due to malfunctions of the product.
If a difficulty develops with this machine, you should contact the dealer from whom it was purchased.
This warranty gives you specific legal rights, and you may have other rights which vary from state to state. Some
states do not allow the exclusion or limitation of special, incidental or consequential damages, or limitations on how
long an implied warranty lasts, so the above exclusions and limitations may not apply to you.
Cord Electric Group………. Three years parts, two years labor, ninety days travel (Not to exceed two hours)
Exceptions………. Port-A-Scrub, one year parts, six months labor
MPV 13, one year parts
MPV 14 and 18, two years parts, one year labor
RapidAir blower, one year parts, one year labor
Explosion-Proof Vacuum, one year parts, one year labor
Pneumatic Vacuums, three years parts, one year labor
Battery Operated Group….. Three years parts, two years labor, ninety days travel
(Not to exceed two hours)
Exceptions……Sweepers, one year parts, one year labor, ninety days travel
(Not to exceed two hours)
Internal Combustion Group….One year parts, one year labor, ninety day travel
(Not to exceed two hours)
Replacement Parts……………..Ninety days
Batteries………………………….0-3 months replacement, 4-12 months pro-rate
Polypropylene Plastic Tanks…Ten years, no additional labor
111 South Rohlwing Road · Addison, Illinois 60101 USA
Phone 630- 627-6900 · Fax 630- 627-1130
E-Mail, www.minutemanintl.com
A Member of the Hako Group
987846
Rev A 03/07