1
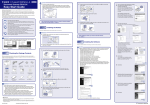
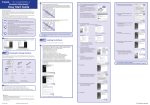
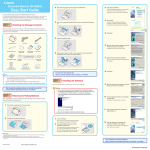
ENGLISH
CAUTION
Easy Start Guide
Thank you for purchasing the Canon imageFORMULA DR-7090C.
The documentation for the scanner consists of the Easy Start Guide (this manual) and the
Reference Guide (supplied with the scanner), the User Manual, and the CapturePerfect3.0
Operation Guide, which are provided in electronic form and registered in the menu during
software installation.
Please read this and the following manuals thoroughly before using the scanner to become
acquainted with its capabilities and make the most of its many functions.
After reading the manuals, store them in a safe place for future reference.
Windows XP
❏ Notice to Cardiac Pacemaker Users
This product emits low level magnetic flux.
If you use a cardiac pacemaker and feel abnormalities, please be away from this
product and consult your doctor.
❏ Removing the Transportation Screw
Three transportation screws are preinstalled at the factory to secure the scanner's
optical unit and protect it from damage caused by vibration and shock during
shipment. Make sure to remove these screws before using the scanner. Turning the
scanner ON without removing the transportation screw may damage the scanner.
7.
Read the software license agreement, and
click [Yes] if you consent to its conditions.
Installation of the scanner driver starts.
8.
Click [Finish] to complete the installation.
Next, the installation wizard for
CapturePerfect 3.0 appears.
9.
Click [Next].
Windows Vista
Transportation
screw
Easy Start Guide (This Manual)
This manual describes the procedures for setting up the scanner for use.
Please follow the procedures in the Easy Start Guide to set up the scanner.
Reference Guide
This manual consists of the basic scanner operating instructions extracted
from the User Manual. For more details, refer to the User Manual.
User Manual (Electronic Manual)
This manual consists of two sections: Hardware and Software.
The Hardware section provides general information about the scanner
operational settings, maintenance, and troubleshooting.
The Software section describes how to use the ISIS/ TWAIN driver with the
scanner, and how to set up job registration tools.
❏ Installing the Securing Braces
The securing brace prevents the scanner from tipping backward when the feeder is
open. Make sure to install the securing plates before using the scanner.
1.
2.
CapturePerfect 3.0 Operation Guide (Electronic Manual)
This is the operation guide for CapturePerfect 3.0, the Canon document
scanner application program.
IMPORTANT
The electronic manuals are PDF (Portable Document Format) files, and are installed
in the following folders during software installation. (☞ STEP 2)
User Manual
❏ Close all other applications before installing the software.
Securing braces
❏ The scanner weights about 41 kg.
To lift or move the scanner, always use two people, one on each side. Never
attempt to lift the scanner by yourself. You could drop the scanner or pinch your
fingers, resulting in personal injury or damage to the scanner. Remember to be
extra careful when moving it.
Log on to Windows with Administrator privileges.
Insert the DR-7090C Setup Disc into the
computer’s CD-ROM drive.
The setup menu automatically starts up
when you insert the CD-ROM into the CDROM drive. If the setup menu does not start
up, run the setup.exe application on the
CD-ROM.
When Installing in Windows Vista
When using Windows Vista, the “User
Account Control” dialog box may appear. In
this case, enter your login user password
for Administrator privileges, and click [OK].
10. Read the software license agreement, and
click [Yes] if you consent to its conditions.
11. Confirm the installation destination, and
click [Next].
Installation of CapturePerfect 3.0 starts.
CapturePerfect 3.0 Operation Guide
3.
❏ When moving the scanner, make sure to secure the optical unit by installing the
three transportation screws. For details, refer to “Installing the Transportation
Screws” on page 5 of the Reference Guide.
The setup menu starts up.
The setup menu consists of the following screens:
Menu Screen
Typical Installation
12. Click [Finish] to complete the installation of
CapturePerfect 3.0.
Next, the installation wizard for the User
Manual appears.
Checking the Package Contents
When you unpack your scanner, make sure all of the following accessories are included.
If any of the items listed below are missing or damaged, contact your local authorized Canon
dealer or service representative.
After checking the package contents, you need to install the software.
(☞ STEP 2)
* Installs all of the software displayed.
13. Click [Next].
Installation of the User Manual starts.
Read Manuals
Custom Installation
* The User Manual and CapturePerfect 3.0
Operation Guide electronic manuals for
the scanner are installed on the computer
with the rest of the software.
* Installs only the selected software.
Installing the Software
Install the software before connecting the scanner to the computer.
DR-7090C
Securing braces (2)
Screws (4)
Power Cord
(Length: 1.5 m)
USB Cable
(Length: 2 m)
CAUTION
Avant l’utilisation
Vor dem Gebrauch
Antes de la utilización
Prima dell’uso
Voor gebruik
Easy Start Guide
(This Guide)
DR-7090C Setup Disc
Reference Guide
Cleaning Paper
Before Use
Software license
agreement
Cleaning Cloth
Clear Binder
IMPORTANT
●
●
●
●
●
●
The cleaning paper is attached to and used with the cleaning tool stored inside the
scanner. For details on use, refer to the User Manual.
Use the cleaning cloth to clean the scanning glass and rollers inside the scanner.
Items included in this package are subject to change without notice.
Keep the package and packing materials for storing or transporting the scanner.
A print version of Reference Guide is supplied in English. PDF files of the
Reference Guide in other languages can be found on the DR-7090C Setup Disc.
Use the supplied clear binder to store manuals printed from the Setup Disc.
❏ Before installing the software, make sure your computer is correctly running one of
the following versions of Windows. For details on system requirements, refer to
“Installation Requirements” on p. 2-3 of the User Manual.
• Windows 2000 Professional SP4 or later
• Windows XP Home Edition SP3 or later
• Windows XP Professional SP3 or later
• Windows XP Professional x64 Edition SP2 or later
• Windows Vista Home Basic/Home Premium/Business/Ultimate/Enterprise
(32- and 64-bit versions) SP1 or later
❏ Do not connect the scanner to the computer before installing the software. If you
connect the scanner and turn it ON before you install the software, a wizard screen
will appear. If this wizard appears, click [Cancel] to exit the wizard, and then turn
the scanner OFF.
Windows 2000
4.
5.
6.
Click [Typical Installation].
[Typical Installation] installs the software
(scanner driver, CapturePerfect 3.0) and the
User Manual. The CapturePerfect 3.0
Operation Guide is installed on the
computer during the CapturePerfect 3.0
installation.
14. Click [Finish] to complete the installation of
the User Manual.
15. When all installations are complete, the
installation completed screen appears.
Click [Exit] to exit the installer. Click [Back]
to return to the menu screen.
Click [Install].
The scanner driver installation wizard
appears. This operation installs both the
scanner driver and the Job Tool.
Click [Next].
This completes the software installation.
Next, you need to connect the scanner to your computer. (☞ STEP 3)
■ Trademarks
• Canon and the Canon logo are registered trademarks of Canon Inc. in the United States and may also be
trademarks or registered trademarks in other countries.
• imageFORMULA® is a registered trademark of Canon Electronics Inc.
• Microsoft Windows® is a registered trademark of Microsoft USA in the United States and other countries.
• Other brands and product names used in this manual may be trademarks or registered trademarks of their
respective companies.
PUB. CE-IE-657
© CANON ELECTRONICS INC. 2008
☞ Continued on back side
☞ Continued from front side
Connecting the Scanner to the
Computer
There are two methods for connecting the DR-7090C scanner to a computer: a USB
connection to a standard USB port built in to the computer, or SCSI connection to a SCSI
card installed in an expansion slot of the computer. Select the method that is best suited to
your computer environment.
CAUTION
IMPORTANT
❏ Observe the following when connecting the scanner with other devices in a “daisy
chain”.
• The SCSI ID of the scanner is set to “SCSI ID = 2” by default. When using a
daisy-chain configuration with other SCSI devices, set the DIP switches so that
SCSI ID numbers are not duplicated in the system.
●
With Windows Vista, installation proceeds automatically regardless of the displayed
“Check here for status” balloon help.
You can click “Check here for status” to display the installation progress.
DIP switches (SW1 to SW3 = SCSI ID, SW4 = Terminator)
SCSI Connector (D-sub, 50-pin half-pitch)
●
Selecting the Scanner
To use the scanner with an ISIS/TWAIN-compliant application program, the scanner must first
be selected.
The menus and procedures used for selecting scanners vary depending on the application
used. For detailed information on selecting scanners, refer to the user’s manual for your
application.
This section describes how to select the scanner when using CapturePerfect 3.0. For details
on how to use CapturePerfect 3.0, refer to CapturePerfect 3.0 Operation Guide located in the
Windows program menu.
With Windows XP and Vista, a message appears when installation is finished.
Windows XP
1.
OFF
USB Connector
ON
1 2 3 4
DIP Switches for SCSI ID
Power Connector
CAUTION
❏
❏
❏
❏
Do not connect both USB and SCSI cables to the scanner at the same time.
Use only the supplied power cord.
The scanner and computer should both be turned OFF when making connections.
Make sure that the computer is turned OFF before connecting the SCSI cable. The
scanner may not be properly recognized by the computer if it is connected while
the computer is turned ON.
❏ A SCSI cable is not supplied with the scanner. Obtain a cable with connectors that
match the SCSI connectors on both the scanner and the computer.
SCSI ID
0
SW1
OFF
SW2
OFF
SW3
OFF
1
2
ON
OFF
OFF
ON
OFF
OFF
3
4
5
ON
OFF
ON
ON
OFF
OFF
OFF
ON
ON
6
7
OFF
ON
ON
ON
ON
ON
Windows Vista
●
The DR-7090C device driver is installed in Device Manager under [Imaging
Devices] as [CANON DR-7090C USB] or [CANON DR-7090C SCSI].
●
From the Control Panel, you can display the Device Manager using the following
procedure:
With Windows 2000, open [System] and click [Device Manager] on the Hardware
tab sheet.
– With Windows XP, first switch the Control Panel to the Classic View to display
[System]. Then open [System] and click [Device Manager] on the Hardware
tab sheet.
– With Windows Vista, open [System Maintenance] and click [Device Manager].
Or, switch the Control Panel to the Classic View and click the [Device
Manager] icon.
The scanner is now connected to your computer.
Next, you need to turn on the scanner and ensure Windows
recognizes it. (☞ STEP 4)
Turning the Power ON (Scanner
Recognition)
Before connecting to the computer, make sure that cable connectors A to E are
properly connected at the rear of the scanner.
When you turn ON the computer and the scanner, the Windows Plug and Play function
recognizes the scanner and automatically installs the required device driver.
CAUTION
2.
From the [Scan] menu, select [Select Scanner].
The [Select Scanner] dialog box appears.
3.
❏ When connecting the scanner to the computer using a SCSI cable, be sure to turn
ON the scanner first, and then turn ON the computer. If you turn ON the computer
first, the scanner may not be properly recognized by the computer.
❏ Be sure to log on to Windows using an account with Administrator privileges.
❏ After turning the scanner OFF, wait at least 10 seconds before turning it ON again.
❏ If you will not be using the scanner for an extended period, disconnect the power
cord from the AC outlet for safety.
1)
scanner. (1
2.
CapturePerfect3.0
• When connecting the scanner and other SCSI devices in a daisy chain, make
sure to set the terminator of the last connected SCSI device to ON, and set the
terminator of all other SCSI devices to OFF.
Checking the Rear Cables
Connecting the Power Cord
1. Connect the supplied power cord into the power connector on the back of the
Launch CapturePerfect 3.0 from the Windows program menu.
Select [CANON DR-7090C], and click [Settings].
The computer should now recognize the scanner properly.
Next, you need to select the scanner from your application program.
(☞ STEP 5)
The [Configure Device Settings] dialog box appears.
4.
Set the default page size.
5.
Click [OK] to finish scanner selection.
2)
Connect the power cord into an AC outlet. (2
1.
2.
When Connecting by USB
3. Use the supplied USB cable to connect the scanner to the computer.
Make sure that the scanner and computer are connected properly.
Press the power switch to turn the scanner ON.
Power Switch
The setup is now complete
Connect the square plug (Type B) of the USB cable to the scanner.
ON
Type A
3.
4.
Type B
Turn ON the computer.
Windows automatically recognizes the scanner and performs the device driver
installation.
Windows 2000
When Connecting by SCSI
4. Use the SCSI cable to connect the scanner to the computer.
A SCSI cable is not supplied. Acquire a SCSI cable beforehand that matches
the shape of the connectors on your SCSI card and the scanner.
Display panel
Windows XP
Windows Vista
This completes the setup of the DR-7090C. Before you start using the scanner, make
sure to thoroughly read the Reference Guide or the User Manual.
● For details on how to use CapturePerfect 3.0, refer to CapturePerfect 3.0 Operation
Guide located in the Windows program menu.
●