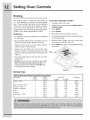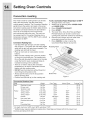
1
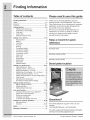
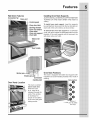
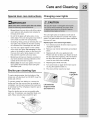
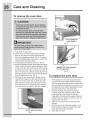
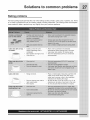
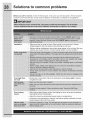
Use _ Care Guide
Built-ln
Wall Oven
ectrolux
Fin
ing Information
Table of contents
Please read & save this guide
Finding information .................................................... 2
Thank you for choosing Electrolux, the new
premium brand in home appliances. This Use &
Care Guide is part of our commitment to customer
satisfaction and product quality throughout the
service life of your new appliance.
We view your purchase as the beginning of a
relationship. To ensure our ability to continue
serving you, please use this page to record
important product information.
Safety ....................................................................... 3=4
Features .................................................................... 5-8
Getting Started .........................................................
8-9
Setting clock at power up ......................................
8
Temperature visual display ....................................
8
Oven light ..............................................................
9
Control lock ............................................................
9
•
Setting the kitchen timer ........................................
9
Setting oven controls ............................................
9-19
•
Rapid preheat ........................................................
9
•
Baking ..................................................................
10
•
Cook time ............................................................
11
•
End time ..............................................................
11
•
•
•
•
•
Broiling .................................................................
Convection baking ...............................................
Convection roasting .............................................
Convection broiling ..............................................
Convection convert ..............................................
12
13
14
15
15
•
•
Keep warm ..........................................................
Slow cook ............................................................
16
16
•
,
•
•
Dehydrating .........................................................
Bread proof ..........................................................
My favorite ...........................................................
Sabbath feature ...................................................
17
17
18
18
Keep a record
reference
Purchase
date
Electrolux
model
Electrolux
serial number
for quick
number
Serial plate location
Setting your preferences ....................................
19-21
•
User preferences - Menu .....................................
19
Setting the clock - Time of day ............................ 20
Setting clock display - On or off ........................... 20
Setting time of day display - 12 or 24 hours ........ 20
Setting temperature display - F or C .................... 20
Setting continuous bake or 12 hour energy saving... 21
Audio control ........................................................
21
Adjusting oven temperature ................................. 21
•
Re-setting to default factory settings ................... 21
Setting starting self-clean ...................................
22-23
•
Before starting self-clean .....................................
22
•
Setting self-clean .................................................
23
•
Setting delayed self-clean ...................................
23
iiiiiiiiiiiiiiiiiiiiiiiiiiiiiiiiiiiiiiiiiiiiiiiiiiiiiiiiiiiiiiiiiiiiiiiiiiiiiiiiiiiiiiiiiiiiiiiiiiiiiiiiiiiiiiiiii_iiiiiiiiiiiiiiiiiiiiiiiiiiiiiiiiiiiiiiiii
Care and cleaning ................................................
24-26
_i_i_i_i_i_i_i_i_i_i_i_i_i_i_i_i_i_i_i_i_i_i_i_i_i_i_i_i_i_i_i_i_i_i_i_i_i_i_i_i_i_i_i_i_i_i_i_i_i_i_i_i_i_i_i_i_i_i_i_i_!_#_
iiiiiiiiiiiiiiiiiiiiiiiiiiiiiiiiiiiiiiiiiiiiiiiiiiiiiiiiiiiiiiiiiiiiiiiiiiiiiiiiiiiiiiiiiiiiiiiiiiiiiiiiiiiiiiiiiiiiiiiiiiiii_i!iiiiiiiiiiiiiiiiiiiiiiiiiiiiiiiiiiiiiiiiiiii_
•
Cleaning various parts of your appliance ............ 24
•
Special door care instructions ............................. 25
•
Broiler pan cleaning tips ......................................
25
•
Changing oven lights ...........................................
25
•
To remove and replace oven door ....................... 26
Solutions
to common problems ......................... 27-29
•
Baking problems ..................................................
27
•
Solutions .........................................................
28-29
Notes ..........................................................................
30
Warranty
31
information
...............................................
Questions?
For toll-free telephone support in the U.S. and
Canada:
1-877-4ELECTROLUX
(1-877-435-3287)
For online support and Internet production information
visit http://www.electroluxappliances.com
@2011 Etectrolux Home Products, Inc.
All rights reserved. Printed in Canada.
iiiiiiiiiiiiiiiiiiiiiiiiiiiiiiiiiiiiiiii
important Safety instructions
......
3
iiiiiiiiiiiiiiiii
Wh at yo u need to k now a bo uI s afet y in st r ucti o ns
iiiiiiiiiiiiiiiiiiiii
iiiiiiiiiiiiiiiiiiiiiiiiii
iiiiiiiiiiiiiiiiiiiiiiiiii
Warning and Important Instructions appearing in this guide are not meant to cover all possible conditions
iiiiiiiiiiiiiiiiiiiiiiiiiiiii
and situations that may occur. Common sense, caution and care must be exercised when installing,
iiiiiiiiiiiiiiiiiiiiiiiiiiiiiiiiiiiiiiii
maintainingoroperatingamicrowave,
iiiiiiiiiiiiiiiiiiiiiiiiiiiiiiiiiiiiiiii
ALWAYS contact your dealer, distributor, service agent or manufacturer about problems or conditions
iiiiiiiiiiiiiiiiiiiiiiiiiiiiiiiiiiiiiiii
youdonotunderstand,
iiiiiiiiiiiiiiiiiiiiiiiiiiiiiiiiiiiiiiii
iiiiiiiiiiiiiiiiiiiiiiiiiiiiiiiiiiii
Recognize
Safety Symbols,
Words,
Labels
iiiiiiiiiiiiiiiiiiiiiiiiii
iiiiiiiiiiiiiiiii
Remove all tape and packaging wrap before
using the appliance. Destroy the carton and
plastic bags after unpacking the appliance.
Never allow children to play with packaging
material. Do not remove the wiring label and other
literature attached to the back of the wall oven. Do
not remove model/serial number plate.
Proper InstallationmBe
sure your appliance is
properly installed and grounded by a qualified
electrician or installer in accordance with the
National Electrical Code ANSI/NFPA No. 70
(U.S.A.) or CSA C22.1, PART 1 (Canada)mlatest
editions and local code requirements.
Install
only per installation instructions provided in
the literature package for this appliance.
Ask your dealer to recommend a qualified
technician and an authorized repair service. Know
how to disconnect the electrical power to the
range at the circuit breaker or fuse box in case of
an emergency.
•
•
User Servicing=Do
not repair or replace
any part of the appliance unless specifically
recommended in the manuals. All other servicing
should be done only by a qualified technician to
reduce the risk of personal injury and damage to
the appliance.
Never modify or alter the construction
of a
range by removing leveling legs, panels, wire
covers, anti-tip brackets/screws,
or any other
part of the product.
Removetheovendoorfromanyunusedappliance
ifitistobestoredordiscarded,
iiiiiiiiiiiiiiiiiiiiiiiiiiiiiiiiiiiiiiii
iiiiiiiiiiiiiiiiiiiiiiiiiiiiiiiiiiiiiiii
iiiiiiiiiiiiiiiiiiii
iiiiiiiiiiiiiiiiiiii
iiiiiiiiiiiiiiiiiiii
iiiiiiiiiiiiiiiiiiii
iiiiiiiiiiiiiiiii
________________
Storage
in or on Appliance=Flammable
materials should not be stored in an oven.
This includes paper, plastic and cloth items, such
as cookbooks, plasticware and towels, as well as
flammable liquids. Do not store explosives, such
as aerosol cans, in or near the appliance.
• Do not leave children alone--Children should not
be left alone or unattended in the area where an
appliance is in use. They should never be allowed
to sit or stand on any part of the appliance.
important Safety instructions
• DO NOT TOUCH INTERIOR OVEN ELEMENTS
OR INTERIOR SURFACES OF THE WALL OVEN
UNTIL THEY HAVE COOLED. The oven heating
elements may be hot even though the elements are
dark in color.Areas near the elements may become
hot enough to cause burns. During and after use,
do not touch, or let clothing or other flammable
materials touch these areas until they have had
sufficient time to cool. Among these areas are
the oven vent openings, the surfaces near these
openings, oven door and window.
Wear Proper Apparel--Loose-fitting
or hanging
garments should never be worn while using the
appliance. Do not let clothing or other flammable
materials contact hot surfaces.
• Do Not Use Water or Flour on Grease Fires-Smother the fire with a pan lid, or use baking soda,
a dry chemical or foam-type extinguisher.
e
e
hands to reposition. Do not let pot holders contact
the hot oven element or interior of the oven.
Do not use the broiler pan without its insert. The
broiler pan and grid allow dripping fat to drain and
be kept away from the high heat of the broiler.
Do not cover the broiler grid or oven bottom with
aluminum foil. Exposed fat and grease could ignite,
Do not touch a hot oven light bulb with a damp
cloth. Doing so could cause the bulb to break.
Disconnect the appliance or shut offthe power to the
appliance before removing and replacing the bulb,
iMPORTANTINSTRUCTIONS
FOR CLEANING YOUR OVEN
• Clean the appliance regularly to keep all parts
free of grease that could catch fire. Exhaust fan
ventilation hoods and grease filters should be kept
clean. Do not allow grease to accumulate. Greasy
deposits in the fan could catch fire. Refer to the
hood manufacturer's instructions for cleaning.
.................................................................................................................................................................................................................
SELF CLEANING OVENS
• When heating fat or grease, watch it closely. Fat or • Clean in the self-cleaning cycle only the parts of the
grease may catch fire if allowed to become too hot.
appliance listed in this Owner's Guide. Before using
Use Only Dry Pot holders--Moist
or damp pot
the self-cleaning cycle of the appliance, remove the
holders on hot surfaces may result in burns from
broiler pan, oven racks and any utensils stored in the
steam. Do not let the pot holders touch the hot
appliance. Also the side rails of the oven racks must
heating elements. Do not use a towel or other bulky
be removed for the self-clean function to operate.
cloth instead of a pot holder.
Do not clean the oven door gasket. The door gasket
Do Not Heat Unopened Food Containers--Buildis essential for a good seal. Care should be taken
up of pressure may cause the container to burst
not to rub, damage or move the gasket.
and result in injury.
Do not use oven cleaners. No oven cleaner or oven
liner protective coating of any kind should be used
in or around any part of the appliance
IMPORTANTINSTRUCTIONS
FORUSINGYOUROVEN
• Use Care When Opening an Oven Door--Stand to
the side of the appliance when opening the door of
a hot oven. Let hot air or steam escape before you
remove or replace food in the oven.
• Keep Oven Vent Ducts Unobstructed. The wall
oven is vented at the upper control panel or at the
center trim depending on the model. Touching the
surfaces in this area when the wall oven is operating
may cause severe burns. Also, do not place plastic
or heat-sensitive items near the oven vent. These
items could melt or ignite.
• Placement of Oven Racks. Always place oven
racks in desired location while oven is cool. Remove
all utensils from the rack before removing rack. If
rack must be moved while oven is hot, use extreme
caution. Use pot holders and grasp the rack with both
Important
safety
notice
The California Safe Drinking Water and Toxic
Enforcement Act requires the Governor of California
to publish a list of substances known to the state to
cause cancer, birth defects or other reproductive
harm, and requires businesses to warn customers
of potential exposure to such substances.
Features
__:_
__:_
__:_
Wall 0 yen Features
Installi ng 0 yen Rack Supports
Co_vection fan
ALWAYSINSTALLOVENRACKSUPPORTBEFORE
TURNING ON THE OVEN (WHEN THE OVEN IS
Over vent
__
:::::::::::::::::::::::
________________
iiiiiiiiiiiiiiiiiiiiiiiiiiiiiiiiiiiiiii
:::::::::::::::::::::::::::::::::::::::::::::::::::::::::::::::::::::
panel
door latch
_gelement
COOL).
iiiiiiiiiiiiiiiiiiiiiiiiiiiiiiiiiii
iiiiiiiiiiiiiiiiiiiiiiiiiiiiiiiiiii
To install oven rack support, insert the supports
by pushing them downward into the two brackets on
each side of the oven interior, as shown below.
_i_i_!_!_!_!_!_!_!_!_
rack sliders
racks
rack support
light
To remove the oven rack support for a self-clean
cycle, pull up the support to disengage them from the
brackets. If the rack supports are not removed, the
self-clean cycle won't start.
Glass oven
-door
handle
Broiler
Broiler pan grid
Convection
Oven RackPositions
iiiiiiiiiiiiiiiiiiiiiiiiiiiiii
Thisoven isequippedwith ladderracksupportswith
8 positionstoaccommodatepreciselyeverymodeof
cooking,
iiiiiiiiiiiiiiiiiiiiiiiiiiiiiiiiiiiiiiii
iiiiiiiiiiiiiiiiiiiiiiiiiiiiiiiiiiiiiiii
iiiiiiiiiiiiiiiiiiiiiiiiiiiiiiiiiiiiiiii
Rack
roasting rack
iiiiiiiiiiiiiiiiiiiiiiiiii
Oven Vents Location
Air
The oven is vented
above each door.
When the oven
is on, warm air is
released through the
vents. This venting
is necessary for
proper air circulation
in the oven and good
baking results.
_
:
(Non-SLIDING
iiiiiiiiiiiiiiiiiiiii
iiiiiiiiiiiiiiiiiiiiiiiiiiiiiiiiiiiiiiii
,ackon,yiiiiiiiiiiiiiiiiiiii
iiiiiiiiiiiiiiii
iiiiiiiiiiiiiiiiiiiiiiiiiiiiiiiiiiiiiiiiiiiiiiiiiiiiiiiii
Features
Removing and replacing oven racks
Removing
Sliding
Oven Racks
Replacing
Sliding
Oven
Racks
1. With the rack in its closed position; grasp the
rack and the sliders at once.
To replace the oven racks, follow the instructions
above in reverse order.
2. Slightly lift the rack and sliders and pull it to
clear the first bracket.
3. Pull the rack and sliders until the second bracket
Refer to the care and cleaning section for directions
on how to clean the racks,
stops the rack.
4. Lift the rack and sliders and carefully remove
them from the oven,
1st Bracket
0
>
0
2nd Bracket
0
0
_o
,Oven Rack
Oven Rack Slider
Oven Rack Support
Removing
Non=Sliding
Oven
Rack
Replacing
Non=Sliding
Oven
Rack
Simply pull the rack and slightly tilt it upward when
Insert the rack into the oven rack supports by
the rack hits its stop position,
inserting the rack openings into the rack supports,
_i_i_i_i_i_i_i_i_i_i_i_i_i_i_i_i_i_i_i_i_i_i_i_i_i_i_i_i_i_i_i_i_i_i_i_i_i_i_i_i_i_i_i_i_i_i_i_i_i_i_i_i_i_i_i_i__!__________________________________________
Be sure the rack is at the same position on each
iiiiiiiiiiiiiiiiiiiiiiiiiiiiiiiiiiiiiiiiiiiiiiiiiiiiiiiiiiiiiiiiiiiiiiiiiiiiiiiiiiiiiiiiiiiiiiiiiiiiiiiiiiiiiiiiiiiiiii_i!iiiiiiiiiiiiiiiiiiiiiiiiiiiiiiiiiiiiiiiiiiiiiiiiiiiii_
iiiiiiiiiiiiiiiiiiiiiiiiiiiiiiiiiiiiiiiiiiiiiiiiiiiiiiiiiiiiiiiiiiiiiiiiiiiiiiiiiiiiiiiiiiiiiiiiiiiiiiiiiiiiiiiiiiiiiiiiiiiii_i!iiiiiiiiiiiiiiiiiiiiiiiiiiiiiiiiiiiiiiiiiiii_
oven rack support on both sides,
Features
Control
pad functions
1.
Light Pad - Used to turn the oven light on and
off (on left or right side depending on your
model).
11. Bread Proof Pad- Usedtoselectthe
proof mode.
2.
Bake Pad - Used to enter the normal baking
mode temperature.
Broil Pad - Used to select the variable broil
mode.
13. LiteClean Pad -Used tostarta2
clean cycle,
3.
4.
5.
6.
Convection
Bake Pad - Used to select the
convection baking mode.
Convection Roast Pad - Used to select the
convection roasting mode.
Convection Broil Pad - Used to select the
convection broil mode.
7.
Keep Warm Pad - Used to select the keep
warm mode.
8.
Slow Cook - Used to select the slow cook
mode.
9.
Control
Lock Pad - Used to disable all oven
function (on left or right side depending on your
model).
10. Dehydrate
mode.
Pad - Used to select the dehydrate
bread
12. MyFavorite Pad- Usedtosaveorrecall
favoritecooking mode.
a
hoursself-
iiiiiiiiiiiiiiiiiiiiiiiiiiiiiiiiiiiiiiii
iiiiiiiiiiiiiiiiiiiiiiiiiiiiiiiiiiiiiiii
iiiiiiiiiiiiiiiiiiiiiiiiiiiiiiiiiiiiiiii
iiiiiiiiiiiiiiiiiiiiiiiiiiiiiiiiiiiiiiii
iiiiiiiiiiiiiiiiiiiiiiiiiiiiiiiiiiiiiiii
iiiiiiiiiiiiiiiiiiiiiiiiiiiiiiiiiiiiiiii
14. Med Clean Pad -Usedtostarta
3 hours selfcleancycle,
15. HeavyClean Pad- Used tostarta4
hours
iiiiiiiiiiiiiiiiiiiiiiiiiiiiiiiiiiiiiiii
iiiiiiiiiiiiiiiiiiiiiiiiiiiiiiiiiiiiiiii
iiiiiiiiiiiiiiiiiiiiiiiiiiiiiiiiiiiiiiii
16. CookTime
iiiiiiiiiiiiiiiiiiiiiiiiiiiiiiiiiiiiiiii
se fc eancyc e
Pad -Used tosetacooking
durationtime,
17. EndTimePad-
Used toselectthetime
at
iiiiiiiiiiiiiiiiiiii
iiiiiiiiiiiiiiiiiiiiiiiiiiiiiiiiiiiiiiii
iiiiiiiiiiiiiiiiiiiiiiiiiiiiiiiiiiiiiiii
whichthe cookingwill end.
18. RapidPreheatPad-Usedtopreheattheoven
iiiiiiiiiiiiiiiiiiiiiiiiiiiiiiiiiiiiiiii
iiiiiiiiiiiiiiiiiiiiiiiiiiiiiiiiiiiiiiii
tothedesiredtemperature,
19. Conv. ConvertPadUsed tocoverta
standard temperaturetoa
convection
iiiiiiiiiiiiiiiiiiiiiiiiiiiiiiiiiiiiiiii
iiiiiiiiiiiiiiiiiiiiiiiiiiiiiiiiiiiiiiii
iiiiiiiiiiiiiiiiiiiiiiiiiiiiiiiiiiiiiiii
temperature,
iiiiiiiiiiiiiiiiiiiiiiiiiiiiiiiiiiiiiiii
iiiiiiiiiiiiiiiiiiii
iiiiiiiiiiiiiiiiiiiiiiiiiiiiiiii
Control
pad functions
20. Oven Pad- Used to select the upper oven or
the lower oven.
i_i_i_i_i_i_i_i_i_i_i_i_i_i_i_i_i_i_i_i_i_i_i_i_i_i_i_i_i_i_i_i_i_i_i_i_i_i_i_i_i_i_i_i_i_i_i_i_i_i_i_i_i_i_i_i_i_i_i_i_i_i_i_i_i_i_i_i_i_i_i_i_i_i_i_i_i_i_i_i_i_i_i_i
21. User Preference Pad- Used to bring the user
preference menu in the display.
22. Timer on-off Pad- Used to set or cancel the
minute timer. The minute timer does not start or
stop cooking.
23. Cancel Pad- Used to cancel any functions
previously entered except the time of day and
Gettin
Setting
the minute timer. Push Cancel Pad to stop
cooking.
24. Start Pad- Used to start all oven functions.
25. 0 thru 9 Number Pads- Used to enter
temperature and times.
26. - Io Pad- Used to lower the temperature and
times.
27. + hi Pad- Used to raise the temperature and
times.
Started
clock at power up
When the unit is first plugged in, or when the power
supply to the range has been interrupted, the timer
cannot be set when the oven is on. If an invalid
in the display will flash with "CLO 12:00". The clock
time of day is entered, the control will triple beep to
prompt you to re-enter a valid time of day.
To set the clock (example for 1:30)
1.
Press 1 3 0 pads to set the time of day to 1:30.
The pads HI or LO can also be pressed to raise
or lower the actual time displayed.
2.
Press START to accept the changes or CANCEL
to start with a time of 12:00.
Temperature
visual
display
Your oven is equipped with a temperature visual
display for each oven. When a cooking mode is set,
the actual temperature will be shown in the display
and will rise as the unit preheats. When the unit has
reached its target temperature, a chime will sound
to remind you to place the food in the oven. This
feature will be active with some cooking modes; bake,
convection bake and convection roast. The cooking
modes which does not feature the temperature visual
display will be noted in their descriptions.
NOTE: The lowest temperature that can be displayed
is 100°F.
Gettin
Started
Oven light
Setting the kitchen timer
Your appliance includes "theater" style oven lighting
feature that gradually lights both the upper and
lower oven interiors to full brightness. Each oven
is equipped with 2 halogen lights. The oven lights
will turn on automatically when the oven door is
opened. The oven light may be turned on when the
door is closed by using the oven light pad located
on the control panel. The oven light key will toggle
the lights in both ovens at the same time.
This unit is equipped with 2 Kitchen Timers which
serves as extra timers in the kitchen that will beep
when the set time has run out. It does not start
or stop cooking. The Timer feature can be used
during any of the other oven control functions and
cooking modes.
To toggle the Oven Lights ON and OFF
1.
Press OVEN LIGHT.
Control
lock
The Control Lock feature automatically locks the oven
door and the control panel. The Control Lock is only
allowed when the oven is turned OFF (not active).
The Control Lock feature will lock both oven at the
same time. DOOR LOCK will flash in the display for
20 seconds or until the door has finished locking.
Once the door has been locked, DOOR LOCK will
remain static. Do not attempt to open to oven door
while DOOR LOCK is flashing.
Totogget
I heCo n to
r I L oc k 0 N an dO FF
1.
Keep CONTROL LOCK pressed for 3
__
'_
To set the Timer (example for 5 minutes)
1.
Press TIMER. "00:00" will appear in the
display.
2.
Press 5 pad to set the timer to 5 minutes. The
pads HI or LO can also be pressed to raise or
lower the actual time displayed.
3.
Press again TIMER to accept and start the
countdown.
.
_:_iiiiiiiiiiiiiiiiiiiiiiiiiiiiiiiii
When the set time has run out, "00:00" will be
displayed and the TIMER pad will flash. The
clock will sound a chime that will be repeated
at regular intervals until the TIMER pad is
pressed.
To cancel the Timer before the set time has run
out:
Press
TIMER " The d sp ay w
_
(lay.
return to the t me of
seconds.
Setting
Oven Controls
Rapid preheat
o
The Preheat feature will bring the oven up to
temperature faster than a regular preheat and
then indicate when to place the food in the oven.
Preheating is not necessary when roasting or
cooking casseroles. The oven can be programmed
To set a rapid preheat (exampleis for a 350 F
to preheat at any temperature between 170°F to
550°F with some of the cooking modes; Bake,
2.
3.
Press BAKE.
Press RAPID PREHEAT.
Convection Bake and Convection Roast.
4.
Press START to begin the baking with the
IMPORTANT: The rapid preheat feature is for
single rack ONLY. The heat distribution with
multiple rack will be uneven,
5.
B8 ke)
.
7.
.................
_e,ec, oven.uypressmg
or LUVV_t_
e,mer u_'_'_=, uv_=N
UV_N
rapid preheat feature enabled.
Place food in the oven when the chime signals
and PRE-HEATING message disappears
indicating that the oven has reached the set
target temperature.
Settin
Oven Controls
Baking
This mode is best used for your standard recipes.
The hidden bake element is used to heat the air and
To set a Bake Temperature of 350°F
maintain temperature. The oven can be programmed
to bake at any temperature from 170°F to 550°F with
a default temperature of 350°F.
1.
Arrange interior oven racks.
2.
Select oven by pressing either UPPER OVEN or
LOWER OVEN,
3.
Press BAKE.
4.
Press START. The oven display shows PREHEATING.
5.
Place food in the oven when the chime signals
and temperature display shows that the oven
has reached the set target temperature and the
PRE-HEATING message disappear.
6.
The Cook Time, Timer, End Time and Rapid
Preheat features can be set to control your
cooking time (read their sections for directions).
7.
Remove food. Always use oven mitts when
removing hot pans from the oven.
8.
Press CANCEL to stop or cancel the Bake
feature at any time.
Baking Tips
• Always preheat your oven before using the bake
mode.
• During preheat, the 3 elements and the
convection fan are used in cycle to quickly heat
the oven.
• Use only one rack and center the pans as much
as possible.
• If using two racks, place the oven racks in
positions 3 and 7.
• Allow 2" to 4" (5,1 to 10,2cm) around the
utensil(s) for proper air circulation.
° Be sure the pans do not touch each other, the
door, sides or back of the oven.
To change to a Bake Temperature of 425°F
'i
!
I
)
,
1.
1.
Select the active oven by pressing either UPPER
OVEN or LOWER OVEN.
Press the HI or LO pads to get to the desired
temperature. Each press of + or - will adjust the
temperature by 5°F (or 2°C)
Baking Problems
Refer to the Baking Problems Table in the Solutions
to Common Problems section of this manual,
Stagger
pans as shown.
Settin
Oven Controls
Cook time
End time
iiiiiiiiiiiiiiiiiiiiiiiii
CookTime allowsthe oven to be setto cookfora
setlengthoftime
and shutoffautomatically,
End Time allows theoven to be setto shutoff
automaticallyata
settimeofday.
Theoven control
will calculate the remaining time by itself. The time
remaining will always be shown in the timer section
of the display. The oven will shut off and will beep
when the countdown is finished. This feature can
be used with Bake, Convection Bake, Convection
Roast, Slow Cook, Keep Warm, Dehydrate, Clean
and Bread Proof cooking modes. This oven can be
programmed with Cook Time and End Time to start
and stop by itself at the right time.
iiiiiiiiiiiiiiiiiiiiiiiiiiiiiiiiiiiiiii
iiiiiiiiiiiiiiiiiiiiiiiiiiiiiiiiiiiiiii
The time remaining will always be shown in the
timer section of the display. The oven will shut off
and will beep when the countdown is finished. This
feature can be used with Bake, Convection Bake,
Convection Roast, Slow Cook, Keep Warm, Bread
Proof and Dehydrate cooking modes.
To set a timed cooking (example is a 450°F Bake
for 30 minutes)
Select oven by pressing either UPPER OVEN or
LOWER OVEN.
To set a delayed timed cooking (example is
a 450 °F Bake for 30 minutes which will end at
2.
Press BAKE. The temperature numbers will blink
in the display,
6:00PM)
3.
Enter temperature
4.
Press COOK TIME,
5.
Enter time needed; 3 0.
,
,
1.
Select oven by pressing either UPPER OVEN or
LOWER OVEN,
2.
Press BAKE. The temperature numbers will
blink in the display.
3.
Enter temperature
4.
Press COOK TIME.
5.
Enter time needed; 3 0.
6.
Press END TIME.
7.
Enter time of day needed; 6 0 0.
8.
Press START. The time remaining will be
shown in the display.
9.
Press CANCEL to stop the audible alarm or to
cancel the cook time at anytime.
needed; 4 5 0.
Press START. The oven will start heating. The
cook time will start counting down for the set
time.
Press CANCEL to stop the audible alarm or to
cancel the cook time at anytime.
needed; 4 5 0.
iiiiiiiiiiiiiiiiiiiiiiiiiiiiiiiiiiiiiiii
Settin
Oven Controls
iiiiiiiiiiiiiiiiiiiiiiiiiiiiiiiiiiiiiiiiiiiiiiiiiiiiiiiiiiiiiiiiiiiiiiiiiiiiiii
_i_i
_i
_i
_i_i
_i
_i_i
_i
_i
_i_i
_i
_i_i
_i
_i
_i_i
_i
_i_i
_i
_i
_i_i
_i
_i
_i_i
_i
_i_i
_i
_i
_i_i
_i
_i_i
_i
_i
_i_i
_i
_i_i
_i
_i
_i_i
_i
_i
_i_i
_i
_i_i
_i
_i
_i_i
_i
_i_i
_i
_i
_i_i
_i
_i_i
_i
_i
_i_i
_i
_i
_
This mode is best for meats, fish and poultry up
to 1" thick. Broiling is a method of cooking tender
cuts of meat by direct heat under the broil element
of the oven. The high heat cooks quickly and gives
a rich, brown outer appearance. The oven can be
programmed to broil at any temperature from 300°F
to 550°F with a default temperature of 550°F.
To set a Broil Temperature of 550°F
1.
Arrange interior oven racks.
2.
3.
Select oven by pressing either UPPER OVEN or
LOWER OVEN,
Press BROIL.
4.
Press START.
Broiling Tips
5.
Place food in the oven after 2 minutes.
• For optimum browning, preheat the broil element
for 2 minutes.
6.
Turn food when the top side is browned and cook
on the second side.
• Broil one side until the food is browned; turn and
cook on the second side. Season and serve.
7.
Remove food. Always use oven mitts when
removing hot pans from the oven.
Always pull the rack out to the <<stop>>position
before turning or removing food.
8.
Press CANCEL to stop or cancel the Broil feature
at any time.
Always use the broiler pan and its grid when
broiling. It allows the dripping grease to be kept
away from the high heat of the broil element (see
Figure 1).
For best broiling results, broil with the oven door
slightly open.
DO NOT use the broil pan without the insert. DO
NOT cover the broil pan insert with foil. The
exposed grease could catch fire. DO NOT use
the roasting rack when broiling.
-Broiler
Figure
1
Broiling Times
Electric Wall Oven Broilin_
Food Item
Table Recommendations
Rack
Temp.
Cook Time
1st side
2nd side
6:00
4:00
Doneness
Position
7
Setting
550 ° F
7
550 ° F
7:00
5:00
Medium
Pork Chops 3/4" thick
Chicken - Bone In
7
5
550 ° F
450 ° F
8:00
20:00
6:00
10:00
Well
Well
Chicken - Boneless
Fish
7
7
450 ° F
500 ° F
8:00
13:00
6:00
n/a
Well
Well
Shrimp
5
550 ° F
5:00
n/a
Welt
Hamburger 1" thick
7
5
550 ° F
550 ° F
9:00
10:00
7:00
8:00
Medium
Welt
Steak 1" thick
Rare
Pan
Settin
Convection
Oven Controls
baking
This mode of cooking enables you to obtain the
best culinary results when baking with multiple
pans and racks. Multiple rack baking may slightly
increase cook time for some foods but the overall
result is time saved. Most foods cooked in a
standard oven will cook faster and more evenly
with Convection Bake. Convection baking uses the
three elements and a fan to circulate the oven's
heat evenly and continuously within the oven. The
oven can be programmed for Convection baking
at any temperature between 170°F to 550°F with a
default temperature of 350°F.
Convection Baking Tips:
To set a Convection Bake Temperature of 350°F
1.
.
• If your recipe cooking temperature has already
been converted for convection baking there is no
need to reduce your oven temperature. If your
recipe has not had the temperature converted
for convection baking you can easily reduce
using the Convection Convert feature. Please
see Convection Convert section on next page for
further instruction on temperature conversion.
• Use tested recipes with times adjusted for
convection baking when using this mode. With
single rack convection baking the some foods
may have as much as a 25% reduction in
cook time, check food at minimum time. Time
reductions will vary depending on the amount
and type of food to be cooked.
• When using Convection Bake with a single rack,
place oven rack in position 3 or 4. If cooking on
multiple racks, place the oven racks in positions
2 and 6 or 1,4 and 7.
• Most bakeries (except cakes) should be baked
on pans with no sides or very low sides to allow
heated air to circulate around the food.
• Food baked on pans with a dark finish will cook
faster.
Select oven by pressing either UPPER OVEN
or LOWER OVEN.
3.
Press CONVECTION
4.
Press START. The oven display shows PREHEATING.
5.
Place food in the oven when the chime signals
and temperature display shows that the oven
has reached the set target temperature and the
PRE-HEATING message disappear.
BAKE.
6.
The Cook Time, Timer, End Time and Rapid
Preheat features can be set to control your
cooking time (read their sections for directions).
7.
Remove food. Always use oven mitts when
removing hot pans from the oven.
8.
Press CANCEL to stop or cancel the
Convection Bake feature at any time.
• Always preheat your oven before using the
Convection Bake mode.
• During preheat, the 3 elements and the
convection fan are used in cycle to quickly heat
the oven.
Arrange interior oven racks.
ij_J
/
Convection
Air Flow
Bake
iiiiiiiiii_iiiiiiiiiiiiiiiiiiiiiiiiiii
iiiiiiiiiiii_iiiiiiiiiiiiiiiiiiiiiiiii
iiiiiiiiiiiiiiiiiiii_iiiiiiiiiiiiiiiii
................................
Settin
Oven Controls
Convection
roasting
This mode is best for cooking tender cuts of beef,
lamb, park and poultry. Use this mode when
cooking speed is desired. The Convection Roasting
gently browns the exterior and seals in the juices.
Convection roasting uses the hidden bake element,
the hidden convection element, the broil element
and a fan to circulate the oven's heat evenly
and continuously within the oven. The oven can
be programmed for Convection Roasting at any
temperature between 170°F to 550°F with a default
temperature of 350°F.
To set a Convection Roast Temperature of 350°F
1.
2.
3.
4.
5.
6.
7.
Convection Roasting Tips
• Use the broiler pan and grid, and the roasting
rack (Figure 1). The broiler pan will catch grease
spills and the grid will help prevent spatters. The
roasting rack will hold the meat.
• Place an oven rack on rack position 2 (nextbottom).
• Make sure the roasting rack is securely seated
on the grid in the broiler pan. The roasting rack
fits on the grid allowing the heated air to circulate
under the food for even cooking and helps to
increase browning on the underside.
• There is no need to reduce the convection
temperature or to use the Convection Convert
feature with this cooking mode.
DO NOT use the broiler pan without the grid or
cover the grid with aluminum foil.
Always pull the rack out to the stop position
before removing food.
Position food (fat side up) on the roasting rack.
Convection
Roastinq
Poultry
Pork
The Cook Time, Timer, End Time and Rapid
Preheat features can be set to control your
cooking time (read their sections for directions).
Remove food. Always use oven mitts when
removing hot pans from the oven.
Press CANCEL to stop or cancel the
Convection Roast feature at any time.
Roasting Rack
\
Grid
Broiler Pan
Figure 1
Chart
Meat
Beef
Arrange interior oven racks.
Select oven by pressing either UPPER OVEN
or LOWER OVEN.
Press CONVECTION ROAST.
Press START.
Weight
Oven Temp
Internal Temp
Cooking Time
25-30
Standing rib roast
4 to 6tbs.
350°F
*
Rib eye roast
Tenderloin roast
4 to 61bs.
2 to 3tbs.
350°F
400°F
*
*
Turkey, whole**
12 to 16tbs.
325°F
180°F
Turkey, whole**
Turkey, whole**
Chicken
16 to 201bs.
20 to 241bs.
3 to 41bs.
325°F
325°F
350-375°F
180°F
180°F
180°F
Ham roast, fresh
Shoulder blade roast
4 to 6 tbs.
4 to 6 Ibs.
325°F
325°F
160°F
160°F
20-30
Loin
3 to 4tbs.
325°F
160°F
20-25
Pre-cooked ham
5 to 71bs.
325°F
160°F
30-40
25-30
15-25
8-10
10-15
12-16
12-16
30-40
* For beef: med rare 145°F, med 160°F, well done 170°F
** Stuffed turkey requires additional roasting time. Shield legs and breast with foil to prevent over
browning and dying of the skin.
Settin
Convection
Oven Controls
broiling
Use this mode for thicker cuts of meat, fish and
poultry. The Convection Broiling gently browns the
exterior and seals in the juices. Convection broiling
uses the broil element and a fan to circulate the
Grid
oven's heat evenly and continuously within the
oven. The oven can be programmed for Convection
Broiling at any temperature between 300°F to
550°F with a default temperature of 550°F.
Convection Broiling Tips
• For optimum browning, preheat the broil element
for 2 minutes.
• Broil one side until the food is browned; turn and
cook on the second side. Season and serve.
• Always pull the rack out to the "stop" position
before turning or removing food.
• Always use the broiler pan and its grid when
broiling. It allows the dripping grease to be kept
away from the high heat of the broil element
(see Figure 1).
o DO NOT use the broil pan without the insert. DO
NOT cover the broil pan insert with foil. The
exposed grease could catch fire. DO NOT use
the roasting rack when broiling.
• Convection broiling is generally faster than
conventional broiling. Check for doneness at the
minimum recommended time.
iMPORTANT: Always use this cooking mode with
the oven door closed or the fan will not turn on.
To set a Convection Broil Temperature of 550°F
1.
2.
3.
4.
5.
Arrange interior oven racks.
Select oven by pressing either UPPER OVEN
or LOWER OVEN.
Press CONVECTION BROIL.
Press START.
Place food in the oven after 2 minutes.
6.
Turn food when the top side is browned and
cook on the second side.
7.
Remove food. Always use oven mitts when
removing hot pans from the oven.
Press CANCEL to stop or cancel the
Convection Broil feature at any time.
8.
___________i:i_i_i_i_i_i_
_:_iiiiiiiiiiiiiiiiiiiiiiiiiiiiiiiii
Broiler Pan
Figure 1
Convection
convert
The Convection Convert pad is used to
automatically convert a standard baking recipe
for convection baking. When set properly, this
feature is designed to display the actual converted
(reduced) temperature in the display. Convection
Convert may ONLY be used with a Convection
Bake cooking mode. It can be used with the
features End Time and Cook Time (see their
sections for directions). If convection conversion
is used with the cook time and end time features,
"CF" (check food) will be displayed when 75%
of the bake time complete. At this time the oven
control will sound 3 long beeps at regular intervals
until baking had finished. When the bake time has
completely finished the control will beep at regular
interval until the CANCEL pad is pressed.
NOTE: To use this feature with the COOK TIME
option, the COOK TIME pad must be pressed
before the CONVECTION CONVERT pad.
Changing from a normal bake temperature to a
convection bake temperature
1.
Select oven by pressing either UPPER OVEN
or LOWER OVEN.
2.
Press CONVECTION
3.
Press CONVECTION CONVERT. The
temperature displayed will be 25°F lower than
what it used to be.
4.
Press START to begin the convection baking
(see Convection Baking section for more
informations).
BAKE.
Settin
Oven Controls
Keep warm
This mode is best for keeping oven baked foods
warm for serving after cooking has finished. The
iiiiiiiiiiiiiiiiiiiiiiiiiiiiiiiiiiiiiiiiiiiiiiiiiiiiiiiiiiiiiiiiiiiiiiiiiiiiiiiKeep Warm feature uses the hidden bake element
to maintain the temperature within the oven. The
oven can be programmed for Keep Warm at any
temperature between 150°F to 190°F with a default
temperature of 170°F.
Keep Warm Tips
• Always start with hot food.
• Do not use the Keep Warm feature to heat cold
food.
• Food in heat=safe glass and glass ceramic containers may need higher temperature settings
compared to food in regular containers.
• Avoid repeated openings of the oven, it will allow
hot air to escape and the food to cool.
• Aluminum foil may be used to cover food to
increase moisture content.
To set a Warm Keep Temperatureof 170°F
1.
2.
3.
4.
5.
6.
7.
Arrange interior oven racks.
Select oven by pressing either UPPER OVEN or
LOWER OVEN.
Press KEEP WARM,
Press START.
The Cook Time, Timer and End Time features
can be set to control your warming time (read
their sections for directions).
Remove food. Always use oven mitts when
removing hot pans from the oven.
Press CANCEL to stop or cancel the Keep
Warm feature at any time.
Slow cook
This mode may be used to cook foods more slowly, at
lower oven temperatures and provide cooking results
much the same way as a Slow Cooker or Crock=Pot.
The Slow Cook feature is ideal for roasting beef,
pork & poultry. Slow Cooking meats may result in the
exterior of meats becoming dark but not burnt. This is
normal. The Slow Cook mode uses the hidden bake
element to maintain a low temperature in the oven.
There are 2 settings available, high (HI) or low (LO).
The maximum cook time for the Slow Cook feature is
12 hours unless the oven control has been changed
to the Continuous Bake mode.
Slow Cook Tips:
•
•
•
•
•
•
•
•
•
Completely thaw all frozen foods before cooking
with the Slow Cook feature.
When using a single rack, position it in the
center of the oven.
Position multiple racks to accommodate size of
cooking utensils when cooking multiple food items.
Do not open the oven door often or leave the
door open when checking foods. If the oven
heat escapes often, the Slow Cook time may
need to be extended.
Cover the foods to keep them moist or use a
loose or vented type cover to allow foods to turn
crisp or brown.
Cook times will vary; depending on the weight,
fat content, bone & the shape of the meat.
Use the recipe's recommended food
temperature and a food thermometer to
determine when the food is done.
Preheating the oven will not be necessary when
using the Slow Cook feature.
Add any cream or cheese sauces during the last
hour of cooking.
To set a Slow Cook
1. Arrange interior oven racks and place food in
the oven.
iiiiiiiiiiiiiiiiiiiiiiiiiiiiiiiiiiiiiiiiiiiiiiiiiiiiiiiiiiiiiiiiiiiiiiiiiiiiiiiiiiiiiiiiiiiiiiiiiiiiiiiiiiiiiiiiiiiiiii_i!iiiiiiiiiiiiiiiiiiiiiiiiiiiiiiiiiiiiiiiiiiiiiiiiiiiii_
iiiiiiiiiiiiiiiiiiiiiiiiiiiiiiiiiiiiiiiiiiiiiiiiiiiiiiiiiiiiiiiiiiiiiiiiiiiiiiiiiiiiiiiiiiiiiiiiiiiiiiiiiiiiiiiiiiiiiiiiiiiii_i!iiiiiiiiiiiiiiiiiiiiiiiiiiiiiiiiiiiiiiiiiiii_
2. Select oven by pressing either UPPER OVEN
or LOWER OVEN.
3. Press SLOW COOK.
_i_i_i_i_i_i_i_i_i_i_i_i_i_i_i_i_i_i_i_i_i_i_i_i_i_i_i_i_i_i_i_i_i_i_i_i_i_i_i_i_i_i_i_i_i_i_i_i_i_i_i_i_i_i_i_i__!__________________________________________
4.
5.
6.
7.
8.
Press Hi for high setting or Lo for low setting.
Press START.
The Cook Time, Timer and End Time features
can be set to control your Slow Cook time
(read their sections for directions).
Remove food. Always use oven mitts when
removing hot pans from the oven.
Press CANCEL to stop or cancel the Slow
Cook feature at any time.
Settin
Oven Controls
Dehydrating
Bread proofing
This mode dries foods with heat from the bake
and the convection element. The heat is circulated
throughout the oven by the convection fan.
Dehydrating is used to dry and/or preserve foods
such as fruits, meats, vegetables and herbs.
This mode holds an optimum low temperature
while circulating the heated air to slowly remove
moisture. The oven can be programmed for
Dehydrating at any temperature between 100°F to
225°F with a default temperature of 120°F.
Proofing bread prepares the dough for baking
by activating the yeast. This feature is ideal for
proofing, or rising bread dough. The oven can be
programmed for Bread Proofing at any temperature
between 85°F to 100°F with a default temperature
of 100°R
Bread Proofing Tips
•
•
•
Dehydrating Tips
• Do not preheat the oven.
• Multiple racks can be used simultaneously.
• Drying times vary depending on the moisture
and sugar content of the food, the size of the
pieces, the amount being dried and the humidity
in the air.
• Check food at the minimum drying time.
• Treat fruits with antioxidants to avoid
discoloration.
• Consult a food preservation book or a library for
additional information.
To set a Dehydrate Temperature of 120°F
1.
2.
3.
4.
5.
6.
Arrange interior oven racks and place food.
Select oven by pressing either UPPER OVEN
or LOWER OVEN.
Press DEHYDRATE.
Press START to begin dehydrating.
Remove food. Always use oven mitts when
removing hot pans from the oven.
Press CANCEL to stop or cancel the
Dehydrate feature at any time.
iiiiiiiiiiii_iiiiiiiiiiiiiiiiiiiiiiiii
•
•
No need to preheat for this feature.
Proof bread until dough has doubled in bulk.
For best results, place a shallow pan with 1 to
3 cups of boiling hot water on the lowest rack
position to keep the air moist inside the oven
cavity.
Allow at least 1" between edge of pan and walls
of the oven.
iiiiiiiiiiiiiiiiiiiiiiiiii_iiiiiiiiiii
Limit frequent door openings to prevent losing
heat and lengthening proofing time.
To set a Bread Proof
1.
Arrange interior oven racks and place bread
dough in the oven.
2. Selectoven bypressingeitherUPPEROVENor
LOWEROVEN.
3. PressBREADPROOF.
4. PressSTARTto
beginthe bread proofing,
5. TheCookTime,
Timerand EndTimefeatures
can besettocontrolyourBread
Proof time
(read theirsectionsfordirections),
6. Removefood.
7. PressCANCELtostoporcanceltheBread
Prooffeatureatanytime.
iiiiiiiiiiiiiiiiiiiiiiiiiiiiiiiiiiiiiiii
iiiiiiiiiiiiiiiiiiiiiiiiiiiiiiiiiiiiiiii
iiiiiiiiiiiiiii
iiiiiiiiiiiiiiiiiiiiiiiiiiiiiiiiiiiiiiii
iiiiiiiiiiiiiiiiiiiiiiiiiiiiiiiiiiiiiiii
iiiiiiiiiiiiiiiiiiiiiiiiiiiiiiiiiiiiiiii
iiiiiiiiiiiiiiiiiiiiiiiiiiiiiiiiiiiiiiii
iiiiiiiiiiiiiiiiiiiiiiiiiiiiiiiiiiiiiiii
iiiiiiiiiiiiiiiiiiiiiiiiiiiiiiiiiiiiiiii
iiiiiiiiiiiiiiiiiiiiiiiiiiiiiiiiiiiiiiii
iiiiiiiiiiiiiiiiiiiiiiiiiiiiii
TochangeaBreadProoftemperaturewhilethe
functionisactive:
iiiiiiiiiiiiiiiiiiiiiiiiiiiiiiiiiiii
iiiiiiiiiiiiiiiiiiiiiiiiiiiiiiiiiiii
1.
iiiiiiiiiiiiiiiiiiiiiiiiiiiiiiiiiiiiiiii
iiiiiiiiiiiiiiiiiiiiiiiiiiiiiiiiiiiiiiii
SelectovenbypressingeitherUPPEROVEN
orLOWEROVEN,
2. Pressthe
H orLOpadstogettothe
desired iiiiiiiiiiiiiiiiiiiiiiiiii
temperature,
iiiiiiiiiiiiiiiiiiii
iiiiiiiiiiiiiiiiiiii
iiiiiiiiiiiiiiiiiiii
iiiiiiiiiiiiiiiiiiii
iiiiiiiiiiiiiiiiiiii
iiiiiiiiiiiiiiiiiiii
iiiiiiiiiiiiiiiiiiii
iiiiiiiiiiiiiiiiiiii
iiiiiiiiiiiiiiiiiiiiiiiiiiiiiiiiiiii
Settin
Oven Controls
My favorite
The Favorites settings allows you to save your
most frequently used or most complex cooking
sequences. This feature will save the cooking
mode, the target temperature and the cooktime (if
any). The oven can recall two cooking sequences
from its internal memory, one for each oven, which
are easily accessible from a one touch button.
These functions can be used with all cooking
modes and features.
To save a Favorite (example is a 450 °F Bake for
30 minutes)
- Saving a Favorite can only be done for an oven
which is currently in operation.
1. Select oven by pressing either UPPER OVEN
or LOWER OVEN.
2. Press BAKE. The default temperature will
appear in the display.
3. Enter temperature needed; 4 5 0.
4. Press COOK TIME. The time numbers will
blink in the display.
5. Enter time needed; 3 0.
6. Press START.
7. Press and hold for 3 seconds any MY
FAVORITE pad. Notice that the red indicator
above the key will light up.
To recall a Favorite
- Recalling a Favorite can only be done for an oven
which is not currently in operation.
1. Select oven by pressing either UPPER OVEN
or LOWER OVEN.
2.
3.
Press MY FAVORITE pad which is currently
lighted up.
Press START.
To overwrite a Favorite:
1.
Sabbath feature (for use on the
Jewish sabbath & holidays)
The HI and LO pads are used to set the Sabbath
feature. The Sabbath feature may only be used
with the BAKE pad. The oven temperature may be
set higher or lower after setting the Sabbath feature
(the oven temperature adjustment feature should
be used only during Jewish Holidays), however the
display will not visibly show or provide any audible
tones indicating whether the change occurred
correctly. Once the oven is properly set using
Bake with the Sabbath feature active, the oven will
remain continuously ON until cancelled. This will
override the factory preset 12-Hour Energy Saving
feature.
If the oven light will be needed during the Sabbath,
press OVEN LIGHT before activating the Sabbath
feature. Once the oven light is turned ON and
the Sabbath feature is active, the oven light will
remain ON until the Sabbath feature is turned OFF.
If the oven light needs to be OFF, be sure to turn
the oven light OFF before activating the Sabbath
feature.
IMPORTANT NOTES: It is not advised to attempt
to activate any other program feature other than
BAKE while the Sabbath feature is active. ONLY
the following key pads will function after setting
the Sabbath feature; 0 to 9, BAKE, START,
CANCEL, HI and LO. ALL OTHER KEYPADS will
not function once the Sabbath feature is properly
activated.
To Program the Upper Oven to Begin Baking
Immediately & Activate the Sabbath feature
(example: baking at 350°F)
1.
2.
To overwrite a My Favorite simply start a new
iiiiiiiiiiiiiiiiiiiiiiiiiiiiiiiiiiiiiiiiiiiiiiiiiiiiiiiiiiiiiiiiiiiiiiiiiiiiiiiiiiiiiiiiiiiiiiiiiiiiiiiiiiiiiiiiiiiiiii_i!iiiiiiiiiiiiiiiiiiiiiiiiiiiiiiiiiii_
cooking sequence and save it into My Favorite.
3.
iiiiiiiiiiiiiiiiiiiiiiiiiiiiiiiiiiiiiiiiiiiiiiiiiiiiiiiiiiiiiiiiiiiiiiiiiiiiiiiiiiiiiiiiiiiiiiiiiiiiiiiiiiiiiiiiiiiiiiiiiiiii_i!iiiiiiiiiiiiiiiiiiiiiiiiiiiiiiiiiiiiiiiiiiii_
The new My Favorite settings will overwrite the
old one.
To delete a Favorite:
1.
2.
Select oven by pressing either UPPER OVEN
or LOWER OVEN.
Press MY FAVORITE pad for 3 seconds,
4.
Place the food in the oven.
Select oven by pressing either UPPER OVEN
or LOWER OVEN.
Press BAKE.
If you desire to set the oven control for a
COOK TIME do so at this time. If not, skip
this step and continue to step 5. Refer to their
section for complete instructions. Remember
the oven will shut down after using COOK
TIME and therefore may only be used once
during the Sabbath/Jewish Holidays.
Settin
Oven Controls
Sabbath feature (for use on the
Jewish sabbath & holidays)
5.
Press START.
6.
The oven will turn ON and begin heating
immediately.
Press and hold both the HI and LO pads for at
least 3 seconds. SAb will appear in the oven
display. Once SAb appears in the display the
oven control will no longer beep or display any
further changes and the oven is properly set for
the Sabbath feature.
,
8.
Note: You may change the oven temperature once
baking has started. Press UPPER OVEN, BAKE,
the numeric key pads for the temperature you want
(example for 425°F press 4, 2, 5) and then press
START'RNICE (for Jewish Holidays only). Remember
that the oven control will no longer beep or display
any further changes once the oven is set for the
Sabbath feature,
The oven may be turned OFF at any time by
pressing CANCEL pad (this will turn the oven
OFF only). To turn OFF the Sabbath feature press
and hold both the HI and LO pads for at least 3
seconds. SAb will disappear from the display.
Should you experience a power failure or interruption,
the oven will shut off. When power is returned the
oven will not turn back on automatically. SF (Sabbath
Failure) will be displayed in the oven control display.
The oven will remember that it is set for the Sabbath
........
%i%i%i%i%i%i%i_
_iiiiiiiiiiiiiiiiiiiiiiiiiiiiiiiiiiiii
iiiiiiiiiiiiiiiiiiiiiiii_iiiiiiiiiiiii
iiiiiiiiiiiiiiiiiiiiiiiiiiiiiiii_i
and the food may be safely removed from the oven
while still in the Sabbath feature, however the oven
cannot be turned back on until after the Sabbath.After
the Sabbath observance turn OFF the Sabbath feature.
Press and hold both the HI and LO pads for at least
3 seconds. SAb will disappear from the display and
the oven may be used with all normal functions. For
further assistance, guidelines for proper usage, and
a complete list of models with the Sabbath feature,
please visit the web at http:\\www.star-k.org.
Setting
Your Preferences
User Preferences
iiiiiiiiiiiiiiiiiiiiiiiiii
The UserPreferences menu includesall user
definedoptions. Thisfeatureenablesyoutocontrol
thevariousoptionsofthe
electroniccontrols.
This menufeaturestheTimeofDay,
Celsiusor
Fahrenheitdisplaymode,
ContinuousBakeor12
Hour EnergySaving modes, ClockdisplayorNoClockdisplay, 12 HoursTimeofDayor24
Hours
3.
TimeofDay, AudioControl, andAdjustingtheoven
UserPreferencesmenuitems:
iiiiiiiiiiiiiiiiiiiiiiiiiiiiiiiiiiii
temperature. The UserPreferences menu isonly
availablewhen theoven is notbeing used (not
cooking).
. CLO 12:00; Settingthe clock,
. CLOon; Clockon/off.
. CLO12hr; 12/24hourtimeofdaydisplay.
F-C F; Fahrenheit / Celsius display,
• ESon; 12hourEnergySavingon/off.
• AUd;Audioon/offandvolume.
• UPO:Adjustingoventemperature.
• rSt; Resettodefaultfactorysettings.
iiiiiiiiiiiiiiiiiiiiiiiiiiiiiiiiiiiiiiii
iiiiiiiiiiiiiiiiiiiiiiiiiiiiiiiiiiiiiiii
iiiiiiiiiiiiiiiiiiiiiiiiiiiiiiiiiiiiiiii
iiiiiiiiiiiiiiiiiiiiiiiiiiiiiiiiiiiiiiii
iiiiiiiiiiiiiiiiiiiiiiiiiiiiiiiiiiiiiiii
iiiiiiiiiiiiiiiiiiiiiiiiiiiiiiiiiiiiiiii
iiiiiiiiiiiiiiiiiiiiiiiiiiiiiiiiiiiiiiii
iiiiiiiiiiiiiiiiiiiiiiiiiiiiiiiiiiiiiiii
__```````
TobrowsethroughtheUserPreferencesmenu
1.
2.
Press USERPREFtobring
upthe User
Preferencesmenu.
Press USERPREF again tobrowsethrough
the menu pages.
4.
5.
Press LOorHItotoggle
between theavailable
options,
PressSTARTwhilethechosenoption
ison
displaytochange,
PressCANCELwhenfinishedtogetbackto
the standard oven display,
iiiiiiiiiiiiiiiiiiiiiiiiiiiiiiiiiiiiiiii
iiiiiiiiiiiiiiiiiiiiiiiiiiiiiiiiiiiiiiii
iiiiiiiiiiiiiiiiiiiiiiiiiiiiiiiiiiiiiiii
iiiiiiiiiiiiiiiiiiiiiiiiiiiiiiiiiiiiiiii
iiiiiiiiiiiiiiiiiiiiiiiiiiiiiiiiiiiiiiii
iiiiiiiiiiiiiiiiiiiiiiiiiiiiiiiiiiiiiiii
iiiiiiiiiiiiiiiiiiiiiiiiiiiiiiiiiiiiiiii
Settin
Your Preferences
Setting the clock - Time of day
The clock may be set for 12 or 24 hour time of
day operation (see advanced settings section).
The clock has been preset at the factory for the 12
hour operation. When the range is first plugged in,
or when the power supply to the range has been
interrupted, the display will show "CLO 12:00". The
clock must be set before the oven can be used.
When power to the unit has been interrupted,
"12:00" appears and flashes in the display. To set
the Clock in this case, skip step 1 in the example
below and follow steps 2 and 3.
Setting time of day display
12 or 24 hours
The oven control can be programmed to display
time of day in 12 hours or 24 hours mode. The
oven has been preset at the factory to display in 12
hours mode.
Changing between 12 or 24 hour time of day
display
1.
2
To set the clock (example for 1:30)
1.
2.
3.
4.
Press USER PREF until you get to the CLO
12:00 menu page.
Press 1 3 0 pads to set the time of day to 1:30.
The pads HI or LO can also be pressed to
raise or lower the actual time displayed.
Press START to accept the changes and go
back to user preferences menu display.
Press CANCEL when finished to get back to
the standard oven display,
S..etti..n.ng
th...ecloc_k .:O...._n
.or Off
The oven control can be programmed to display
the time of day or not. The oven has been preset at
the factory to display the time of day.
Changing clock display between ON and OFF
1.
Press USER PREF until you get to the CLO on
menu page.
2. Press LO or HI to toggle between displaying or
hiding the clock.
3. Press START to accept the changes and go
back to user preferences menu display.
4. Press CANCEL when finished to get back to
iiiiiiiiiiiiiiiiiiiiiiiiiiiiiiiiiiiiiiiiiiiiiiiiiiiiiiiiiiiiiiiiiiiiiiiiiiiiiiiiiiiiiiiiiiiiiiiiiiiiiiiiiiiiiiiiiiiiiii_i!iiiiiiiiiiiiiiiiiiiiiiiiiiiiiiiiiii_
the standard oven display,
-
3.
4.
5.
Press USER PREF until you get to the CLO
12hr menu page.
Press LO or HI to toggle the display of the
clock in 12 or 24 hours.
Press START to accept the changes and go
back to user preferences menu display.
Press CANCEL when finished to get back to
the standard oven display.
Remember to set your clock after changing the
time of day display mode,
Setting temperature
display
Fahrenheit or Celsius
-
The oven control can be programmed to display
temperatures in Fahrenheit or Celsius. The
oven has been preset at the factory to display in
Fahrenheit.
To change display from Fahrenheit to Celsius or
Celsius to Fahrenheit
1.
2.
3.
iiiiiiiiiiiiiiiiiiiiiiiiiiiiiiiiiiiiiiiiiiiiiiiiiiiiiiiiiiiiiiiiiiiiiiiiiiiiiiiiiiiiiiiiiiiiiiiiiiiiiiiiiiiiiiiiiiiiiiiiiiiii_i!iiiiiiiiiiiiiiiiiiiiiiiiiiiiiiiiiiiiiiiiiiii_
4.
Press USER PREF until you get to the F-C F
menu page.
Press LO or HI to toggle between the °C and
°F display options,
Press START to accept the changes and go
back to user preferences menu display.
Press CANCEL when finished to get back to
the standard oven display.
Setting Your Preferences
Setting continuous
12 hour energy
bake or
saving
Theovencontrolhasafactorypresetbuilt-in
12 Hour Energy Saving feature that will shut off
the oven if the oven control is left on for more
than 11 hours and 59 minutes. The oven can be
Adjusting
oven temperature
Thetemperatureintheovenhasbeenpre-setat
iiiiiiiiiiiiiiiiiiiiiiiiiiiiiiiiiiiiiii
the factory. When first using the oven, be sure to
followrecipetimesandtemperatures.
Ifyouthink
the oven is too hot or too cool, the temperature in
programmed to override this feature for Continuous
Baking.
the
oven
beaadjusted.
Before
adjusting,
a
recipe
by can
using
temperature
setting
that is test
higher
or lower than the recommended temperature. The
baking results should help you to decide how much
Changing between 12 hour energy saving and
continuous bake
of an adjustment is needed. Each oven can be
individually adjusted.
1.
2.
3.
4.
Press USER PREF until you get to the E S
menu page.
Press LO or HI to toggle the energy saving
setting on and off.
Press START to accept the changes and go
back to user preferences menu display.
Press CANCEL when finished to get back to
the standard oven display.
Audio
control
To adjust the oven temperature
1.
2.
3.
4.
Press USER PREFERENCES until you get to
the UPO menu page.
If you want to adjust the temperature in the
lower oven, press USER PREFERENCES
again. UPO will appear in the lower display.
Enter the temperature by pressing the LO or HI
pads. The temperature can only be adjusted by
+ 35°F.
Press START to accept the changes and go
back to user preferences menu display.
Press CANCEL when finished to get back to
the standard oven display.
The Audio Control feature allows the oven
control to be operated without sounds or beeps
whenever necessary. If desired the control can be
programmed for silent operation and later returned
to operating with all the default sounds and beeps.
The volume of the beeps can also be adjusted.
5.
To change the audio mode or audio volume
The oven control can be set to return to its original
factory settings. This includes: Setting the Clock
ON/OFF to ON, Setting the clock display mode to
12h, Display mode to Fahrenheit, Setting the oven
temperature adjustment to zero, Setting audio level
to 5 and Enabling the 12h energy saving mode.
Reseting the control also erase the My Favorite
recipes.
1.
2.
3.
4.
Press USER PREF until you get to the AUd
menu page.
Press LO or HI to toggle between the available
volume settings. AUd 5 for the highest volume
setting to AUd 1 for the lowest volume. AUd
OFF to disable the beeps.
Press START to accept the changes and go
back to user preferences menu display.
Press CANCEL when finished to get back to
the standard oven display.
iiiiiiiiiiiiiiiiiiiiiiiii
Re-setting
settings
to default factory
To reset the oven control to its original settings
1.
2.
3.
Press USER PREF until you get to the rSt no
menu page.
Press LO or Hi to select YES.
Press START to reset to default factory
settings.
iiiiiiiiiiiiiiiiiiiiiiiiiiiiiiiiiiiiiii
Settin
Self-Clean Cycle
Before starting
self-clean
Adhere to the Following Cleaning Precautions:
• Allow the oven to cool before cleaning.
• Wear rubber gloves when cleaning any exterior
parts of the oven manually.
Before cleaning any part of the oven, be sure the
oven is turned off or else push CANCEL pad.
Wait until the oven is cool.
DO NOT use commercial oven cleaners or oven
protective coatings in or around any part of the
self-cleaning oven.
• DO NOT clean the oven door gasket. The gasket
on the oven door is essential for a good seal.
Care should be taken not to rub, damage or
move the gasket.
• DO NOT use any cleaning materials on the
gasket. Doing so could damage it.
• DO NOT force the oven door open. The
automatic door locking system can be damaged.
•
Remove the broiler pan, insert, all utensils
and any aluminum foil, These items can not
withstand high cleaning temperatures.
•
All oven racks and supports MUST be removed.
If they are left in while attempting to set the
self-clean cycle, the display will show REMOVE
RACKS. The oven control will not start a selfclean cycle without first removing all the oven
racks and supports.
•
Remove any excess spillovers in the oven
cavity before starting the self-cleaning cycle.
To clean, use hot, soapy water and a cloth.
Large spillovers can cause smoke or a fire when
subjected to high temperatures.
•
Do NOT
Hand
Clean Door
Gasket
Clean any soil from the oven frame and the
door liner (see illustration). These areas heat
sufficiently during a self-clean to burn soil on.
_i_i_i_i_i_i_i_i_i_i_i_i_i_i_i_i_i_i_i_i_i_i_i_i_i_i_i_i_i_i_i_i_i_i_i_i_i_i_i_i_i_i_i_i_i_i_i_i_i_i_i_i_i_i_i_i__!__________________________________________
Clean with hot soapy water.
iiiiiiiiiiiiiiiiiiiiiiiiiiiiiiiiiiiiiiiiiiiiiiiiiiiiiiiiiiiiiiiiiiiiiiiiiiiiiiiiiiiiiiiiiiiiiiiiiiiiiiiiiiiiiiiiiiiiiii_i!iiiiiiiiiiiiiiiiiiiiiiiiiiiiiiiiiiiiiiiiiiiiiiiiiiiii_
• DO NOT allow food spills with a high sugar or
acid content (such as tomatoes, sauerkraut, fruit
juices or pie filling) to remain on the surface as
Do Hand C_ean Door Area
they may leave a dull spot even after cleaning.
which out of the Door Gasket
Do Hand
Clean
Frame
Settin
Self-Clean
Cycle
:::::::::::::::::::::::::::::::::::::::::::::::::::::::
iiiiiiiiiiiiiiiiiiiiiiiiiiiiiiiiiiiiiiiiiiiiiiiiiiiiiiiiii
Setting self-clean
Setting delayed self-clean
iiiiiiiiiiiiiiiiiiiiiiiii
iiiiiiiiiiiiiiiiiiiiiiiii
Aself-cleaningoven
cleans itself with high
temperatures (well above cooking temperatures)
which eliminate soil completely or reduce it to a
fine powdered ash you can whisk away with damp
cloth. If you are planning to use the oven directly
after a self=clean cycle remember to allow time for
the oven to cool down and the oven door to unlock.
This normally takes about one hour.
1.
iiiiiiiiiiiiiiiiiiiiiiiiiiiiiiiiiiiiiii
iiiiiiiiiiiiiiiiiiiiiiiiiiiiiiiiiiiiiii
1.
2.
3.
4.
5.
6.
Remove the oven racks and the racks
supports.
Be sure the clock is set with the correct time of
day and the oven door is closed.
Select oven by pressing either UPPER OVEN
or LOWER OVEN.
Press LITE CLEAN for a 2 hours self-clean,
MED CLEAN for 3 hours, or press HEAVY
CLEAN for 4 hours cleaning cycle.
Press START. The "DOOR _" icon will flash.
As soon as the control is set, the motor driven
oven door lock will begin to close automatically.
Once the door has been locked the "DOOR _"
indicator light will stop flashing and remain on.
Note: Allow about 15 seconds for the oven door
lock to close.
2.
3.
4.
5.
6.
7.
8.
9.
When the Self-Clean Cycle is Completed
1.
When the Self-Clean Cycle is Completed
3.
The time of day and "DOOR _" will remain ON.
The display will show an "Hot" message while
the oven is still too hot to open door.
Once the oven has cooled down for 1 HOUR,
and the "DOOR t_" icon is no longer displayed,
the oven door can then be opened.
Stopping or Interrupting a Self-Cleaning Cycle
If it becomes necessary to stop or interrupt a selfcleaning cycle due to excessive smoke:
1.
2.
Press CANCEL.
Once the oven has cooled down for
approximately 1 HOUR and the "DOOR _"
icon is no longer displayed, the oven door can
then be opened.
CLEAN for 4 hours cleaning cycle.
Press START. The "DOOR _" icon will flash.
As soon as the control is set, the motor driven
oven door lock will begin to close automatically.
Once the door has been locked the "DOOR _"
indicator light will stop flashing and remain on.
Press END TIME.
Enter time of day needed for the end of the
cycle (example for "6:00"; 6 0 0).
Press START.
Note: Allow about 15 seconds for the oven door
lock to close.
2.
1.
2.
Removetheoven
racksandthe
racks
supports,
Be sure the clock is set with the correct time of
day and the oven door is closed.
Select oven by pressing either UPPER OVEN
or LOWER OVEN.
Press LITE CLEAN for a 2 hours self-clean,
MED CLEAN for 3 hours, or press HEAVY
3.
The time of day and "DOOR _" will remain
ON.
The display will show an "Not" message while
the oven is still too hot to open door.
Once the oven has cooled down for 1 HOUR,
and the "DOOR _" icon is no longer displayed,
the oven door can then be opened.
Stopping or Interrupting a Self-Cleaning Cycle
If it becomes necessary to stop or interrupt a selfcleaning cycle due to excessive smoke:
1.
2.
Press CANCEL.
Once the oven has cooled down for
approximately 1 HOUR and the "DOOR t_"
icon is no longer displayed, the oven door can
then be opened.
:::::::::::::::::::::::::::::::::::::::::::::::::::::::::
iiiiiiiiiiiiiiiii
iiiiiiiiiiiiiiiii
iiiiiiiiiiiiiiiii
iiiiiiiiiiiiiiiii
iiiiiiiiiiiiiiiii
iiiiiiiiiiiiiiiii
iiiiiiiiiiiiiiiii
iiiiiiiiiiiiiiiii
iiiiiiiiiiiiiiiii
iiiiiiiiiiiiiiiii
Care an
Cleani
Cleaning Various Parts of Your appliance
Before cleaning any part of the appliance, be sure all controls are turned OFF and the appliance is COOL.
REMOVE SPILLOVERS AND HEAVY SOILING AS SOON AS POSSIBLE. REGULAR CLEANINGS WILL
REDUCE THE NUMBER OF MAJOR CLEANINGS LATER.
iiiiiiiiiiiiiiiiiiiiiiiiiiiiiiiiiiiiiiiiiiiiiiiiiiiiiiiiiiiiiiiiiiiiiiiiiiiiiii
Control
Panel
Stainless Steel, Chrome
Dec0rative Tdm; oven
Racks Oven Racks
SuppOrt
Before cleaning the control panel, turnail ContioIs to OFF. L!ghtiy spray the
control panel with a liquid cleaner. Wipe witha soft cloth or paper towel: DO
NOT use abrasive cleaners or scoudng pads: These can permanently damage
the cQntrol pane! surface:
Clean with hot soapy water and a dishcloth, Rinse with clean wate[ and a
cl0th: CoVer stubb0m spOts With an amm0nia:s0aked paper t0wel for 30 tO40
minutes: Rinse: Cleaners made especia lyforstainlesssteelarerec0mmended.
Be Sure to dnse the cleaners as bluish stainS may 0cCur dudng heating and
cannot be removed:
_i_i_i_i_i_i_i_i_i_i_i_i_i_i_i_i_i_i_i_i_i_i_i_i_i_i_i_i_i_i_i_i_i_i_i_i_i_i_i_i_i_i_i_i_i_i_i_i_i_i_i_i_i_i_i_i__!__________________________________________
iiiiiiiiiiiiiiiiiiiiiiiiiiiiiiiiiiiiiiiiiiiiiiiiiiiiiiiiiiiiiiiiiiiiiiiiiiiiiiiiiiiiiiiiiiiiiiiiiiiiiiiiiiiiiiiiiiiiiii_i!iiiiiiiiiiiiiiiiiiiiiiiiiiiiiiiiiiiiiiiiiiiiiiiiiiiii_
iiiiiiiiiiiiiiiiiiiiiiiiiiiiiiiiiiiiiiiiiiiiiiiiiiiiiiiiiiiiiiiiiiiiiiiiiiiiiiiiiiiiiiiiiiiiiiiiiiiiiiiiiiiiiiiiiiiiiiiiiiiii_i!iiiiiiiiiiiiiiiiiiiiiiiiiiiiiiiiiiiiiiiiiiii_
Care and Cleaning
Special door care instructions
•
Do not close the oven door until all the interior
oven racks are fully inserted and retracted to
the back of the oven.
•
Do not hit the glass with pots, pans, or any
other object. The oven door glass may break or
even break at a later time unexpectedly.
•
•
Scratching, hitting, jarring or stressing the oven
door glass may weaken its structure causing
an increased risk of breakage at a later time.
You may use a glass cleaner on the outside
of the oven door glass. Do not spray or allow
water or the cleaner to enter or drip down into
the oven door vents. Spray cleaner on cloth
first and then wipe the oven door clean.
•
Do not use strong oven cleaners, powders or
any harsh abrasive cleaning materials on the
outside of the oven door or glass.
•
Never clean the oven door gasket. The oven
door gasket should always clean during the
Self-clean cycle.
Changing oven lights
The oven light bulbs are located on both side of
the oven cavity and both are covered with a glass
shield. The glass shield must be in place whenever
the oven is in use.
Replacing
1.
Turn electrical power off at the main source or
unplug the appliance.
2.
Remove oven interior light shield as illustrated
below.
3.
Replace bulb with a new appliance bulb.
Please note: Do not allow your fingers to touch
the new bulb when replacing, This will shorten
the life of the new bulb. Use a paper towel to
cover the new bulb when installing.
4.
Replace glass shield over bulb,
5.
Turn power back on again at the main source
(or plug the appliance back in).
The clock will then need to be reset.
6.
Broiler
the oven interior light bulbs:
pan cleaning tips
Halogen
Light Bulb
To make cleaning easier, line the bottom of the
broiler pan with aluminum foil. DO NOT cover the
broiler grid with foil.
To prevent grease from baking on, remove the
broiler pan from the oven as soon as cooking is
completed. Use hot pads because the broiler pan
is extremely hot. Pour off grease. Soak the pan in
HOT, soapy water.
Clean the broiler pan as soon as possible after
each use. If necessary, use soap-filled steel wool
pads. Heavy scouring may scratch the grid.
Grid
Broiler Pan
Lift backside
of glass shield
and remove it.
iiiiiiiiiiiiiiiiii
Care an
Cleani
To remove the oven door
Lock engaged for
door removal
Fig. 2
1. Fully open the oven door.
2. Unlock both oven door hinge locks by pulling
them up and away from the oven frame until
they stop (unlocked position) -Fig. 2=. If needed
use a small flat-bladed screwdriver to assist with
loosening the door hinge locks.
Firmly grasp both sides of oven door -Fig. 3-.
Before completing this step, be prepared to hold the
whole weight of the door while grasping the sides
of the oven door with both hands. Hold midway
down the oven door sides. Close the oven door to
about 4 inches and continue closing beyond the
door stop position. The oven door should release
from the frame on its own -Fig. 3-.
5. Carefully lift door away evenly, slightly up and
out until both hinge arms are clear of the hinge
slots in the oven frame -Fig. 3-. After door has
been removed, be sure to lay the door flat with
the inside of the door downward (never rest the
oven door with any weight on the door handle).
HINGE SLOT - Door removed
from the appliance
Fig. 3
To replace
1.
the oven door
Firmly grasp the oven door along both sides
just below the door handle. When positioning
the door hinge arms with the door hinge slots in
the oven frame, you may wish to use your knee
to stabilize the door before attempting to insert
the door hinge arms in the hinge slots.
_i_i_i_i_i_i_i_i_i_i_i_i_i_i_i_i_i_i_i_i_i_i_i_i_i_i_i_i_i_i_i_i_i_i_i_i_i_i_i_i_i_i_i_i_i_i_i_i_i_i_i_i_i_i_i_i__!__________________________________________
iiiiiiiiiiiiiiiiiiiiiiiiiiiiiiiiiiiiiiiiiiiiiiiiiiiiiiiiiiiiiiiiiiiiiiiiiiiiiiiiiiiiiiiiiiiiiiiiiiiiiiiiiiiiiiiiiiiiiii_i!iiiiiiiiiiiiiiiiiiiiiiiiiiiiiiiiiiiiiiiiiiiiiiiiiiiii_
2. Position the angle of the door to the door
iiiiiiiiiiiiiiiiiiiiiiiiiiiiiiiiiiiiiiiiiiiiiiiiiiiiiiiiiiiiiiiiiiiiiiiiiiiiiiiiiiiiiiiiiiiiiiiiiiiiiiiiiiiiiiiiiiiiiiiiiiiii_i!iiiiiiiiiiiiiiiiiiiiiiiiiiiiiiiiiiiiiiiiiiii_
removal angle and carefully insert the door
hinge arms fully and evenly into the door
hinge slots. Carefully let the weight of the door
transfer from your hands so that the oven now
supports the oven door.
3. Open the oven door down to the fully open
position.
4. With the door in the fully open position, push
both oven door hinge locks toward the oven
frame until they both are locked.
Lock in normal position
5. Close the oven door.
Fig. 1
Baking problems
For best cooking results pre-heat the oven when baking cookies, breads, cakes, pies or pastries, etc. There
is no need to preheat the oven for roasting meats or baking casseroles.
The cooking times and temperatures needed to bake a product may vary slightly from your previous appliance.
Cakes too dark on top
cakes put into the oven
or bottom,
before preheat ng time is
....
completedl'
Cakesnet
level,
Rangenot
,
)
•
•
evel.,
Pan too close to oven wa!t or
rack oVercrowde&
Panwarped:
,
Allow OVento preheat to the selected
temperature before placing food inthe oven.
Use proper rack position for baking needs:
Ptaceamarkedgiassmeasu[ngcup
,
filledwith
Water on the center of the oven rackl If the
water level is uneven refer to the installation
instructions for ,eve!ing the rangel
Be sure to atlow5.!cm to 10,2cm (Z! to 4!i)of
Clearance on all Sides 0f each pan in the ovenl
Do not use pans that are dented or warped.
....................................
Solutions to common pro
ms
Before you call for service, review the following list. It may save you time & expense. The list includes
common occurrences that are not the result of defective workmanship or materials in this appliance.
Installation'
Place oven rack in center of oven: Place a level on the Oven rack. Contact
install!ng agent if rack and cab!net cutout flooring ale not level:
'
cabinets
Oven light does,
not work
Poor cooking
results
Cabinet miSalignment may make range appeal t0 be not level Be sure
are square and level; Contact cabinet maker tO correct problem
Burned_out Orloose bul
or tighten the bulbl
.
,ve Light to rep!ace
Many factors affect baking resultsl see baking for hints, cause and corrections.
See Adjusting Oven Temperature I
,Adjust
.
,hi
the recipe-,s recommended
poWer levels or cooking times!
Cookware is too lightweight or warpedi Use heavier quality cookware so foods
being prepared may cook more evenlyl
Soilnot
completely
removedafter
self"cleamng
cycleis
"
completed
• Failureto cleanbottom:fromtopof oven:frameofoven0rdOOr
areaoutside
OVen
SeallTheSeareasarenotinthe Self'cleaning
area;butgethotenough
to burnonresidue;
CleantheseareasbeforetheSelf'cleaning
cycleis started
BurnedonresiduecanbecleanedWitha stiffnylonbrushandWateror a nylOn
'
scrubber: Be careful n0t tO damage the oven gaSketl
Excessive spillovers in oVenl Set the self-clean cycle for lOng
_gtime:
ores
_i_i_i_i_i_i_i_i_i_i_i_i_i_i_i_i_i_i_i_i_i_i_i_i_i_i_i_i_i_i_i_i_i_i_i_i_i_i_i_i_i_i_i_i_i_i_i_i_i_i_i_i_i_i_i_i__!__________________________________________
iiiiiiiiiiiiiiiiiiiiiiiiiiiiiiiiiiiiiiiiiiiiiiiiiiiiiiiiiiiiiiiiiiiiiiiiiiiiiiiiiiiiiiiiiiiiiiiiiiiiiiiiiiiiiiiiiiiiiii_i!iiiiiiiiiiiiiiiiiiiiiiiiiiiiiiiiiiiiiiiiiiiiiiiiiiiii_
iiiiiiiiiiiiiiiiiiiiiiiiiiiiiiiiiiiiiiiiiiiiiiiiiiiiiiiiiiiiiiiiiiiiiiiiiiiiiiiiiiiiiiiiiiiiiiiiiiiiiiiiiiiiiiiiiiiiiiiiiiiii_i!iiiiiiiiiiiiiiiiiiiiiiiiiiiiiiiiiiiiiiiiiiii_
arranty
:::::::::::::::::::::::::::::::::::::::::::::::::::::::
Your appliance is covered by a one year limited warranty. For one year from your original date of purchase, Electrolux will
repairorreplaceanypartsofthisappliancethatproveto
bedefectivein
materialsorworkmanshipwhen
suchappliance
is
installed, used, and maintained in accordance with the provided instructions.
In addition, the glass cooktop or radiant surface
element of your appliance (excluding built-in and free-standing
range appliances)is
covered by a two through five year
limited warranty. During the 2nd through 5th years from your original date of purchase, Electrolux will provide a replacement
iiiiiiiiiiiiiiiiiiiiiiiiiiiiiiiiiiiiiiiiiiiiiiiii
iiiiiiiiiiiiiiiiiiiiiiiiiiiiiiiiiiiiiiiiiiiiiiiii
iiiiiiiiiiiiiiiiiiiiiiiiiiiiiiiiiiiiiiiiiiiiiiiii
iiiiiiiiiiiiiiiiiiiiiiiiiiiiiiiiiiiiiiiiiiiiiiiii
iiiiiiiiiiiiiiiiiiiiiiiiiiiiiiiiiiiiiiiiiiiiiiiii
glassc__kt_p_rradiantsurfacee_ementf_ry_urappliancewhichhaspr_vent_bedefectiveinmaterials_rw_rkmanship
when such appliance is installed, used, and maintained in accordance with the provided instructions.
Exclusions
___________i:i_i_i_i_i_i_
This warranty
does not cover the following:
1.
2.
3.
Products with original serial numbers that have been removed, altered or cannot be readily determined.
Product that has been transferred from its original owner to another party or removed outside the USA or Canada.
Rust on the interior or exterior of the unit.
4.
Products
5.
6.
Products used in a commercial setting.
Service calls which do not involve malfunction or defects in materials or workmanship,
or for appliances
ordinary household use or used other than in accordance with the provided instructions.
Service calls to correct the installation of your appliance or to instruct you how to use your appliance.
7.
8.
purchased
"as-is" are not covered
by this warranty.
not in
Expenses for making the appliance accessible for servicing, such as removal of trim, cupboards, shelves, etc.,
which are not a part of the appliance when it is shipped from the factory.
Service calls to repair or replace appliance light bulbs, air filters, water filters, other consumables,
or knobs,
handles, or other cosmetic parts.
Labor or in-home service costs during the additional limited warranty periods beyond the first year from your
original date of purchase.
9.
10.
11.
12.
Pickup and delivery costs; your appliance is designed to be repaired in the home.
Surcharges including, but not limited to, any after hour, weekend, or holiday service calls, tolls, ferry trip charges,
or mileage expense for service calls to remote areas, including the state of Alaska.
Damages to the finish of appliance or home incurred during transportation
or installation, including but not limited
to floors, cabinets, walls, etc.
13.
14.
Damages caused by: services performed by unauthorized
service companies; use of parts other than genuine
Electrolux parts or parts obtained from persons other than authorized service companies; or external causes such
as abuse, misuse, inadequate power supply, accidents, fires, or acts of God.
DISCLAIMER
CUSTOMER'S
OF IMPLIED WARRANTIES;
LIMITATION OF REMEDIES
SOLE AND EXCLUSIVE
REMEDY UNDER THIS LIMITED
WARRANTY
SHALL
BE REPAIR OR
REPLACEMENT
AS PROVIDED HEREIN. CLAIMS BASED ON IMPLIED WARRANTIES,
INCLUDING
WARRANTIES
OF MERCHANTABILITY
OR FITNESS FORA PARTICULAR
PURPOSE, ARE LIMITED TO ONE YEAR OR THE
SHORTEST PERIOD ALLOWED
BY LAW, BUT NOT LESS THAN ONE YEAR. ELECTROLUX
SHALL NOT BE LIABLE
FOR CONSEQUENTIAL
OR INCIDENTAL DAMAGES SUCH AS PROPERTY DAMAGE AND INCIDENTAL EXPENSES
RESULTING
FROM ANY BREACH OF THIS WRITTEN LIMITED WARRANTY
OR ANY IMPLIED WARRANTY.
SOME
STATES AND PROVINCES
DO NOT ALLOW
THE EXCLUSION
OR LIMITATION
OF INCIDENTAL
OR CONSEQUENTIAL
DAMAGES, OR LIMITATIONS
ON THE DURATION OF IMPLIED WARRANTIES,
SO THESE LIMITATIONS OR
EXCLUSIONS
MAY NOT APPLY TO YOU. THIS WRITTEN WARRANTY
GIVES YOU SPECIFIC LEGAL RIGHTS.
MAY ALSO
If You
HAVE OTHER
Need
RIGHTS
YOU
THAT VARY FROM STATE TO STATE.
Service
Keep your receipt, delivery slip, or some other appropriate
payment record to establish the warranty
be required. If service is performed, it is in your best interest to obtain and keep all receipts. Service
must be obtained by contacting Electrolux at the addresses or phone numbers below.
period should service
under this warranty
This warranty only applies in the USA, Puerto Rico and Canada. In the USA and Puerto Rico, your appliance is warranted
by Electrolux Major Appliances North America, a division of Electrolux Home Products, Inc. In Canada, your appliance
is warranted by Electrolux Canada Corp. Electrolux authorizes no person to change or add to any obligations under this
warranty. Obligations for service and parts under this warranty must be performed by Electrolux or an authorized service
company.
Product features
or specifications
USA
1.800.944.9044
Etectrolux Home Products, Inc.,
10200 David Taylor Drive
Charlotte, NC 28262
as described
or illustrated
are subject
to change
without
notice.
Canada
1-800-265-8352
Etectrolux Canada Corp.
5855 Terry Fox Way
Mississauga, Ontario, Canada L5V 3E4
_:_iiiiiiiiiiiiiiiiiiiiiiiiiiiiiiiii
ectrolux