1
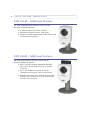
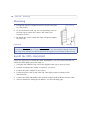
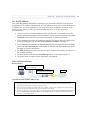
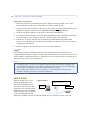
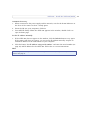
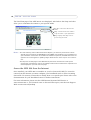
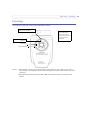
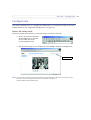
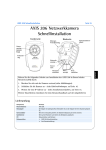
AXIS 206 Family
Network Camera
User’s Manual
About this Document
This manual is intended for administrators and users of the
AXIS 206\206M\206W Network Camera, and is applicable
for software release 4.10. It includes instructions for using
and managing the product on your network. Previous
experience of networking will be of use when using this
product. Some knowledge of UNIX or Linux-based systems
may also be beneficial, for developing shell scripts and
applications. Later versions of this document will be posted
to the Axis Website, as required. See also the product’s
online help, available via the Web-based interface.
Safety Notices Used In This Manual
Caution! - Indicates a potential hazard that can damage the
product.
Important! - Indicates a hazard that can seriously impair
operation.
Do not proceed beyond any of the above notices until you
have fully understood the implications.
Intellectual Property Rights
Axis AB has intellectual property rights relating to
technology embodied in the product described in this
document. In particular, and without limitation, these
intellectual property rights may include one or more of the
patents listed at http://www.axis.com/patent.htm and one
or more additional patents or pending patent applications
in the US and other countries.
Legal Considerations
Camera surveillance can be prohibited by laws that vary
from country to country. Check the laws in your local
region before using this product for surveillance purposes.
Electromagnetic Compatibility (EMC)
near a radio or television receiver in a domestic environment, it
may cause radio interference. Install and use the equipment
according to the instruction manual.
Australia - This electronic device meets the requirements of
the Radio communications (Electromagnetic Compatibility)
Standard 1998 AS/NZS 3548.
Equipment Modifications
This equipment must be installed and used in strict accordance
with the instructions given in the user documentation. This
equipment contains no user-serviceable components.
Unauthorized equipment changes or modifications will
invalidate all applicable regulatory certifications and approvals.
Radio Transmission Regulatory Information
(AXIS 206W)
This equipment generates and radiates radio-frequency energy,
and must be installed and operated while maintaining a
minimum body-to-camera distance of 3 feet (1 meter).
Liability
Every care has been taken in the preparation of this manual.
Please inform your local Axis office of any inaccuracies or
omissions. Axis Communications AB cannot be held responsible
for any technical or typographical errors and reserves the right
to make changes to the product and manuals without prior
notice. Axis Communications AB makes no warranty of any
kind with regard to the material contained within this
document, including, but not limited to, the implied warranties
of merchantability and fitness for a particular purpose. Axis
Communications AB shall not be liable nor responsible for
incidental or consequential damages in connection with the
furnishing, performance or use of this material.
Trademark Acknowledgments
This equipment generates, uses and can radiate radio
frequency energy and, if not installed and used in
accordance with the instructions, may cause harmful
interference to radio communications. However, there is no
guarantee that interference will not occur in a particular
installation.
If this equipment does cause harmful interference to radio
or television reception, which can be determined by turning
the equipment off and on, the user is encouraged to try to
correct the interference by one or more of the following
measures: Re-orient or relocate the receiving antenna.
Increase the separation between the equipment and
receiver. Connect the equipment to an outlet on a different
circuit to the receiver. Consult your dealer or an
experienced radio/TV technician for help. Shielded (STP)
network cables must be used with this unit to ensure
compliance with EMC standards.
Acrobat, Adobe, Boa, Ethernet, IBM, Internet Explorer, LAN
Manager, Linux, Macintosh, Microsoft, Mozilla, Netscape
Navigator, OS/2, UNIX, Windows, WWW are registered
trademarks of the respective holders. Java and all Java-based
trademarks and logos are trademarks or registered trademarks
of Sun Microsystems, Inc. in the United States and other
countries. Axis Communications AB is independent of Sun
Microsystems Inc. UPnPTM is a certification mark of the
UPnPTM Implementers Corporation.
USA - This equipment has been tested and found to
• download user documentation and firmware updates
• find answers to resolved problems in the FAQ database.
Search by product, category, or phrases
• report problems to Axis support by logging in to your private
support area
• visit Axis Support at www.axis.com/techsup/
comply with the limits for a Class B computing device
pursuant to Subpart B of Part 15 of FCC rules, which are
designed to provide reasonable protection against such
interference when operated in a commercial environment.
Operation of this equipment in a residential area is likely to
cause interference, in which case the user at his/her own
expense will be required to take whatever measures may be
required to correct the interference.
Europe This digital equipment fulfills the
requirements for radiated emission according to limit B of
EN55022/1998, and the requirements for immunity
according to EN55024/1998 residential, commercial, and
light industry.
Japan - This is a class B product based on the standard of
the Voluntary Control Council for Interference from
Information Technology Equipment (VCCI). If this is used
AXIS COMMUNICATIONS
<Product
Name> Quick User’s Guide
Support
Should you require any technical assistance, please contact
your Axis reseller. If your questions cannot be answered
immediately, your reseller will forward your queries through
the appropriate channels to ensure a rapid response. If you are
connected to the Internet, you can:
AXIS 206 Network Camera Family - User’s Manual
Revision 1.0
Part No: 22351
June 2004
Copyright© Axis Communications AB, 2004
AXIS 206
Contents
About this manual . . . . . . . . . . . . . . . . . . . . . . . . . . . . . . . . . . . . . . . . . . . . . . . . . . . . . . . . . . . . . . . 5
Product Family Features. . . . . . . . . . . . . . . . . . . . . . . . . . . . . . . . . . . . . . . . . . . . . . . . . . . . . . . . . . . 5
AXIS 206M - Additional Features . . . . . . . . . . . . . . . . . . . . . . . . . . . . . . . . . . . . . . . . . . . . . . . . . . . 6
AXIS 206W - Additional Features . . . . . . . . . . . . . . . . . . . . . . . . . . . . . . . . . . . . . . . . . . . . . . . . . . . 6
Overview AXIS 206/206M . . . . . . . . . . . . . . . . . . . . . . . . . . . . . . . . . . . . . . . . . . . . . . . . . . . . . . . . . 7
Overview AXIS 206W . . . . . . . . . . . . . . . . . . . . . . . . . . . . . . . . . . . . . . . . . . . . . . . . . . . . . . . . . . . . . 8
LED Indicators . . . . . . . . . . . . . . . . . . . . . . . . . . . . . . . . . . . . . . . . . . . . . . . . . . . . . . . . . . . . . . . . . . . 9
AXIS 206 & AXIS 206M . . . . . . . . . . . . . . . . . . . . . . . . . . . . . . . . . . . . . . . . . . . . . . . . 9
AXIS 206W . . . . . . . . . . . . . . . . . . . . . . . . . . . . . . . . . . . . . . . . . . . . . . . . . . . . . . . . . . 9
Mounting. . . . . . . . . . . . . . . . . . . . . . . . . . . . . . . . . . . . . . . . . . . . . . . . . . . . . . . . . . . . . . . . . . . . . . 10
Install the AXIS 206/206M. . . . . . . . . . . . . . . . . . . . . . . . . . . . . . . . . . . . . . . . . . . . . . . . . . . . . . . . 10
Set the IP address. . . . . . . . . . . . . . . . . . . . . . . . . . . . . . . . . . . . . . . . . . . . . . . . . . . . 11
One-click Installation. . . . . . . . . . . . . . . . . . . . . . . . . . . . . . . . . . . . . . . . . . . . . . . . . 11
UPnPTM . . . . . . . . . . . . . . . . . . . . . . . . . . . . . . . . . . . . . . . . . . . . . . . . . . . . . . . . . . . . 12
AXIS IP Utility . . . . . . . . . . . . . . . . . . . . . . . . . . . . . . . . . . . . . . . . . . . . . . . . . . . . . . . 12
Manual Installation with ARP/Ping. . . . . . . . . . . . . . . . . . . . . . . . . . . . . . . . . . . . . . 14
Install the AXIS 206W . . . . . . . . . . . . . . . . . . . . . . . . . . . . . . . . . . . . . . . . . . . . . . . . . . . . . . . . . . . 15
Set up the wireless connection - Windows . . . . . . . . . . . . . . . . . . . . . . . . . . . . . . . 15
Discover the IP address for the AXIS 206W . . . . . . . . . . . . . . . . . . . . . . . . . . . . . . . 16
Set up the AXIS 206W on other operating systems . . . . . . . . . . . . . . . . . . . . . . . . 16
Access the Camera . . . . . . . . . . . . . . . . . . . . . . . . . . . . . . . . . . . . . . . . . . . . . . . . . . . . . . . . . . . . . . 17
Access From a Browser . . . . . . . . . . . . . . . . . . . . . . . . . . . . . . . . . . . . . . . . . . . . . . . 17
Select the language and password . . . . . . . . . . . . . . . . . . . . . . . . . . . . . . . . . . . . . . 17
Access the AXIS 206 from the Internet . . . . . . . . . . . . . . . . . . . . . . . . . . . . . . . . . . 18
Focusing. . . . . . . . . . . . . . . . . . . . . . . . . . . . . . . . . . . . . . . . . . . . . . . . . . . . . . . . . . . . . . . . . . . . . . . 19
The Live View Page . . . . . . . . . . . . . . . . . . . . . . . . . . . . . . . . . . . . . . . . . . . . . . . . . . . . . . . . . . . . . . 20
Configuration . . . . . . . . . . . . . . . . . . . . . . . . . . . . . . . . . . . . . . . . . . . . . . . . . . . . . . . . . . . . . . . . . . 21
Access the Setup tools . . . . . . . . . . . . . . . . . . . . . . . . . . . . . . . . . . . . . . . . . . . . . . . . 21
Overview of the Setup tools . . . . . . . . . . . . . . . . . . . . . . . . . . . . . . . . . . . . . . . . . . . 22
Using the Setup tools. . . . . . . . . . . . . . . . . . . . . . . . . . . . . . . . . . . . . . . . . . . . . . . . . 23
Live View Config - Layout . . . . . . . . . . . . . . . . . . . . . . . . . . . . . . . . . . . . . . . . . . . . . 25
Live View Config - HTML Examples. . . . . . . . . . . . . . . . . . . . . . . . . . . . . . . . . . . . . . 26
System Options . . . . . . . . . . . . . . . . . . . . . . . . . . . . . . . . . . . . . . . . . . . . . . . . . . . . . . . . . . . . . . . . . 27
Users . . . . . . . . . . . . . . . . . . . . . . . . . . . . . . . . . . . . . . . . . . . . . . . . . . . . . . . . . . . . . . 27
3
4
AXIS 206
Date & Time . . . . . . . . . . . . . . . . . . . . . . . . . . . . . . . . . . . . . . . . . . . . . . . . . . . . . . . . 27
Network - TCP/IP Settings . . . . . . . . . . . . . . . . . . . . . . . . . . . . . . . . . . . . . . . . . . . . . 28
Wireless Settings (AXIS 206W only) . . . . . . . . . . . . . . . . . . . . . . . . . . . . . . . . . . . . . 30
SMTP (email) . . . . . . . . . . . . . . . . . . . . . . . . . . . . . . . . . . . . . . . . . . . . . . . . . . . . . . . . 31
UPnPTM . . . . . . . . . . . . . . . . . . . . . . . . . . . . . . . . . . . . . . . . . . . . . . . . . . . . . . . . . . . . 31
LED Settings . . . . . . . . . . . . . . . . . . . . . . . . . . . . . . . . . . . . . . . . . . . . . . . . . . . . . . . . 31
Maintenance . . . . . . . . . . . . . . . . . . . . . . . . . . . . . . . . . . . . . . . . . . . . . . . . . . . . . . . . 32
Support . . . . . . . . . . . . . . . . . . . . . . . . . . . . . . . . . . . . . . . . . . . . . . . . . . . . . . . . . . . . 32
Technical Specifications . . . . . . . . . . . . . . . . . . . . . . . . . . . . . . . . . . . . . . . . . . . . . . . . . . . . . . . . . . 34
Troubleshooting . . . . . . . . . . . . . . . . . . . . . . . . . . . . . . . . . . . . . . . . . . . . . . . . . . . . . . . . . . . . . . . . 36
Glossary of Terms . . . . . . . . . . . . . . . . . . . . . . . . . . . . . . . . . . . . . . . . . . . . . . . . . . . . . . . . . . . . . . . 40
Index . . . . . . . . . . . . . . . . . . . . . . . . . . . . . . . . . . . . . . . . . . . . . . . . . . . . . . . . . . . . . . . . . . . . . . . . . 41
AXIS 206 - About this manual
About this manual
This user’s manual is valid for all camera models included in the AXIS 206 family of
network cameras. All text in the manual applies to all models, except where otherwise
indicated. Apart from their names, the AXIS 206 and the AXIS 206M are identical in
appearance.
Product Family Features
The network cameras currently included in the AXIS 206 product family are:
• The AXIS 206 Network Camera
• The AXIS 206M Megapixel Network Camera
• The AXIS 206W Wireless Network Camera
All models share the following features:
• Live high-quality video over the network, with images provided as a real-time
Motion JPEG stream. Multiple resolutions are available.
• Built-in Web server, providing full access to all features and setup tools, via a
standard web browser. For advanced functionality, the camera can be accessed
via the AXIS HTTP API (more info at www.axis.com/developer).
• Support for multiple viewers.
• Support for other languages. Simply select a language from the available options.
The camera’s entire web interface is then displayed in the selected language.
• Upgradeable firmware.
• Support for UPnPTM
UPnPTM is a certification mark of the UPnPTM Implementers Corporation.
5
6
AXIS 206 - AXIS 206M - Additional Features
AXIS 206M - Additional Features
The AXIS 206M Megapixel Network Camera has the
following additional features:
• 6 different video resolutions available.
• Maximum resolution 1280 x 1024 pixels.
• Support for HDTV (High Definition TV) format (16:9
format 1280x720 pixels).
AXIS 206/206M
AXIS 206W - Additional Features
The AXIS 206W Wireless Network Camera has the
following additional features:
• Built-in wireless module supporting the IEEE
802.11b Wi-Fi standard, for access to wireless
networks
• 64 or 128-bit WEP encryption for secure
communication between camera and network
• Multiple resolutions, up to 640x480 pixels (VGA
format), with a frame rate of up to 30 frames per
second in all resolutions.
AXIS 206W
AXIS 206 - Overview AXIS 206/206M
Overview AXIS 206/206M
Front
Rear panel
Serial number label
Lock
ring
Power Cable
clip
Focus
ring
Network
indicator
Control
button
Status
indicator
(outer ring)
Power
indicator
Network
connector
Power
connector
Power Connector - For connection of the PS-H or PS-L power adapter (included).
Network Connector - The AXIS 206/206M connects to the network via a standard RJ45
connector and automatically detects the speed of the local network segment
(10BaseT/100BaseTX Ethernet).
Serial Number - This may be required during installation.
Control Button - Press this button to install using the AXIS Internet Dynamic DNS Service
(see page 11) or to restore the factory default settings, as described on page 33.
7
8
AXIS 206 - Overview AXIS 206W
Overview AXIS 206W
Network traffic
indicator
Wireless module
power indicator
Front
Wireless module
Rear panel
Wireless
module
Serial number
label
Mounting
lock ring
Focus
ring
Power cable
clip
Power
indicator
Status
indicator
(outer ring)
Control button
USB connector
Power connector
Power Connector - For connection of the PS-H or PS-L power adapter (included).
USB Connector - For connection of the supplied USB cable, used for the initial
configuration of the wireless network connection.
Serial Number - This may be required during installation.
Control Button - Press this button to install using the AXIS Internet Dynamic DNS Service
(see page 11) or to restore to the factory default settings, as described on page 33.
AXIS 206 - LED Indicators
LED Indicators
After completion of the startup and self test routines, the multi-colored Network, Status,
and Power LED indicators flash as follows:
AXIS 206 & AXIS 206M
Network
Amber
Steady for connection to 10 Mbit/s network. Flashes for network activity.
Green
Steady for connection to 100 Mbit/s network. Flashes for network activity.
Red
Flashes rapid red, together with the Status indicator, for hardware error.
Unlit
No connection.
Green
Shows steady green for normal operation. Can be configured to flash green at intervals
whenever the camera is accessed. See the online help for more information.
Unlit
When configured for “no flash” on camera access.
Amber
Shows steady amber during reset to factory default or when restoring settings.
Red
Slow flash for failed upgrade (see Emergency Recovery Procedure, on page 37.)
Rapid flash, together with the Network indicator, for hardware error.
Green
Normal operation.
Amber
Flashes green/amber during firmware upgrade.
Network
(power)
Blue
Steady blue when wireless module has power.
Network
(traffic)
Amber
Flashes for traffic on wireless network.
Unlit
No network traffic.
Green
Shows steady green for normal operation. Can be configured to flash green at intervals
whenever the camera is accessed. See the online help for more information.
Unlit
When configured for “no flash” on camera access.
Amber
Shows steady amber during reset to factory default or when restoring settings.
Red
Please contact Axis support at www.axis.com/techsup
Green
Normal operation.
Amber
Flashes green/amber during firmware upgrade.
Status
Power
AXIS 206W
Status
Power
Note that the Network indicators (power and traffic) for the AXIS 206W are located on the
front of the wireless module.
9
10 AXIS 206 - Mounting
Mounting
1. If required, use the 3 supplied screws to fix the base plate
Wall mounting
to a flat surface.
2. To use the shorter stand, e.g. for wall mounting, unscrew
the lock ring to release the camera, and remove the
extension section.
3. Re-attach the camera, adjust the angle and gently tighten
the lock ring.
Important!
Lock ring
The AXIS 206 (all models) is designed for indoor use only, and must always be positioned where it is
not exposed to direct sunlight or strong halogen light, which can cause permanent damage to the camera’s image sensor. Damage as a result of exposure to strong light is not covered by the Axis warranty.
Install the AXIS 206/206M
Follow the steps below to install the AXIS 206/206M on your local network (LAN). To
install the AXIS 206W, please see page 15.
1. Using the self-adhesive strip, attach the supplied cable clip to the rear panel.
2. Position and mount the camera as required - see above.
3. Connect the power adapter to the camera.
4. Fasten the power cable in the cable clip. This helps prevent accidental cable
disconnection.
5. Connect the AXIS 206/206M to the network using a standard RJ-45 network cable.
6. Select a method for setting the IP address - see the following page.
AXIS 206 - Install the AXIS 206/206M
Set the IP address
The AXIS 206/206M is designed for installation on an Ethernet network. This involves
assigning it an IP address, automatically (via e.g. DHCP) or manually. Several methods are
available. The one to use depends on how your network is configured. If unsure of the
method to use, please consult your network administrator, or see the network’s
documentation.
• If you are using e.g. a home broadband router, you may find it convenient to view the
router’s administration pages to discover which IP address has been assigned to your AXIS
206/206M. Please consult the router’s documentation for further information.
• If your network has an Internet connection (with no HTTP proxy) and uses a DHCP server
to assign IP addresses, use the One-Click installation procedure. See page 11.
• If your network uses automatic IP addressing (DHCP) and your computer uses the UPnPTM
service, the AXIS 206/206M will automatically be detected and displayed on your screen.
See page 12 for more information.
• Use AXIS IP Utility (see page 12) to discover the IP address. This can also be used to set
the IP addess manually.
• Set the IP address manually with the ARP/Ping method, as described on page 14.
• The default static IP address for the AXIS 206 is 192.168.0.90
One-click Installation
Requirements:
Computer
on a LAN
AXIS 206/206M (AXIS 206W via
wireless connection)
Broadband router/modem providing automatic IP addressing
Internet
The AXIS Internet Dynamic DNS Service
•
The One-click installation procedure uses the AXIS Internet Dynamic DNS Service. This free service allows you to quickly
and simply install your camera, which then receives a static name (DNS name). More information about the AXIS
Internet Dynamic DNS Service is available at www.axiscam.net
•
Please note that this procedure will send the AXIS 206’s IP address, firmware version, product type and serial number to
the Axis Internet Dynamic DNS Service. No personal information is transferred.
•
To remove the DNS name and unregister from the Axis Internet Dynamic DNS Service, open the Setup pages in the AXIS
206, click System Options > Network > TCP/IP, click the Settings button for the AXIS Internet Dynamic DNS Service
and finally, click the Remove button.
11
12 AXIS 206 - Install the AXIS 206/206M
Follow these instructions:
1. When the camera is connected to the power supply and the network, wait for the
Status Indicator on the front of the camera to show a steady green.
2. Now press the Control button on the rear of the camera once. The Status indicator will
blink green while it connects to the AXIS Internet Dynamic DNS Service.
3. Wait for the Status indicator to go back to showing a steady green.
4. To complete the installation, now visit www.axiscam.net from an Internet connected
PC. This must be done within 60 minutes of pressing the Control button.
5. Follow the on-screen instructions provided by the AXIS Internet Dynamic DNS
Service. You will need your product’s serial number (see the label on the rear panel) to
complete the installation.
6. Please see page 17 for instructions on how to set the password.
UPnPTM
UPnPTM functionality is enabled by default in the AXIS 206. If also enabled on your
computer (Windows ME or XP), the camera will automatically be detected and a new icon
will be added to “My Network Places.” Click this icon to access the camera. See page 19 for
instructions on how to set the password.
Notes:
• To install the UPnPTM service on your computer, open the Control Panel from the Start Menu and
select Add/Remove Programs. Select Add/Remove Windows Components and open the Networking
Services section. Click Details and then select UPnP as the service to add.
• Once the AXIS 206 is accessible from your computer, it is then possible to use the One-click
installation method to provide the camera with a DNS name.
UPnPTM is a certification mark of the UPnPTM Implementers Corporation.
AXIS IP Utility
AXIS IP Utility 2.0 is a free
Requirements:
AXIS 206/206M (AXIS 206W via
Windows application that
wireless connection)
discovers and displays Axis
Computer
Hub/Switch
devices on your network. The
on a LAN
application can also be used to
manually set a static IP address.
AXIS IP Utility 2.0 is available
on the CD supplied with the
AXIS 206. Updated versions of AXIS IP Utility may be available at www.axis.com
AXIS 206 - Install the AXIS 206/206M
Automatic discovery
1. When connected to the power supply and the network, wait for the Status Indicator on
the front of the camera to show a steady green.
2. Insert the CD into your computer’s CD drive.
3. Start AXIS IP Utility. When the AXIS 206 appears in the window, double-click it to
open its home page.
Set the IP address manually
1. If the AXIS 206 does not appear in the window, click the Refresh button to try again.
If the camera still does not appear, you can set the IP address manually. Acquire an
unused IP address on the same subnet as your computer.
2. Click the button “Set IP address using serial number” and enter the serial number (see
page 10) and IP address for the AXIS 206. Follow the on-screen instructions.
Note:
After using AXIS IP Utility, the AXIS 206 can be assigned a DNS name by using the AXIS Dynamic DNS
Service. See page 11.
13
14 AXIS 206 - Install the AXIS 206/206M
Manual Installation with ARP/Ping
1. Acquire an unused IP address for the AXIS 206/206M. This IP address must be on the
same subnet as your computer.
2. Locate the serial number (S/N) on the label on the camera’s rear panel.
3. From a computer on your network, open a Command Prompt (in Windows: from the
Start menu, select Run... and type cmd in the field. Click OK).
4. As appropriate for your operating system, enter the following commands:
Windows syntax:
Windows example:
arp -s <IP Address> <Serial Number>
ping -l 408 -t <IP Address>
arp -s 192.168.0.125 00-40-8c-18-10-00
ping -l 408 -t 192.168.0.125
UNIX/Linux/Mac syntax:
UNIX/Linux/Mac example:
arp -s <IP Address> <Serial Number> temp
ping -s 408 <IP Address>
arp -s 192.168.0.125 00:40:8c:18:10:00
temp
ping -s 408 192.168.0.125
5. Check that the network cable is connected (or that the wireless connection is
functioning). Start/restart the camera by disconnecting and reconnecting the power
cable.
6. Close the Command prompt when you see ‘Reply from 192.168.0.125: ...’
7. The IP address has been set when the Power indicator is permanently lit and the
Network indicator flashes intermittently.
8. Start your browser, enter the IP address of the camera in the Location/Address field
and press Enter on your keyboard. See below for instructions on how to set the
password.
Note:
After installation, the AXIS 206 can be assigned a DNS name by using the AXIS Dynamic DNS Service.
See page 11.
AXIS 206 - Install the AXIS 206W
Install the AXIS 206W
Before the AXIS 206W can connect to an encrypted wireless network, the wireless settings
in the camera must be configured and an IP address must be set. This is done by
connecting the camera to a computer with the help of the supplied USB cable. Follow the
instructions below.
Set up the wireless connection - Windows
1. Connect the power adapter to the camera. Press the power cable into the cable clip on
the rear panel. This will help prevent accidental cable disconnection.
2. Connect the USB cable to your computer and then to the camera.
3. Open My
Computer or
Windows
Explorer, and the
AXIS 206W
should be
displayed as a
new drive.
4. Click on the drive
for the AXIS
206W to see the
files contained in the camera.
The AXIS 206W displays
as a drive
5. Click on the file setup.exe. This starts
the AXIS Setup Tool, which lets you
configure the wireless settings. See the
online help in the setup tool for more
information. Note that you should first
configure your wireless access point
and then duplicate those settings in
the AXIS 206W.
6. Specify the type of IP address to use.
See the online help for more
information.
7. Click OK, close the AXIS Setup Tool
and disconnect the USB cable.
8. Wait at least 10 seconds for the
settings to take effect and then restart
the camera by disconnecting and
reconnecting the power cable.
15
16 AXIS 206 - Install the AXIS 206W
Discover the IP address for the AXIS 206W
If you set the IP address manually, you can now access the camera’s web interface simply
by starting a browser and entering the IP address.
If you selected Obtain IP address via DHCP, you have several options:
• Reconnect the USB cable, browse to the camera as before, and restart the AXIS Setup
Tool. The DHCP-assigned address will be displayed in the tool.
• If you are using e.g. a home broadband router, you may find it convenient to view the
router’s administration pages to discover which IP address has been assigned to your AXIS
206W. Please consult the router’s documentation for further information.
• If your network has an Internet connection (with no HTTP proxy), use the AXIS Dynamic
DNS Service to assign your camera a DNS name, which is then used to access the camera.
See page 11 for more information.
• If your network uses automatic IP addressing (DHCP) and your computer uses the UPnPTM
service, the AXIS 206W will automatically be detected and displayed on your screen.
• Use AXIS IP Utility 2.0 to discover the IP address. See the CD included with the product.
Set up the AXIS 206W on other operating systems
To set up the AXIS 206W on other operating systems (Linux/Unix/Mac), follow these steps:
1. Connect the camera to the computer via the USB cable. This allows you to access the
camera as a USB Mass Storage device.
2. Browse to and open the file config.txt and enter the encryption keys, the SSID network
name, the IP address, etc. The wireless settings entered here should be identical to
those previously configured in your wireless access point.
3. Save the file, wait at least 10 seconds for the settings to take effect and then restart the
camera to enable the wireless connection.
UPnPTM is a certification mark of the UPnPTM Implementers Corporation.
AXIS 206 - Access the Camera
Access the Camera
Access From a Browser
The AXIS 206 can be used with most standard operating systems and browsers. The
recommended browser is Internet Explorer with Windows, and Mozilla with other
operating systems. See also the Technical Specifications, on page 34.
1. Start a browser (e.g. Internet
Explorer, Mozilla)
2. Enter the IP address or host name
of the AXIS 206 in the
Location/Address field of your
browser.
Select the language and password
1. When accessing the AXIS 206 for the first time you can optionally change the
language. Select the language from the available options, by clicking the appropriate
flag.
2. The next step is to set the password for the
user “root.” Enter a password and then
re-enter it to confirm the spelling. Click OK.
3. The ‘Enter Network Password’ dialog will
appear. Enter the user name: root
4. Enter the password as set in step 2 above, and click OK. If the password is lost, the
AXIS 206 must be reset to the factory default settings. See below.
5. If required, click Yes to install the AXIS Media Control (AMC). You will need
administrator rights on the computer to do this.
Note: The default administrator user name root is permanent and cannot be deleted.
17
18 AXIS 206 - Access the Camera
The Live View page of the AXIS 206 is now displayed, with links to the Setup tools that
allow you to customize the camera to your specific needs.
Live View - Shows live video from the
camera.
Setup - Provides all the tools needed to
set up the camera to your requirements.
Help - Displays online help on all aspects of using the camera.
Notes:
•To view streaming video in Microsoft Internet Explorer, you must set your browser to allow
ActiveX controls and allow the AXIS Media control (AMC) to be installed on your workstation. If
your workstation restricts the use of additional software components, the AXIS 206 can be configured to use a Java applet for updating images. Please see the online help for more information.
•The layout of the web pages in the AXIS 206 may have been customized to meet specific
requirements. Consequently, some of the examples and functions featured here may differ from
those displayed on your own Live View page.
Access the AXIS 206 from the Internet
Once installed, your AXIS 206 is accessible on your local network (LAN). To access the
camera from the Internet you must configure your broadband router to allow incoming
data traffic. For security reasons this is usually done on a specific port. Please refer to the
documentation for your broadband router for further instructions.
For more information, please visit the AXIS Internet Dynamic DNS Service at
www.axiscam.net or, for Technical notes on this and other topics, visit the Axis Support
Web at www.axis.com/techsup
AXIS 206 - Focusing
Focusing
To focus the AXIS 206, refer to the information below.
A small dot is located over the
top of the lens assembly.
The focus ring features a
raised line.
To focus:
Open a browser and
examine the image. If
required, adjust the focus
ring until the focus is
satisfactory.
Focus Ring
Status Indicator
Notes:
•Upon delivery, the raised line is aligned with the dot above the lens, and the focus is set to
infinity. After a focus adjustment, the raised line might not be aligned with the dot. This is not
important.
•Although the illustration shows the AXIS 206W, the focusing procedure is identical for all
models.
19
20 AXIS 206 - The Live View Page
The Live View Page
Depending on whether or not the Live View page has been customized, the buttons
described below may or may not be visible.
To resize the image, click the View Size buttons: half-size (x1/2),
full-size (x1), x2 or x4. Note that this does not change the image’s
resolution, but simply how it is displayed.
The Snapshot button saves a snapshot of the image currently being displayed.
Right-click on the image to save it in JPEG format on your computer. This
button is primarily intended for use when the AMC viewer toolbar is not
available.
The AMC (AXIS Media Control) viewer toolbar is available in Microsoft Internet
Explorer only. It displays the following buttons:
The Play/Stop buttons start and stop the live video stream.
The Snapshot button saves a snapshot of the image currently being displayed. The
Snapshot function and the target directory for saving snapshots can be configured
from the AMC Control Applet in the Windows Control Panel (Internet Explorer
only.)
Click the View Full Screen button to make the video image fill the entire screen
area. No other windows will be visible. Press Esc (Escape) on the computer
keyboard to cancel.
AXIS 206 - Configuration
Configuration
This section describes how to configure the AXIS 206, by accessing the setup tools from a
standard browser (see Supported Web Browsers, on page 34).
Access the Setup tools
Follow the instructions below to access the Setup tools from a browser.
1. Start your browser and enter
the IP address or host name
of the AXIS 206 in the
location/address field.
2. The Live View page is now displayed. Click Setup to display the Setup tools.
Setup tools
Note: The link to the Setup tools may have been hidden by the administrator. In this case, the only way to access
the tools is to enter the address to the tools in your browser. The address is:
http://<ip address>/operator/basic.shtml
21
22 AXIS 206 - Configuration
Overview of the Setup tools
Basic Configuration
The links under Basic Configuration are shortcuts providing a convenient way of making
the basic settings the first time the unit is configured.
Tools
Description
Instructions
General Instructions
Users
See System Options > Security > Users below
TCP/IP
See System Options > Network > TCP/IP below.
Date & Time
See System Options > Date & Time below
Video & Image
See Video & Image below
Wireless (AXIS 206W only)
See System Options > Network > Wireless below.
Video & Image
Tools
Settings
Description
Video & Image
Image Appearance
Basic settings - resolution, compression, image rotation, color, brightness and sharpness.
Overlay Settings
Add a text overlay to the video image.
Video Stream
Used to limit the video stream display time and frame rate.
Lighting Conditions
White balance and exposure control settings.
Advanced
Live View Config
Tools
Description
Layout
Customize the Live View page. Set your preferred method of viewing moving images.
HTML Examples
Add live video from the AXIS 206 to your own web site, or to an HTML page on your local hard disk.
System Options
Tools
Settings / Options / Description
Users
Access to the camera can be restricted to defined users only (maximum 20). An administrator has unrestricted access to the Setup tools and can determine rights for all other users;
Administrators or Viewers.
Date & Time
Network
Define the date and time settings for your camera, manually or automatically.
TCP/IP
Specify IP address configuration, DNS configuration, Host Name configuration, Notification
of changes to the IP address. Register/unregister for the AXIS Internet Dynamic DNS Service
Specify the HTTP port. Set network traffic preferences (AXIS 206/AXIS 206M only).
Wireless
(AXIS 206W only)
Provides access to the wireless connection settings. These settings are the same as those in
the AXIS Setup Tool (see page 15).
SMTP
Specify the host names or addresses for your primary and secondary mail servers in the
fields provided to allow the camera to send email notification of IP address changes.
UPnP
The AXIS 206 includes support for UPnP. Enter a user-friendly name for the camera. UPnP is
enabled by default.
LED settings
The Status LED can be made to flash whenever the camera is accessed.
Maintenance
Functions for restarting the camera, restoring settings, upgrading the camera, backing up
and restoring configurations.
Support
Support Overview
Links to the Troubleshooting guide, the Server report and Axis Support Service.
Logs & Reports
Generate Logs (all log information is shown in one file), reports (information about the
camera’s status) and a parameter list.
About
Link to the source code for the Linux kernel, Boa and more.
AXIS 206 - Configuration
Language
Tools
Settings
Description
Language
Select language
To convert the camera’s web interface to another language, select from the available
options.
Using the Setup tools
The following descriptions offer examples of the features available in the AXIS 206. For
complete details of each feature, please refer to the online help available from the Setup
tools. Click
to access the help function.
Image Settings
Use the Image Appearance settings to change the image as required.
The configuration of the image and overlays will affect the camera’s overall performance,
depending on how it is used and on the available bandwidth. Lower compression improves
image quality, but generates larger files. See Technical Specifications, on page 34.
Advanced Image Settings
These settings can be used to fine-tune the image, by adjusting the white balance and
exposure type. For further information, please see the online help.
23
24 AXIS 206 - Configuration
Overlay Settings
You can include the date and
time and text as an overlay in
the video image. These overlay
items are all included on one
line at the top or bottom of the
video image.
Text, date and
time overlay
Video Stream
Define the maximum video
stream time per session in
seconds, minutes or hours.
When the set time has expired, a
new stream can be started by
refreshing the page in the Web
browser. For unlimited video
stream time, set this value to 0.
The frame rate allowed to each viewer can also be limited, to avoid bandwidth problems
on the network. To allow the highest available frame rate, set to 0. For a preview of the
image and overlay settings before saving, click Test. When satisfied with the settings, click
Save.
AXIS 206 - Configuration
Live View Config - Layout
The existing Live View page in the AXIS 206 can be customized to suit your requirements,
or you can upload and use your own custom web page.
This is done by the administrator from Setup > Live View Config > Layout. Click the radio
button Use custom settings and click Configure. The following dialog opens:
The setup address is http://<ip address>/operator/basic.shtml
25
26 AXIS 206 - Configuration
Upload Own Web Files
Your own web files, background pictures, etc., must first be uploaded to the AXIS 206 in
order to be available for selection in the Custom Settings setup dialog. Once uploaded, the
files are shown in the drop-down list.
1. Click the Browse button and browse to the file to upload, e.g. a file located on
your workstation.
2. Select the user level for the uploaded file. Setting the user access level means that
you have complete control over which pages can be viewed by which users.
3. When the path is shown correctly in the text field, click the Upload button.
All uploaded files are shown in the list in the lower section of the popup window. To
remove a file, check the box provided next to it and then click the Remove button. Close
the Upload dialog when finished.
Select your own files
Now that your own files have been uploaded, check the Own radio button and select the
file from the drop-down list.
To use a file located somewhere other than in the AXIS 206, click the External radio
button and enter the URL.
Own Home Page
To use a previously uploaded web page as the default page, check the box, select the page
from the drop-down list and click OK.
Action Buttons
Enabling the display of the Snapshot button allows users to save a JPEG snapshot from the
video stream by clicking the button. This button is mainly intended for use with browsers
other than Internet Explorer (IE), or when otherwise not using the AXIS Media Control
(ActiveX) to view the video stream. The AXIS Media Control for IE provides its own
snapshot button.
Default Viewer for Motion JPEG in Internet Explorer for Windows
Select the appropriate radio button for the viewer to use in IE for Windows.
Please see the online help
for more information.
Live View Config - HTML Examples
Live video from the AXIS 206 can be added to your own web site. This page provides help
on how to do this.
Select the image type, size and other settings to suit your web page and click Update. The
AXIS 206 then generates the required source code for your configuration. Copy this code
and paste it into your own web page code.
AXIS 206 - System Options
System Options
Users
User access control is enabled by default. An administrator can set up other users, by
giving these user names and passwords. It is also possible to allow anonymous viewer
login, which means that anybody may access the Live View page, as described below:
Users - the user list displays the authorized users and user groups (levels):
Viewer
Provides the lowest level of access, which only allows access to the Live View page.
Administrator
An administrator has unrestricted access to the Setup Tools and can determine the registration of
all other users.
Click the Add... button to add a new user. Please see the online help for more information.
User Settings - check the relevant checkboxes to enable:
• Enable anonymous viewer login - allows any viewer direct access to the Live View
page.
• Maximum number of simultaneous Motion JPEG viewers - enter a value here to
restrict the number of viewers accessing the unit. This is useful if you need to save on
bandwidth.
Date & Time
Current Server Time - displays the current date and time (24h clock). The time can be
displayed in the 12h or 24h clock format in images (see below).
New Server Time - Select your time zone from the drop-down list and check the daylight
saving time changes, if desired.
For the Time Mode, select your preferred method for setting the time:
• Synchronize with computer time - sets the time from the clock on your
computer.
• Synchronize with NTP Server - the camera will obtain the time from an NTP
server every 60 minutes. Specify the NTP server's IP address or host name.
• Set manually - this option allows you to manually set the time and date.
Notes:
•As the AXIS 206 contains no internal battery, the time and date will be reset every time the unit
is restarted.
•If using a host name for the NTP server, a DNS server must be configured under TCP/IP settings.
See Network > TCP/IP below.
Date & Time Format Used in Images - specify the formats for the date and time (12h or
24h) displayed in the Live View video stream.
27
28 AXIS 206 - System Options
Network - TCP/IP Settings
Important!
Most of the settings available here are advanced settings that do not normally require configuration or
adjustment. The only required setting for the AXIS 206 is the IP address, which can be set automatically
or manually.
IP Address Configuration
The camera’s IP address can be set automatically via DHCP, or a fixed IP address can be set
manually. A host name can be used and there are options for setting up notification of
changes in the IP address. DHCP is enabled by default.
Note: DHCP is a protocol for automatic IP address assignment on a network. IP address assignment via DHCP may
lead to the situation where the IP address changes and you lose contact with the unit. To prevent this, configure the options for notification of IP address change (under Services) to receive notification whenever
the IP address for the camera changes.
Alternatively, if your DHCP server can update a DNS server, you can access the AXIS 206 by a host name,
which is always the same, regardless of the IP address.
Auto-Configure Link-Local Address is enabled by default and assigns the AXIS 206 an
additional IP address for use with UPnP (see page 31). The camera can have both a
Link-Local IP and a static/DHCP-assigned IP address at the same time - these will not
affect each other.
DNS Configuration
The Domain Name Server (DNS) provides the translation of host names to IP addresses on
your network.
Obtain DNS server address via DHCP - automatically use the DNS server settings provided
by the DHCP server. Click the View button to see the current settings.
Use the following DNS server address - specify the DNS server with the following:
Domain name - enter the domain(s) to search for the host name used by the AXIS 206.
Multiple domains can be separated by semicolons (;). The host name is always the first part
of a Fully Qualified Domain Name, e.g. myserver is the host name in the Fully Qualified
Domain Name myserver.mycompany.com where mycompany.com is the Domain name.
DNS servers - enter the IP addresses of the primary and secondary DNS servers.
Host Name Configuration
The AXIS 206 can be accessed using a host name instead of an IP address. The host name
is usually the same as the assigned DNS Name. The host name can be entereed manually or
it can be retrieved via DHCP.
AXIS 206 - System Options
Enable dynamic DNS updates - The AXIS 206M/206W includes support for dynamically
updating local DNS servers whenever the product's IP address changes. Check this box to
enable the function.
Note: Note that these settings concern the use of local DNS servers and should not be confused with the settings
for the AXIS Internet Dynamic DNS service.
Register DNS name - The name entered here will be associated with the IP address for the
AXIS 206 in the DNS server. An example of a DNS name is Axisproduct.example.com
TTL (Time To Live) - This value determines how long (in seconds) the reply from the DNS
server should be remembered when checking that the domain name for the registered IP
address is still valid. This reduces the number of times the client has to query the DNS
server, which in turn reduces network usage.
Services
Options for notification of IP address change - if the IP Address for the camera is
changed automatically, e.g. by DHCP, you can choose to be notified of the change. Click
Settings... and enter the required information.
AXIS Internet Dynamic DNS Service - If the AXIS 206M/206W has been registered with
the Axis Internet Dynamic DNS service and the IP address for the product changes, the
service is updated to reflect the change. Check the box to enable/disable automatic
updates.
The domain name currently registered at the Axis Internet Dynamic DNS service for your
product can be removed at any time. To do this click Settings... and follow the
instructions. For more information, please refer to the online help.
HTTP
The default HTTP port number (port 80) can be changed to any port within the range
1024-65535. This is useful for e.g. simple security port mapping.
Network Traffic (AXIS 206/AXIS 206M only)
The default setting is Auto-negotiate which means that the correct speed is automatically
selected. If necessary, the connection speed can be set by selecting it from the drop-down
list.
29
30 AXIS 206 - System Options
Wireless Settings (AXIS 206W only)
These settings control how the AXIS 206W interacts with the wireless network. Apart from
identifying the wireless network, it is also possible to enable wireless encryption.
Important!
If the wireless settings need to be changed and the USB cable is not available, be sure to change the
settings in the AXIS 206W first and then duplicate the settings in your access point.. It will not otherwise be possible to access the camera after the settings have been changed.
If the USB cable is used to configure the settings, then the settings can be made in any order, as long
are they are identical in both cases.
SSID - This is the name of the wireless network that the AXIS 206W is configured for. The
field accepts up to 32 alphanumeric characters, but no blank spaces. The name must be
exactly the same as that used in the wireless access point, or the connection will not be
established.
Leaving this field blank means that the AXIS 206W will attempt to access the nearest open
network.
Note: SSID is sometimes written as ESSID.
WEP (Wired Equivalent Privacy)
Enabled - Check to enable WEP encryption over the wireless link.
Encryption length - This sets the strength of the wireless encryption. 128-bit encryption is
the more secure level.
Note: The encryption key length can sometimes be shown as 40/64 and 104/128.
Key Type - Keys are used to encrypt and decrypt the data passing between the wireless
access point and the AXIS 206W. The up to 4 encryption keys are actually hexadecimal
(0-9, A-F) strings, which are usually represented by words or phrases, as these are much
easier to remember. These strings, words or phrases must be entered in the access point and
in the AXIS 206W.
The key types available depend on the access point being used. The following options are
available:
• Manual - Allows you to manually enter the hex key. This is supported by most brands of
access point.
• ASCII - In this method the string must be exactly 5 characters for 64-bit WEP and 13
characters for 128-bit WEP.
AXIS 206 - System Options
• Passphrase - The passphrase can contain up to 31 characters (a-z, A-Z and 0-9) and is
supported by Windows and most brands of access point. In 64-bit WEP, the Passphrase
generates 4 different keys. For 128-bit WEP, only 1 key is generated, which is then
replicated for all 4 keys. Check that the generated keys are identical to those in your
access point - if not they must be entered manually.
Active Transmit Key - This selects which of the 4 keys the AXIS 206W uses when
transmitting. The key should be changed every now and then, to increase the security of
the wireless connection.
Click Save to save your changes.
SMTP (email)
Enter the host names or addresses for your primary and secondary mail servers in the fields
provided. This allows the camera to send IP address change notification messages via
email.
UPnPTM
The AXIS 206 includes support for UPnPTM, which is enabled by default. If also enabled on
your computer (Windows ME or XP), the camera will automatically be detected and a new
icon will be added to “My Network Places.”
Note: UPnPTM must also be enabled on your workstation. To do this, open the Control Panel from the Start Menu
and select Add/Remove Programs. Select Add/Remove Windows Components and open the Networking
Services section. Click Details and then select UPnPTM as the service to add.
LED Settings
The Status indicator LED on the front of the camera can be set to flash at a configurable
interval (or to not light up at all) whenever the unit is accessed. For a listing of all LED
behavior, see page 9, or see the online help.
UPnPTM is a certification mark of the UPnPTM Implementers Corporation.
31
32 AXIS 206 - System Options
Maintenance
• Restart - The unit is restarted without changing any of the settings. Use this method if
the unit is not behaving as expected.
• Restore - The unit is restarted and most current settings are reset to the factory default
values. The only settings saved are:
• the boot protocol (DHCP or static)
• the static IP address
• the default router
• the subnet mask
• the language currently in use
• Default - The Default button should be used with caution. Pressing this will return all of
the camera's settings, including the IP address, to the factory default values. The camera
must then be re-installed. The default button also resets the language in the camera to
English and erases any manually uploaded language file.
Upgrade Server - See Upgrading the Firmware, on page 36.
Backup - To take a backup of all parameters and any user-defined scripts, click this
button. If it should later be necessary, it will then be possible to return the unit to the
previous settings if the settings are changed and there is unexpected behavior.
Restore - click the Browse button to locate the saved backup file (see above) and then click
the Restore button. The settings will be restored to the configuration saved in the file.
Note: Backup and Restore can only be used on the same unit running the same firmware. This feature is not
intended for the configuration of multiple units or for firmware upgrades.
Support
The support overview page provides valuable information on troubleshooting and contact
information, should you require technical assistance.
Logs & Reports - when contacting Axis support, please be sure to provide a valid Server
Report with your query.
View Information - The Log file, the Server Report and the Parameter List all provide
valuable information for troubleshooting and when contacting Axis support.
Configuration
Log Level for Log Files - from the drop-down list, select the level of information to be
added to the Log file
AXIS 206 - System Options
Resetting to the Factory Default Settings
To reset the AXIS 206 to the original factory default settings, go to the System Options >
Maintenance web page, or use the Control button on the rear of the camera (see the
illustration on page 7) as described below:
Using the Control Button
To reset the AXIS 206 to the factory default settings using the Control Button:
1. Disconnect the power adapter.
2. Press and hold the Control button while reconnecting the power.
3. Keep the Control button pressed until the Status Indicator displays amber (this
may take up to 15 seconds).
4. Release the Control button.
5. When the Status Indicator changes to Green (which may take up to 1 minute), the
process is complete and the AXIS 206 has been reset. The unit will now have the
default IP address 192.168.0.90
33
34 AXIS 206 - Technical Specifications
Technical Specifications
Item
Specification
Supported Operating Systems
Windows (XP, 2000, NT4.0, ME, 98) Linux, Mac OSX.
Supported Web Browsers
For Windows - Internet Explorer 5.x or later, Mozilla 1.4* or later.
For Linux - Mozilla 1.4* or later.
For Mac OSX - Mozilla 1.4* or later, Netscape 7.1* or later.
* = limited functionality
Networking
(AXIS 206 & AXIS 206M)
Required protocols: Standard TCP/IP protocol suite.
Supported protocols: 10baseT Ethernet, 100baseTX Fast Ethernet, TCP/IP, HTTP,
FTP, DHCP, SMTP, NTP, ARP, BOOTP, DNS, UPnP.
Connection via RJ-45 twisted pair cable.
Networking (AXIS 206W)
Required protocols: Standard TCP/IP protocol suite.
Supported protocols: TCP/IP, HTTP, FTP, DHCP, SMTP, NTP, ARP, BOOTP, DNS,
UPnP.
Built-in 802.11b Wireless module. Wi-Fi compliant. Range 150m (450 feet) with
clear line of sight.
Management
Remote configuration and status via web-based tools.
Compression
Motion-JPEG. Snapshot JPEG images available. User-controlled compression level.
Video Features (AXIS 206 &
AXIS 206W)
Maximum frame rate: 30 fps.
300 Kpixel 1/4” progressive scan CMOS image sensor.
Illumination: 4-10 000 Lux.
Time stamp, text overlay, image rotation, color control.
Video Features
(AXIS 206M)
Maximum frame rate: 12 fps (all resolutions).
1.3 Mpixel 1/2” progressive scan CMOS image sensor.
Illumination: 10-10 000 Lux.
Time stamp, text overlay, image rotation, color control.
Video Resolutions
(AXIS 206 & AXIS 206W)
640x480, 640x360, 320x240, 160x120
Video Resolutions
(AXIS 206M)
1280x1024, 1280x960, 1280x720, 640x480, 640x360, 320x240
Lens (AXIS 206/AXIS 206W)
Fixed focal length; 4mm. Fixed iris; F2.0.
Lens (AXIS 206M)
Fixed focal length; 10mm. Fixed iris; F2.8.
Security
Multi-user password protection.
Operating Conditions
Temperature: +5oC to +40oC (41oF to 104oF)
Humidity: 20-80% RHG.
For indoor use only.
Approvals - EMC
EN 55024:1998+A1+A2
EN 55022:1998+A1 (CISPR 22:1997+A1) Class B
EN 61000-3-2:2000
EN 61000-3-3:1995+A1
VCCI:2003, Class B, ITE (CISPR 22:1997+A1:2000, Class B)
C-Tick AS/NZS 3548
FCC part 15, Subpart B, Class B demonstrated by compliance with EN 55022:1998
(CISPR 22:1997) Class B
AXIS 206 - Technical Specifications
Item
Specification
Approvals - Safety
EN 60950, UL, CSA
Hardware & System
Motion JPEG compression chip
32-bit RISC CPU
16 MByte RAM
4 MByte FLASH
Linux 2.4 kernel
Power
PS-H or PS-L power supply, 5.0-5.5 VDC, min 500mA. Included.
Metrics
(AXIS 206 & AXIS 206M)
Height: 88 mm (3.46”) Width: 55 mm (2.17”) Depth: 34 mm (1.34”)
Weight: 177g (0.39 lb) including stand
Metrics
(AXIS 206W)
Height: 100mm (3.94”) Width: 55 mm (2.17”) Depth: 35 mm (1.38”)
Weight: 177g (0.39 lb) including stand
Complimentary software
AXIS IP Utility 2.0 - for installation in Windows. (Included on product CD.)
AXIS Camera Explorer - Viewing, management and recording software. (Included
on product CD.)
AXIS Media Control (AMC) - ActiveX component software required for Microsoft
Internet Explorer - installed automatically on first use.
Specifications are valid for all models, except where otherwise indicated.
35
36 AXIS 206 - Troubleshooting
Troubleshooting
Checking the Firmware
One of your first actions when troubleshooting a problem should be to check the currently
installed firmware version. The latest version may contain a correction that fixes your
particular problem. The current firmware version in your AXIS 206 can be seen on the
page Setup > Basic Configuration.
Upgrading the Firmware
Firmware is software that determines the functionality of the AXIS 206. When you
upgrade the firmware with a file from the Axis Web site, the camera will receive the latest
available functionality. Always read the upgrade instructions and release notes available
with each new release, before updating the firmware.
1. Save the new firmware file to your computer. The latest version of the firmware is
available free of charge from the Axis Web site at www.axis.com/techsup
2. Go to Setup > System Options > Maintenance in the camera’s Web pages.
3. In the Upgrade Server section, browse to the desired firmware file on your
computer. Click Upgrade.
Notes:
•Preconfigured and customized settings will be saved when the firmware is upgraded (providing
the relevant features are available in the new firmware) although this is not guaranteed by Axis
Communications. Always read the instructions and release notes available with each new
release, before upgrading the firmware.
•After starting the upgrade process, always wait at least 5-10 minutes before restarting the AXIS
206, even if you suspect the upgrade has failed.
•Your dealer reserves the right to charge for any repair attributable to faulty upgrading by the
user.
AXIS 206 - Troubleshooting
Emergency Recovery Procedure
If power or the network connection to the AXIS 206 is lost during the upgrade, the process
will fail and the unit will become unresponsive. A flashing red Status LED indicates a failed
upgrade. To recover the AXIS 206 or the AXIS 206M, follow the steps below. If the
upgrade for the AXIS 206W fails, please contact Axis support at www.axis.com/techsup.
Recover the AXIS 206/AXIS 206M
1. Unix/Linux - From the command line, type the following:
arp -s <IP address of AXIS 206> <Serial number> temp
ping -s 408 <IP address of AXIS 206>
Windows - From a command/DOS prompt, type the following:
arp -s <IP address of AXIS 206> <Serial number>
ping -l 408 -t <IP address of AXIS 206>
Note: The serial number is on the label on the product casing.
2. If the unit does not reply within a few seconds, restart it and wait for a reply.
Press CTRL+C to stop Ping.
3. Open a browser and type in the AXIS 206’s IP address. In the page that appears,
use the Browse button to select the upgrade file to use, e.g. axis206.bin or
axis206m.bin. Then click the Load button to restart the upgrade process.
4. After the upgrade has completed (1-10 minutes), the unit will automatically
restart and show a steady green on the Power and Status LED:s and flashing
green or amber on the Network LED.
5. Repeat the ARP and Ping commands as described above.
6. Open a new browser and enter the unit's IP address.
7. Reconfigure your settings.
If the emergency recovery procedure does not get the AXIS 206/AXIS 206M up and
running again, please contact Axis support at www.axis.com/techsup/
Axis Support
If you need to contact Axis support, please help us to help you, by providing the server
report, the log file and a brief description of the problem.
Server Report - go to Setup > System Options > Support Overview. The server report
contains important information about the server and its software, as well as a list of the
current parameters.
The Log file is available from Setup > System Options > Logs & Reports. The Log file
records events in the unit since the last system restart and can be a useful diagnostic tool
when troubleshooting.
37
38 AXIS 206 - Troubleshooting
Symptoms, Possible Causes and Remedial Actions
Problems setting the IP address
Using ARP/Ping - the IP address must
be set within two minutes after power
has been applied to the camera.
Try the installation again. Ensure the Ping length is set to 408. Please see Manual
Installation with ARP/Ping, on page 14.
The camera is located on a different
subnet.
If the IP address intended for the AXIS 206 and the IP address of your computer are
located on different subnets, you will not be able to set the IP address.
The IP address is being used by another Disconnect the AXIS 206 from the network. Run the Ping command. (In a Command/DOS
device
window, type ping and the IP address of the unit.)
If you receive: Reply from <IP address>: bytes = 32; time = 10 ms..... - this means
that the IP address may already be in use by another device on your network. You must
obtain a new IP address and reinstall the unit.
If you see: Request timed out - this means that the IP address is available for use with
your camera. In this case, check all cabling and reinstall the unit.
Possible IP address conflict with
another device on the same subnet.
The static IP address in the AXIS 206 is used before the DHCP server sets a dynamic IP
address. This means that if the same default static IP address is also used by another
device, there may be problems accessing the camera. To avoid this, set the static IP
address to 0.0.0.0.
The AXIS 206/AXIS 206M cannot be accessed from a Web browser
The IP address has been changed by
DHCP.
1) Move the AXIS 206 to an isolated network or to one with no DHCP or BOOTP server.
Set the IP address again, using the AXIS IP Utility (see page 12) or the ARP/Ping commands.
2) Access the unit and disable BOOTP and DHCP in the TCP/IP settings. Return the unit to
the main network. The unit now has a fixed IP address that will not change.
3) As an alternative to 2), if dynamic IP address via DHCP or BOOTP is required, select
the required service and then configure IP address change notification from the network
settings. Return the unit to the main network. The unit will now have a dynamic IP
address, but will notify you if the address changes.
Other networking problems.
Test the network cable by connecting it to another network device, then Ping that device
from your workstation. See the instructions above.
The AXIS 206W cannot be accessed from a Web browser
The wireless settings in the AXIS 206W Check that the SSID and WEP settings are identical in the camera and in the access
point. Check the configuration with the USB cable. See page 15. Check the configuration
do not match those in the wireless
in the wireless access point.
access point.
Support for 802.11b disabled or missing.
Check that the wireless access point supports the 802.11b standard and that this is
enabled.
Wireless access point requires MAC
address registration.
Some brands of wireless access point require the wireless device’s MAC address to be
registered before allowing the connection to the wireless network. Check the access
point’s settings and/or documentation.
The IP address for the AXIS 206W is no longer valid
The DHCP assigned IP address has
changed.
Unplug and plug the USB cable back in, to update the IP address in the AXIS Setup Tool.
For more information on how to discover the IP address, see also page 16.
The AXIS 206 is accessible locally, but not externally
Firewall protection.
Check the Internet firewall with your system administrator.
Default routers required.
Check if there are default router settings that must be configured.
AXIS 206 - Troubleshooting
The Power indicator is not constantly lit
Faulty power supply.
Check that you are using the correct power supply. See the technical specifications.
The Status and Network indicator LED:s are flashing red
Hardware failure.
Contact your Axis dealer.
The Status indicator LED is flashing red and the camera is inaccessible
A firmware upgrade has been interrupted or the firmware has otherwise
been damaged.
See the Emergency Recovery Procedure above.
No images displayed on web page
Problem with AMC.
(Internet Explorer only)
To enable the updating of images in Microsoft Internet Explorer, set your browser to
allow ActiveX controls. Also, make sure that AXIS Media Control (AMC) component is
installed on your workstation.
Installation of additional ActiveX com- Configure the AXIS 206 to use a Java applet for updating the images under
ponent restricted or prohibited
Live View Config > Layout > Default Viewer for Internet Explorer. See the online help for
more information.
Video/Image Problems
Image too dark or too light.
Check the image settings. See the online help on Video and Image Settings.
Slow image update.
Configuring, e.g. high-resolution images, high frame rates, etc, will reduce the performance of the camera.
Slow performance.
Slow performance may be caused by e.g. heavy network traffic, too many users accessing the unit, low performance clients, Image rotation.
Image gradually gets darker or lighter.
When using the AXIS 206 in locations lit by fluorescent lighting, check in the advanced
image settings that the Exposure control is set to Flicker-free.
Poor quality snapshot images
Screen incorrectly configured on your
workstation
In Display Properties, configure your screen to show at least 65000 colors, i.e. at least
16-bit. Using only 16 or 256 colors will produce dithering artifacts in the image.
Browser freezes
Netscape 7.x or Mozilla 1.4 (or later)
can sometimes freeze on a slow computer.
Lower the image resolution.
Problems uploading own files
Limited space.
There is only limited space available for the upload of your own files. To free up space,
try deleting one or more existing files.
For additional assistance, please contact your reseller or see the support pages on the Axis
Website at www.axis.com/techsup
39
40 AXIS 206 - Glossary
Glossary of Terms
ActiveX - A control (or set of rules) used by a browser.
ActiveX controls are often downloaded and installed
automatically as required.
AMC - AXIS Media Control. The control required for
viewing images in Internet Explorer. Installs automatically
on first use. AMC is an ActiveX control.
API - Application Programming Interface. The Axis API can
be used for integrating Axis products into other
applications.
ARP - Address Resolution Protocol. A protocol for assigning
an IP address to a physical device address that is recognized
in the local network.
CGI - Common Gateway Interface. A set of rules (or a
program) that allows a Web Server to communicate with
other programs.
Client/Server - Describes the network relationship between
two computer programs in which one, the client, makes a
service request from another - the server.
DNS - The Domain Name System (DNS) locates and
translates Internet domain names into IP (Internet Protocol)
addresses.
Ethernet - A widely used networking standard.
ETRAX - Axis' own microprocessor.
HTML - Hypertext Mark-up Language. Used widely for
authoring documents viewed in web browsers.
HTTP - Hypertext Transfer Protocol. The set of rules for
exchanging files (text, images, sound, video, and other files)
on the World Wide Web.
Intranet - A private network limited to an organization or
corporation. Usually closed to external traffic.
IP - Internet-Protocol. See TCP/IP.
in networks. A LAN might run at 10 or 100 Mbit/s.
Ping - A small utility for verifying that IP addresses are
valid and are available. Used diagnostically to check that a
host/server/device is operational and reachable.
Protocol - A special set of rules governing how two entities
will communicate. Protocols are found at many levels of
communication, and there are hardware protocols and
software protocols.
Router - A device that determines the next network point to
which a packet should be forwarded on its way to its final
destination. A router is often included as part of a network
switch (see below.)
SMTP - A common e-mail protocol.
SSID - A Service Set Identifier (SSID) is a sequence of
characters that uniquely names a wireless local area
network (WLAN). This name allows stations to connect to
the network when multiple networks operate in the same
physical area.
Subnet Mask - An IP address consists of two components:
the network address and the host address. “Subnetting’
enables a network administrator to further divide the host
part of the address into two or more subnets. The subnet
mask identifies the subnet to which an IP address belongs.
Switch - Whilst a simple hub transmits all data to all
devices connected to it, a switch only transmits the data to
the device it is specifically intended for.
TCP/IP - Transmission Control Protocol/Internet Protocol. A
suite of network protocols that determine how data is
transmitted. TCP/IP is used on many networks, including
the Internet. TCP keeps track of the individual packets of
information and IP contains the rules for how the packets
are actually sent and received.
URL - Uniform Resource Locator. An "address" on the
network.
WAN - Wide-Area-Network. Similar to a LAN, but on a
larger geographical scale.
IP address - A unique number used by a network device, to
allow it to be identified and found on the network. The
32-bit IP address is made up of four groups (or quads) of
decimal digits separated by periods. An example of an IP
address is: 192.168.0.1
W-LAN - Wireless LAN. Computers/devices connect to the
network via wireless access points.
JPEG - A standard image format, used widely for
photographs. Also known as JPG.
WEP - Wired Equivalent Privacy. A security protocol,
specified in the IEEE Wireless Fidelity (Wi-Fi) standard,
802.11b, which is designed to provide a wireless local area
network (W-LAN) with a level of security and privacy
comparable to what is usually expected of a wired LAN.
LAN - A local area network (LAN) is a group of computers
and associated devices that typically share common
resources within a limited geographical area.
Linux - A popular operating system, which is “open source”
and practically free of charge.
Lux - A standard unit for the measurement of light, where 1
Lux equals the light emitted from a single candle at a
distance of one meter.
Mbit/s - Megabits per second. A unit for measuring speeds
Web server - A program on a computer (server) providing
the resources (e.g. web pages) requested by the user (client).
AXIS 206 - Index
Index
A
Accessing the camera 17
Active Transmit Key 31
AMC 18
AMC Viewer Toolbar 20
AMC viewer toolbar 20
AXIS Internet Dynamic DNS Service 12
AXIS Setup Tool 15
B
Backup 32
Basic Configuration 22
C
Configuration 21
Control Button 7, 8, 33
D
Date & Time 27
Default Viewer 26
Discover the IP address (206W) 16
DNS Configuration 28
DNS Server 28
Domain Name 28
E
Emergency Recovery 35
Encryption keys 30
F
Factory Default Settings 33
Focusing 19
Frame rate 24
H
Host Name 28
HTML Examples 26
HTTP 29
I
Install - AXIS 206/M 11
Install - AXIS 206W 15
IP address 11
L
Languages 17
LED Indicators 9
LED indicators 32
Live View Config 25
Live View page 20
Logs & Reports 33
M
Maintenance 32
Megapixel 6
Mounting 11
N
Network Connector 7
Network Settings 28
NTP Server 27
O
One-click installation 12
Overlay Settings 24
Overview 7
Own home page 26
Own web files 26
P
Passphrase 31
Power Connector 7
R
Recovery 35
Resolutions 6
Restart 32
Restore 32, 33
S
Security 27
Server Time 27
41
42 AXIS 206 - Index
Services 28
Setup Tools 22
SMTP 32
Snapshot button 20, 26
SSID 30
Support 33
System Options 27
System Options Overview 22
T
TCP/IP Settings 28
Time Mode 27
Troubleshooting 34
U
Upgrade Server 32
Uploading web files 26
UPnP 13, 32
USB cable 8
Users 22, 27
V
Video Stream 24
View Size 20
W
Wall mounting 11
WEP (Wired Equivalent Privacy) 30
Wireless 6
Wireless connection 15
Wireless settings 30