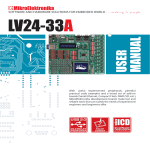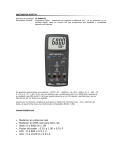
1
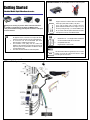
Installation Caution: This device must be installed in a horizontal position.
Getting Started
Embedded/Mobile Digital Video Recorder series
TIP
Power
Requirements
T
hank you for choosing our products. Please read these Instructions
carefully so you will know how to operate your MDVR properly.
After you have finished reading, please keep this document in a safe place
for future reference.
1.
2.
3.
4.
To reduce risk of fire and electronic shock, do not expose
this appliance to rain or moisture. Do not expose this device
with direct sunshine and keep away from high temperature.
Do not remove cover. No user-serviceable parts inside.
Refer servicing to qualified service personnel.
The information in this getting start was current when
published. The manufacturer reserves the right to revise and
improve its products. All specifications are therefore subject
to change without notice.
This device should be installed in a horizontal position.
TIP
HDD and
CF card
TIP
Support 12V/3A-5A or 24V/3A. There are 3 cables of the
Power Input (Yellow, Red and Black). The yellow
one is used for signals, used to connect to the car’s
ignition if MDVR is installed in the car. Engine is on or off
the car by turning the Key. If you test the MDVR in the
lab, you need to make the yellow cable and the red cable
of the power short circuit, so the MDVR will start.
1.
2.
Hitachi Brand 2.5ͳand Seagate mobile anti-vibration
and shock resistance HDD are recommended
Compactable Flash Card:
Kingston Brand is recommended
NOTE
GPS
-1-
The GPS antenna MUST be hypaethral (on the roof of the
vehicle), and should be horizontal and airward to make
sure the signal can be received.
-2-
MDVR Installation layout
-3-
Input Bridal DB37 (Video/Audio IN/ Sensor Input)
Output Bridal DB25 (Video/AudioOut/RS232/Inertia Sensor/Control Panel)
Label
RS232A
RS232B
RS232C
RS232D
Reserve for future use
4 Pins
2 Pins
Connector for control panel connecting
Connector for power to Inertia sensor
V1
Label
V1/ V2/ V3/ V4
V5 / V6 / V7/ V8
A 1/ A 2/ A 3/ A 4
A5 /A6 / A7 /A8
Description
Video input for camera number 1/2/3/4
Video input for camera number 5/6/7/8
Audio input for camera number 1/2/3/4
Audio input for camera number 5/6/7/8
Color coded wire
Sen 1-8 (Red)
A/D –IN2(Green)
Sensor-INV
V2
AL/ AR
Only for 8ch
VGA
Only for 8ch
Description
Sensor 1-8 (0~36 V) input
Enable the Analog to Digital input
Connect with Speed Sensor
Description
4CH
Operation Interface
8CH
Logo
4CH Live view output
8CH Operation Interface /Live view
Left/ Right Audio output
VGA output for controlling MDR. IR handheld is fully
functional when connected to VGA output
For Inertia Sensor connecting
Steering and device data output (hyperlink)
PTZ / ID card reader
-54
Recording
1.
2.
Service and Warranty
Format the HDD of the MDVR. (ǏSetupǐÎǏSystemǐÎǏHDD
Formatǐ). (Default user: 00000. Default password: 88888888)
Setup the schedule of recording. (ǏSetupǐÎǏScheduleǐÎDate,
Schedule)
Network Settings Connected through a Router
1.
2.
3.
4.
5.
6.
7.
Gather the following from the LAN/Router: Static IP address, Subnet mask,
Gateway.(Note: The internal IP derives from the LAN/router. IP address
MUST be unique or an unused IP address. From a computer connected to
the LAN/router type IP configuration from a command prompt. This will give
you the gateway & subnet from the LAN. Copy the gateway & subnet and
enter this information into the DVR
Enter the menu screen by pressing theǏSetupǐ.
Setup the network details. (ǏSetupǐÎǏSystemǐÎǏNetworkǐ)
Enter the IP Address specifically assigned for the MDR on your network.
This can be achieved using the Arrow buttons. (NOTE: IP Address is
assigned by router)
Enter the Mask Address assigned to your network. This can be achieved
using the Arrow buttons
Enter the Gateway Address assigned to your network. This can be
achieved using the Arrow buttons.
Exit the Menu by pressing the ǏExitǐand Reboot the MDR by powering
it down and back up.
Thank you for buying our product. As a valued customer, you now have
access to :
1.
2.
3.
Prompt technical support if you confront any difficulties using our products
Information, tips and software upgrades
Our warranty
To realize all the above benefits, please complete and provide some
information to your distributor by email as product registration process.
For your records
Model number: ……………………………………………
Serial Number: ………………………….........................
Where Purchased: …………………………………………….
Date Purchased: …………………….....................
Distributor information
CF Card backup recorder
1.
2.
3.
4.
Place a Compact Flash Card into the Compact Flash Reader/Writer located
next to the Hard Drive Bay on the MDR.
Playback (full screen) the video that you want to archive.
When finished the DVR will notify you with a successful message button.
Eject the Compact Flash Card from the Reader/Writer.
-6-
-7-