1
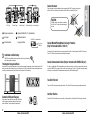
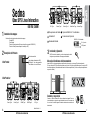
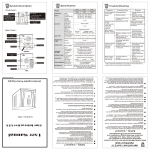
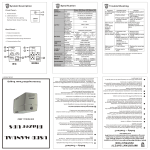
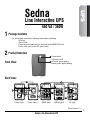
UPS
Sedna
Line Interactive UPS
650 VA / 360W
1 Package Contents
You should have received the following items inside of package:
*UPS Unit
*Quick Guide
*Communication cable (only for the model with USB/RS-232 port)
*Power cable (only for the IEC-type model)
2 Product Overview
Power switch
UPS status LED
AC mode: green lighting
Battery mode: green flashing
Front View:
Back View:
4
4
2
2
3
5
1
3
French Type I
2
3
1
1
5
French Type II
5
NEMA Type I
NEMA Type II
UK Type
Quick Guide V.1.1
Sedna Line Interactive UPS
1
4
4
2
3
3
5
1
5
IEC Type
Plug in the loads to output receptacles on the rear panel of the UPS. Simply turn on the power
switch of UPS unit, then devices connected to the UPS will be protected by UPS unit.
2
1
1
1
Schuko Type I
2
5
5
Schuko Type II
South Africa Type
CAUTION:
Universal Type
1
Output receptacles
4
Optional USB & RJ-11 combinations
2
AC input
5
Optional network
3
Circuit breaker
USB & RJ-11 combinations:
surge protection
RJ-11 port
USB port
3
NEVER connect a laser printer or scanner to
the UPS unit. This may cause the damage of
the unit.
UPS
2
2
Connect the Loads
Connect Modem/Phone/Network for Surge Protection
(Only for the model with RJ-11/RJ-45)
Connect a single modem/phone line into surge-protected “IN” outlet on the back panel of the UPS unit. Connect
from “OUT” outlet to the computer with another phone line cable.
Installation & Initial Startup
NOTE: Before installation, please inspect the unit. Be sure that nothing
inside the package is damaged.
Connect Communication Cable (Only for the model with USB/RS-232 port)
Placement & Storage Conditions
Install the UPS in a protected area that is free of excessive dust and has adequate air flow. Please place the UPS
away from other units at least 20 cm to avoid interference. Do NOT operate the UPS where the temperature and
humidity is outside the specific limits. (Please check the specs for the limitations.)
To allow for unattended UPS shutdown/start-up and status monitoring, connect the communication cable one
end to the USB/RS-232 port and the other to the communication port of your PC. With the monitoring software
installed, you can schedule UPS shutdown/start-up and monitor UPS status through PC.
Turn On/Off the Unit
Turn on the UPS unit by pressing the power switch. Turn off the UPS unit by pressing again the power switch.
Cold Start Function
Connect to Utility and Charging
Plug in the AC input cord to the wall outlet. For the best
results, suggest to charge the battery at least 4 hours
before initial use. The unit charges its battery while
2
When the UPS is off and there is no power utility, it’s still possible to cold start the UPS unit to power the loads.
4 hour s
3
Sedna Line Interactive UPS
Sedna Line Interactive UPS
Important Safety Warning (SAVE THESE INSTRUCTIONS)
Use the table below to solve minor problems.
CAUTION! To prevent the risk of fire or electric shock, install in a temperature and humidity controlled indoor area
free of conductive contaminants. (See the specifications for the acceptable temperature and humidity range.)
CAUTION! To reduce the risk of overheating the UPS, do not cover the UPS’ cooling vents and avoid exposing the
unit to direct sunlight or installing the unit near heat emitting appliances such as space heaters or furnaces.
CAUTION! Do not attach non-computer-related items, such as medical equipment,life-support equipment,
microwave ovens, or vacuum cleaners to UPS.
CAUTION! Do not plug the UPS input into its own output.
CAUTION! Do not allow liquids or any foreign object to enter the UPS. Do not place beverages or any other liquidcontaining vessels on or near the unit.
CAUTION! In the event of an emergency, press the OFF button and disconnect the power cord from the AC power
supply to properly disable the UPS.
CAUTION! Do not attach a power strip or surge suppressor to the UPS.
CAUTION! If the UPS is with metal chassis, for safety purpose, grounding is a must during UPS installation in order
to reduce leakage current below 3.5mA. Attention hazardous through electric shock. Also with disconnection of
this unit from the mains, hazardous voltage still may be accessible through supply from battery. The battery supply
should be therefore disconnected in the plus and minus pole at the quick connectors of the battery when maintenance or service work inside the UPS is necessary.
CAUTION! Servicing of batteries should be performed or supervised by personnel knowledgeable of batteries and
the required precautions. Keep unauthorized personnel away from batteries.
CAUTION! When replacing the batteries, use the same number and type of batteries.
CAUTION! Internal battery voltage is 12Vdc. Sealed, lead-acid, 6-cell battery.
CAUTION! Do not dispose of batteries in a fire. The battery may explode. Do not open or mutilate the battery or
batteries. Released electrolyte is harmful to the skin and eyes.
CAUTION! Unplug the UPS prior to cleaning and do not use liquid or spray detergent.
CAUTION! A battery can present a risk of electric shock and high short circuit current.
The following precaution should be observed before replacing batteries:
1)
Remove watches, rings, or other metal objects.
2)
Use tools with insulated handles.
3)
Wear rubber gloves and boots.
4)
Do not lay tools or metal parts on top of batteries.
5)
Disconnect charging source prior to connecting or disconnecting batteries terminal.
5
Software Download & Installation
(Only for the model with communication port)
Please follow steps below to download and install monitoring software:
1. Go to the website http://www.power-software-download.com
2. Click ViewPower software icon and then choose your required OS to download the software.
3. Follow the on-screen instructions to install the software.
4.When your computer restarts, the monitoring software will appear as an orange
plug icon located in the system tray, near the clock.
4
6 Trouble Shooting
Problem
Possible Cause
Solutions
Low battery.
Charge the UPS at least 6 hours.
Battery fault.
Replace the battery with the
same type of battery.
The UPS is not turned on
Press the power switch again
to turn on the UPS.
Alarm continuously
sounds when the
mains is normal.
The UPS is overload.
Remove some loads first. Before
reconnecting equipment, please
verify that the load matches the
UPS capability specified in the
specs.
When power fails,
back-up time is
shorten.
The UPS is overload.
Remove some critical load.
Battery voltage is too low.
Charge the UPS at least 6
hours.
Battery defect. It might be due to
high temperature operation
environment, or improper
operation to battery
Replace the battery with the
same type of battery.
Power cord is loose
Reconnect the power cord
properly
No LED display on
the front panel.
The mains is normal
but LED is flashing.
7 Specifications
Model
CAPACITY
450
450 VA / 240 W
INPUT
Voltage
Voltage Range
650
650 VA / 360 W
UPS
4
850
850 VA /480 W
110/120 VAC or 220/230/240 VAC
81-145 VAC / 162-290 VAC
OUTPUT
Voltage Regulation
+/-10%
Transfer Time
Typical 2-6 ms, 10 ms max.
Waveform
Simulated Sine Wave
BATTERY
Type & Number
12 V/4.5 AH x 1
12 V/7 AH x 1
Charging Time
4-6 hours recover to 90% capacity
12 V/9 AH x 1
PHYSICAL
Dimension (DxWxH)
287 x 100 x 142 mm
Net Weight (kgs)
3.55
4.25
4.9
Environment
Humidity
0-90 % RH @ 0-40° C (non-condensing)
Noise Level
Less than 40 dB
MANAGEMENT
USB/RS-232 (Option)
Supports Windows® 98/2000/2003/XP/
Vista/2008, Linux, and MAC
5
Sedna Line Interactive UPS
Sedna Line Interactive UPS
2
Qbex UPS Linea Interactiva
Contenidos del empaque
Usted recibira los siguientes items dentro del empaque:
* Unidad UPS
* Guía Rápida
* Cable de Comunicaciones (Solo para el modelo con puerto USB/RS-232)
* Cable de Poder (Únicamente para el modelo tipo IEC)
IEC Type
Botón de encendido
Led indicador del estado del UPS
AC Modo AC: Luz verde encendida
Modo Bateria: Luz verde Titilante
Vista Frontal:
3
3
5
2
1
1
1
Schuko Type I
2
5
5
Schuko Type II
South Africa Type
Universal Type
1
Receptaculos de Salida
4
Opcional USB & RJ-11 combinados
2
Entrada AC
5
Comunicacion Opcional
3
Breakerde Entrada
USB & RJ-11 Combinadas:
RJ-11 puerto
USB puerto
3
2 Descripción del Producto
2
1
5
650 VA / 360W
2
UPS
Sedna
1
4
4
Instalación y Operación
NOTA: Antes de la instalación, por favor inspeccione la unidad.
Asegúrese que nada dentro del empaque esta dañado.
Ubicación & Condiciones de Almacenamiento
Instale el UPS en un área protegida que este libre de polvo excesivo y que tenga Flujo de aire adecuado.
Por favor ubique la UPS lejos de otras unidades como mínimo 20 cm para evitar interferencias. No opere la UPS
donde la temperatura y la humedad estén fuera de los límites especificados. (Por favor verifique las especificaciones para los límites).
Vista Posterior:
4
4
2
2
3
5
1
3
French Type I
6
2
3
1
1
5
French Type II
Conexión y carga inicial
5
NEMA Type I
NEMA Type II
UK Type
Conecte el cable de entrada AC a la toma ubicada en la pared. Para mejores resultados, se sugiere la carga de batería al menos 6 horas antes de
su uso inicial. La unidad cargara la batería mientras esta conectada a la
alimentación.
Quick Guide V.1.1
UPS Sedna Linea Interactiva
4 hour s
7
UPS Sedna Linea Interactiva
Conectando la carga
PRECAUCION:
NUNCA conecte una impresora laser o escaner a la unidad UPS. Esta puede causar daño
a la unidad.
Conexión Modem/Línea Telefónica protección de transitorios
(Solo para el modelo con RJ-11)
Conecte el cable de línea telefónica al conector RJ11 denominado “IN” en el respaldo de la UPS y el cable hacia el
modem se coloca en el conector RJ11 identificado como “OUT” con el cable de línea telefónica.
Conexión cable de comunicaciones
(Sólo para el modelo con USB/RS-232 port)
Para permitir el monitoreo, apagado, encendido y estado del UPS, conecte el cable de comunicación a el puerto
USB/RS-232 y el otro extremo al puerto de su PC. Con el software de monitoreo instalado, podrá programar apagado / encendido y monitoreo del estado del UPS a través de su PC.
4
PRECAUCION! Prevenir el riesgo de incendio o descarga eléctrica, instale en una temperatura y humedad controladas libre de contaminantes conductores. (Ver especificación del rango de temperatura y
humedad aceptables).
PRECAUCION! Para reducir el riesgo de recalentamiento del UPS, no cubra las rejillas de refrigeración
del UPS, evite la exposición de la unidad a la luz directa del sol o de instalar cerca a equipos que emitan
calor, tales como calentadores u hornos.
PRECAUCION! No adicione equipos no relacionados con computadoras, como son equipos médicos,
equipos para soporte de vida, hornos microondas o aspiradoras a la UPS.
PRECAUCION! No conecte la entrada del UPS a su propia salida, por ningún motivo.
PRECAUCION! No permita que líquidos o cualquier objeto extraño entre al UPS. No ubique bebidas o
cualquier otro líquido cerca de la unidad.
PRECAUCION! En el evento de una emergencia, presione el botón de OFF y desconecte el cordón de
energía AC para deshabilitar el suministro de energía al UPS.
PRECAUCION! No conecte multitomas o supresores al UPS.
PRECAUCION! Con la instalación de estos equipos, se debe prevenir que la suma de corrientes de fuga de lo
conectados supere los 3.5 mA.
ATENCION Peligro a través de descarga eléctrica. También con desconexión de la unidad principal, el peligro
de voltaje aún puede ser accesible a través de la batería. La batería por lo tanto podrá ser desconectada el polo
positivo y negativo en los conectores rápidos de la batería cuando se realice mantenimiento o trabajos de servicio
dentro del UPS si es necesario.
PRECAUCION! Servicio de baterías deberá ser realizado o supervisado por personal con conocimiento de baterías, tomando las precauciones requeridas. Mantener alejado a personal no autorizado en mantenimiento de
baterías.
PRECAUCION! Cuando reemplace las baterías, use el mismo número y tipo de baterías.
PRECAUCION! El Voltaje interno de las baterías es 12VDC, Baterías de 6 celdas Selladas, de plomo-acido.
PRECAUCION! No deposite en el fuego. La batería puede explotar. No abra o mutile la batería o baterías. Libera
electrolito perjudicial para la piel y los ojos.
PRECAUCION! Desconecte la UPS previa limpieza y no utilice detergente líquido o spray.
PRECAUCION! Una batería puede presentar riesgo de descarga eléctrica y de alta corriente de corto circuito.
Las siguientes precauciones deben observarse antes de reemplazar baterías:
1)
Remueva reloj, anillos, u otro objeto de metal.
2)
Use herramientas con manilas aisladas.
3)
Use guantes de goma y botas.
4)
No ponga herramientas o partes de metal arriba de las baterías.
5)
Desconecte la fuente de carga antes de conectar o desconectar el terminal de las baterías.
Encendido / Apagado de la unidad
Encienda la UPS presionando el botón frontal en la UPS. Apague la UPS presionando nuevamente el botón frontal
del UPS.
4. Aviso Importante de Seguridad (Guarde estas instrucciones)
UPS
Conecte la carga a las tomas de salida en la parte posterior del UPS. Prenda el UPS
presionando el botón de encendido, luego los dispositivos conectados quedaran protegidos.
5
Descarga e Instalación de Software
(Solo para el modelo con Puerto de comunicación).
Por favor siga los pasos siguientes para descargar e instalar el software:
1. Ir al sitio Web http://www.power-software-download.com
2. Haga click en ver power software y elija su Sistema Operativo para descargar el software.
3. Siga las instrucciones en la pantalla para instalar el software.
4. Cuando se reinicie el equipo, el software de monitoreo aparecerá como un icono enchufe
8
9
UPS Sedna Linea Interactiva
UPS Sedna Linea Interactiva
Use la siguiente tabla para resolver problemas menores.
Problemas
Posible Causa
Soluciones
Batería Baja.
Cargue la UPS por lo menos 6 horas.
Falla de Batería.
Remplace la batería con el
mismo tipo de batería.
La UPS no esta activada
Presione de Nuevo el interruptor de
encendido para encender la UPS.
Alarma de Sonido
constante cuando la
alimentación es normal.
La UPS esta sobrecargada.
Remueva algunas cargas
primero. Antes de reconectar el
equipo, por favor verifique que la
carga coincida con la capacidad
del UPS.
Cuando falla la
energía, el tiempo
de respaldo es muy
corto.
La UPS esta sobrecargada.
Remueva algunas cargas críticas.
El Voltaje de Batería es bajo.
Cargue la UPS por lo
menos 6 horas.
Defecto de batería. Podría ser
debido a alta temperatura de
operación del medio ambiente
o de operación de la batería.
Reemplace la batería con el
mismo tipo de batería.
La alimentación es normal pero
el UPS esta en modo batería.
El cable de alimentación
está suelto.
Vuelva a conectar el cable de
alimentación correctamente.
No esta activado
el LED en el panel
frontal.
7 Especificaciones
Modelo
CAPACIDAD
450
450 VA / 240 W
ENTRADA
Voltaje
Rango de Voltaje 650
650 VA / 360 W
UPS
6 Solución de Problemas
850
850 VA /480 W
110/120 VAC or 220/230/240 VAC
81-145 VAC / 162-290 VAC
SALIDA
Regulacion de Voltaje
+/-10%
Tiempo Transferencia
Typical 2-6 ms, 10 ms max.
Forma de Onda
Onda Seno Modificada
BATERIA
Tipo & Número
12 V/4.5 AH x 1
12 V/7 AH x 1
12 V/9 AH x 1
Tiempo de carga
4-6 horas, capacidad de recarga al 90%
FISICA
Dimension (DxWxH)
287 x 100 x 142 mm
Peso Neto (kgs)
3.55
4.25
4.9
AMBIENTE
Humedad
0-90 % RH @ 0-40° C (non-condensing)
Nivel de Ruido
Menos que 40 dB
ADMINISTRACION
USB/RS-232 (Opción)
Soporte Windows® 98/2000/2003/XP/Vista/2008, Linux, MAC
10
UPS Sedna Linea Interactiva