1
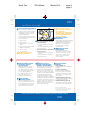
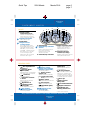
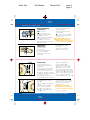
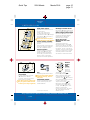
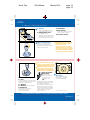
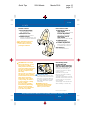
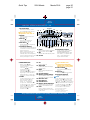
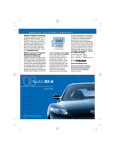
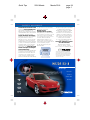
Quick Tips
2004 Mazda
Mazda RX-8
page 24
page 1
DRIVER ASSURANCE
Mazda Drivers Assurance Plan
Check out www.mymazda.com,
the website dedicated to you.
Manage your maintenance records,
receive valuable offers, see the latest
accessories, and much more!
Mazda Roadside Assistance
Exhilaration, liberation and inspiration,
are great reasons to drive a
Mazda car, truck, SUV or minivan.
In addition to all the other great
standard features, you also get peace
of mind, our Emergency Roadside
Assistance Plan, it’s just a phone
call away, 24 hours a day, 365
days a year, call 1-800-866-1998
Mazda ‘’bumper-to-bumper”
Limited Warranty
We design and build every Mazda
to give you driving pleasure now
and far down the road. We’re so
confident in our quality that we
cover the entire vehicle against
defects in materials and workmanship
for 48 months or 50,000 miles,
whichever comes first
Mazda Service
Transportation Solution
Being without your Mazda may
put a crimp in your day, if you do
ever have to take your Mazda
in for repairs don’t worry, you’re
covered. With the Mazda
Transportation Solution, you
will be given a loaner car at no
charge when your Mazda vehicle
is in for warranty repairs.
For all the details, see your
Mazda Dealer
This Quick Tips® guide is provided
by Mazda North American
Operations to make your Mazda
ownership experience more
convenient. It is not intended to
replace your Owner’s Manual.
If you have any questions about
your vehicle, you are invited to
contact your local dealer.
Or if you need additional help,
feel free to call our
Customer Assistance Center
at 1-800-222-5500
Monday through Friday,
9 a.m.- 4 :45 p.m., Pacific
9 a.m.-5:45 p.m., Eastern/Central
Unleaded
Gasoline
91-octane only,
15.9-gallon/
60.0-liter tank
©2003 Calcar, Quick Tips® is a trademark
of Calcar, made in USA 1/03 32.5M CG
Mazda North American Operations reserves
the right to change product specifications
at any time without incurring obligations.
9999-95-079C-04QT
MAZDA RX-8
Quick Tips
®
Reference
Guide for
2004
Controls and
Functions
®
Quick Tips
2004 Mazda
Mazda RX-8
page 2
page 3
DRIVER’S VIEW
1
2 3
45 6 7 8
9
10
7 8 9
6
C
F
E
H
11
C
H
P
R
N
D
M
1 0
ON
OFF
VOL
6 16
10
5
4
3
2
12 13 14 15
SET
ACCEL
SET
MODE
CANCEL
SET
COAST
CLK
FM 1/2
AM
CD
TAPE/MD
DISP
AMB
LOAD
PUSH POWER
SEEK
TRACK
APC
1
2
DISC
DISC
VOL
3
4
RPT
PROG
RDM
TUNE/AUTO-M
0
5
6
SCAN
17
18
TEXT/AUDIO CONT
1
2
A/C
3
4
MODE
19
20
30 29 28 26 27 26
31
32
25
21
24
22
Getting Started
RX-8 Quick Tips® are designed
to quickly familiarize you with
some important features of
your RX-8
This Driver’s View tab is your
index to the Quick Tips®, locate
the item you would like to
learn more about and then
turn to the listed tab
Be sure to see the tab called
Getting Started, this section
contains important operating
tips about your RX-8
Items identified with a Rotary
Engine symbol
call out
important information
23
1. Power window switches,
see Switches/Locks
2. Power door locks,
see Switches/Locks
3. Dual power mirrors,
see Switches/Locks
4.
Instrument panel
lighting, see Getting Started
5. Turn signal/lighting control
lever, see Driver Controls
6. Air vents
7. DSC Traction Control
System*, see Getting Started
8. Audio control switches*,
see Driver Controls
9. Tire pressure monitoring
system, see Getting Started
10. Horn/Air bag
11. Cruise control,
see Driver Controls
12. Wiper/washer control
lever, see Driver Controls
13. Clock, see Audio Systems
14. Information display,
see Owner’s Manual
15.
Hazard warning
switch, Press on/off
16. NAVI system*
System is used to locate
street addresses, points of
interest or cross streets: see your
Owner’s Manual for additional
operating information
17. Ambient temperature
display
18. Audio system,
see Audio Systems
19. Climate control panel,
see Climate Controls
20. Gearshift lever (A/T)*,
see Transmission
21. Parking brake lever,
see Console/Transmission
22. Cup holder
23. Accessory socket
24. Console,
see Console/Transmission
25. Seat warmer*,
see Console/Transmission
26. Steering paddle
switches (A/T only)*,
see Transmission
27. Tilt steering-wheel lever,
see Driver Controls
28. Storage
29.
Hood release handle
30.
Remote trunk-lid
release
Push to open trunk; main
switch in glove box must be ON
Remote trunk-lid release
lock-out, see Trunk
31. Power window lock switch
32.
Remote fuel-door release
Use unleaded gasoline,
91-octane only
*Denotes optional equipment
Always check the Owner’s Manual for more operating information and safety features
Driver’s
View
Quick Tips
2004 Mazda
Mazda RX-8
page 4
page 5
Getting
Started
GETTING STARTED
Short trip driving procedure
Any trip that is too short for the
engine to reach normal operating
temperature; needle in middle
of temperature gauge indicates
normal temperature
The following procedure should
be followed when moving vehicle
a short distance**:
1. Start engine
2. Move vehicle
3. Warm engine for 5-minutes
at idle
4. Raise engine speed to 3000
RPM for 10-seconds
5. Return to idle
6. Turn off engine
Tip: Warming up engine
improves engine life
Instant Mobility System
emergency flat tire
repair kit (IMS)
Temporary spare tire is not
equipped with your Mazda, if
tire repair is required, repair tire
with emergency flat tire repair
kit, see Owner’s Manual
If a temporary spare tire is
required, consult your
Authorized Mazda Dealer
Tire pressure
monitoring system
Warning light illuminates for a
few seconds when ignition is on
If tire pressure is too high or low,
or tire temperature is too high
warning light will illuminate
Rear doors
For a rear occupant to exit with
a front passenger:
1. Front occupant must release
seatbelt
2. Front occupant must open door
3. Open rear door
For a rear occupant to exit without
a front occupant:
1. Release front seat to forward
position
2. Unlock and open front door
3. Open rear door
Tips: Close rear door first,
then front door; damage may
occur otherwise
To prevent alarm arming with
passenger inside vehicle, driver
must manually lock door by
pressing lock knob
RX-8 rotary engine
precautions
Check engine oil level when refueling
Rotary engine design uses an oil
injection system in addition to
lubrication of internal parts
It is important to maintain
proper oil level
Engine oil level
warning light
Indicates low engine oil if
illuminated; pull over to a safe
location; turn engine off and
check engine oil level when
engine is cool, add engine
oil if necessary
Traction Control
System (TCS)*/Dynamic
Stability Control (DSC)*
DSC light may occasionally flash
while driving, this indicates
that the DSC was performing a
correction to help maintain your
best vehicle control, if DSC light
remains on, see your Mazda Dealer
If DSC light remains on after
disconnecting battery or jumpstarting, you will need to perform
a Steering Angle Sensor calibration
procedure, after battery power is
restored: Ignition ON; turn steering
wheel to full left lock position;
then full right lock position; turn
ignition OFF, then ON
Instrument panel
lighting
With headlights on:
To brighten/dim turn thumbwheel
up/down
Maximum illumination:
Rotate thumbwheel upward
until click is heard; instrument
cluster and information display
illumination color goes from
red to white
Headlights/parking lights OFF:
Instrument panel lighting defaults
to maximum brightness
Headlights/parking lights ON:
Illumination changes brightness
with dimmer switch adjustment
*Denotes optional equipment
**Moving vehicle at a car wash or moving
vehicle to access another vehicle would
be considered a short distance
Always check the Owner’s Manual for more operating information and safety features
Getting
Started
Quick Tips
2004 Mazda
Mazda RX-8
page 6
page 7
Instrument
Cluster
INSTRUMENT CLUSTER
1. Fuel gauge
2. Engine coolant
temperature gauge
If above normal range, stop
vehicle and turn off engine,
check coolant level when safe
3. Speed unit selector
Select km/h or mph
4. Tachometer
5. Engine over-rev
warning buzzer
The rotary engine design
allows RPM ranges of up to
7000 RPM (A/T) and 9000
RPM (M/T), if you exceed a
given RPM, a warning buzzer
will remind you to up-shift
to the next higher gear
Always obey all local speed
limits and traffic signs
5 6
4
GAUGES
2
1
3
78 9
10
6
C
F
E
H
8 9
7 x1000r/min
10
L
5
OIL-P
4
3
2
1 0
6. Speedometer
7. Odometer/trip odometer
selector
Press to select among trip A,
trip B, and odometer
Press and hold to reset
selected trip meter
8. Odometer/trip odometer
TRIP
A
H
1
O.O
P
R
N
D
M
8
9. Engine oil pressure gauge,
Indicates normal engine oil
pressure when needle is
halfway between L and H
with engine running
10. Manual mode gear
indicator (A/T only)*
Displays current gear of Sport AT
during manual shift mode
WARNING LIGHTS
• Low fuel
•
Turn signals/hazard
warning on
•
Anti-lock Brake
System (ABS)*
ABS malfunction, normal brakes
only, dealer inspection required
•
Cruise set,
see Driver Controls
•
Automatic transaxle
indicator
Dealer inspection required
if light remains on
•
High beams on
•
Charging system
warning light
Dealer inspection required
Tire pressure
monitoring system,
see Getting Started
•
•
•
•
•
•
Lights on
•
Traction Control
System (TCS)*/Dynamic
Stability Control (DSC)*,
see Getting Started
DSC Traction Control
System* off,
System turned off manually
CRUISE
MAIN Cruise control main
power on, see Driver Controls
Brake system
Parking brake on/low fluid level
Check engine
Dealer inspection required
Immobilizer system,
see Locks
Engine oil level
warning light,
see Getting Started
Power steering
malfunction
Dealer inspection required
if light remains on
•
Air bag readiness
Front, side and curtain air bag
malfunction; warning light
constantly flashes or stays on
or never comes on with ignition
on, dealer inspection required
•
Door ajar
•
Always fasten
safety belts
•
Low washer fluid level*
•
Engine coolant level
•
Headlight auto
leveling malfunction
*Denotes optional equipment
Always check the Owner’s Manual for more operating information and safety features
Instrument
Cluster
Quick Tips
2004 Mazda
Mazda RX-8
page 8
page 9
Driver
Controls
DRIVER CONTROLS
1
2
3
1 2
ON
OFF
CANCEL
SET
ACCEL
SET
COAST
4 3
6
VOL
MODE
5 8 7
Turn signal/lighting
control lever
OFF = Lights off
= Tail, parking and
dashboard lights on: Rotate
knob (1) to first notch
= Tail, parking, dashboard
and headlights on: Rotate
knob (1) to second notch
High beams on/off: Push forward/
pull back to detent
To flash high beams: Pull back
slightly and release
Turn signals right/left: move
lever up/down
= Fog lights on: Rotate (2);
functions only with headlight
low beams on
Tip: Headlights switch off,
parking lights remain on, if
lights are left on and switch is
in lock position or key removed
Wiper/washer
control lever
Intermittent wiper:
One click down
To change interval speed:
Rotate inner ring (3)
Normal wiper speed: Two
clicks down
Fast wiper speed: Three
clicks down
Single wipe: Push stalk up
Washer: Pull stalk back
Cruise control
Operates above 25 mph
To activate: Press and release
ON/OFF (1)
To set speed: Press and release
SET/COAST (3) at desired speed
To accelerate: Press and hold
RESUME/ACCEL (2); incremental
acceleration: Press and release (2),
each tap = plus 1mph
To decelerate: Press and hold
SET/COAST (3), release at desired
speed; or tap brake pedal,
press and release (3) at
desired speed; incremental
deceleration: Press and release
(3), each tap = minus 1 mph
To cancel: Tap brake pedal, clutch
pedal (manual transaxle) or press
CANCEL button (4) or ON/OFF (1)
Return to preset speed after CANCEL
button or braking: Press and
release RESUME/ACCEL button (2)
Steering-wheel audio controls
To increase/decrease volume:
Press (5)
Radio: Press (6) to select preset
stations
Cassette/CD/MD: Press (6) to
select next selection/track
Press (7) to select AM, FM1,
FM2, Tape, CD and MD mode
Press (8) to mute
Tilt steering-wheel lever
Pull lever located under steeringwheel down to unlock column,
position tilt angle steering
column position
WARNING: Do not adjust
steering-wheel while driving,
you can lose control of vehicle
*Denotes optional equipment
Always check the Owner’s Manual for more operating information and safety features
Driver
Controls
Quick Tips
2004 Mazda
Mazda RX-8
page 10
page 11
Switches/
Locks
SWITCHES/LOCKS
1
L
R
2
6
5
3
4
Dual power mirrors
Ignition switch must be in ACC
or ON position
Switch is on driver’s door
To adjust left/right mirror:
Press selector switch (1) left/right,
press switch (2) in direction of
desired movement
Tip: To lock mirrors in place,
move selector to center position
Power window switches
Ignition switch must be in ON
position
Front windows controlled from
the driver’s armrest; passenger
door has a separate switch
Driver’s window
One-touch-down: Push down
AUTO switch (3) firmly and
release, window goes down
all the way; pull switch back
briefly to stop; press lightly
and hold for normal operation
1
Passenger window switch
Press button (4) down and hold to
open; pull back and hold to close
Power window lockout switch
Press button (5) down until clicks,
only driver’s window operates;
press again and passenger
windows function again
Power door locks
Master front door lock
switches
To lock/unlock all doors:
Press bottom/top of switch (6)
To lock doors without key: With
door open, press bottom of door
lock switch, exit car, close doors
To unlock: Use key to unlock driver’s
front door, rotate key to counterclockwise position for more than
one second to unlock other doors
Remote
4 keyless
entry
5 system
3
Functions
only with
ignition in
OFF position
To lock doors: Press
button (4); pressing again
within 5 seconds causes doors
to relock and horn to beep
To unlock: Press
(5) for driver’s
door; press again within 5 seconds
to unlock other doors
To open trunk: Press
(3)
Panic alarm: Press (2); horn
sounds and turn signals flash;
to stop, press (2) again or turn
ignition to ON position
If trunk fails to open: See Trunk
Tab, then Remote trunk-lid
release lock-out
2
LOCK
UN
LOCK
Manual door locks
Lock button
To lock: Press front of button
(1) toward door handle
To unlock: Pull front of button
away from door handle
Tip: Doors can be locked with
key in ignition (chime sounds
to alert you to key in ignition)
Key
Operates ignition and all locks
Tip: Use key number plate to
purchase new key; store in
safe place
Immobilizer system
Prevents engine from running
unless coded key used; see
Owner’s Manual
*Denotes optional equipment
Always check the Owner’s Manual for more operating information and safety features
Locks
Quick Tips
2004 Mazda
Mazda RX-8
page 12
page 13
HomeLink®
HOMELINK®
1
2 3
HomeLink® Wireless
Control System*
Located on rear view mirror
To program or reprogram:
Ignition must be off; hold
transmitter for the device to
be programmed between 1-3
inches to HomeLink®; press
transmitter button and desired
HomeLink® button (1) simultaneously
until HomeLink® indicator light
goes from slow to rapid flashing
1
2
1
DOOR
OFF
SLIDE
3 5
TILT
7 6
3
Turn ignition on; verify device
operation by pressing HomeLink®
button (1) that was just programmed;
repeat procedure for other buttons
Rolling code synchronization
procedure
Refer to your garage door opener or
device instruction manual to confirm
your system is equipped with a
rolling code feature
Tip: This procedure is easier
done with the assistance of
another person
To synchronize: Press programming
button on garage door opener motor;
press and release the programmed
HomeLink® button 2 times within 30
seconds of pressing the garage door
opening motor programming button
Some devices may require you to
press and release a third time to
complete programming procedure
1. Map/reading light
Press on/off
2. Interior light switch
DOOR = light on when door open
ON = light always on
OFF = light always off
3. Front interior light
4. Rear interior light
5. Sunglass holder
Press concaved lip then open
6. Sunroof tilt switch*
Press rear of switch to tilt rear
of sunroof
Press front of switch to close
7. Sunroof slide switch*
Press rear of switch to open
sunroof
Press front of switch to close
Illuminated visor mirrors
Mirrors lighted when covers open;
off when closed
Auto-dimming rear
view mirror
Auto-dimming function changes
are based on outside lighting
conditions and if bright headlights
are visible in rear view mirror
Press on (2), off (3)
2
OFF
DOOR
ON
4
*Denotes optional equipment
Always check the Owner’s Manual for more operating information and safety features
Interior
Lights
Quick Tips
2004 Mazda
Mazda RX-8
page 14
page 15
Console/
Transmission
CONSOLE/TRANSMISSION
2
4
6
3
1
5
Automatic transmission*
P = Park
To move gearshift from Park:Press
firmly on brake pedal, then move
gearshift to gear selection
R = Reverse
N = Neutral No gear engaged
D (Overdrive)
For normal driving: Shifts
through four forward
gears automatically
1. Console
Press button (6) and slide
cover rearward until it clicks
2. Parking-brake lever
To engage: Pull up
To release: Pull up slightly while
depressing button at front of
lever, lower hand brake lever
3. Cup holders
4. Seat warmer*
Press on/off switch; indicator
light on when activated
5. Accessory socket
Manual transmission*
Depress clutch pedal to start
engine and change gears,
push shifter downward when
selecting reverse gear
WARNINGS: Do not shift into
1st above 20 mph or clutch
failure could occur
Resting your foot on clutch
pedal while driving and using
the clutch to hold your vehicle
at a stand still while waiting
on a hill may reduce clutch life
Tip: Torque converter lock-up
improves fuel economy and can
feel like an additional gear change
WARNING: Placing shift lever
in P position without setting
parking brake may not hold
vehicle, always set parking brake
Sport AT manual
P
shift mode*
R
Move shift lever
N
return from D to M;
M D
then M to D for
automatic mode
M (Manual)
Manual gear selection is achieved
by moving shifter back to upshift
and forward to downshift
Shift and gear position indicator
located in the instrument panel,
M will be illuminated for manual
mode, numeral for gear position
will be shown next to shift
position indicator
ON
OFF
VOL
SET
ACCEL
MODE
CANCEL
SET
COAST
Steering shift switches
(A/T only)*
Upshift/downshift; pull
either switch up/down,
see Owner’s Manual
*Denotes optional equipment
Always check the Owner’s Manual for more operating information and safety features
Transmission
Quick Tips
2004 Mazda
Mazda RX-8
page 16
page 17
Seats
SEATS
Manual controls
1. Fore-aft adjustment
Lift lever and hold, slide
seat, release lever
2. Raise/lower seat
Pull/push lever and release
3. Seatback angle
To adjust: Lift and hold lever, lean
forward or backward, release lever
Tip: Side-impact air bags*
deploy from outboard
side of driver and front
passenger seatbacks
1
2
Power driver’s seat*
4. Raise/lower front of
seat cushion
Pull/push front of switch vertically
Fore/aft adjustment
Slide switch horizontally
Raise/lower rear of
seat cushion
Pull/push rear of switch vertically
5. Seatback angle
Press front/rear of switch
6. Lumbar adjustment*
Press front/rear of switch to
increase/decrease firmness
Seat warmer*,
see Console/Transmission
3
6
4 5
WARNINGS: Do not adjust
seats while driving, you can
lose control of vehicle
Safety belts must always be
worn when vehicle is in motion
Air bags are supplemental
and do not replace safety
belt usage
Always wear your safety belt
and properly secure children
12 and under in the rear seat
Never place rear-facing
infant-safety seat in front
of any air bag, an infant is
in serious danger of being
injured or killed
If you choose to install a
forward-facing child-safety
seat in the front seating
position, move vehicle seat
as far back as possible
Child-safety seat
To install in rear outboard seats:
Use dual locking mode retractor
seat belts; see Owner’s Manual
for proper installation and child
seat tether and LATCH system
instructions
WARNING: Use age
appropriate child restraints,
see Owner’s Manual and
state or province laws
Dual locking mode
lap/shoulder belt
retractor (front passenger
and rear safety belts only)
Emergency locking mode: Belt
locks only on hard braking/
cornering or impacts of about
5 mph or more
Automatic locking mode:
Must be used when installing
child-safety seat
To activate: Pull webbing until fully
extended from retractor until click
is heard; belt will only tighten
when released
To disengage: Unbuckle belt and
allow webbing to retract fully
*Denotes optional equipment
Always check the Owner’s Manual for more operating information and safety features
Seats
Quick Tips
2004 Mazda
Mazda RX-8
page 18
page 19
Climate
Controls
CLIMATE CONTROLS
1. Air flow selections
= air to dash
= air to dash and floor
= air to floor
2.
3.
4.
5.
= air to floor and
windshield
Fan control
Rotate knob between 0 (OFF)
and 4 (HIGH)
Temperature control
Cooler/warmer = rotate knob
counterclockwise/clockwise
A/C = air conditioner
Press to turn on/off
Air intake control
= recirculate inside air;
use for maximum cooling
= fresh air
3
1
2
Trunk
To open: Use key, remote
trunk-lid release or remote
keyless entry fob
Remote trunk-lid release,
see Driver’s View
Remote trunk-lid
release lock-out
Switch in ON position,
remote trunk release
functions normal; OFF position
disables system; located in glove box
1. Instant Mobility System
emergency flat tire
repair kit (IMS)†,
see Getting Started
TRUNK OPENER
OFF
ON
2
0
4 1
1
3
2
A/C
3
4
MODE
7
5
6
WARNING: Do not use
position in cold
weather, windows may
fog and hamper vision
6.
Rear window defogger
Press on/off; shuts off with
ignition; also operates heated
side mirrors*
Control positions for
maximum defrost
Fan to maximum, temperature to
maximum hot,
selected
Tips: To help prevent windshield
fogging in humid weather,
select
before starting engine
To prevent moisture buildup,
never drive with system off
Objects placed under the
front seats may interfere
with air flow to the rear
7.
Front windshield
defogger
A/C switches ON and air
intake switches to fresh air
2. Jack/jack handle
3. Lug wrench
Tire economy and tips
Check pressure regularly when
tires are cold, maintain correct
front-end alignment and tire
balance; rotate tires at the mileage
shown in the Maintenance
Guide; see Owner’s Manual
for rotation chart
Tire pressure
P225/55R16 94V,
P225/45R18 91W
Front/rear: 32psi cold
Tips: Correct tire pressure ensures
safe handling and ride comfort
If you experience pull/drift while
driving, possible causes may
be road crown, tire pressure,
or wheel alignment
The suspension is sport-tuned
with firmer ride for optimum
handling and response
Tire chains*†
Tire chains can damage
aluminum wheels; use on
steel wheels only
Tips: Use only SAE class “S”
chains, install only on rear
tires; install as tightly as
possible and retighten
after driving 1/4 -1/2 miles;
chains may affect handling
Never exceed 30 mph with
tire chains
Luggage
compartment
internal safety
release
Allows you to escape
should you become locked in trunk
Slide illuminated release lever in
direction of arrow; lever will glow
if it has been exposed to light
Located on interior trunk lid
*Denotes optional equipment
† See Owner’s Manual
Always check the Owner’s Manual for more operating information and safety features
Trunk
Quick Tips
2004 Mazda
Mazda RX-8
page 20
page 21
Audio
Systems
AM/FM STEREO/CASSETTE/CD
9 10 11
1. Power/Volume
8
12
Press to turn on/off; rotate
7 A B
13
14
to increase/decrease volume
Tip: Press (8) and (9)
SET CLK
FM 1/2
AM
CD
TAPE/MD
DISP AMB
together to turn radio on
LOAD
2. Repeat
15
VOL
Press to replay current CD/
1
2
3
4
5
6
tape selection
16
17
SCAN
3. Disc up †
Press to skip forward to
beginning of next CD
4. Disc down †
Press to skip back to beginning
of previous CD
5
4 3
6
18
17
5. Tune/Auto-Memory
23 22 21 20 19
2
24
Tune: Rotate counterclockwise/
1
clockwise for lower frequency/ 8. FM1/2
21. Text/Audio Control
higher frequency
Audio control: Press to select
Press to select between FM1/FM2
BASS/MID/TREBLE/FADE/
station preset buttons (15)
Radio: Press and hold until a
BALANCE/BEEP ON/ALC OFF/
9. AM
beep is heard; system autoALC LEVEL 1, 2, 3/AUDIO PLT
Press to select AM frequency band
matically scans and temporarily
ON**; rotate right/left to
stores six strong stations in each 10. CD slot
adjust selected feature
band; press again to cancel
MINI DISC
PUSH POWER
SEEK
TRACK
APC
DISC
TUNE/AUTO-M
6. SEEK/TRACK/APC
Radio: Press / to
automatically seek higher/
lower frequency
CD: Press / to select
next/previous track
Tape: Press / to
automatically advance tape to
beginning of next selection/
replay selection; to stop this
operation, press button again
7. LOAD*
To load multiple discs: Press
and hold LOAD (7) until
beep is heard; insert CD
when “In” is displayed
To eject disc: Press Eject (14)
To eject specific disc: Press and
hold Eject (14) until beep is
heard; within five seconds
press the desired tray
number 1-6 (15)
DISC
RPT
PROG
RDM
TEXT/AUDIO CONT
Tip: Automatic Level
11. CD
Control(ALC)automatically
Press to play CD
adjusts audio volume/quality
12. Tape*/MD*
depending on vehicle speed
Press to play Mini-disc Player/
22. Fast forward
cassette tape
Press to fast forward through
13. DISP*
a track
Press: Changes display during
23. Reverse
MD play
Press to reverse through a track
14. CD eject button
24. Program Random†
15. Memory preset buttons
Press to enable/cancel
To set: Tune to station, press
Clock
and hold until beep is heard
To set: With ignition in ACC or ON
16. Mini Disc slot*
position, press (B) and hold until
17. Eject button*
beep sounds; 12 hr/24 hr will be
18. Cassette door*
displayed; press (A) to select; press
19. Dolby® Noise Reduction* (B) again while selection is flashing:
Hr ADJUST displays; press (A) to
Reduces tape noise and hiss;
select hr; press (B) when done,
press to activate/deactivate
do the same to set minutes
20. Scan
*Denotes optional equipment
Press to briefly sample next
audio system only
listenable selections; functions **Bose
† For use with cassette tape player,
in all modes
MD player, or CD changer*
Always check the Owner’s Manual for more operating information and safety features
Audio
Systems
Quick Tips
2004 Mazda
Mazda RX-8
page 22
page 23
Under Hood
UNDER HOOD
11
2 1 12 10 3
4 978
6
5
1.3-liter 13B
Break-in period
First 600 miles: Drive at varying
road and engine speeds; avoid
full throttle, rapid acceleration
or kick-down of transmission
Do not use special “break-in” oils
Anti-lock Braking System (ABS)*
ABS automatically reduces
hydraulic pressure to any wheel
on the verge of locking up
You may feel a slight pulsing of
the brake pedal and hear a
clicking noise; this tells you the
ABS is functioning properly;
increase pressure on pedal for
maximum braking
Tips: Maintain constant
pressure on the brake pedal
Do not pump the brakes
ABS self test*
A self-diagnostic test is performed
when starting; you may feel some
brake pedal pulsation and hear
some noise, this is normal
9. Engine coolant reservoir
1. Engine oil filler cap
Level should be between F and
SAE 5W-20
L lines when cold
Remove engine cover (12) to
access engine oil dipstick and
WARNING: Never remove
oil filler cap
coolant reserve tank cap
while engine is running or
2. Automatic transmission
hot; you could get burned
fluid dipstick*
Check with engine on at
10. Engine oil dipstick
operating temperature; fluid
Check with engine off and at
level should be within crossoperating temperature; fluid
hatched area/between top two
level should be between F and
notches on dipstick
L marks on dipstick
3. Brake/Clutch* fluid reservoir 11. Windshield washer
Fill to MAX mark with DOT 3
reservoir
fluid; check with cap on
Fill with windshield
washer fluid
4. Battery
12. Engine cover
5. Fuse block
6. Air filter
7. Hood support rod
8. Hood latch
Push hood latch to the left,
*Denotes optional equipment
† See Owner’s Manual
open hood
Normal maintenance
notes
Rotate tires every 7,500 miles or
15,000 miles
A B
E
sooner if needed; replace cabin air
filter every 25,000 miles or 24 months
22,500 miles
A
A. Change: Engine oil/replace filter
30,000 miles
A B C
E
Lube: Locks and hinges
37,500 miles
A
D
B. Inspect: Disc brakes
45,000 miles
A B
C. Inspect: Drive belts, fuel lines,
52,500 miles
A
E
hoses, and connections, brake
lines and hoses, steering
60,000 miles
A B C
F
operation and linkages, front
67,500 miles
A
and rear suspension ball joints,
A
75,000 miles
driveshaft dust boots, chassis
and body bolts, exhaust system
A
82,500 miles
heat shields, cooling system,
A
90,000 miles
and bolts and nuts on seat
D.
Replace: Air filter, spark plugs
†
Unique driving conditions
Every 5,000 miles change oil/filter, E. Clean: Air filter
inspect coolant level, lights, brake/ F. Replace: Manual transmission
clutch fluid, tire pressure/wear,
and rear differential oil,
locks/hinges and washer fluid
engine coolant
7,500 miles
A
Always check the Owner’s Manual for more operating information and safety features