1
User’s Manual
SPORT DIGITAL AUDIO PLAYER
Thank you for purchasing our products.
Before using the unit, please read this manual carefully
to obtain the best performance from your unit and
retain it for future reference.
FCC Certification
THIS DEVICE COMPLIES WITH PART 15 OF THE FCC RULES.
OPERATION IS SUBJECT TO THE FOLLOWING TWO CONDITIONS:
(1) THIS DEVICE MAY NOT CAUSE HARMFUL INTERFERENCE, AND
(2) THIS DEVICE MUST ACCEPT ANY INTERFERENCE RECEIVED,
INCLUDING INTERFERENCE THAT MAY CAUSE UNDESIRED
OPERATION.
Note: This equipment has been tested and found to comply with the
limits for a Class B digital device, pursuant to Part 15 of the FCC Rules.
These limits are designed to provide reasonable protection against
harmful interference in a residential installation. This equipment
generates, uses, and can radiate radio frequency energy and, if not
installed and used in accordance with the instructions, may cause
harmful interference to radio communications. However, there is no
guarantee that interference will not occur in a particular installation. If
this equipment does cause harmful interference to radio or television
reception, which can be determined by turning the equipment off and
on, the user is encouraged to try to correct the interference by one or
more of the following measures:
-Reorient or relocate the receiving antenna.
-Increase the separation between the equipment and receiver.
-Connect the equipment into an outlet that is on a circuit
different from the one the receiver is connected.
-Consult the dealer or an experienced radio/TV technician
for help.
Note: The manufacturer is not responsible for any radio or TV interference
caused by unauthorized modifications to this equipment. Such
modifications could void the user’s authority to operate the equipment.
-I-
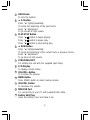
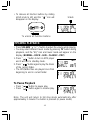
TABLE OF CONTENTS
WARNING & CAUTIONS.................................................................1
NAMES OF EACH PART..................................................................2
MAIN UNIT.......................................................................................2
FUNCTION OF CONTROLS.............................................................2
USE OF THE BATTERY...................................................................4
USING THE SPORT STRAP.........................................................5
GETTING STARTED......................................................................7
POWER ON/OFF.............................................................................7
LOCKING THE BUTTONS (HOLD)...................................................7
MP3/WMA PLAYBACK....................................................................8
TO PAUSE PLAYBACK...................................................................8
TO SEARCH A TRACK....................................................................9
FAST FORWARD/BACKWARD........................................................9
ID3 TAG DISPLAY...........................................................................9
TO SELECT PLAYBACK MODE......................................................9
TO STOP PLAYBACK.....................................................................9
MENU FUNCTION...........................................................................9
FOLDER ROOT.............................................................................10
AUTO PLAY...................................................................................11
EQ MODES...................................................................................11
REPEAT MODES...........................................................................11
-NORMAL................................................................................................................................11
-RPT 1 (Repeat one)............................................................................................................12
- II -
-RPT ALL (Repeat all)........................................................................................................12
-RANDOM.............................................................................................................................12
-INTRO...................................................................................................................................12
MEMORY USAGE.........................................................................13
DELETE ALL FILE.........................................................................13
FORMAT .......................................................................................14
ABOUT........................................................................................14
EXIT.....................................................................................................14
DELETE ONE................................................................................15
USB DRIVER INSTALLATION ( for Win.98 & Win 98SE
only)....................................................................................................16
USE IN PC....................................................................................19
TROUBLE SHOOTING GUIDE.....................................................21
SPECIFICATIONS...........................................................................22
Important Note:
DRM-Digital Rights Management is used to protect legal music
downloads. You can play WMA/WMA-DRM files if you are trying to
play music from your own original CD collection on the player. To
do this simply rip your CDs in windows media player. Use Windows
Media player and select "copy from CD" or "RIP" and then select
OPTIONS, and select copy protection or the copy music tab (if
you are using Windows media player v.9). Visit online help at
www.18002526123.com/findit/Troubleshooting.htm #mp3 to get
more information.
- III -
WARNING & CAUTIONS
WARNING: TO PREVENT FIRE OR SHOCK HAZARD, DO NOT
EXPOSE THE UNIT TO RAIN OR MOISTURE.
TO AVOID ELECTRICAL SHOCK, DO NOT OPEN THE
CABINET.
REFER SERVICING TO QUALIFIED PERSONNEL
ONLY.
Cautions
•
•
•
•
•
•
•
•
•
•
All the safety and operating instructions should be read before
the appliance is operated.
Do not expose the product to direct sunlight or any source of
heat for a long period.
Should the unit become deformed or malfunction due to exposure
to smoke or heat, remove the battery away.
Do not apply excessive force to LCD screen.
Do not pull the accessory wires (earphone & USB cable) with
excessive force.
Do not use the built-in USB cable and supplied USB cable
synchronously.
The appliance should not be used near water - for example, near
a bathtub, washbowl, kitchen sink, laundry tub, in a wet basement,
or near a swimming pool, etc.
Do not use volatile chemicals on this unit. Clean by lightly wiping
with a soft cloth.
Do not attempt to service the appliance.
Refer servicing to qualified personnel.
For easy continuous playback of all music files, it is recommended
that all music files be stored under the main root directory.
-1-
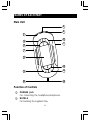
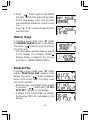
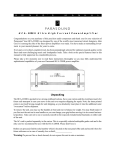
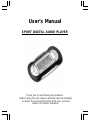
NAMES OF EACH PART
Main Unit
2
3
1
6
4
7
5
7
8
10
9
11
12
13
Function of Controls
1
2
PHONES Jack
For connecting the headphones/earphones.
BUCKLE
For buckling the supplied strip.
-2-
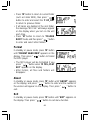
3
4
5
6
7
8
9
10
11
12
13
HOLD Knob
To lock the buttons.
F.F Button
Press “ ” lightly/repeatedly:
To locate the beginning of the next tracks.
Keep “ ” depressed:
To go ahead at high speed.
PLAY/STOP Button
Press “ / ” button to begin playing.
Press “ / ” button to pause play.
Press “ / ” button to stop during play.
REW Button
Press “ ” lightly/repeatedly:
To locate the beginning of the current track or previous tracks.
Keep “ ” depressed:
To go back at high speed.
STRAP BRACKET
For holding the unit with the supplied sport strap.
LCD Display
To display current status.
VOLUME + Button
To increase the volume.
MENU Button
Press MENU button to select various modes.
VOLUME - Button
To decrease the volume.
MINI USB Port
For connecting to your PC with supplied USB cable.
Built-in USB Plug
Open the battery cover and take it out.
-3-
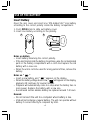
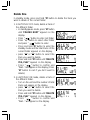
USE OF THE BATTERY
Insert Battery
Open the rear cover and insert one “UM-4/AAA/1.5V” size battery
according to the correct polarity inside the battery compartment.
1. Push OPEN knob to slide out battery cover.
2. Insert one battery according to the polarity.
1
2
DC : 1.5V UM-4 / “AAA”
SIZE OR EQUIVALENT
Notes on battery
• Insert battery observing the correct polarity.
• If the electrolyte inside the battery should leak, wipe the contaminated
parts in the battery compartment with a cloth and replace the old
battery with a new one.
• When the unit is not to be used for a long period of time, remove the
battery.
Notes on “
”
• Insert a new battery, and “
” appears on the display.
• When the battery voltage level is low, “
” will appear on the display,
playback still continues for several minutes.
• Playback will automatically come to a stop when the battery has no
more power. Replace the battery with a new one.
• Recommend normal alkaline battery be replaced around 7-8 hours.
Remark:
• Do not connect the unit to a computer when battery is low.
• USB will not recharge a regular battery. The unit can operate without
battery if connect directly to computer by USB.
-4-
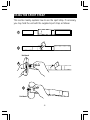
USING THE SPORT STRAP
This section mainly explains how to use the sport strap. If necessary,
you may hold the unit with the supplied sport strap as follows:
1
2
Unit back
3
4
Unit back
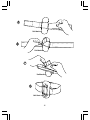
-5-
5
Unit back
6
Unit back
7
Unit back
8
Unit front
-6-
GETTING STARTED
Power On / Off
1. Press “
” button to turn on MP3 player.
The total memory and free memory will
appear on the display (for example,
256Mb Memory Display is subject to the
unit your purchased <128Mb/256Mb/
512Mb>), and then the MP3 player will turn
to standby mode.
• The total tracks of the root folder appear
on the display (such as, “01” shows the first
track, “30” shows the total tracks of the root
folder).
VOL
VOL
” button more than 2
2. Press and hold “
seconds until the message “POWER OFF”
appears on the display to turn the unit off.
• In standby mode, the unit will
automatically shut down after approx 1
minute if no button is pressed.
Locking the Buttons (Hold)
HOLD function is used for preventing wrong operation during playback.
• To lock all function buttons by sliding HOLD
knob to right, and the “ ” icon will appear
Lock
on the display. Then all function buttons
can’t be operated.
To lock all function buttons
-7-
• To release all function buttons by sliding
HOLD knob to left, and the “
” icon will
disappear on the display.
Unlock
To unlock all function buttons
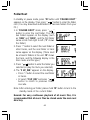
MP3/WMA PLAYBACK
• Press VOLUME “ + ” or “ -” button to adjust the volume while playing.
• You may select different music mode by pressing “M” button during
playback, and the “EQ” icon and music mode will appear on the
display. (NORMAL - ROCK - LIVE - CLASSIC - POP)
1. Press “
” button to turn on MP3 player
and it will turn to standby mode.
2. Press “
” button again to play the tracks
of the current folder.
• The MP3/WMA files are played once from
beginning to end in current folder.
To Pause Playback
• Press “
• Press “
” button to pause play.
” button again to resume play.
Note: The unit will return to full stop mode automatically after
approximately 1 minute if no button is pressed (in pause mode).
-8-
To Search a Track
• During playback, you can search a track in current folder.
1. Press “ ” or “ ” button to search a track. Each press skips one track.
2. It will start to play automatically after searching a desired track.
Fast Forward / Backward
• Press and hold “ ” button will go fast forward during playback.
• Press and hold “ ” button will go fast backward during playback.
ID3 TAG Display
• During playback or pause, File Name and File type will be scrolled
from right to left.
To Select Playback Mode
• During playback, you may set up the playback mode by pressing
and holding “M” button more than 2 seconds.
• Each time the “M” button is pressed and held, the playback mode
will be changed to the next one as follows:
RPT 1 (Repeat one) -> RPT ALL (Repeat all) -> RANDOM -> INTRO
-> NORMAL
To Stop Playback
• Press and hold “
” button more than 2 seconds to stop play and
return to the standby mode.
MENU FUNCTION
In standby or pause mode, each time the “ M ” button is pressed, the
mode will be changed to the next one as follows:
FOLDER ROOT -> AUTO PLAY -> EQ_MODE -> RPT_MODE ->
MEMORY USAGE -> DELETE ALL FILE -> FORMAT -> ABOUT ->
EXIT
-9-
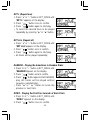
Folder Root
In standby or pause mode, press “M” button until “FOLDER ROOT”
appears on the display. Then press “
” button to enter the folder
root. (You may download multi-folders or cascade folders from your
PC.)
1. In “FOLDER ROOT” mode, press “
”
button to enter the root folder. The first
two folders appear on the display (such
as “0001” and “0002”), and the first folder
name scrolls from right to left. (“F” shows
the folder.)
2. Press “-” button to select the next folder or
other tracks, and the next folder or track
name appear on the display. (There must
be at least 2 folders in the unit. “M” shows
the track, and the following display is the
track name and file type.)
” button to enter the folder you
3. Press “
selected (or play the track you selected).
4. The “F UP_DIR” appears on the display.
• Press “-” button to select the next folder
or tracks.
• Or select “F UP_DIR” and press “
”
button to return to previous folder
cascade.
Note: After entering per folder, please hold “M” button to turn to the
standby mode of the current folder.
Remark: For easy continuous playback of all music files, it is
recommended that all music files be stored under the main root
directory.
-10-
Auto Play
In standby or pause mode, press “ M ” button until the “ AUTOPLAY”
appears on the display, and press “ + ” or “ - ” button to select ON /
” button to confirm.
OFF, then press “
• AUTOPLAY ON - Playing all tracks of the cascade folders.
• AUTOPLAY OFF - Playing the tracks of the folder you selected.
Notes:
• In AUTOPLAY ON mode, all tracks of all folders appear on the
display.
• In AUTOPLAY OFF mode, all tracks of root folder appear on the
display. (If there is not any tracks in the root folder, the “00/00 NO
FILE” will appear on the display.)
EQ Modes
In standby or pause mode, press “ M ” button until the “EQ_MODE”
appear on the display, then press “ + ” or “ - ” button to select different
music mode, and it will be changed to the next one as follows:
NORMAL, ROCK, LIVE, CLASSIC or POP.
• During playback, each time the “ M ” button is pressed, the music
mode will be changed to next one.
• The EQ icon will disappear on the display when you select the
Normal mode.
Repeat Modes
In standby or pause mode, press “ M ” button until the “RPT_MODE”
appears on the display. Press “ + ” or “ - ” button to select RPT 1, RPT
ALL, RANDOM, INTRO or NORMAL, and then press “
” button to
confirm.
• During playback, each time the “ M ” button is held down for 2
seconds, the repeat mode will be changed to next one.
Normal
The MP3 will be played with normal sequence after choosing NORMAL
mode.
-11-
RPT 1 (Repeat one)
1. Press “ + ” or “ - ” button in RPT_MODE until
“RPT 1” appears on the display.
2. Press “
” button once to confirm.
” button again to start play.
3. Press “
• To select the desired track to be played
repeatedly by pressing “ ” or “ ” button.
RPT ALL (Repeat all)
1. Press “ + ” or “ - ” button in RPT_MODE until
“RPT ALL”appears on the display.
2. Press “
” button once to confirm.
3. Press “
” button again to start play.
• All tracks will be played repeatedly.
RANDOM - Playing the Selections in Random Order
1. Press “+” or “ - ” button in RPT_MODE until
“RANDOM”appears on the display.
2. Press “
” button once to confirm.
3. Press “
” button again to start RANDOM
play (All tracks will be played without
sequence automatically).
• Press “ ” or “
” button to locate the
previous or next track.
INTRO - Playing the First Ten Seconds of Each Track
1. Press “+” or “ - ” button in RPT_MODE until
“INTRO” appears on the display.
2. Press “
” button once to confirm.
-12-
3. Press “
” button again to start INTRO
play (play each track for approx 10 seconds).
• INTRO play always starts from the track
that immediately follows the current running
one.
• Press “ ” or “ ” to start intro play from the
selected track.
Memory Usage
In standby or pause mode, press “ M ” button
until MEMORY USAGE appears on the display.
Then press “
” button to check the memory
size of the unit.
• The total memory and free memory appear
on the display (for example, 256Mb
Memory Display is subject to the unit your
purchased <128Mb/256Mb/512Mb>).
Delete All Files
In standby or pause mode, press “ M ” button
until the “DELETE ALL FILE” appears on the
display. Then press “
” button to delete all
tracks of the current folder (The folder name
can not be deleted).
• All tracks of the current folder will be deleted
if you press “
” button when “IF YES,
PLAY KEY” appears on the display.
• If all files of the current folder are deleted,
the message “NO FILE” will appear on the
display.
-13-
VOL
• Press “M” button to return to current folder
”
(such as Folder 0001), then press “
button to enter and select the “F UP_DIR”
to return to previous folder.
• If all tracks are deleted of the root folder,
the message “NO FILE” will always appear
on the display when you turn on the unit
each time.
• Press “M” button to return to “FOLDER
ROOT” mode, and then press “
” button
to enter and select other folders.
Format
In standby or pause mode, press “M” button
until “FORMAT NAND MEM” appears on the
display. Then press “
” button to format
the MP3 player.
• The MP3 player will be formatted if you
press “
” button when “IF YES, PLAY
KEY” appears on the display.
• After format, all files and folders will
disappear.
VOL
About
In standby or pause mode, press “M” button until “ABOUT” appears
on the display, and press “
” button to enter and the number of
the version will appear on the display. Then press “
” button to
exit.
Exit
In standby or pause mode, press “M” button until “EXIT” appears on
the display. Then press “
” button to exit menu function.
-14-
Delete One
In standby mode, press and hold “M” button to delete the track you
want to delete of the current folder.
1. In AUTOPLAY OFF mode, delete a track of
the different folder.
• In standby/pause mode, press “M” button
until “FOLDER ROOT” appears on the
display.
• Press “
” button to enter root folder.
• Press “+/-” button to select other folder
” button to enter.
and press “
• Press and hold “M” button to enter the
standby mode and the total tracks of the
current folder appears on the display.
• press “ ” or “ ” button to select the
track you want to delete.
• Press and hold “M” button until “DELETE
YES, PLAY” appears on the display.
• Press “
” button to confirm and
“Wait...” will appear on the display. (Press
“M” button to exit if you don’t want to
delete.)
2. In AUTOPLAY ON mode, delete a track of
the different folder.
• Turn on the unit and the number of total
tracks will appear on the display.
• press “ ” or “ ” button to select the
track you want to delete.
• Press and hold “M” button until “DELETE
YES, PLAY” appears on the display.
• Press “
” button to confirm and
“Wait...” will appear on the display.
-15-
VOL
VOL
USB DRIVER INSTALLATION (for Win.98 & Win.98SE only)
Windows Me, Windows 2000 and Windows XP have the program to
support USB 1.1 Storage Device, and No Driver is required for them.
The OS will detect the Audio Player automatically after the connection
with the USB port is established.
When connect the unit to your PC (Windows 98 OS) for the first time,
the USB mass storage function will not be activated without driver
installation. Please use the installation CD-ROM to install the driver
and follow the two kinds of installation methods below.
Method One:
1. Insert the installation CD first.
2. Read the readme file of the installation CD.
3. Double Click " install.bat " and Reboot Computer.
Method Two:
1. Insert the installation CD and connect the unit to your PC.
2. If the player is recognized on your PC, the “Add New Hardware
Wizard” is activated, and click “Next”.
-16-
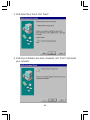
3. Select “Search for the best driver for your device (Recommended)”.
Click “Next”.
4. Select “Specify a location” and click “Next”.
-17-
5. USB driver file is found. Click “Next”.
6. USB driver installation has been completed, click “Finish” and restart
your computer.
-18-
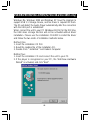
USE IN PC
1. Turn on your computer, and connect MP3 Player to USB Port (Do
not use the built-in USB cable and supplied USB cable synchronously).
2. The “Removable Disk” appears in “My Computer” (Figure 1). In
WindowsMe/2000/XP, a new icon appears on the bottom of the
desktop (Figure 2).
Figure 1
Figure 2
3. Then you may directly download the MP3 files or other files. The
message “DATA_WD” will appear on the MP3 display when
download the files.
Notes:
• For easy continuous playback of all music files, it is recommended
that all music files be stored under the main root directory.
• The unit can operate without battery if connect directly to
computer by USB.
4. After use, if you want to unplug the MP3 Player, please do as below:
Windows 98: You may directly unplug the MP3 Player after the
message “DATA_WD” disappears on the display for about 5 seconds.
Then “Removable Disk” disappears in “My Computer”.
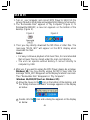
Windows Me/2000/XP(Such as Windows XP):
icon on the bottom of the desktop, and
1 Move the mouse to the
the “Safely Remove Hardware” message appears on the display
as below:
2
Double click the
as below:
icon and a dialog box appears on the display
-19-
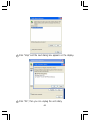
3
Click “Stop” and the next dialog box appears on the display.
4
Click “OK”, then you can unplug the unit safely.
-20-
TROUBLE SHOOTING GUIDE
Should any problem persists after you have made the following checks,
consult your nearest service facility.
LCD is blank:
• Weak battery.
Replace the batteries with new one.
• The battery polarity is wrong.
Insert the battery with right polarity.
MP3 play does not start:
• Main unit is locked (HOLD ON mode).
Release the lock mode.
• Weak batteries.
Replace the battery with new one.
• Moisture condensation
Leave the unit in a warm place until the moisture evaporates.
No sound from the headsets:
• The headphones/earphones plug is not firmly connected to the
“ PHONES ” jack .
• Adjust the “ VOLUME ” control.
• Dirty plug.
Failed download of a file to the player
• Check the connection between your computer and the player to
ensure that the cable is secure.
• Check whether the battery is exhausted.
The OS fails to detect the MP3 Player automatically after the USB
Driver installation.
• Check USB Driver installation and ensure it is successful.
• Check the USB control in BIOS and ensure it is enabled.
If you have any questions, please contact dealer or refer servicing
to qualified personnel.
-21-
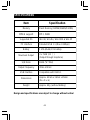
SPECIFICATIONS
Item
Memory
MPEG support
Supported OS
PC Interface
Battery
Maximum Output
S/N Ratio
Output Frequency
USB Interface
Dimensions
Weight
Specification
Flash Memory (128Mb/256Mb/512Mb)
MP3, WMA
Win.98, Win.Me, Win.2000 & Win.XP
Standard USB 1.1 (Max 3.5Mbps)
1 UM-4/AAA/1.5V battery
2 x 7mW (32 Ω )
(Output through Earphone)
90dB ("A" filter)
20Hz~20KHz
Compatible with USB1.1
Approx. 45mm x 19mm x 85mm
(W x D x H)
Approx. 40g (without battery)
Design and specifications are subject to change without notice!
-22-
Printed in China
811-333291-040