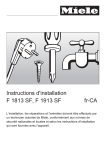
1
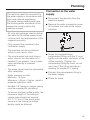
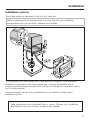
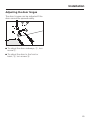
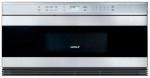
Installation instructions
CVA4066
en-CA
Installation, repair and maintenance work should be performed by a
Miele authorized service technician in accordance with national and
local safety regulations and the provided installation instructions.
Plumbing
The machine must be connected to
the water supply in accordance with
local and national regulations.
The water being used should have
the drinking water standards of the
respective country where the
machine is used.
Connection to the water
supply
^ Disconnect the machine from the
electrical supply.
^ Remove the water connection cover
at the lower rear side of the coffee
machine.
– All units and systems used to deliver
the water to the coffee system must
conform with the requirements of the
respective country.
– Only connect the machine to the
cold water supply.
– The machine can be connected
without a non-return valve.
– The on-site water line must have a
water valve to turn the water off if
needed. If not present, have a water
valve installed by a licensed
plumber.
– The water faucet must be accessible
after installation.
– Water pressure on-site:
Minimum: 14.5 psi
Maximum: 145 psi, if higher, install a
pressure reduction valve.
^ Screw the supplied brass
compression fitting, with the ¾" end,
tightly onto the water connector of the
coffee machine. (Tighten the
compression fitting by hand, do not
use a tool.) The fitting includes an
opening for standard ¼" piping.
^ Connect the compression fitting to
the water supply.
^ Check for leaks.
– Suitable 1/4" tubing or copper piping
must be supplied for plumbing.
– To ensure the best coffee quality, the
maximum length of the tubing or
copper pipe should not exceed
4 ft. 11" (1.5 m). If too much water
remains in the tubing the coffee
quality could be affected.
65
Electrical connection
Important
Ensure that power is not supplied to
the machine while installation or
maintenance work is performed.
All electrical work should be
performed by a qualified electrician
in strict accordance with national
and local safety regulations.
Installation, repairs and other work
by unqualified persons could be
dangerous.
Verify that the voltage, load and circuit
rating information found on the data
plate match the household electrical
supply before installing the coffee
system.
If there is any question concerning the
electrical connection of this appliance
to your power supply, please consult a
licensed electrician or contact Miele’s
Technical Service Department. See
back page for contact information.
WARNING:
THIS APPLIANCE MUST BE
GROUNDED
66
The coffee system comes equipped
with a 6 ft (1.8 m) power cord with a
NEMA 5-15P molded plug for
connection to a 120 V, 15 A, 60 Hz
power supply.
Installation
Installation options
The coffee system is designed to be built into cabinetry.
Miele appliances can be installed flush or proud. Discuss your installation
requirements with your architect, designer and installer.
A combination with other Miele built in appliances is possible. If the machine is
installed in combination with other appliances, it should be installed with a
protective base between the appliance and the unit (exception: installation with a
built-in plate warmer).
A special display cabinet is also available from your dealer or Miele, as an
installation option.
Miele appliances can be installed flush or proud. Discuss your installation
requirements with you architect, designer and installer.
67
Installation
Installation
Make sure power is not supplied to
the appliance while installation or
maintenance work is performed.
Disconnect the power supply to the
work area by unplugging the unit,
tripping the circuit breaker or
removing the fuse. The coffee
system must be installed into
cabinetry before being used.
This unit should only be used in
room temperatures ranging between
59 °F and 140 °F. Do not use the
appliance outside of this range of
temperatures
^ If your cabinet has 3/4" (19 mm) side
walls, drill four holes for the
mounting.
^ Center the unit and turn the screws a
little bit in and then out again.
^ Take the unit out of the niche and drill
four holes at the screw markings
(1/16" [2 mm], diameter 3/16"
[4.5 mm]).
^ Connect the water supply.
^ Plug the appliance into the electrical
outlet.
^ Push the appliance into the niche.
^ Open the door and partially tighten
the screws.
^ Unscrew the height adjustable feet
on the underside of the machine
about 1/16" (2 mm).
^ Push the appliance all the way back
into the cabinet and center it. If
necessary level the unit with the four
height adjustable feet.
The feet can be turned out up to 3/8"
(10 mm).
68
^ Carefully turn the lower screws, a, to
center the machine.
^ To secure the appliance in the
cabinet, tighten the upper screws, b,
by hand. Do not use an electric
screwdriver.
Installation
Adjusting the door hinges
The door hinges can be adjusted if the
door cannot be opened easily.
^ To adjust the door sideways, a, turn
screw a.
^ To adjust the door to the front or
back, b, turn screw b.
69
RemoteVision
Miele's RemoteVision Wi-Fi technology
creates a 'virtual link' between your
appliance and our monitoring center. If
a fault occurs, Miele's client service
center will be notified and contact you,
or another trusted individual identified
on your call roster, in order to gain
access to your appliance to fix the
problem.
For information on set-up and
installation of the RemoteVision module,
see the separate RemoteVision
installation manual.
70
Be sure your wireless system meets the
following requirements
– A wireless router that supports an
IEEE 802.11b protocol
– Windows XP® or newer operating
system, Mac® OS X 10.3 or higher
– Cable or DSL modem
– Microsoft® Internet Explorer 6 or
higher, Safari 2.0 or higher, Firefox
1.5 or higher
* Please note that each wireless router
manufacturer supplies their own device
drivers and setup programs. Due to the
differences in manufacturers, exact
router setup instructions are not
included in this manual. Wording and
instructions may vary.
Alteration rights reserved / 1409
M.-Nr. 07 611 530 / 00
CVA 4066
For the most updated manual please see the Miele web site.