1
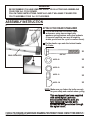
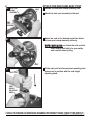
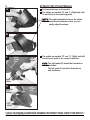
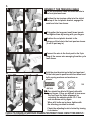
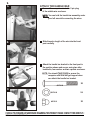
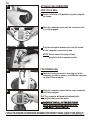
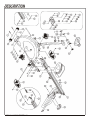
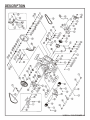
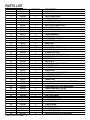
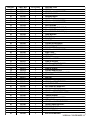
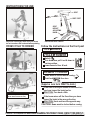
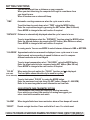
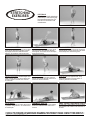
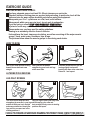
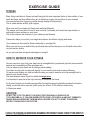
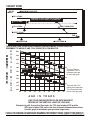
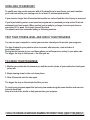
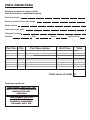
YORK 2in1 CYCLE ROWER
SAFETY GUIDELINES:
Please read and follow the following safety guidelines:
Read this owner’s manual and follow the instructions.
Assemble and operate the YORK 2in1 CYCLE ROWER on a solid, level surface.
Keep the area behind the YORK 2in1 CYCLE ROWER clear.
You will need at least one person to help you assemble this unit, preferably two.
Always use your YORK 2in1 CYCLE ROWER in adequate space e.g., At least 2 ft. clearance on each side.
Never allow children on or near the YORK 2in1 CYCLE ROWER.
Always check the YORK 2in1 CYCLE ROWER before using it, making sure all parts are assembled,
and nuts and bolts are tightened.
Do not use the YORK 2in1 CYCLE ROWER if the unit is disassembled in any way.
WARNING: Injuries could occur particularly to young children if the guards are
removed and not correctly replaced.
WE DO NOT RECOMMEND THE REMOVAL OF THE GUARDS.
Always check the guards to ensure they are secured before use.
If guards are not secured tighten the screws on the guards.
Keep hands away from moving parts.
The weight limit for this product is 225 lbs(100kgs).
Wear proper workout clothing: Do not wear loose clothing.
Do not wear shoes with leather soles or high heels. Tie back all long hair.
Remove jewelry, rings, chains and pins before exercising.
Do not rock the unit from side to side.
Care should be taken when mounting and dismounting the unit.
Do not place any liquids on any part of the YORK 2in1 CYCLE ROWER .
Do not use any accessories not specifically recommended by
the manufacturer, that might cause injuries or cause the unit to fail.
Always consult your doctor before undertaking any exercise program.
Work within your recommended exercise level, do NOT work to exhaustion.
If you feel any pain or abnormal symptoms, STOP YOUR WORKOUT IMMEDIATELY.
Consult your physician immediately.
TAKE CARE TO PROTECT CARPETS AND FLOORS in case of leakages.
This product is a machine and contains moving parts which have been greased /
lubricated and could leak.
The safety level of the equipment can be maintained only if it is regularly examined for damage and wear e.g.
ropes, pulleys & connection points.
Replace defective components immediately and/or keep the equipment out of use until repair.
Component such as pulleys, bearings and cables are always more susceptible to wear. Special attention
should be taken to inspect these component before use.
WARNING: Injuries to health may result from incorrect use of this equipment. Always correctly follow
the instructions that are set out in this manual.
That adjustment devices are not left projecting as they may interfere with people.
The YORK 2in1 CYCLE ROWER is designed for use and enjoyment in the home (NOT FOR COMMERCIAL USE).
By following the above precautions and using good judgement and common sense, you will have a safe and
pleasurable exercise regimen with the YORK 2in1 CYCLE ROWER.
CARE AND MAINTENANCE
TOOLS REQUIRED
The tools enclosed in the carton are two multi-purpose spanners
Use a warm damp cloth with mild detergent
to keep your YORK 2in1 CYCLE ROWER clean. (which has a screwdriver function) and one allen key.
SHOULD YOU REQUIRE ANY ASSISTANCE REGARDING THIS PRODUCT PLEASE CONTACT YORK DIRECTLY.
U.K.
F I T N E S S
HELP LINE (8:30am- 4:30pm)
YORK BARBELL (U.K.) LTD.
CHURCHILL WAY, DAVENTRY,
NORTHANTS, NN11 4YB ENGLAND
TEL: (01327) 701-824
FAX: (01327) 706-704
E-MAIL: [email protected]
AUSTRALIA
U.S.A.
F I T N E S S
F I T N E S S
HELP LINE (8:00am- 4:00pm)
YORK BARBELL (AUST.) PTY. LTD.
UNIT 1, LOT 2, SWAFFHAM ROAD,
MINTO, N.S.W. 2566 AUSTRALIA
TEL: (02) 9603-8444
FAX: (02) 9603-8555
E-MAIL: [email protected]
HELP LINE (8:00am- 5:00pm)
YORK BARBELL USA.
3300 BOARD ROAD.
YORK, PA 17402
TEL: +1-717-767-6481
FAX: +1-717-764-0416
E-MAIL: [email protected]
YORK 2in1 CYCLE ROWER / 01
GENERAL
WE RECOMMEND YOU HAVE SOMEONE ASSIST YOU IN LIFTING AND ASSEMBLING
YOUR YORK 2in1 CYCLE ROWER.
FOLLOW THESE INSTRUCTIONS CAREFULLY AND IT WILL MAKE IT EASIER FOR
YOU TO ASSEMBLE YOUR 2in1 CYCLE ROWER.
ASSEMBLY INSTRUCTION
1.
REAR END CAP
ATTACH THE REAR STABILIZER
Fit the rear stabilizer to the main frame
and secure, using two carriage bolts,
washers, spring washers and nylon locknuts.
(It has end caps that can vary in height to
enable you to level the cycle on uneven floors).
Fix the plastic caps onto the locknut heads.
To fit use:
X2
#5676-07
REAR STABILIZER
#5676-08
X2
#5676-09
X2
#5676-10
X2
#5676-130
X2
NOTE: Make sure you fasten the bolts securely
for your safety and comfort when cycling.
This equipment has been supplied
with some Nylon Locknuts.
It is essential that the nuts are
fully tightened onto the bolts,
so that the bolt penetrates through
the nylon insert.
SHOULD YOU REQUIRE ANY ASSISTANCE REGARDING THIS PRODUCT PLEASE CONTACT YORK DIRECTLY. *
*YORK
2in1 CYCLE ROWER / 02
2.
A.
ATTACH THE SEAT AND SEAT POST
SEAT POST
CLAMP
ASSEMBLY
SEAT
Release the seat post clamp assembly first.
Attach the seat post assembly to the seat.
SEAT
POST
ASSEMBLY
Adjust the seat to the desired angle then fasten
the seat post clamp assembly securely.
B.
NOTE: MAKE SURE you fasten the nuts on both
sides evenly and tightly for your safety
and comfort when cycling.
SEAT
C.
SEAT POST
Fit the seat post into the seat post mounting tube
and secure in position with the seat height
adjusting knob.
SEAT
HEIGHT
ADJUSTING
KNOB
CONTACT YORK DIRECTLY. *
* SHOULD YOU REQUIRE ANY ASSISTANCE REGARDING THIS PRODUCT PLEASEYORK
2in1 CYCLE ROWER / 03
3.
A.
ATTACH THE CYCLE PEDALS
Fix the pedal straps to the pedals.
,, ,,
,, ,,
The straps are marked R and L (Right and Left)
fix each strap to the matching pedal.
NOTE: The eight adjustable holes on the straps
must be set outwards so that you can
easily adjust the straps.
B.
C.
RIGHT
CRANK
ARM
ATTACH
RIGHT
PEDAL
,, ,,
,, ,,
The pedals are marked R and L (Right and Left)
connect each pedal to the correct crank arm.
NOTE: The right pedal (R) should be threaded on
clockwise.
The left pedal (L) should be threaded on
anti-clockwise.
RIGHT
PEDAL
D.
ATTACH
LEFT
PEDAL
LEFT
CRANK
ARM
LEFT
PEDAL
SHOULD YOU REQUIRE ANY ASSISTANCE REGARDING THIS PRODUCT PLEASE CONTACT YORK DIRECTLY. *
*YORK
2in1 CYCLE ROWER / 04
4.
A.
B.
HANDLE
KNOB
ATTACH THE FRONT POST.
Firstly, set the tension control to 9 or 10.
Release the adjusting knob (anti-clockwise)
then pull it down to the centre position as
shown.
So, the locking arm can slide in or out of the
front post.
C.
Take off the black plastic cover from the
base first.
LOCKING
ARM
Fit the locking arm to the locking arm connector
with the counter sunk machine screw as shown.
#5676-114
LOCKING
ARM
CONNECTOR
D.
PLASTIC
COVER
X1
Tighten with the screw-driver provided as shown.
FRONT
POST
Hold the seat carriage and fold up the front post.
Lower the seat carriage gently until it stops.
Push the adjusting knob up and turn it
clockwise to lock the front post in the upright
position as shown.
SEAT
CARRIAGE
E.
HANDLE
KNOB
CONTACT YORK DIRECTLY. *
* SHOULD YOU REQUIRE ANY ASSISTANCE REGARDING THIS PRODUCT PLEASEYORK
2in1 CYCLE ROWER / 05
5.
A.
B.
D.
C.
E.
CONNECT THE TENSION CABLE
A.
Pull the top tension cable out from the hole in
the front post as shown.
B.
Position the top tension cable in to the slot at
the top of the red plastic bracket, engage the
metal end into it as shown.
C.
Fit together the large and small brass barrels
and tighten them by turning with your fingers.
D.
Position the red plastic bracket in the
entrance of the hole in the front post as shown.
(It will fit part way in.)
E.
Connect the wire in the front post to the 2 pin
plug of the sensor wire emerging from the cycle
main frame.
SENSOR
WIRE
6.
A.
B.
Fold the pivot bracket up to the front post and
fit the front post in position with four allen head
bolts, spring washers and washers as
shown.
FRONT
POST
PIVOT
BRACKET
X4
#5676-36
#5676-09
#5676-08
TIP: You should be able to fit these bolts with
your fingers. If they are difficult to turn move
the front post for better alignment by
unlocking the adjusting knob 1/2~1 turn
anti-clockwise and try again.
When all 4 bolts are in place, tighten with
the allen key provided as shown.
Check the adjusting knob is locked by turning
it clockwise.
SHOULD YOU REQUIRE ANY ASSISTANCE REGARDING THIS PRODUCT PLEASE CONTACT YORK DIRECTLY. *
*YORK
2in1 CYCLE ROWER / 06
7.
A.
ATTACH THE ROWER PEDALS
Slide the pedal pivot rod through the chain
cover holes.
NOTE: The pedal pivot rod is packed inside the
seat post of the cycle.
PIVOT
ROD
Push the pedals on either side of the pivot rod
and secure, using two wheel nuts as shown.
B.
NOTE: The strap buckle should be fitted to the
inside by the chain covers for easy
adjustment of the pedal strap.
X2
PIVOT
ROD
#5676-15
WHEEL
NUT
ROWER PEDAL
8.
ATTACH THE ROWER SEAT
Attach the rower seat to the seat carriage
with four seat screws as shown.
ROWER
SEAT
NOTE: You can use your left knee to hold the seat
while fitting the seat screws.
The front (shorter edge) of the seat should
face to the ground.
X4
#5676-112
CONTACT YORK DIRECTLY. *
* SHOULD YOU REQUIRE ANY ASSISTANCE REGARDING THIS PRODUCT PLEASEYORK
2in1 CYCLE ROWER / 07
9.
A.
ATTACH THE HANDLE BAR
Connect the computer wire to the 2 pin plug
of the middle wire as shown.
NOTE: You can hold the handle bar assembly under
your left arm while connecting the wires.
B.
Slide the extra length of the wire into the front
post carefully.
C.
Attach the handle bar bracket to the front post in
the position shown and secure, using two allen
head bolts, four washer and two capnuts as shown.
NOTE: You should TAKE CARE to ensure the
computer wire does not get trapped when
you attach the handle bar bracket.
X2
#5676-28
D.
#5676-08
X4
#5676-23
X2
SHOULD YOU REQUIRE ANY ASSISTANCE REGARDING THIS PRODUCT PLEASE CONTACT YORK DIRECTLY. *
*YORK
2in1 CYCLE ROWER / 08
10.
A.
ATTACH THE COMPUTER
FOR CYCLE USE:
Insert 2 x AA size 1.5V batteries into the computer
as shown.
B.
Slide the computer down onto the connector until
it in fully engaged.
C.
Plug the hand pulse sensors wire into the socket
on the computer console as shown.
NOTE: Please ensure the plug is firmly
inserted into the computer socket.
D.
FOR ROWER USE:
Take the hand pulse sensor wire plug out of the
computer console as shown, and slide the computer
up and off the connector.
E.
Slide the computer down onto the rower connector
until fully engaged.
N.B: The computer will beep and automatically
display rower exercise mode.
RECHECK THAT ALL OF THE BOLTS AND
NUTS ARE TIGHTENED SECURELY FOR
YOUR SAFETY AND COMFORT.
CONTACT YORK DIRECTLY. *
* SHOULD YOU REQUIRE ANY ASSISTANCE REGARDING THIS PRODUCT PLEASEYORK
2in1 CYCLE ROWER / 09
DESCRIPTION
YORK 2in1 CYCLE ROWER / 10
DESCRIPTION
YORK 2in1 CYCLE ROWER / 11
PARTS LIST
KEY NO.
1
2
3
4
5
6
7
8
9
10
11
12
13
14
15
16
17
18
19
20
21
22
23
24
25
26
27
28
29
30
31
32
33
34
35
36
37
38
39
40
41
42
43
44
45
46
PART NO.
5676-01
5676-02
5676-03
5676-04
5676-05
5676-06
5676-07
5676-08
5676-09
5676-10
5676-11
5676-12
5676-13
5676-14
5676-15
5676-16
5676-17
5676-18
5676-19
5676-20
5676-21
5676-22
5676-23
5676-24
5676-25
5676-26
5676-27
5676-28
5676-29
5676-30
5676-31
5676-32
5676-33
5676-34
5676-35
5676-36
5676-37
5676-38
5676-39
5676-40
5676-41
5676-42
5676-43
5676-44
5676-45
5676-46
YORK 2in1 CYCLE ROWER / 12
Q'TY(PCS)
1
1
1
1
1
1
2
11
12
2
1
PAIR
1
PAIR
2
1
PAIR
1
1
2
1
1
2
1
1
1
1
2
1
1
1
1
1
1
1
4
1
1
1
1
2
2
1
2
1
2
DESCRIPTION
MAIN FRAME
LEFT CHAIN COVER
RIGHT CHAIN COVER
REAR STABILIZER
LEFT REAR END CAP
RIGHT REAR END CAP
M8 X 75mm CARRIAGE BOLT
M8 FLAT WASHER
M8 SPRING WASHER
M8 NYLON LOCKNUT
CRANK ASSEMBLY
CYCLE PEDAL ( L&R )
ROWER PEDAL PIVOT ROD
ROWER PEDAL ( L&R )
WHEEL NUT
SEAT POST
CYCLE PEDAL STRAP ( L&R )
CYCLE SEAT
SLIDING SEAT POST
SLIDING SEAT POST END CAP
SEAT HEIGHT ADJUSTING KNOB
ROWER BEAM
M8 CAP NUT
TENSION CONTROL ASSEMBLY
COMPUTER WIRE
ADJUSTING KNOB
ROWER SEAT
M8 X 72mm ALLEN HEAD BOLT
ROWER BEAM STOP PLATE
SAFETY STOP PLATE
HANDLE BAR
M8 X 38mm HEX HEAD BOLT ( HALF THREAD )
CABLE CLIP
ADJUSTABLE SEAT POST HAND KNOB
ROWER EBAM SAFETY STOP
M8 X 20mm ALLEN HEAD BOLT
COMPUTER
SEAT POST INSERT
TENSION CABLE PLASTIC BRACKET
CYCLE SENSOR WIRE
BEARING BOWL
PLASTIC BUSH
PIVOT BRACKET
PLASTIC SLEEVE
FRONT PIVOT POST
FRONT END CAP W / MOVING WHEEL
KEY NO.
47
48
49
50
51
52
53
54
55
56
57
58
59
60
61
62
63
64
65
66
67
68
69
70
71
72
73
74
75
76
77
78
79
80
81
82
83
84
85
86
87
88
89
90
91
92
93
PART NO.
5676-47
5676-48
5676-49
5676-50
5676-51
5676-52
5676-53
5676-54
5676-55
5676-56
5676-57
5676-58
5676-59
5676-60
5676-61
5676-62
5676-63
5676-64
5676-65
5676-66
5676-67
5676-68
5676-69
5676-70
5676-71
5676-72
5676-73
5676-74
5676-75
5676-76
5676-77
5676-78
5676-79
5676-80
5676-81
5676-82
5676-83
5676-84
5676-85
5676-86
5676-87
5676-88
5676-89
5676-90
5676-91
5676-92
5676-93
Q'TY(PCS)
2
2
6
2
2
5
8
2
1
1
1
1
2
1
1
1
1
1
1
1
1
1
1
1
2
1
2
1
1
2
2
1
2
1
1
1
1
2
1
1
2
1
1
1
3
1
1
DESCRIPTION
STOP PAD
M6 X 25mm MACHINE SCREW
BEARING / 6001Z
BEARING INSERT
COVER PLATE
M6 X 6mm MACHINE SCREW
M6 X 10mm MACHINE SCREW
BALL BEARING
BALL BEARING RING NUT ( R )
38mm WASHER
BALL BEARING RING NUT ( L )
35mm WASHER
RING NUT
PULLEY DISC
MAGNET
PULLING STRAP WHEEL
SPRING BOX ASSEMBLY
PULLING STRAP
M4 X 20mm MACHINE SCREW
SHAFT AXLE
METAL SLEEVE
GEAR DISC
M4 X 23mm SCREW
PLASTIC ROLLER
M8 X 70mm HEX HEAD BOLT
PULLING STRAP WHEEL
PLASTIC SLEEVE
PULLING HANDLE BAR
M5 X 12mm SELF TAPPING SCREW
FOAM GRIP
END CAP
ADJUSTABLE BRACKET
M8 X 16mm HEX HEAD BOLT
MAGNET HOLDER
M6 X 55mm HEX HEAD BOLT
M6 NYLON LOCKNUT
M8 X 52mm HEX HEAD BOLT
M3 X 8mm SELF TAPPING SCREW
TENSION SPRING
LOCKING ARM CONNECTOR
METAL BUSH
M8 X 72mm ALLEN HEAD BOLT
JOCKEY WHEEL BRACKET
DRIVE BELT WHEEL
C12 CLIP ( ID 11.1mm )
PULLING SPRING
M10 NYLON WASHER
YORK 2in1 CYCLE ROWER / 13
KEY NO.
94
95
96
97
98
99
100
101
102
103
104
105
106
107
108
109
110
111
112
113
114
115
116
117
118
119
120
121
122
123
124
124A
124B
125
126
127
128
129
130
131
132
133
134
135
136
137
138
PART NO.
5676-94
5676-95
5676-96
5676-97
5676-98
5676-99
5676-100
5676-101
5676-102
5676-103
5676-104
5676-105
5676-106
5676-107
5676-108
5676-109
5676-110
5676-111
5676-112
5676-113
5676-114
5676-115
5676-116
5676-117
5676-118
5676-119
5676-120
5676-121
5676-122
5676-123
5676-124
5676-124A
5676-124B
5676-125
5676-126
5676-127
5676-128
5676-129
5676-130
5676-131
5676-132
5676-133
5676-134
5676-135
5676-136
5676-137
5676-138
YORK 2in1 CYCLE ROWER / 14
Q'TY(PCS)
1
4
1
1
2
1
1
1
1
1
1
2
1
6
6
12
5
12
4
1
1
1
1
1
1
1
1
4
1
5
2
1
1
2
1
1
2
1
2
2
1
1
1
1
1
1
1
DESCRIPTION
M10 FLAT WAHSER ( t=1mm )
M10 FLAT WAHSER ( t=2mm )
M8 X 25mm HEX HEAD BOLT
FLYWHEEL ASSEMBLY
ONE WAY BEARING
DRIVE BELT PULLEY WHEEL
FLYWHEEL AXLE
CYCLE FREE GEAR
BEARING SLEEVE
DRIVE BELT - RIBBED
CHAIN
WHEEL NUT 3/8" - 26
ROWER SEAT CARRIAGE
ROLLER WHEEL ( W / BEARING )
METAL SLEEVE
M8 FLAT WASHER
M8 X 32mm HEX HEAD BOLT ( HALF THREAD )
M8 NYLON LOCKNUT
M6 X 15mm MACHINE SCREW
LOCKING ARM
M8 X 15mm COUNTER SUNK MACHINE SCREW
M12 NYLON WASHER
PLATE WHEEL
M6 NYLON WASHER
M6 FLAT WASHER
M6 NYLON LOCKNUT
COMPUTER CONNECTOR AND SENSOR PLATE
MAGNET
M6 X 8mm FLAT HEAD MACHINE SCREW
M6 X 12mm MACHINE SCREW
METAL BUSHING DIA 32 X 6mm
METAL BUSHING DIA 16 X 16.5mm
METAL BUSHING DIA 16 X 15.5mm
BEARING / 608ZC2
METAL BUSHING DIA 19 X 5mm
M8 NYLON WASHER ( t=1.5mm )
METAL BUSHING DIA 16 X 19mm
M6 X 12mm FLAT HEAD MACHINE SCREW
PLASTIC CAP
PLASTIC SLEEVE
M8 X 60mm HEX HEAD BOLT
M6 X 25mm MACHINE SCREW
SPACER SLEEVE
PLASTIC SPACER
FIXING PLATE ( SEAT BRACKET )
PLASTIC PAD ( SEAT BRACKET )
M10 FLAT WASHER ( t=2mm )
INSTRUCTIONS FOR USE
SEAT
SEAT POST
SEAT
HEIGHT
ADJUSTING
KNOB
Adjust the seat height, make sure your knees
do not rise above the horizontal when pedaling.
FROM CYCLE TO ROWER
ADJUSTING SEAT HEIGHT
Follow the Instructions on the front post
CYCLE ROWER
CYCLE ROWER
Unlock
.
Turn knob then pull it out & down to
centre position.
Lower beam to floor & lock.
ROWER TO LOCK
Beam must be locked before rowing.
Push knob
then turn.
(Approx one turn ONLY to lock.)
If the front of the cycle raises off the floor-then
you have turned the knob too far.
SOLUTION: Turn back a little.
Move the computer to new position
(On the bracket below the seat).
If the beam raises off the floor-then you have
turned the knob in the wrong direction.
SOLUTION: Undo and turn the opposite way.
CAUTION: Beam must be locked before rowing.
CONTACT YORK DIRECTLY. *
* SHOULD YOU REQUIRE ANY ASSISTANCE REGARDING THIS PRODUCT PLEASEYORK
2in1 CYCLE ROWER / 15
YORK 2 in 1 CYCLE ROWER COMPUTER
F I T N E S S
F I T N E S S
TELEMETRY OPTION
A chest belt transmitter which can monitor the heart rate
to ECG accuracy can be purchased for use with this
computer. The ultra lightweight transmitter is worn on
the chest, a receiver plugs into the computer and
the readout is displayed on the computer screen.
TO START:
Contact the YORK Help line or your local YORK Dealer
and ask for item #5103 TELEMETRY SET.
(Chest Belt Transmitter + Receiver that
plugs into the 2in1 computer)
Press the SET button to activate the unit.
The computer will automatically start / stop when you exercise.
The computer display will switch from cycle to row when you relocate it whilst
changing exercise positions.
Kilometers or Miles can be selected using the switch on the back of the computer.
Any options in imperial in the instructions will be shown in brackets.
POWER AND FUNCTIONS
Before exercising, press the MODE key to select the desired speed measurement
and press SET to confirm, the options are:
TIME/500M(or YDS) OR STROKE INDEX
KPH(or MPH) OR RPM
Press the MODE key to alternate
,,
,,between the options.
The selected function will flash when chosen. For both exercises, the options are:
TIME
DISTANCE
CALORIE
PULSE
The computer will shut off if no signal is received after three minutes.
SHOULD YOU REQUIRE ANY ASSISTANCE REGARDING THIS PRODUCT PLEASE CONTACT YORK DIRECTLY. *
*YORK
2in1 CYCLE ROWER / 16
SETTING FUNCTIONS
You can set a target time or distance on your computer.
When you start exercising the computer will begin to count down from
your target to zero.
When it reaches zero an alarm will bleep.
,,
,,
TIME
Automatic counting commences when the cycle rower is active.
,,
,,
To set the timer to count down select TIME using the MODE button.
Enter the required time target by pressing the SET button. (Max 99.59 min)
Press MODE to change to the next function if required.
,,
,,
DISTANCE Distance is automatically displayed when the cycle / rower is in use.
,,
,,
To set a target distance select the DISTANCE function using the MODE button.
Enter the desired distance by pressing the SET button. (Max 999 km or miles)
Press MODE to change to the next function if required.
In rowing mode: You can use MODE to select between distance in KMS or METERS.
,,
,,
CALORIES Approximate calories consumed is displayed, once cycle rower is in use
Calories used varies according to speed & distance use it to compare
different workouts and to set targets.
,,
,,
To set a target consumption select CALORIES using the MODE button.
Enter the target calories to be consumed using SET button. (Max 999 cal)
Press MODE to change to the next function if required.
,,
,,
PULSE
(USE HAND
PULSE SENSORS)
,,
,,
When using the cycle option the PULSE function and
The hand pulse sensor should only be used for cycling.
is displayed.
,,
,,
To set a limit select PULSE by using the MODE button.
Enter the maximum heart rate using the SET button. (Range 40 - 999 BPM)
Refer to the exercise guide for more information on heart rate.
(SEE OPPOSITE PAGE TELEMETRY OPTION)
The movement from rowing will make any reading inaccurate.
If you wish to use a heart rate monitor for rowing we suggest you
use a chest belt transmitter and watch.
,,
,,
ALARM
When targets/limits have been reached an alarm of four beeps will sound.
,,
,,
RESET
Resets a single function. Press and hold for 2 secs. For a total reset.
CONTACT YORK DIRECTLY. *
* SHOULD YOU REQUIRE ANY ASSISTANCE REGARDING THIS PRODUCT PLEASEYORK
2in1 CYCLE ROWER / 17
STRETCHING
EXERCISES
PECTORALS
Lace fingers and with abdominals
pulled firmly in and knees slightly
bent ease arms away from you.
Hold for 8-10 seconds or until
muscle eases.
QUADRICEPS STRETCH
HAMSTRING STRETCH
Holding back of thigh with leg straight, gently
ease leg towards chest hold and increase
stretch gently. This stretch can be developed
slowly 20-30 seconds.
Engage abdominals and drop fingers down back
pressing gently on fleshy part of arm until stretch
is felt in tricep area. Avoid arching back.
DELTOID STRETCH
CALF STRETCH
GLUTEALS
ABDOMINAL STRETCH
INNER THIGH & LOWER BACK STRETCH
With one hand, hold lace of shoe, knees together,
stand tall with abdominals engaged. Squeeze
hips slightly forward to increase the stretch.
Hold for 8-10 seconds or until muscle eases.
Take arm across body at shoulder height. Press
gently on fleshy part of arm above elbow until
you feel a stretch in shoulder area. Hold for
8-10 seconds.
CAT STRETCH
Starting with a neutral not arched spine lift back
up towards ceiling hold for 8-10 seconds return
to neutral spine.
Take leg back ensuring toe point in directly
forward. Rest hands on thigh. Hold for 8-10
seconds or until muscle eases.
Lengthen and gently lift upper body keeping
head in line until stretch felt. Hold for 8-10
seconds.
TRICEP STRETCH
Cross one ankle over opposite knee, using
hands lift leg off floor to increase stretch if
necessary. Hold for 8-10 seconds.
Sit with soles of feet together. Sit tall and gently
lean forwards until a stretch is felt. Hold of 8-10
seconds.
SHOULD YOU REQUIRE ANY ASSISTANCE REGARDING THIS PRODUCT PLEASE CONTACT YORK DIRECTLY. *
*YORK
2in1 CYCLE ROWER / 18
EXERCISE GUIDE
BEFORE EXERCISING CHECK:
You have adequate space ie.at least 2ft. (60cm) clearance on each side.
Check all bolts and locking pins are secured and protruding. In particular check all the
bolts and pins for wear, replace doubtful parts before using the equipment.
Always use your 2 in 1 cycle/rower on a flat, level, solid surface.
Always work within your exercise level, do not work to exhaustion.
If you feel pain or unwell STOP YOUR WORKOUT IMMEDIATELY
IMMEDIATELY.
Injuries to health may result from incorrect or excessive training.
Please make sure you have read the safety guidelines.
Rowing is an extremely effective form of exercise.
It strengthens the heart, improves circulation, as well as exercising all the major muscle
groups - back, waist, arms, shoulders, hips & legs.
The pictures below show the muscle groups in use during each stroke.
HOW TO ROW
2
1
3
Take up the initial position leaning Push yourself backwards,
forward, knees bent and arms
straightening your back and legs
straight.
at the same time.
ALTERNATIVE EXERCISE
Continue movement until you are
leaning slightly backwards,
bending the arms at the same time.
Return to 1 and repeat.
LEG ONLY ROWING
4
5
This exercise will help tone and
Use your legs to push your body back
strengthen the muscles in your legs whilst keeping your arms and
and back. With your back straight back straight, slowly return to starting
and arms outstretched, bend your position and repeat.
legs until the row arms are in the
starting position 4.
6
CONTACT YORK DIRECTLY. *
* SHOULD YOU REQUIRE ANY ASSISTANCE REGARDING THIS PRODUCT PLEASEYORK
2in1 CYCLE ROWER / 19
EXERCISE GUIDE
FITNESS
Many things contribute to fitness and well being but the most important factor is the condition of your
heart and lungs and how efficient they are in delivering oxygen via your blood to your muscles.
Your muscles use this oxygen to provide enough energy for daily activity.
This is called aerobic activity (with oxygen).
When you are fit your heart and lungs work well and efficiently.
This means your heart will not have to work so hard. It will pump a lot fewer times per minute so
reducing the wear and tear on your heart.
This in turn reduces the chances of your suffering heart disease.
Fitness also helps you control your weight and reduces the effects of aging and stress.
You come across the need for fitness continually in everyday life.
When you are fit you can walk briskly up hills and stairs without being too out of breath once at the
top you recover quickly.
As you can see there are great advantages in being fit.
HOW TO IMPROVE YOUR FITNESS
Like any muscle in your body your heart can be strengthened by systematic physical exercise which
requires an increased blood flow and heart rate.
You can measure your heart rate by taking a pulse reading.
Your heart of pulse rate corresponds directly to your exertion level and exercise efficiency.
To improve your fitness in a safe and effective way you need to exercise at a high enough level to
improve your aerobic fitness.
The area between these 2 levels is called the target zone.
It is important to exercise at the right intensity to stay within this zone.
For the best results you should exercise within the target zone and gradually increase the duration.
Ideally you should aim to exercise (within zone) for at least 15-20 minutes continuously,
3-4 times per week.
CAUTION
DO NOT TRY TO DO TOO MUCH TO QUICKLY START GRADUALLY AND BUILD UP.
IF YOU BECOME ILL, IF YOU ARE UNDER DOCTOR CARE, OR OVER 35-40 AND NOT CURRENTLY
TAKING REGULAR EXERCISE THEN WE WOULD ADVISE YOU NOT TO START TO EXERCISE
WITHOUT CONSULTING YOUR DOCTOR.
SHOULD YOU REQUIRE ANY ASSISTANCE REGARDING THIS PRODUCT PLEASE CONTACT YORK DIRECTLY. *
*YORK
2in1 CYCLE ROWER / 20
TARGET ZONE
MAXIMUM PULSE RATE
PULSE
RATE
85% OF MAX.
EXERCISE SO THAT YOUR PULSE STAYS IN
THIS RATE FOR AT LEAST 15-20 MINUTES
70% OF MAX.
55% OF MAX.
COOL DOWN LEVEL
RESET PULSE
TIME
COOL DOWN
WARM UP
THIS IS HOW YOUR PULSE SHOULD BEHAVE DURING GENERAL FITNESS EXERCISE.
REMEMBER TO WARM UP AND COOL DOWN FOR A FEW MINUTES.
B
E
A
T
S
H
E
A
R
T P
E
R
R
A
M
T I
E N
U
T
E
200
200
195
190
190
185
180
180
175
170
170
174
165
169
160
87% maximum
heart rate
160
165
155
161
150
152
144
TRAINING ZONE
140
140
157
136
148
143
133
130
130
139 135
125
122
120
119
115
110
100
20
25
30
35
40
45
The top of this bar
represents 100% of
maximum heart rate
for each age group.
50
55
60
65
111
The lower end of the
training zone represents
72% of maximum heart
rate for each age group.
AGE IN YEARS
FIND YOUR OWN EXERCISE PULSE RATE RANGE BY
MOVING UP THE VERTICAL LINE FOR YOUR AGE.
Example: Age 40, the vertical line meets the 70% level at about 128 and the
85% level at about 154, pulse rate should remain between these values.
Use this graph to determine your personal target zone.
CONTACT YORK DIRECTLY. *
* SHOULD YOU REQUIRE ANY ASSISTANCE REGARDING THIS PRODUCT PLEASEYORK
2in1 CYCLE ROWER / 21
HOW TO MONITOR YOUR HEART RATE DURING EXERCISE
Now that you know where your training zone is, you’ll have to monitor yourself to be sure you’re
'
in it. Here is a simple rule, if you can t hold a conversation without gasping for breath you are
probably above your training zone.
To know precisely where you’re working - making sure you’re getting all the benefits We recommend you check your heart rate periodically throughout your workout.
You can use the electronic pulse monitor which will count and display your heart rate for you.
CONTROL YOUR PULSE RATE TO KEEP WITHIN ZONE
How hard you exercise affects your pulse rate, it is determined by two things:
1. Rate: How fast you exercise.
e.g. The speed you cycle, run or step.
2. Load: The resistance against which you exercise.
e.g. The tension you apply on a cycle or stepper, or the incline set on a treadmill.
THE PULSE RATE RULES
If your pulse rate is too low exercise faster or increase load.
If your pulse rate is too high exercise slower or decrease load.
If your pulse rate goes up towards the end of your exercise, you are trying to exercise for too
long, shorten the time.
If your pulse rate does not quickly return to normal after exercise (5-10 minutes) you are not
giving your body a chance to recover, reduce how often you exercise.
REMEMBER - GENERAL FITNESS IS BEST IMPROVED BY INCREASING HOW LONG
YOU EXERCISE RATHER THAN BY HOW HARD.
SHOULD YOU REQUIRE ANY ASSISTANCE REGARDING THIS PRODUCT PLEASE CONTACT YORK DIRECTLY. *
*YORK
2in1 CYCLE ROWER / 22
HOW LONG TO EXERCISE?
To qualify as a true aerobic exercise with all the benefits we're mentioned, you must maintain
your heart rate within your training zone for at least 12 uninterrupted minutes.
If you exercise longer than 60 minutes the benefits are reduced and the risk of injury is increased.
If you're just starting out on a new exercise program we're commend you stay at the 12 minute
minimum for at least a week. When you feel you're ready to go longer, increase your time no
more than 10% a week. Don't push yourself too hard.
You should never feel exhausted during or following exercise.
TEST YOUR FITNESS LEVEL AND CHECK YOUR PROGRESS
You can use your computer to control your exercise intensity and to monitor your progress.
The time it takes for your pulse to return to normal, after exercise, is an indicator of
your fitness level.
During the first minute of your cool-down phase you will experience a drop in your pulse rate.
The bigger the drop in that minute -- the fitter you are.
TO CHECK YOUR PROGRESS:
1. Monitor your pulse rate the moment you end the aerobic phase of your workout and note your
pulse rate.
2. Begin slowing down for the cool down phase.
3. After 60 seconds note the rate again.
The bigger the drop in that minute-the fitter you are.
To check your progress repeat this test every few weeks using the same duration and exercise
intensity each time.
Keep a record of the results to help you monitor your progress.
CONTACT YORK DIRECTLY. *
* SHOULD YOU REQUIRE ANY ASSISTANCE REGARDING THIS PRODUCT PLEASEYORK
2in1 CYCLE ROWER / 23
YORK BARBELL LIMITED WARRANTY INFORMATION
York Barbell Ltd warrants this product to be free from defects in workmanship and material
under normal use and conditions from the date of original purchase. This excludes normal
wear and tear and is applicable to the original purchaser with sales receipt as proof of
purchase.
The warranty period varies according to the type of product, model or parts concerned and
may vary according to country. Please request full warranty details from the York office in
your location (see below).
The warranty for York 2in1 Cycle Rower is 12 months.
This warranty covers the product for home/domestic use only and not for commercial or
rental usage.
York Barbell Ltd will not be responsible for damages or failures that occur as a result of
improper assembly, adjustment or failure to operate the product as detailed in the manual.
This warranty does not cover accidental damage, misuse, abuse, lack of reasonable care for
the product, freight damage or alterations or repairs not made by York Barbell Ltd or a
recommended service centre.
During the warranty period, York Barbell will at no additional charge replace parts or repair
the product if it becomes defective, malfunctions or otherwise fails to conform to this
warranty under usual, non commercial use.
In repairing the product, York Barbell Ltd may replace defective parts and reserves the right
to use serviceable used parts that are equivalent to new parts in performance.
In the unlikely event of a problem occurring, please contact your local York Barbell authorised
dealer. Please have your proof of purchase ready.
If the problem cannot be fixed by sending parts, you will need to arrange to send the goods to
a York authorised repair centre. You must prepay any shipping charges and you are
responsible for insuring any product or part shipped or returned. Returns will not be
accepted without written authorisation by York Customer Service Department.
WARRANTY REGISTRATION
It is strongly recommended that you complete the warranty card enclosed
with your product and return it to your authorized local YORK dealer.
U.K.
F I T N E S S
HELP LINE (8:30am- 4:30pm)
YORK BARBELL (U.K.) LTD.
YORK WAY, DAVENTRY,
NORTHANTS, NN11 4YB ENGLAND
TEL: (01327) 701-824
FAX: (01327) 706-704
E-MAIL: [email protected]
CANADA
F I T N E S S
HELP LINE (8:30am- 4:30pm)
YORK BARBELL CO. LTD.
1450 S. SERVICE ROAD WEST,
OAKVILLE (TORONTO), ONTARIO,
CANADA L6L 5T7
TEL: (905) 827-6362
FAX: (905) 827-9593
YORK 2in1 CYCLE ROWER / 24
AUSTRALIA
U.S.A.
F I T N E S S
F I T N E S S
HELP LINE (8:00am- 4:00pm)
YORK BARBELL (AUST.) PTY. LTD.
UNIT 1, LOT 2, SWAFFHAM ROAD,
MINTO, N.S.W. 2566 AUSTRALIA
TEL: (02) 9603-8444
FAX: (02) 9603-8555
E-MAIL: [email protected]
TAIWAN
F I T N E S S
HELP LINE (9:00am- 6:00pm)
YORK FITNESS (TAIWAN) LTD.
ROOM A2 4F, NO.51, GONG-YI ROAD,
SEC. 2, TAICHUNG CITY, TAIWAN
TEL: +886-4-2319-3448
FAX: +886-4-2319-3449
E-MAIL: [email protected]
HELP LINE (8:00am- 5:00pm)
YORK BARBELL USA.
3300 BOARD ROAD.
YORK, PA 17402
TEL: +1-717-767-6481
FAX: +1-717-764-0416
E-MAIL: [email protected]
Authorized Dealer
WARRANTY REGISTRATION
IMPORTANT: Please complete and return this page, with a copy of your local YORK Dealer within 14 days.
Alternatively, you can register your warranty on-line - please visit www.yorkfitness.com
Which product did you buy? _________________________________________________________________________
Where from (name of retailer)? _______________________________________________________________________
Date Purchased _____________________________
Serial / Batch No _______________________________
Name (Mr/Miss/Mrs)_________________________________________________________________________________
Address __________________________________________________________________________________________
__________________________________________________________________________________________________
Telephone Number ____________________________________
E-mail address _______________________________________
Please help us to improve our products and services by answering the following questions:
How did you buy this product?
Are you a member of a gym or fitness club?
In a shop
Mail order catalogue
Over the internet
Other, please specify
Yes
No
Why did you choose this product (tick all that apply)?
Replacing old equipment
Saw an advert with big price savings
Medical advice
Thought it was about time to get fit
Want to look good
Discounted price
York brand name
Best specification at the price you wanted to pay
Word of mouth recommendation
Sales staff recommendation
Received as a present
Did you search the web before buying this product?
Yes
No
Were you aware of York before you bought this product?
Yes
No
How old are you?
Under 18
18 29
30-39
40-49
50+
What prompted you to buy fitness equipment (tick all
that apply)?
Do you have access to a PC at home?
Yes
No
How would you rate the product you have just
purchased (1 = poor, 10 = excellent)?
Quality
Looks
Usability
Instruction manual
Ease of assembly
On average, how many times a week do you
exercise / work out?
0
1-2
2-3
4 or more
Any other comments
This information will be held by York Barbell Ltd and will not be passed onto third parties. Please tick this box if you would not like to
receive further information from York Barbell
YOUR WARRANTY IS ONLY VALID IF YOU CAN PROVIDE PROOF OF THE ORIGINAL PURCHASE.
This can be the receipt, invoice, delivery note or internet confirmation.
YORK 2in1 CYCLE ROWER / 25
PLACE
STAMP
HERE
F I T N E S S
PARTS ORDER FORM
Enclose a check or money order
with this form for replacement parts.
Date of purchase
Name of location where purchased
Model number
Last name, First name
Telephone number
Address
Part No. Q'ty
City
State
Part Description
Zip/Postcode
Unit Price
Total value of order $
Send your order to:
YORK BARBELL (AUST.) PTY. LTD.
UNIT 1, LOT 2, SWAFFHAM ROAD,
MINTO N.S.W. 2566
AUSTRALIA
YORK BARBELL (U.K.) LTD.
CHURCHILL WAY,
DAVENTRY, NORTHANTS,
ENGLAND, NN11 4YB
Total
PLACE
STAMP
HERE
F I T N E S S
PLACE
STAMP
HERE
PLACE
STAMP
HERE